Russ J.C. Image Analysis of Food Microstructure
Подождите немного. Документ загружается.

(a) (b)
(c) (d)
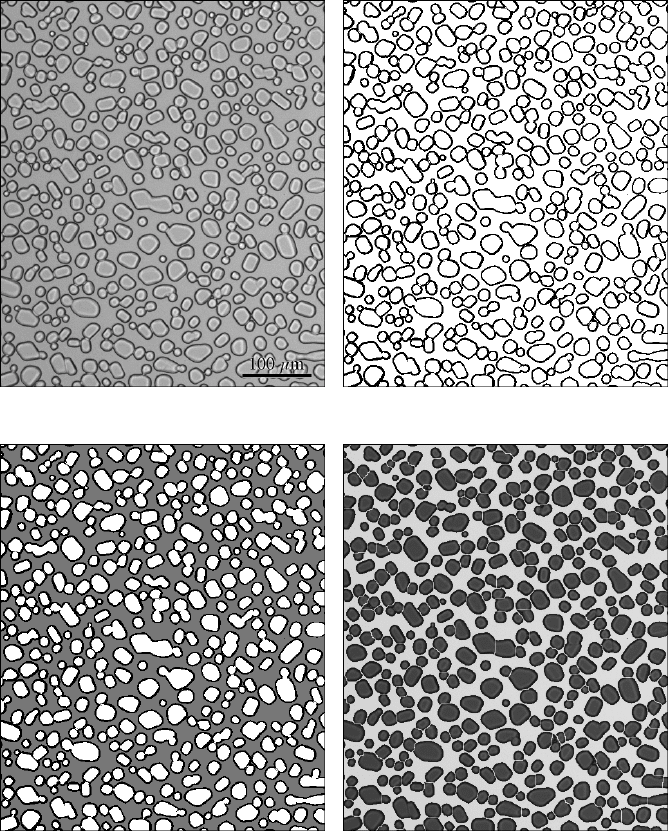
FIGURE 4.24 Filling holes within features: (a) ice crystals in melted and refrozen ice cream
(edges are dark because of light refraction; courtesy of Ken Baker, Ken Baker Associates);
(b) thresholded feature outlines; (c) the background (grey) is identified because it reaches the
edge(s) of the image field; (d) the filled ice crystals after watershed segmentation (note that
a few erroneous separation lines have been drawn due to irregular feature or cluster shapes).
2241_C04.fm Page 246 Thursday, April 28, 2005 10:29 AM
Copyright © 2005 CRC Press LLC
USING MARKERS TO SELECT FEATURES
The examples of Boolean logic shown above operate at the pixel level. At each
pixel location, the values in the two source images are compared and the result used
to determine the state of the pixel in the derived result, without any regard to any other
pixels in the image. For some purposes it is desirable to perform Boolean logic using
entire features. This makes it possible to have one image containing markers that identify
features of interest, with a second image containing the features themselves, to produce
a result in which the features that contain the markers are selected in their entirety.
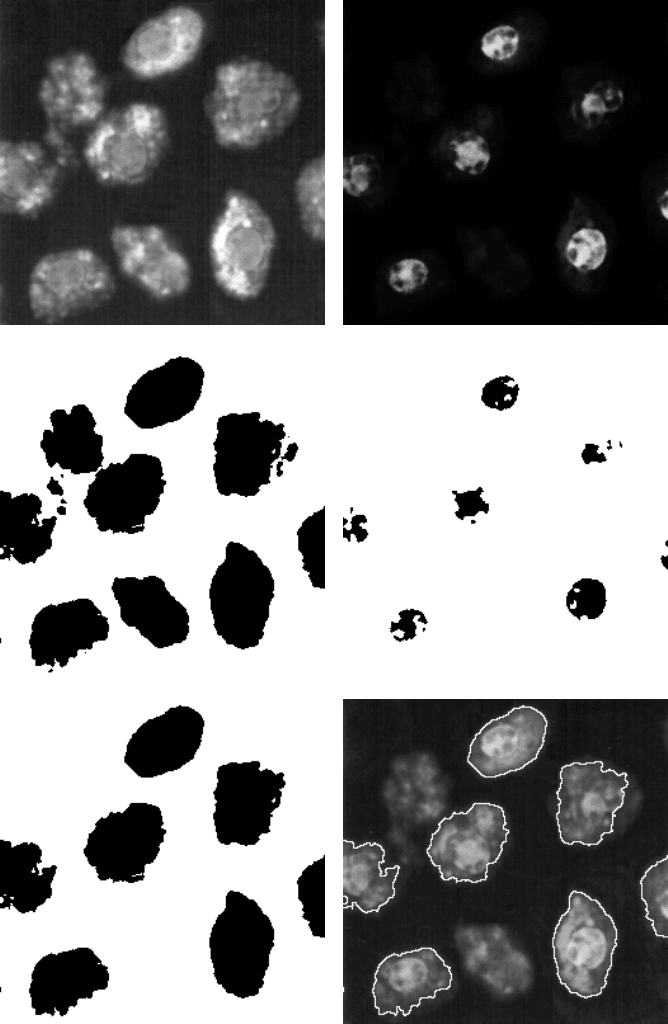
An example of a Boolean feature-AND is shown in Figure 4.25. Originally a
color image, this confocal microscope image shows red cells, some of which contain
green nuclei. The challenge is to select those cells that contain the green nuclei as
markers. Thresholding the red and green channels, respectively, produces binary
images of the cells and the nuclei. Combining these with a pixel-based Boolean
AND would produce an image identical to Figure 4.25(d), which is just the marks
themselves. A feature-based AND using Figure 4.25(d) as the marker and Figure
4.25(b) as the target instead keeps the entire feature (the cell) if any part of it is
selected by the marker (the nucleus).
It is necessary to understand that in the feature-based AND, order is important.
A conventional pixel-based Boolean operation commutes (i.e., A AND B produces
the same result as B AND A), but the feature-based AND does not. There are several
different ways that this process can be implemented. Some systems use a dilation
method, in which the markers are dilated iteratively but only pixels selected by the
target image can be turned on. The method must be repeated until no further changes
occur, and for complex shapes this can take a long time. Another approach first
labels all of the features in both images, and if any pixel within a feature is selected
by a marker, the entire feature is kept.
The feature-based AND is an important tool, but there is no need for a feature-
based OR. That would produce exactly the same result as a pixel-based OR, keeping
any feature that was present in either image. A feature-based Ex-OR may be useful
in some instances (one is the disector used for stereological counting using two
parallel plane images), and may either be implemented directly or by combining a
feature-based AND with a pixel-based Ex-OR.
Regardless of the details of the implementation method, the feature-AND tech-
nique opens up many possibilities for selecting objects based on the presence of a
marker. The marker(s) may in some instances be a set of lines or points used to
probe the image, such as a grid or a set of outlines of regions present in the image.
Examples of this will be shown below. In many cases the marker is a feature within
the object itself, either usually a shape or color tag that can be separately identified.
For example, the image in Figure 4.26 shows some candies imaged with a desktop
flatbed scanner. Thresholding of the candies is most easily accomplished by selecting
the background pixels (a fairly uniform unsaturated grey) rather than the candies,
which vary in color. The resulting image has interior holes due to the reflections
from the shiny candy surface and the printed “m” characters, but these holes can be
filled as described previously. The resulting features touch, but are convex and easily
separated by a watershed segmentation.
2241_C04.fm Page 247 Thursday, April 28, 2005 10:29 AM
Copyright © 2005 CRC Press LLC
(a) (c)
(b) (d)
(e) (f)
FIGURE 4.25 Feature-AND: (a) red channel of color microscope image showing stained
cells; (b) thresholded cells; (c) green channel of same image showing stained nuclei in some
of the cells; (d) thresholded nuclei; (e) Feature-AND using (d) as the marker image to select
features from (b); (f) outline of selected cells which contain stained nuclei.
2241_C04.fm Page 248 Thursday, April 28, 2005 10:29 AM
Copyright © 2005 CRC Press LLC
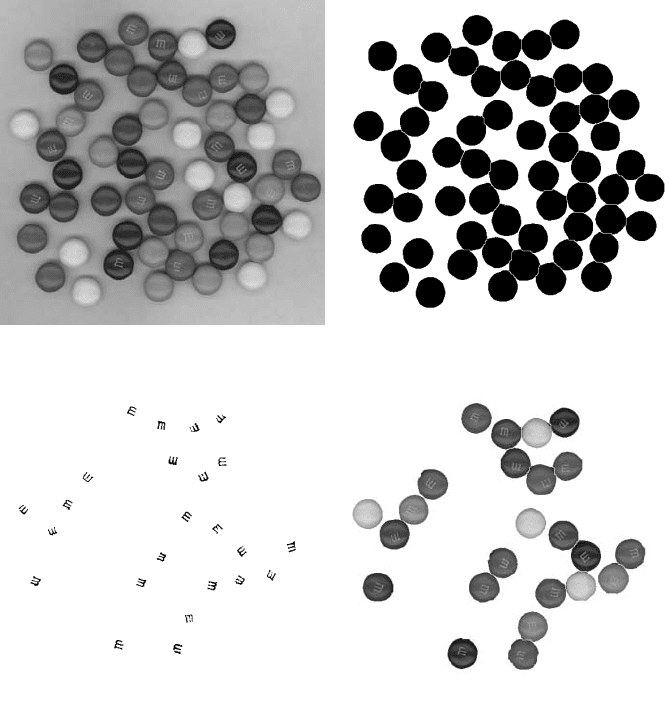
In order to select only the candies that have the printed “m” on the visible face,
a separate marker image was obtained by thresholding the image for the printed
white characters. This was done by creating a background with a grey-scale closing
to remove the white printing, and then subtracting that background from the original.
After thresholding, the markers (Figure 4.26c) can be used in a feature-AND with
the binary image of the candies (Figure 4.26b). The result is then used as a mask
to recover the candy image, by combining it with the original and keeping whichever
pixel is brighter. The black pixels in the selected features are replaced by the color
information, and the white background erases everything else.
(a) (b)
(c) (d)
FIGURE 4.26 Use of markers for selection: (a) scanned image of candies (Color Figure
4.26a); (b) thresholded features as described in text; (c) thresholded markers (white “m”
printing); (d) selected features (Color Figure 4.26b); see color insert following page 150.
2241_C04.fm Page 249 Thursday, April 28, 2005 10:29 AM
Copyright © 2005 CRC Press LLC
COMBINED BOOLEAN OPERATIONS
Boolean operations are often used in combination with each other, or with the
various morphological operations described above. All of the Boolean operations,
both pixel- and feature-based, are combined in the next example, to solve one of
the problems that can arise when attempting to use the watershed segmentation
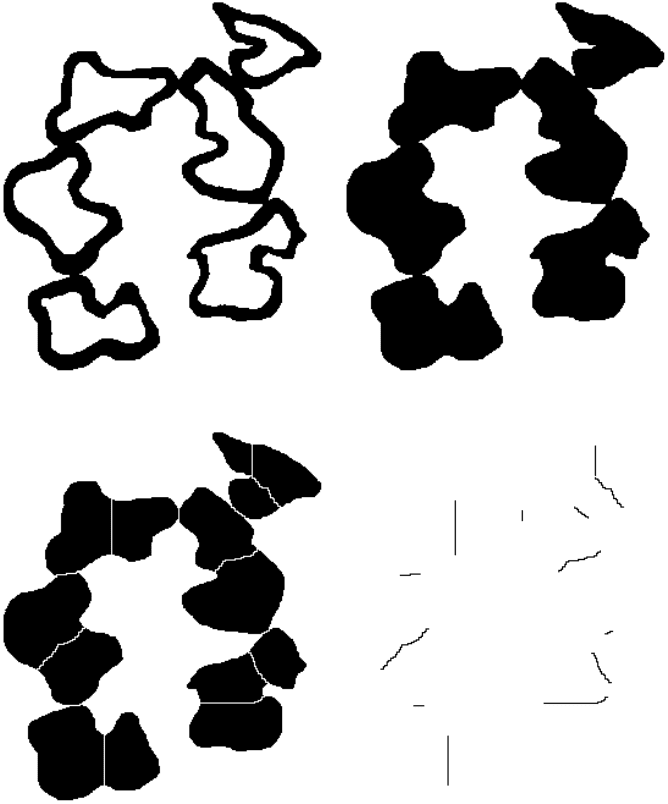
procedure to separate touching features. The image in Figure 4.27 is a thresholded
(a) (b)
(b) (d)
FIGURE 4.27 Separation of touching, irregular, hollow features using Boolean logic and a
watershed segmentation, as described in the text.
2241_C04.fm Page 250 Thursday, April 28, 2005 10:29 AM
Copyright © 2005 CRC Press LLC
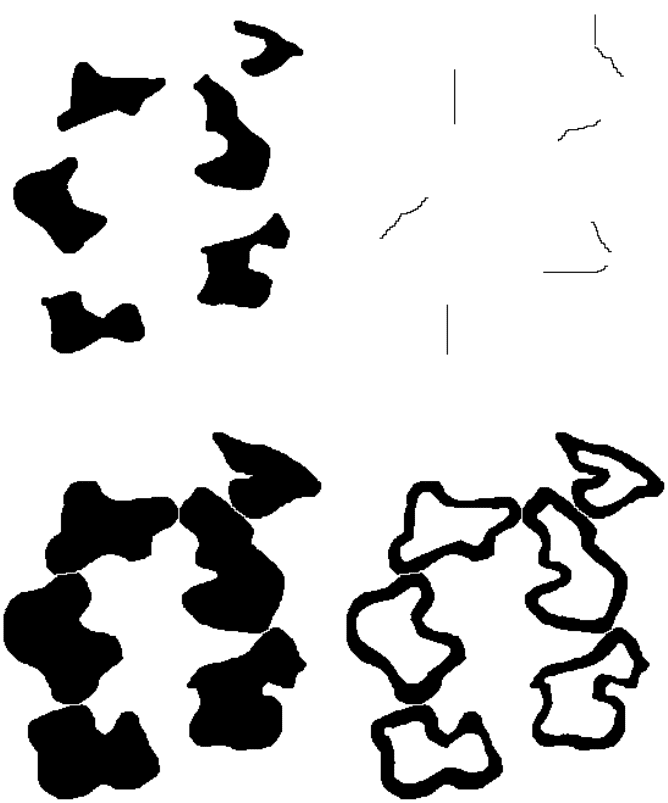
binary image of the sheaths around nerve axons. The problem is that the sheaths
touch each other, but because they are both hollow and irregular in shape they cannot
be straightforwardly separated by the watershed algorithm. The procedure, illustrated
in the figure, requires several duplicates of the original image (Figure 4.27a). The
first duplicate has internal holes filled (Figure 4.27b). A duplicate of this image is
then processed by watershed segmentation (Figure 4.27c), but it can be seen that in
addition to the correct lines of separation there are additional lines that cut through
the features. Combining images Figure 4.27b and Figure 4.27c using a Boolean
exclusive-OR isolates just the separation lines (Figure 4.27d).
(e) (f)
(g) (h)
FIGURE 4.27 (continued)
2241_C04.fm Page 251 Thursday, April 28, 2005 10:29 AM
Copyright © 2005 CRC Press LLC
A separate image of the holes inside the original features (Figure 4.27e) is
prepared by ex-ORing the original (Figure 4.27a) with the filled image (Figure
4.27b). Using these holes as a marker image, a feature-AND with the lines in image
(Figure 4.27d) selects just those lines that cross the interior of the features (Figure
4.27f). Restoring these lines to the watershed result (Figure 4.27c) using a Boolean
OR corrects for the additional segmentations due to shape (Figure 4.27g). Finally,
combining this image with the original using a Boolean AND removes the interior,
leaving the hollow, irregular features properly separated (4.27h). This sequence has
multiple steps and may appear confusing initially, but serves both as a very useful guide
and example to the various Boolean procedures and an illustration of the power that
they offer, particularly when used in conjunction with other processing operations.
REGION OUTLINES AS SELECTION CRITERIA
The markers used for a feature-based AND operation shown above were features
present in the original image, in one way or another. It is also very useful to generate
various kinds of lines to use as a marker for selection of features. One of the most
important kinds of lines is the boundary line that separates one region from another.
These boundaries in images of cut sections through three-dimensional structures
represent surfaces in three-dimensions. Much of the chemistry and many of the
mechanical properties of structures depend on those surfaces, and the presence (or
absence) or objects from them is often of interest. The measurement of adjacency
between different objects is something that can be measured using a combination
of morphological and Boolean operations.
Outlines and boundaries are important markers to measure adjacency (common
boundaries between features) or to select adjacent features. These are two somewhat
different ideas, best illustrated by an example. To emphasize the importance of the
difference between the conventional pixel-based Boolean AND and the feature-based
AND, Figure 4.28 illustrates two different types of measurement and selection that
can be performed. The original image is milk. Casein micelles are positioned around
the periphery of the fat globules.
Measurement of the fraction of the surface area of the fat globules occupied by
casein particles can be performed by first creating an outline of the pixels just around
the globules. This is done by duplicating the binary thresholded image showing just
the fat, dilating it, and Ex-ORing the dilated version with the original binary. The
dilation is necessary because there are no common pixels between the globules and
the particles. The dilation distance must be a minimum of one pixel, but can be
made greater to define the distance that is considered to be adjacent or touching.
Dilation by thresholding the EDM of the background is preferred over iterative
neighbor selection because it is isotropic. The total length of the outlines around the
globules, ratioed to the area of picture, is proportional to the surface area of the
globules per unit volume as discussed in Chapter 1.
Performing a conventional pixel-based AND of the outlines with the binary
image of the dark casein particles selects just those pixels on the outline that are
covered by the particles. Measuring the total length of those lines gives the length
of the touching interface between the casein and the float globules. In Figure 4.28(e)
the portions of the line that touch particles, as selected by an AND, are superimposed
2241_C04.fm Page 252 Thursday, April 28, 2005 10:29 AM
Copyright © 2005 CRC Press LLC
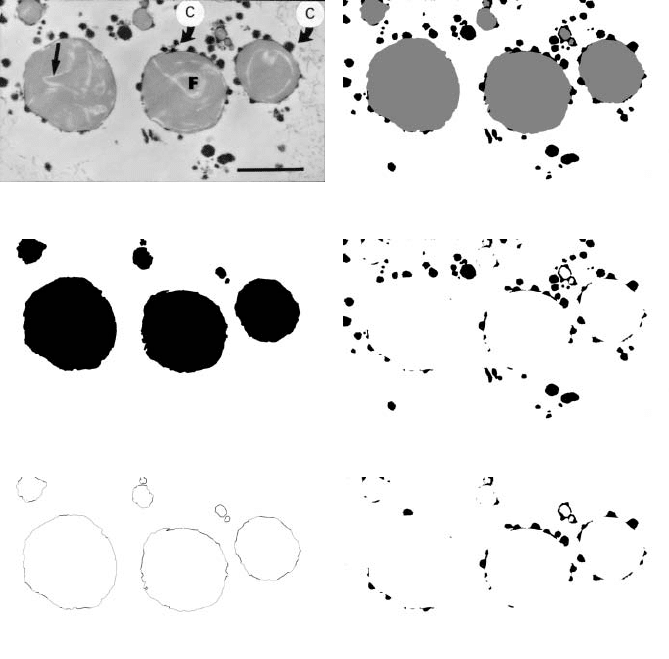
on the complete outline. Measurement of the length of the touching segments divided
by the total length of the outline gives a direct measurement of the fraction of the
surface of the fat globules occupied by casein micelles (41.7% in the example). This
is usually described as a measurement of adjacency.
Instead of the pixel-based AND, it is also possible to perform a feature-based AND
to obtain a very different, but also very useful result. Using the outline as a marker, and
combining it with the image of the dark casein particles using a feature-AND, provides
a way to select all of the casein particles that touch the fat globules as shown in
Figure 4.28(f). The image of the selected particles can then be used for counting,
measurement or other analysis as required.
(a) (b)
(c) (d)
(e) (f)
FIGURE 4.28 Feature boundaries as test probes: (a) TEM image of fat emulsion in milk (F =
fat globules, C = casein micelles, arrow = fat crystal within the globule, original picture from
Goff et al. appears as Figure 7-3a in Stanley and Aguilera, used with permission); (b) thresholded
and superimposed fat globules (grey) and micelles (black); (c) fat globules; (d) micelles; (e) layer
of pixels around the fat globules obtained by dilating and ex-OR with original; with the super-
imposed result of ANDing the outlines with the micelles (image d); (f) using the outline of the
fat globules as a marker and performing a Feature-AND with image (d).
2241_C04.fm Page 253 Thursday, April 28, 2005 10:29 AM
Copyright © 2005 CRC Press LLC
SKELETONIZATION
A specialized form of erosion can be used to remove pixels from the outside of
a thresholded, binary feature leaving just the midline or skeleton. These lines are
useful in a variety of situations, ranging from cleaning up tessellations such as that
formed by cell walls in plant tissue, to extracting the basic topological shape of
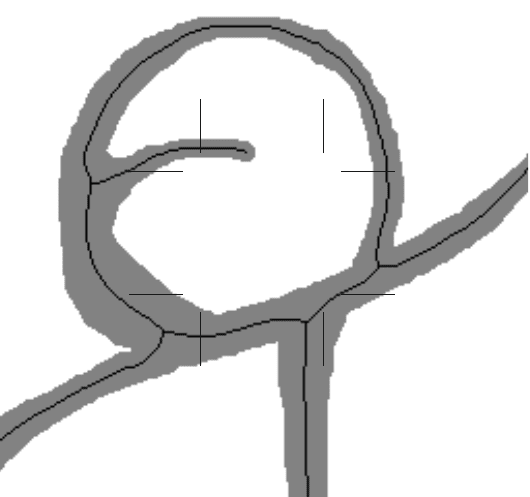
features. Figure 4.29 shows a typical skeletonization result: the original feature
(shown in grey) is reduced to a line of pixels. The process can be performed with
different algorithms that produce slightly different results, but with the same overall
effect. An iterative erosion that removes pixels adjacent to background, but only if
removing the pixel does not result in breaking the remaining feature into segments,
is the most common approach, but somewhat smoother shapes result for the skeleton
when it is taken from the ridge lines of the Euclidean distance map.
First, it is useful to consider the role of skeletonization in cleaning up thresholded
images. In many situations, the preparation of a sample involves staining, polishing,
sectioning of a finite thickness slice, or other techniques that produce cell boundaries
which appear much thicker than they actually are. Skeletonization can thin these
down to idealized lines, which often simplifies measurement of the structure. In the
example of Figure 4.30, the staining of a cross section of pork muscle shows broad
endomysium separations between muscles, and also dark interiors of the muscles.
FIGURE 4.29 Illustration of skeletonization.
2241_C04.fm Page 254 Thursday, April 28, 2005 10:29 AM
Copyright © 2005 CRC Press LLC
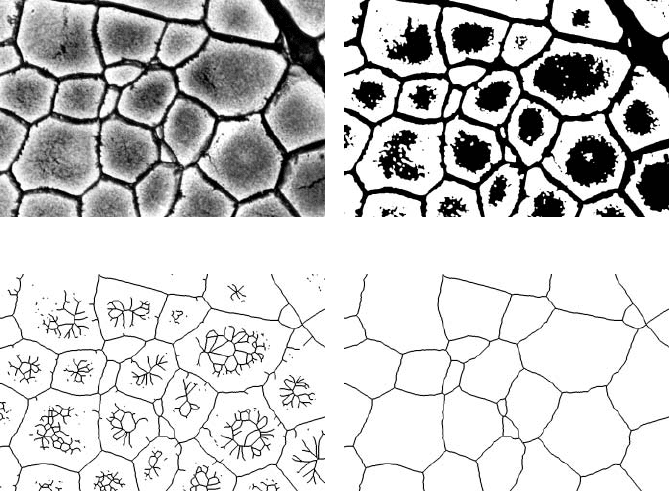
Thresholding this image (and applying a closing to clean up some noise) does not
produce a clean structural image suitable for measurement. Skeletonizing the binary
image thins down the tessellation but leaves additional lines in the interior of each
region.
These extraneous lines can be removed by pruning the skeleton. To understand
this, consider the diagram in Figure 4.29. Most of the pixels in a skeleton have
exactly two neighbors out of the eight possible positions. A few may have three or
even four; these are usually called nodes or branch points and represent junctions
in the network. Pixels that have only a single neighbor are end points. In a tessellation
there should be no end points. Pruning a skeleton is a procedure that finds the end
points (with one neighbor) and erases them, and then repeats the process until there
are none left. As shown in Figure 4.30(d), this removes the isolated lines and
branches. In the example, lines that do not have a connection to the continuous
network (which touches all edges of the image) have also been eliminated, leaving
just the continuous network.
One further note is in order. Skeleton lines a single pixel thick are difficult for
printers to show clearly, so in some of these examples the skeleton lines have been
(a) (b)
(c) (d)
FIGURE 4.30 Skeletonization of a tessellation: (a) transverse section through pork muscle
stained with silver to show endomysium (image courtesy of Howard Swatland, Department
of Animal and Poultry Science, University of Guelph); (b) thresholded binary; (c) skeleton-
ized; (d) skeleton pruned to remove all terminal branches and leave just the continuous
tessellation.
2241_C04.fm Page 255 Thursday, April 28, 2005 10:29 AM
Copyright © 2005 CRC Press LLC
