Morling K. Geometric and Engineering Drawing
Подождите немного. Документ загружается.


Geometric and Engineering Drawing324
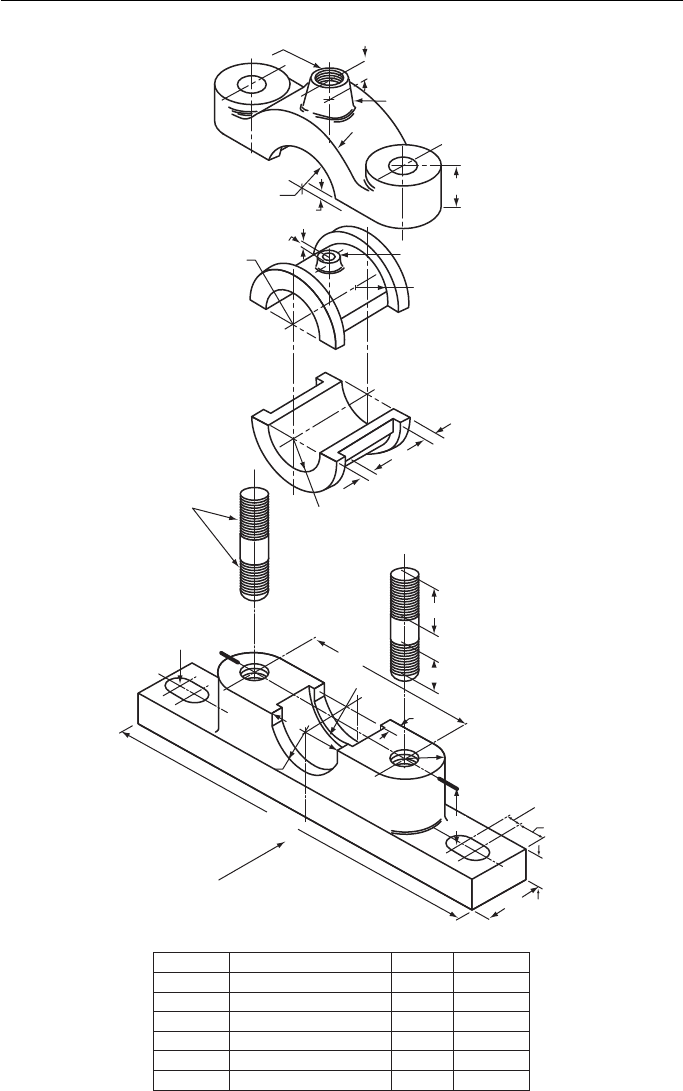
15. Figure 15 is an exploded view of a plummer block bearing. Draw, to a scale of 2:1 in first
angle orthographic projection, the following views of the assembled bearing: (a) a sec-
tioned elevation as seen looking in the direction of arrow X ; the cutting plane to be verti-
cal and to pass through AA; (b) an elevation as seen when looking from the left of view
(a); (c) a plan (beneath view (a)).
The cap is held in position on the studs by means of single chamfered hexagonal nuts that
have 2 mm thick single bevelled plain washers beneath them.
Although the tapped hole, for the lubricator, is shown in the cap, further details of this
hole are not shown and have been left to your own discretion. Details of this hole are
required to be shown as are the details of the stud holes in the base.
Hidden detail of the base, only , is to be shown in view (c); no other hidden detail is to be
shown.
Fully dimension the bottom brass, only.
Draw a suitable frame around your drawing and insert the title PLUMMER BLOCK, your
name, the scale and the system of projection.
A parts schedule incorporating the part number, name of part and the number off of each
part is to be completed in the lower right-hand corner of your sheet of drawing paper
immediately above your title block.
Oxford Local Examinations

Engineering Drawing 325
φ12
φ18
15
φ9
R17
R20
2
3
R17
9
R12
Mio
72
32
R17
156
6
6
25
Cap
Brasses
R18
4
R12
R4
A
A
25
6
11
12
25
12
11
18
Dimensions in mm
Base
X
6 Nut M.S. 2
5 Washer M.S. 2
4 Stud M.S. 2
3 Brass G.M. 2
2 Cap C.I. 1
1 Base C.I. 1
Part No. Part Matl No. Off
Figure 15

Geometric and Engineering Drawing326
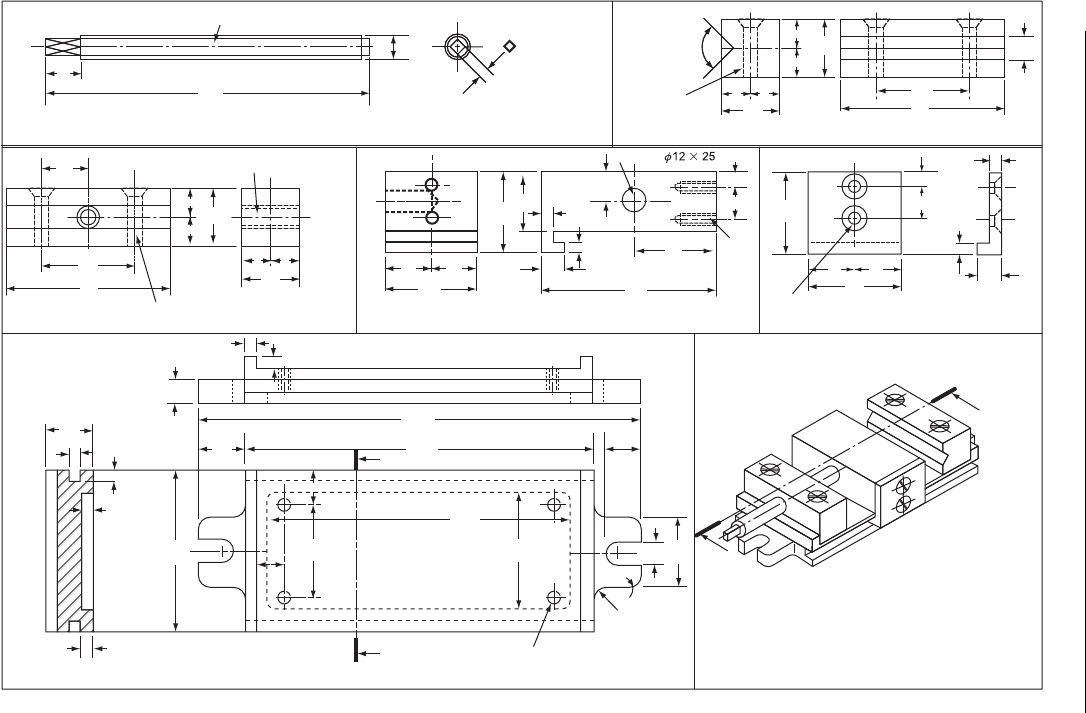
16. Figure 16 shows the details of a small machine vice and the key to its assembly. Draw,
full size and in correct orthographic projection, the following views of the completely
assembled vice, the sliding jaw being approximately 25 mm from the fixed jaw. (a) A sec-
tional elevation on a VP passing through the axis of the square-headed screw, in the direc-
tion indicated by XX in the key; (b) a plan projected from the above.
Details of screws are not given, and these may be omitted from your drawing. No hidden
edges are to be shown and dimensions are not required.
Either first or third angle (but not both) methods of projection may be used; the method
chosen must be stated on the drawing.
In the bottom right-hand corner of the paper draw a title block 112 mm 62 mm and in it
print neatly the drawing title, MACHINE VICE ASSEMBLY, the scale and your name.
University of London School Examinations

Engineering Drawing 327
X
X
Key to assembly of
machine vice
15
50
88
6
6
6
6
6
6
240
190
36
R6
12
18
25
12
25
18
162
4 Holes M8
Section on AA
Base
62
A
A
φ12
18
25
150
Hole 12 square
thread
φ 12
2 Holes
φ8
CSK
6
Square thread
50
2 Holes φ8 C’Sunk φ12
Block
Screw
Fixed jaw
32
32
88
==
=
==
=
50
44
32
6
6
12
44
2Holes
M8
2 Holes φ8 CSK
φ12
50
17 8
6
6
12
Sliding jaw
End plate
17 8
44
Hole
Deep
15
==
94
φ12
32
50
12
88
32
90º
==
==
Figure 16

Geometric and Engineering Drawing328
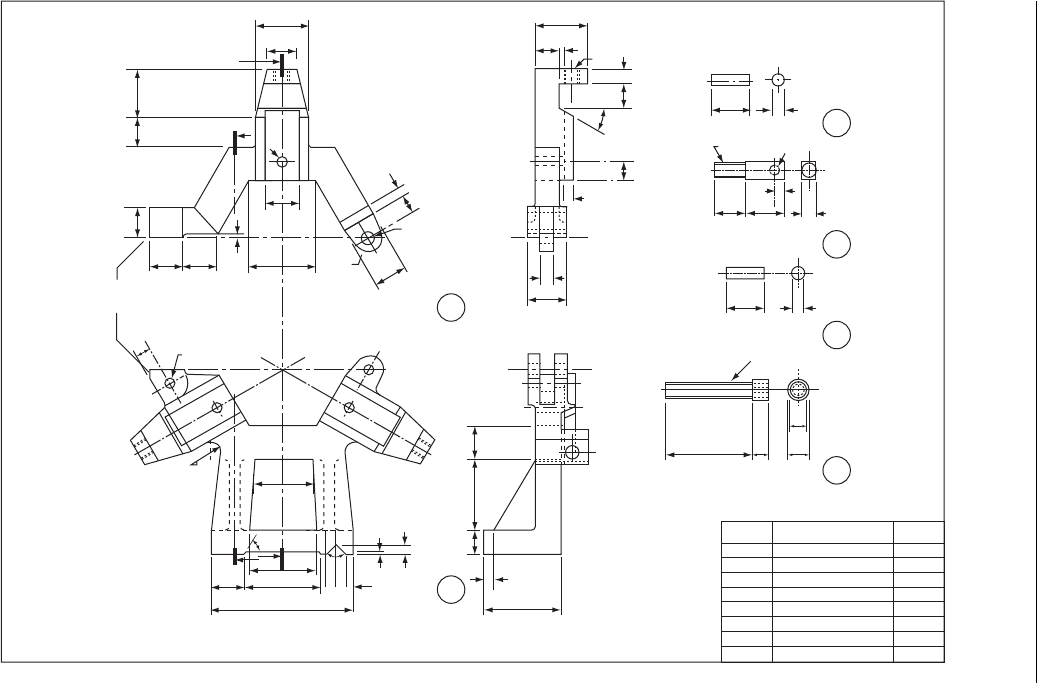
17. Figure 17A consists of a half-sectioned FE, a side elevation and a plan of part of a lathe
steady. Draw, full size, in first angle orthographic projection, detail drawings of each of
the six parts of the lathe steady, as follows:
Part 1. Top. A FE and an elevation as seen from the right of the FE.
Part 2. Base. A FE., a plan and a half-sectioned side elevation as seen from the right of the
FE; the section planes for this view are PQ, QR.
Part 3. Pivot screw. An elevation with the axis horizontal and the head to the right.
Part 4. Hinge pin. An elevation with the axis horizontal and an EE as seen from the left.
Part 5. Eye bolt. A FE. and an elevation as seen from the left of the FE.
Part 6. Clamping nut. A plan and elevation.
Full hidden detail is to be shown in Part 1 only; no other hidden detail is to be shown.
Part 5 is to be fully dimensioned; no other dimensions are to be shown.
Draw a suitable frame around your drawing and insert, in accordance with the recom-
mendations of BS 308, the title LATHE STEADY, your name, the scale and the system of
projection.
Also insert, in the right-hand corner of the frame, above the title block, a parts list giving
the part number, name of part and the number off. It is suggested that the parts list should
have a width of 125 mm.
Figure 17B gives an indication of how your sheet should be arranged.
Oxford Local Examinations

Engineering Drawing 329
M6
6
9
60 56
37
3
50
85
37
20
9
10
φ15
φ18
8
8
8
R28
18
120°
120°
R9
R15
R28
R50
3 Holes φ6
39 P.C.D.
1
3
4
5
6
2
3 slots
as indicated
φ6
φ14
56
2
R50
φ9
φ25
18
φ10
φ25
15
16
R50
Q
P
First angle projection Dimensions in mm
10 10
R
M6 CSK
head bolt
Figure 17A
1
2
6
5
3
4
Parts
list
Figure 17B

Geometric and Engineering Drawing330
18. The detail drawings in Fig. 18 are parts of a fixed steady. The adjustable bearing blocks,
screws to hold them in position and the means of fixing the steady to the lathe have been
omitted.
When the steady is assembled, the top frame hinges on the right-hand lug and turns about
part number 3. The left-hand slot of the bottom frame takes part number 4 which turns
about part number 5 into the left-hand slot of the top frame. The two frames, parts 1 and
2, are held together by an M8 nut which is screwed with a washer on part 4.
To a scale of three-quarters full size draw the following views of the assembled steady: (a)
an elevation looking perpendicularly to the hexagon, i.e. in a similar position to the given
left-hand views; (b) project a plan from the elevation; (c) a sectional elevation on AA; (d)
a sectional elevation on BB.
Only show one adjusting screw, part number 6, this to be fully screwed into the lug below
A. Hidden detail is not required for the sectional elevations. Add six main dimensions. In
block letters give the following: FIXED STEADY; SCALE; and NAME.
Southern Universities Joint Board

Engineering Drawing 331
34
18
A
321818
B
φ6
6
E
12
21
21
44
3
R9
φ8
φ6
F
38
R6
21 50
A
6
44
B
60°
45°
94
5
2
6.8
9
Hexagonal
9 slots to
take part No.4
21 20
21
M8
9
12956
4815
6
50
25
20
25
8
25
6
9
φ6
M8
6
34
15
M8
9
9
15
12
5
9
25
60°
3
1
2
6
5
4
3
1 Top frame 1
2 Bottom frame 1
3 Hinge pin 1
4 Screwed block 1
5 Hinge pin 1
6 Adjusting screw 3
7 M8 nut 1
8 M9 washer 1
Part No. Fixed steady No. Off
All casting fillets are 3 mm radius
All dimensions are in millimetres unless otherwise stated
Figure 18

Geometric and Engineering Drawing332
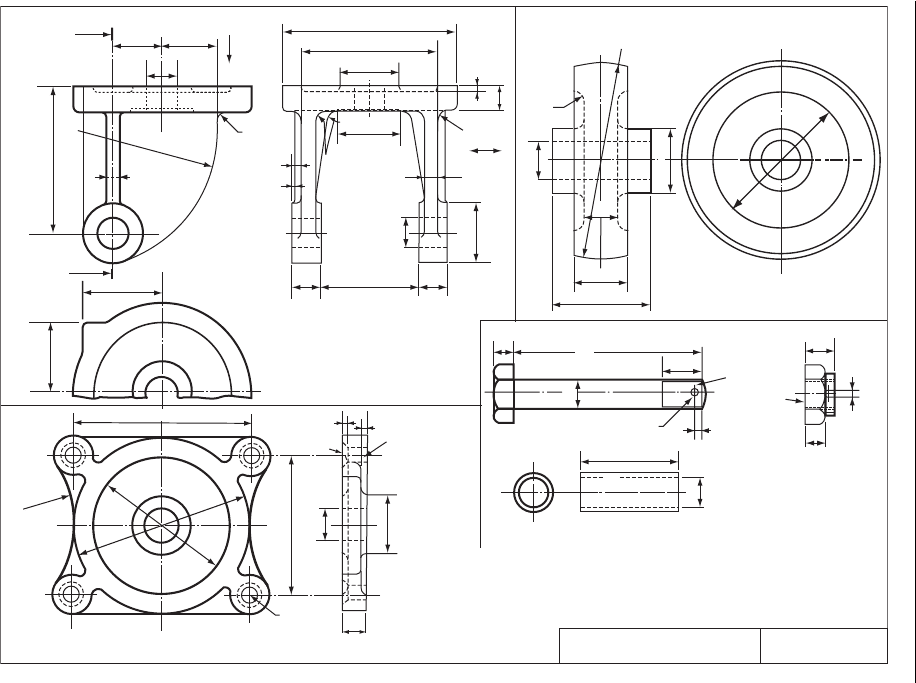
19. Figure 19 opposite shows details of a bogie truck. The fixed plate is secured to the truck
by four M10 countersunk screws (not to be shown) and carries the wheel and frame by
means of a central bolt M18, 50 mm long. With the parts correctly assembled and allow-
ing a 2 mm clearance between the top of the frame and the underside of the plate draw,
full size, the following views: (a) a sectional FE looking in the direction of arrows AA and
taken on the centre line as indicated; (b) an outside EE looking in the direction of arrow
B , the longer side of the fixed plate to be shown in this view; (c) an outside plan projected
from (b) above and looking in the direction of arrow C .
Hidden details to be shown in view (b) only.
The castle nuts to be shown in view (b) only.
Insert the following dimensions: (i) the distance between the centres of the fixing screw
holes in the fixed plate in both directions; (ii) the distance of the centre of the wheel from
the top of the frame; (iii) the outside diameter of the wheel; (iv) the internal diameter of
the bush.
Add, in letters 10 mm high, the title TRUCK BOGIE, and in letters 6 mm high, the scale
and system of projection used.
First or third angle projection may be used but the three views must be in a consistent
system of projection.
Associated Examining Board

Engineering Drawing 333
A
32 36 C
R6
R88
φ112
φ 19
φ112
φ38
φ88
φ40
φ18.5
φ38
6218 18
φ38
S’Face 2 deep
9
6R6
9
R6
21
34
61
1 off - 50 long
12
25
Hole φ3
Bush 1 off
All fillets 3 rad unless specified
All dimensions in mm
First angle projection
TRUCK BOGIE
φ 25
φ 18
Bolt
61
5
Thread
4
12
Castle nut
2 off
M18
Wheel 1 off
18
φ18
φ88
1 off - 117 long
B
15
R6
Sphere φ125
3
2
50
R68
112 Centres
Frame 1 off
3
3
4 Holes φ11
φ19
φ 38
CSK at 90º
3 Deep
A
44
94
Fixed plate
1 off
R12
15
88 Centres
φ 40
φ 25
Figure 19
