Morling K. Geometric and Engineering Drawing
Подождите немного. Документ загружается.


Geometric and Engineering Drawing284
two different drawings can ever raise exactly the same problems. Each drawing that
you do needs to be studied very carefully before you begin to dimension it.
Examination questions often ask for only five or six ‘ important ’ dimensions to
be inserted on the finished drawing. The overall dimensions – length, breadth and
width – are obviously important but the remaining two or three are not so obvious.
The component or assembled components need to be studied in order to ascertain the
function of the object. If, for instance, the drawing is of a bearing, then the size of
the bearing is vitally important because something has to fit into that bearing. If the
drawing is of a machine vice, then the size of the vice jaws should be dimensioned
so that the limitations of the vice are immediately apparent. These are the types of
dimensions that should make up the total required.
Conventional Representations
There are many common engineering details that are difficult and tedious to draw.
The screw thread is an example of this type of detail and it has been shown earlier in
this part of the book that there are conventional ways of drawing screw threads which
are very much simpler than drawing out helical screw threads in full.
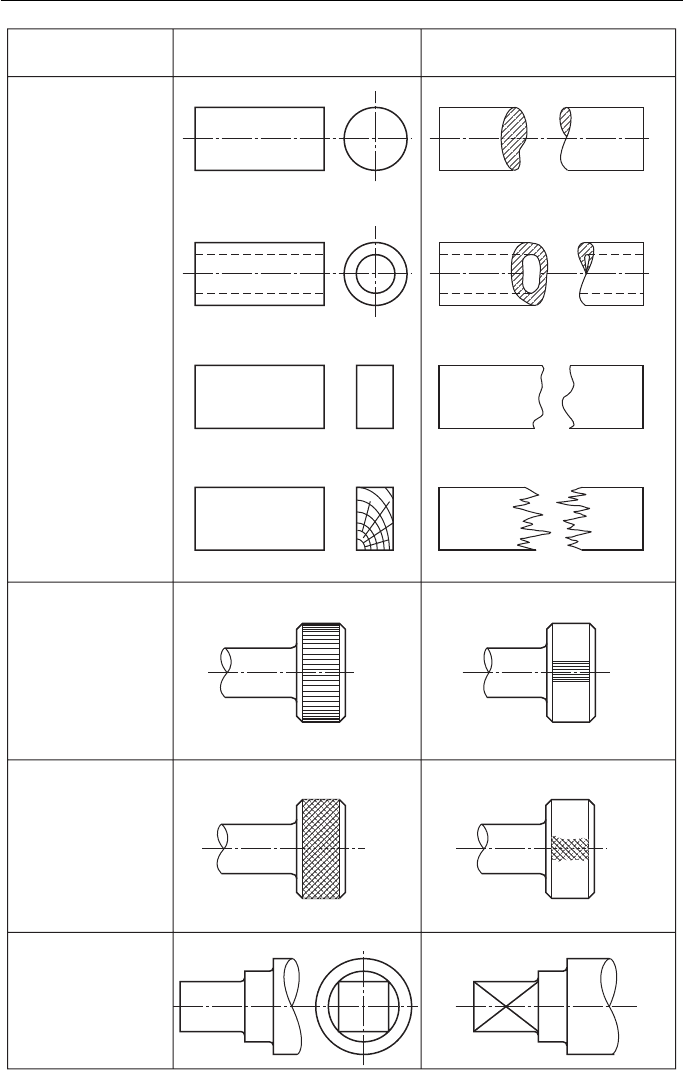
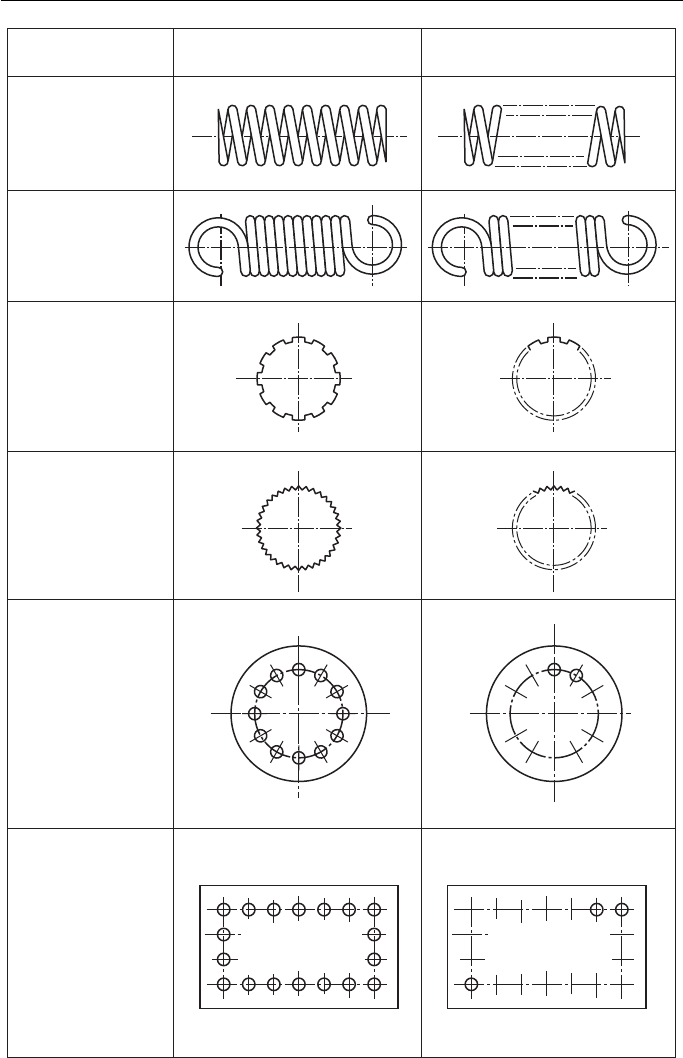
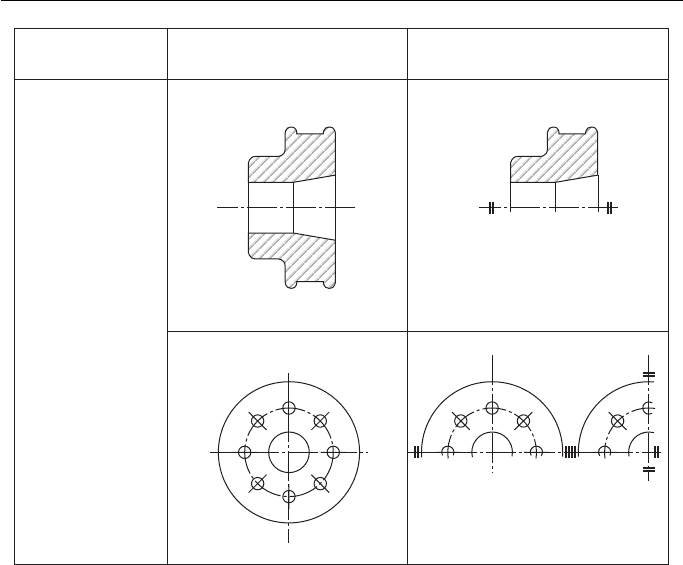
Figure 18.22 shows some more engineering details and alongside the detailed
drawing is shown the conventional representation for that detail. These conventions
are designed to save time and should be used wherever and whenever possible.
These are not all the conventional representations that are available but the rest
are beyond the scope of this book. The interested student can find the rest in BS 308.
There is a way of representing compression and tension springs diagrammatically.
The coils of these springs can be represented by straight lines.
Engineering Drawing 285
Title
Break
lines
Straight
knurling
Diamond
knurling
Square
on shaft
Subject
Round (Solid)
or
or
Round (Tubular)
Rectangular
Rectangular (Wood)
Convention
Figure 18.22 (a)
Geometric and Engineering Drawing286
Title
Compression
springs
Tension
springs
Splined
shafts
Serrated
shafts
Holes
on
circular
pitch
Holes
on
linear
pitch
Subject Convention
Figure 18.22 (b)
Engineering Drawing 287
Machining Symbols
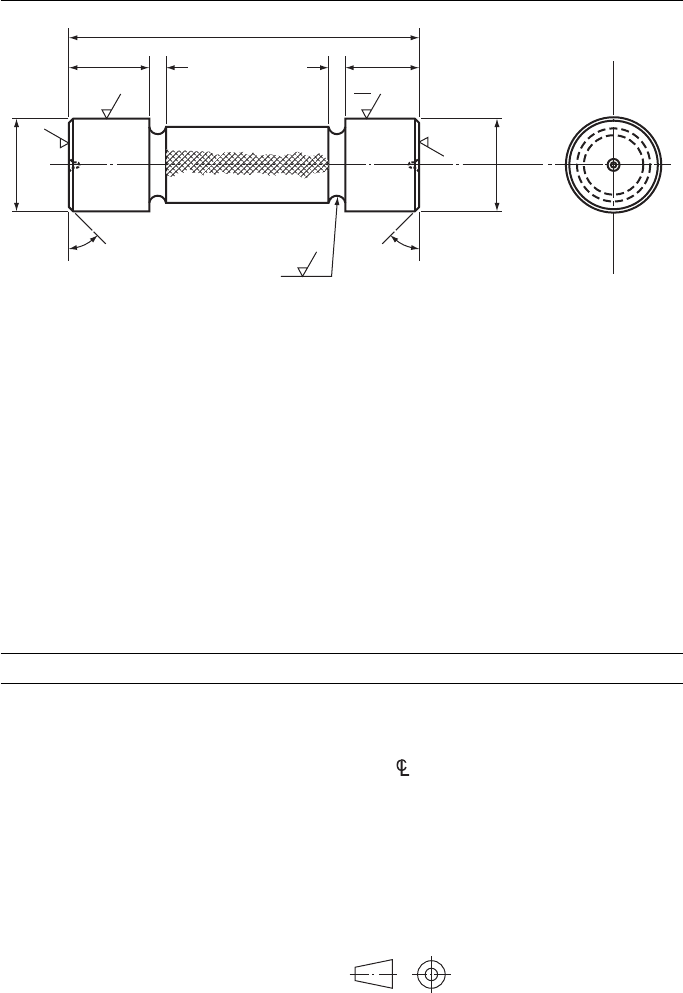
The shape of an engineering component can be determined in several ways. The
component may be forged, cast, drawn, etc. After one or more of these processes, it
is quite likely that some machining will have to be done. It is therefore important that
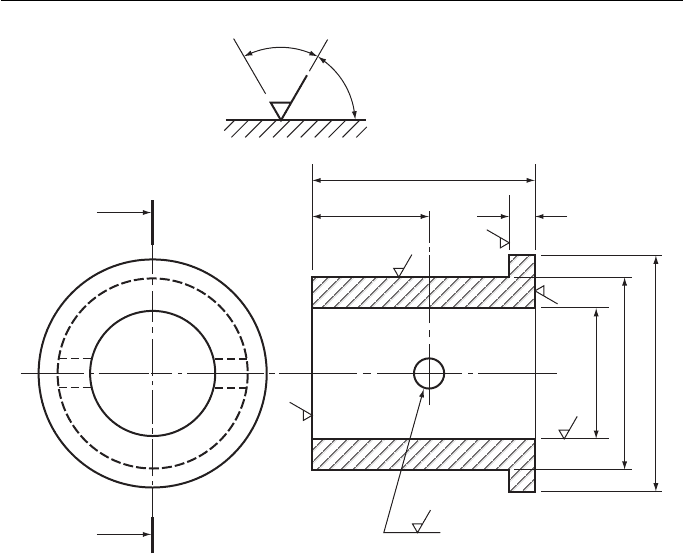
these machined faces be indicated on the drawing. The method recommended by BS
308 is shown in Fig. 18.23 but this is not the only method in use. Sometimes, the let-
ter ‘ f ’ is written over the face to be machined. This letter ‘ f ’ stands for ‘ finish ’ .
The small tick shows only that that particular face has to be machined. It does
not show how it is to be machined, nor does it show how smooth the finish is to be.
The method of machining – turning, milling, grinding, etc. – is not normally put on a
drawing but the standard of finish is.
Title
Treatment
of
symmetrical
parts
or
Subject
(Note the short thick double line at the end of each centre line.)
Convention
Figure 18.22 (c)
Geometric and Engineering Drawing288
Surface Roughness
This short section on roughness symbols is beyond the scope of this book, but it is
well worth looking at.
The standard of finish, or roughness of a surface, is of vital importance in engineer-
ing. The degree of roughness permitted depends on the function of the component. When
two pieces of metal slide against each other, as in the case of a bearing, the finish on both
parts must be very smooth or the bearing will overheat and ‘ seize ’ . On the other hand,
smooth finishes are expensive to produce and should be kept to a sensible minimum.
If the surface of a piece of machined metal is magnified it will look like a range
of very craggy mountains. The surface roughness is the distance from the highest
‘ peak ’ to the lowest ‘ valley ’ . This roughness is measured in micrometres and one
micrometre is one millionth part of a metre. Not only can a surface be made smooth
to one micrometre but it can also be measured to one micrometre.
The British Standard index numbers of surface roughness are 0.025, 0.05, 0.1, 0.2,
0.4, 0.8, 1.6, 3.2, 6.3, 12.5 and 25.0. A surface roughness from 0.025 to 0.2 can be
obtained by lapping or honing, 0.4 can be obtained by grinding and 0.8 by careful turn-
ing, rough grinding, etc. The surface roughness number is shown within the vee of the
machining symbol. A tolerance on surface roughness is shown as a fraction, with the
maximum roughness number above the minimum roughness number ( Figure 18.24 ).
60°
60°
Machining
symbol
First angle projection
Figure 18.23 Application of machining symbol.
Engineering Drawing 289
3.2
3.2
0.8
0.05
3.2
0.2
Figure 18.24 Application of surface roughness symbols.
Abbreviations
A list of the standard abbreviations for some general engineering terms is shown
below. These abbreviations are used to save time, and space on drawings.
Although the abbreviations are shown in block capital letters, small letters may
be used. For unit abbreviations always use small letters. The abbreviations are the
same in the singular and the plural. Note that full stops are not used except when the
abbreviation makes another word, e.g. number becomes No. and figure becomes Fig.
These are by no means all the standard abbreviations. They should contain all that
are required at this stage but should the students require the full list of abbreviations,
they will find them in BS 1991.
Term Abbreviation
Across-flats AF
British Standard BS
Centimetre cm
Centre line CL or
Chamfered CHAM
Cheese head CH HD
Countersunk CSK
Counterbore CBORE
Degree (of angle) °
Diameter (preceding a dimension) φ
Drawing DRG
Figure FIG.
First angle projection
Hexagon HEX
Internal diameter I/D
Kilogram kg
Left hand LH
Machine MC

Geometric and Engineering Drawing290
Material MATL
Maximum MAX
Metre m
Millimetre mm
Minimum MIN
Minute (of angle)
Number NO.
Outside diameter O/D
Per /
Pitch circle diameter PCD
Radius (preceding a dimension) R
Right hand RH
Roundhead RD HD
Second (of angle)
Square (in a note) SQ
Square (preceding a dimension)
䊐 or
Square metre m
2
Standard STD
Third angle projection
Screw threads
British Standard Pipe BSP
International Organization for
Standardization
ISO
Syst è me International SI
Undercut U ’ CUT
Unified coarse UNC
Unified fine UNF
Unified selected UNS
Framing and Title Block
Most paper comes in standard sizes. The largest sheet you are likely to use is A0 and
the smallest A4. If your drawing paper has no frame then draw one. A minimum of
20 mm is used on A0 and A1 from the edge of the paper to the frame line and a mini-
mum of 10 mm on A2, A3 and A4.
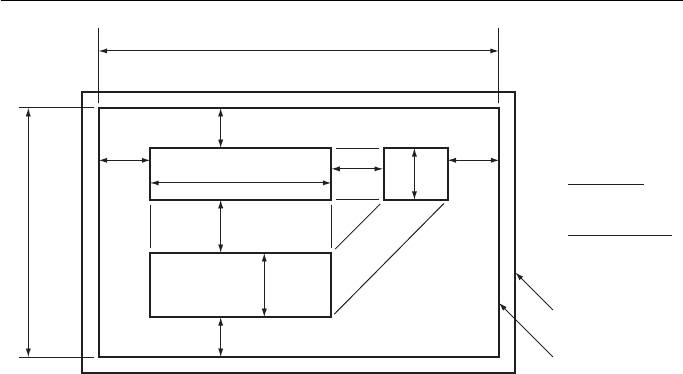
In order to space out the views that you will draw on your paper use the following
formulas (A, B and C are the maximum sizes of your views) and the p and q dimen-
sions are the distances between the views.
You do not have to use exact dimensions which might complicate the sums; use
sensible approximations for A, B and C ( Fig. 18.25 ).
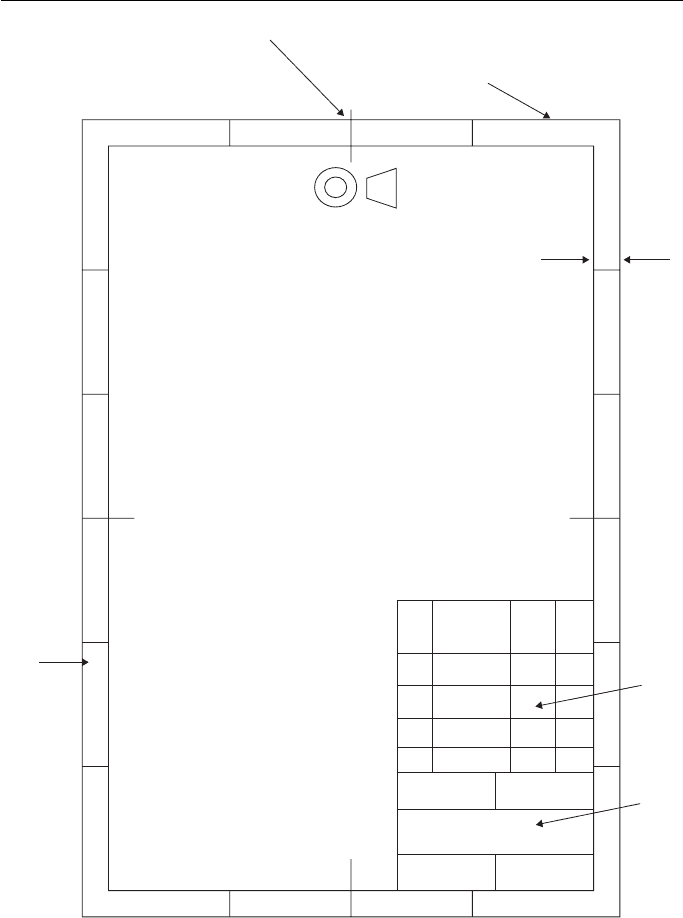
You may well have to add information to your finished drawing and this should be
shown in blocks. This information could include:
Title
Your name
Engineering Drawing 291
X
p
p
C
p
p = X – (A + B)
3
pq
B
q
A
Y
2
q = Y – (B + C + p)
Edge of paper
Frame
Figure 18.25 Positioning of views to be drawn.
Your location (college or company)
The scale of the drawing
The system of projection used
Date
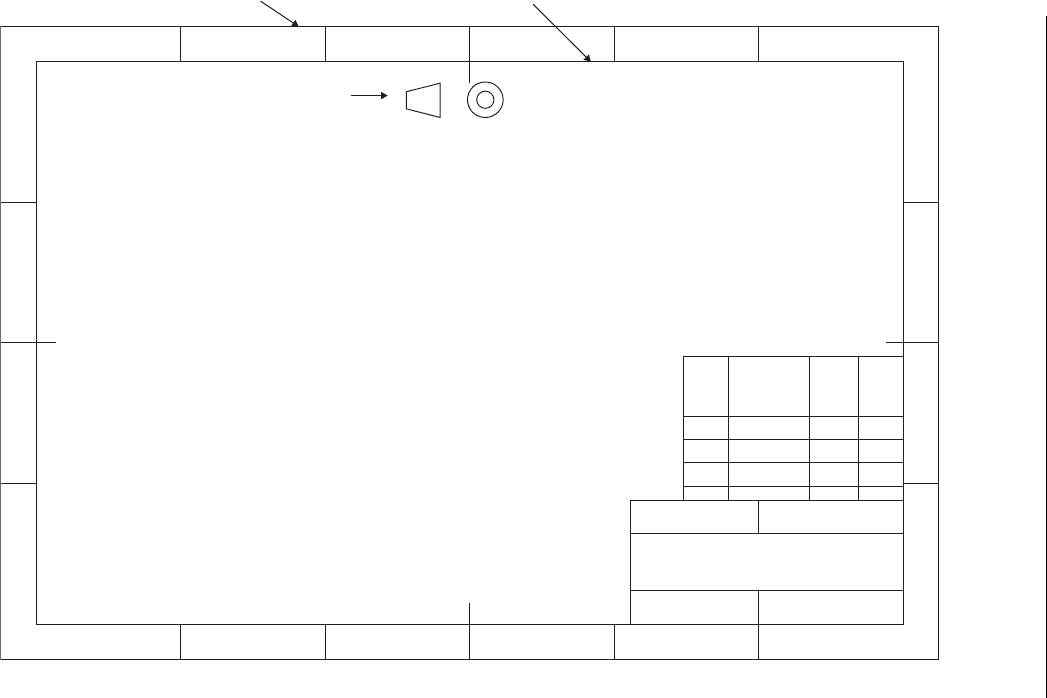
You might also have many parts assembled on your drawing and you will need to
list them, show where they can be found on the drawing by using a grid reference,
describe what the parts are called and say how many there are. This information can
be done as shown in Fig. 18.26 (see pages 292 and 293).
Geometric and Engineering Drawing292
Centring mark
Edge of sheet
Projection
Border
Grid
reference
Part
info
Title
block
12 34
F
E
D
Pt
No
Descrip.
SCALE NAME
TITLE
DATE LOCATION
Grid
Ref.
No.
off
C
B
A
4321
A
B
C
D
E
F
(A)
Figure 18.26 Layout of title boxes. (A) Portrait format. (B) Landscape format.
Engineering Drawing 293
Edge of sheet Frame
Projection
SCALE NAME
TITLE
LOCATIONDATE
E
4
3
2
1
FEDCBA
1
2
3
4
ABCD
Descrip.
F
Pt
No
Grid
Ref.
No.
Off.
(B)
Figure 18.26 (Continued)
