Higgins R.A. Engineering Metallurgy: Applied Physical Metallurgy
Подождите немного. Документ загружается.

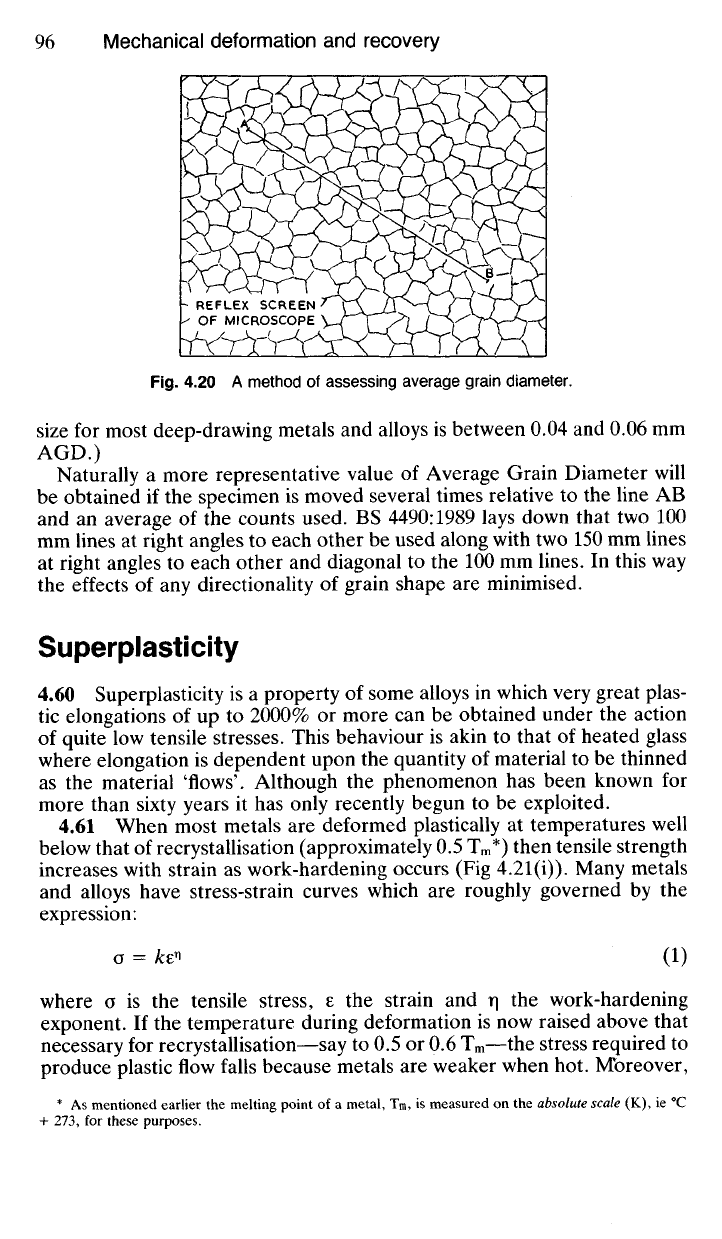
Fig.
4.20 A method of assessing average grain diameter.
size for most deep-drawing metals and alloys is between 0.04 and 0.06 mm
AGD.)
Naturally a more representative value of Average Grain Diameter will
be obtained if the specimen is moved several times relative to the line AB
and an average of the counts used. BS 4490:1989 lays down that two 100
mm lines at right angles to each other be used along with two 150 mm lines
at right angles to each other and diagonal to the 100 mm lines. In this way
the effects of any directionality of grain shape are minimised.
Superplasticity
4.60 Superplasticity is a property of some alloys in which very great plas-
tic elongations of up to 2000% or more can be obtained under the action
of quite low tensile stresses. This behaviour is akin to that of heated glass
where elongation is dependent upon the quantity of material to be thinned
as the material 'flows'. Although the phenomenon has been known for
more than sixty years it has only recently begun to be exploited.
4.61 When most metals are deformed plastically at temperatures well
below that of recrystallisation (approximately 0.5 T
m
*) then tensile strength
increases with strain as work-hardening occurs (Fig 4.21(i)). Many metals
and alloys have stress-strain curves which are roughly governed by the
expression:
a = k& (1)
where a is the tensile stress, 8 the strain and r\ the work-hardening
exponent. If the temperature during deformation is now raised above that
necessary for recrystallisation—say to 0.5 or 0.6 T
m
—the stress required to
produce plastic flow falls because metals are weaker when hot. Moreover,
* As mentioned earlier the melting point of a metal, Tm, is measured on the
absolute scale
(K), ie
0
C
+ 273, for these purposes.
REFLEX SCREEN
OF MICROSCOPE
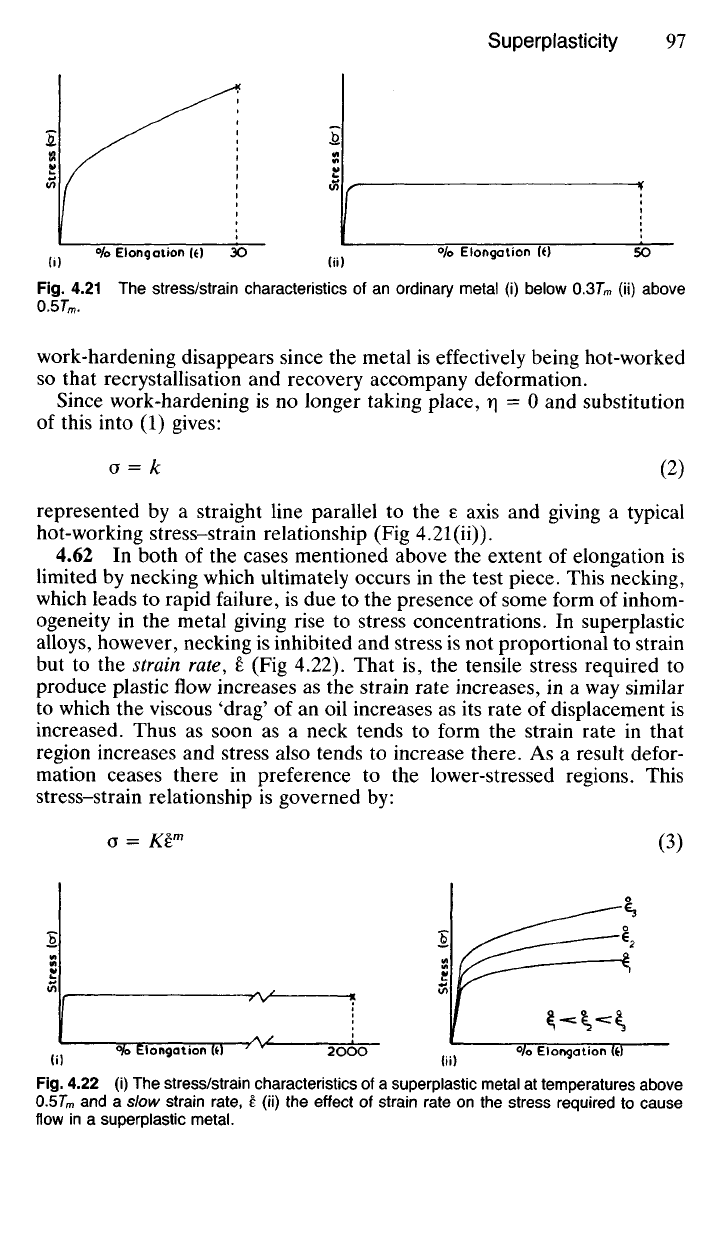
Fig.
4.21 The
stress/strain characteristics
of an
ordinary metal
(i)
below O.37"
m
(ii)
above
0.5T
m
.
work-hardening disappears since
the
metal
is
effectively being hot-worked
so that recrystallisation
and
recovery accompany deformation.
Since work-hardening
is no
longer taking place,
r\ - 0 and
substitution
of this into
(1)
gives:
o
= k (2)
represented
by a
straight line parallel
to the e
axis
and
giving
a
typical
hot-working stress-strain relationship
(Fig
4.21(ii)).
4.62
In
both
of the
cases mentioned above
the
extent
of
elongation
is
limited
by
necking which ultimately occurs
in the
test piece. This necking,
which leads
to
rapid failure,
is due to the
presence
of
some form
of
inhom-
ogeneity
in the
metal giving rise
to
stress concentrations.
In
superplastic
alloys, however, necking
is
inhibited
and
stress
is not
proportional
to
strain
but
to the
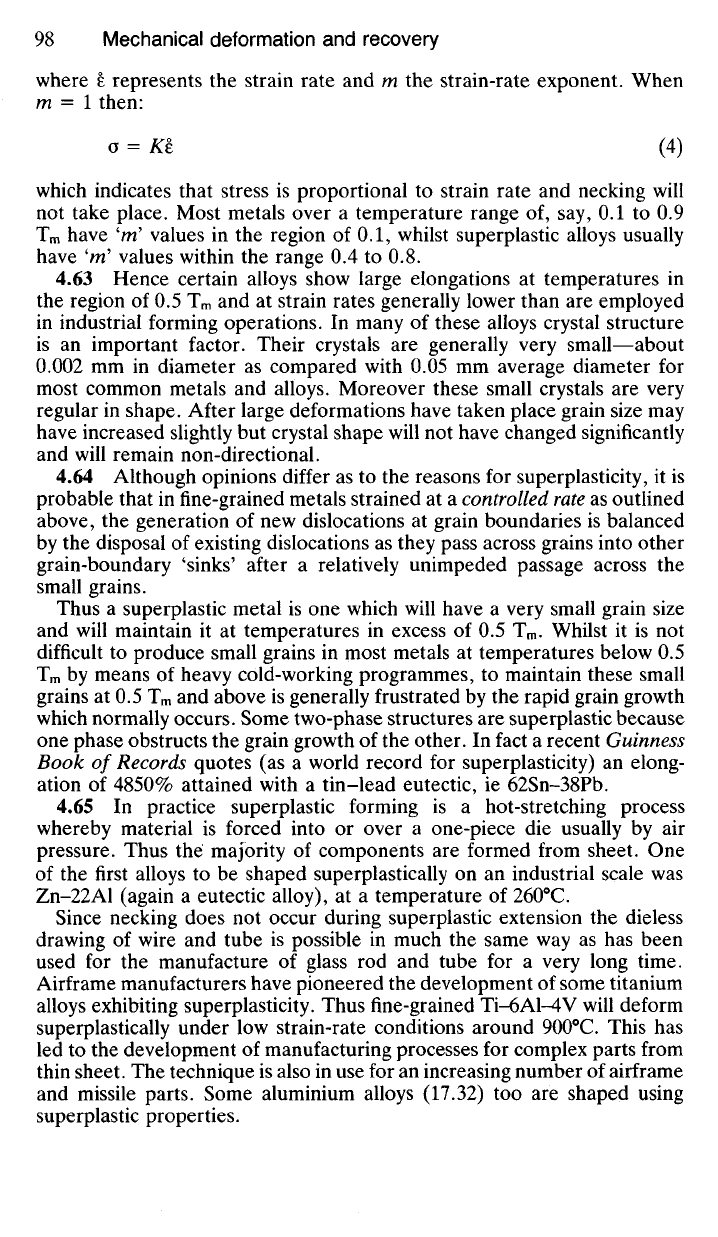
strain rate,
e (Fig
4.22). That
is, the
tensile stress required
to
produce plastic flow increases
as the
strain rate increases,
in a way
similar
to which
the
viscous 'drag'
of an oil
increases
as its
rate
of
displacement
is
increased. Thus
as
soon
as a
neck tends
to
form
the
strain rate
in
that
region increases
and
stress also tends
to
increase there.
As a
result defor-
mation ceases there
in
preference
to the
lower-stressed regions. This
stress-strain relationship
is
governed
by:
Stress
(cr)
Stress
[or)
Stress
(cr)
Stress
(Q-)
Fig.
4.22 (i) The
stress/strain characteristics
of a
superplastic metal
at
temperatures above
0.5T
m
and a
slow strain rate,
e (ii) the
effect
of
strain rate
on the
stress required
to
cause
flow
in a
superplastic metal.
Wo
ElongationW
°/o Elongation
(fc)
(3)
°/o Elongation
(O
°/o Elongation
(0
where 8 represents the strain rate and m the strain-rate exponent. When
m - \ then:
0 = KE (4)
which indicates that stress is proportional to strain rate and necking will
not take place. Most metals over a temperature range of, say, 0.1 to 0.9
T
m
have 'm' values in the region of 0.1, whilst superplastic alloys usually
have 'm' values within the range 0.4 to 0.8.
4.63 Hence certain alloys show large elongations at temperatures in
the region of 0.5 T
m
and at strain rates generally lower than are employed
in industrial forming operations. In many of these alloys crystal structure
is an important factor. Their crystals are generally very small—about
0.002 mm in diameter as compared with 0.05 mm average diameter for
most common metals and alloys. Moreover these small crystals are very
regular in shape. After large deformations have taken place grain size may
have increased slightly but crystal shape will not have changed significantly
and will remain non-directional.
4.64 Although opinions differ as to the reasons for superplasticity, it is
probable that in fine-grained metals strained at a controlled rate as outlined
above, the generation of new dislocations at grain boundaries is balanced
by the disposal of existing dislocations as they pass across grains into other
grain-boundary 'sinks' after a relatively unimpeded passage across the
small grains.
Thus a superplastic metal is one which will have a very small grain size
and will maintain it at temperatures in excess of 0.5 T
m
. Whilst it is not
difficult to produce small grains in most metals at temperatures below 0.5
T
m
by means of heavy cold-working programmes, to maintain these small
grains at 0.5 T
m
and above is generally frustrated by the rapid grain growth
which normally occurs. Some two-phase structures are superplastic because
one phase obstructs the grain growth of the other. In fact a recent Guinness
Book of Records quotes (as a world record for superplasticity) an elong-
ation of 4850% attained with a tin-lead eutectic, ie 62Sn-38Pb.
4.65 In practice superplastic forming is a hot-stretching process
whereby material is forced into or over a one-piece die usually by air
pressure. Thus the majority of components are formed from sheet. One
of the first alloys to be shaped superplastically on an industrial scale was
Zn-22A1 (again a eutectic alloy), at a temperature of 260
0
C.
Since necking does not occur during superplastic extension the dieless
drawing of wire and tube is possible in much the same way as has been
used for the manufacture of glass rod and tube for a very long time.
Airframe manufacturers have pioneered the development of some titanium
alloys exhibiting superplasticity. Thus fine-grained Ti-6A1-4V will deform
superplastically under low strain-rate conditions around 900
0
C. This has
led to the development of manufacturing processes for complex parts from
thin sheet. The technique is also in use for an increasing number of airf rame
and missile parts. Some aluminium alloys (17.32) too are shaped using
superplastic properties.
Exercises
1.
What visual evidence is there to support the view that permanent deformation
in metals takes place by a process of 'slip'?
Outline the theory which seeks to explain the essential nature of slip. (4.11
and 4.14)
2.
In a tensile test on a single metallic crystal the yield stress of the material was
found to be 55 N/mm
2
, and slip planes were formed at an angle of 40° to the
axis of the specimen.
Calculate the value of the stress which caused slip along these planes.
This value will be found to be about 10
3
times less than the 'theoretical' value.
Account for this (4.13)
3.
Describe the nature of an 'edge dislocation' in a metallic structure.
Explain with sketches how plastic deformation proceeds by the movement of
such faults in a crystal. (4.15)
4.
Discuss the relationship between yield stress of a metal and the presence of
dislocations in the structure. Illustrate your answer by reference to metallic
'whiskers'. (4.16)
5.
Why do ductile metals work-harden progressively during plastic deformation?
(4.17)
6. Discuss the effects of (a) cold working (b) subsequent heat-treatment, on the
structure and mechanical properties of a pure metal.
Explain the terms stress
relief,
recrystallisation
and grain growth. (4.19 and
4.20)
7.
Given that the melting point of nickel is 1458°C make a rough estimate of its
recrystallisation temperature. (4.42)
8. The melting point of pure tin is 232°C. Show why it is not possible to work-
harden the metal at ambient temperatures. (4.42)
9. Describe the mechanism of grain growth in metals and show how the rate of
grain growth is related to the annealing temperature. (4.50)
10.
A heavily cold-worked copper bar is placed with one end in a furnace at 900
0
C
whilst the other end reaches a temperature of 25°C. Assuming that there is a
uniform temperature gradient along the whole length describe the structures
you would expect to find along the bar after about two hours of such treatment.
(4.30 to 4.50)
11.
A nail is driven through a piece of sheet metal which has previously been
cold-rolled and annealed under conditions which produced a small grain size.
After puncture the specimen is annealed just above its recrystallisation tem-
perature. Sketch and describe the type of crystal structure which would now
be found in the region of the nail hole and account for the results you describe.
(4.50)
12.
What is 'superplasticity' as applied to metals? To what extent is this phenom-
enon related to microstructure. (4.60)
Bibliography
Cahn, R. W., Physical Metallurgy, North Holland, 1980.
Cottrell, Sir Alan, Theoretical Structural Metallurgy, Arnold, 1965.
Cottrell, Sir Alan, Dislocations and Plastic Flow in Crystals, Oxford University
Press,
1979.

Honeycombe, R. W. K., The Plastic Deformation of Metals, Arnold, 1984.
Martin, J. W. and Doherty, R. D., Stability of
Microstructures
in Metallic Systems,
Cambridge University Press, 1976.
Smallman, R. E., Modern Physical Metallurgy, Butterworths, 1985.
BS 4490: 1989 Micrographic Determination of the Grain Size of
Steel.
5
Fracture
of
Metals
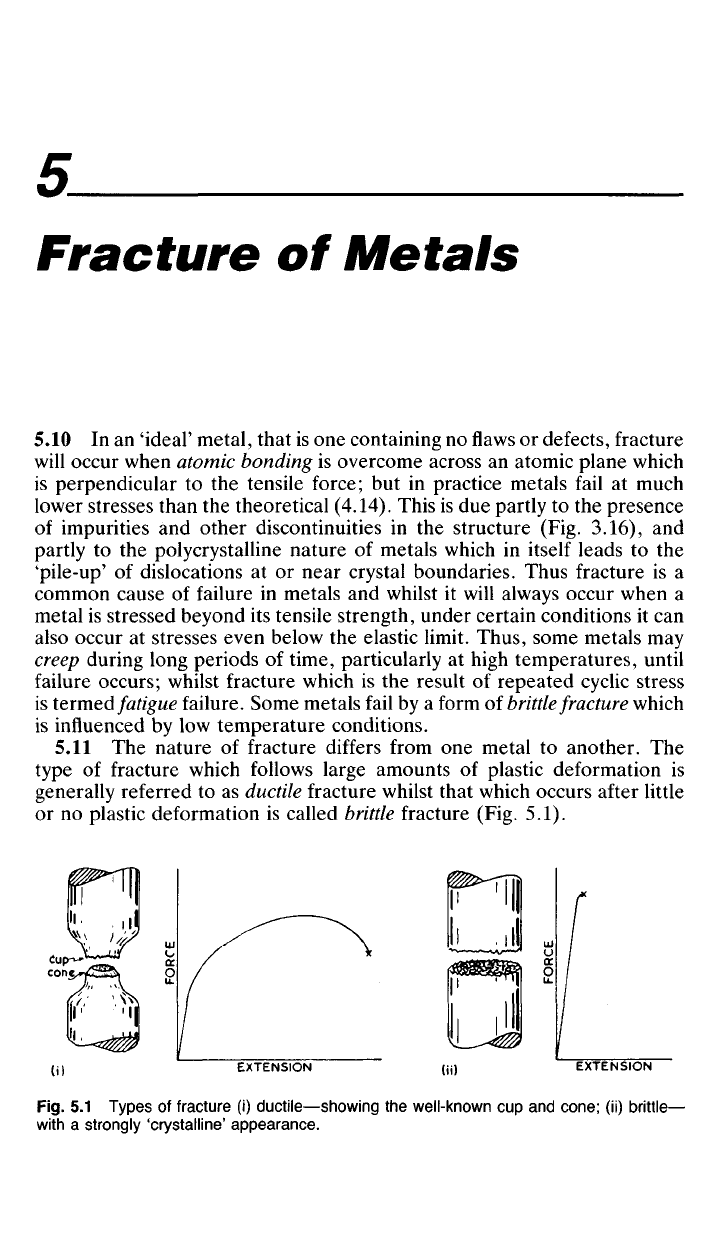
5.10
In an
'ideal' metal, that
is one
containing
no
flaws
or
defects, fracture
will occur when atomic bonding
is
overcome across
an
atomic plane which
is perpendicular
to the
tensile force;
but in
practice metals fail
at
much
lower stresses than
the
theoretical (4.14). This
is due
partly
to the
presence
of impurities
and
other discontinuities
in the
structure
(Fig.
3.16),
and
partly
to the
polycrystalline nature
of
metals which
in
itself leads
to the
'pile-up'
of
dislocations
at or
near crystal boundaries. Thus fracture
is a
common cause
of
failure
in
metals
and
whilst
it
will always occur when
a
metal
is
stressed beyond
its
tensile strength, under certain conditions
it can
also occur
at
stresses even below
the
elastic limit. Thus, some metals
may
creep during long periods
of
time, particularly
at
high temperatures, until
failure occurs; whilst fracture which
is the
result
of
repeated cyclic stress
is termed fatigue failure. Some metals fail
by a
form
of
brittle
fracture which
is influenced
by low
temperature conditions.
5.11
The
nature
of
fracture differs from
one
metal
to
another.
The
type
of
fracture which follows large amounts
of
plastic deformation
is
generally referred
to as
ductile fracture whilst that which occurs after little
or
no
plastic deformation
is
called brittle fracture
(Fig. 5.1).
FORCE
FORCE
(tup
cone.
EXTENSION EXTENSION
Fig.
5.1
Types
of
fracture
(i)
ductile—showing
the
well-known
cup and
cone;
(ii)
brittle—
with
a
strongly 'crystalline' appearance.
It was stated in the previous chapter that during plastic deformation slip
takes place along some crystallographic planes more readily than along
others. Similarly, metallic fracture—or cleavage—tends to follow pre-
ferred crystallographic planes. Thus FCC metals are likely to suffer cleav-
age along the {111} planes (3.15), whilst BCC metals cleave along the
{100} planes. In CPH metals cleavage occurs along the basal planes of the
hexagon (designated the {0001} planes).
Brittle Fracture
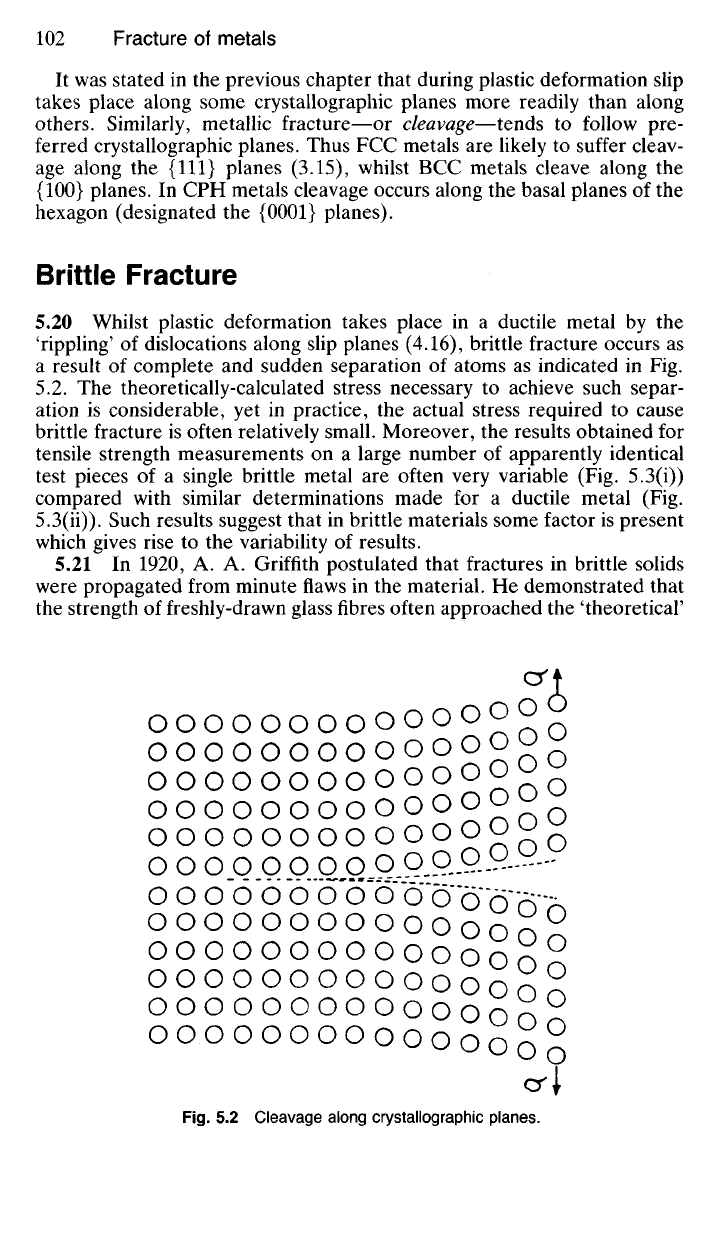
5.20 Whilst plastic deformation takes place in a ductile metal by the
'rippling' of dislocations along slip planes (4.16), brittle fracture occurs as
a result of complete and sudden separation of atoms as indicated in Fig.
5.2. The theoretically-calculated stress necessary to achieve such separ-
ation is considerable, yet in practice, the actual stress required to cause
brittle fracture is often relatively small. Moreover, the results obtained for
tensile strength measurements on a large number of apparently identical
test pieces of a single brittle metal are often very variable (Fig. 5.3(i))
compared with similar determinations made for a ductile metal (Fig.
5.3(ii)). Such results suggest that in brittle materials some factor is present
which gives rise to the variability of results.
5.21 In 1920, A. A. Griffith postulated that fractures in brittle solids
were propagated from minute flaws in the material. He demonstrated that
the strength of freshly-drawn glass fibres often approached the 'theoretical'
Fig.
5.2 Cleavage along crystallographic planes.

Fig.
5.3 The
variability
of
results during
the
tensile testing
of (i) a
brittle material;
(ii) a
ductile material.
value,
but if
these fibres were allowed
to
come into contact with
any
other substance, including
the
atmosphere, even
for
short periods then
the
strength
was
considerably reduced. This suggests that
the
strength
of
glass
fibre was very dependent upon surface perfection
and
that anything likely
to initiate even minute surface irregularities would weaken
it. In
certain
respects these principles
may
also
be
applied
to
brittle metals. Engineers
will already
be
familiar with
the
concept
of
'stress raisers'
and
stress
con-
centrations associated with
the
presence
of
sharp in-cut corners
and the
necessity
of
eliminating these
in
engineering design whenever possible.
Thus
in
iron castings in-cut corners
are
rounded
by
using leather 'fillets'
on
the
wooden pattern.
5.22 Griffith's Crack Theory. Whilst
the
presence
of a
small fissure
(Fig.
5.4) will obviously reduce
the
effective cross-section
of the
material,
the
reduction
in
breaking stress
is
very much greater than
can be
accounted
for
by
this reduction
in
cross-sectional area. This
is
because
an
applied
stress,
S,
generates stress concentrations
at the tip of the
fissure.
Griffith concluded that
the
concentrated stress,
S
c
, is
related
to the
applied stress,
S, the
width
of the
crack,
c, and the
radius
of
curvature
of
the
tip of the
crack,
r, by:
Fig.
5.4.
TENSILE
STRENGTH
TENSILE
STRENGTH
NUMBER
OF
TESTS NUMBER
OF
TESTS
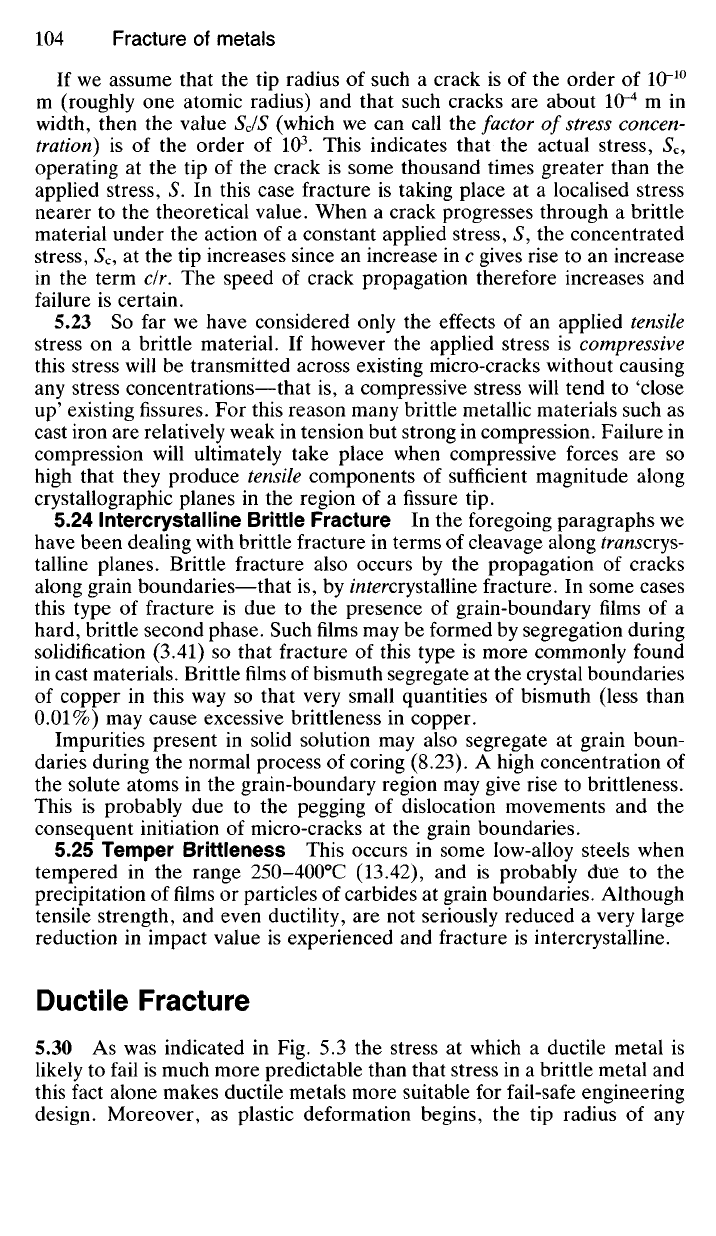
If we assume that the tip radius of such a crack is of the order of 10~
10
m (roughly one atomic radius) and that such cracks are about 10~
4
m in
width, then the value SJS (which we can call the factor of
stress
concen-
tration) is of the order of 10
3
. This indicates that the actual stress, 5
C
,
operating at the tip of the crack is some thousand times greater than the
applied stress, S. In this case fracture is taking place at a localised stress
nearer to the theoretical value. When a crack progresses through a brittle
material under the action of a constant applied stress, S, the concentrated
stress,
S
c
, at the tip increases since an increase in c gives rise to an increase
in the term dr. The speed of crack propagation therefore increases and
failure is certain.
5.23 So far we have considered only the effects of an applied tensile
stress on a brittle material. If however the applied stress is compressive
this stress will be transmitted across existing micro-cracks without causing
any stress concentrations—that is, a compressive stress will tend to 'close
up'
existing fissures. For this reason many brittle metallic materials such as
cast iron are relatively weak in tension but strong in compression. Failure in
compression will ultimately take place when compressive forces are so
high that they produce tensile components of sufficient magnitude along
crystallographic planes in the region of a fissure tip.
5.24 lntercrystalline Brittle Fracture In the foregoing paragraphs we
have been dealing with brittle fracture in terms of cleavage along
transcvys-
talline planes. Brittle fracture also occurs by the propagation of cracks
along grain boundaries—that is, by mtercrystalline fracture. In some cases
this type of fracture is due to the presence of grain-boundary films of a
hard, brittle second phase. Such films may be formed by segregation during
solidification (3.41) so that fracture of this type is more commonly found
in cast materials. Brittle films of bismuth segregate at the crystal boundaries
of copper in this way so that very small quantities of bismuth (less than
0.01%) may cause excessive brittleness in copper.
Impurities present in solid solution may also segregate at grain boun-
daries during the normal process of coring (8.23). A high concentration of
the solute atoms in the grain-boundary region may give rise to brittleness.
This is probably due to the pegging of dislocation movements and the
consequent initiation of micro-cracks at the grain boundaries.
5.25 Temper Brittleness This occurs in some low-alloy steels when
tempered in the range 250-400
0
C (13.42), and is probably due to the
precipitation of films or particles of carbides at grain boundaries. Although
tensile strength, and even ductility, are not seriously reduced a very large
reduction in impact value is experienced and fracture is intercrystalline.
Ductile Fracture
5.30 As was indicated in Fig. 5.3 the stress at which a ductile metal is
likely to fail is much more predictable than that stress in a brittle metal and
this fact alone makes ductile metals more suitable for fail-safe engineering
design. Moreover, as plastic deformation begins, the tip radius of any
micro-crack present is likely to increase and this will automatically reduce
the concentrated stress, 5
C
, as the value of clr (in the Griffith equation)
decreases. As a result of this stress relaxation propagation of the crack
may cease. The fracture which ultimately occurs in ductile materials is due
partly to strain hardening which progressively reduces the ductility which
is necessary for further stress relaxation.
5.31 It is difficult to differentiate implicitly between brittle and ductile
fracture since some brittle metals undergo some ductile deformation before
fracture, whilst many ductile metals exhibit final brittle-type cleavage.
However, whilst a brittle fracture is one in which the progress of the crack
involves very little plastic deformation of the neighbouring metal, a ductile
fracture is one which proceeds as a result of high localised plastic defor-
mation of the metal near the tip of the crack. Thus, whilst the two extremes
of these methods of failure are easily recognised, there can be no sharp
division between brittle and ductile fracture. A fracture which is almost
completely of the brittle variety will exhibit a mass of minute facets which
reflect light strongly and reveal the crystalline nature of the metal. An
almost completely ductile fracture, on the other hand, shows a rough, dull
dirty-grey surface because much of that surface has been deformed along
the general plane of fracture. When viewed under the scanning electron
microscope (10.33) however the surface of a ductile fracture has a 'dimpled'
appearance, caused by the presence of a multitude of minute cavities
accompanying the rupture process. Closer examination reveals that the
formation of these minute cavities is due to the presence of very small
particles of impurity and other phases. This confirms the observed fact that
as the purity of a metal increases so does its ductility.
5.32 Most ductile polycrystalline metals fail with the well-known cup-
and-cone fracture. Fracture of this type follows the formation of a neck in
a tensile test piece. Crack formation begins at the centre of the neck on a
plane that is roughly normal to the applied stress axis. Small cavities form
near the centre of this cross section (Fig. 5.5(i)) and these coalesce to form
a visible fissure (Fig. 5.5(iii)). As deformation proceeds the crack spreads
outwards towards the edges of the test piece. The final fracture then occurs
rapidly along a surface which makes an angle of approximately 45° with
the stress axis. This leaves a circular lip on one half of the test piece and
a corresponding bevel on the surface of the other
half,
leading to the
formation of a cup on one half and a cone with a flattened apex on the
other half (Fig. 5.1(i)).
Factors Leading to Crack Formation
5.40 Very pure metals are much more ductile than those of slightly lower
purity and will often draw down to a 'chisel point' where the cross-section
at failure is approaching zero. It is therefore reasonable to suppose that
even minute inclusions in the microstructure play an important part in
nucleating cracks. When slip in a metal takes place dislocations will tend
to pile up at the metal/inclusion interface. Assuming that the inclusion
