FTA (изд-во). Flexography: Principles And Practices. Vol.1-6
Подождите немного. Документ загружается.

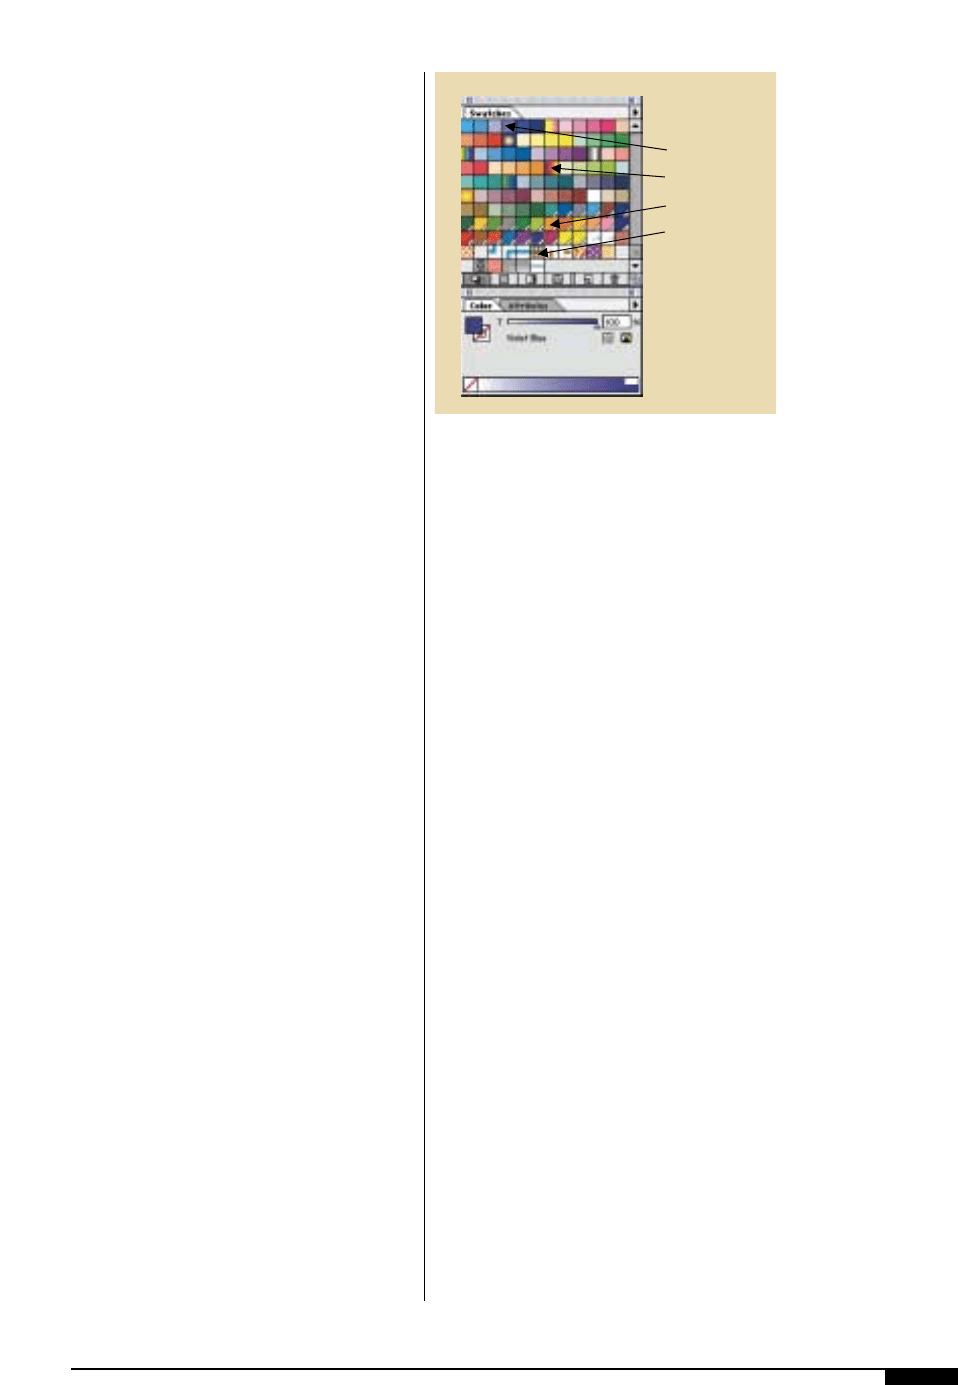
to not specifically create the palette using
the designated printing colors. If the graph-
ics are created without a prepared palette,
colors not intended to print are unintention-
ally added to the palette. Actions that can
unintentionally add colors to the palette are:
• Creating a blend from one spot color to
another.
• Adding or pasting in clip art that has
additional colors in it.
• Naming one color (such as Pantone 259
purple) two or three different names.
• Creating graphics using colors that look
good but are not one of the specified
print colors.
When deciding on the number of colors in
one item, the designer should consider what
the item would look like when it is out of reg-
ister. Misregistration of two or more inks can
ruin a beautiful design faster than anything
else in the printing process. There is a way
for the designer to evaluate the out-of-regis-
ter look. Each color used must be on its own
layer, then select all items on one layer and
move in one direction — the amount of the
trap. The result simulates the worst-case
look of the graphics when printed.
If the designer chooses to create a custom
color, the color should be designated in the
drawing program as a spot color. Custom
colors are not always designated in a draw-
ing program as a spot color, but instead
default to a process color “breakdown”.
When this default happens, the spot color
separates into the process color match
instead of being one spot color on the final
film. It is recommended that a designer use
the Pantone library provided with all draw-
ing applications.
When choosing a color palette for a pro-
ject, it is necessary to know the number and
color of inks that will print. It can be expen-
sive and difficult for a production artist to
“clean-up” an electronic artwork file that
should print with five colors, but ends up
with 22 colors as a result of how the colors
were created in the artwork. An artist should
use only the specified printing ink colors. In
addition, colors should not be duplicated
and renamed. Extra, unwanted colors can be
inadvertently added to a graphics file when
artwork from one application is cut and
pasted or imported into a file in a different
application. Even when precautions are
taken, unwanted spot colors can appear in
the file. For example, if the file is in Adobe
Illustrator, one way to eliminate these colors
is to select objects from the menu, then
select custom colors and delete all unused
colors.
Tints. Extra colors or inks can also be inad-
vertently added to an artwork file when
spot-color tints are incorrectly created. To
create a spot tint correctly, select the spot
color and define a percentage of that color.
Spot tints should not be created by selecting
a new color to create the tint. If a new color
is selected to create the tint, it will create an
additional color that will separate onto its
own film, rather than appear on the original
spot-color film. During the final design
review, any colors that are not one of the
specified printing colors and are existing in
the graphic file should be eliminated.
Of course, many times the designer and
separator work together to decide how cer-
DESIGN 47
4^
When choosing a color
palette for a project, it is
necessary to know the
number and color of inks
that will print. It can be
expensive and difficult
for a production artist to
“clean-up” an electronic
artwork file that should
print with five colors, but
instead has 22 colors as
a result from how the
colors were created in
the artwork.
.
.
Process Color
Custom Gradient
Custom Color
Custom Pattern Fill
4^

48 FLEXOGRAPHY: PRINCIPLES & PRACTICES
tain effects and colors can be achieved using
available process and spot colors. When a
special color is needed, the designer leaves an
extra color in the design, so the separator can
determine how it should be created. This is
only done when the designer and separator
have communicated and agreed upon this
action plan. The designer must specify the
special color as “match color PMS 259” for
example, or whatever the match is supposed
to be.

W
ith the production art
completed, it’s ready for
the platemaker. Now is
the time, before the
expense of platemak-
ing, to get final approval
of all copy, positioning and color. Depending
on the specific printer, interdepartmental as
well as customer approval may be required.
Usually, you can save time if the original pro-
duction art is retained in-house and copies
forwarded for customer approval. For pur-
poses of approving the copy and positioning
of line work, ink jet or laser copies are often
sufficient.
COLOR PROOFING
Color proofs, better known as contract
proofs, are used for customer approval
throughout the entire design, prepress and
print process. The proof is used to represent
what the graphics will look like when print-
ed. A proof is a very useful and inexpensive
way to determine if any changes should be
made to graphic color, placement, text, trap,
dot-gain compensation and much more.
Unfortunately, many contract proofs are
produced on devices that are not calibrated
or even capable of reproducing a proof that
will match the press result. Consumer prod-
uct companies and designers are approving
and expecting the final print to match this
proof, which doesn’t happen in many cases.
The most common issue with contract
proofs is that they are made to offset and not
flexo specifications. The proofing stage
needs to be set up for flexo specifications.
Although the designer does not usually pro-
duce the proof that is used in the approval
stages, he/she can take charge of providing
the correct flexo information to those mak-
ing the proof. The designer should work
closely with the flexo separator when deter-
mining how the contract proof should be
made. Some guidelines to follow when using
an analog or digital proofing system are:
• Use flexo target densities.
• Make sure the correct color of the sub-
strate is compensated for or simulated.
• Use the correct flexo tonal values for
minimum highlight and maximum
shadow dots.
• Do whatever else the separator or print-
er suggests.
DESIGN 49
Final Approval

50 FLEXOGRAPHY: PRINCIPLES & PRACTICES
Programs and Applications
T
he designer needs to focus on
the printability of the design,
and at the same time, create files
that can be edited. With all of the
software bells and whistles
available today, it is very easy to
create graphics that are difficult for the sep-
arator to pull apart and separate, and to
make compensations for dot gain and trap.
Computer programs or applications are
the tools that designers use to create elec-
tronic artwork, the way a carpenter uses
saws, hammers and awls to create furniture
or cabinetry. And like a good carpenter, a
good designer will be familiar with many of
the tools available for creating artwork in
the desktop environment. He/she will be
aware what each application offers in fea-
tures and options to accomplish a specific
project. A carpenter can’t create every piece
of woodwork with just a hammer and a
designer shouldn’t try to create every design
with just one application. While many pro-
grams available today are similar, all offer
unique features or options that set them
apart from other programs. Some programs
are specifically developed to handle page
layout with graphics. Some are more applic-
able for packaging graphics and some are
ideal for working on scanned graphics.
Packaging graphics are usually created and
completed in a drawing program.
The designer must use software programs
that allow for easy and efficient graphics cre-
ation. These programs also must allow the
separator to easily separate and compensate
for flexo variables. Choosing software that
works for both processes should not be an
issue if the designer and separator have good
communication procedures in place.
Regardless of which application the
designer chooses to create artwork, the
application is a tool that the designer must
skillfully use so that the completed project
can be effectively separated. Artwork files
that are successfully separated are usually
very simple files. That is not to say that the
artwork design is simplistic or unsophisti-
cated. Simple files are files that are built or
created in an uncomplicated manner.
LAYERS
The layer function is available in most
desktop applications. Layers are a useful
tool for organizing elements in an artwork
file (Figure
4&
). Some graphics are simple
with very few elements and do not justify the
time it takes to create layers for varying ele-
ments. Other graphics can be quite complex
by incorporating many different graphic ele-
ments, such as a variety of flavors or special
banner information. These graphics can eas-
ily cause confusion, and if not organized
accurately, they can result in the wrong
graphic elements appearing on the separa-
tor’s proof. With complex graphics, layering
can be very useful. Layers used in creating
an artwork file can make editing or out-
putting the correct color separations or fla-
vor separations very efficient.
Separate layers can be created to organize
an artwork file in the following manner:
• Die line. This layer indicates the overall
shape and layout of the packaging
design, and should be created in a
color called “die line”.
• Graphics. This layer contains the main
.
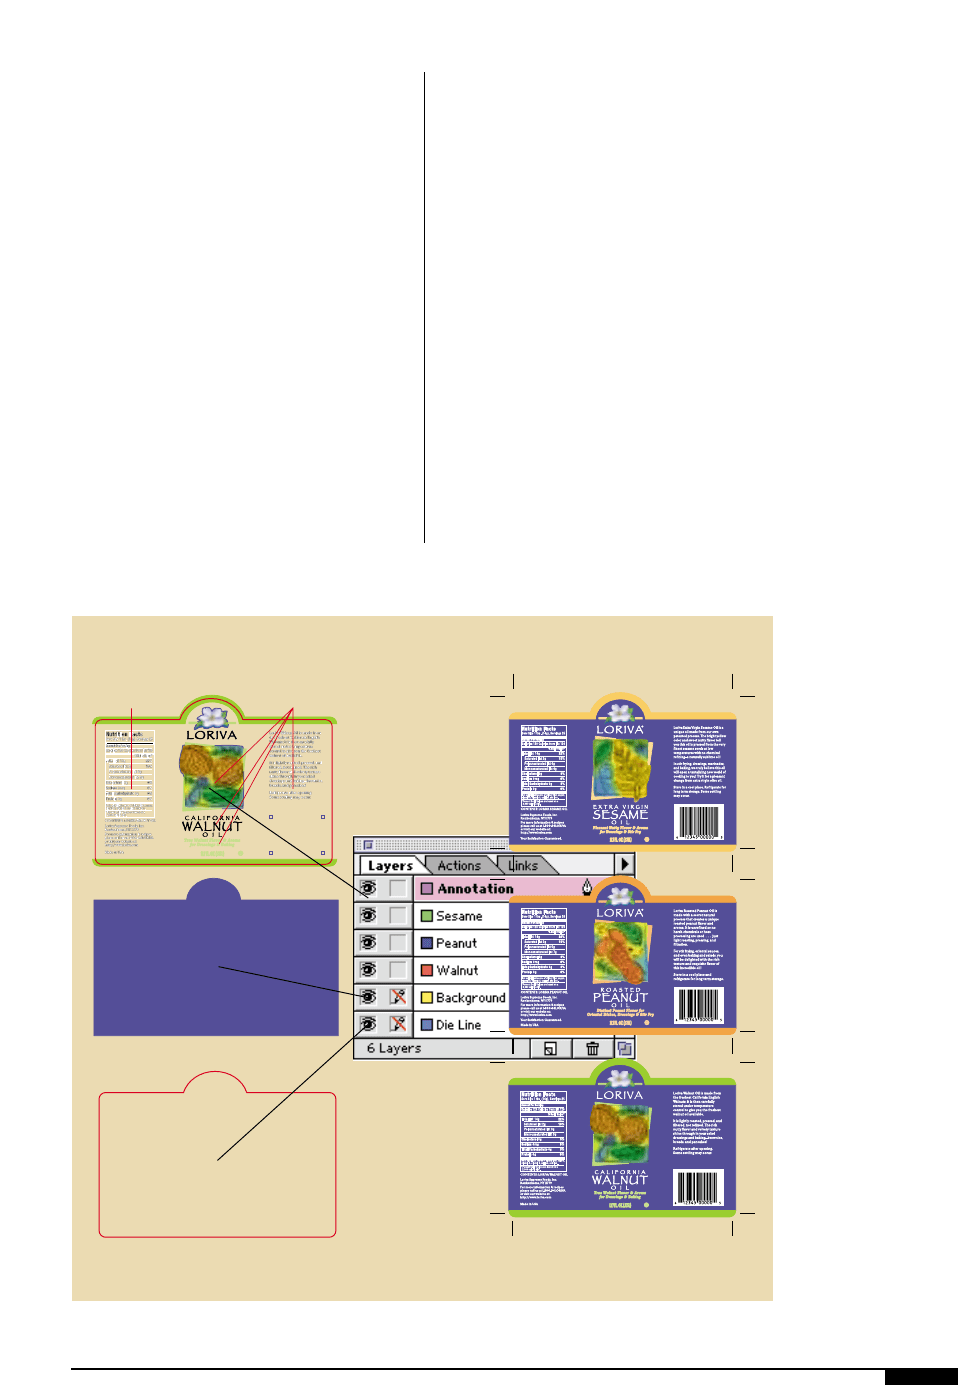
portion of the overall design and any
common artwork. It is not unusual for
a packaging project to have different
versions of the same package. If all
elements that are common to the dif-
ferent versions are on one layer, mod-
ifying the file to output a specific ver-
sion of the package becomes easy.
• Additional versions. This is where art-
work unique to a specific version of the
package should be placed.
• Annotation. This layer is used for any
comments or remarks relevant to the
project, as well as for the graphic lay-
ering information.
When designing a project consisting of lay-
ers, a designer should be aware of what ele-
ment(s) are being placed on which layer(s).
To check the contents of the layers, the
designer should deactivate the display of all
layers and then display each layer, one at a
time. This procedure is a good way to avoid
a print rerun caused by misplacing an impor-
tant element on the unintended layer.
A designer should also try to organize the
file so that it doesn’t contain excessive lay-
ers or layers with confusing names.
Remember that a production artist is going
to have to output this file after the designer
is finished with it. It is not unusual to have a
last-minute change to the project that a pro-
duction artist will have to make in the file.
Layers that have confusing names or that are
excessive in numbers can make editing the
file very difficult and time consuming.
DESIGN 51
4&
Layers are created to
organize an artwork file
in the following manner:
die, annotation, image,
harvest, strawberry.
Barcode
Here
®
Common Copy Label Variations
®
4&
52 FLEXOGRAPHY: PRINCIPLES & PRACTICES
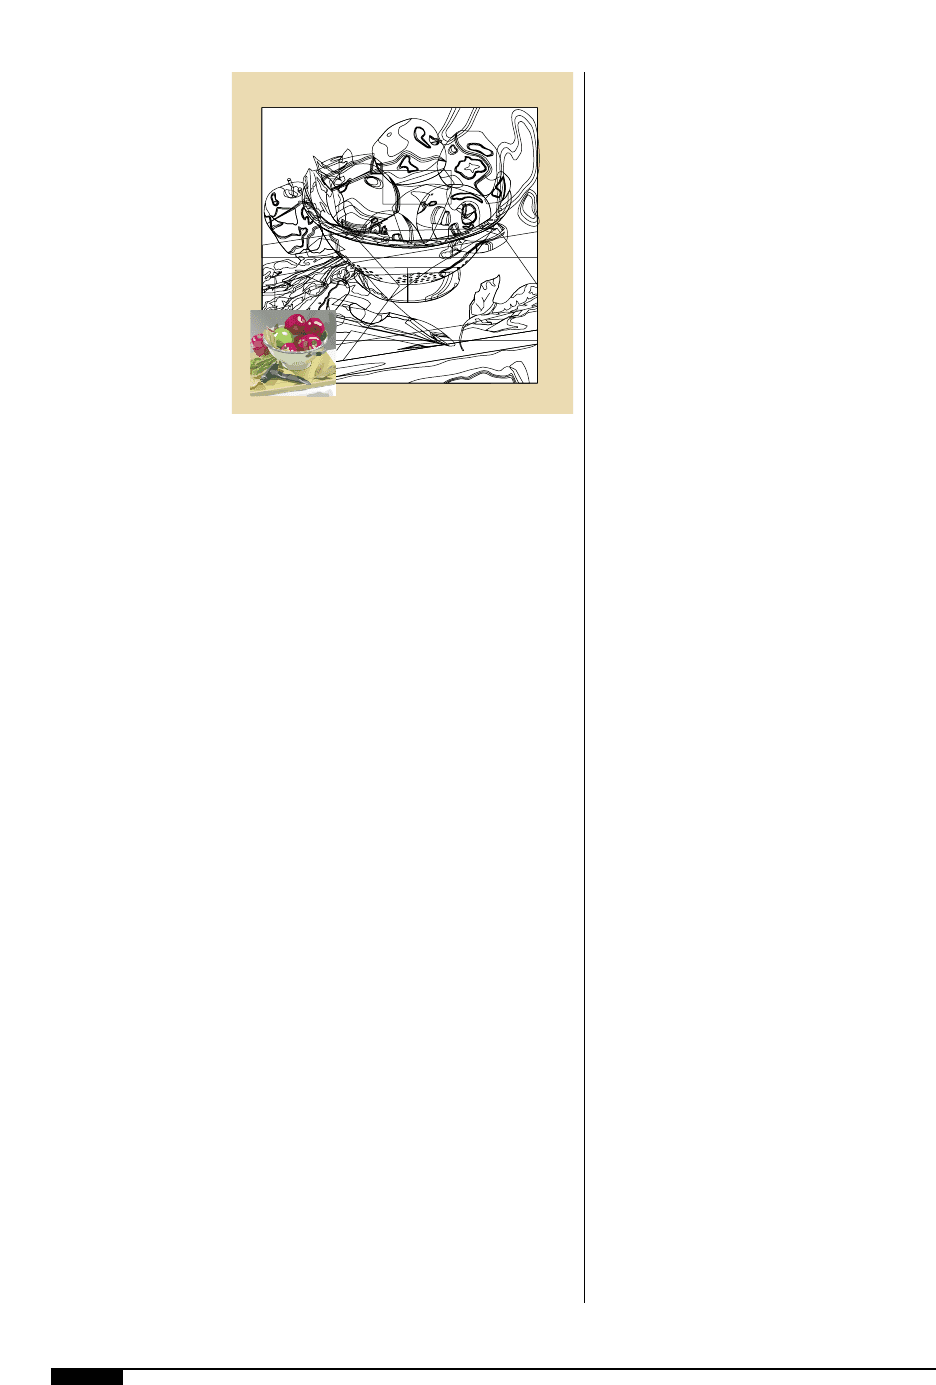
DRAWING PROGRAMS
Drawing programs utilize vectors (mathe-
matical information of a point and line in
space, defined by its magnitude and direc-
tion). Vector-based or object-oriented art-
work consists of points that defines how the
lines between them should act – as straight
lines, arcs or Bezier curves. The shapes
defined by the lines can then be filled with or
without color (Figure
4*
).
Several drawing programs are available
for the desktop publisher – the two most
popular applications are Adobe Illustrator
and Macromedia FreeHand. Vector-based
programs create object-oriented art with the
following qualities:
• Objects are perpetually editable.
• Objects print at the highest possible res-
olution.
• Objects maintain their quality and don’t
degrade like bitmapped images.
• Objects are infinitely scaleable.
• Graphics are very small compared to
bitmapped graphics.
• Die lines can be created in vector-based
software that can then be forwarded to
the diemaker.
Other features of these drawing programs
include the ability to create blends or
vignettes and edit raster images.
The designer should find out what format
the separator prefers for placing or import-
ing graphics into a drawing program. If using
Adobe Illustrator, for example, it is recom-
mended to use only placed EPSs, especially
when working with process color graphics.
When a file has an embedded TIFF file,
instead of a placed EPS, the separator may
have to re-raster the image in PhotoShop to
color correct it. The edited file is then placed
back into Illustrator as an EPS. This lengthy
procedure increases time expended on cor-
recting the file and increases prepress costs.
When designing with a placed EPS, verify
that the clipping path is included in the
Illustrator document, especially if the image
has to trap to a background or gradient. This
procedure enables the separator to quickly
trap the Illustrator file and can be done as
follows :
1. Export the clipping path to Illustrator
from within PhotoShop.
2. Save the graphic as an EPS.
3. Open the Illustrator file with the
exported path, which opens it with
crop marks and indicates the docu-
ment boundary.
4. View the image in the artwork mode
showing the rulers and choose any
corner.
5. Line up two guides – one vertical and
one horizontal. Make sure the general
preference is set to “snap to point”.
6. Place the EPS by selecting and drag-
ging from one corner; the graphic will
snap and line up exactly with the path.
PAGE LAYOUT PROGRAMS
As with the drawing programs, there are
several applications available in the desktop
environment designated as page layout pro-
grams. Two major applications for page lay-
out are QuarkXpress and Adobe Pagemaker.
As the title suggests, page layout programs
are designed for laying out documents that
4*
Drawing programs uti-
lize vectors, i.e., points
that define how the lines
between them should
act – as straight lines,
arcs or Bezier curves.
4*
can be of a single page or of multiple pages.
The primary function of the page layout pro-
gram is to create a layout that has text with
placed graphics to complete the file. The
tools available for assembly and manipula-
tion are very extensive for handling large
bodies of text. While the functionality of
these page layout programs may be very
impressive when producing files for the pub-
lishing industry, they have few tools to
address packaging graphics. These applica-
tions were designed to create layouts by
flowing text from page to page and dropping
in graphics as necessary. Most packaging
projects are graphic intensive, contain bar
codes, have very little text and must be
applied to diecut structures of unusual
shapes. Page layout programs are not usual-
ly designed to handle all of the various items
that are required of packaging.
The focus of page layout applications is to
effectively handle type, not graphics. Some
simple graphic elements can be created in
page layout programs, but the applications
were not originally designed to create graph-
ics. Additional bodies of text can be created
and modified in a page layout program and
then imported into the drawing program.
Importing text from the page layout program
to the drawing program is especially recom-
mended if 80% of the artwork is graphics and
the remainder is text, some of which may be
created in the drawing program. It is an
unnecessary, time-consuming step to import
the bulk of artwork into a page layout pro-
gram in order to add a few lines of text.
Some designers import the bulk of artwork
into a page layout program because of the
misconception that the page layout program
is needed to output to a digital color proofer.
Actually, all desktop applications have the
ability to output to a digital color proofer. If
TIFF images are used in a page layout pro-
gram, it is recommended that the image is to
cropped or rotated in the native application,
such as PhotoShop or Illustrator, thus
decreasing the file size. Be sure to includea
bleed area of 0.125" for the separator to
work with.
Recent releases of page layout programs,
has added the ability to create graphics with-
in the program. Though this may seem like an
excellent addition, in reality these new fea-
tures can cause a prepress processing prob-
lem. Many of the new features are automated;
therefore the level of control for editing is
severely restricted or impossible.
RASTER IMAGE PROGRAMS
Raster image applications such as Adobe
PhotoShop provide a means to manipulate
scanned photographs in the desktop envi-
ronment. Raster image programs are excel-
lent tools for cleaning scanned images, uti-
lizing GCR/UCR, compensating for press
characteristics, adjusting color to match the
original and even converting the file formats
of digital artwork. When using a raster image
program to modify scanned artwork, it is
best if all modifications and manipulations
of the image are handled in the raster pro-
gram. Scaling, cropping, clipping paths,
color application and rotations are best dealt
with in the raster program, rather than plac-
ing and manipulating the scanned artwork in
a drawing or page layout program.
DESIGN 53
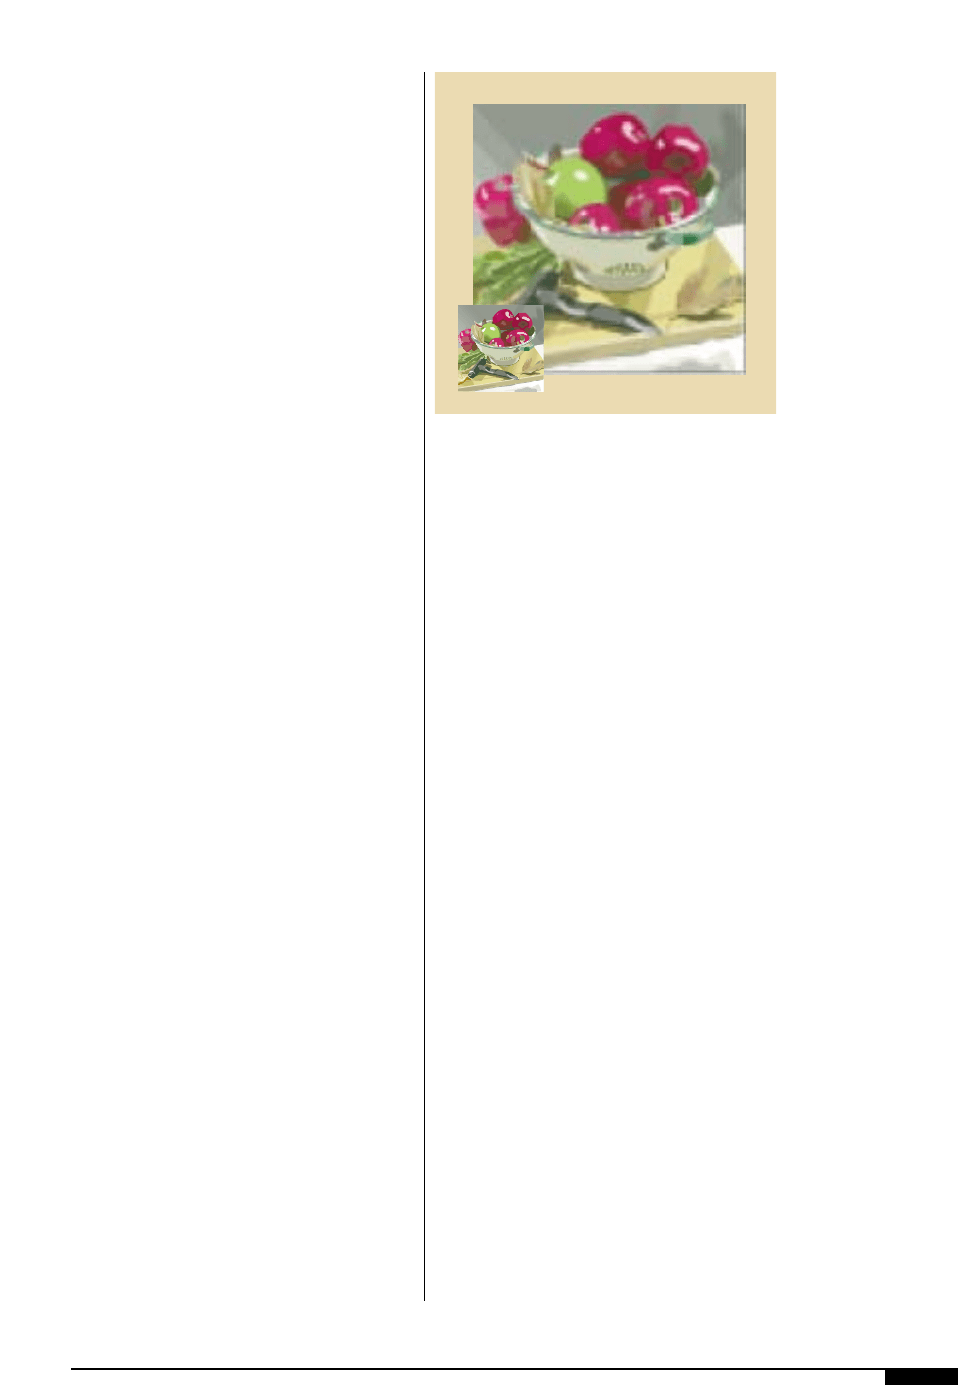
4(
Raster programs use
pixels to define the
image.
4(
54 FLEXOGRAPHY: PRINCIPLES & PRACTICES
5)
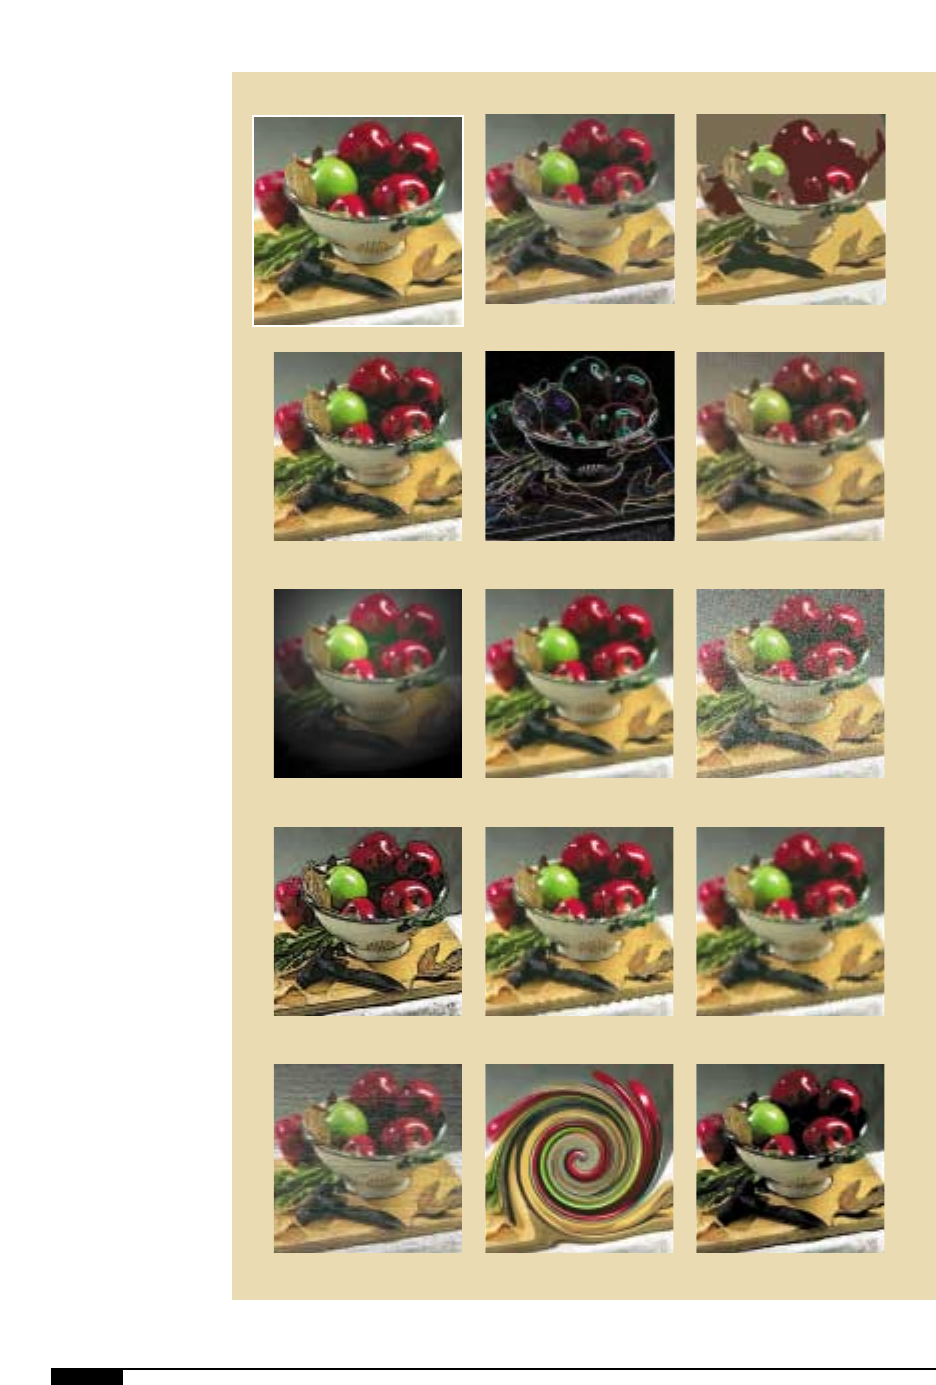
Image manipulation
progams offer a variety
of filters to achieve
interesting effects in
addition to photo
retouching and color
correction.
Original Image
Crosshatch Cutout
Dry Brush
Glowing Edges Halftone
Lighting Mosaic Pointillism
Posturize Ripple Spatter
Texture Twirl Watercolor

Raster programs use pixels to define
images (Figure
4(
). These pixels or squares
define all data in a bitmapped graphic. Every
pixel can have different colors in a
bitmapped graphic. In a high-resolution
graphic with hundreds of pixels per inch,
this capability allows for the reproduction of
subtle shading and tonal changes.
A raster program can provide the designer
with many creative avenues for the look of
the type. But, this type cannot be edited and
makes the type file large compared to type
files created from a font in a drawing pro-
gram. Therefore, a raster program should
only be used for small amounts of text and
effects that cannot be created in other pro-
grams. There are several capable and cre-
ative special effects that can be used in a
raster program. When utilizing these effects,
keep in mind the flexo criteria (parameters)
within which the design must be created.
SPECIAL EFFECTS
In addition to photo-retouching and color-
correcting tools, image-manipulation pro-
grams such as Adobe PhotoShop offer a
large variety of visual effects. These built-in
features have been enhanced and supple-
mented over time by third-party software
plug-ins. Figure
5)
shows the variations
created using various filters. These special
effects may take an image so far from its orig-
inal form, that the final result is an image that
itself appears entirely original.
INTEGRATING PROGRAMS
A designer should always remember that
after the artwork is created, the electronic
file has to go through a RIPping or transla-
tion process in order to output to film.
During this process, the electronic artwork
file is essentially pulled apart, converted into
binary language and then put back together
in a manner such that the imagesetter can
receive the data. It is during the RIP that
many problems occur from the electronic
artwork. Files that are built cleanly and sim-
ply are the most successful files to translate
during the RIP stage.
Receiving a package and opening the
package is comparable to the first stage of
the RIP – the electronic file is received and
opened. But before a file can be translated,
the RIP must know what is in the file; data
such as bar codes, scanned images, text, die
lines, gradations, illustrations, placed graph-
ics and more. All of this electronic data can
confuse the RIP. This first stage of the
process is referred to as file nesting. When
building an electronic artwork file, a design-
er should try to create the design in as few
desktop applications as possible.
If the bulk of the design is built with graph-
ics, the final electronic file should remain in
the drawing program in which the artwork
was created. Files that are imported into the
main artwork from raster image applications
should be imported as EPS files and should
not require further manipulation in the draw-
ing program. Any resizing, rotation or color
adjustments should be applied to the
imported artwork in the application originat-
ing the artwork. This guideline is also true of
any text that is imported from page layout
applications.
Another step to avoid is to create artwork
in a drawing program, save it as an EPS file
and then re-import it into the same drawing
program. The EPS file from a drawing pro-
gram can be opened and cut and pasted into
the design layout. Placing an EPS file into
the file’s native application creates unneces-
sary steps and data for the RIP. The designer
who copies and pastes the EPS file in the
native program creates a stable electronic
artwork file that will RIP successfully. Files
that don’t RIP successfully sometimes
require an entire rebuild of the artwork file,
which can add significant time and cost to
the entire project’s progress. The cleaner
DESIGN 55
56 FLEXOGRAPHY: PRINCIPLES & PRACTICES
and more simple a file is built, the fewer
problems it will have during the prepress
processing and the more likely it is to suc-
cessfully print.
COLOR MANAGEMENT PROGRAMS
With the advent of reasonably priced
instrumentation, it has become possible to
measure and control color using CIELab
color space. Basically this means measuring
color in the same way that people perceive
color. Instead of a set of CMYK values, a
color is described in terms of the three char-
acteristics that people distinguish in color:
hue (red, green, blue, etc), chroma (the satu-
ration or purity of the color, where gray has
zero or no chroma), and lightness (the
brightness of a color, where black is at one
end of the scale and white at the other).
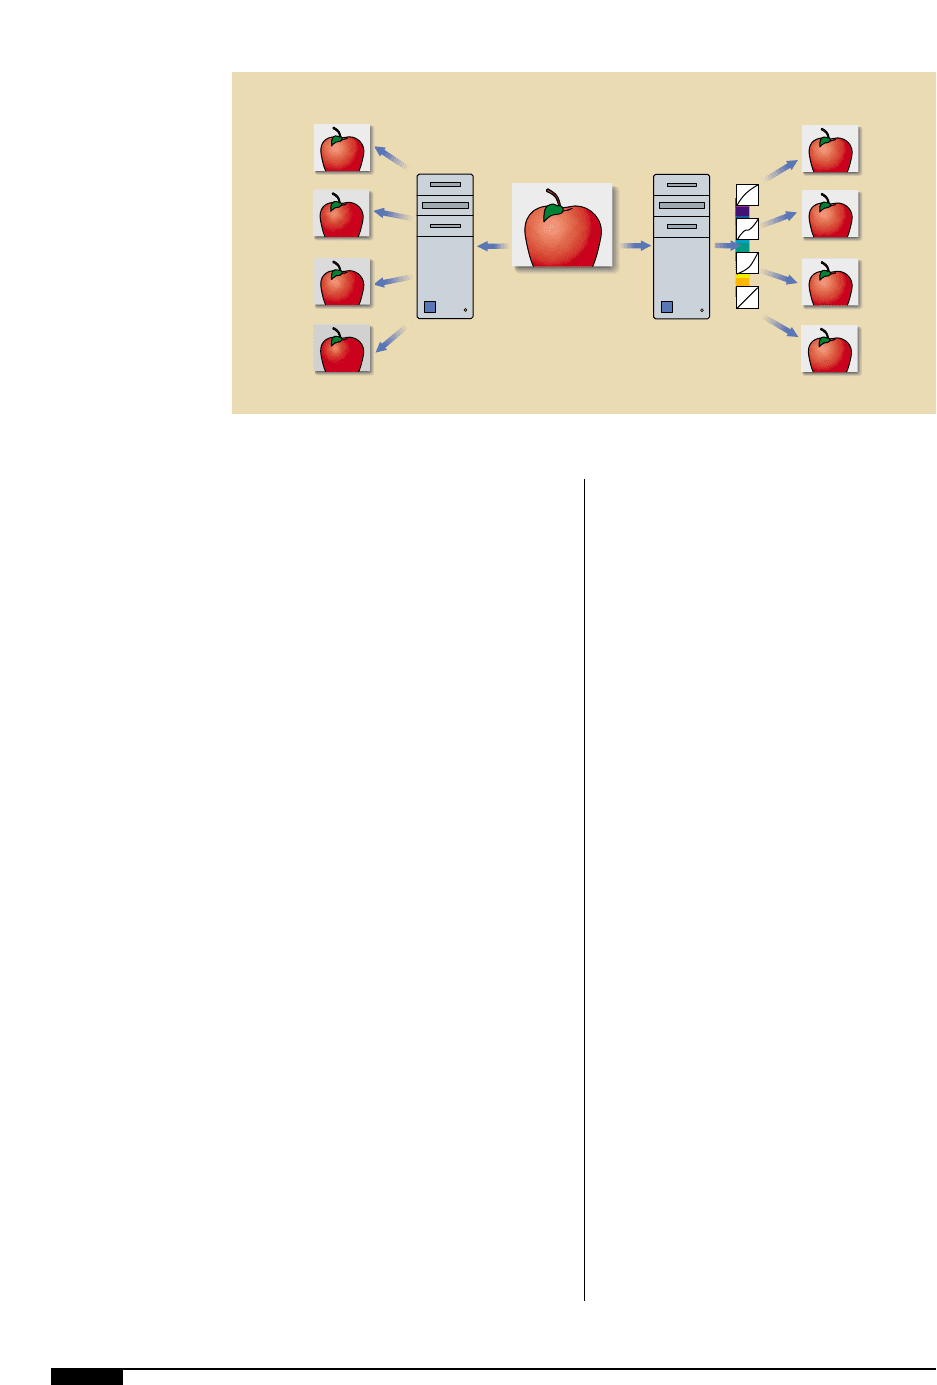
Color management programs are tools
that apply this technology to the workflow
(Figure
5!
). Applications can range from
CMYK-to-CMYK conversions which match
two output devices, such as a proofer to a
press, all the way to the full-scale integration
of the technology to implement what is
known as device-independent color. The lat-
ter term refers to color that is measured and
managed from an absolute measurement
point of view. In the CIELab color space or
color description, any color has a unique
value given by three numbers. If that partic-
ular color is to be reproduced, the charac-
teristics of the output device must be
known. These characteristics are called the
profile, or more specifically, the ICC profile
of that device. If all input and output devices
are characterized in this way, color can be
specified and reproduced in terms of these
“absolute” values.
By the late 1990’s, color management has
received a lot of attention and is becoming
more widely used. It is by no means as
prevalent as some of the more mature tech-
nologies, such as Postscript, for example.
Many different “workflows” still exist and
will likely continue to exist as the technolo-
gy matures and becomes the accepted way
of working with color from creation to ink
on substrate.
5!
Applications of color
management technology
can range from CMYK-
to-CMYK conversions
which match four output
devices, such as a
proofer to a press, all
the way to the full-scale
integration of the tech-
nology to implement
what is known as
device-independent
color.
CPU
CPU
ORIGINAL
Monitor
Thermal
Transfer
Color
Laser
Imagesetter
Monitor
Thermal
Transfer
Color
Laser
Imagesetter
ICC
Profiles
5!
