FTA (изд-во). Flexography: Principles And Practices. Vol.1-6
Подождите немного. Документ загружается.

separator and photographer. Most digital
camera software offers the option to convert
from RGB to CMYK on the fly, but unless the
photographer is a trained separator, the
CMYK conversion should not be done. The
separator has the print characterization data
and experience and should do the conver-
sion. However, the photographer does need
to control and properly set the following:
• Make certain that the highlight and
shadow input/output values are set to
the tonal range of the actual flexo
curve. Setting tonal values in this way
limits the amount of detail and con-
trast in the photo. The full 0–256 gray
scale range should be used. By using
software like Adobe PhotoShop, the
flexo tonal range can then be applied
to the photo data file.
• Ensure that the lighting and exposure
of the actual photo area is controlled
so there is plenty of detail in the shad-
ow areas.
• Be sure the camera is capturing true
neutrals. A gray reference should be
used in each photo. Camera software
should be properly neutralized to the
gray reference.
Halftone Images
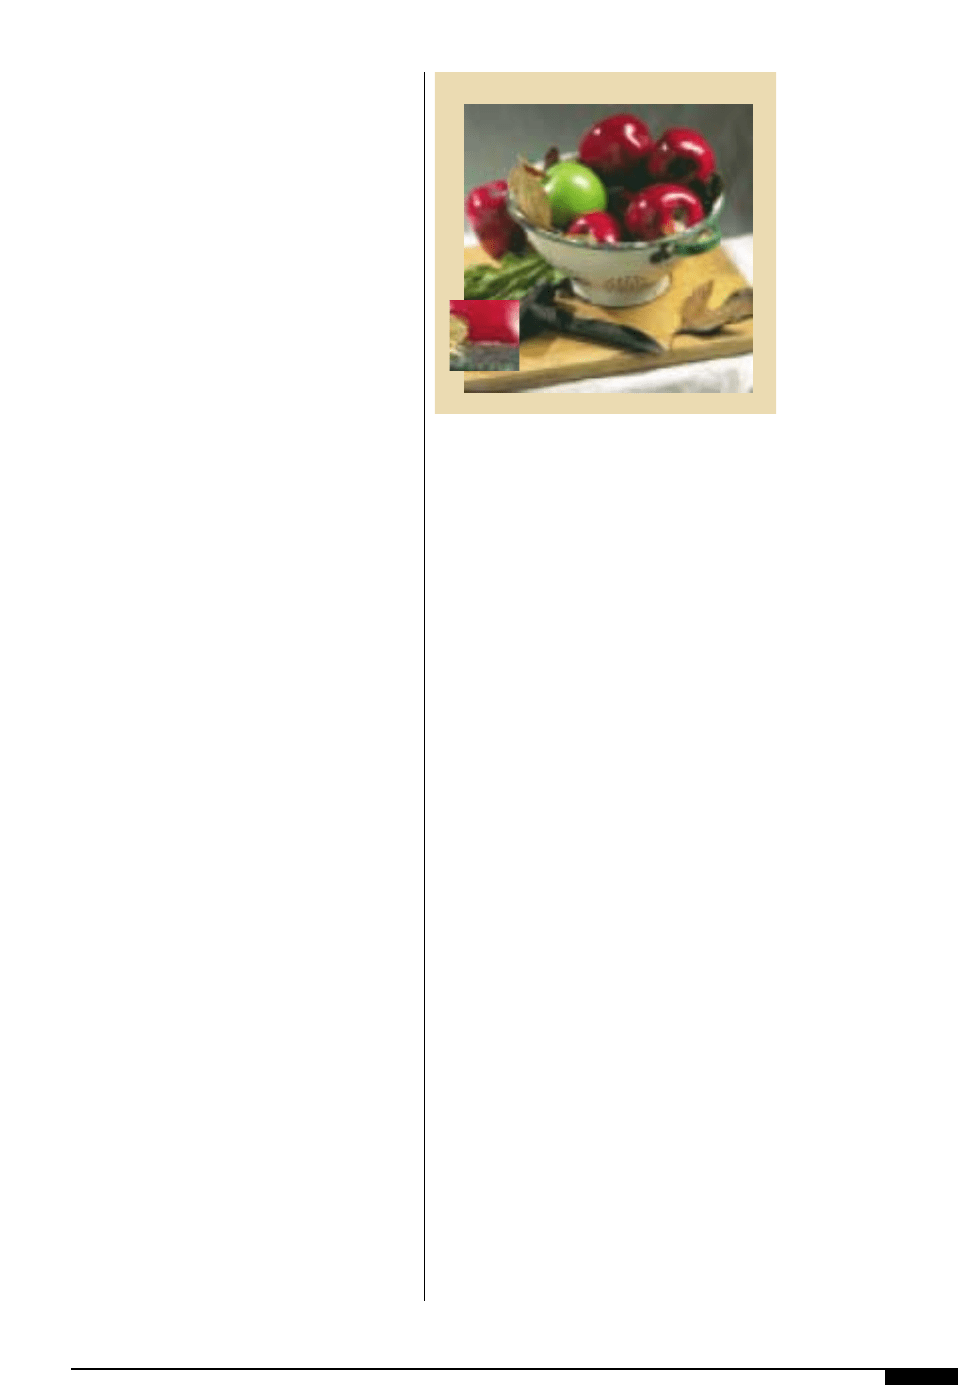
Halftone, process, grayscale, monotone
and continuous-tone images all refer to art-
work that has been scanned or created in a
pixel-based application such as Adobe
PhotoShop (Figure
3$
). Working with such
images opens an entirely different arena of
situations that need consideration during the
design process.
Content of image. Applications such as Adobe
Illustrator, Macromedia’s FreeHand or
QuarkXpress allow a designer to crop,
rotate, resize and mask graphics, but it is far
better to manipulate raster images directly
in PhotoShop.
Unfortunately, many artists do not use
PhotoShop to perform these tasks. If an
image is cropped or masked in PhotoShop
before it is placed in an illustration program,
the image file is easier to manage in the sec-
ondary application. Modifications in Photo-
Shop also make the overall size of the com-
pleted artwork file smaller, which then
makes transfer easier across a network or
process through a prepress system or RIP.
Screen resolution. It is important to use the
specified line screen resolution when view-
ing illustrations for approval. Viewing at the
correct line screen can be done with the
color printer, but cannot be seen on the mon-
itor. Line screens can look very different at a
high resolution, such as 175 line screen, com-
pared to low resolution (45 line screen).
Typically, color proofs and monitors use a
viewing resolution comparable to a 175 line
screen.
Color. Another area of consideration is the
color mode of the image that the designer is
working on. If a full-color photograph has
been scanned in, chances are that the photo-
graph was scanned into RGB channels.
Initially, when working during the design
phase of the artwork, using RGB channels
can be helpful in expediting the creative
process. Files saved with three channels
makes for a smaller file, which allows for
faster manipulation of the image in desktop
application programs. A problem occurs
DESIGN 37
3$
Halftone, process,
grayscale, monotone
and continuous tone
images all refer to
artwork that has been
scanned or created in a
pixel-based application.
3$
38 FLEXOGRAPHY: PRINCIPLES & PRACTICES
when the designer does not preview the
image in CMYK. The file should be sent to
the separator in the original RGB format.
The separator will then convert to CMYK
using the correct dot-gain compensation.
RGB channels are a color mode used for pro-
jecting color onto the monitor. It is also the
color mode that many desktop scanners sup-
port. But presses do not print in RGB and if
a press will not support a color mode,
chances are excellent that a prepress system
or RIP will not support it either. Some pre-
press systems will not process an artwork
file if an RGB image is detected. Converting
files into printable color modes is done very
simply inside an application such as Adobe
PhotoShop. It can be very useful for the
designer to know what file formats and color
modes are supported by the prepress system
or RIP that will process the artwork files.
Trap. Trapping a halftone to another halftone
can be tricky because different halftones
contain common colors. The designer may
not want a trap to occur, while the prepress
software may automatically apply a trap. It is
best to consult with the prepress provider to
find out what will happen when these files
are sent to the RIP. It is up to the designer
and separator to decide whether or not the
halftones should be trapped to each other.
Trapping a halftone to a solid color or out-
line is fairly simple. If the halftone is trap-
ping to a dark color, the trap probably will
not show. But if part of the halftone is dark
and part light, a dark line color will show in
the light area of the halftone.
Shadow, Highlight. Shadow and highlight
areas (the darkest and lightest areas of an
image) can have a positive or negative impact
on the overall design appearance, depending
on these areas print. When an image has a
highlight area that graduates from 15% black
to 0%, it may look good on the computer
screen and may even print out beautifully on
the laser proof. There is no guarantee, how-
ever, that what is seen prior to printing is
what is going to come off the press. To avoid
this type of problem, a designer should be
aware that all presses are different and refer
to the specific press characterization data
from the printer or separator.
Each press has a set of tolerances or lim-
its. For example, some presses are unable to
print very small dots. These limits occur for
a variety of reasons. T he substrate that a job
is being printed on, the plate material or the
ink being used can cause limitations. Even
the pressman running the press can have an
effect on the print appearance of a particular
project. Looking back to the example of a
graduated highlight area consisting of 15%
black through 0%, imagine that the press
running this particular project is unable to
print any dots that are 5% or lower. The
result will be graduated areas of the image
that fall within the 0% to 5% range will not be
printed. When this occurs in a highlight area,
what will appear on the printed copy is a
gradual reduction of the black area and then
an abrupt stop at 5%. This abrupt stop leaves
what is known as a “break”, or if we com-
pare it to printing with a rubber stamp, a
bald spot where the ink didn’t print.
A designer can modify the highlight areas
so this “break” will not occur if he/she
knows which press the project will run on.
Using the example of a highlight area that
graduates from 15% to 0% with a break at the
5% area, a designer can modify the highlight
area so that it graduates from 15% to 6%. This
modified gradient will provide enough dot
coverage to prevent a break or bald spot
from occurring.
A similar phenomenon can occur at the
opposite end of the tonal range. Shadow
areas in an image may “close up”, become
“muddy” or “disappear”. The primary cause
of shadow areas “closing up” is a problem
known as dot gain. Dot gain on a press is cre-
ated when the surface of the plate (which is
loaded with ink) comes into contact with the
substrate and impresses (prints) the image
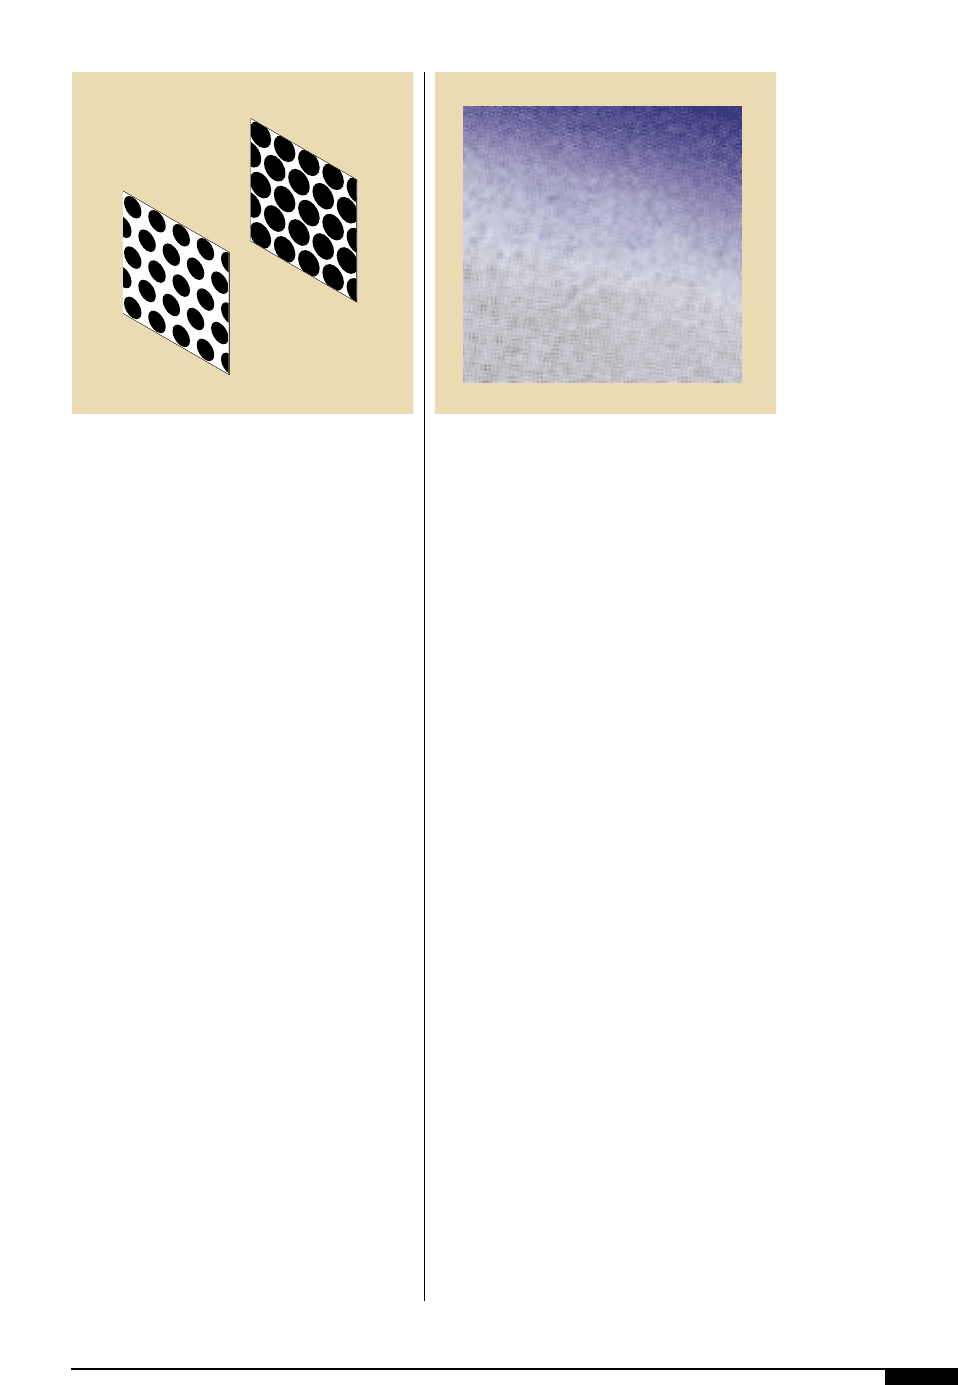
onto the substrate. A variety of reasons may
cause the image to become slightly enlarged.
When an area of the artwork is tinted or
screened, the dots that create this screen
can become enlarged during the printing
process (Figure
3%
).
There are ways of applying creative solu-
tions to manipulate halftones and accentu-
ate the look of the graphics while hiding pos-
sible print defects. In Figure
3^
, the black in
the text is the same process black that is in
the image of the apple. Many times black
requires more impression or a higher vol-
ume anilox to get good, solid coverage. This
approach, however, will make the process
black in the apple print heavier and there-
fore, they will look dirty. If there are enough
print units, the black in the text can print on
a separate unit from the one used for the
black in the halftone image. Impression on
the black in the apples can remain light, giv-
ing it a crisp, clean look.
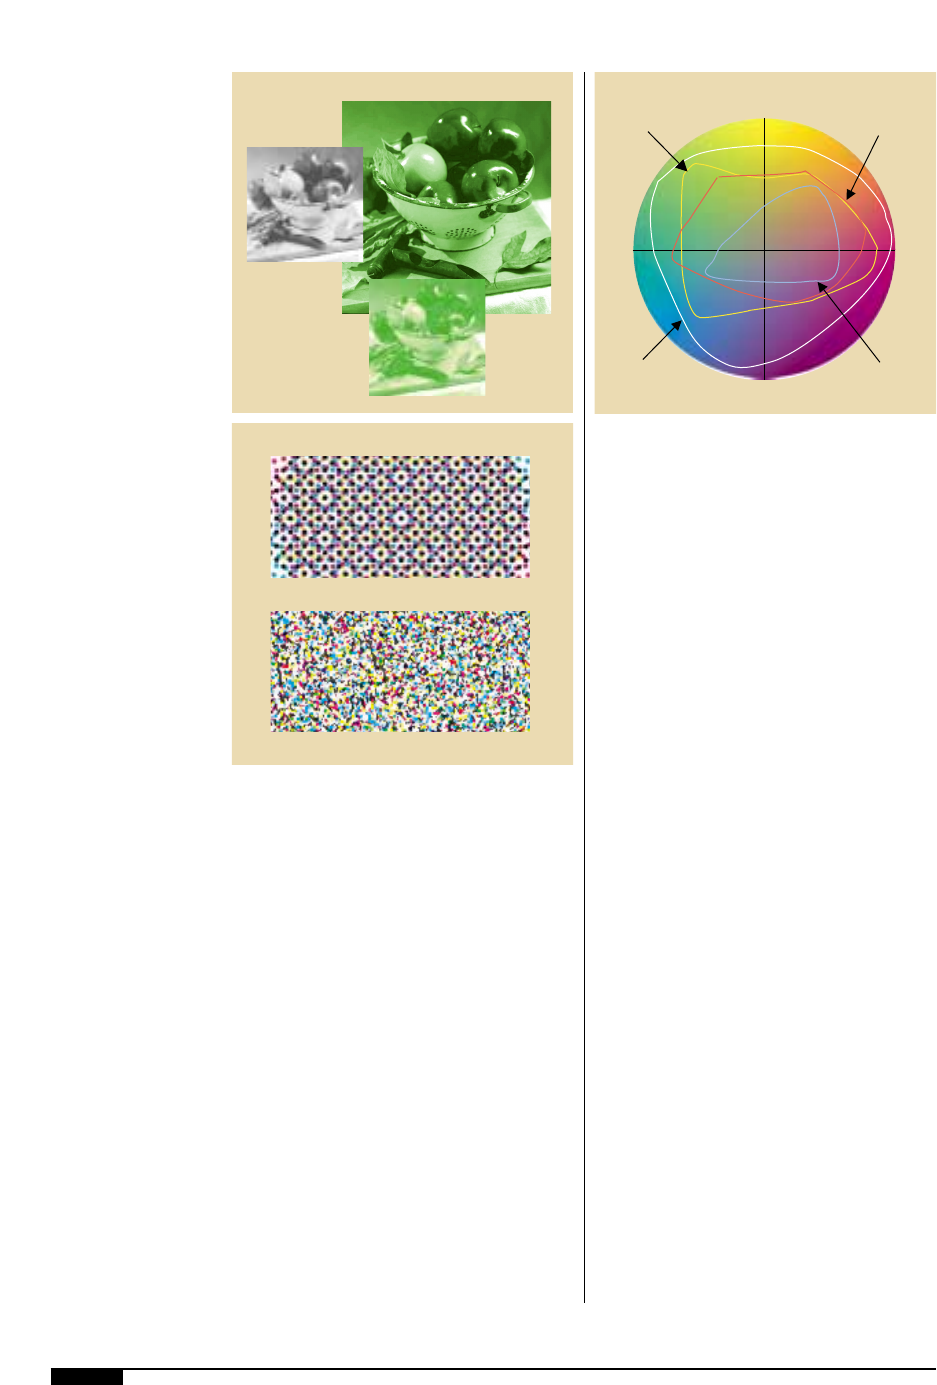
Duotones
A duotone is a halftone consisting of two
colors (Figure
3&
). One color is usually used
for the highlight and shadow areas and the
other color for the midtone areas. Not only
do duotones offer a fresh look for conven-
tional halftones, they also offer print advan-
tages over some halftones. Duotones can be
used for particular print situations. For
example, when the registration tolerances
are not very tight a halftone made up of four
colors instead of two could look quiet blurry.
Duotones can also be used just for the inter-
esting graphic effect of a two-color halftone.
Duotones are handled by both the designer
and separator the same way halftones are
handled, except for color breaks. It is impor-
tant to proof a duotone so everyone can see
and approve or reject the two-color look.
The settings and color separations need to
be adjusted and proofed until a desirable
outcome is achieved. Duotones can be fun to
work with and look better than halftones in
many cases.
Alternative Screens
Traditional halftone screening uses the size
of the dot to convey shading. The larger the
dot the darker the shading, while smaller dots
provides lighter shades. Alternative screens
can be visually appealing options for the
designer. These screens look different than
conventional halftone screens and can be
more forgiving to print than conventional
screens. Alternative screens come in the form
of mezzotints, random or FM (Figure
3*
),
pixelization, noise and others. Much atten-
tion has been given to FM (Frequency
Modulated), also known as stochastic,
DESIGN 39
3%
Halftone dots typically
increase in size as the
wet ink spreads when it
reaches the surface of
the substrate.
3^
To achieve good solid
coverage on the solid
black, without causing
the process black to
fill in, two black print
stations are used.
Film Negative
Halftone Dot
Printed
Halftone Dot
3% 3^
40 FLEXOGRAPHY: PRINCIPLES & PRACTICES
screens in the past few years, although
usage in final production is still limited. FM
screening renders the different shades of an
image by controlling the number of dots in
each area. More dots produce darker areas
and fewer dots produce lighter areas. FM
and conventional screening can be com-
bined effectively in what is called combina-
tion screening, which is covered in more
detail in the prepress chapter.
Before using any screen other than a con-
ventional screen, the separator and printer
should be consulted. The characterization
data for new screen styles is not the same as
that for conventional screens. Dark print or
low contrast images could result if the new
screen is not characterized on press before
being used in a design. These screens could
have very small dots – smaller than 1% con-
ventional dots, which might not print or be
on the plate at all. There could be RIP prob-
lems as well, because the RIP may not cor-
rectly interpret the data. Once the character-
ization and RIP tests are successfully com-
pleted, alternative screens can be handled in
the same manner as conventional screens.
High-fidelity Color Printing
High-fidelity color printing uses additional
process inks in order to reproduce more of
the color spectrum. A package printed with
high-fidelity color may use orange and green
inks in addition to the cyan, magenta, yellow
and black process inks. This would increase
the color gamut by approximately 20%
(Figure
3(
). High-fidelity color is relatively
new and is not widely used at this time, but
produces some very striking results.
Scanning
The rule of thumb for scanning in pho-
tographs is to scan an image at a resolution
that is double the line screen used to print
the image. Hence, an image that is to be
printed at a 100 line screen should be
scanned in at 200 dpi (dots per inch). If an
image is scanned at too low a resolution,
there is little that can be done to improve the
quality of the image for printing. If any devi-
3&
Duotones are usually
printed in black and a
custom color. In an
image-processing pro-
gram it is very easy to
see how a duotone will
look on-screen before
the image is finalized.
3*
Conventional (AM) and
FM Screening. Because
there is no regular dot
pattern in FM screening,
moiré patterns cannot
occur and the smaller
dots display more
detail.
3(
The color gamut shows
the enlarged palette of
colors available with
high-fidelity printing
techniques.
RGB
Color Gamut
Pantone
Color Gamut
Visible
Color Gamut
High-fidelity
Color Gamut
3(
3*
3&
ation from the rule of thumb is made, it is
better to scan an image at a higher resolu-
tion than is needed. Reducing a file’s resolu-
tion is a much more pardonable offense than
trying to add resolution to an already
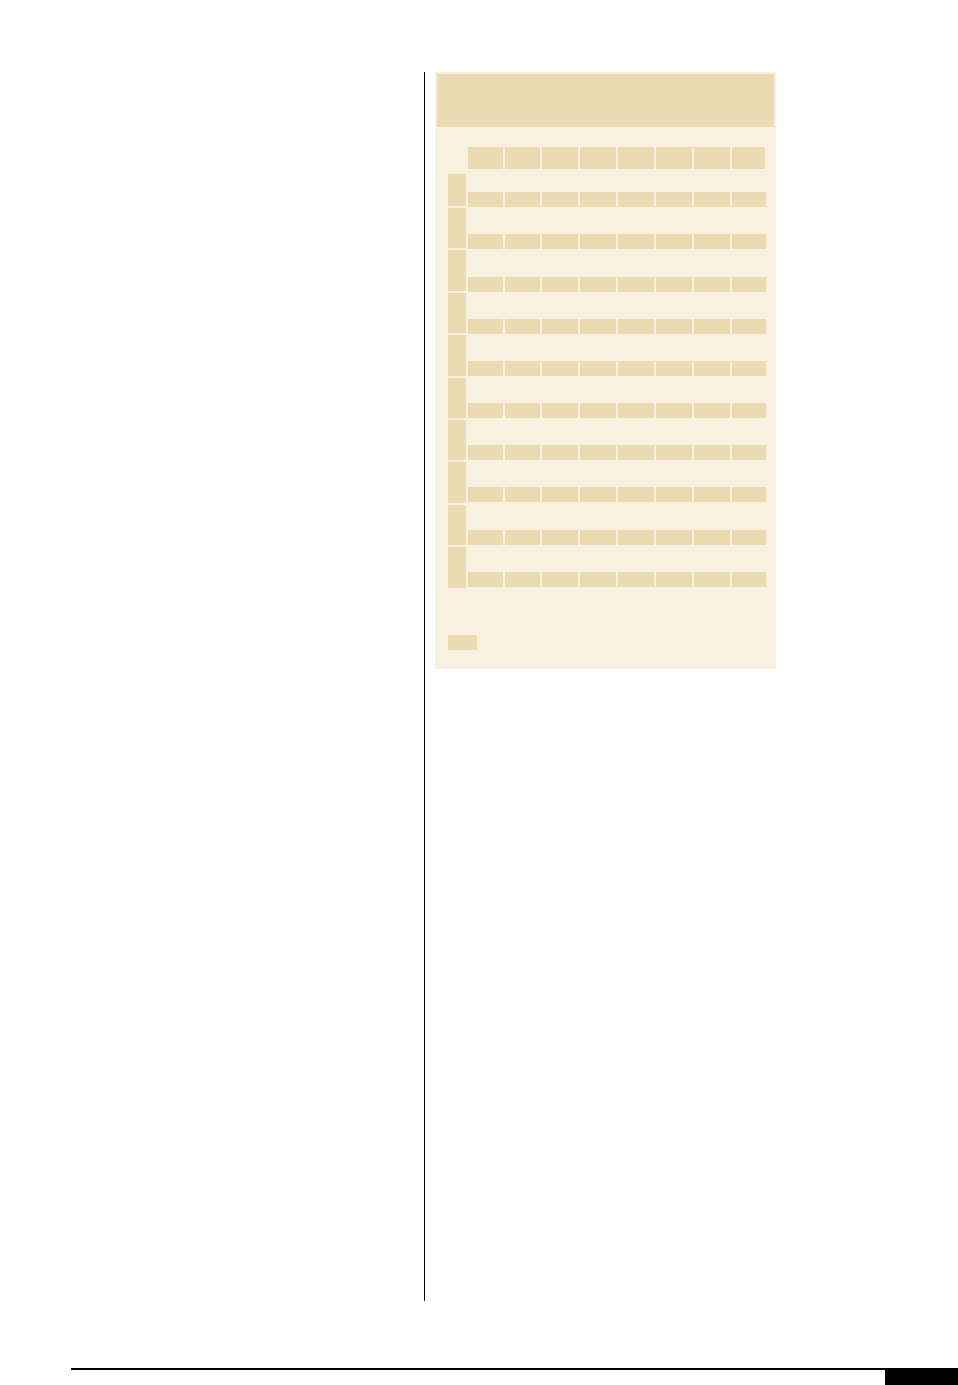
scanned image (Table 6).
The image should not be scanned using
offset settings. The settings must be adjusted
for flexo. The information needed to scan
includes the minimum highlight, maximum
shadow and the dot-gain curve. The dot-gain
curve can be used as the density curve. The
scanner operator will convert this dot gain
curve into the correct density curve. GCR
and UCR are widely used in flexo printing
and the scanner operator can adjust the scan
for the correct amount of each of these vari-
ables if this information is provided. GCR
and UCR are applications used to make the
black longer in the shadow areas. In other
words, instead of trying to create shadows
or neutrals with a combination of C, M and
Y, black is used. Using these applications
makes register, color control and trapping
much simplier during the printing process.
Since more black is being printed, the print-
er will separate the process black and the
line black onto different print decks. This
separation allows the printer to set the press
for enough density and coverage to print bar
codes and fine type, but limit dot gain in the
process image.
The artist should also consider the size at
which the image is to be scanned. If any
enlargements to the original image are to
occur, it is best to scan the image at the
enlarged size. The scaling of images can
have a direct impact on the time it takes to
process the completed artwork. Also, the
scanned image should not be much larger
than the size at which it will be printed. A
label image might be scanned from an 8" x
10" transparency, creating a 21.6 mb file. Yet
the label might only print at 2" x 2.5", which
is only a 1.35 mb file. When the image is
scanned in at a much larger size, the design-
er or separator will have to reduce this
image to the print size to make the file small
enough so that it is manageable. If the orien-
tation of the print is known, it should be
scanned at the same orientation, if possible.
Correct orientation saves output time and
also makes the files somewhat smaller.
Bar Codes
Almost all packages require either a bar
code or UPC symbol for pricing, identifica-
tion and inventory information. FIRST
(Flexographic Image Reproduction Stan-
dards and Tolerances) and ANSI (American
National Standards Institute) have specifica-
tions that should be followed. The difficulty
for a designer who has to use the UPC code in
a package design is that the specifications for
creating these symbols are very strict and
UPC codes rarely, if ever, add to the appeal of
an overall design. Not only have bar codes
DESIGN 41
Table 6
2700 Digital file size image scanned at 266 ppi/133 lpi
3430
Digital file size image scanned at 300 ppi/150 lpi
1
2
3
4
5
6
7
8
9
10
12345678
FILE SIZES OF SCANNED IMAGES
277 553 830 1080 1350 1620 1890 2160
352 704 1030 1370 1720 2060 2400 2750
553 1080 1620 2160 2700 3240 3780 4320
704 1370 2060 2750 3430 4120 4810 5490
830 1620 2430 3420 4050 4860 5670 6480
1030 2060 3090 4120 5150 6180 7210 8240
1080 2160 3240 4320 5400 6840 7560 8640
1370 2750 4120 5490 6870 8240 9610 11000
1350 2700 4050 5400 6750 8100 9450 10800
1720 3430 5150 6870 8580 10300 12000 13700
1620 3240 4860 6480 8100 9720 11300 13000
2060 4120 6180 8240 10300 12400 14400 16500
1890 3780 5670 7560 9450 11300 13200 15100
2400 4810 7210 9610 12000 14400 16800 19200
2160 4320 6480 8640 10800 1300 15100 17300
2750 5490 8240 11000 13700 16500 19200 22000
2430 4860 7290 9720 12200 14600 17000 19400
3090 6180 8270 12400 15500 18500 21600 24700
2700 5400 8100 10800 13500 16200 18900 21600
3430 6870 10300 13700 17200 20600 24000 27500
42 FLEXOGRAPHY: PRINCIPLES & PRACTICES
become a necessary evil, they also have a
very strict set of tolerances that must be fol-
lowed by the designer and separator.
If designers decide to generate the bar
code themselves, there are many utilities and
applications available in the desktop envi-
ronment that will create bar codes and UPC
symbols. A word of caution: if a designer
chooses to generate the bar codes to be used
in the final printed piece, then he/she also
accepts all of the legal responsibility for guar-
anteeing that the bar code will print accu-
rately. Should the designer decide that this is
a responsibility he/she does not wish to
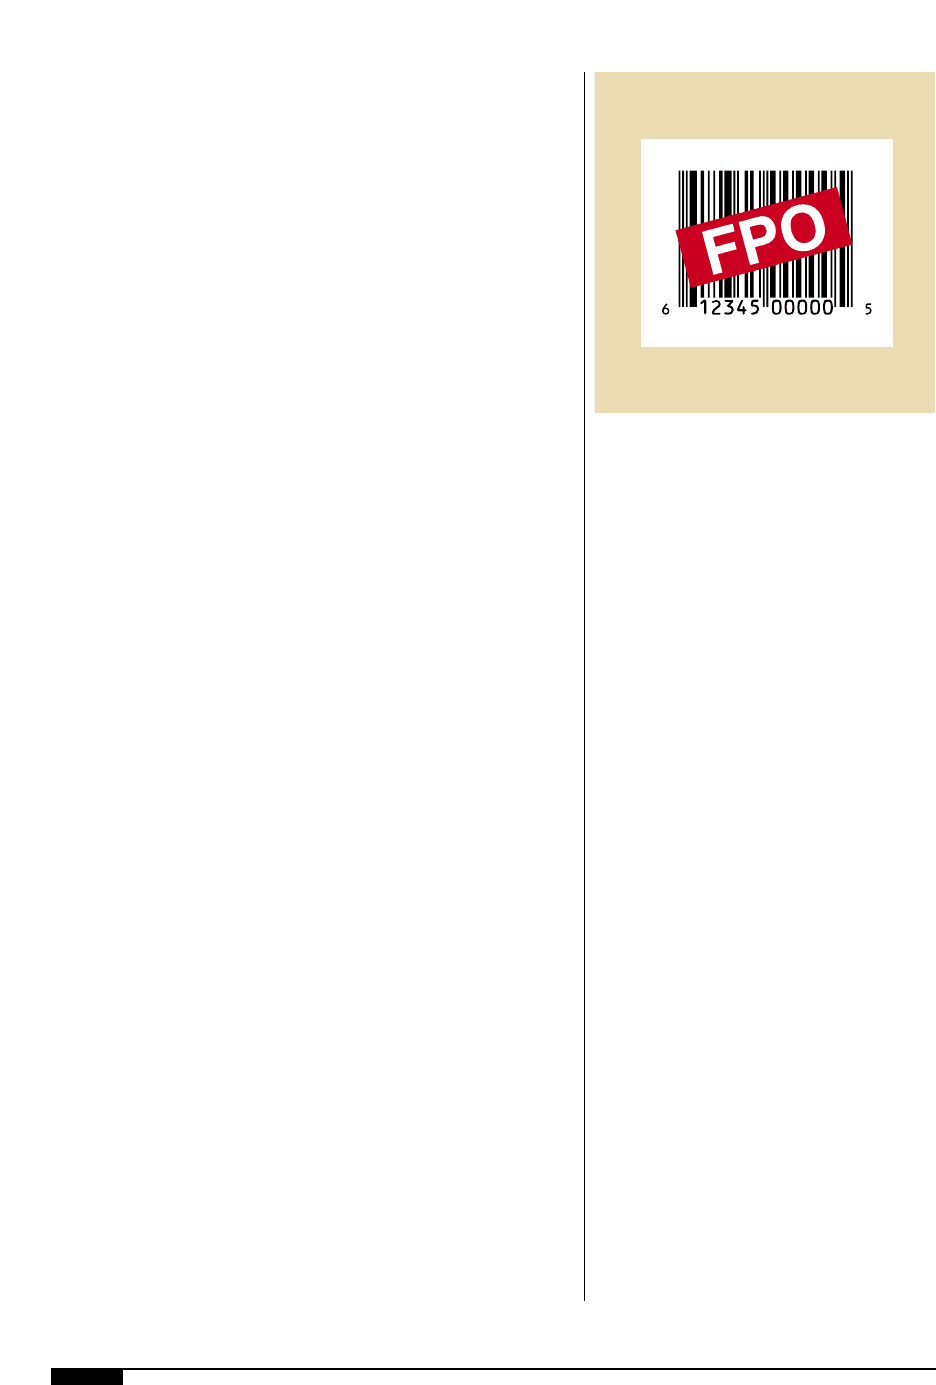
incur, he/she can provide an FPO. The FPO
(Figure
4)
) represents where the bar code is
to be placed in the design and the separator
creates a correct, final bar code. When pro-
viding an FPO for the final placement of a bar
code, the designer should be aware of the tol-
erances necessary for accurately printing a
bar code, so that the placement, dimensions,
quiet zone and color of the FPO are correct
for the final printed symbol. The ultimate
goal by everyone involved is to create a sym-
bol that, when scanned, is within ANSI stan-
dards of acceptance.
Compensation. Compensation is achieved by
undercutting the bar width, so that when
printed with the expected amount of gain,
the bar code grows back to the original size.
Color and Symbol Contrast. When selecting a
color for the UPC symbol or bar code, it is
imperative to choose a color combination
that will provide sufficient contrast between
the scan bars and spaces. Black bars with
white spaces provide the highest symbol con-
trast (SC) for accurate scan reading. The
amount of required SC varies based on the
symbol and where it will be used. The light
sources used in bar code scanners generally
use red light. Therefore bar codes should not
be colored in reds or oranges, as they will not
read when scanned. These colors can be used
for background colors. If the bars are printed
with a color other than black, dark colors
such as brown, blue and green; with back-
grounds in yellow, orange, pink, peach and
red generally scan successfully. Bar codes
should be created with one color to create
sharp edges and avoid any register issues.
Placement. Certain types of packaging may
require specific symbol placement. The posi-
tioning depends on the symbol used and the
packaging of the product. It is strongly rec-
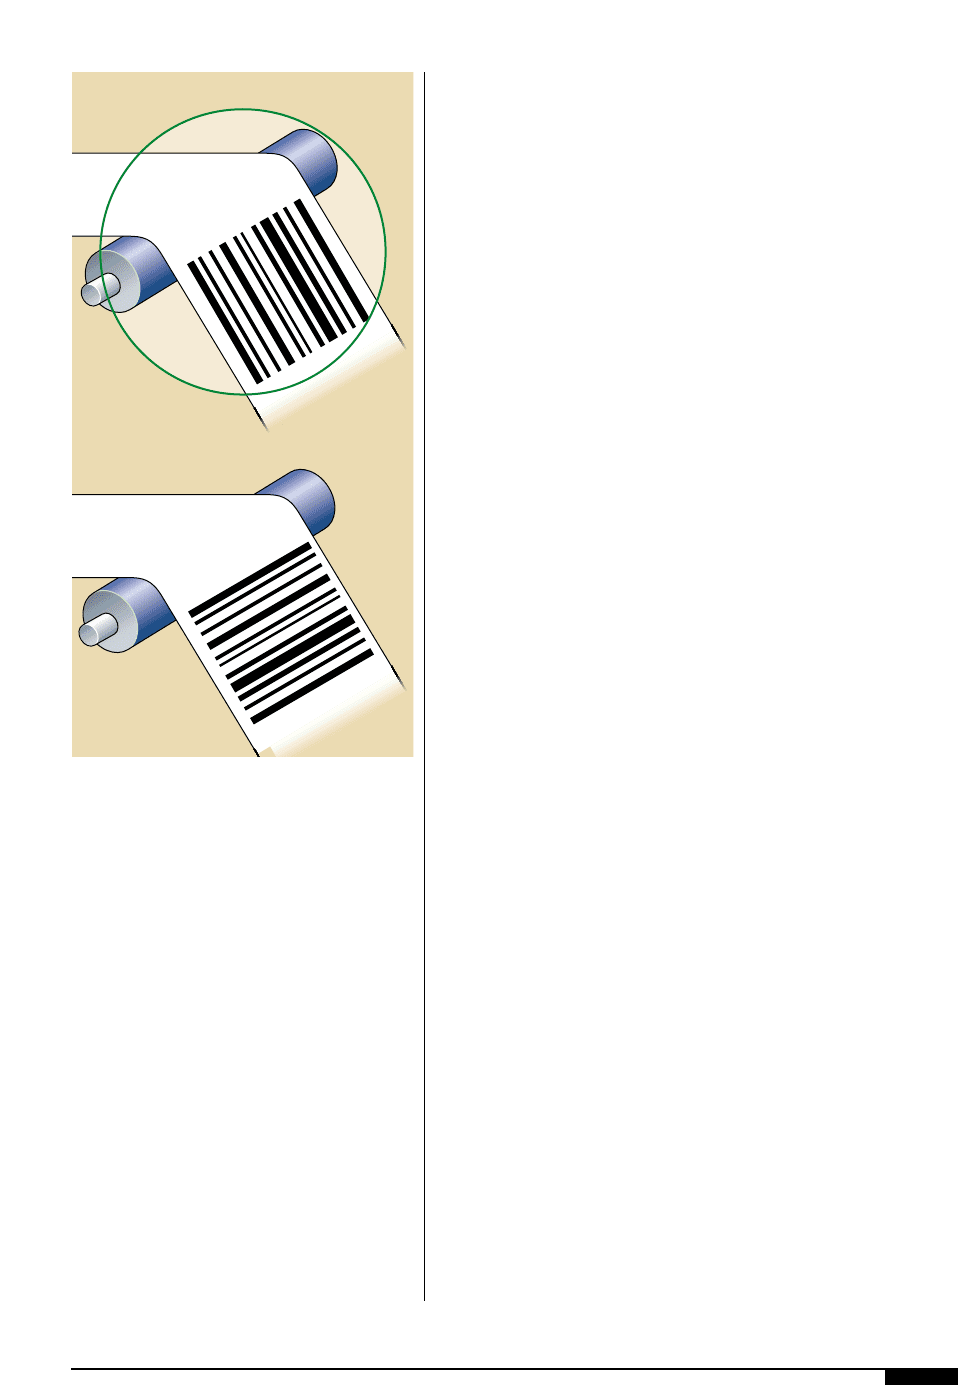
ommended that the symbols be printed in
the web direction, also known as through the
press or picket fence (Figure
4!
). The
widths of each bar and background space
are what the scanner detects and must be
printed as accurately as possible. When the
symbol prints through the press, the bars
might be longer because of press slur, but
the width will not be affected. If there is no
other choice but to print in the across the
press direction (Ladder) the printer must
provide specifications.
Size. Symbol sizes are specified according to
the symbol and the use. UPC codes that are
scanned by point-of-sale scanners have a
fixed relationship between height and width.
The specified magnification range is 80 -
200% of nominal size. Most symbols have
minimum requirements for the quiet zone,
the background area free of printing on the
left and right side of the bars. As symbols are
reduced in size, so are the bars and back-
4)
An FPO label denotes
that the bar code shown
is only intended to indi-
cate orientation, size,
color, etc.; it is not to be
printed.
4)
ground areas. Tighter tolerances are
required for bar-width reduction. Most sym-
bols have a height/width relationship that
must be maintained, which makes trunca-
tion unacceptable.
Color Reproduction
and Line Count
When continuous-tone, full-color repro-
duction from original copy is required – as
with color photographs and transparencies,
oil paintings, reflective art, watercolors and
illustrations – a full understanding of three-
and four-color process printing is mandatory
If single-color reproduction of continuous-
tone copy is required – as with photographs
or vignettes – halftone reproduction must be
fully understood and an appropriate halftone
screen count specified. The original artwork
must be digitally captured to be usable in the
computer by using a flatbed or drum scanner
or a digital camera.
For printing either tints or halftones on
corrugated board, 45- to 65-line screens are
suitable. Screens for wide-web package
printing on film range anywhere from 65- to
133-line, while narrow-web printers typically
range from 120 to 150. 200-line screen print-
ing and higher is being achieved with the use
of newer technology in plates and anilox
rolls. The preprinted linerboard industry ini-
tially attempted 150-line screens, but
dropped back to 100- to 133-line screens
with far better results.
When halftones, duotones, three- and
four-color process halftones are used in a
design, they can either be handled separately
in photography, photoengraving and printing
or they can be combined with line work. The
method depends on the number of printing
stations available, whether line copy is fine
enough to print on the plate with halftones,
or whether the presence of large solids in the
line plate makes it preferable to run the
halftones separately. Running halftones sepa-
rately minimizes ink distribution problems
and allows finer impression control.
Many times, a low-resolution file is placed
in position by the designer as a FPO. It is the
separator’s job to replace FPOs with high-
resolution images. All FPOs must be clearly
marked.
Screen Ruling. When referring to illustra-
tions, halftones, screen tints and duotones,
screen ruling refers to the number of rows or
lines of dots used to render an image. Screen
ruling is measured in lines per inch (lpi). The
relationship between the output resolution
(dpi) and the screen ruling (lpi) determines
how fine or coarse an image will appear in
print. To determine screen ruling, fill a 1"
square area with an imaginary grid that con-
tains 100 lines running vertically. Next fill
the square with 100 imaginary horizontal
DESIGN 43
4!
Bar code symbols
should be printed in the
web direction, also
known as through the
press or picket fence.
When the symbol prints
through the press, the
bars might be longer
because of press slur,
but the width will not be
affected.
Picket Fence
Ladder
4!
44 FLEXOGRAPHY: PRINCIPLES & PRACTICES
lines. The intersection of each line has a dot
on it; the number of lines of dots in this
arrangement is referred to as the line screen.
In this example, the line screen is 100 lpi. If
the square has 133 lines vertically and hori-
zontally, it is 133 lpi.
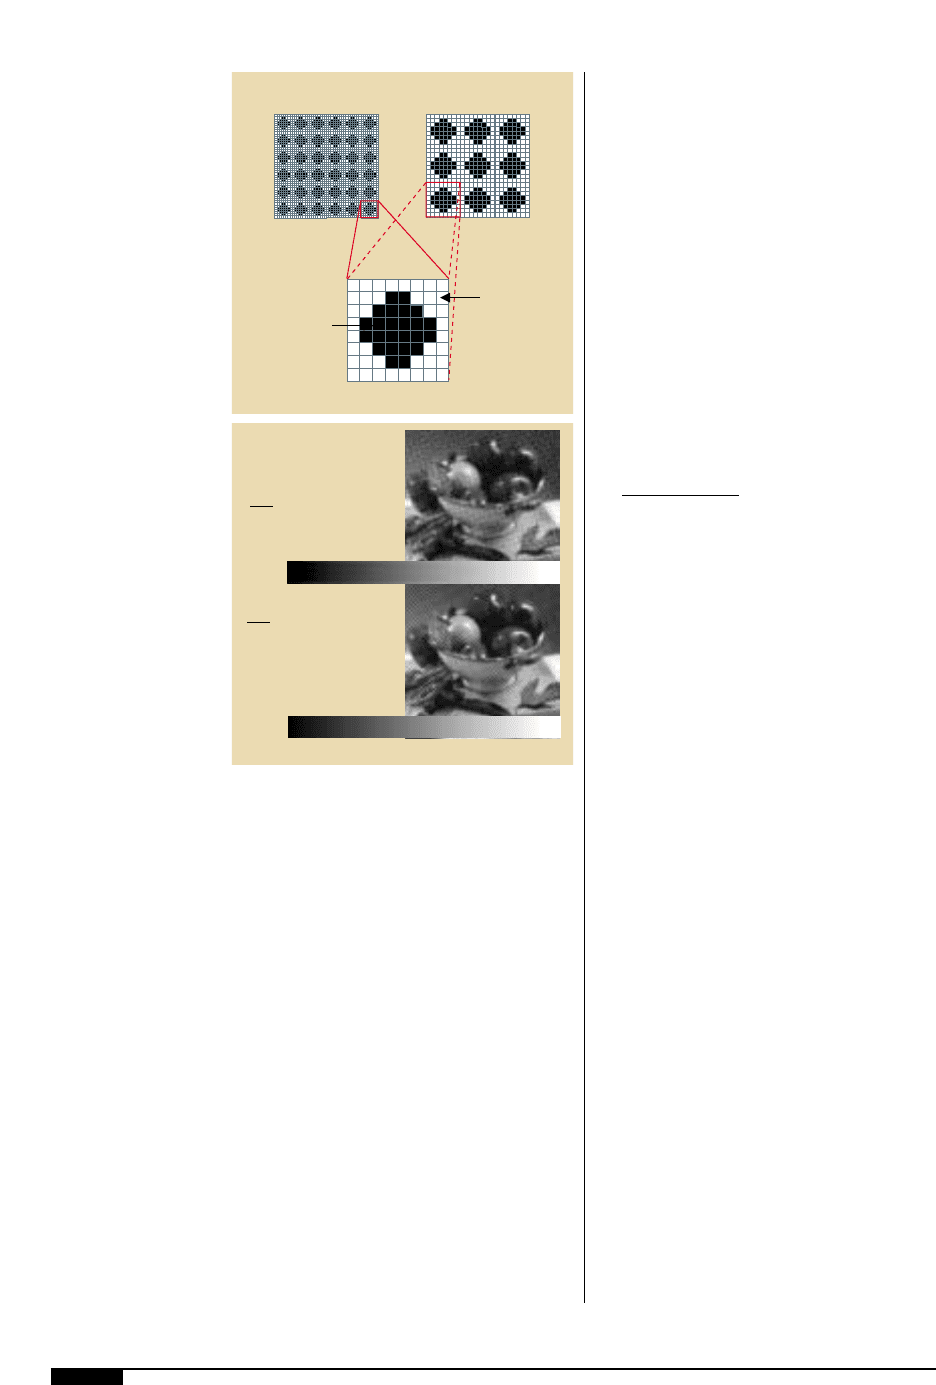
Screen ruling also determines the size of a
halftone cell, which in turn determines the
maximum size of a halftone dot. The rela-
tionship between screen ruling and printer
resolution determines the tonal range that
can be printed. The halftone dot is made up
of printer dots, with the printer resolution
determining the number of dots available to
create the halftone dot. When the screen rul-
ing is increased, the size of the halftone cell
is decreased and fewer printer dots are used
to create the halftone dot, so fewer shades
are represented (Figure
4@
).
Printable Line Screen (lpi). Line screen print-
ability varies greatly depending on the print
variables. These variables could be sub-
strate, ink-metering system, ink formulation
and anilox configuration. The same graphic
can look very different depending on the
particular line screen (Figure
4#
) used, and
successful designs must look good in the
line screen actually printed. Line screens
can vary from 45 to 175 lpi.
To calculate the levels of gray available at
a given screen ruling and output device, use
the following formula:
output resolution
2
1 shades of gray
screen ruling
The maximum number of grays available
on most output devices is 256. The levels of
gray available also determine the smooth-
ness of blends and vignettes.
Blends, Vignettes and Gradation Fills.
Vignettes, gradients and blends all describe a
color filling in an area of artwork where one
or more colors progress from one percentage
of the color or colors to a different percent-
age. When used correctly, gradients can add
spectacular results to a design. When created
incorrectly, they can be extremely difficult to
print accurately or can ruin the overall
impact of the final printed piece. The tools
available in desktop software applications
make it very easy to add gradients to every
element of a design. Unfortunately, it is also
easy to create them incorrectly. Because gra-
dations can be complicated, it is recom-
mended that the designer create the grada-
tions as an FPO with the design specifica-
tions noted, and let the separator create the
final, ready-for-film gradation. When working
with blends and vignettes, the following
characteristics of the gradations should be
considered: tonal range, banding, and color
mixtures.
Tonal range. Most artists will create a tonal
4@
The lower the screen
ruling, the larger the
halftone cells; the high-
er the screen ruling, the
smaller the halftone
cells.
4#
Increasing the line
screen ruling creates
smaller halftone dots
which adds detail to the
image, but it reduces
the number of grays
available.
Low dpiHigh dpi
Halftone Cell
Halftone Dot
Printer Dot
(dpi)
4@
1
257
levels of gray
2400
150
2
1
1,112
levels of gray
2400
72
2
4#
range of 0% to 100% for all gradients or
blends. This range presents problems in
flexo. Because some flexo plates cannot hold
a dot below 3%, the tonal range in the graph-
ics should typically not be below 3%. Some
plates can hold a 2% or even 1% dot, but
because of substrates, anilox or ink choices,
the dot is often not printed. Therefore, when
creating the flexo gradient, the minimum dot
percent should be what is specified in the
characterization data. On the shadow end,
dot percentages above 85% have a tendency
to “fill in” which can result in an excessive
ink laydown. Again the maximum shadow
dot should be in the characterization data
(Figure
4$
). If this data is not available, use
the standard flexo gradient of 5% to 85% .
Banding. A problem that can occur when
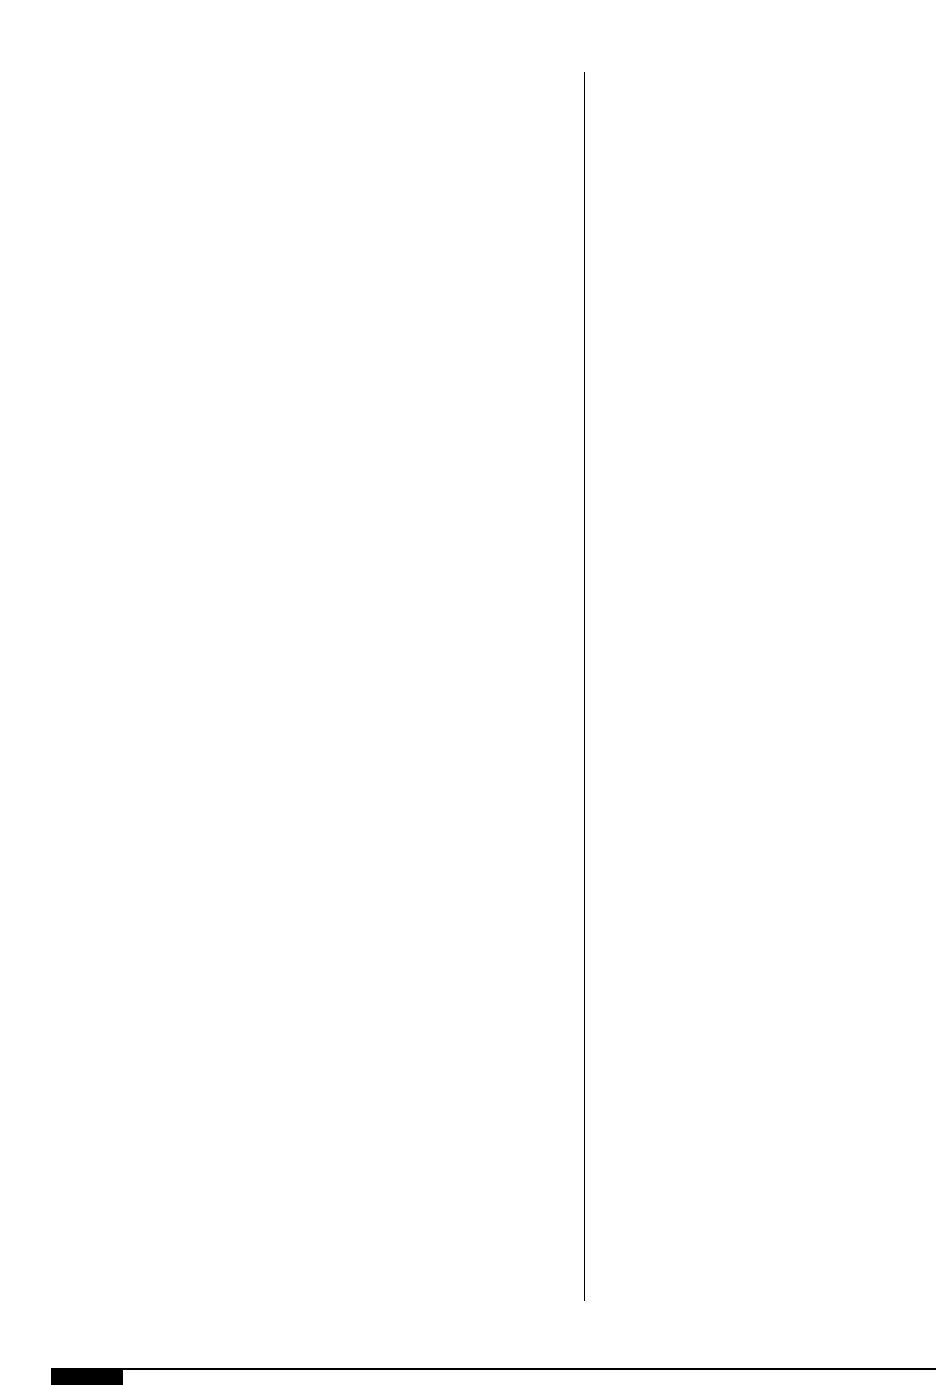
using a gradient fill is banding (Figure
4%
).
When tints do not blend smoothly, there is a
distinct “stepped” appearance as opposed to
a nice, smooth gradation of tints blending
from one percentage to another. Banding in
a gradient is usually created when the length
of the area to be filled exceeds the capabili-
ty of the number of gray levels available for
a particular gradient range to fill the area.
Banding can be avoided by remembering a
few, basic rules:
1. Keep gradient fills small. Banding is
more likely to occur in gradients that
cover a large area.
2 Use larger gradient ranges. A blend
from 5% through 25% covering a rela-
tively large area will most likely band
because there will most likely not be
enough gray levels to create a smooth
transition from tint value to tint value.
A larger range, such as 5% through 75%
will be more successful.
Another way to create gradients is to man-
ually create a blend by selecting two ele-
ments in a file and using the blend tool in the
application’s toolbox. When creating gradi-
ent blends in this manner, the operator has
the ability to set the number of steps that
will complete the blend. If gradients are cre-
ated in this manner, 256 steps should be used
DESIGN 45
4$
Tonal range in the press
characterization.
4%
Banding in a vignette
occurs when the length
of the area to be filled
exceeds the capability
of the number of tint
levels available.
3373839404142
024686 88 90 92 94 96 98 100 024686 88 90 92 94 96 98 100
4$
No Banding Banding
4%
46 FLEXOGRAPHY: PRINCIPLES & PRACTICES
to create a blend that varies from 1% to 100%.
A gradient that blends from 1% through 50%
requires a minimum of 128 steps to blend
without banding. Simply put, more steps
equal better blends.
Another cause of banding in vignettes
occurs when blends run at a variety of differ-
ent angles on a design. Electronic artwork
files must be converted to binary coding
when set to the RIP to be output on a film
imagesetter or platesetter. Binary coding uses
a coordinate system that is comparable to a
grid. Under the line screen grid is a secondary
grid that is determined by the resolution of
the artwork file. The line screen grid can be
rotated on top of the underlying resolution
grid. Because the line-screen grid can be
rotated, but the resolution grid (which con-
tains the dots) cannot, banding can occur
when lines in the line-screen grid run in dif-
ferent directions than those on the resolution
grid. This phenomenon can be compared to
painting a wooden fence. The paint lies more
evenly and fills in all of the cracks with a
stroke that follows the grain of the wood, ver-
sus a stroke that runs across the wood. Paint
strokes that run cross-grain can leave cracks
that are completely untouched by the paint.
A good way to avoid banding in a vignette
is to create the gradient in Adobe PhotoShop
and use the “Add Noise” filter. The “Add
Noise” filter will shift the pixels in the gradi-
ent blend so that different tint values will not
align along a straight edge. This shift creates
a feathered effect that softens any hard
breaks where different tint values meet. The
difficulty in using this method to create
vignettes is that files generated from Adobe
PhotoShop are much larger than files creat-
ed in Adobe Illustrator or Macromedia’s
FreeHand. The PhotoShop files must be
placed in a drawing application and can be
difficult to manipulate inside the drawing
program. These files can also greatly
increase the amount of disk space the art-
work file requires for storage.
Blends which might appear banded on the
computer screen, or even on a laser proof,
may have been correctly created and may
not band in the final film. Computer screens
generally display at a resolution of 72 dpi.
The artwork will probably be output to film
at a resolution of 1,200 dpi, or even higher.
These higher resolutions of film imageset-
ters will help in decreasing the possibility of
banding in a gradient fill.
Color Mixtures. When two elements are made
of two different spot colors and then blend-
ed manually, the resultant blend might not
actually consist of the two spot colors.
Usually drawing programs will convert this
type of blend automatically into a process-
color breakdown. The blend function is
unable to separate the different percentages
of both spot colors and hold the integrity of
those colors at all tint values. It is easier for
the application to convert the entire blend to
process colors. For example, if a blend
needs to be created with a blue-spot gradient
to a red-spot gradient, the designer will have
to create two separate gradient blends. The
blue should be placed on top of the red, with
the blue gradient set to overprint. This pro-
cedure is the only way to ensure the gradient
will separate into the two spot colors upon
film output. It is also important to consult
the separator or printer because some col-
ors, yellow or beige for example, can grade
to 2% but look like a fade to 0%.
Color
Creating a custom color palette before
beginning the actual design is a good practice
for designers. At this time, they should refer
to the print color criteria of the project. The
print color refers to how many and what col-
ors will be printed. The designer should not
use colors that the printer will not be using.
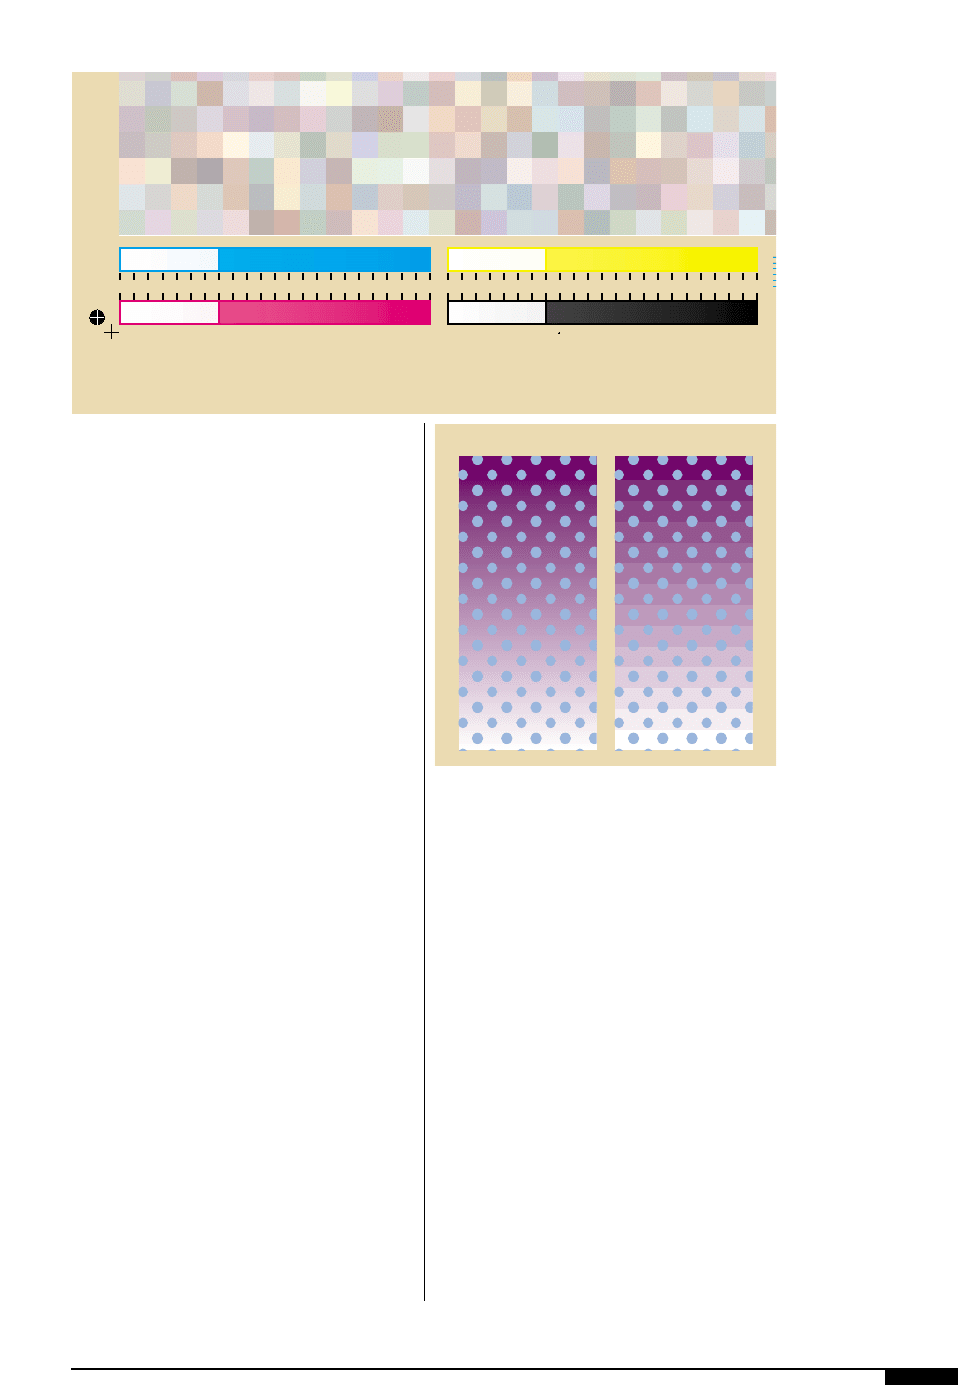
Usually the palette includes cyan, magenta
,yellow, black and any spot or special colors
specified for the project (Figure
4^
).
Unfortunately, it is common for the designer
