AWS B4.0: 2007 Standard Methods for Mechanical Testing of Welds
Подождите немного. Документ загружается.


CLAUSE 10. WELDABILITY TESTING AWS B4.0:2007
94
(1) Base metal specification;
(2) Filler metal specification, size, and chemical
composition;
(3) Trough test specimen dimensions and thickness;
(4) Welding procedure (process and parameters);
(5) Shielding gas identification;
(6) Location of weld starts and stops;
(7) Preheat, interpass, and postweld thermal treatments
used;
(8) Description of thermal treatment found to elimi-
nate delayed cracking and/or reduced tensile ductility;
(9) Time delay and description for presence of
cracks;
(10) Method of examination for presence of cracks;
(11) Tension test ductility, if required; and
(12) Results of diffusible hydrogen test, if required.
Test data should be recorded on a Test Results Sheet
similar to Figure 10.8.3.
10.8.9 Commentary. There are other U.S. and ISO test
methods available whose objectives are to evaluate the
susceptibility of weld metal and consumables to hydro-
gen-assisted cracking. This test method is unique in that
it is intended to determine welding parameters and ther-
mal treatments to eliminate hydrogen-assisted cracking
in repair welds in thick section medium and high strength
alloy steel structures and components.
Copyright American Welding Society
Provided by IHS under license with AWS
Not for Resale
No reproduction or networking permitted without license from IHS
--`,,```,,,,````-`-`,,`,,`,`,,`---
AWS B4.0:2007 CLAUSE 10. WELDABILITY TESTING
95
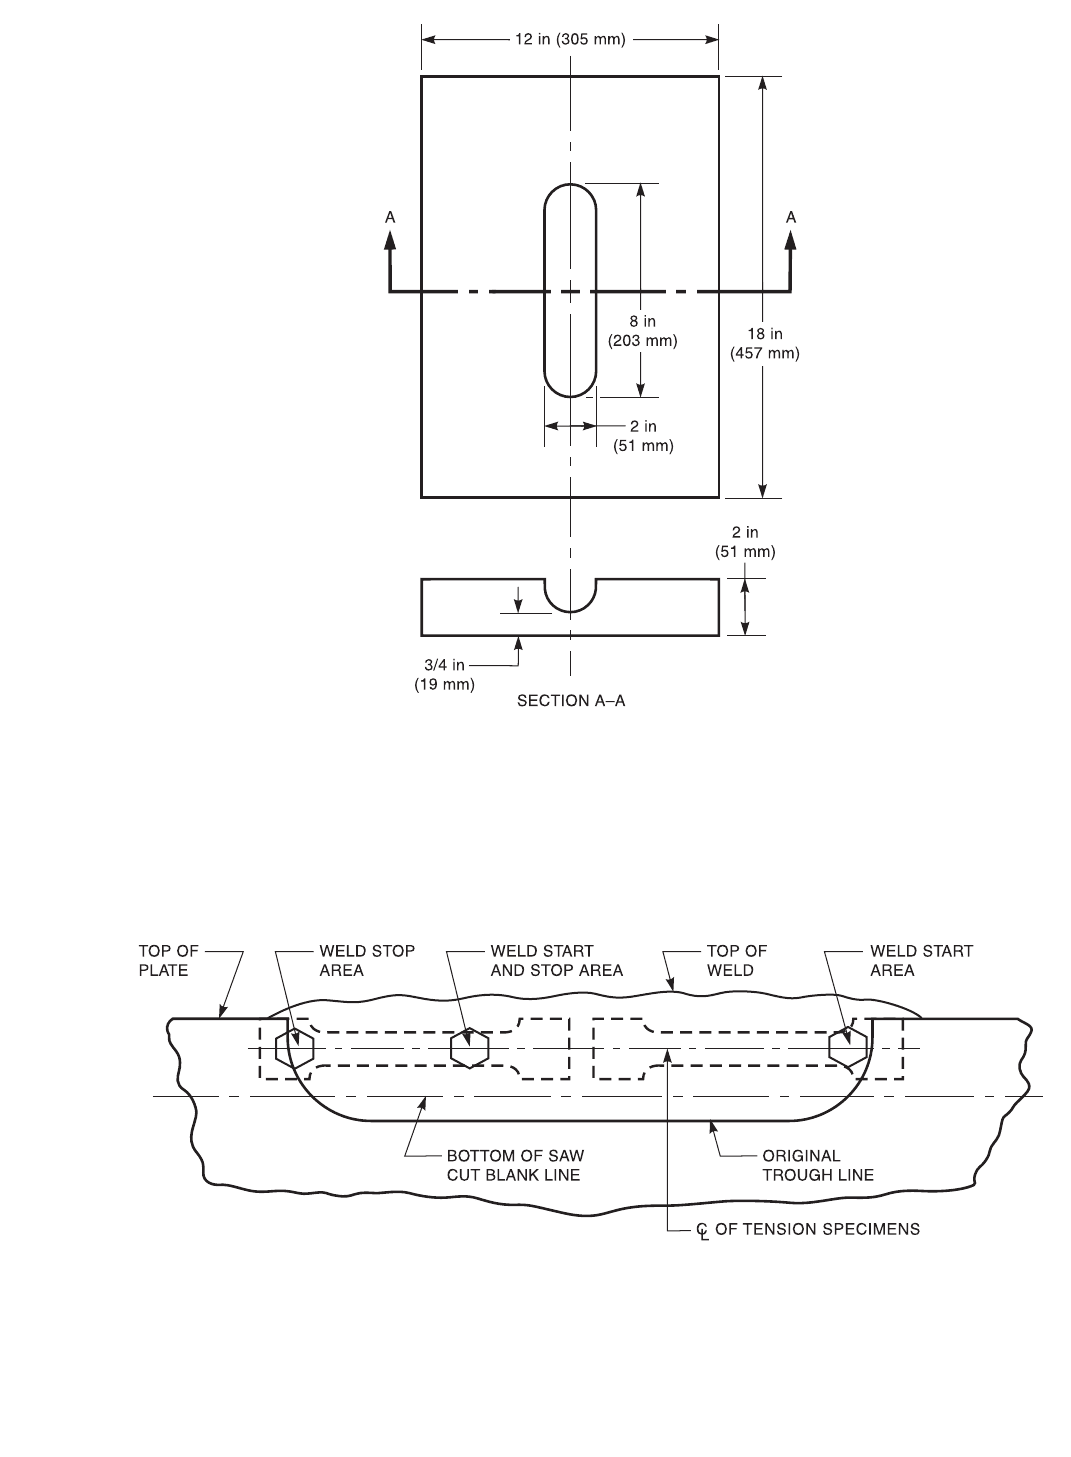
Figure 10.8.1—Trough Test Specimen
Figure 10.8.2—Location of Weld Starts, Stops, and Tension Test Specimens (Side View)
Copyright American Welding Society
Provided by IHS under license with AWS
Not for Resale
No reproduction or networking permitted without license from IHS
--`,,```,,,,````-`-`,,`,,`,`,,`---
CLAUSE 10. WELDABILITY TESTING AWS B4.0:2007
96
TROUGH TEST RESULTS
Company Name _____________________________________________________________ Date _______________________
Job/Test No. ________________________________________________________________ Sheet _________ of __________
Description of Investigation ____________________________________________________________________________________
Base Metal Identification and Thickness__________________________________________________________________________
Base Metal Heat Treatment_____________________________________________________ Heat No. ____________________
Base Metal Composition:
C__________ Si __________ Mn ________ P __________ S__________ Cr__________ Mo ________
Ni _________ V __________ Cu_________ Nb _________ Ca_________ B __________ Ti _________
Al _________ N __________ _________ __________ _________ __________ _________
Weld Metal Composition ______________________________________________________________________________________
C__________ Si __________ Mn ________ P __________ S__________ Cr__________ Mo ________
Ni _________ V __________ Cu_________ Nb _________ Ca_________ B __________ Ti _________
Al _________ N __________ _________ __________ _________ __________ _________
Welding Process Procedure Spec. No. ___________________________________________________________________________
Electrode/Wire Spec. No. ______________________________ Commercial Name ____________________________________
Diameter ___________________________________________ Baking Treatment _____________________________________
Shielding Gas/Flux ___________________________________ Flow Rate/Flux Size ___________________________________
Current ____________________________________________ Ambient Temp. _______________________________________
Travel Speed ________________________________________ Ambient Humidity _____________________________________
Current ____________________________________________ Voltage _____________________________________________
Heat Input __________________________________________
Hydrogen Determination Method ________________________________________________ Date _______________________
Result ____________________________________________________________________________________________________
Results:
Results (cracking free welding and thermal treatment)_______________________________________________________________
Tested By __________________________________________________________________
Signature___________________________________________________________________ Date _______________________
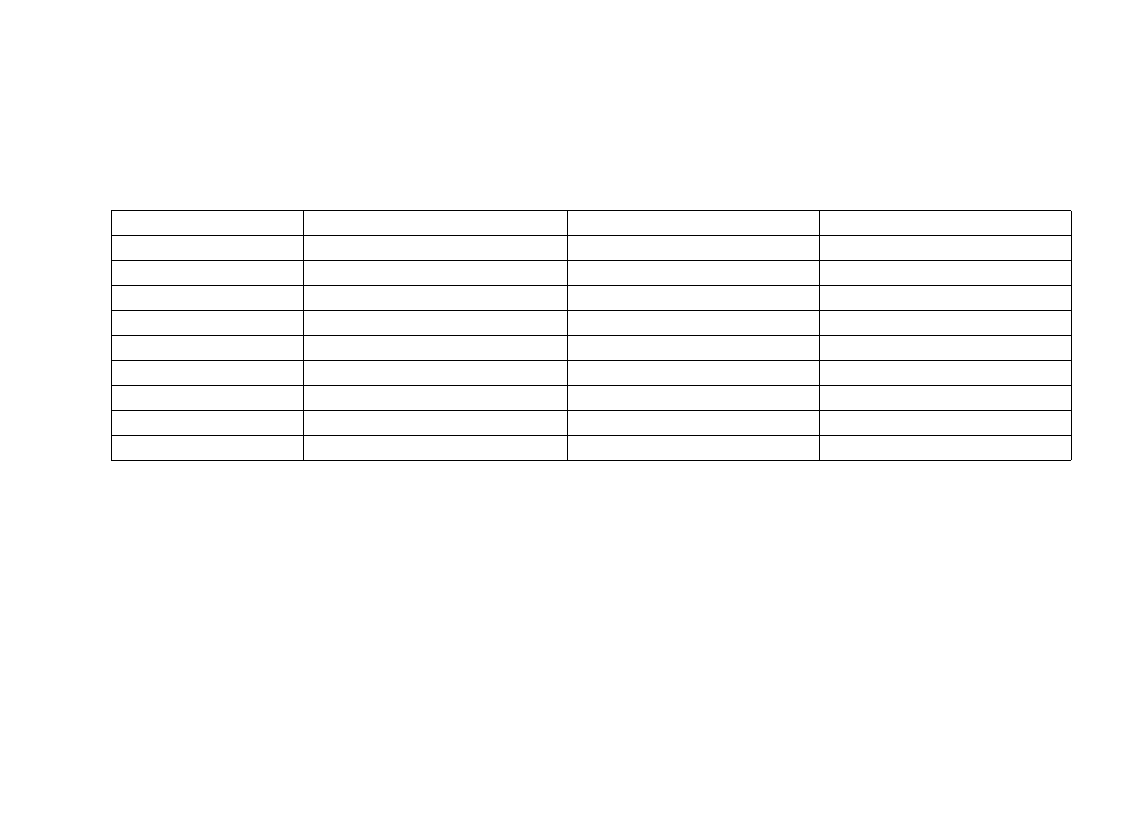
Figure 10.8.3—Suggested Data Sheet for Trough Test
Specimen No. Welding and Thermal Treatment
a
Cracking Time Lapse (Days) Red. in Tensile Ductility (Y/N)
a
See 10.8.7.3 for suggested welding and thermal treatment (number of weld layers, preheat and interpass temperature, postweld
thermal treatment).
Copyright American Welding Society
Provided by IHS under license with AWS
Not for Resale
No reproduction or networking permitted without license from IHS
--`,,```,,,,````-`-`,,`,,`,`,,`---

AWS B4.0:2007 CLAUSE 10. WELDABILITY TESTING
97
10.9 Gapped Bead On Plate (GBOP)
Test
10.9.1 Scope
10.9.1.1 This subclause covers the Gapped Bead On
Plate (GBOP) test for susceptibility of as-welded metal
to hydrogen-assisted cracking. The standard gives the
requirements for test specimen preparation, test parame-
ters and testing procedures, but does not specify the
requirements or acceptance criteria.
10.9.1.2 Where specified, this standard is applicable
to the following:
(1) Information, specifications of acceptance, manu-
facturing quality control; and
(2) Research and development.
10.9.1.3 When this standard is used, the following
information shall be furnished:
(1) Weld procedure (process and parameters);
(2) The specific criteria used for distinguishing
cracked verses not cracked samples. For example, 50%
cracked may be used as the distinguishing level of crack-
ing to be considered “cracked”; and
(3) The specific test temperature [for example, test-
ing may start at 212°F (100°C)].
10.9.2 Normative References. The following standards
contain provisions which, through reference in this text,
constitute mandatory provisions of this test. For undated
references, the latest edition of the referenced standard
shall apply. For dated references, subsequent amend-
ments to, or revisions of, any of these publications do not
apply.
ASME Documents:
ASME B46.1, Surface Texture, Surface Roughness,
Waviness and Lay
10.9.3 Summary of Method. This test assesses the sus-
ceptibility of weld metal to hydrogen-assisted cracking.
A preheat temperature at which the weld metal shows
acceptable resistance to hydrogen-assisted cracking is
determined. At low temperatures hydrogen can’t easily
escape, causing a weld metal condition that is susceptible
to cracking. Conversely, at higher preheat temperatures,
there is more opportunity for the hydrogen to diffuse out,
and susceptibility to hydrogen-assisted cracking is reduced.
10.9.4 Significance. Hydrogen-assisted cracking is a
major cause for concern in weldments. Understanding of
appropriate preheat temperatures to reduce the suscepti-
bility of a weldment to such cracking can be beneficial
for both electrode comparison and determination of
appropriate welding procedures.
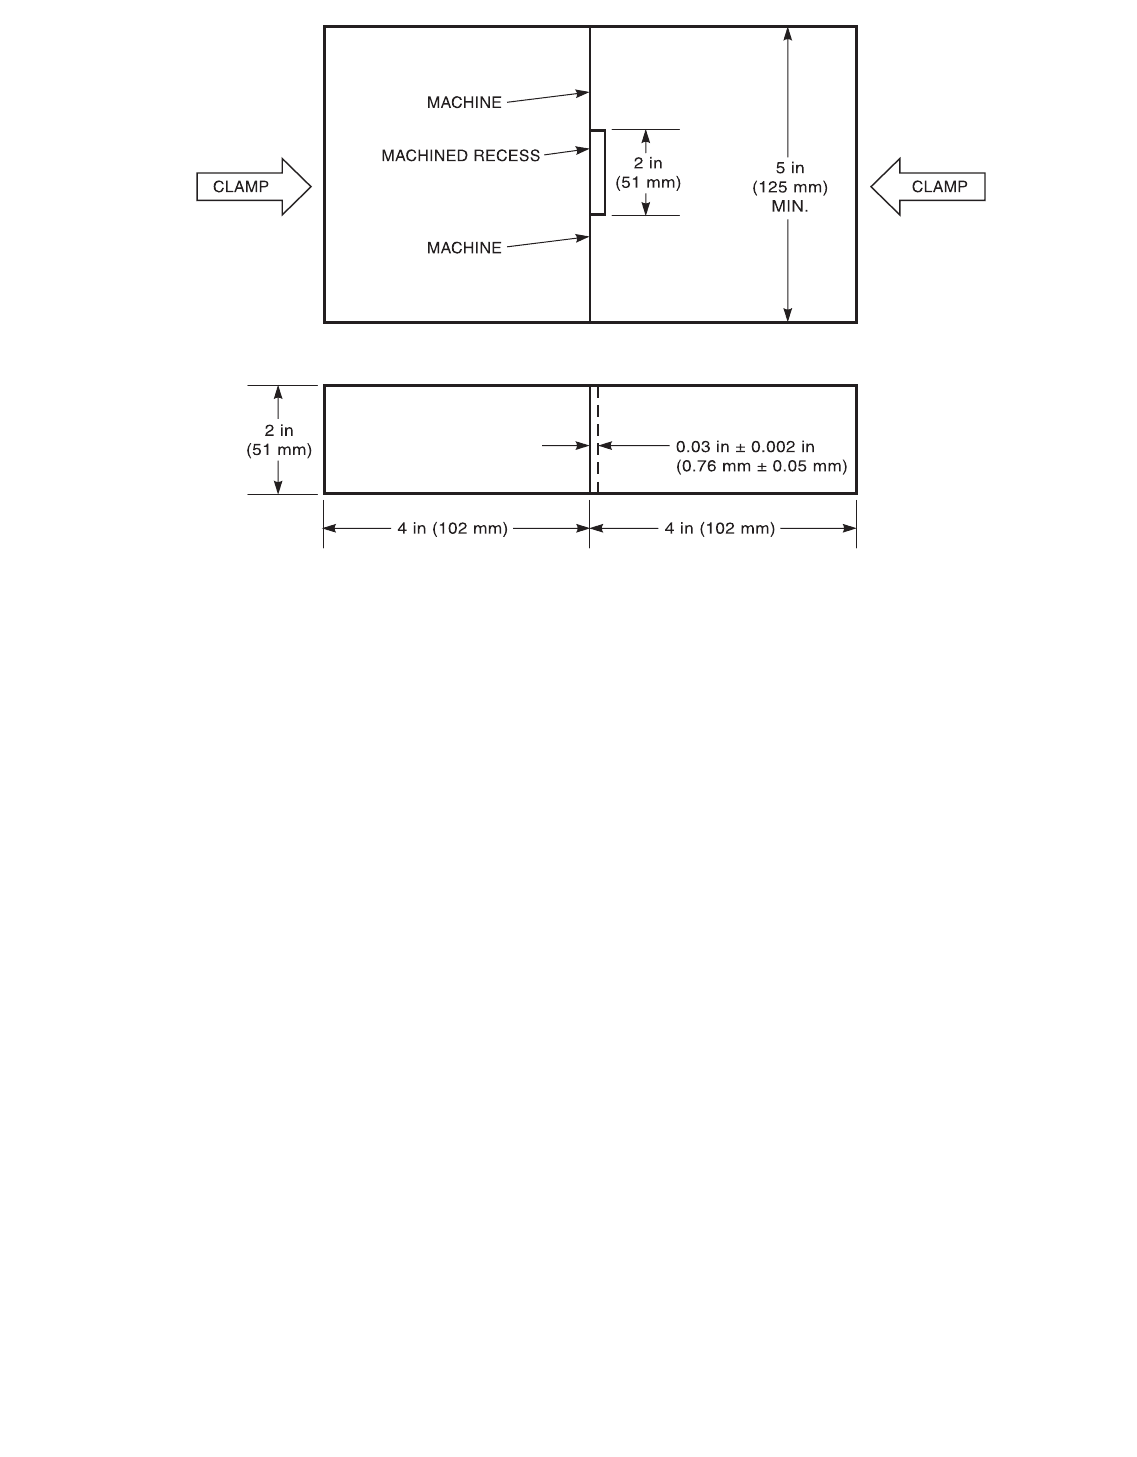
10.9.5 Apparatus. The apparatus consists of 2 machined
blocks that are clamped together. One of the blocks has a
machined recess though the thickness. This is illustrated
in Figure 10.9.1.
10.9.6 Specimens
10.9.6.1 Butter plates, if necessary. If plate buttering
is employed the details of the buttering procedure shall
be described in the test report. Three (3) layers is suffi-
cient to minimize the effects of base plate dilution.
10.9.6.2 Machine the test block to 4 in by 5 in by 2 in
(101 mm by 126 mm by 50 mm) thick, with a maximum
average roughness of 125 microinches (3 micrometers),
and final dimensions as shown in Figure 10.9.1.
10.9.6.3 Bake the samples at least 5 h at a minimum
of 550°F (288°C) for hydrogen removal. If there is an
oxide coating, it should be cleaned with a power brush or
equivalent prior to testing.
10.9.7 Procedure
10.9.7.1 A minimum of three samples should be
welded for each test. Preheat samples for at least 4 h to
25°F (–4°C) above the anticipated test temperature. The
sample block should be removed from the oven, then
placed in a test fixture or simply clamped together. The
samples are then tightened together and welding can be
done once the test temperature is reached. Either temper-
ature crayons or digital temperature probes are permissi-
ble for temperature measurement.
10.9.7.2 Weld across the gap a minimum of 4 in
(101 mm) total weld length. Welding parameters should
follow manufacturer’s suggested welding procedures.
10.9.7.3 After welding, the test assembly must sit a
minimum of 24 h in the test fixture or clamp.
10.9.7.4 Examination for Cracks. Penetrant testing,
heat tinting or other methods may be used to determine
the extent of cracking. One other method is to break the
test assembly and note whether it did not crack or the
degree to which it cracked based on the predetermined
testing criteria.
10.9.7.5 The samples can be re-used indefinitely, pro-
vided that they are baked out between successive tests.
This is to remove the hydrogen introduced during the
testing. This normally entails grinding away some weld
metal or machining after grinding.
10.9.7.6 If a sample cracks at a certain test tempera-
ture, the next test should be run at a higher temperature.
If the sample doesn’t show cracks at a given preheat tem-
Copyright American Welding Society
Provided by IHS under license with AWS
Not for Resale
No reproduction or networking permitted without license from IHS
--`,,```,,,,````-`-`,,`,,`,`,,`---

CLAUSE 10. WELDABILITY TESTING AWS B4.0:2007
98
perature, the next temperature should be done with a
lower preheat.
10.9.7.7 As soon as the “cut-off” point is known
between cracking and noncracking samples, the test is
complete for that particular electrode.
10.9.8 Report
10.9.8.1 In addition to the requirements of the norma-
tive references, the report shall include the following:
(1) Weld procedure (process and parameters);
(2) Materials identification including base metal
specification and filler metal specification;
(3) Specimen thickness and width;
(4) Specific test temperatures performed;
(5) Number of tests per condition or lot;
(6) The number, type, size, and location of defects (if
any); and
(7) Observations of unusual characteristics of the
specimens or procedure.
Copyright American Welding Society
Provided by IHS under license with AWS
Not for Resale
No reproduction or networking permitted without license from IHS
--`,,```,,,,````-`-`,,`,,`,`,,`---
AWS B4.0:2007 CLAUSE 10. WELDABILITY TESTING
99
Note: Surface finish to be 125 microinches (3 micrometers) R
a
maximum.
Figure 10.9.1—Specimen Dimensions and Test Set-Up
Copyright American Welding Society
Provided by IHS under license with AWS
Not for Resale
No reproduction or networking permitted without license from IHS
--`,,```,,,,````-`-`,,`,,`,`,,`---

CLAUSE 11. PROCESS SPECIFIC TESTS AWS B4.0:2007
100
11. Process Specific Tests
11.1 Stud Weld Test
11.1.1 Scope
11.1.1.1 This subclause covers mechanical testing of
stud welds. When testing of stud welds is required, the
procedure shall conform to this standard. This standard
does not specify requirements or acceptance criteria.
11.1.1.2 When specified, this standard is applicable to
the following:
(1) Qualification of materials, welding operators, and
welding procedure;
(2) Information, basis of inspection and fabrication
quality control (when acceptance criteria have been
established); and
(3) Research and development.
11.1.1.3 When these tests are specified, the following
information shall be furnished:
(1) Weld procedure (process and parameters);
(2) The specific tests and number of specimens that
are required;
(3) Base metal specification/identification;
(4) Position of welding;
(5) Stud analyses or specification (part number), or
both;
(6) Type of testing;
(7) Acceptance criteria; and
(8) For bend testing, the maximum angle of bend
must be specified, and for torque testing, the torque to be
used must be specified.
11.1.2 Normative References. The following standards
contain provisions which, through reference in this text,
constitute mandatory provisions of this test. For undated
references, the latest edition of the referenced standard
shall apply. For dated references, subsequent amend-
ments to, or revisions of, any of these publications do not
apply.
AWS Documents:
AWS C5.4, Recommended Practices for Stud
Welding
AWS D1.1, Structural Welding Code—Steel
11.1.3 Summary of Method. The specimen is tested by
one of two methods:
(1) The stud is bent by striking with a hammer or
bending it using a length of tube or pipe, or
(2) A tensile load is applied to the stud using an
appropriate fixture. This commonly is accomplished by
use of a torque wrench and a stand-off sleeve.
11.1.4 Significance
11.1.4.1 Mechanical testing of arc welded studs is
used to evaluate weld soundness, tensile properties, and
ductility of the stud weld.
11.1.4.2 These tests are primarily used as a welding
procedure qualification method to evaluate welding
parameters and surface preparation.
11.1.5 Apparatus. Apparatus used shall be capable of
firmly holding the test assembly and applying the bend-
ing force or torque as needed.
11.1.6 Specimens
11.1.6.1 Test specimens shall be prepared by welding
the studs being tested (qualified) to specimen plates of
the appropriate base metal as specified in 11.1.1.3.
11.1.6.2 Test specimens shall be made using the
appropriate automatic timing, voltage, current, and gun
settings for lift and plunge as recorded in 11.1.1.3.
11.1.7 Procedure. The following are two test procedures
as specified in Part 11.1.3:
(1) Bend Testing. The required number of welded
specimens shall be tested by bending the required num-
ber of degrees from their original axis. Bending may be
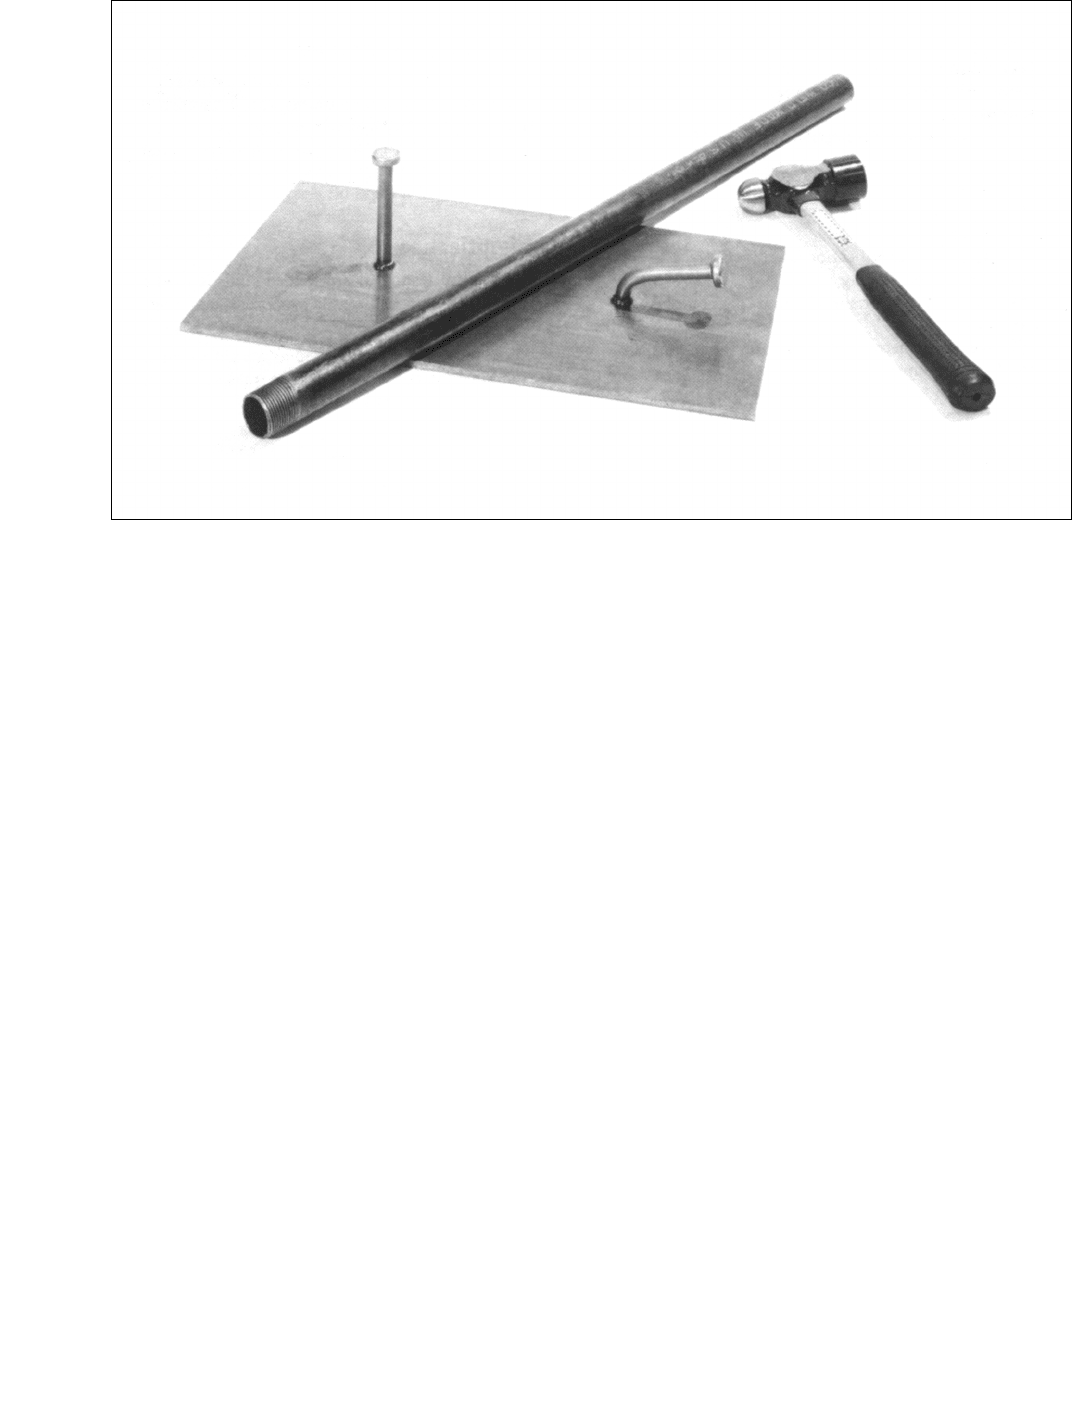
done by striking the stud with a hammer or by bending it
using a length of tube or pipe as shown in Figure 11.1.1;
and
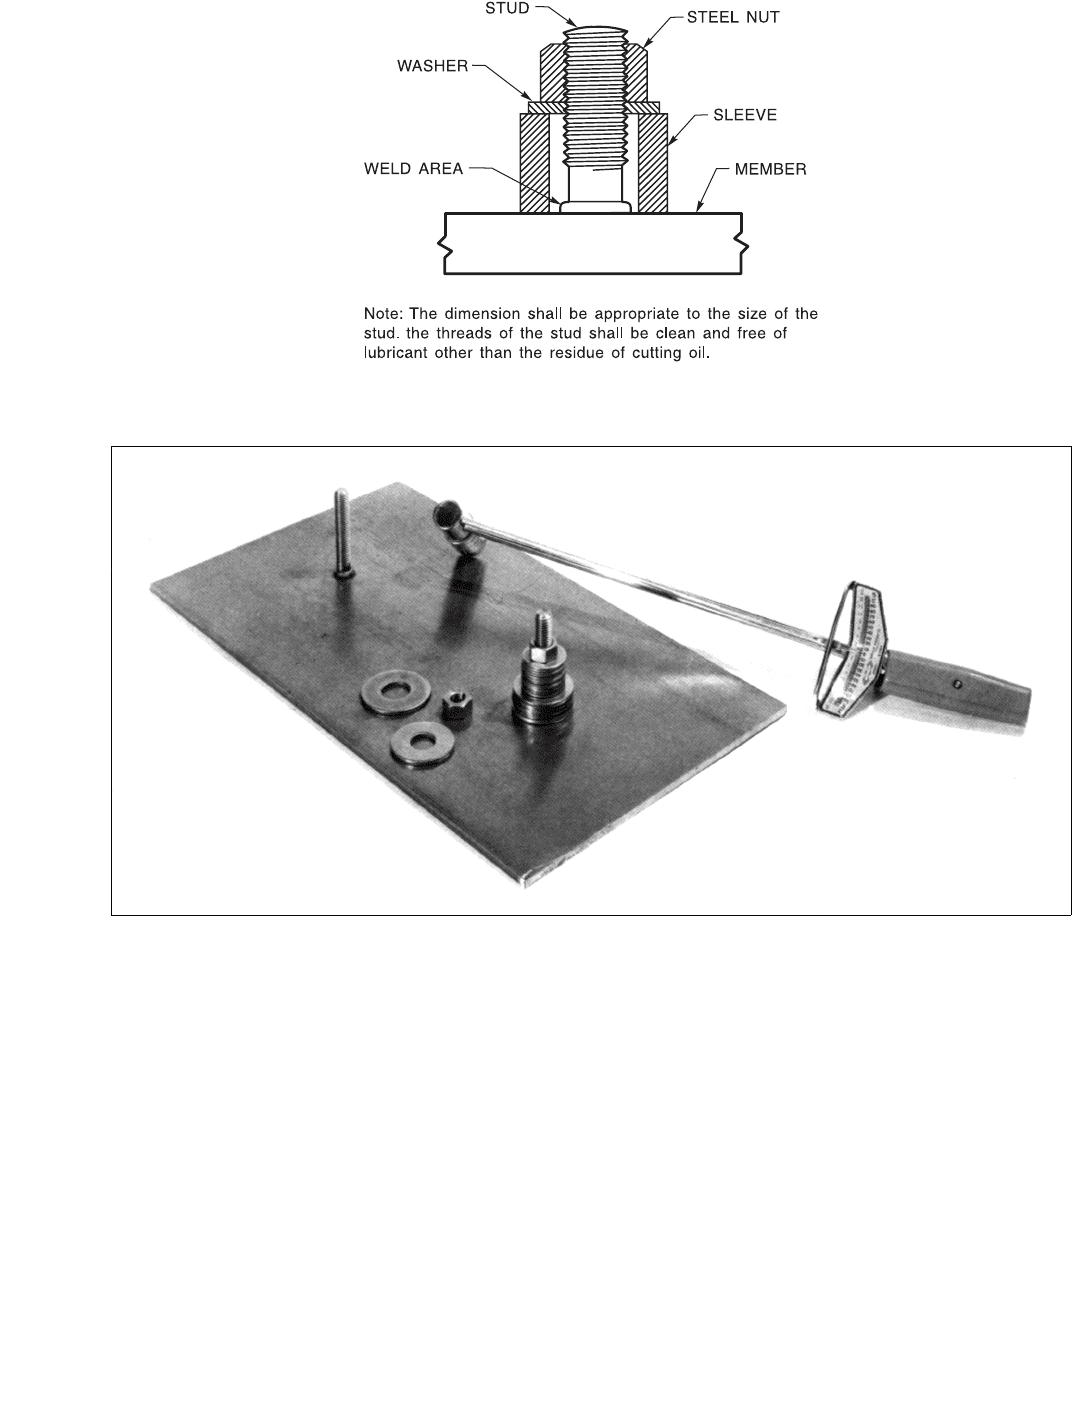
(2) Torque Testing. The required number of stud
welded specimens shall be tested by applying a torque
using equipment as shown in Figure 11.1.2. A steel
sleeve or washers, of appropriate size are placed over the
stud. A nut of the same material as the stud is tightened
against the washer bearing on the sleeve, using a torque
wrench. Tightening the nut applies the tensile load to the
weld. Torque is applied until the specified level is
reached or the weld fails. The results of this test may be
significantly affected by friction. Care should be taken to
minimize this effect.
11.1.8 Report. In addition to the requirements of appli-
cable documents, the report shall include the following:
(1) Test results and observations,
(2) The information listed in Part 11.1.1.3, and
(3) Drawings showing shapes and dimensions of studs
and arc shields.
Copyright American Welding Society
Provided by IHS under license with AWS
Not for Resale
No reproduction or networking permitted without license from IHS
--`,,```,,,,````-`-`,,`,,`,`,,`---
AWS B4.0:2007 CLAUSE 11. PROCESS SPECIFIC TESTS
101
Figure 11.1.1—Equipment for Bend Tests for Welded Studs
Copyright American Welding Society
Provided by IHS under license with AWS
Not for Resale
No reproduction or networking permitted without license from IHS
--`,,```,,,,````-`-`,,`,,`,`,,`---
CLAUSE 11. PROCESS SPECIFIC TESTS AWS B4.0:2007
102
Figure 11.1.2—Equipment for Applying a Tensile Load to a Welded Stud Using Torque
Copyright American Welding Society
Provided by IHS under license with AWS
Not for Resale
No reproduction or networking permitted without license from IHS
--`,,```,,,,````-`-`,,`,,`,`,,`---

AWS B4.0:2007 CLAUSE 11. PROCESS SPECIFIC TESTS
103
11.2 Resistance Welding Test
7
11.2.1 Scope
11.2.1.1 This subclause covers the destructive testing
used to determine the weld quality and mechanical prop-
erties of resistance spot, seam, and projection welds.
When testing of resistance welds is required, the test
specimens and procedure shall conform to this standard.
This standard does not specify requirements or accep-
tance criteria.
11.2.1.1 This standard is applicable to the following,
where specified:
(1) Qualification of materials, welding personnel,
welding procedures;
(2) Information, specification of acceptance, manu-
facturing quality control; and
(3) Research and development.
11.2.1.2 When this standard is used the following
information shall be furnished:
(1) Weld procedure (process and parameters);
(2) The specific types and number of specimens
required;
(3) Base metal specification and thickness;
(4) Electrode material, diameter, and shape;
(5) Base metal surface condition; and
(6) Postweld temper time.
11.2.2 Normative References. The following standards
contain provisions which, through reference in this text,
constitute mandatory provisions of this test. For undated
references, the latest edition of the referenced standard
shall apply. For dated references, subsequent amend-
ments to, or revisions of, any of these publications do not
apply.
AWS Documents:
AWS C1.4M/C1.4, Specification for Resistance
Welding of Carbon and Low-Alloy Steels
11.2.3 Summary of Method
11.2.3.1 Weld Quality Tests. Three tests used to
determine the quality of resistance welds are:
7
Test procedure adopted from AWS C1.1M/C1.1:2000,
Recommended Practices for Resistance Welding.
(1) Peel Test. The peel test is used to determine the
weld button diameter and fracture mode of spot and pro-
jection welds;
(2) Bend Test. This test, which was developed for
aluminum and its alloys, is used for a quick check of pro-
duction spot weld soundness, particularly for freedom
from cracks or micro fissures. The bend test is not pre-
cise enough to calibrate equipment, evaluate machine
performance, or to set-up and qualify welding schedules.
It is intended as a supplement to the shear or peel tests. It
can be performed with equipment which is readily avail-
able in most shops and requires only visual examination
of the specimen; and
(3) Chisel Test. The test consists of forcing a tool
into the lap on each side of the weld until the lap joint
separates.
11.2.3.2 Mechanical Property Tests. The following
tests are used to assess the mechanical properties for
spot, seam, and projection welds:
(1) Tension-Shear Test. This test consists of pulling a
test specimen in tension to destruction on a standard ten-
sile testing machine and determining its tension-shear
characteristics;
(2) Tension Test. The purpose of the tension test is to
provide a method to determine the spot weld strength
under tensile loading;
(3) Cross-Joint Tension Test. This form of tension
test is designed to stress the weld in a direction normal to
the surface of the material so that tension at right angles
to the plane of the joint is produced;
(4) U-Specimen Tension Test. The purpose of this test
is to also determine the tension strength of spot weld but
is limited to base metal thicknesses and material that can
be readily bent into a U-shape;
(5) Pull Test. The pull test determines the resistance
of the welded joint to the opening mode of fracture. This
test may also be referred to as a “90° peel test”;
(6) Torsion Shear Test. The torsion-shear test may be
used where the strength and ductility of a spot weld is
required;
(7) Impact Test. The impact test differentiates
between degrees of weld resistance to fracture under
impact load. Five types of spot weld impact tests are
described in this standard;
(8) Fatigue Test. This test is used to evaluate the
fatigue performance of spot and projection welds for cer-
tain applications; and
Copyright American Welding Society
Provided by IHS under license with AWS
Not for Resale
No reproduction or networking permitted without license from IHS
--`,,```,,,,````-`-`,,`,,`,`,,`---
