AWS B4.0: 2007 Standard Methods for Mechanical Testing of Welds
Подождите немного. Документ загружается.

CLAUSE 10. WELDABILITY TESTING AWS B4.0:2007
74
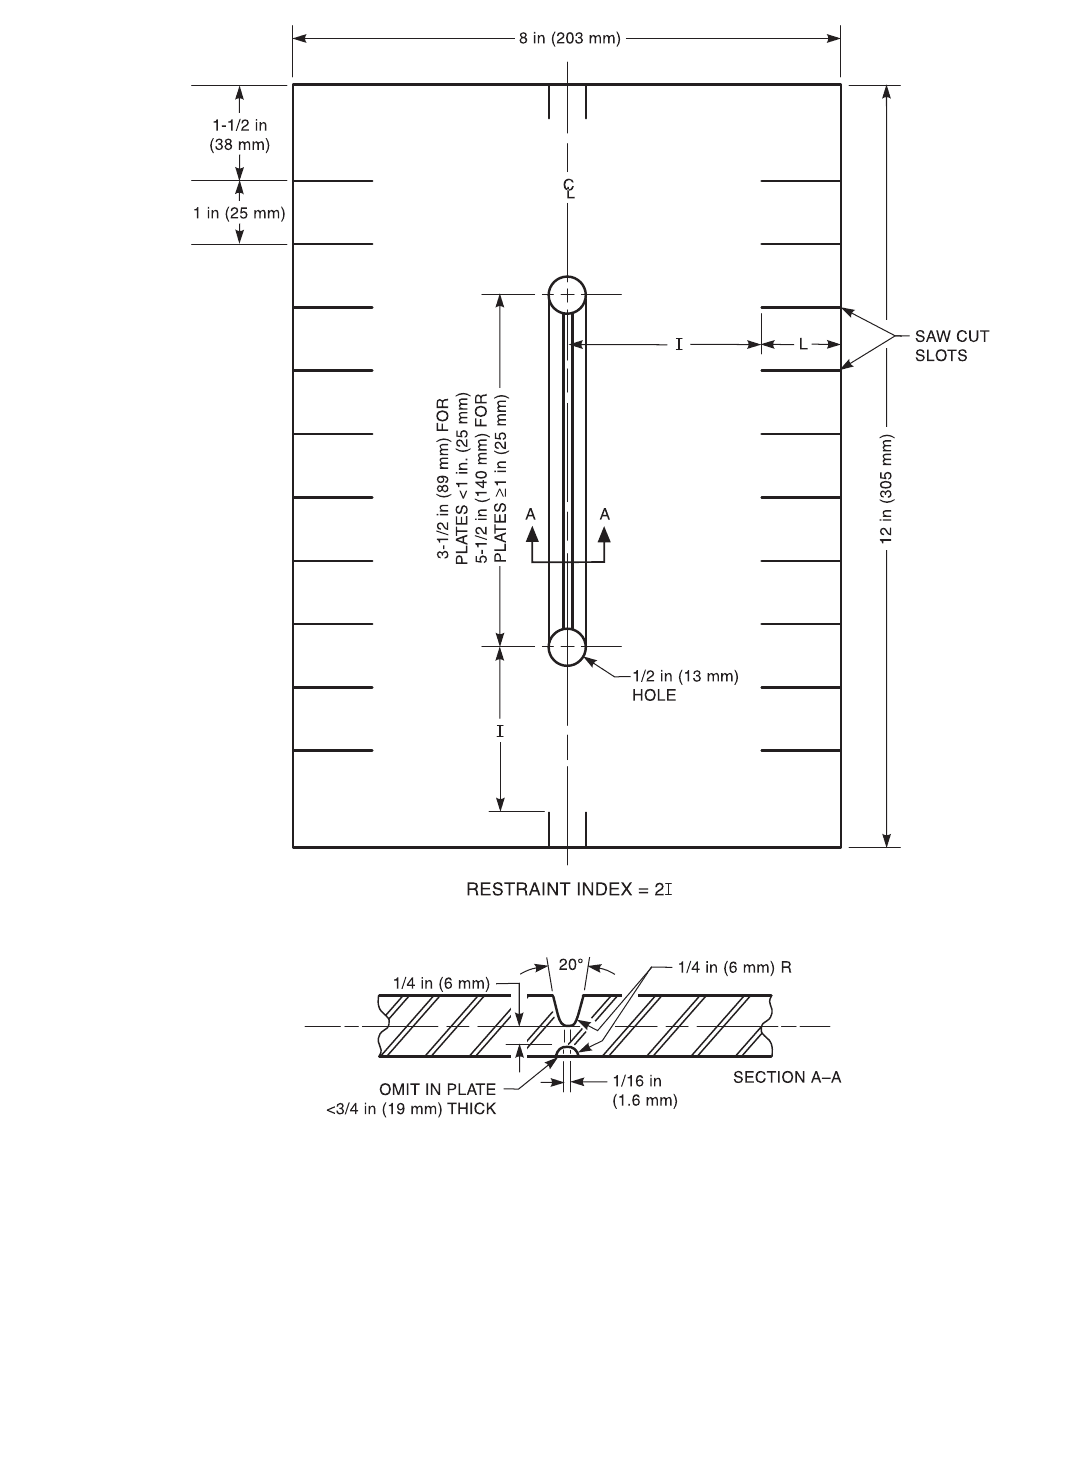
Figure 10.4.1—Lehigh Restraint Weld-Metal Cracking Test Specimen
Copyright American Welding Society
Provided by IHS under license with AWS
Not for Resale
No reproduction or networking permitted without license from IHS
--`,,```,,,,````-`-`,,`,,`,`,,`---
AWS B4.0:2007 CLAUSE 10. WELDABILITY TESTING
75
LEHIGH TEST RESULTS
Company Name _____________________________________________________________ Date _______________________
Job/Test No. ________________________________________________________________ Sheet _________ of __________
Description of Investigation ____________________________________________________________________________________
Base Metal Identification _______________________________ Thickness ___________________________________________
Base Metal Heat Treatment_____________________________ Heat No. ____________________________________________
Composition:
C__________ Si __________ Mn ________ P __________ S__________ Cr__________ Mo ________
Ni _________ V __________ Cu_________ Nb _________ Ca_________ B __________ Ti _________
Al _________ N __________ _________ __________ _________ __________ _________
Welding Procedure Spec. No. ___________________________ Welding Process ______________________________________
Electrode/Wire Spec. No. ______________________________ Commercial Name ____________________________________
Diameter ___________________________________________ Baking Treatment _____________________________________
Shielding Gas _______________________________________ Flow Rate ___________________________________________
Shielding Flux _______________________________________ Flux Size ____________________________________________
Current ____________________________________________ Preheat Temp.________________________________________
Voltage ____________________________________________ Postweld Heat Treatment _______________________________
Polarity ____________________________________________ Ambient Temp. _______________________________________
Travel Speed ________________________________________ Ambient Humidity _____________________________________
Heat Input __________________________________________
Weld Bead Size and Shape (flat, concave, or convex) _______________________________________________________________
Hydrogen Determination Method ________________________________________________ Date _______________________
__________________________________________________ Result ______________________________________________
Results:
Method of Crack Determination ________________________________________________________________________________
Resulting Cracking Index _____________________________________________________________________________________
Remarks __________________________________________________________________________________________________
Remarks __________________________________________________________________________________________________
Tested By __________________________________________________________________
Signature___________________________________________________________________ Date _______________________
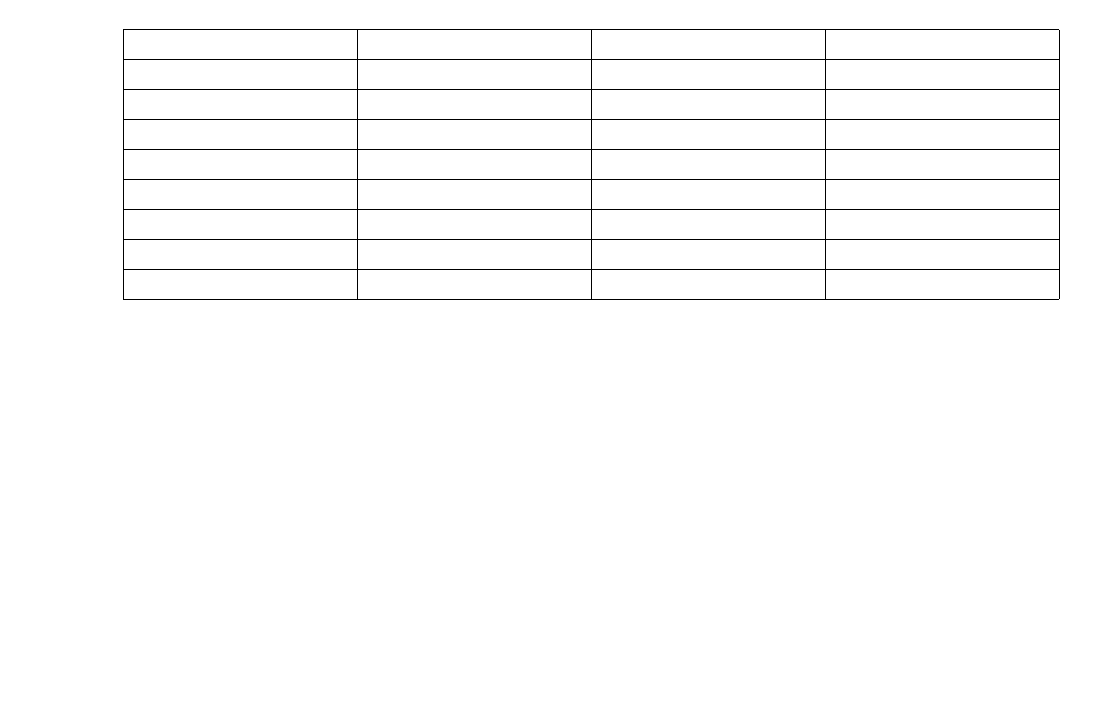
Figure 10.4.2—Suggested Data Sheet for Lehigh Test
Specimen No. Restraint Index Result (C or NC) Crack Length
Copyright American Welding Society
Provided by IHS under license with AWS
Not for Resale
No reproduction or networking permitted without license from IHS
--`,,```,,,,````-`-`,,`,,`,`,,`---

CLAUSE 10. WELDABILITY TESTING AWS B4.0:2007
76
10.5 Varestraint Test
10.5.1 Scope. The varestraint test is used to evaluate
base-metal weldability and determine the influence of
the welding variables on hot cracking of the base metal.
A means is provided for augmenting conventional
shrinkage strains to simulate the large shrinkage strains
found in highly restrained production weldments.
10.5.1.1 This standard is applicable to the following:
(1) Qualification of materials and welding procedures,
(2) Manufacturing quality control, and
(3) Research and development.
10.5.1.2 The use of this test is restricted as follows:
(1) This test is used for base metal in the thickness
range of 1/4 in (6 mm) to 1/2 in (13 mm). A variation of
this test, called the mini-varestraint test, is used for base
metal in the thickness range of 1/8 in (3 mm) to 1/4 in
(6 mm);
(2) Specialized equipment for testing (see Figure
10.5.1) and specimen examination is required;
(3) Welding usually is done by the mechanized gas
tungsten arc welding (GTAW) process to minimize vari-
ables in the welding parameter and testing results; and
(4) Specimens are tested under laboratory conditions.
Shop floor or field examination of specimens may not be
practical.
10.5.1.3 The following information shall be furnished:
(1) Weld procedure (process and parameters);
(2) Number of specimens to be tested;
(3) Orientation of specimens relative to the rolling
direction of the base metal, if known;
(4) Base-metal chemical composition;
(5) Base-metal thickness;
(6) Desired weld bead surface geometry (weld bead
profile);
(7) Specimen surface finish;
(8) Value of augmented tangential strain (see 10.5.5.4);
(9) Magnification to be used in examination for cracks;
and
(10) The rate of loading of the specimen during the
test (if applicable).
10.5.2 Summary of Method
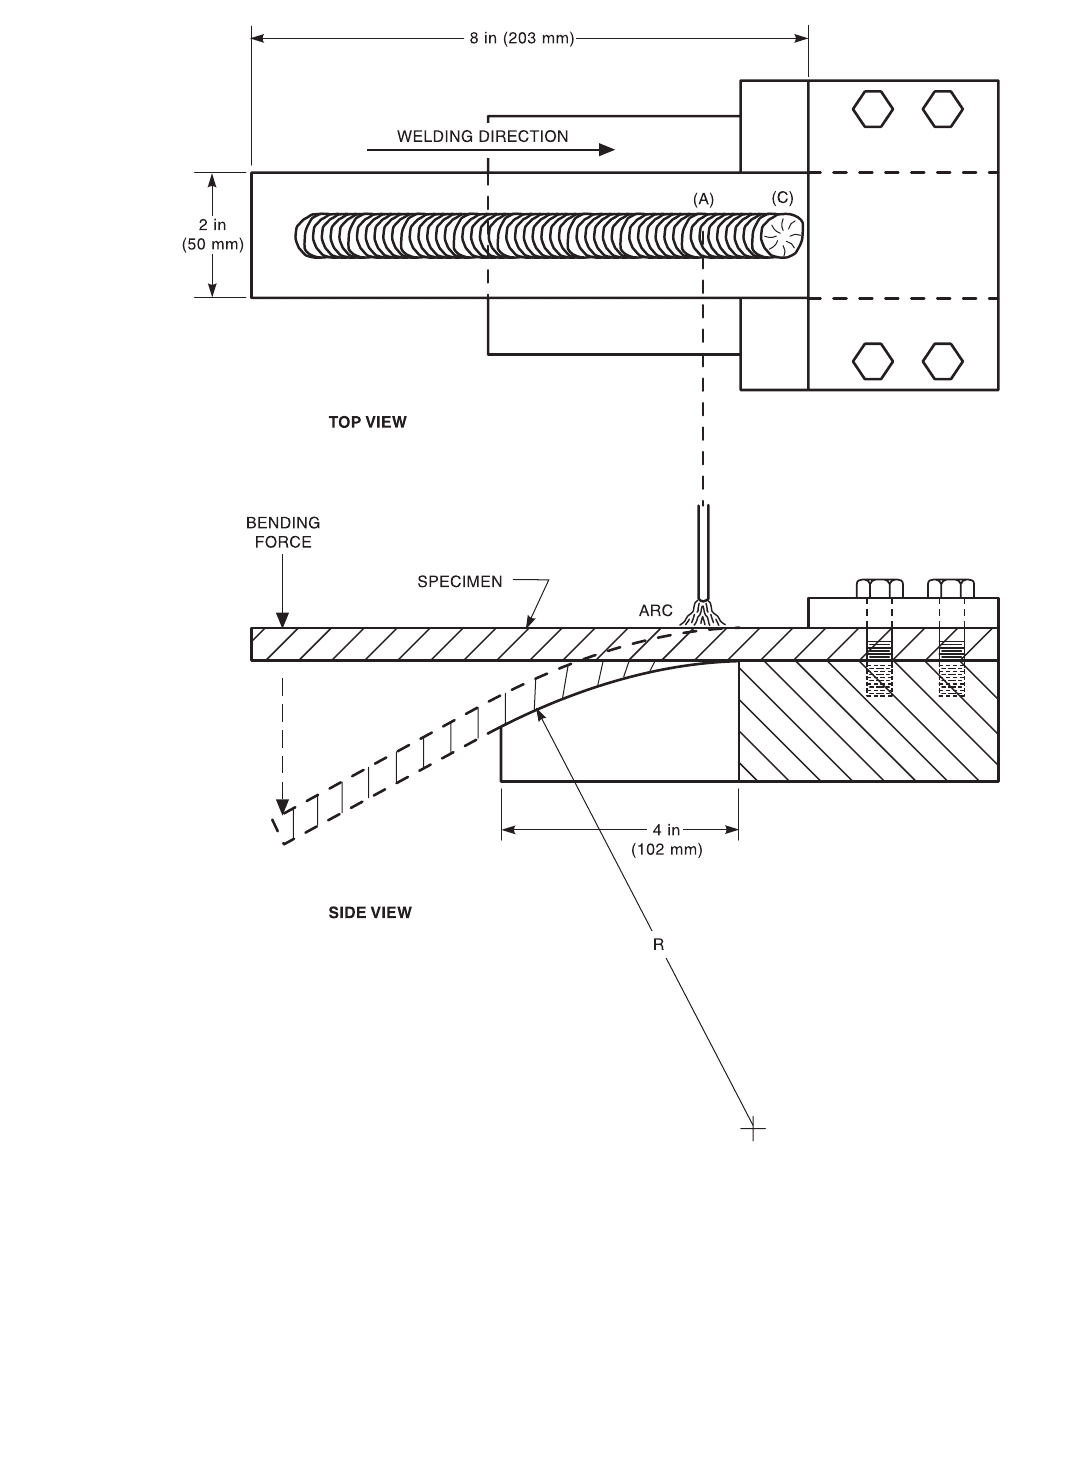
10.5.2.1 The test is conducted by depositing a weld on
a cantilevered specimen beginning at one end of the
specimen (Figure 10.5.1). When the weld progresses
along the centerline of the specimen to a predetermined
point (A), the specimen is bent to conform to a curved
die (B) as the arc continues to a location (C) near the end
of the specimen. A series of decreasing radius dies is
used to provide various magnitudes of strain, i.e., aug-
mented tangential strain, to the solidifying weld in a cor-
responding series of test specimens. The strain that
results in solidification cracking is an index of the crack
susceptibility of the base metal.
10.5.2.2 After cooling, the surface of the weld is
examined for the presence of cracks. Examination is
done at a magnification of 40X to 80X, and the length
and location of each crack is noted and recorded. The
specimen may be sectioned and polished for a more
accurate determination of the presence of cracks.
10.5.2.3 A smaller scale test, called the mini-
varestraint test, is used to study the hot-crack suscepti-
bility of expensive base metals or more common base
metals in sheet thicknesses. This test utilizes a smaller
test specimen [1 in (25 mm) wide × 6 in (152 mm) long]
and correspondingly smaller test equipment. The mini-
varestraint test may not be practical for thicker material
since its testing apparatus may not have the loading
capacity to bend the thicker material.
10.5.3 Significance. The varestraint test is used for the
analytic investigation of the hot-crack sensitivity of weld
deposits, the effect of specific alloying elements on this
sensitivity and the basic mechanisms of hot cracking.
This test combines a direct correlation with actual fabri-
cation behavior, reproducibility of results, an ability to
differentiate between small differences in test and weld-
ing variables, and uses relatively small test plates.
10.5.4 Definitions and Symbols. Unless otherwise noted,
the following designations are used:
A = point of arc progression at which bending force
is applied
B = a series of decreasing radius die blocks
C = location of termination of test weld
e = augmented tangential strain (%)
T = specimen thickness
R = die block radius
10.5.5 Apparatus
10.5.5.1 The equipment required for conducting the
varestraint test clamps one end of the flat specimen and
provides a method for bending the specimen around a
fixed curved die during welding. This concept is illus-
Copyright American Welding Society
Provided by IHS under license with AWS
Not for Resale
No reproduction or networking permitted without license from IHS
--`,,```,,,,````-`-`,,`,,`,`,,`---

AWS B4.0:2007 CLAUSE 10. WELDABILITY TESTING
77
trated in Figure 10.5.1. Curved dies having different
radius are used while conducting a series of tests. Each
specimen of the series is bent around a die having a
smaller radius than the die used with the previous speci-
men. The tests are continued until the die radius is small
enough to cause cracking.
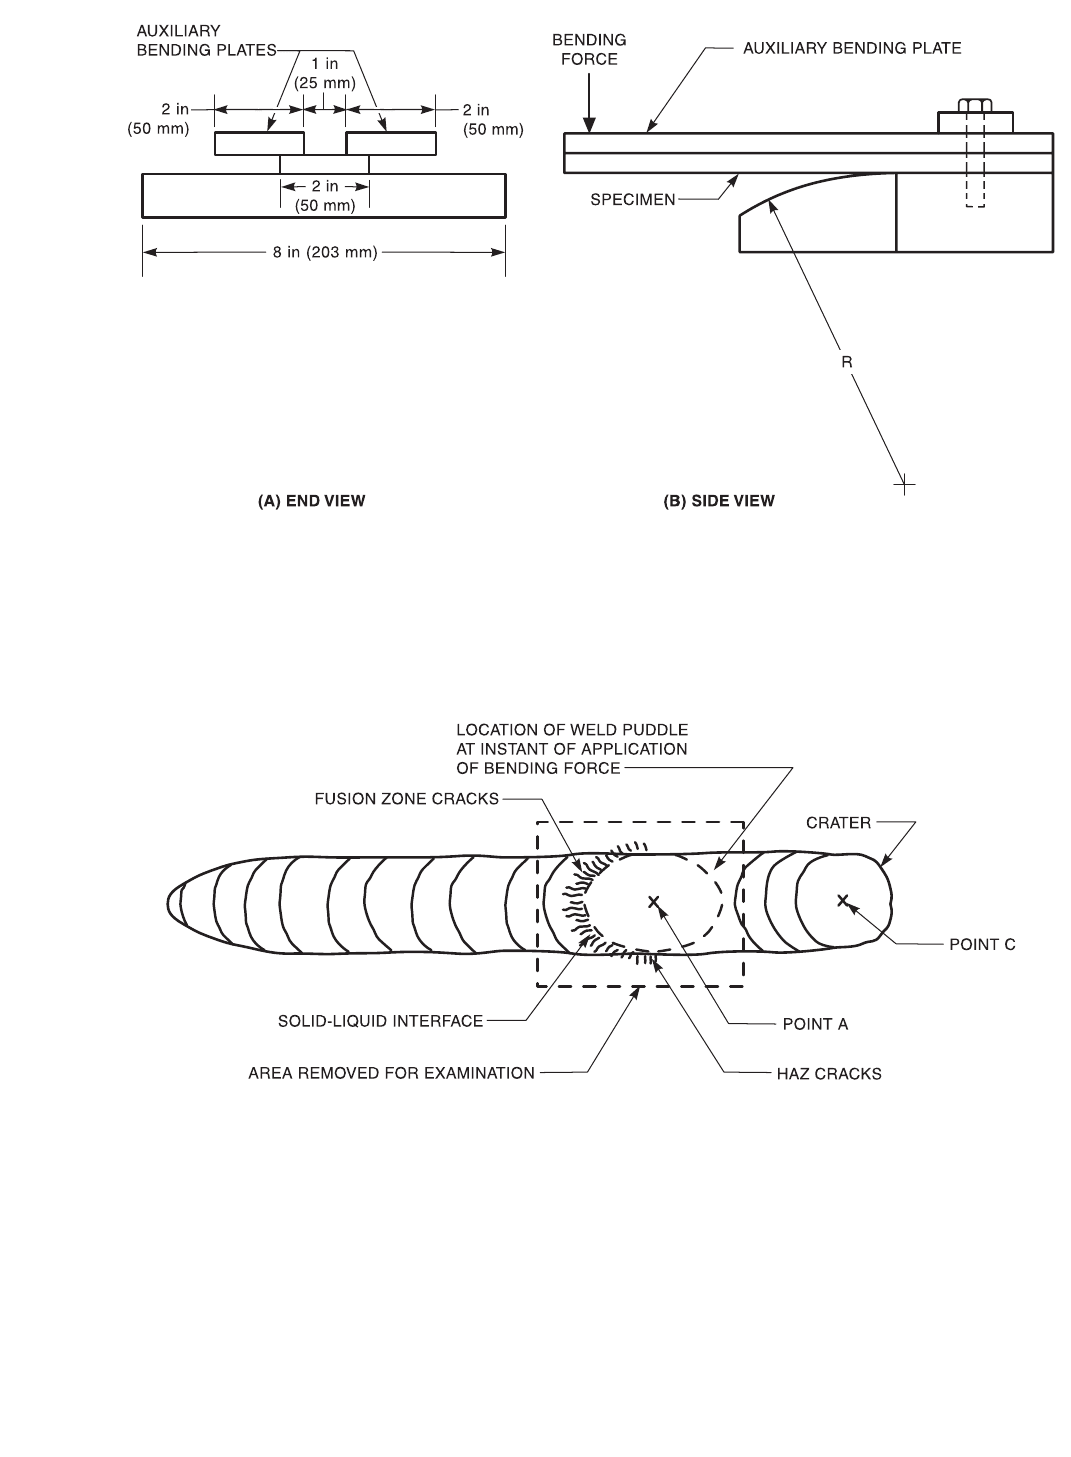
10.5.5.2 Localized bending in the vicinity of the mol-
ten weld puddle is avoided by using auxiliary bending
plates to force the test specimen to conform to the die
contour. These plates are clamped into the edges of the
specimen and are bent along with the specimen. The
plates are made from rolled steel; their size is 1/2 in
(13 mm) thick by 2 in (50 mm) wide by 12 in (305 mm)
long. These auxiliary plates are illustrated in Figure
10.5.2. Auxiliary plates used with the mini-varestraint
test are 1/4 in (6 mm) thick.
10.5.5.3 The bending force may be applied either
hydraulically or pneumatically. The design of the equip-
ment and method for bending depends on the individual
equipment builder.
10.5.5.4 The augmented tangential strain for given
radius of curvature of the die block can be calculated
from the following formula:
where
e = augmented tangential strain (%),
T = specimen thickness, and
R = die block radius.
The typical range of augmented tangential strain is 0% to
4%. The required die radius for a given value of aug-
mented tangential strain can be calculated using the same
equation.
10.5.5.5 Die block radii for the mini-varestraint test
are calculated in the same manner as for the varestraint
test. The overall size of the mini-varestraint die block
may be smaller as the test specimen is smaller.
10.5.6 Specimens. The varestraint test specimens are
rough sawed and machined to size. The specimen size is
2 in (50 mm) wide by 12 in (305 mm) long. The speci-
men size thickness is 1/4 in (6 mm) or 1/2 in (13 mm)
The mini-varestraint specimen is 1 in (25 mm) wide by
6 in (152 mm) long. Typical mini-varestraint specimen
thicknesses are in the range of 1/8 in (3 mm) to 1/4 in
(6 mm). The specimen surface on which the test weld
will be produced should be machined in the longitudinal
direction to a finish no rougher than 125 microinches
(3 micrometers) R
a
unless it is desired to simulate a sur-
face condition used in service.
e
T
2RT+()
---------------------=
10.5.7 Procedure
10.5.7.1 The varestraint specimen is clamped in the
test fixture. Auxiliary bending plates, when needed to
facilitate bending, are clamped in the fixture with the
specimen. The removable die block of the desired radius
is fastened in the position shown in Figure 10.5.1. The
arc is initiated on the centerline of the specimen, approx-
imately 2 in (50 mm) from the specimen’s unclamped
end. The bending force (F) is suddenly applied as the
center of the arc passes Point A, which is near the point
of tangency between the curved surface of the die block
and the fixed end of the specimen. The specimen and
auxiliary bending plates are bent downward until the
specimen conforms to the radius of curvature of the top
surface of the die block. The rate of arc travel is constant
from its point of initiation to its point of termination in
the runoff area at location C.
10.5.7.2 The bending load and the shielding gas flow
(if used) are maintained for five minutes after termina-
tion of the weld pass. The specimen then is removed
from the fixture for examination.
10.5.7.3 The following test parameters shall be
maintained:
(1) Number of Specimens. A minimum of three speci-
mens shall be tested under the same conditions at each
selected or required value of augmented tangential strain.
(2) Specimen Orientation. The specimen shall be
taken from the base metal so that the 12 in (305 mm)
dimension is parallel to the final direction of rolling or
major working unless the specimen used is a casting or if
service conditions in which a different orientation of roll-
ing direction are to be simulated.
(3) Weld Geometry. The weld puddle geometry is
kept constant when using the maximum crack length cri-
terion [see 10.5.8.3(2)] for screening of materials.
10.5.8 Report
10.5.8.1 The as-welded surface near Point A is exam-
ined for visual evidence of cracks at a magnification of
40X, 60X, or 80X. The locations of any HAZ or fusion-
zone cracks are shown schematically in Figure 10.5.3.
The length of each crack shall be measured to the nearest
0.001 in (0.025 mm) with a low-power microscope (40X,
60X, or 80X) containing a calibrated reticle in the eye-
piece. The test results that are reported shall include the
following:
(1) The base-metal type, composition, thickness, and
condition;
(2) The percent augmented tangential strain;
Copyright American Welding Society
Provided by IHS under license with AWS
Not for Resale
No reproduction or networking permitted without license from IHS
--`,,```,,,,````-`-`,,`,,`,`,,`---

CLAUSE 10. WELDABILITY TESTING AWS B4.0:2007
78
(3) The total crack length of the three specimens
tested under the same conditions that were found on the
as-welded surface at the specified magnification (40X,
60X, or 80X) and the location of the cracks (weld metal
or HAZ);
(4) The maximum crack length of each of the three
specimens tested under the same conditions that were
found on the as-welded surface at the specified magnifi-
cation (40X, 60X, or 80X) and the location of the cracks
(weld metal or HAZ);
(5) Weld procedure (process and parameters);
(6) Rate of loading of the specimen during the test (if
available).
10.5.8.2 The following criteria can be used to evaluate
the test results:
(1) Cracking Threshold. The cracking threshold is
the minimum augmented tangential strain required to
cause cracking in a particular base metal with a given set
of welding variables. This criterion provides a quantita-
tive method for comparing welding procedures.
(2) Maximum Crack Length. The maximum crack
length that is measured in a given specimen can be used
as a quantitative index for preliminary screening of base
metal, filler metal, or both, at comparable levels of
augmented tangential strain, provided constant puddle
geometry is maintained. This criterion is useful when
searching for metals with low crack sensitivity.
(3) Total Combined Crack Length. The total com-
bined crack length is obtained by adding the lengths of
cracks found in the weld metal and in the HAZ of each
specimen. The total combined crack length produced in
the weld metal and HAZ will give the best quantitative
index of the hot-crack sensitivity of the weld metal and
HAZ, respectively, for a given welding procedure. This
criterion also may be used to examine the effects of
welding procedure changes.
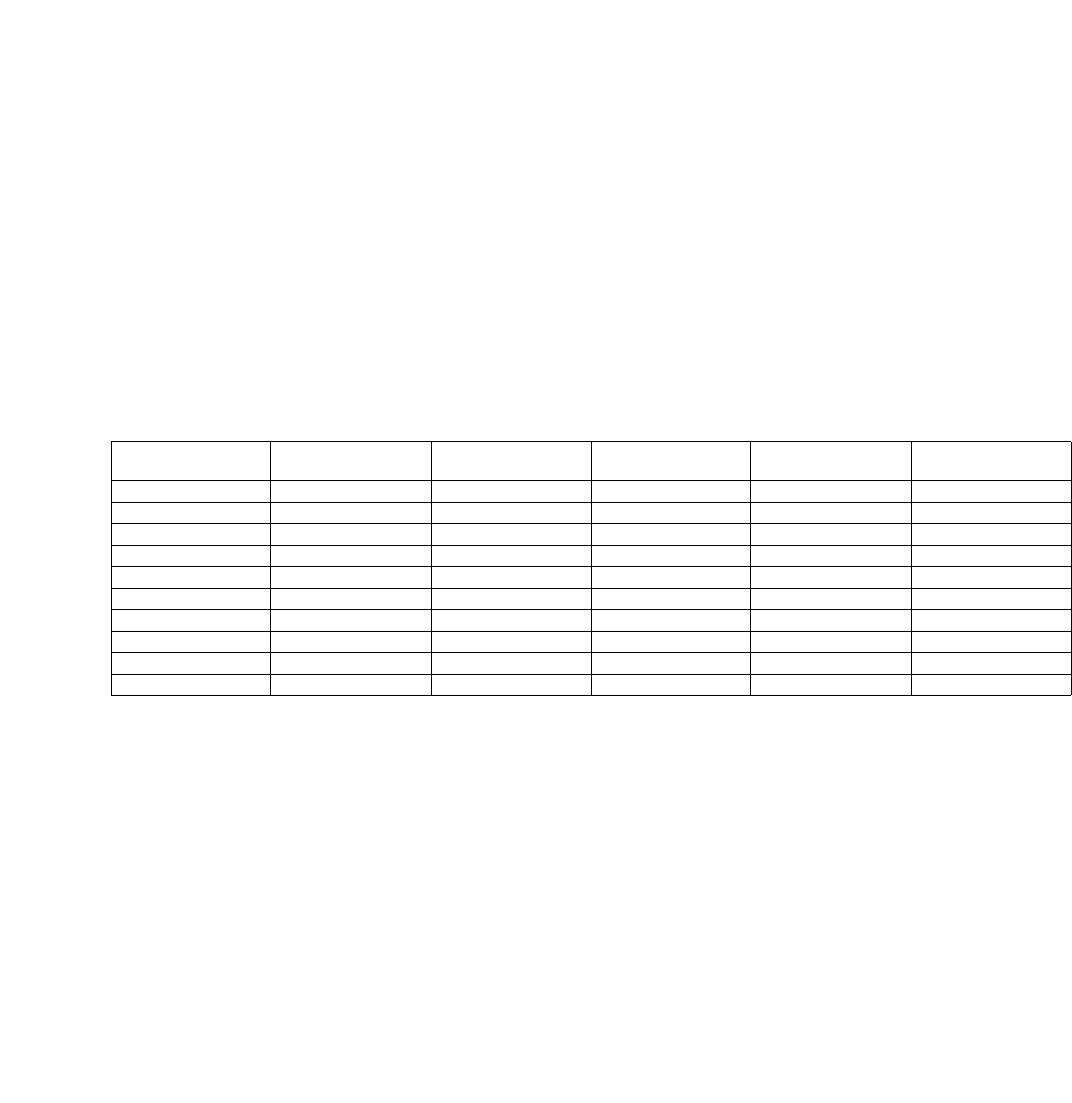
10.5.8.3 Test data should be recorded on a Test
Results Sheet similar to Figure 10.5.4.
10.5.9 Commentary
10.5.9.1 The technology of the varestraint test is un-
dergoing further refinement. The test specimen size and
geometry, test apparatus, interpretation of results, and
understanding of the effect of test variables on cracking
susceptibility are being examined in detail. Two
articles
5, 6
describing these investigations are included in
the Bibliography of this document. The classical aspects
of the varestraint test have been presented herein.
10.5.9.2 The rate of loading can affect test results and
use of certain rates of loading may result in scatter in test
results.
5
Lin, W. “A model for heat-affected zone liquation cracking.”
Welding in the World 30 (9/10): 236–242, 1992.
6
Lin, W., Lippold, J. C., and Baeslack III, W.A. “An evalua-
tion of heat-affected zone liquation cracking susceptibility, Part
I: Development of a method for quantification.” Welding Journal
72(4): 135-s–153-s, 1993.
Copyright American Welding Society
Provided by IHS under license with AWS
Not for Resale
No reproduction or networking permitted without license from IHS
--`,,```,,,,````-`-`,,`,,`,`,,`---
AWS B4.0:2007 CLAUSE 10. WELDABILITY TESTING
79
Figure 10.5.1—Varestraint Test Fixture and Specimen
Copyright American Welding Society
Provided by IHS under license with AWS
Not for Resale
No reproduction or networking permitted without license from IHS
--`,,```,,,,````-`-`,,`,,`,`,,`---
CLAUSE 10. WELDABILITY TESTING AWS B4.0:2007
80
Figure 10.5.2—Auxiliary Bending Plates
TOP SURFACE OF TEST WELD SHOWING LOCATION OF ARC, WELD PUDDLE, SOLID-LIQUID INTERFACE AT
INSTANT OF APPLICATION OF BENDING FORCE AND WELD METAL AND HEAT-AFFECTED ZONE HOT CRACKS.
Figure 10.5.3—Typical Indications on Top Surface of Test Weld
Copyright American Welding Society
Provided by IHS under license with AWS
Not for Resale
No reproduction or networking permitted without license from IHS
--`,,```,,,,````-`-`,,`,,`,`,,`---
AWS B4.0:2007 CLAUSE 10. WELDABILITY TESTING
81
VARESTRAINT TEST RESULTS
Company Name _____________________________________________________________ Date _______________________
Job/Test No. ________________________________________________________________ Sheet _________ of __________
Description of Investigation ____________________________________________________________________________________
Base Metal Identification:
Identification ________________________________________ Heat No. ____________________________________________
Width and Thickness__________________________________ Heat Treatment _______________________________________
Metallurgical Condition _______________________________________________________________________________________
Surface Condition ___________________________________________________________________________________________
Rolling Direction _____________________________________
Composition:
C__________ Si __________ Mn ________ P __________ S__________ Cr__________ Mo ________
Ni _________ V __________ Cu_________ Nb _________ Ca_________ B __________ Ti _________
Al _________ N __________ _________ __________ _________ __________ _________
Filler Metal:
Identification ________________________________________ Diameter ____________________________________________
Feed Rate __________________________________________
Composition:
C__________ Si __________ Mn ________ P __________ S__________ Cr__________ Mo ________
Ni _________ V __________ Cu_________ Nb _________ Ca_________ B __________ Ti _________
Al _________ N __________ _________ __________ _________ __________ _________
Welding Process _____________________________________ Electrode Type _______________________________________
Electrode Diameter ___________________________________ Shielding Gas ________________________________________
Shielding Gas Flow Rate_______________________________ Shielding Gas Dew Point________________________________
Current ____________________________________________ Polarity _____________________________________________
Arc Voltage _________________________________________ Arc Length___________________________________________
Travel Speed ________________________________________ Heat Input ___________________________________________
Ambient Temp. ______________________________________ Ambient Humidity _____________________________________
Results:
Cracking Threshold __________________________________________________________________________________________
Maximum Crack Length ______________________________________________________________________________________
Total Combined Crack Length__________________________________________________________________________________
Remarks __________________________________________________________________________________________________
Remarks __________________________________________________________________________________________________
Tested By __________________________________________________________________
Signature___________________________________________________________________ Date _______________________
Figure 10.5.4—Suggested Data Sheet for Varestraint Test
Specimen
No.
Die
Radius
Tangent
Strain
Crack
Location
Number
of Cracks
Length of
Each Crack
Copyright American Welding Society
Provided by IHS under license with AWS
Not for Resale
No reproduction or networking permitted without license from IHS
--`,,```,,,,````-`-`,,`,,`,`,,`---

CLAUSE 10. WELDABILITY TESTING AWS B4.0:2007
82
10.6 Oblique Y-Groove Test
10.6.1 Scope
10.6.1.1 The oblique Y-groove test (Tekken test) is a
single-pass, restrained groove weld test used to evaluate
susceptibility to hydrogen and weld metal solidification
cracking of steel weldments.
10.6.1.2 This standard is applicable to the following,
when specified:
(1) Qualification of materials and welding procedures;
(2) Information, basis for a acceptance, and manufac-
turing quality control; and
(3) Research and development.
10.6.1.3 The use of this test is restricted as follows:
(1) Base-metal thickness limited to 1/2 in (13 mm) or
greater, and
(2) Test results are applicable only to the base-
material thickness tested.
10.6.1.4 When this standard is used, the following
information shall be furnished:
(1) Welding procedure (process and parameters);
(2) Base-metal identification: specification, heat num-
ber, mill test chemical composition, and heat treatment;
(3) Base-metal thickness;
(4) Filler metal identification, specification, and
diameter;
(5) Filler metal preweld conditioning (e.g., baking);
(6) Weld preheat temperature;
(7) Maximum interpass temperature; and
(8) Acceptance criteria (if any).
10.6.2 Normative References. The following standards
contain provisions which, through reference in this text,
constitute mandatory provisions of this test. For undated
references, the latest edition of the referenced standard
shall apply. For dated references, subsequent amend-
ments to, or revisions of, any of these publications do not
apply.
AWS Documents:
AWS A4.3, Standard Methods for Determination of
the Diffusible Hydrogen Content of Martensitic, Bainitic,
and Ferritic Steel Weld Metal Produced by Arc Welding
10.6.3 Summary of Method
10.6.3.1 The test is performed using a set of three flat
plate test assemblies welded under identical conditions.
Welds are deposited on each side of the test area to pro-
vide restraint. A single test weld is deposited in the
restrained, machined groove of each assembly.
10.6.3.2 The combination of welding amperage, volt-
age, and travel speed shall be such that the specified heat
input range is obtained.
10.6.3.3 Each test weld is examined for the presence
of hydrogen-assisted cracks, not less than 72 h after
depositing the test weld. Test welds are sectioned as
required for internal examination.
10.6.3.4 Testing is usually conducted using several
tested sets welded identically over a range of preheat
temperatures so that 100% cracking occurs at the lowest
temperature test and 0% cracking occurs at the highest
temperature tested. Resulting data is useful as a compar-
ative measure of the susceptibility of the material to
cracking.
10.6.4 Significance. This test is used as a comparative
measure to assess the susceptibility to hydrogen and
weld metal solidification cracking of steel weldments.
10.6.5 Apparatus
10.6.5.1 A simple fixture is used to hold the test plates
so the restraining welds can be deposited. Water-cooled
mechanical means are used to section completed test
assemblies for internal examination for the presence of
cracks. Metallographic equipment is required for polish-
ing, etching, and examining specimens.
10.6.6 Specimens
10.6.6.1 Test assembly configuration is shown in Fig-
ure 10.6.1. All weld joint surfaces shall be machined to
125 microinches (3 micrometers) R
a
minimum. When it
is possible to identify the rolling direction of the material
being tested, the parts should be cut and assembled with
the rolling direction perpendicular to the weld groove,
unless otherwise specified.
10.6.6.2 The test assembly is fabricated by depositing
welds on each end of the weld groove to provide the nec-
essary restraint, as shown in Figure 10.6.1, Section A–A.
Low-hydrogen-type mild steel filler metal is normally
used. Welds shall be deposited by a suitable welding pro-
cess, using a deep penetrating arc and a weave-bead
technique to fill the joints with a minimum number of
weld beads. Care shall be taken to minimize angular dis-
tortion during welding. Weld reinforcement should be
approximately 1/16 in (1.6 mm). Maximum interpass
temperature should be in accordance with steel manufac-
Copyright American Welding Society
Provided by IHS under license with AWS
Not for Resale
No reproduction or networking permitted without license from IHS
--`,,```,,,,````-`-`,,`,,`,`,,`---

AWS B4.0:2007 CLAUSE 10. WELDABILITY TESTING
83
turers recommendations as applicable to the steel type
being joined.
10.6.6.3 Each test assembly shall be dimensionally
inspected after cooling to ensure the proper configuration
as shown in Figure 10.6.1, Section B–B. The groove root
opening dimension shall be within tolerance.
10.6.6.4 Fabricate a minimum of three test assemblies
per set.
10.6.7 Procedure
10.6.7.1 All welding shall be performed in the flat
position (1G).
10.6.7.2 Test assemblies shall be uniformly heated in
an oven, to a temperature slightly higher than the desired
preheat temperature. The test assembly is removed from
the oven and the surface temperature near the joint prep-
aration shall be monitored. Welding shall begin when the
desired preheat temperature is reached.
10.6.7.3 The single-pass test weld shall be deposited
as shown in Figure 10.6.2. Welding techniques which
promote good fusion and crater fill shall be employed.
Following welding, the assembly shall be allowed to
cool in still air. It shall be left at ambient temperature for
minimum period of 48 h before examination for cracks.
10.6.7.4 The test weld area shall be examined for sur-
face cracks. If surface cracks are visible, no further
examination is required. If cracking is not visible, the
weld shall be sectioned and examined microscopically.
10.6.7.5 When sectioning is required, the test weld
should be sectioned at the one-fourth, one-half, and
three-fourth length positions. Water-cooled mechanical
means shall be used to section the test welds. Assemblies
shall be securely clamped in such a manner that the cut-
ting process does not contribute to weld root cracking.
Sectioned specimens shall be polished, etched and exam-
ined at 20X for cracks.
10.6.7.6 When the test is used to evaluate susceptibil-
ity to hydrogen-assisted cracking, a diffusible hydrogen
determination shall be performed for each welding pro-
cess and consumable in accordance with AWS A4.3. The
diffusible hydrogen determination shall be performed
under the same conditions as the test weld.
10.6.8 Report
10.6.8.1 The test results that typically are reported
include:
(1) Test number;
(2) Welding procedure specification and procedure
qualification record numbers (if applicable);
(3) Base metal identification;
(4) Base metal thickness;
(5) Filler metal identification;
(6) Filler metal diameter;
(7) Shielding gas identification;
(8) All welding parameters necessary to completely
define the procedure and heat input;
(9) Weld preheat temperature;
(10) Ambient temperature and relative humidity at
time of welding;
(11) Maximum interpass temperature allowed during
welding of restraining welds (if applicable);
(12) Any observation of unusual characteristics of the
test specimen, weld profile, section surface, or proce-
dure; and
(13) Results of diffusible hydrogen tests.
10.6.8.2 Test data should be recorded on a Test
Results Sheet similar to Figure 10.6.3.
Copyright American Welding Society
Provided by IHS under license with AWS
Not for Resale
No reproduction or networking permitted without license from IHS
--`,,```,,,,````-`-`,,`,,`,`,,`---
