AWS B4.0: 2007 Standard Methods for Mechanical Testing of Welds
Подождите немного. Документ загружается.

CLAUSE 9. BREAK TESTS (NICK AND FILLET WELD) AWS B4.0:2007
44
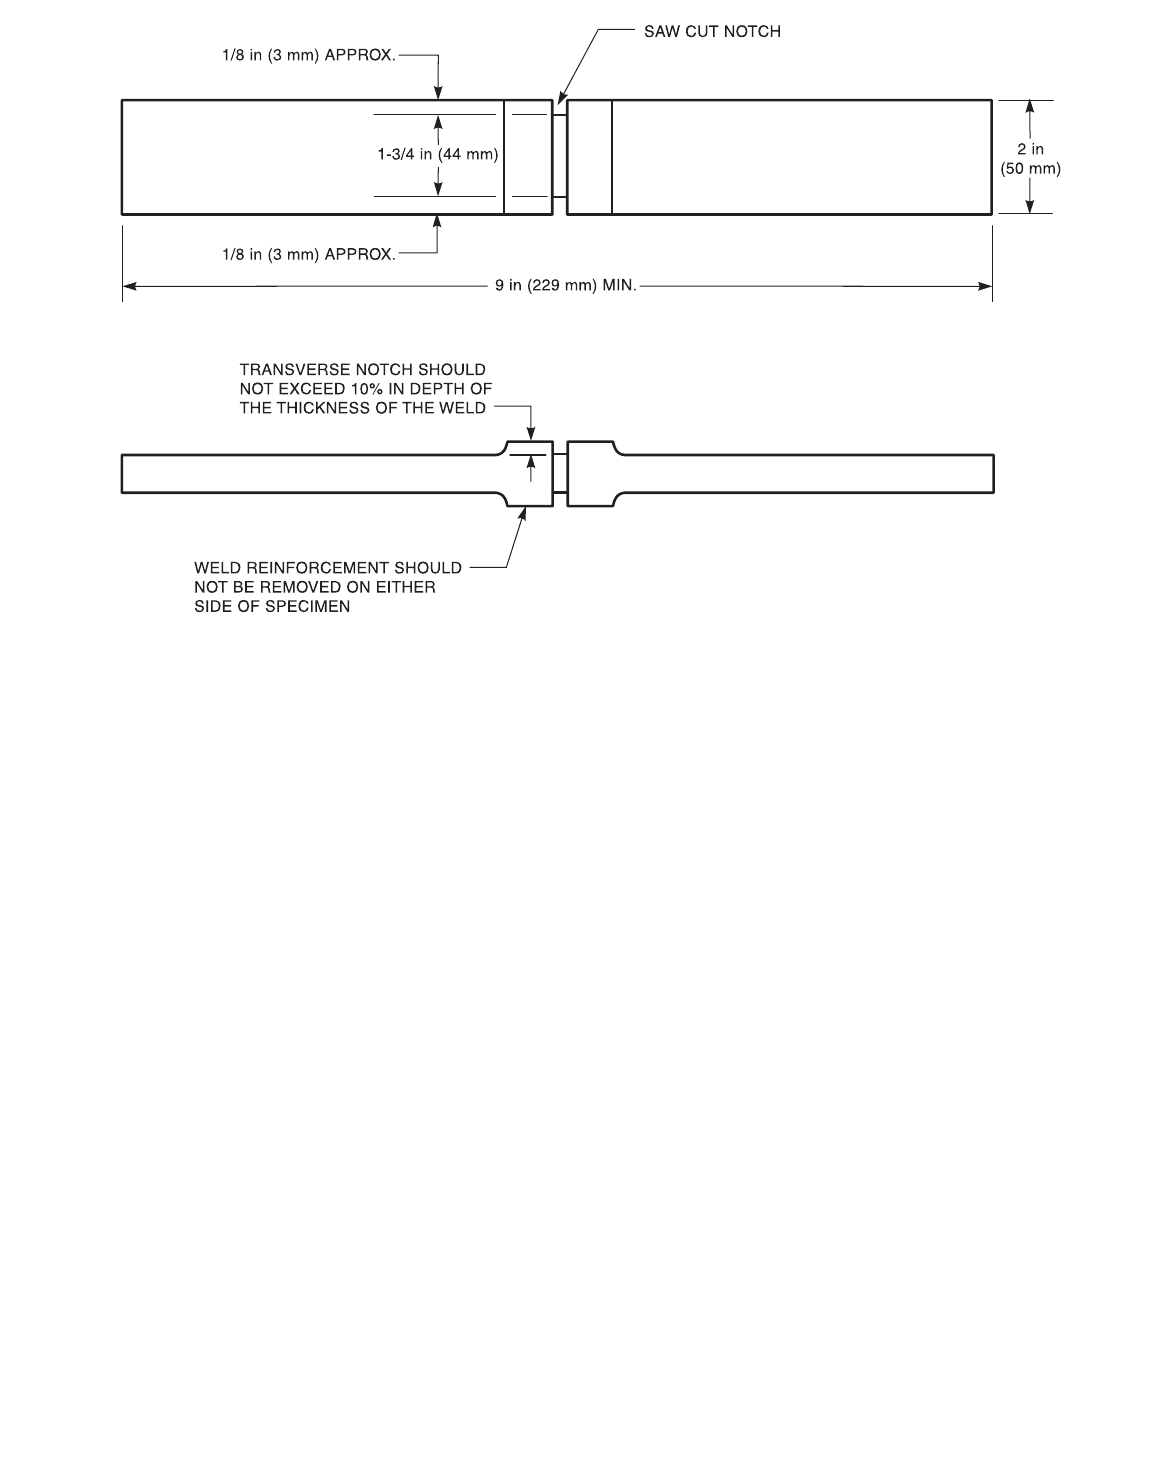
Figure 9.1.5—Specimen for Flash Butt Welds
Copyright American Welding Society
Provided by IHS under license with AWS
Not for Resale
No reproduction or networking permitted without license from IHS
--`,,```,,,,````-`-`,,`,,`,`,,`---
AWS B4.0:2007 CLAUSE 9. BREAK TESTS (NICK AND FILLET WELD)
45
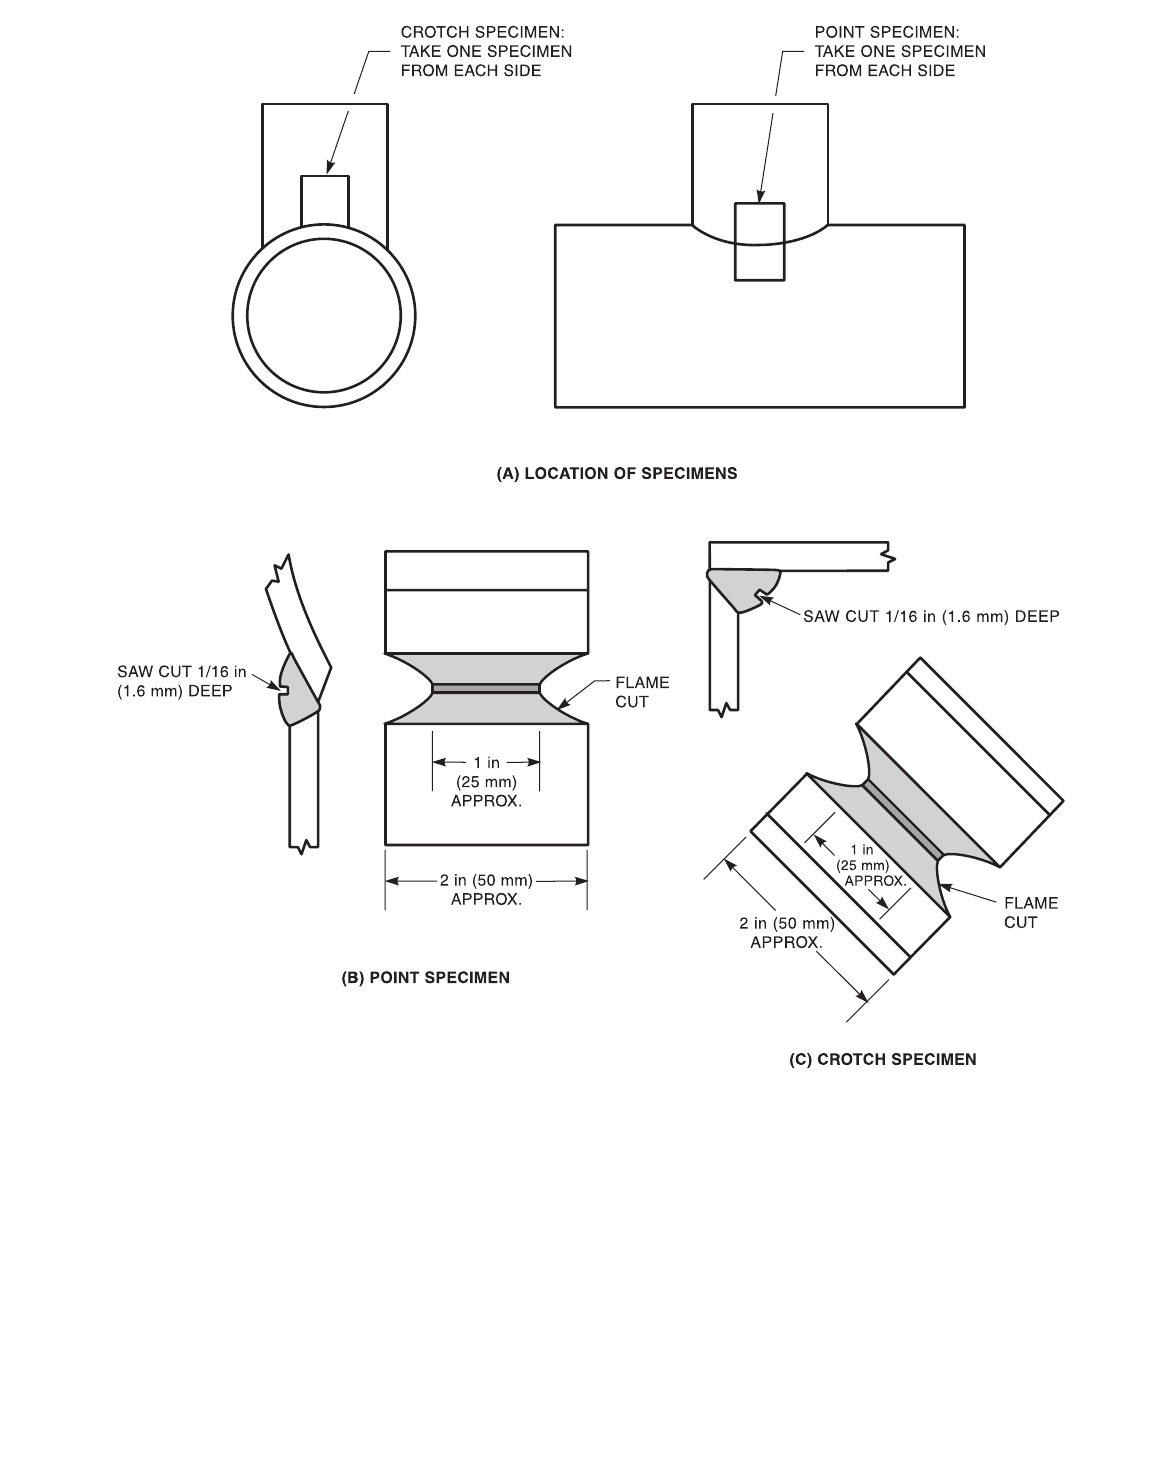
Figure 9.1.6—Specimens for Nick-Break Test of Branch Joint Connections
Copyright American Welding Society
Provided by IHS under license with AWS
Not for Resale
No reproduction or networking permitted without license from IHS
--`,,```,,,,````-`-`,,`,,`,`,,`---
CLAUSE 9. BREAK TESTS (NICK AND FILLET WELD) AWS B4.0:2007
46
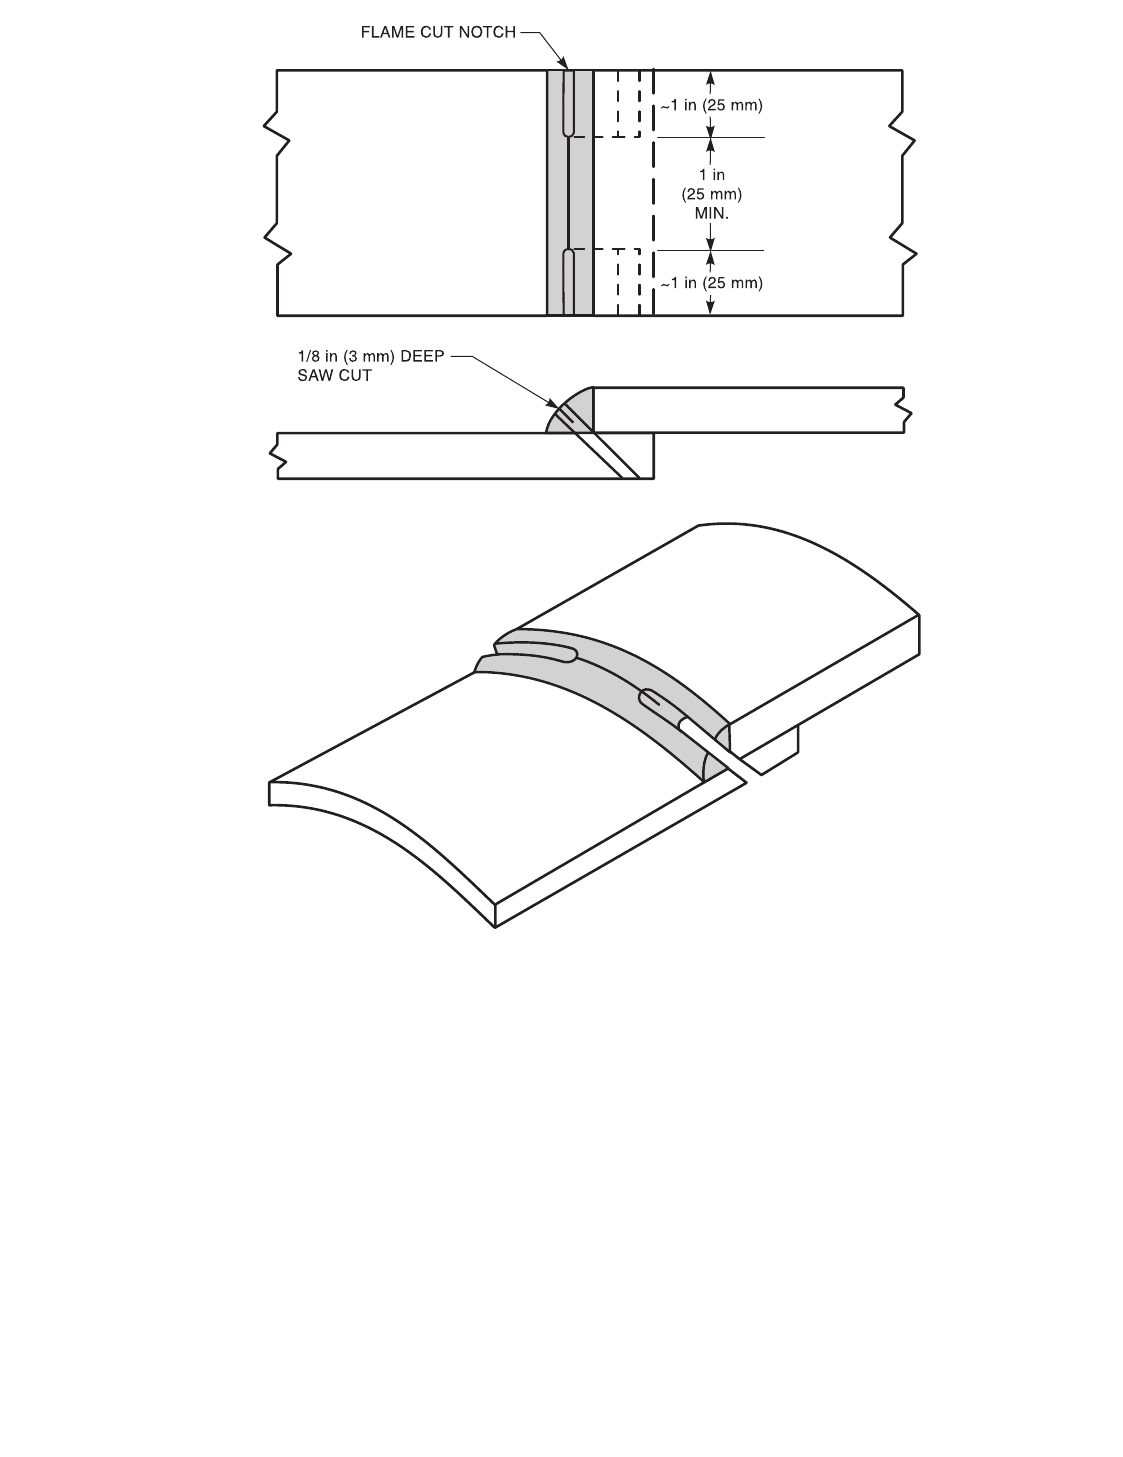
Figure 9.1.7—Pipe Sleeve Test Specimen
Copyright American Welding Society
Provided by IHS under license with AWS
Not for Resale
No reproduction or networking permitted without license from IHS
--`,,```,,,,````-`-`,,`,,`,`,,`---
AWS B4.0:2007 CLAUSE 9. BREAK TESTS (NICK AND FILLET WELD)
47
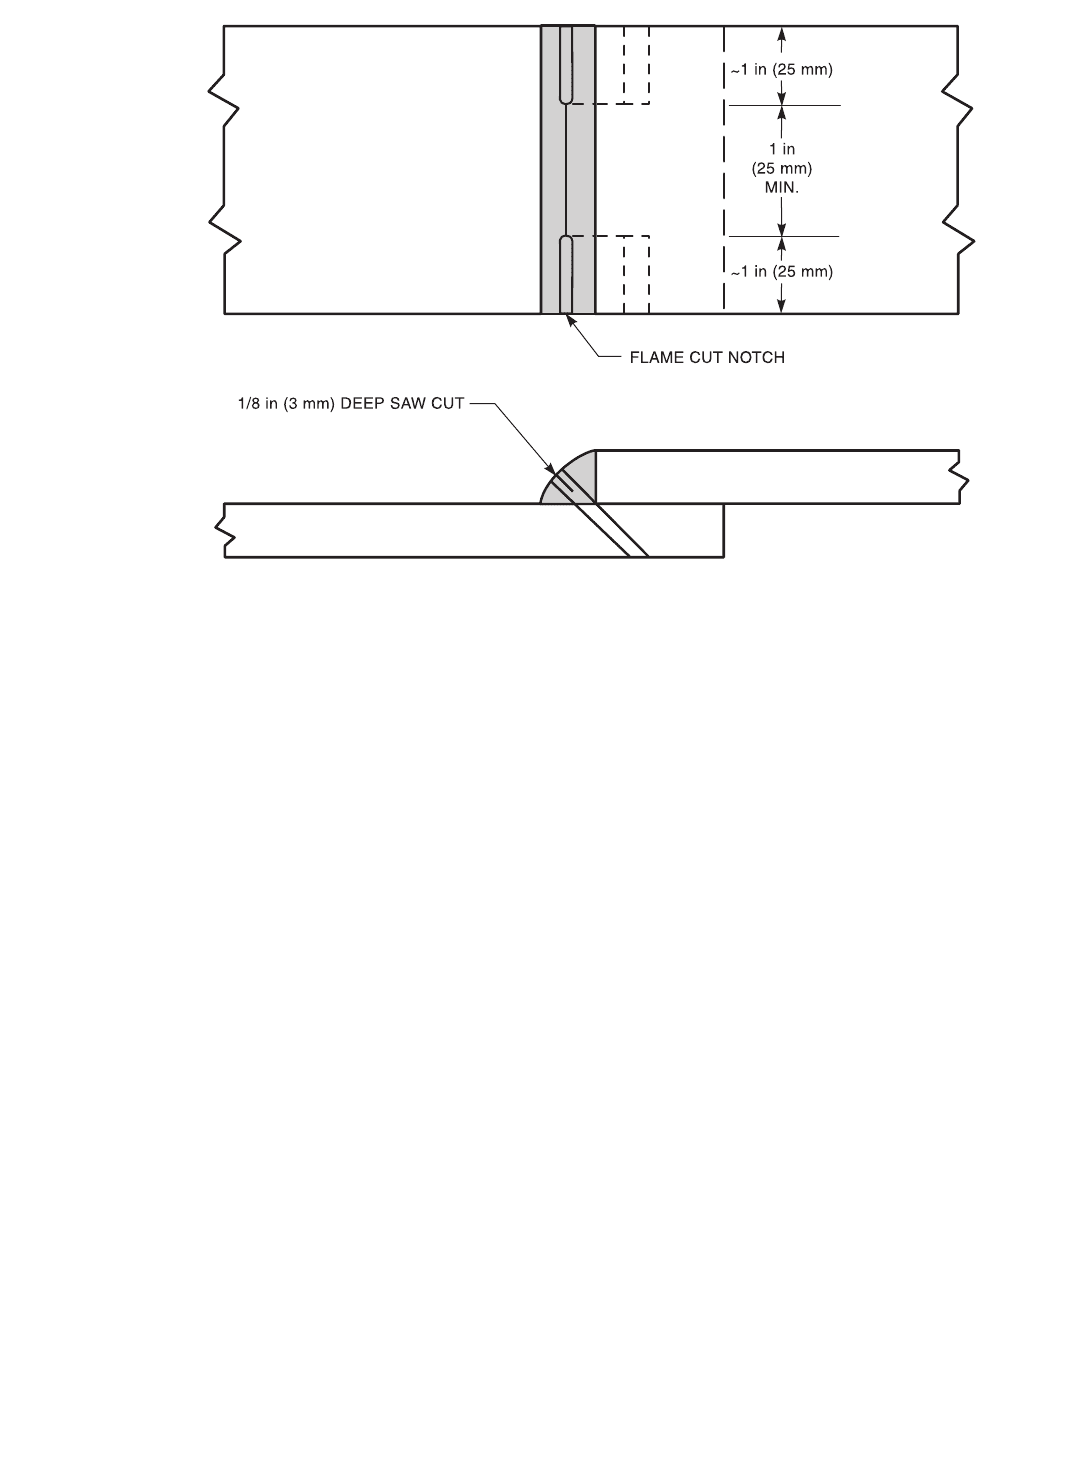
Figure 9.1.8—Fillet Welded Plate Specimens
Copyright American Welding Society
Provided by IHS under license with AWS
Not for Resale
No reproduction or networking permitted without license from IHS
--`,,```,,,,````-`-`,,`,,`,`,,`---

CLAUSE 9. BREAK TESTS (NICK AND FILLET WELD) AWS B4.0:2007
48
9.2 Fillet Weld Break Test
9.2.1 Scope
9.2.1.1 This subclause covers the fillet weld sound-
ness test procedures, test parameters, and methods of
obtaining data and the observations usually required, but
does not specify the requirements or acceptance criteria.
When this standard is used as a portion of a standard or
detail specification, the following information should be
furnished:
(1) The specific tests and the number of specimens
that are required,
(2) Specific orientation of specimens within the weld
sample,
(3) The type of data required and observations to be
made,
(4) The limiting numerical values, and
(5) The interpretation, if any, of the data and
observations.
9.2.2 Summary of Method. One leg of a T-joint is bent
upon the other so as to place the root of the weld in ten-
sion. The load is maintained until the legs of the joint
come into contact with each other or the joint fractures.
9.2.3 Significance. The purpose of this test is to deter-
mine the soundness of fillet welded joints. This test is
qualitative in nature with acceptance determined by the
extent and nature of any flaws present.
9.2.4 Definitions and Symbols. Unless otherwise noted,
the following designations are used:
S = maximum size single pass fillet to be used in
production
t = plate thickness
9.2.5 Apparatus. The apparatus used shall be capable of
firmly holding the specimen and applying the required
force.
9.2.6 Specimens
9.2.6.1 Fillet Weld Break: Procedure Qualifica-
tion. The uncoated fillet weld break specimen shall be
welded and prepared for the test shown in Figure 9.2.1.
The weld shall meet the as-welded visual inspection
requirements of the applicable code or standard.
9.2.6.2 Fillet Weld Break: Primer Coated Proce-
dure Qualification. The fillet weld break specimen shall
be welded over primer-coated material and prepared for
test as shown in Figure 9.2.2. The weld shall present a
reasonably uniform appearance and shall meet the visual
inspection requirements of the applicable code or
standard.
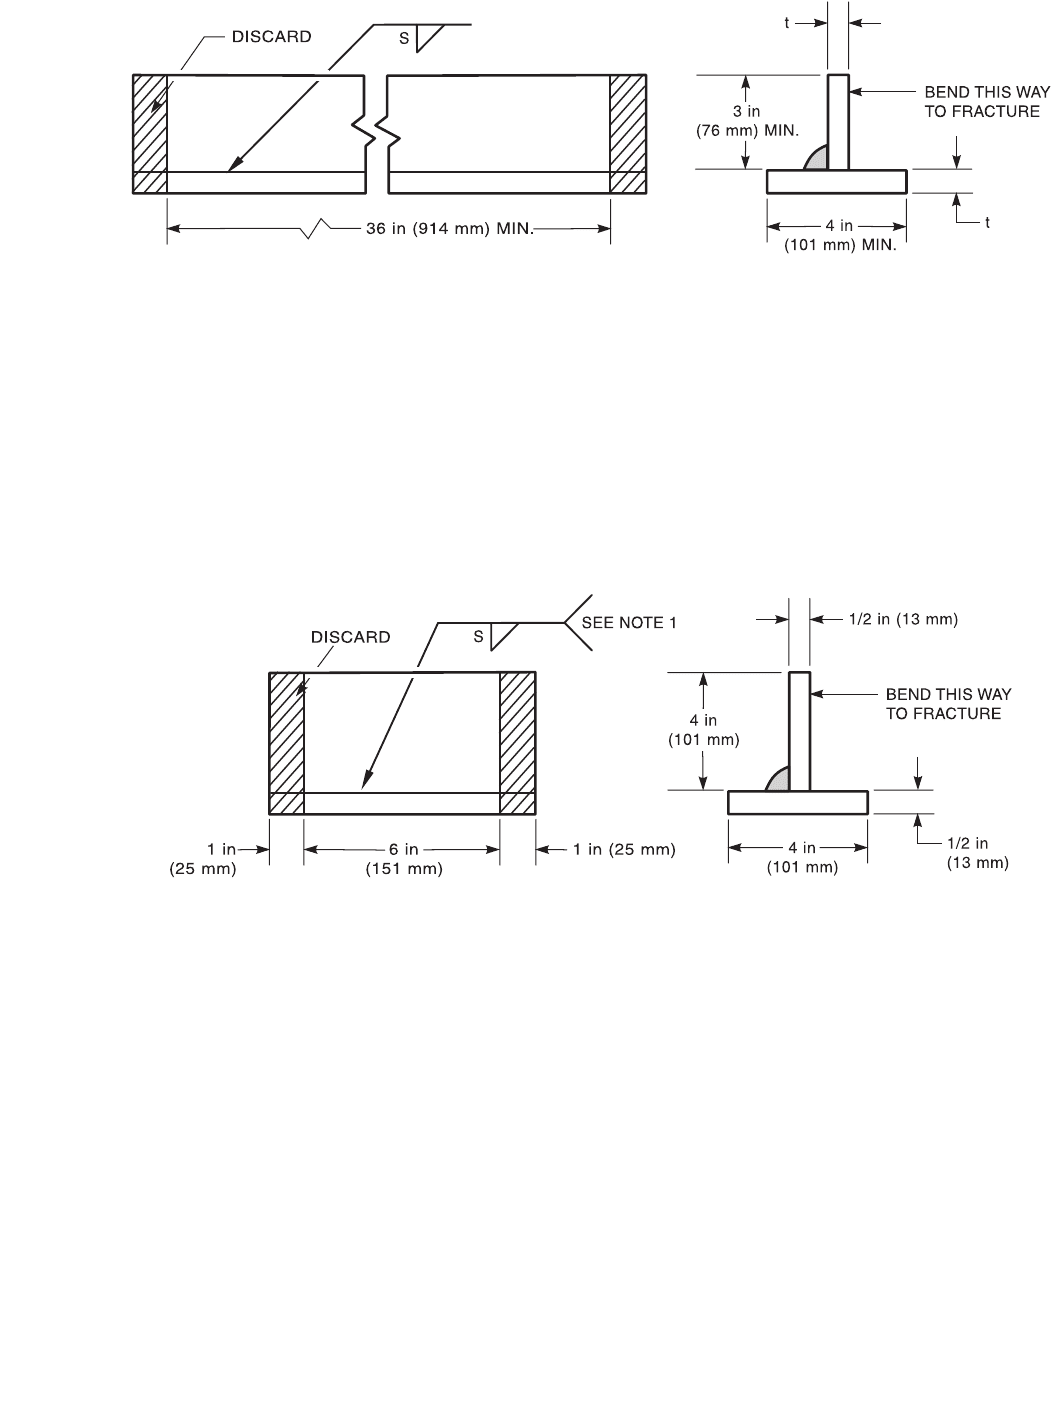
9.2.6.3 Fillet Weld Break: Galvanized Procedure
Qualification. The fillet weld break specimen shall be
welded over galvanized material and prepared for test as
shown in Figure 9.2.3. The weld shall present a reason-
ably uniform appearance and shall meet the visual
inspection requirements of the applicable code or
standard.
9.2.6.4 Fillet Break: Welder Qualification. The fil-
let weld break specimen for welder qualification shall be
welded and prepared as shown in Figure 9.2.4. The weld
shall meet the visual requirements of the applicable code
or standard.
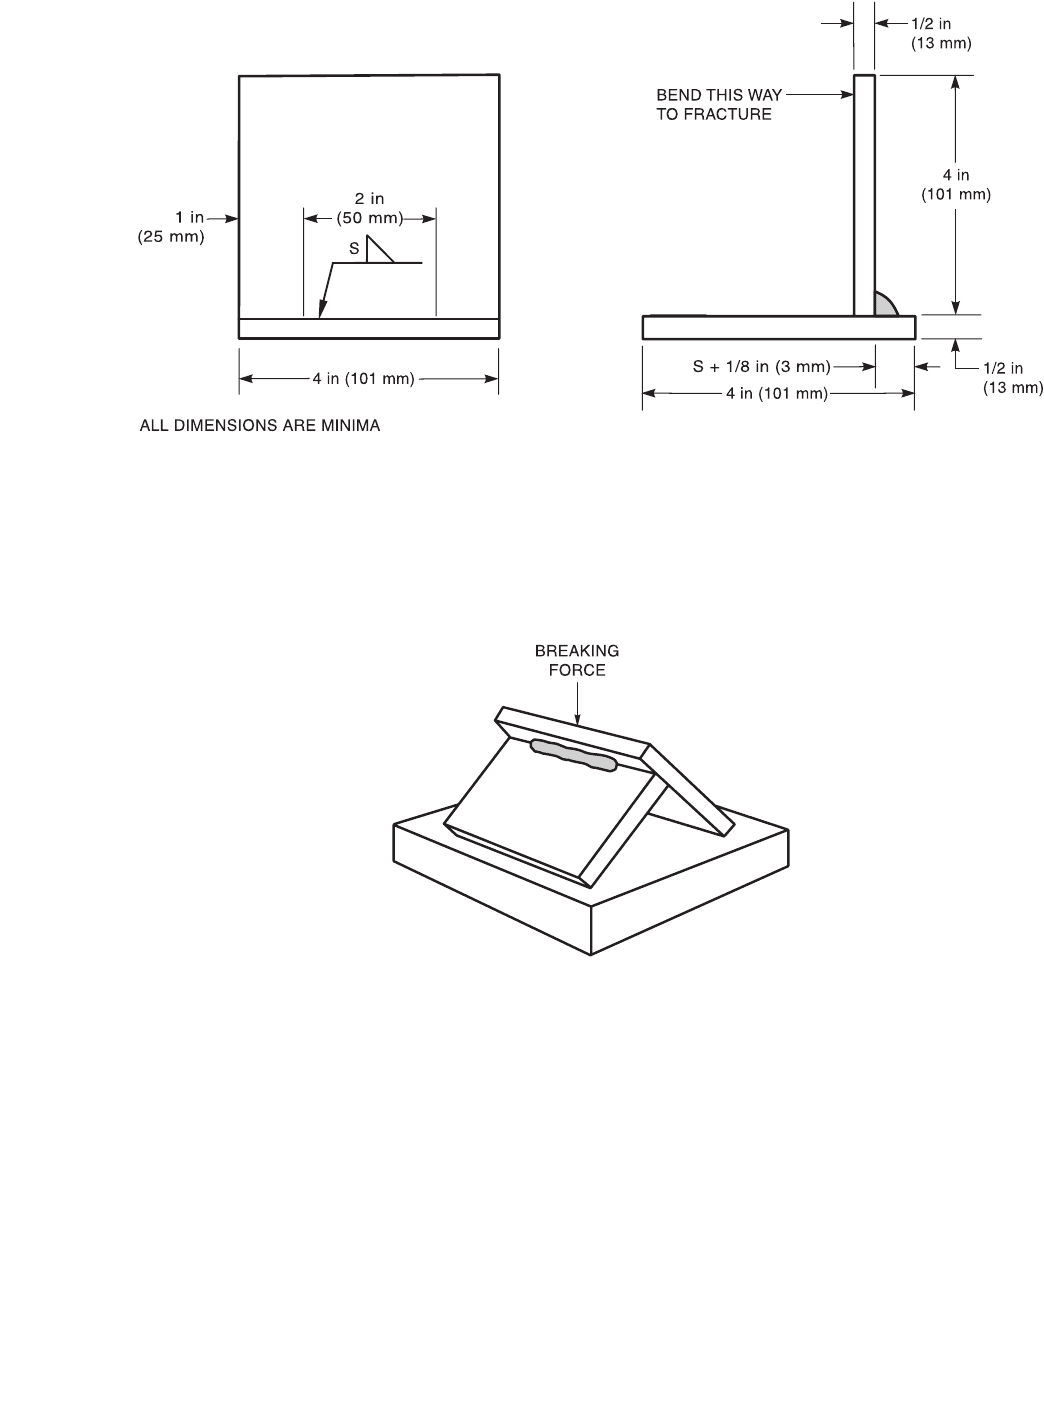
9.2.6.5 Fillet Break: Tack Welder Qualification.
The uncoated fillet weld break specimen for tack welder
performance qualification shall be welded and prepared
for test as shown in Figure 9.2.5. The weld shall present
a reasonably uniform appearance and shall meet the
visual inspection requirements of the applicable code or
standard.
9.2.7 Procedure. A force as shown in Figure 9.2.6 or
other forces causing the root of the weld to be in tension
shall be applied to the specimen. The load shall be
increased until the specimen fractures or bends flat upon
itself. If the specimen fractures, the fracture surfaces
shall be examined visually to the criteria of the applica-
ble standard.
9.2.8 Report. In addition to requirements of the applica-
ble documents, the report shall include the following:
(1) Base metal specification and applied coating
specification;
(2) Filler metal specification;
(3) Fillet weld size;
(4) Welding procedure (process and parameters);
(5) Specimen type;
(6) Fracture appearance;
(7) Number, type, size, and locations of visible inclu-
sions or discontinuities; and
(8) Any observation of unusual characteristics of the
specimens or procedure.
9.2.9 Commentary. There may be other AWS and ISO
fillet weld break tests available that evaluate the qualita-
tive soundness of fillet welded joints and these may be
used if required by the specification or by agreement
between the contracting parties.
Copyright American Welding Society
Provided by IHS under license with AWS
Not for Resale
No reproduction or networking permitted without license from IHS
--`,,```,,,,````-`-`,,`,,`,`,,`---
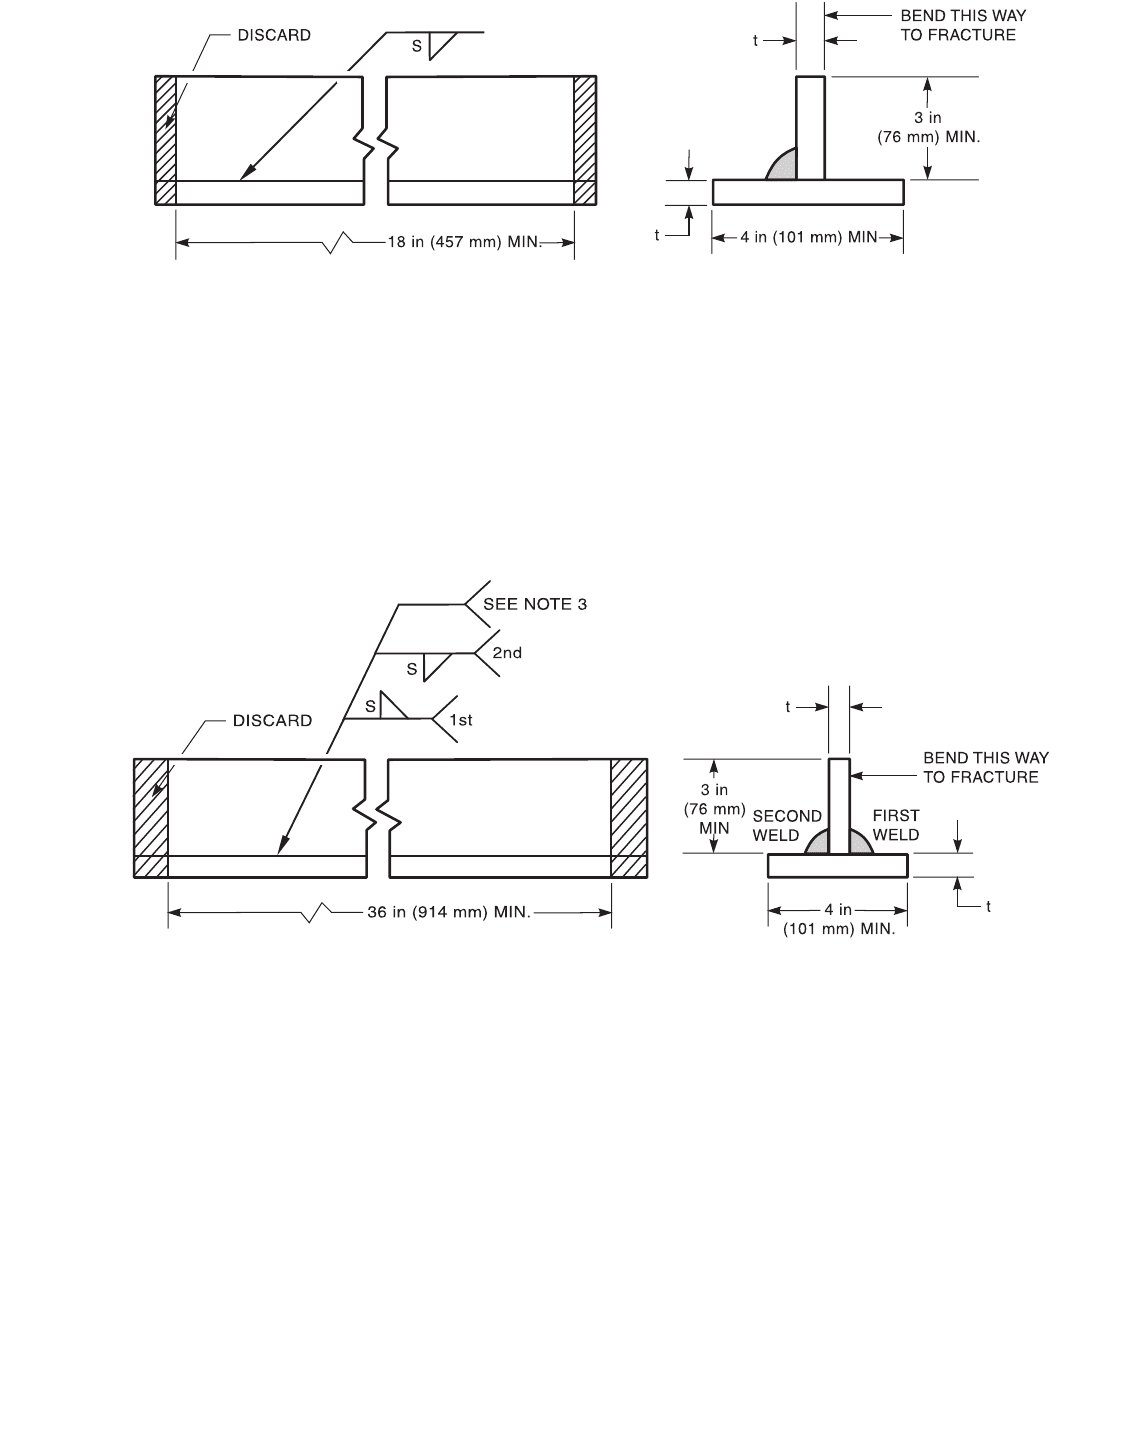
AWS B4.0:2007 CLAUSE 9. BREAK TESTS (NICK AND FILLET WELD)
49
Notes:
1. Positions qualified shall be in accordance with applicable code or standard.
2. Test assembly may be cut into shorter lengths after welding to facilitate testing.
3. Plate thickness, t, shall be maximum used in production or 3/8 in (10 mm), whichever is less.
4. S, maximum weld size on single pass production fillet welds; and S, minimum weld size on multipass production fillet welds.
Figure 9.2.1—Fillet Weld Break Specimen for Procedure Qualification
Notes:
1. Base plate should be same grade and specification material as that used in production.
2. Base plate shall be primer coated to maximum thickness which will be applied in production.
3. The first side weld shall be removed by gouging or mechanical means and the second side shall be tested.
4. Although entire 36 in (914 mm) length is to be tested, the test assembly may be cut into shorter lengths after welding to facilitate
fracturing for examination.
5. Plate thickness, t, shall be maximum used in production or 3/8 in (10 mm), whichever is less.
6. S, maximum weld size on single pass production fillet welds; and S, minimum weld size on multipass production fillet welds.
Figure 9.2.2—Fillet Weld Break Specimen for Primer Coated Materials
Copyright American Welding Society
Provided by IHS under license with AWS
Not for Resale
No reproduction or networking permitted without license from IHS
--`,,```,,,,````-`-`,,`,,`,`,,`---
CLAUSE 9. BREAK TESTS (NICK AND FILLET WELD) AWS B4.0:2007
50
Notes:
1. Plate thickness, t, shall be maximum used in production or 3/8 in (10 mm), whichever is less.
2. S, maximum weld size on single pass production fillet welds; and S, minimum weld size on multipass production fillet welds.
3. Although entire 36 in (914 mm) length is to be tested, the test assembly may be cut into shorter lengths after welding to facilitate
fracturing for examination.
4. Galvanized plating shall be the same grade, specification, and maximum thickness as that used in production.
Figure 9.2.3—Fillet Weld Break Specimen for Galvanized Materials
Notes:
1. Stop and restart near center.
2. Unless otherwise specified, specimen thickness and dimensions are minimum.
3. S, maximum weld size on single pass production fillet welds; and S, minimum weld size on multipass production fillet welds.
Figure 9.2.4—Fillet Weld Break Specimen for Welder Qualification
Copyright American Welding Society
Provided by IHS under license with AWS
Not for Resale
No reproduction or networking permitted without license from IHS
--`,,```,,,,````-`-`,,`,,`,`,,`---
AWS B4.0:2007 CLAUSE 9. BREAK TESTS (NICK AND FILLET WELD)
51
Figure 9.2.5—Fillet Weld Break Specimen for Tack Welder Qualification
Figure 9.2.6—Method of Testing Fillet Weld Break Specimen
Copyright American Welding Society
Provided by IHS under license with AWS
Not for Resale
No reproduction or networking permitted without license from IHS
--`,,```,,,,````-`-`,,`,,`,`,,`---

CLAUSE 10. WELDABILITY TESTING AWS B4.0:2007
52
10. Weldability Testing
The term weldability is the capacity of material to be
welded under the imposed fabrication conditions into a
specific, suitably designed structure and to perform satis-
factorily in the intended service. There are many vari-
ables in the design, fabrication and erection of real
structures as these affect the metallurgical response to
welding. No single test or combination of tests can dupli-
cate the conditions of a real structure. Laboratory weld-
ability tests can only provide an index to compare
different metals, procedures and processes.
Within these limitations, weldability testing can provide
valuable data on new alloys, welding procedures and
welding processes. Numerous weldability tests have
been devised all of which can be classified as either sim-
ulated tests or actual welding tests.
The tests included in this clause are the Controlled Ther-
mal Severity (CTS) Test, Cruciform Test, Implant Test,
Lehigh Restraint Test, Varestraint Test, Oblique Y-
Groove Test, Welding Institute of Canada (WIC) Test,
Trough Test, and the Gapped Bead On Plate (GBOP)
Test. Their applications are summarized below:
Weldability Testing Methods
Weldability Tests Application
Controlled Thermal Severity (CTS) Test Assesses the effect of chemical composition and cooling rate on hardness and hydrogen-
assisted cracking susceptibility.
Cruciform Test Assesses hydrogen-assisted cracking in fillet welding applications.
Implant Test Measures susceptibility to hydrogen-assisted cracking in HAZ of weldment.
Lehigh Restraint Test Characterizes the degree of restraint necessary to produce weld metal cracking.
Varestraint Test Assesses hot cracking susceptibility.
Oblique Y-Groove Test Assesses susceptibility to weld and HAZ cracking.
Welding Institute of Canada (WIC) Test Assesses weld and HAZ cracking.
Trough Test Assesses susceptibility to hydrogen-assisted cracking.
Gapped Bead On Plate (GBOP) Test Assesses susceptibility to weld metal cracking.
Copyright American Welding Society
Provided by IHS under license with AWS
Not for Resale
No reproduction or networking permitted without license from IHS
--`,,```,,,,````-`-`,,`,,`,`,,`---

AWS B4.0:2007 CLAUSE 10. WELDABILITY TESTING
53
10.1 Controlled Thermal Severity
(CTS) Test
10.1.1 Scope
10.1.1.1 The Controlled Thermal Severity (CTS) test
is used for measuring the susceptibility of weld metal
and heat-affected zone (HAZ) to cracking. Cooling rate
is controlled through welding heat input, plate thickness,
and the number of thermal paths available. The fixture is
shown in Figure 10.1.1.
While the primary application is to evaluate base metal
composition, the test may also be used to evaluate the
effects of welding consumables, heat input, or preheat
and postweld heat treatments as well as other process
variables. The test evaluates the effects of HAZ cooling
rate rather than external restraint.
10.1.1.2 This test is applicable to the following:
(1) Qualification of materials and welding procedures
where specific acceptance criteria have been specified,
and
(2) Research and development.
10.1.1.3 This test is restricted to base materials thicker
than 1/4 in (6 mm).
10.1.1.4 When this standard is specified, the follow-
ing information shall be furnished:
(1) Base metal specification/identification;
(2) Base metal heat treatment;
(3) Base metal thickness and/or the Thermal Severity
Number(s) (TSN) to be tested;
(4) Base metal rolling direction, if possible;
(5) Filler metal specification/identification and diameter;
(6) Type and flow rate of any shielding gas used;
(7) All welding parameters necessary to define the
procedure and the resulting heat input;
(8) Any preheat, interpass temperature control, or
postweld heat treatment to be used; and
(9) Report form including the type of data and obser-
vations to be made.
10.1.2 Normative References. The following standards
contain provisions which, through reference in this text,
constitute mandatory provisions of this test. For undated
references, the latest edition of the referenced standard
shall apply. For dated references, subsequent amendments
to, or revisions of, any of these publications do not apply.
ASME Documents:
ASME B46.1, Surface Texture, Surface Roughness,
Waviness and Lay
10.1.3 Summary of Method
10.1.3.1 The CTS test is based on the theory that HAZ
cracking will occur independently of external restraint.
Cracking is thought to happen when cooling at the start
of the austenite to martensite transformation exceeds a
critical rate. The test is designed to provide known
degrees of thermal severity approximating those seen in
common structural joint design and plate thickness.
10.1.3.2 The thermal severity of a welded joint
depends upon the heat input of the weld and the com-
bined cross-sectional area of the paths through which
heat can flow away from the joint. Heat flow from a joint
in which there is one path through which heat can flow is
termed a unithermal flow. Unithermal flow through one
section of 1/4 in (6 mm) plate is assigned a Thermal
Severity Number (TSN) of 1.
10.1.3.3 The test specimen consists of two plates (one
square and one rectangular) bolted together as shown in
Figure 10.1.2. All dimensions except plate thickness are
fixed. Two anchor welds are made as shown in the figure
to provide additional restraint.
10.1.3.4 Two test fillet welds are made in the flat
position. The specimen is allowed to cool by placing the
specimen in the water bath as shown in Figure 10.1.3.
10.1.3.5 The test welds are sectioned and examined
for cracks. Hardness measurements may also be made.
10.1.4 Significance
10.1.4.1 This test is used to evaluate weld metal and
HAZ susceptibility to cracking under the most common
thermal flow conditions.
10.1.5 Definitions and Symbols
10.1.5.1 Unless otherwise stated the following desig-
nations are also used.
t
t
= the thickness of the top (square) plate
t
b
= the thickness of the bottom (rectangular) plate
10.1.5.4 The thermal severity number is a number
used to quantify the thermal severity of the joint tested.
The number is determined from the following formula:
TSN
tri-thermal
=4(t
t
+ 2t
b
)
where
TSN
tri-thermal
= thermal severity number for tri-thermal
heat flow,
t
t
= thickness of the top (square) plate, and
t
b
= thickness of the bottom (rectangular) plate.
Copyright American Welding Society
Provided by IHS under license with AWS
Not for Resale
No reproduction or networking permitted without license from IHS
--`,,```,,,,````-`-`,,`,,`,`,,`---
