AWS B4.0: 2007 Standard Methods for Mechanical Testing of Welds
Подождите немного. Документ загружается.


CLAUSE 10. WELDABILITY TESTING AWS B4.0:2007
54
10.1.6 Apparatus
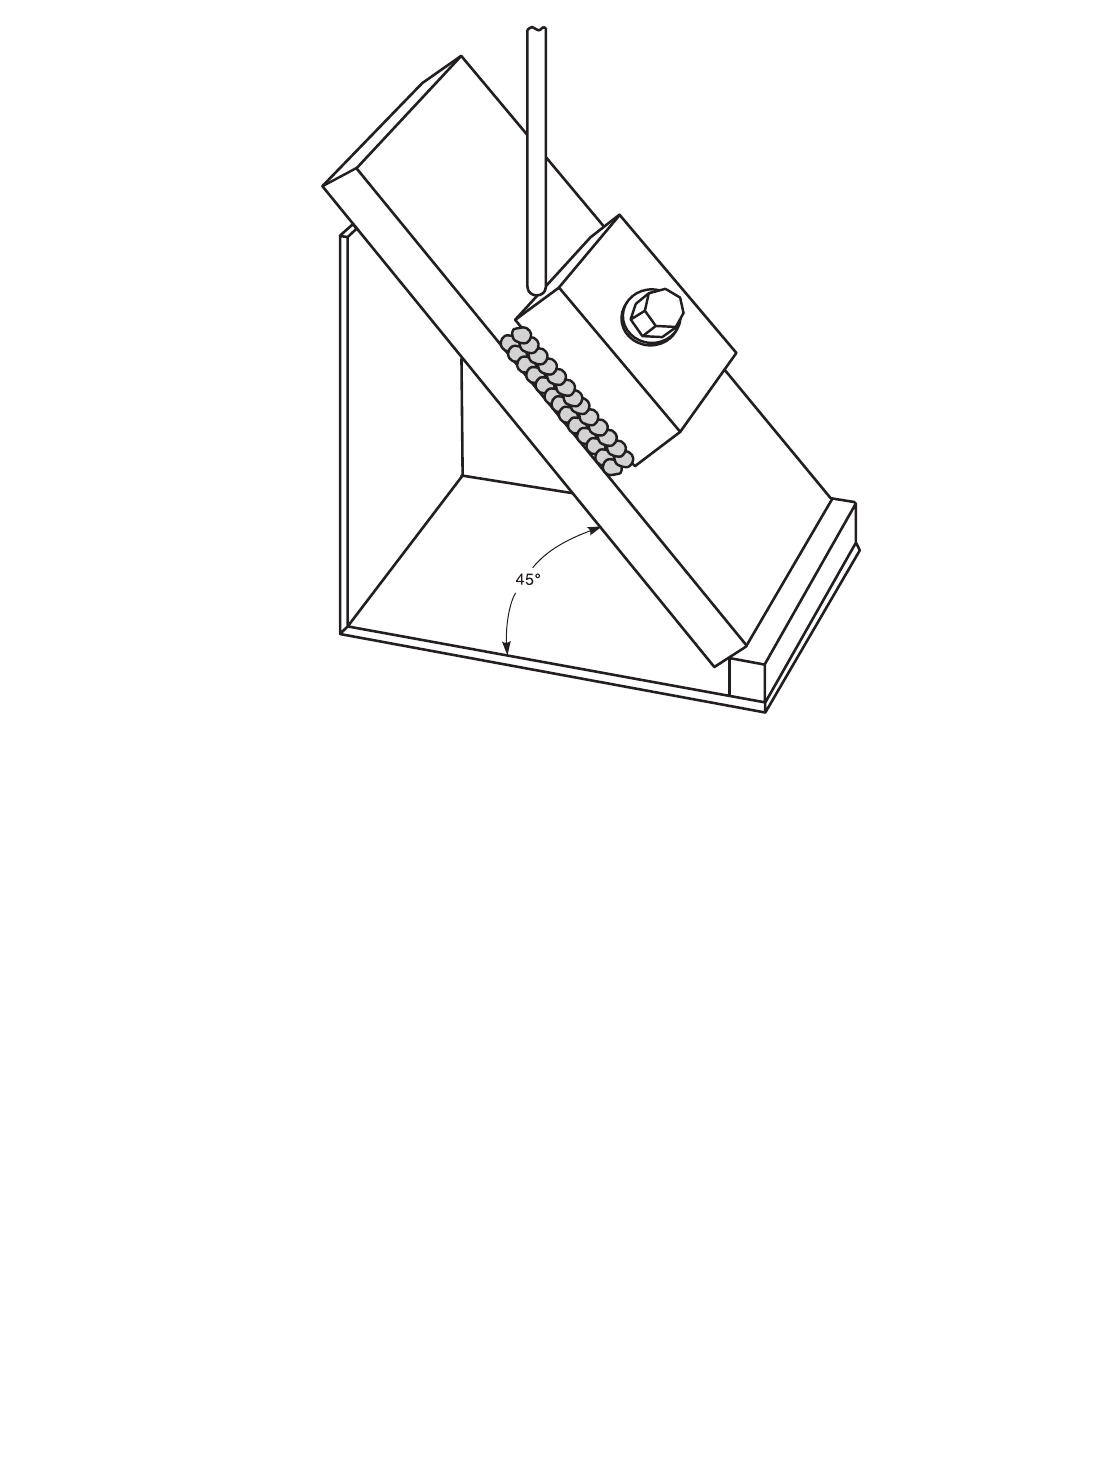
10.1.6.1 A simple fixture is required to hold the speci-
men so that the test welds can be made in the flat posi-
tion. Contact between the specimen and conductive
materials must be minimized throughout the test.
10.1.6.2 Metallographic equipment is required for
polishing and etching sections of the test weld.
10.1.6.3 Microhardness apparatus is required if hard-
ness tests are specified.
10.1.7 Specimens
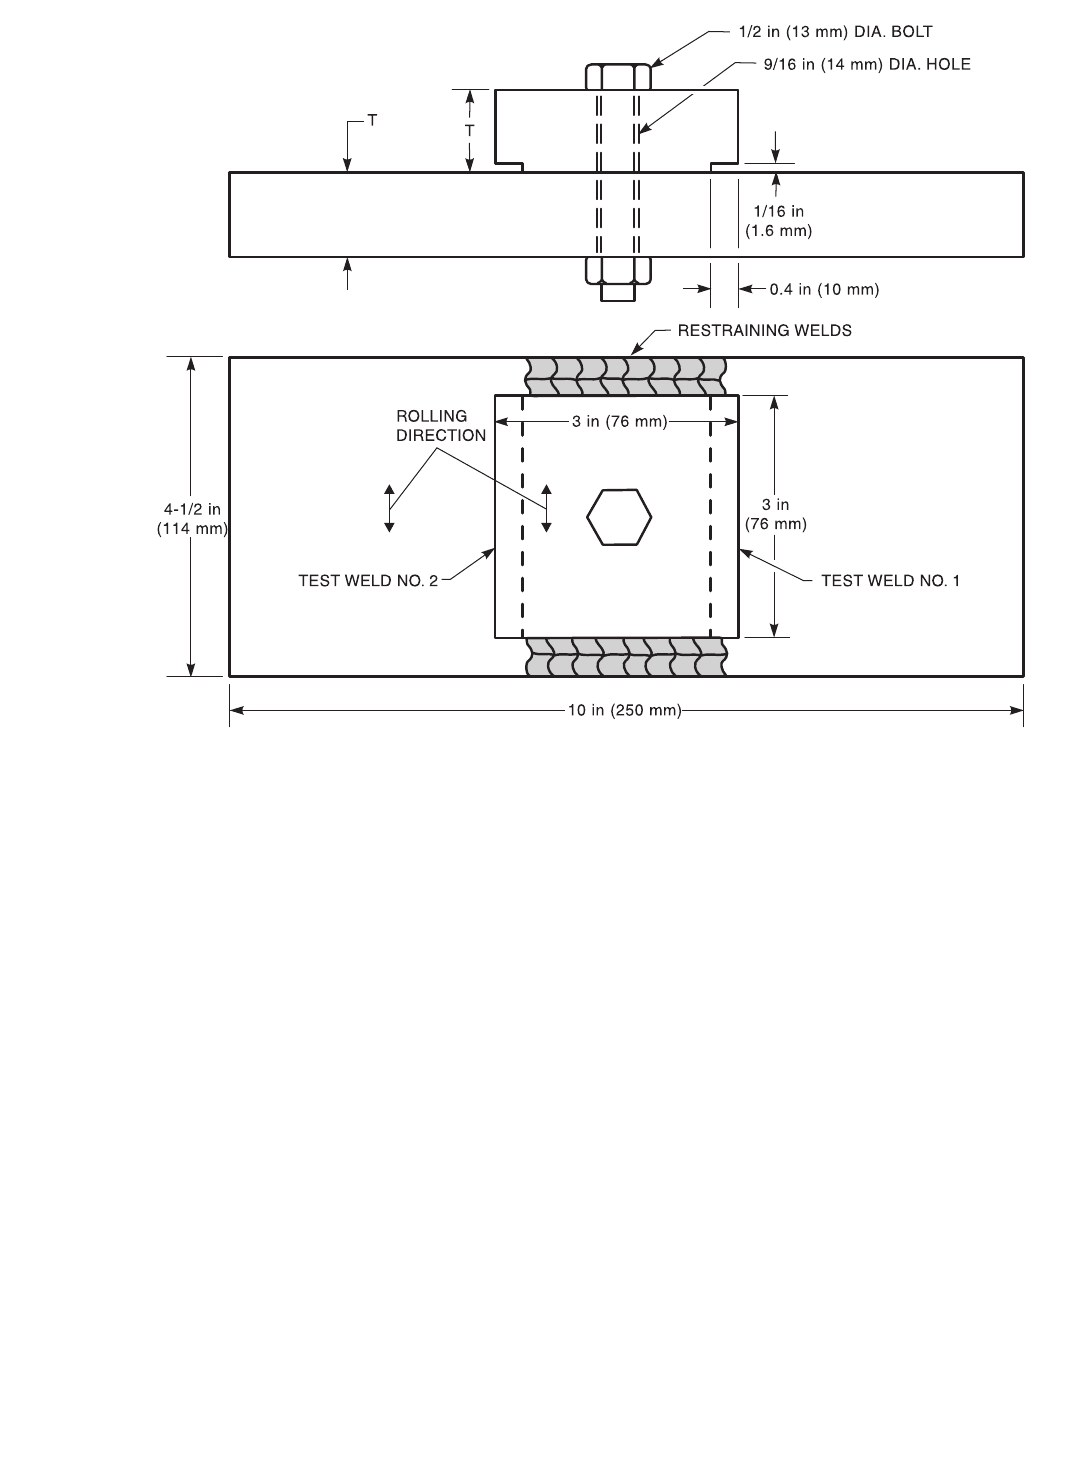
10.1.7.1 Test specimen components are shown in Fig-
ure 10.1.2.
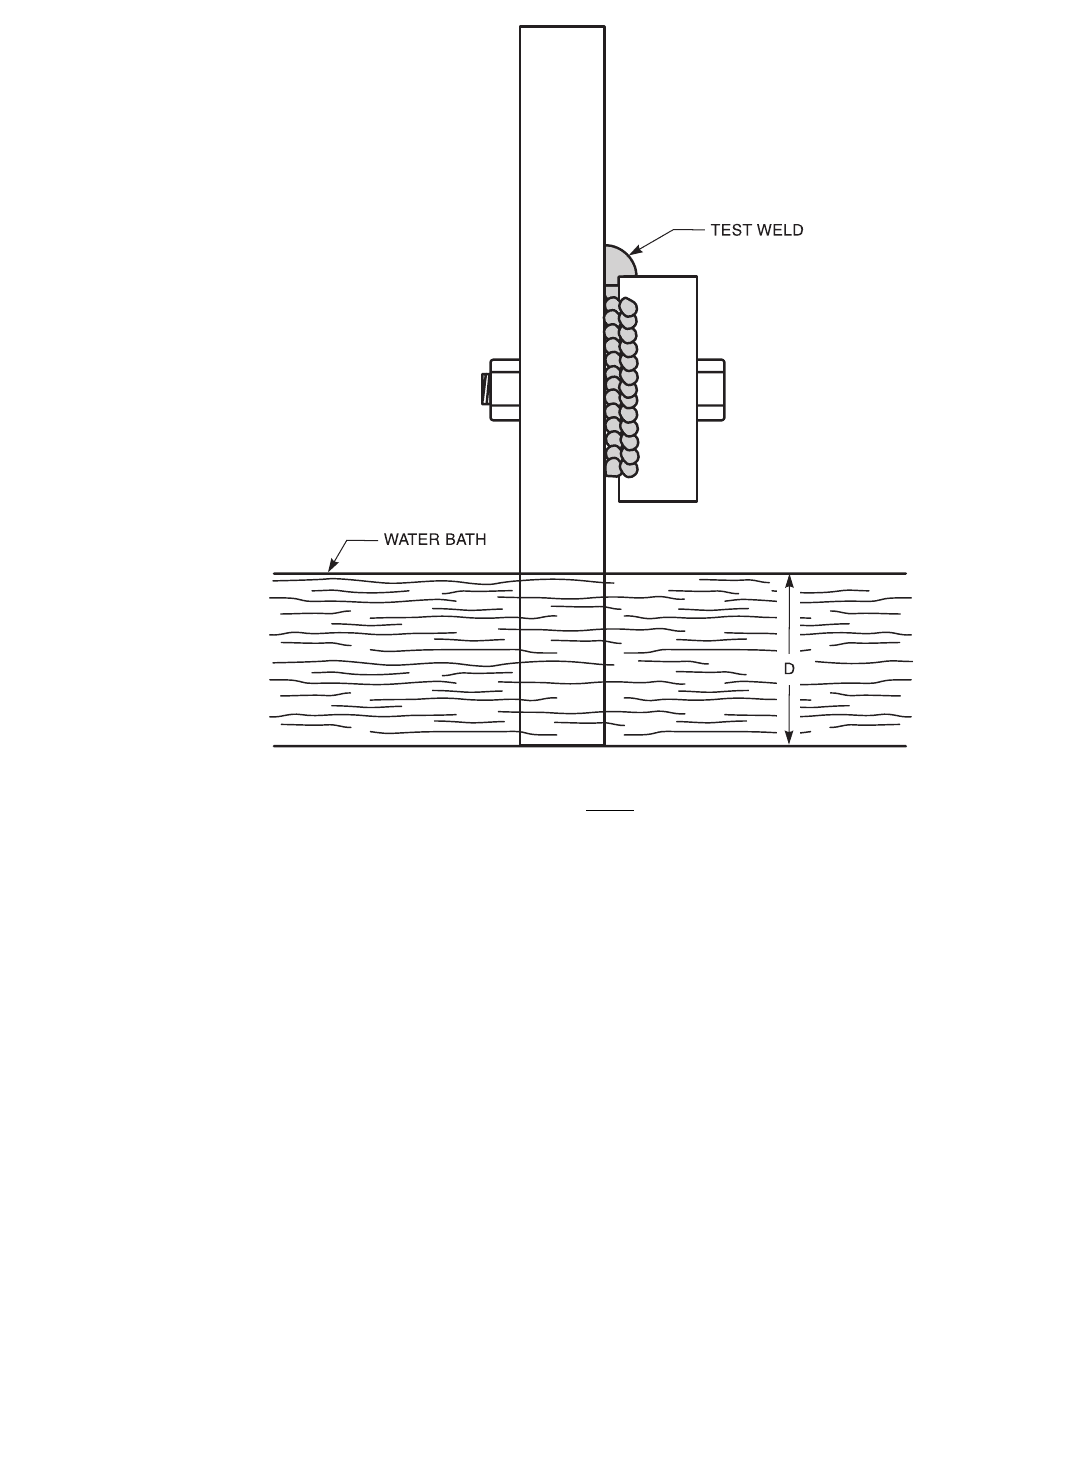
10.1.7.2 The cooling bath arrangement is shown in
Figure 10.1.3.
10.1.7.3 Minimum plate thickness is 1/4 in (6 mm).
10.1.7.4 The mating surfaces of the plates are to be
ground to provide intimate contact between these parts.
10.1.7.5 The surfaces of the top plate on which test
welds are to be deposited are to be machined.
10.1.7.6 Rolling direction shall be identified if
possible.
10.1.7.7 Plates are bolted together as shown in Figure
10.1.2 and anchor welds are deposited. The size of the
anchor welds should be as given below:
Plate Thickness in (mm) Weld Size in. (mm)
<5/8 (16)
≥5/8 (16)
1/4 (6)0
1/2 (13)
10.1.8 Procedure
10.1.8.1 Test welds are deposited in the flat position
using fixturing that minimizes contact between the speci-
men and thermally conductive surfaces. Between test
welds, the specimen shall be allowed to cool by placing
the specimen in the water bath as shown in Figure 10.1.3.
The test welds are to be single pass fillet welds extending
the full length of the top plate. Actual voltage, current,
and travel speed shall be recorded.
10.1.8.2 Any postweld heat treatment shall be accom-
plished immediately after deposition the test welds.
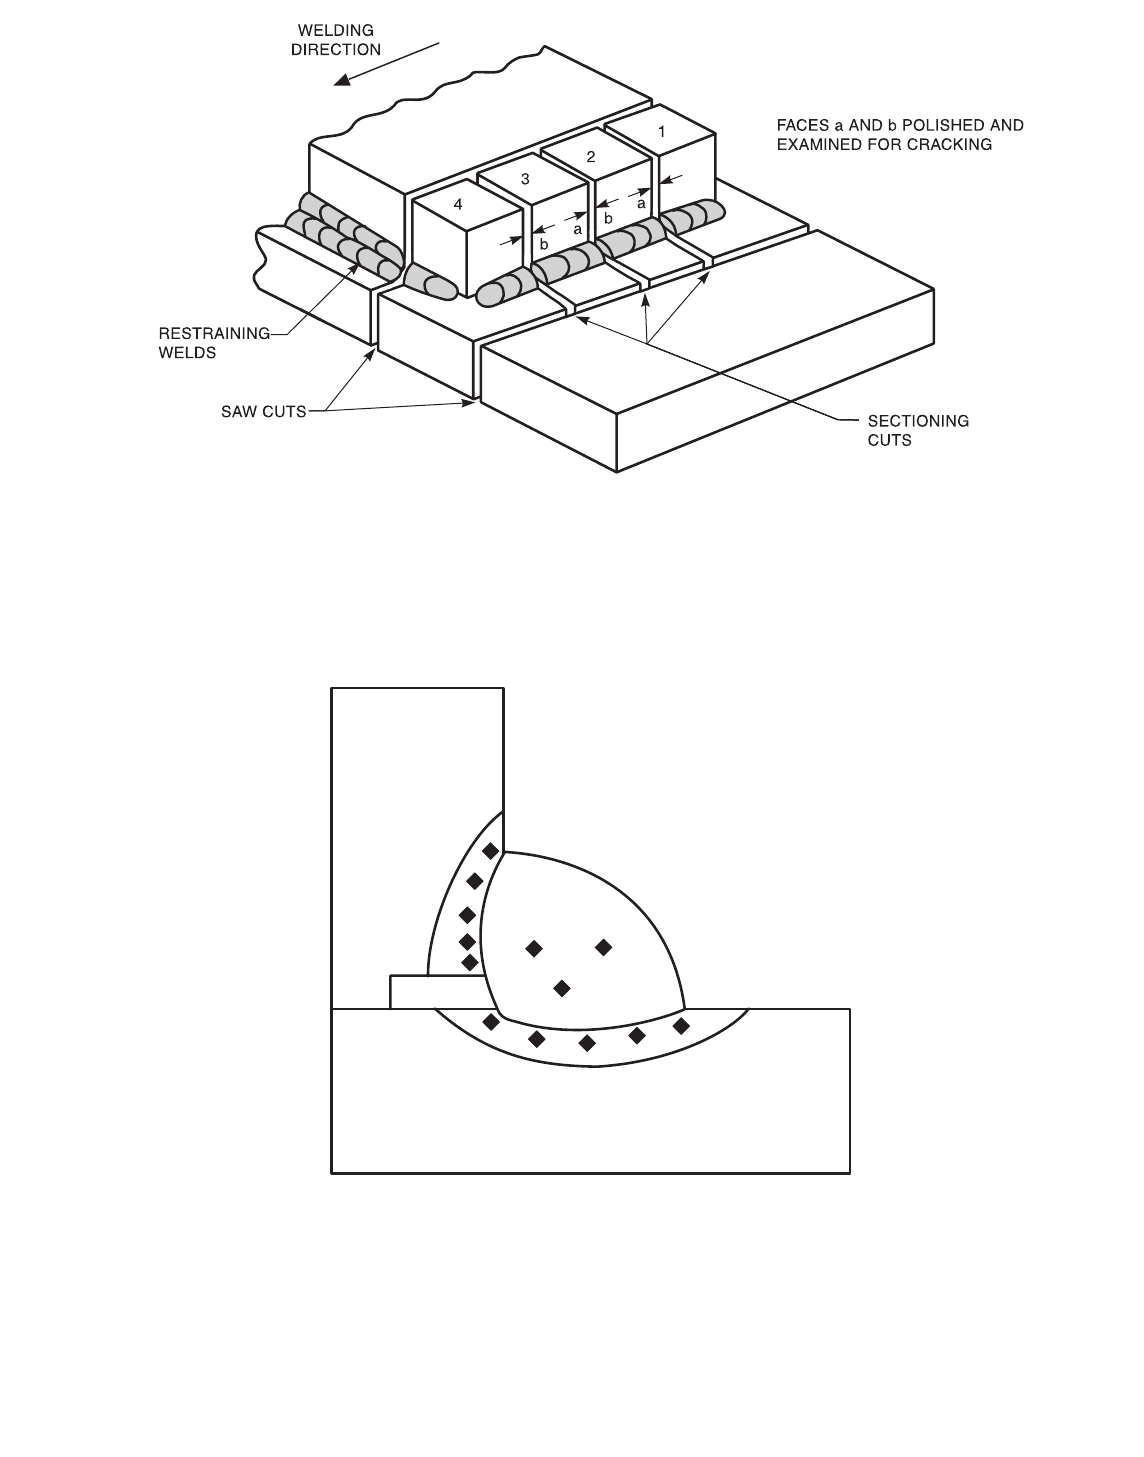
10.1.8.3 The test welds are sectioned as shown in Fig-
ure 10.1.4. These are examined metallographically for
cracks.
10.1.8.4 Hardness tests may be measured in the weld
metal and the HAZ (optional) as shown in Figure 10.1.5.
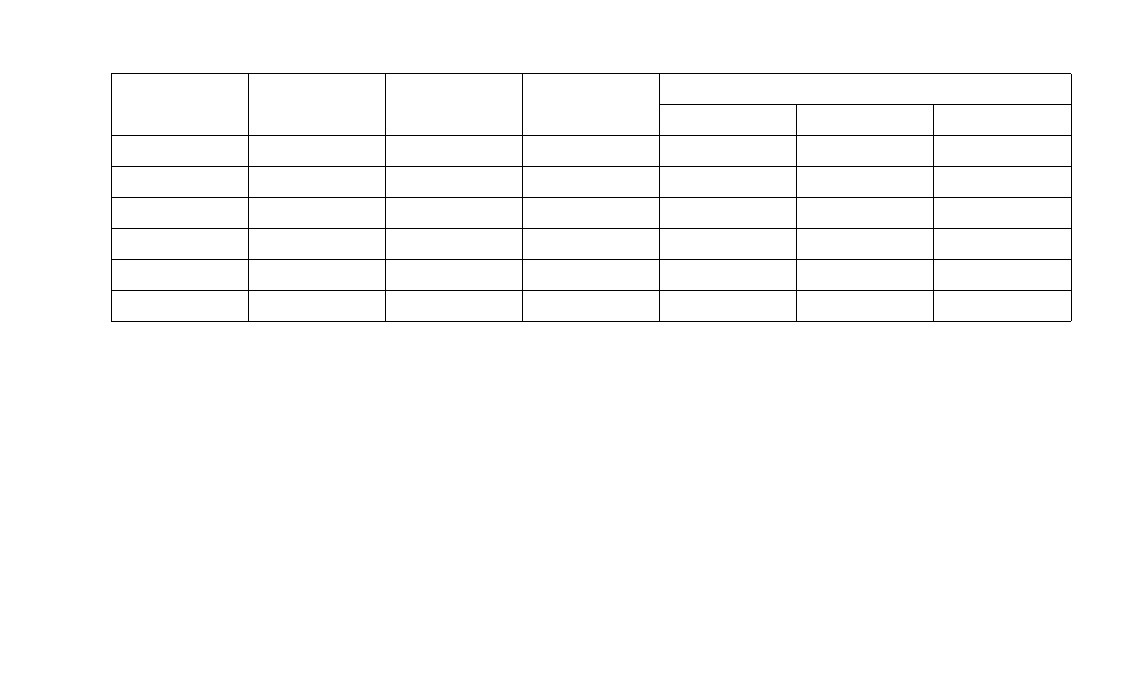
10.1.9 Report. An example of a suggested data sheet for
CTS test results is shown in Figure 10.1.6.
10.1.10 Commentary. A series of CTS tests may be
designed to evaluate the relationships between test
parameters such as TSN, heat input, filler metal, or pro-
cess. Commonly, all test parameters but one are held
constant. Examples of test series interpretation are:
(1) TSN at which cracking occurs for a given base
metal, heat input, and welding procedure;
(2) The heat input at which cracking occurs for a
given base metal, welding process, and TSN; and
(3) Base metal variable (chemistry, heat treatment,
etc.) at which cracking occurs for a given TSN, heat
input, and welding process.
Copyright American Welding Society
Provided by IHS under license with AWS
Not for Resale
No reproduction or networking permitted without license from IHS
--`,,```,,,,````-`-`,,`,,`,`,,`---
AWS B4.0:2007 CLAUSE 10. WELDABILITY TESTING
55
Figure 10.1.1—Fixture Used to Position CTS Specimen for Welding
Copyright American Welding Society
Provided by IHS under license with AWS
Not for Resale
No reproduction or networking permitted without license from IHS
--`,,```,,,,````-`-`,,`,,`,`,,`---
CLAUSE 10. WELDABILITY TESTING AWS B4.0:2007
56
Notes:
1. Welds are placed on sides opposite cooling bath.
2. Mating surfaces shall be no rougher than 125 microinches (3 micrometers) R
a
.
Figure 10.1.2—CTS Test Specimen
Copyright American Welding Society
Provided by IHS under license with AWS
Not for Resale
No reproduction or networking permitted without license from IHS
--`,,```,,,,````-`-`,,`,,`,`,,`---
AWS B4.0:2007 CLAUSE 10. WELDABILITY TESTING
57
Notes:
1. The specimen end that is immersed in the water cooling bath is always
opposite to the end containing the test weld being cooled.
2. Water depth (D) should be 2-1/2 in (63 mm).
Figure 10.1.3—Cooling Bath Arrangement for CTS Test
Copyright American Welding Society
Provided by IHS under license with AWS
Not for Resale
No reproduction or networking permitted without license from IHS
--`,,```,,,,````-`-`,,`,,`,`,,`---
CLAUSE 10. WELDABILITY TESTING AWS B4.0:2007
58
Figure 10.1.4—Sectioning of CTS Specimen
Figure 10.1.5—Typical Location of Microhardness Impressions
Copyright American Welding Society
Provided by IHS under license with AWS
Not for Resale
No reproduction or networking permitted without license from IHS
--`,,```,,,,````-`-`,,`,,`,`,,`---
AWS B4.0:2007 CLAUSE 10. WELDABILITY TESTING
59
CTS TEST RESULTS
Company Name _____________________________________________________________ Date _______________________
Job/Test No. ________________________________________________________________ Sheet _________ of __________
Description of Investigation ____________________________________________________________________________________
Base Metal Specification_______________________________ Thickness ___________________________________________
Base Metal Heat Treatment_____________________________ Heat No. ____________________________________________
Composition:
C__________ Si __________ Mn ________ P __________ S__________ Cr__________ Mo ________
Ni _________ V __________ Cu_________ Nb _________ Ca_________ B __________ Ti _________
Al _________ N __________ _________ __________ _________ __________ _________
Welding Procedure Spec. No. ___________________________ Welding Process ______________________________________
Test Weld Restraining Weld
Electrode/Wire Spec. No. ________________________ ________________________
Commercial Designation ________________________ ________________________
Diameter ________________________ ________________________
Baking Treatment ________________________ ________________________
Shielding Gas/Flux ________________________ ________________________
TEST WELD
Gas Flow Rate ______________________________________ Flux Size ____________________________________________
Current ____________________________________________ Preheat Temp.________________________________________
Voltage ____________________________________________ Postweld Heat Treatment _______________________________
Polarity ____________________________________________ Ambient Temp. _______________________________________
Travel Speed ________________________________________ Ambient Humidity _____________________________________
Heat Input __________________________________________ Water Bath Temp. _____________________________________
Hydrogen Determination Method ________________________________________________ Date _______________________
__________________________________________________ Result ______________________________________________
Results:
Remarks __________________________________________________________________________________________________
Remarks __________________________________________________________________________________________________
Tested By __________________________________________________________________
Signature___________________________________________________________________ Date _______________________
Figure 10.1.6—Suggested Data Sheet for CTS Test
Weld/Face/
Face No.
Mean Leg
Length
Crack
Length
Result
(C or NC)
Hardness, HV
HAZ WM BM
Copyright American Welding Society
Provided by IHS under license with AWS
Not for Resale
No reproduction or networking permitted without license from IHS
--`,,```,,,,````-`-`,,`,,`,`,,`---

CLAUSE 10. WELDABILITY TESTING AWS B4.0:2007
60
10.2 Cruciform Test
10.2.1 Scope
10.2.1.1 The cruciform test is used to measure the
susceptibility to hydrogen-assisted cracking of steel
weldments, primarily focusing on fillet welds. While pri-
mary application is to evaluate base-metal composition,
the test also may be used to evaluate the effects of weld-
ing consumables, welding heat input and preheating,
postheating, or both, on cracking susceptibility.
10.2.1.2 This standard is applicable to the following:
(1) Qualification of materials and welding proce-
dures where specific acceptance standards have been
specified;
(2) Information, basis of acceptance, or manufacturing
and quality control; and
(3) Research and development.
10.2.1.3 The use of this test is restricted as follows:
(1) The test shall not be used for base metal less than
3/8 in (10 mm) thick, and
(2) Close control of the welding parameters is re-
quired as the results of this test may be affected more by
differences in parameters than in cracking susceptibility.
10.2.1.4 The following information shall be furnished:
(1) Welding procedure (process and parameters);
(2) Base-metal specification/identification and actual
chemical composition;
(3) Filler metal specification/identification, size,
and any prewelding treatment, e.g., baking time and
temperature;
(4) Appropriate preheating postheating treatments
used;
(5) Acceptance criteria, if applicable; and
(6) The number of cross sections to be examined.
10.2.2 Normative References. The following standards
contain provisions which, through reference in this text,
constitute mandatory provisions of this test. For undated
references, the latest edition of the referenced standard
shall apply. For dated references, subsequent amend-
ments to, or revisions of, any of these publications do not
apply.
AWS Documents:
AWS A4.3, Standard Methods for Determination of
the Diffusible Hydrogen Content of Martensitic, Bainitic,
and Ferritic Steel Weld Metal Produced by Arc Welding
10.2.3 Summary of Method. Figures applicable to this
test method are shown in Figures 10.2.1 through 10.2.7.
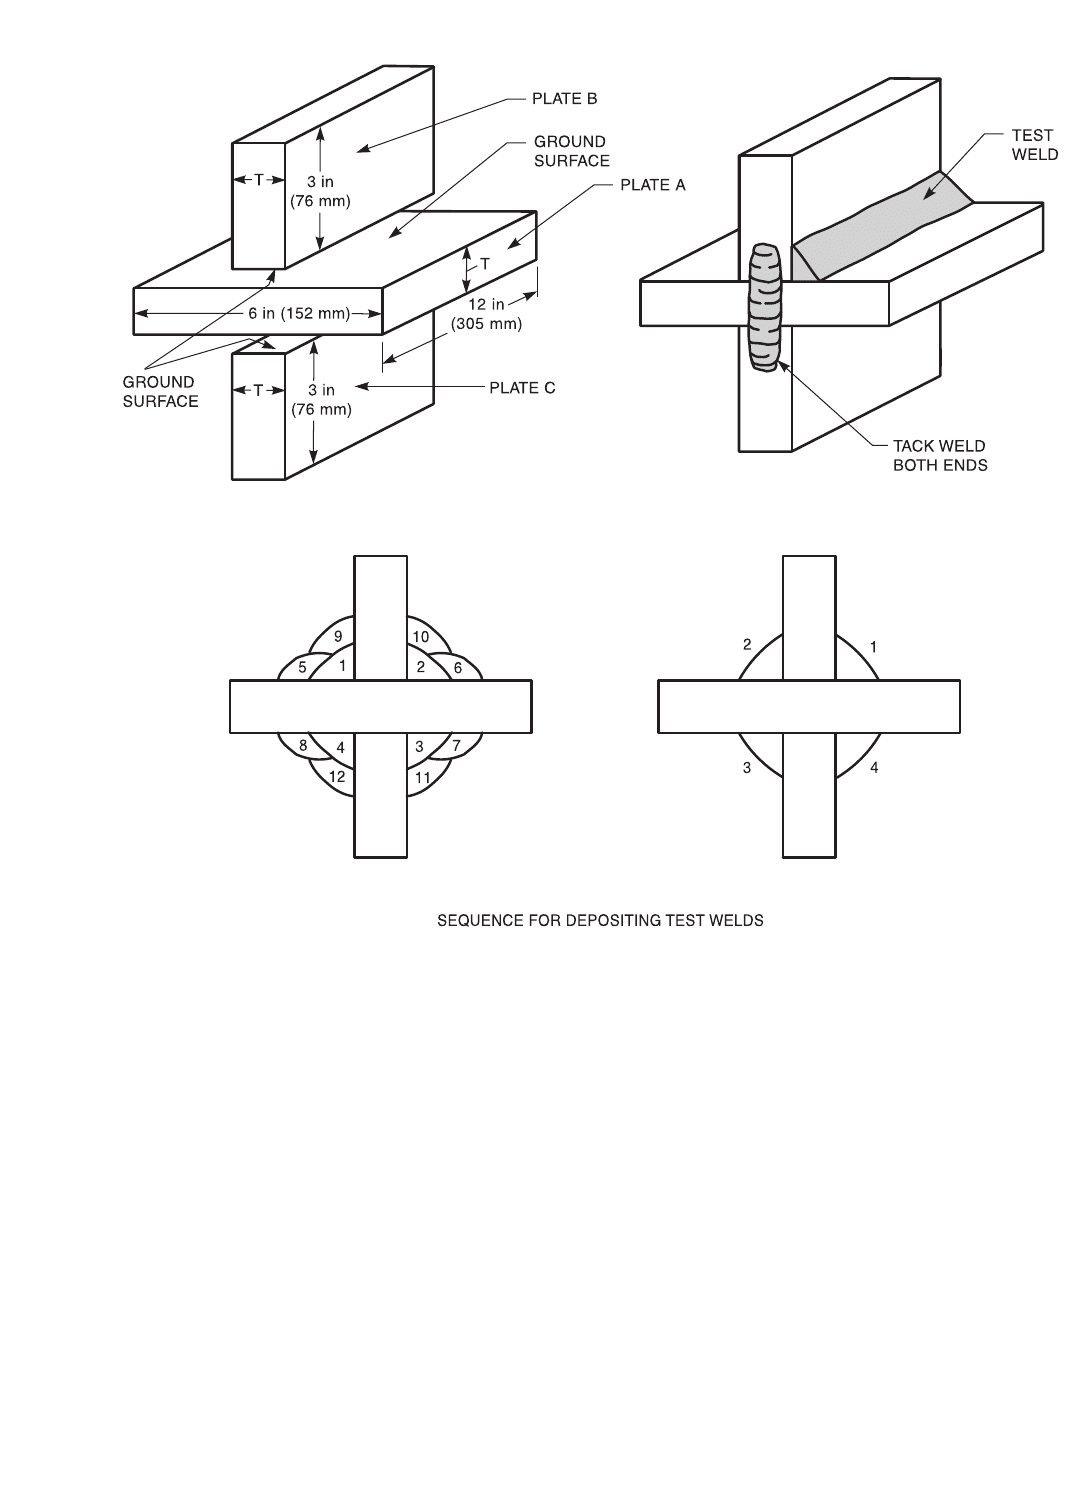
10.2.3.1 The test specimen consists of three plates
tack welded at their ends to form a double T-joint (Figure
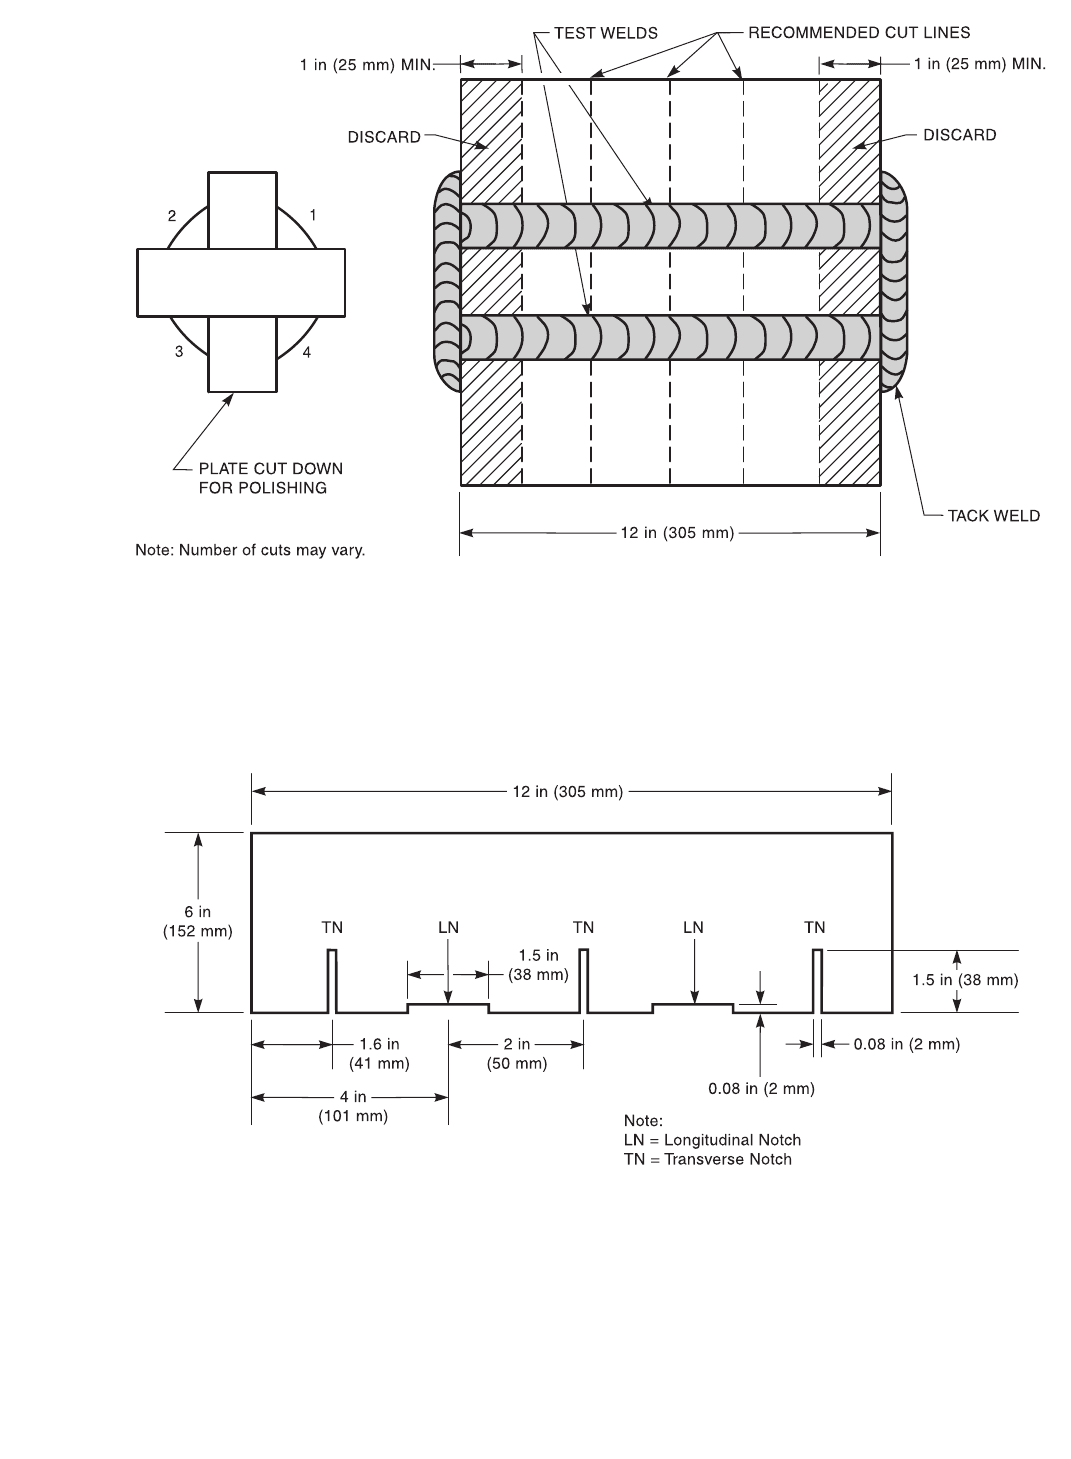
10.2.1). A variation of this test called the slotted cruci-
form may also be evaluated. In this variation of the cruci-
form test, the attached plate (plate B or C) contains
longitudinal and transverse notches that are machined on
the edge of the plate as shown in Figure 10.2.3.
10.2.3.2 A single or multipass fillet weld is deposited
in succession in each of the four T-joints. Each test weld
is allowed to cool to ambient temperature prior to depos-
iting the subsequent weld. After the fourth weld is com-
pleted, the specimen is given any specified postweld
treatment.
10.2.3.3 The completed welds are examined visually
for any external cracks. The standard cruciform speci-
men is sectioned transversely for metallographic exami-
nation for hydrogen cracks. The slotted cruciform
specimen is sectioned longitudinally and transversely for
metallographic examination for hydrogen cracks as
shown in Figure 10.2.2.
10.2.3.4 Some additional longitudinal sectioning will
also be required for portions of the slotted cruciform as
discussed in 10.2.3.6.
10.2.3.5 The recommended base plate thickness for
the slotted cruciform test specimen is 3/4 in (19 mm).
Thicker plate may also be used (depending on the appli-
cation being simulated). The two surfaces of the continu-
ous plate are ground to bright metal prior to assembly.
The mating edges of the attached plates B and C are
machined flat prior to assembly. This is essential to
insure intimate contact and good heat transfer between
these surfaces during welding of the assembled speci-
men. For the slotted cruciform test, notches (or slots) are
machined on the edge of one of the attached plates as
shown in Figure 10.2.3. The assembly is tack welded
together prior to the test.
10.2.3.6 Sectioning for the slotted cruciform will
involve sectioning transverse to the direction of welding
for the longitudinal notches and parallel to the direction
of welding for the transverse notches. Schematic illustra-
tions of the sectioning for the longitudinal and transverse
notches are given in Figures 10.2.4 and 10.2.5. The cut
for the transverse notch is shown in Figure 10.2.5. The
cut for the longitudinal notch is shown in Figure 10.2.4.
10.2.3.7 For the standard cruciform specimen, sections
(Figure 10.2.2) are cut transversely from the test weldments.
For the slotted cruciform specimen, sections (Figure 10.2.6)
are cut longitudinally and transversely. Use of a water-
cooled cut-off wheel is recommended where practical.
Copyright American Welding Society
Provided by IHS under license with AWS
Not for Resale
No reproduction or networking permitted without license from IHS
--`,,```,,,,````-`-`,,`,,`,`,,`---

AWS B4.0:2007 CLAUSE 10. WELDABILITY TESTING
61
10.2.4 Significance. This test is relatively severe for
detecting hydrogen cracks. As a result, the test may be
more sensitive to variations in the welding conditions
than to any differences in the cracking susceptibility of
the base metals being examined. Therefore, the welding
conditions must be very closely controlled to avoid any
variations that may lead to incorrect results. Multiple
specimens are required to help assure reliable measure-
ment of the cracking susceptibility.
10.2.5 Apparatus. Evaluation for the presence of hydro-
gen cracks requires the use of metallographic equipment
to section and prepare the specimen for examination.
10.2.6 Specimens
10.2.6.1 The test specimen is shown in Figure 10.2.1.
The minimum base-plate thickness is 3/8 in (10 mm) The
two surfaces of Plate A and the mating edges of Plates B
and C are ground smooth prior to assembly. This finish is
essential to ensure intimate contact and good heat trans-
fer between these surfaces during welding of the assem-
bled specimen. The specimen is assembled and securely
clamped. The plates are tack welded, and then the clamps
are removed.
10.2.6.2 The suggested dimensions of the specimen
plates are as follows:
Plate A:
Length 12 in (305 mm)
Width 6 in (152 mm)
Plates B and C:
Length 12 in (305 mm)
Width 3 in (76 mm)
10.2.7 Procedure
10.2.7.1 Test welds are deposited in the sequence
shown in Figure 10.2.1. All welding shall be done in the
flat (1F) position using a mechanized process to maintain
close control of the welding parameters. If the shielded
metal arc process is used, it is recommended that the
covered electrodes be fed into the arc mechanically
rather than manually to maintain uniform parameters.
10.2.7.2 All test welds are deposited in the same
direction of travel. Each weld is made without any arc
interruptions, and the craters at the ends of the test welds
are filled before the arc is extinguished. The same weld-
ing parameters are used for each test weld, and each weld
shall be of the same size.
10.2.7.3 In some situations, a multipass test weld may
be desired. The sequence for depositing the individual
passes of multipass weld is indicated in Figure 10.2.1.
10.2.7.4 If weld metal cracking occurs in any of the
test welds, the test shall be discontinued and the location
and extent of cracking noted on the test record sheet.
10.2.7.5 If the welding procedure requires preheating,
the specimen shall be preheated before depositing each
test weld. If postweld heat treatment is required, this
treatment shall be applied to the test weldment immedi-
ately after completion of welding and before cooling to
ambient temperatures unless specifically required by the
weld procedure to cool the weldment prior to postweld
heat treatment. If no postweld heat treatment is required,
the as-welded specimen shall be aged at ambient temper-
atures for 48 h.
10.2.7.6 After postweld heat treatment or aging, the
test weldment is sectioned and examined for cracks. For
standard cruciform specimens, sections (Figure 10.2.2)
are cut transversely from the test weldment. For slotted
cruciform specimens, sections (Figure 10.2.6) are cut longi-
tudinally and transversely. Use of a water-cooled cut-off
wheel is recommended where practical. Each section
shall be identified as to its location in the test weldment.
The four quadrants corresponding to the fabrication
sequence shall be identified. No section shall be located
closer than 1 in (25 mm) from the end of the test weld.
10.2.7.7 One face of each section shall be prepared
with metallographic paper (240 grit or finer), etched and
examined at 50X. The presence and location of any
cracks shall be recorded.
10.2.7.8 When the test is used to evaluate susceptibil-
ity to hydrogen-assisted cracking, a diffusible hydrogen
determination shall be performed for each welding pro-
cess and consumable in accordance with AWS A4.3. The
diffusible hydrogen determination shall be performed
under the same conditions as the test weld.
10.2.8 Report. An example of a data sheet for cruciform
test results is shown on Figure 10.2.7.
10.2.8.1 The test results that shall be reported are the
following:
(1) Base metal and filler metal identification and
chemical composition,
(2) Base metal (specimen) thickness,
(3) Welding parameters,
(4) Any preheating and/or postweld heat treatment,
(5) Fillet weld size and weld bead size for multipass
welds,
(6) Identification of each section cut from the speci-
men and each test weld in the section,
(7) Presence and location of any cracks in each test
weld in each section, and
(8) Results of diffusible hydrogen test, if available.
10.2.8.2 Test data should be recorded on a Test
Results Sheet similar to Figure 10.2.7.
Copyright American Welding Society
Provided by IHS under license with AWS
Not for Resale
No reproduction or networking permitted without license from IHS
--`,,```,,,,````-`-`,,`,,`,`,,`---
CLAUSE 10. WELDABILITY TESTING AWS B4.0:2007
62
Figure 10.2.1—Cruciform Test Assembly
Copyright American Welding Society
Provided by IHS under license with AWS
Not for Resale
No reproduction or networking permitted without license from IHS
--`,,```,,,,````-`-`,,`,,`,`,,`---
AWS B4.0:2007 CLAUSE 10. WELDABILITY TESTING
63
Figure 10.2.2—Locations of Specimens for Examination of Cracks in Cruciform Test
Figure 10.2.3—Schematic Illustration of the Attached Plate
in the Slotted Cruciform Specimen
Copyright American Welding Society
Provided by IHS under license with AWS
Not for Resale
No reproduction or networking permitted without license from IHS
--`,,```,,,,````-`-`,,`,,`,`,,`---
