AWS B4.0: 2007 Standard Methods for Mechanical Testing of Welds
Подождите немного. Документ загружается.


CLAUSE 10. WELDABILITY TESTING AWS B4.0:2007
84
Notes:
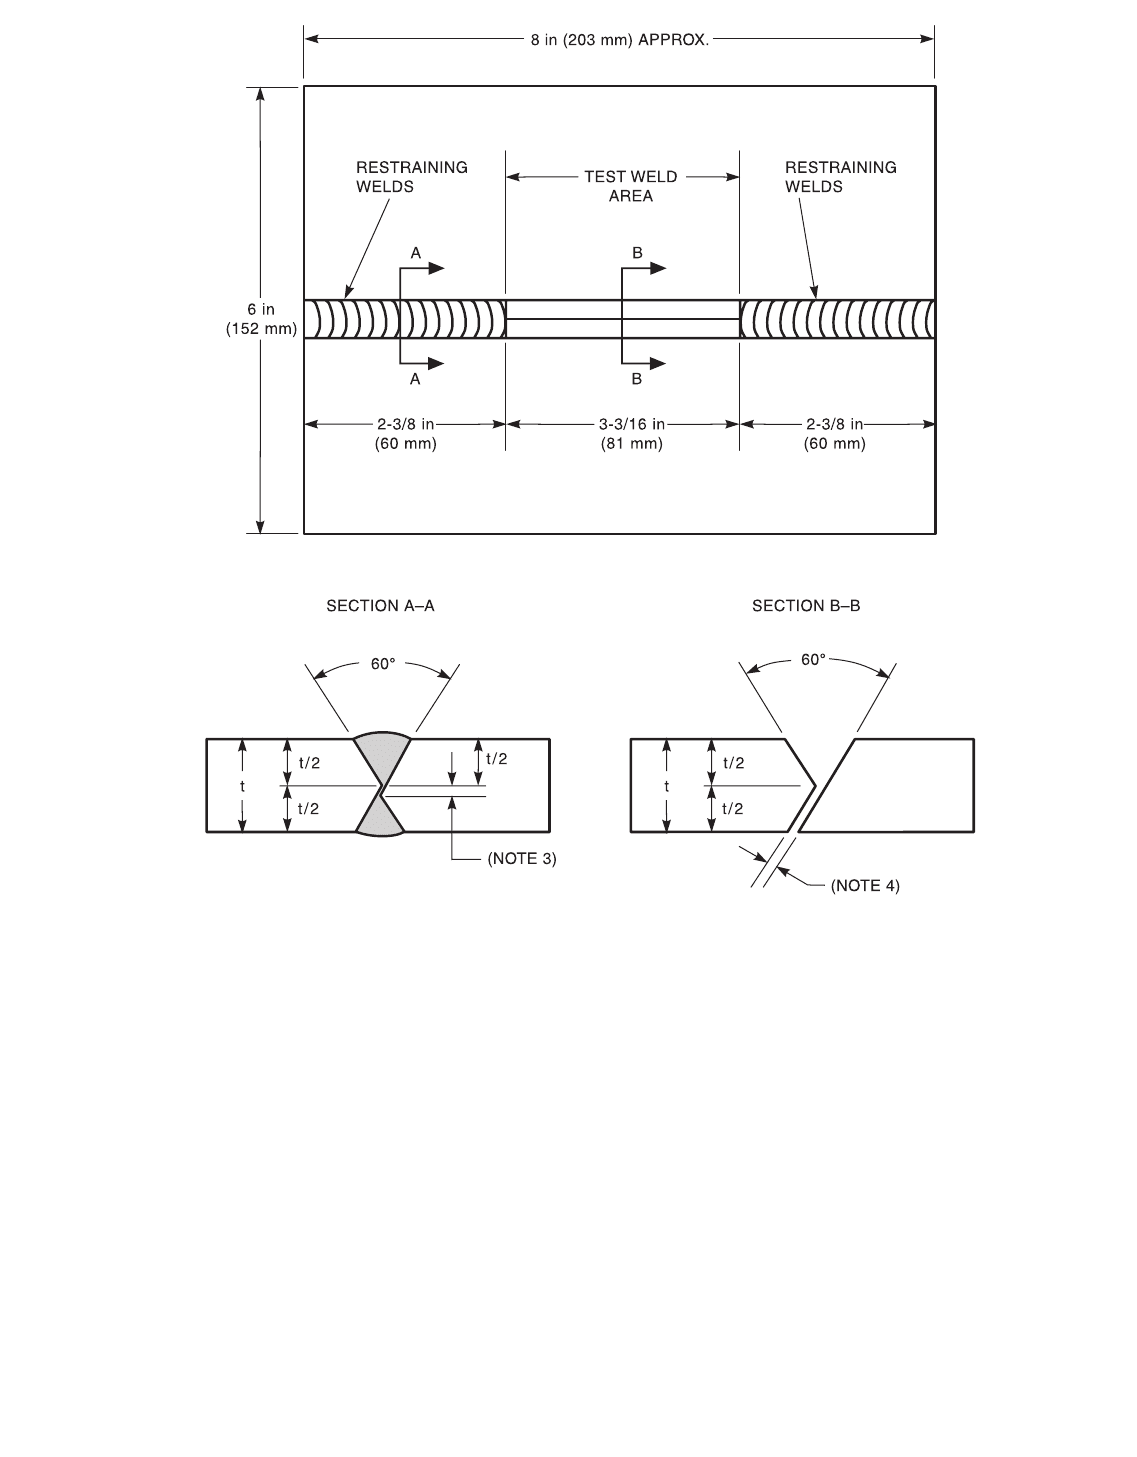
1. Base metal outer edges may be thermally cut (not required to be machined).
2. Joint groove preparation shall be made by machine cutting. Surfaces shall be no rougher than 125 microinches (3 micrometers) R
a
. It
is recommended that the lay of the surface roughness be oriented parallel with the longitudinal axis of the specimen.
3. Dimension shall be 1/8 in (3 mm) prior to depositing restraining welds.
4. Final dimension shall be 0.079 ± 0.008 in (2 mm ± 0.2 mm) after restraining welds are deposited. However, contraction caused during
anchor welding must be considered prior to machining and assembly; typically approximately 0.012 in (0.3 mm) shrinkage.
Figure 10.6.1—Oblique Y-Groove Test Assembly
Copyright American Welding Society
Provided by IHS under license with AWS
Not for Resale
No reproduction or networking permitted without license from IHS
--`,,```,,,,````-`-`,,`,,`,`,,`---

AWS B4.0:2007 CLAUSE 10. WELDABILITY TESTING
85
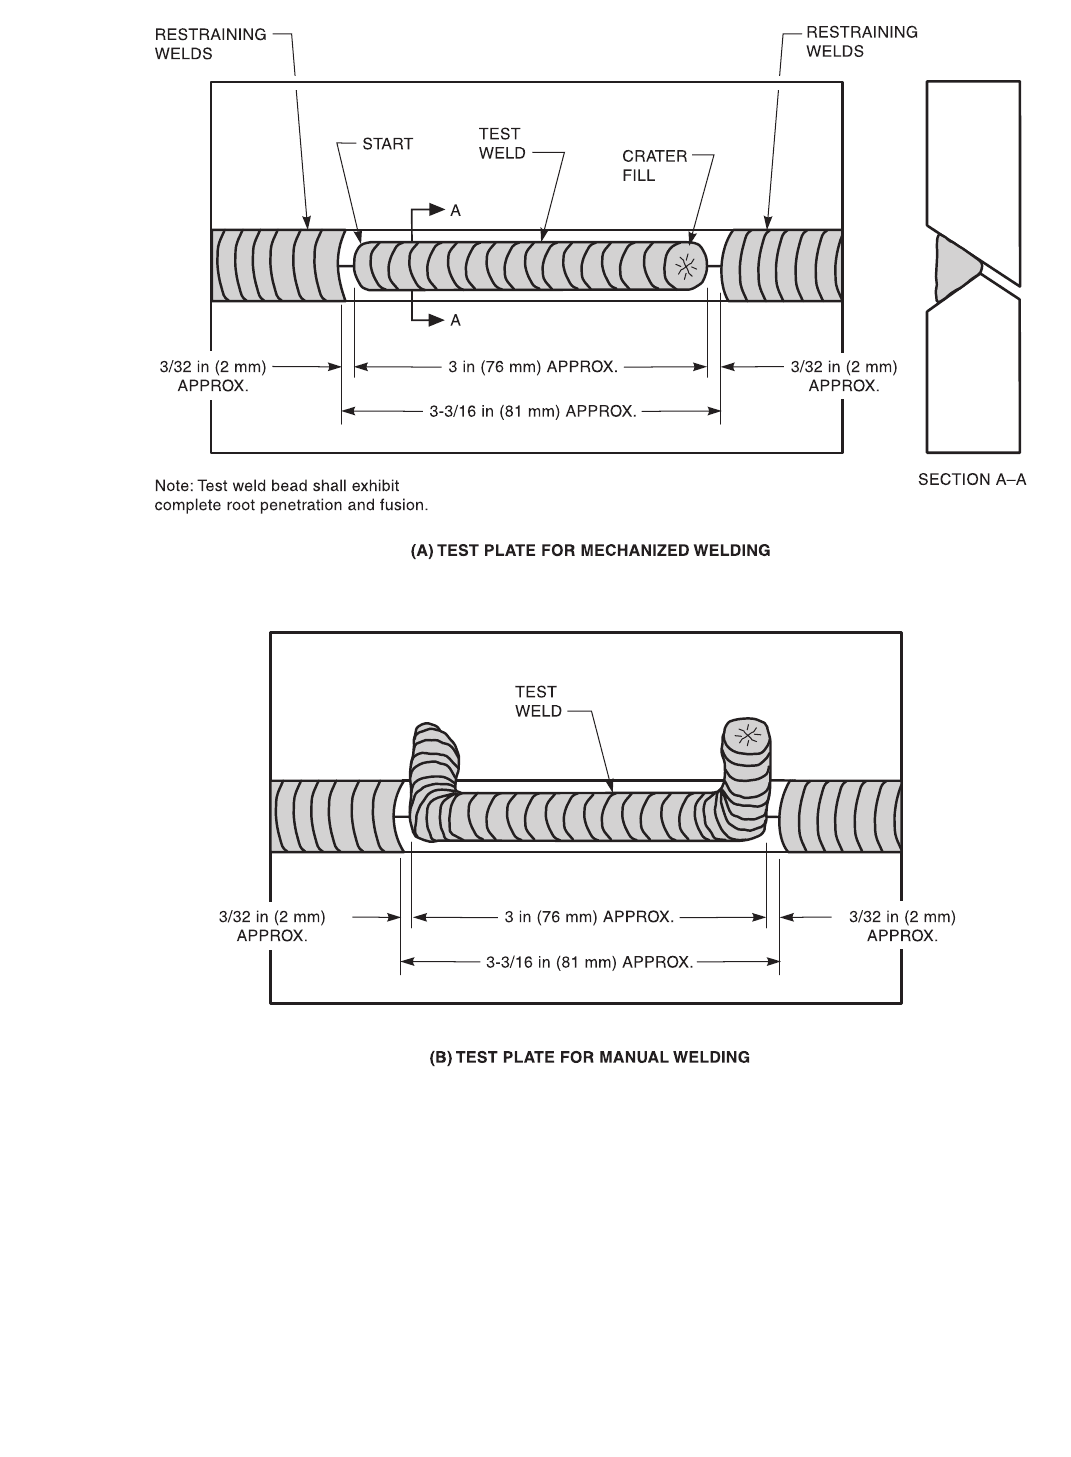
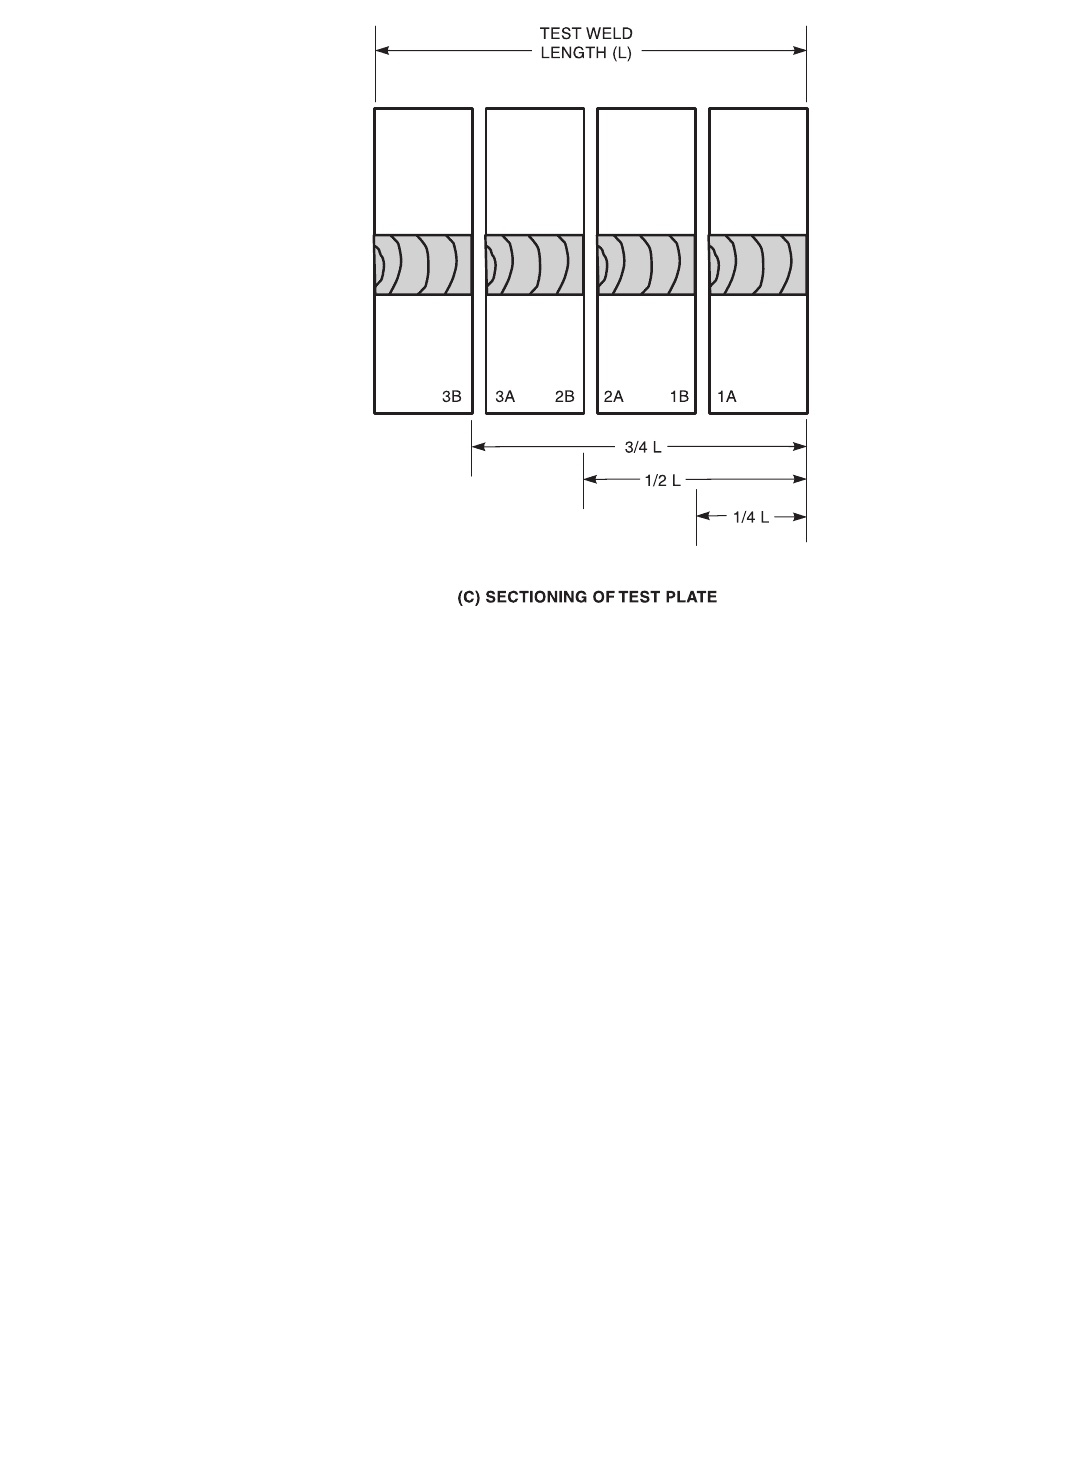
Figure 10.6.2—Oblique Y-Groove Test Weld Configuration
Copyright American Welding Society
Provided by IHS under license with AWS
Not for Resale
No reproduction or networking permitted without license from IHS
--`,,```,,,,````-`-`,,`,,`,`,,`---

CLAUSE 10. WELDABILITY TESTING AWS B4.0:2007
86
Figure 10.6.2 (Continued)—Oblique Y-Groove Test Weld Configuration
Copyright American Welding Society
Provided by IHS under license with AWS
Not for Resale
No reproduction or networking permitted without license from IHS
--`,,```,,,,````-`-`,,`,,`,`,,`---

AWS B4.0:2007 CLAUSE 10. WELDABILITY TESTING
87
OBLIQUE Y-GROOVE TEST RESULTS
Company Name _____________________________________________________________ Date _______________________
Job/Test No. ________________________________________________________________ Sheet _________ of __________
Description of Investigation ____________________________________________________________________________________
Material Identification _________________________________________________________
Material Thickness ___________________________________________________________ Rolling Direction Indicated Y/N
Material Heat Treatment ______________________________________________________________________________________
Applicable Welding Procedure No. _______________________________________________
Welding Details ______________________________________________________________ Process_____________________
Date of Welding______________________________________________________ Time Lapse—Welding to Testing (hrs) _____
No. of Test Assemblies Inspected ________________________ Total % Cracking ______________________________________
Remarks __________________________________________________________________________________________________
Remarks __________________________________________________________________________________________________
Tested By __________________________________________________________________
Signature___________________________________________________________________ Date _______________________
Figure 10.6.3—Suggested Data Sheet for Oblique Y-Groove Test
Parameters Test Weld Parameters Anchor Weld Test Weld
Electrode/Wire Dia. Welding Consumable ID
Amperage Specification
Voltage Classification
Polarity Baking Treatment
Travel Speed Shielding Gas Type, Medium
Preheat Temperature Shielding Gas Dew Point
Heat Input Max. Interpass Temp.
Humidity (RH) Measuring Method
Ambient Temp.
Hydrogen Determination Method Date Result
EXAMINATION
Surface Section
Assembly No. Inspection Method Results (C or NC) Inspection Method Results (C or NC)
Copyright American Welding Society
Provided by IHS under license with AWS
Not for Resale
No reproduction or networking permitted without license from IHS
--`,,```,,,,````-`-`,,`,,`,`,,`---

CLAUSE 10. WELDABILITY TESTING AWS B4.0:2007
88
10.7 Welding Institute of Canada
(WIC) Test
10.7.1 Scope
10.7.1.1 The Welding Institute of Canada (WIC)
cracking test was originally introduced as a general high
restraint test for low carbon steel weldments. While the
primary application is to evaluate weld metal, the test
also may be used to evaluate the effects of welding heat
input, base plate composition, and welding preheat, on
weld metal and heat-affected zone (HAZ) cracking sus-
ceptibility.
10.7.1.2 This standard is applicable to the following:
(1) Qualification of materials and welding proce-
dures where specific acceptance standards have been
specified;
(2) Information, basis of acceptance, or manufacturing
and quality control; and
(3) Research and development.
10.7.1.3 The use of this test is restricted as follows:
(1) The test shall be used for 3/4 in to 1 in (19 mm to
25 mm) thick base metal; and
(2) Close control of all welding conditions is
required. The results of this test may be strongly affected
more by changes in welding conditions.
10.7.1.4 The following information shall be
furnished:
(1) Welding procedure (process and parameters);
(2) Base metal specification/identification, thickness,
and actual chemical composition, if available;
(3) State of heat treatment;
(4) Base metal rolling direction;
(5) Filler metal specification/identification, diameter,
and any prewelding treatment (e.g., electrode baking
temperature and time);
(6) Cross-sectional examination procedure;
(7) Acceptance criteria, if applicable; and
(8) Report form including specific data to be
recorded and observations to be made.
10.7.2 Normative References. The following standards
contain provisions which, through reference in this text,
constitute mandatory provisions of this test. For undated
references, the latest edition of the referenced standard
shall apply. For dated references, subsequent amend-
ments to, or revisions of, any of these publications do not
apply.
ASTM Documents:
ASTM E 3, Methods for Preparation of Metallo-
graphic Specimens
AWS Documents:
AWS A4.3, Standard Methods for Determination of
the Diffusible Hydrogen Content of Martensitic, Bainitic,
and Ferritic Steel Weld Metal Produced by Arc Welding
10.7.3 Summary of Method
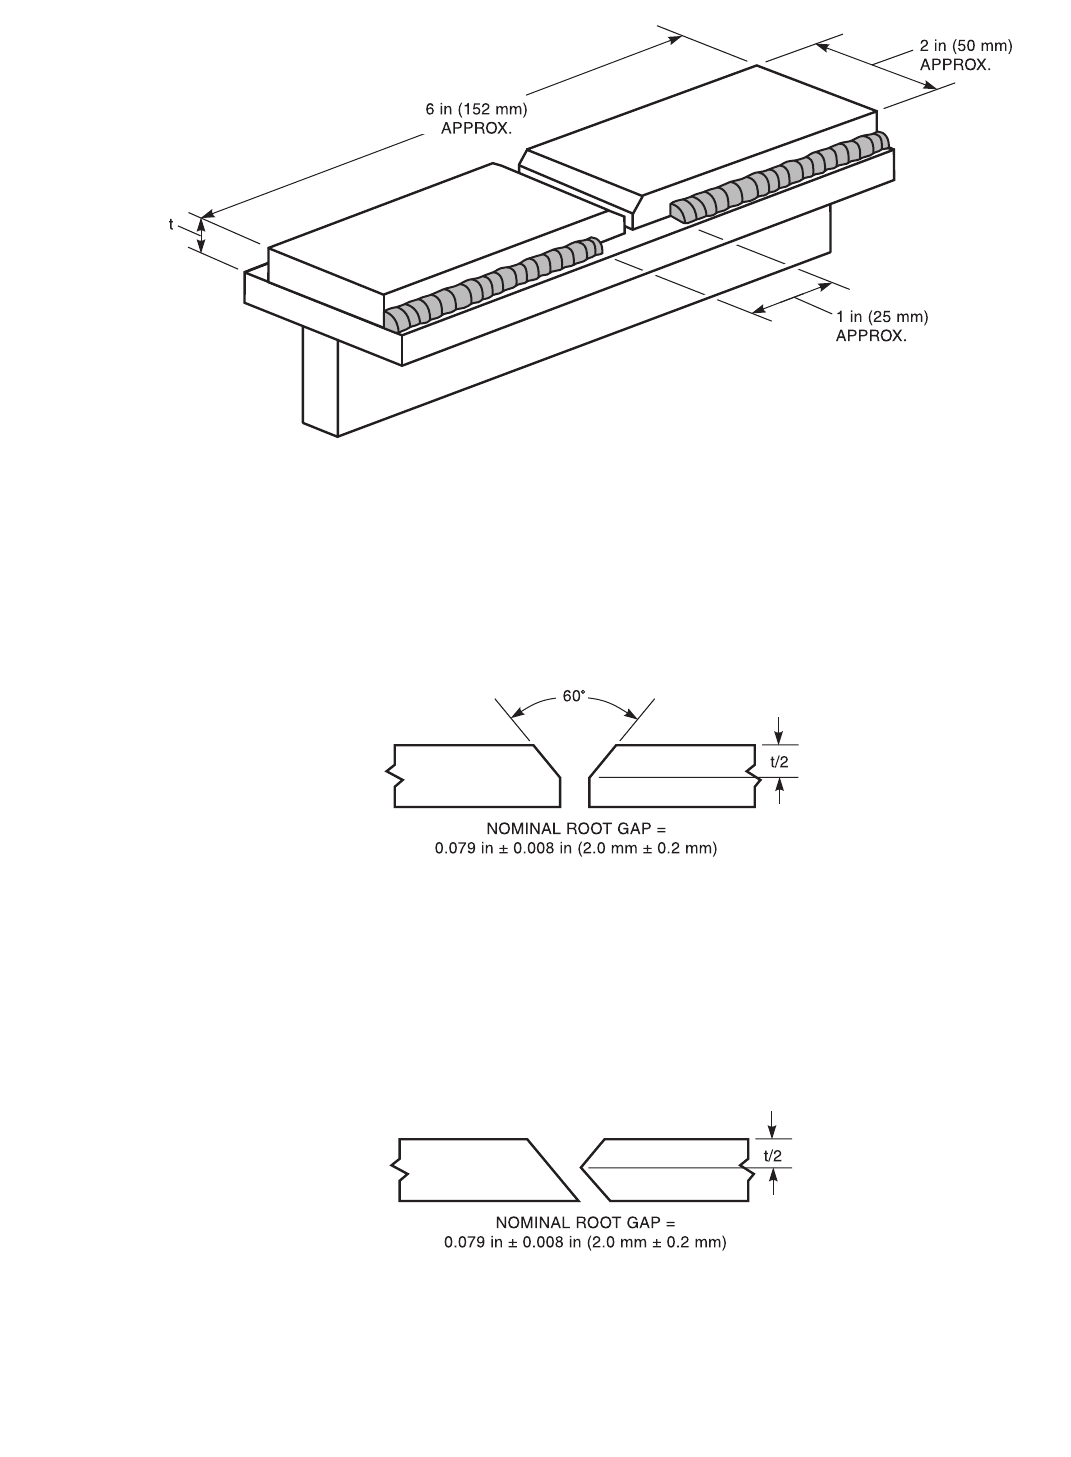
10.7.3.1 The WIC test specimen is schematically
illustrated in Figure 10.7.1. The WIC specimen was orig-
inally developed in Canada using metric dimensions.
The WIC specimen joint design may be either a straight
Y or oblique Y as shown in Figures 10.7.2 and 10.7.3. A
straight Y joint is used when weld deposit hydrogen-
assisted cracking resistance is of principal interest. An
oblique Y is used when the hydrogen-assisted cracking
of both the HAZ and weld metal are of interest.
10.7.3.2 The WIC specimen is restrained by fillet
welding the specimen on 3 sides to either a tee beam (as
shown in Figure 10.7.1) or a thick restraining plate. The
fillet size shall be a minimum of 5/16 in (8 mm). If a fab-
ricated tee beam is used it shall be made from a mini-
mum of 1 in (25 mm) thick plate. If a simple restraining
plate is used, it shall be a minimum of 2 in (50 mm) thick
plate. A run-on/run-off tab shall be used on each speci-
men. Each test condition of interest is usually run in trip-
licate. Three specimens separated by run-on/run-off tabs
can be placed sequentially and welded at the same time.
The run-on/run-off tabs are typically half the thickness of
the test specimen and can be any convenient length and
width. If possible, the run-on/run-off tabs are made from
the same material as the WIC specimen.
10.7.3.3 A single pass weld is deposited in the weld
joint. After the welding is completed, the specimen is
held a minimum of 24 h prior to final inspection.
10.7.3.4 The completed welds are examined by mag-
netic particle inspection for external cracks. The speci-
men may also be sectioned transverse to the direction of
welding, in the center of the specimen, to detect subsur-
face root cracks.
10.7.4 Significance. This test is used to evaluate the
cracking susceptibility of the weld metal and HAZ in sit-
uations simulating the root pass in a highly restrained
butt weld. The welding conditions must be very closely
controlled to avoid variations that may result in inconsis-
tent results. Multiple specimens may be required to
assure reliable assessment of the cracking susceptibility.
Copyright American Welding Society
Provided by IHS under license with AWS
Not for Resale
No reproduction or networking permitted without license from IHS
--`,,```,,,,````-`-`,,`,,`,`,,`---

AWS B4.0:2007 CLAUSE 10. WELDABILITY TESTING
89
10.7.5 Apparatus. A 2 in (50 mm) thick steel plate or a
tee beam made from 1 in (25 mm) thick steel plate is
used to restrain the WIC specimen. The WIC specimen is
fillet welded on 3 sides to either a tee beam (as shown in
Figure 10.7.1) or a thick restraining plate. The fillet size
shall be a minimum of 5/16 in (8 mm). Evaluation for the
presence of hydrogen cracks requires the use of metallo-
graphic equipment to section and prepare the specimen
for examination.
10.7.6 Specimens. The test specimen is shown in Figure
10.7.1. The recommended base plate thickness is 3/4 in
(19 mm) to 1 in (25 mm). The surfaces in and around the
weld joint are ground to bright metal prior to assembly.
The surfaces between the WIC specimen and the
restraining plate shall be ground flat prior to assembly.
This is essential to ensure intimate contact and good heat
transfer during test weld. The test assembly is fillet
welded to a 2 in (50 mm) thick restraining plate or 1 in
(25 mm) tee section as shown in Figure 10.7.2 prior to
the test. A minimum 1/2 in (13 mm) long (any convenient
width) run-on and run-off shall be used for each specimen.
10.7.7 Procedure
10.7.7.1 All welding shall be done in the flat position
unless otherwise specified. A mechanized process may
be used to maintain control of the welding parameters.
10.7.7.2 Each weld is made without any arc interrup-
tions in the test region. Weld starts and stops will be
placed on the weld run-on and run-off tabs, and the cra-
ters at the ends of the test are to be filled before the arc is
extinguished. The same welding parameters are used for
each test weld and each weld should be of the same size.
10.7.7.3 The fabrication sequence is as follows: (1)
Establish the desired preheat temperature of interest. (2)
If no preheat is used, record ambient temperature of the
specimen. The single pass weld deposit shall employ
welding techniques that promote good fusion and crater
fill.
10.7.7.4 If the welding procedure requires preheating,
the specimen shall be preheated before depositing each
test weld. If postweld heat treatment is required, the
treatment shall be applied to the test weldment immedi-
ately after completion of welding and before cooling to
ambient temperature unless specifically required by the
weld procedure to cool the weldment prior to postweld
heat treatment. If no postweld heat treatment is required,
the as-welded specimen shall be held at ambient temper-
ature for 24 h prior to final inspection or as specified by
the customer.
10.7.7.5 If weld metal cracking occurs in any of the
test welds, the location and extent of cracking shall be
noted on the test record sheet.
10.7.7.6 The test weld shall be examined for surface
cracks using magnetic particle inspection. Examination
of a transverse cross section is recommended, especially
if the oblique Y-groove is employed. The requirement
for sectioning should be specified in the work contract or
as agreed by the customer and vendor.
10.7.7.7 If sectioning is required, macrosections are
cut transverse to the direction of welding from the center
of the weldment, preferably by using a water-cooled
bandsaw or abrasive cut-off wheel. Each macrosection
shall be identified. The face of the section to be exam-
ined is polished, etched, and examined at 50X or greater
magnification. The location and size of any cracks shall
be recorded.
10.7.7.8 A diffusible hydrogen test shall be performed
for each welding process and consumable in accordance
with AWS A4.3. The diffusible hydrogen test should be
performed under the same ambient condition as the WIC
test weldment.
10.7.8 Report. The test results that typically are reported
are the following:
(1) Base metal and filler metal identification and
chemical composition,
(2) Base metal (specimen) thickness,
(3) Welding procedures (process and parameters),
(4) Any preheating and/or postweld heat treatment,
(5) Identification of each section cut from the speci-
men,
(6) Location and size of any cracks in each test weld
in each section,
(7) Results of diffusible hydrogen test, and
(8) Test data should be recorded on a Test Record
Sheet similar to Figure 10.7.4.
Copyright American Welding Society
Provided by IHS under license with AWS
Not for Resale
No reproduction or networking permitted without license from IHS
--`,,```,,,,````-`-`,,`,,`,`,,`---

CLAUSE 10. WELDABILITY TESTING AWS B4.0:2007
90
Figure 10.7.1—Schematic Illustration of the WIC Test Assembly
Figure 10.7.2—Illustration of the Straight Y Joint Design for the WIC Specimen
Figure 10.7.3—Illustration of the Oblique Y Joint Design for the WIC Specimen
Copyright American Welding Society
Provided by IHS under license with AWS
Not for Resale
No reproduction or networking permitted without license from IHS
--`,,```,,,,````-`-`,,`,,`,`,,`---

AWS B4.0:2007 CLAUSE 10. WELDABILITY TESTING
91
WIC TEST RESULTS
Company Name _____________________________________________________________ Date _______________________
Job/Test No. ________________________________________________________________ Sheet _________ of __________
Description of Investigation ____________________________________________________________________________________
Material Identification _________________________________________________________
Material Thickness ___________________________________________________________ Rolling Direction Indicated Y/N
Material Heat Treatment ______________________________________________________________________________________
Applicable Welding Procedure No. _______________________________________________
Welding Details ______________________________________________________________ Process_____________________
Date of Welding______________________________________________________ Time Lapse—Welding to Testing (hrs) _____
No. of Test Assemblies Inspected ________________________ Total % Cracking ______________________________________
Remarks __________________________________________________________________________________________________
Remarks __________________________________________________________________________________________________
Tested By __________________________________________________________________
Signature___________________________________________________________________ Date _______________________
Figure 10.7.4—Suggested Data Sheet for WIC Test
Parameters Test Weld Parameters Anchor Weld Test Weld
Electrode/Wire Dia. Welding Consumable ID
Amperage Specification
Voltage Classification
Polarity Baking Treatment
Travel Speed Shielding Gas Type, Medium
Preheat Temperature Shielding Gas Dew Point
Heat Input Max. Interpass Temp.
Humidity (RH) Measuring Method
Ambient Temp.
Hydrogen Determination Method Date Result
EXAMINATION
Surface Section
Assembly No. Inspection Method Results (C or NC) Inspection Method Results (C or NC)
Copyright American Welding Society
Provided by IHS under license with AWS
Not for Resale
No reproduction or networking permitted without license from IHS
--`,,```,,,,````-`-`,,`,,`,`,,`---

CLAUSE 10. WELDABILITY TESTING AWS B4.0:2007
92
10.8 Trough Test
10.8.1 Scope
10.8.1.1 The trough test is used to evaluate the sus-
ceptibility of medium and high strength alloy steel weld
metal and consumables to hydrogen-assisted cracking.
The primary focus of this test is to establish thermal
treatments that eliminate time-delayed cracking in thick
section repair welds particularly during shielded-metal
arc welding (SMAW).
While the primary application is to evaluate the need or
type of thermal treatments required to eliminate poten-
tially damaging hydrogen related weld metal cracking,
this test may be used to evaluate the effects of welding
procedure, welding consumables, welding heat input,
interpass temperature, and postheating on cracking sus-
ceptibility. For weldments or welding procedures that
may not need postweld heat treatment, this test may be
used to determine the sensitivity to hydrogen embrittle-
ment and hydrogen-assisted cracking.
10.8.1.2 This standard is applicable to the following:
(1) Qualification of materials and welding proce-
dures where specific acceptance standards have been
specified;
(2) Information, basis of acceptance, or manufacturing
and quality control; and
(3) Research and development.
10.8.1.3 The use of this test is restricted as follows:
(1) Base metal and welding consumables susceptible
to time delayed hydrogen-assisted cracking,
(2) Short highly restrained repair weld in thick sec-
tion alloy steel base metal, and
(3) Close control of the welding parameters is re-
quired as the results may be affected more by differences
in parameters than in delayed cracking susceptibility.
10.8.1.4 The following information shall be fur-
nished:
(1) Weld procedure (process and parameters);
(2) Base-metal specification/identification and chem-
ical composition;
(3) Filler metal specification/identification, size, and,
any preweld treatment, e.g., baking time and temperature;
(4) The type, number, and location of tensile speci-
mens to be tested;
(5) Report form when required.
10.8.2 Normative References. The following standards
contain provisions which, through reference in this text,
constitute mandatory provisions of this test. For undated
references, the latest edition of the referenced standard
shall apply. For dated references, subsequent amend-
ments to, or revisions of, any of these publications do not
apply.
ASTM Documents:
ASTM E 4, Standard Practices for Load Verification
of Testing Machines
ASTM E 8, Standard Methods for Tension Testing of
Metallic Materials
AWS Documents:
AWS A4.3, Standard Methods for Determination of
the Diffusible Hydrogen Content of Martensitic, Bainitic
and Ferritic Steel Weld Metal Produced by Arc Welding
10.8.3 Summary of Method
10.8.3.1 The conditions that promote hydrogen-
related delayed weld metal cracking can usually be found
during short repair welds in highly restrained weldments
or base metal. The trough test was developed to define
thermal treatments that eliminate delayed weld metal
cracking.
10.8.3.2 The trough test specimen is shown in Figure
10.8.1. The trough configuration is prepared by air-
carbon arc cutting or other suitable methods to achieve
the joint design shown in Figure 10.8.1. Subsequent
grinding is used to obtain the required trough dimen-
sions, to remove all gouging deposits and provide a
bright metal trough surface.
10.8.3.3 The test specimen is welded in the flat posi-
tion and monitored for up to 30 days or until weld crack-
ing occurs. Thermal treatments are applied to various test
weldments that result in the elimination of hydrogen
related delayed weld metal cracking.
10.8.4 Significance
10.8.4.1 The trough weld test is based on the theory
that hydrogen related delayed weld metal cracking
and/or reduced tensile ductility can be controlled by the
careful application of appropriate thermal treatments in
steel weldments. For example, the SMAW process intro-
duces hydrogen into the weld metal through the direct
transfer across the arc of moisture contained within the
electrode coating. Moisture transfer from the electrode
coating to the weld metal can be minimized by following
sound welding procedure control such as electrode
baking, limiting electrode exposure through the use of
portable holding containers and periodic sampling of
electrode coatings to ensure that the percentage of mois-
Copyright American Welding Society
Provided by IHS under license with AWS
Not for Resale
No reproduction or networking permitted without license from IHS
--`,,```,,,,````-`-`,,`,,`,`,,`---

AWS B4.0:2007 CLAUSE 10. WELDABILITY TESTING
93
ture remains below the maximum recommended by the
electrode manufacturer or specification. Despite these
precautions, hydrogen levels in weld metal can exceed
the safe level at which sound weldments can be fabri-
cated. The presence of excessive amounts of dissolved
hydrogen can be observed as time delayed transverse
cracking of weld metal. As hydrogen levels decrease,
weld-metal cracking propensity decreases, however, dif-
fusible hydrogen can result in reduced tensile ductility of
the weld metal.
10.8.4.2 The major characteristics of hydrogen
embrittlement are its strain-rate sensitivity, temperature
dependence and susceptibility to delayed fracture.
Unlike most embrittlement phenomena, hydrogen
embrittlement is enhanced by slow strain rates. For steel,
the region of greatest susceptibility to hydrogen embrit-
tlement is at approximately room temperature.
10.8.4.3 Hydrogen introduction into the weld metal is
not limited to the SMAW process. Other welding pro-
cesses (GMAW, SAW, etc.) may also provide the envi-
ronment that promotes the conditions leading to
hydrogen-related delayed cracking.
10.8.5 Apparatus
10.8.5.1 A simple fixture is required to hold the speci-
men so that the test welds can be deposited in the flat
position. Welding in the flat position minimizes variabil-
ity in welder skill and enhances the depositing of satis-
factory welds not requiring quality interpretation.
10.8.5.2 Electric strip heaters are required to provide
the preweld, intraweld, and postweld heating of the test
specimen. Appropriate temperature control, measuring,
and recording instruments may be needed to document
the thermal treatment applied to the test specimen.
10.8.6 Specimens
10.8.6.1 The specimen and groove configuration is
shown in Figure 10.8.1. The specimen may be prepared
by thermal cutting.
10.8.6.2 The trough is prepared by air carbon arc cut-
ting followed by grinding of the trough surface to bright
metal and required dimensions.
10.8.6.3 The amount of restraint required to produce
time-delayed weld metal cracking is provided by the
mass of the plate surrounding the trough groove.
10.8.6.4 The location of tension test specimens in the
trough weld is shown in Figure 10.8.2. Tension testing is
used to evaluate tensile ductility.
10.8.6.5 A series of test specimens is welded with
each specimen subjected to a thermal treatment proce-
dure designed to eliminate hydrogen related delayed
weld metal cracking and/or reduced tensile ductility.
10.8.7 Procedure
10.8.7.1 The test welds are deposited in the trough in
the flat position.
10.8.7.2 The starts and stops of the weld beads are
stacked in the trough one on top of the other as indicated
in Figure 10.8.2. This is done in order to evaluate the
susceptibility of these locations to high levels of hydro-
gen and possible defect sites. All starts and stops shall be
lightly ground between passes.
10.8.7.3 The initial trough specimen is produced by
continuous welding and minimum preheat and interpass
temperature in order to simulate and effect time delayed
weld metal cracking. Appropriate preheat, interpass, and
postweld thermal treatments are applied to subsequent
specimens until weld metal cracking is eliminated and/or
tensile ductility is recovered. An outline of suggested
thermal treatments is as follows:
(1) Continuous welding with required preheat and
interpass temperature applied; no postweld treatment.
Delayed weld cracking and reduced tensile ductility
should be evident;
(2) Continuous welding of 1/2 in (13 mm) thick lay-
ers with required preheat and interpass temperature
applied; followed by an elevated postweld treatment at
400°F (204°C) for 12 h to 16 h; and
(3) Other thermal treatments may be applied provid-
ing they result in eliminating weld metal cracking and/or
reduced tensile ductility.
10.8.7.4 All trough specimens shall be subjected to
magnetic particle inspection immediately upon comple-
tion of welding and daily for periods up to 30 days. Radi-
ography may be used to confirm the results of magnetic
particle inspection for weld soundness.
10.8.7.5 The location of tension test specimens in the
trough weld is shown in Figure 10.8.2. Tensile testing is
used to evaluate the loss of tensile ductility in the weld
metal as a result of hydrogen embrittlement.
10.8.7.6 When the test is used to evaluate hydrogen-
cracking susceptibility, a diffusible hydrogen determina-
tion shall be performed for each welding process and
consumable in accordance with AWS A4.3. The diffus-
ible hydrogen determination shall be performed under
the same conditions as the test weld.
10.8.8 Report. In addition to the requirements of the
applicable documents, the report shall include the
following:
Copyright American Welding Society
Provided by IHS under license with AWS
Not for Resale
No reproduction or networking permitted without license from IHS
--`,,```,,,,````-`-`,,`,,`,`,,`---
