ASM Metals HandBook Vol. 14 - Forming and Forging
Подождите немного. Документ загружается.

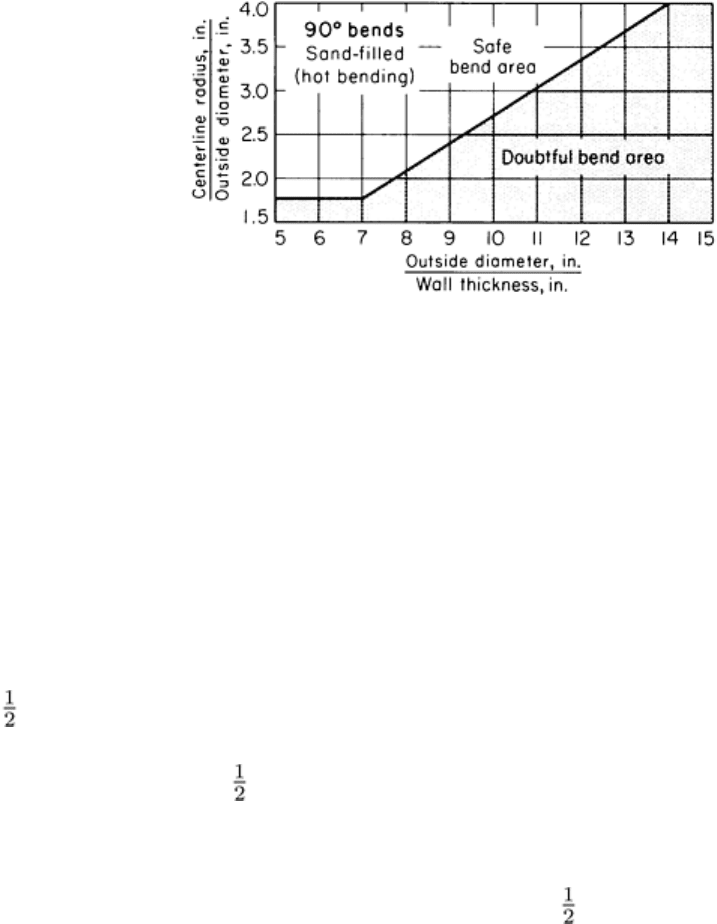
diameter without the use of mandrel.
Fig. 8 Chart for determining conditions for the su
ccessful hot bending of tubes of all diameters with the use of a
mandrel or filler.
If a mandrel is not practical for internal support of the tube, the tube can be packed with dry sand. First, a plate is welded
to one end of the tube to block the end. The tube is filled with sand and is tamped or vibrated to make sure the sand is
packed tight. Another plate is welded to the open end, the tube is heated, and the bend is made. Finally, the plates are cut
off and the sand is emptied out. Various specialized techniques for bending tubes hot are described in Examples 10, 11,
and 12.
Example 10: Five-Step Bending of a Tube.
Return bends for the coils of a boiler were made by bending 50 mm (2 in.) outside diameter carbon steel tube 180° on a
38 mm (1 in.) centerline radius. The tube had a 6.60 mm (0.260 in.) wall. The sequence of operations was:
• Bend 180° on 114 mm (4 in.) centerline radius in a conventional rotary bender
• Heat the bend area to 980 to 1095 °C (1800 to 2000 °F) in a furnace
• Reshape the bend to 50 mm (2 in.) radius in a bending press
• Close legs to 75 mm (3 in.) between centers in a vertical press
• Restrike in the vertical press to make bend radius 38 mm (1 in.)
The last three operations listed above were performed in rapid sequence so that all bends were made before the tube
cooled below 870 °C (1600 °F). Production rate was 30 pieces per hour.
Thinning of the outer wall can sometimes be controlled better in hot bending by heating only the part of the
workpiece that will be the inner wall of the bend. This reduces its compressive strength so that the bend causes very little
stretch of the outer wall. This method makes good bends with centerline radii of 1.3 to 1.5 times the outside diameter of
the tube with the usual tooling in a rotary bender.
Boiler tubes are bent by heating one side for one-third of the way around the tube. The heated portion becomes the inside
of the bend, and because it yields more easily in compression, thinning of the outer wall is limited. The tubes are bent to a
U-shape in a bending machine. The U can then be reheated on the inside as before, and the bend can be squeezed in a
press in one or more steps to make a narrower U, as in the following example.
Example 11: Localized Heating for a Compression Bend.
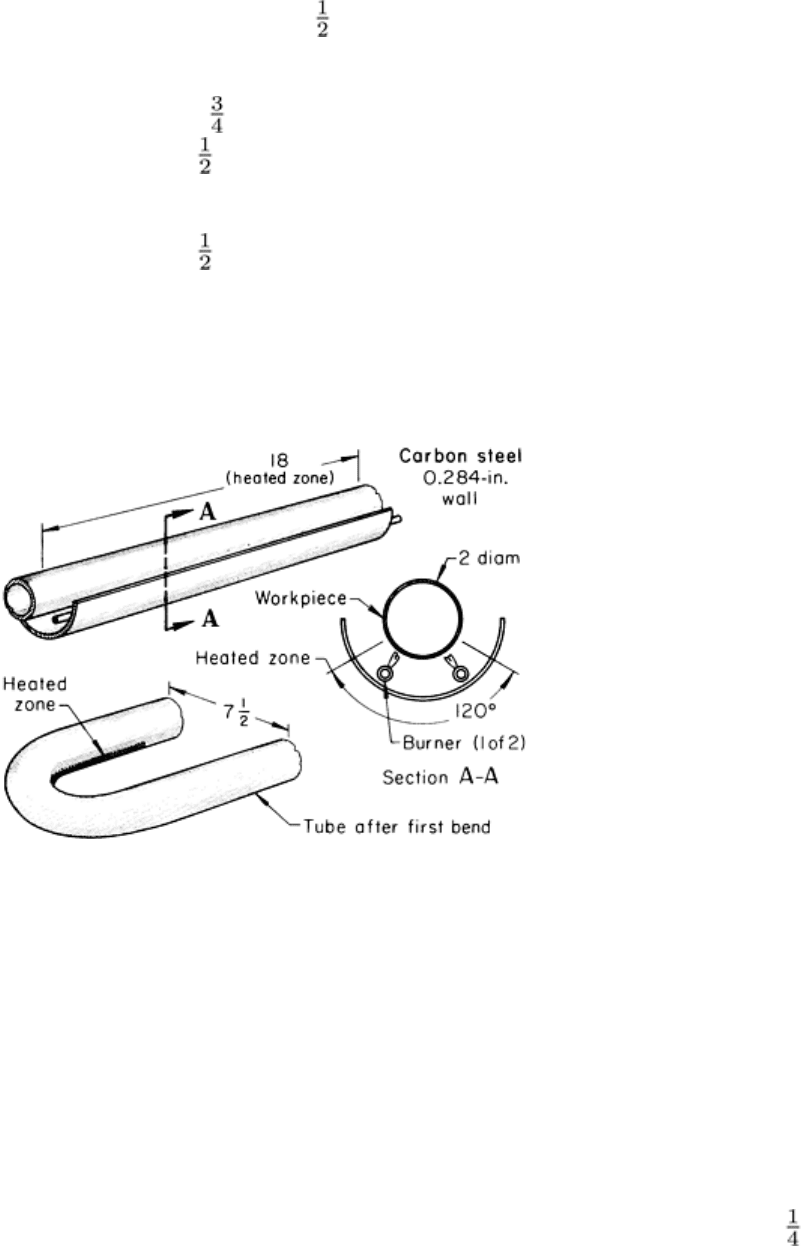
Return bends were made for use in the economizer of a boiler. The tube was made of carbon steel, 50 mm (2 in.) OD by
7.21 mm (0.284 in.) wall. The operations were:
•
Heat the tube to 705 to 730 °C (1300 to 1350 °F) in a special burner that heated the bottom 120° of the
tube for a 457 mm (18 in.) length where the bend was to be made (Fig. 9)
• Bend the tube in a rotary bender 180° to 190 mm (7
in.) between centers with the heated portion on
the inside of the bend
• Squeeze the tube between dies in a hydraulic press to 152 mm (6 in.) between centers
• Squeeze, as in the third step, to 121 mm (4 in.) between centers
• Squeeze, as in the third step, to 89 mm (3 in.) between centers
• Reheat the entire surface of the bend for 203 mm (8 in.) on each side
• Size in a die
• Squeeze, as in the third step, to 64 mm (2 in.) between centers
• Normalize
The production rate, with three men working, was 20 bends per hour.
Fig. 9
Compression bend produced in tubing, and special burner used for localized heating of the workpiece
before bending. Dimensions given in inches.
Dry Sand as Filler. Large tubes are commonly bent hot while they are filled with dry sand. The bending is done on a
bending table made of cast iron plates. The plates have a continuous pattern of cored holes. A bending form for the
desired radius is bolted to the bending table. Steel pins or stops can be placed in the holes in the table to keep the work in
line. A clamshell furnace in sections is the usual source of heat. Winches, jacks, and hoists supply the bending force. A
typical application is described in the following example.
Example 12: Hot Bending a Large Tube on a Cast Iron Bending Table.
A 180° bend with a 381 mm (15 in.) radius was made near the center of a 4.6 m (15 ft) length of steel tube, 184 mm (7
in.) OD by 25 mm (1 in.) wall. A plate was welded to one end of the tube to close it. The tube was dropped, closed-end
down, into a pit and was filled with sand. The tube was vibrated and tamped to make sure the sand was well compacted,
and the open end was closed with another welded-on plate.
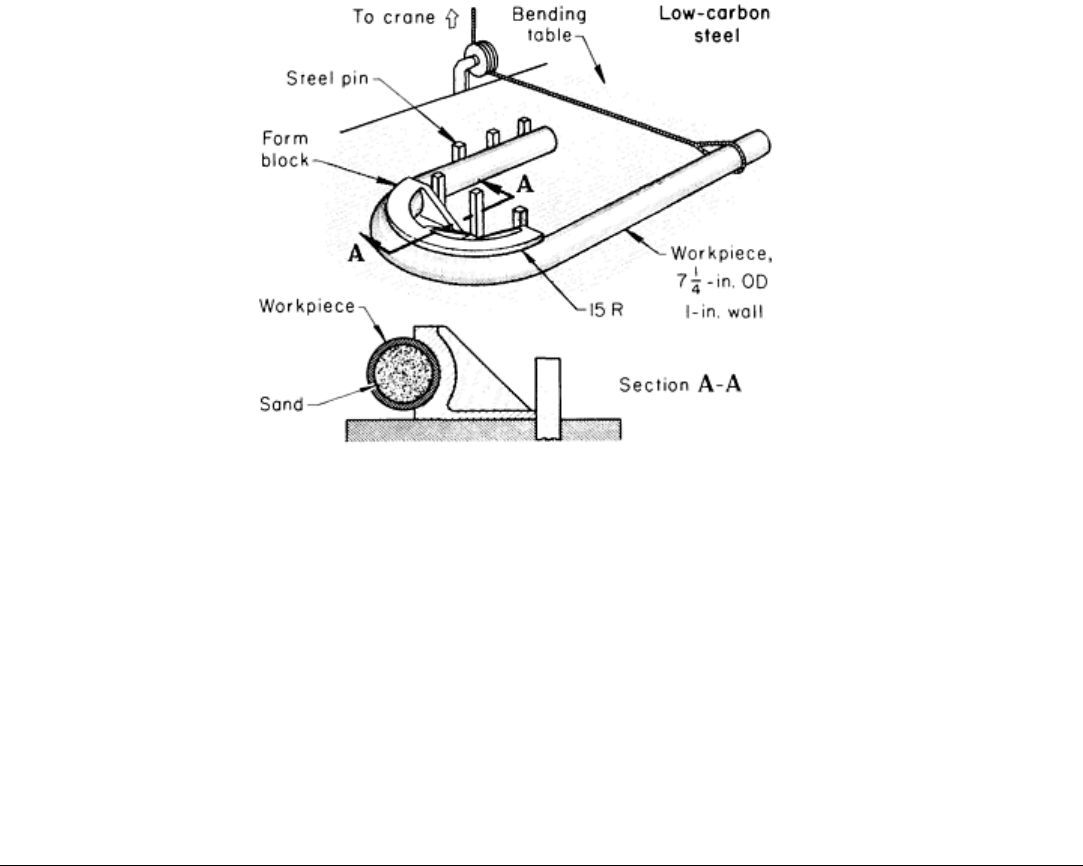
The bending table was set up for the bend. The proper form block was bolted to the table, and lines tangential to the bend
were laid out for proper location of stop pins (Fig. 10).
Fig. 10 Final position in the hot bending of a large sand-
filled tube.
The tube was heated to 980 to 1095 °C (1800 to 2000 °F) in a clamshell furnace and set on the bending table. One end
was clamped down to the table. The other end was pulled by a cable, which, guided by a series of strategically located
pulleys fastened to the table, bent the tube incrementally around the form block to the final position shown in Fig. 10.
When the bend passed inspection, the ends of the tube were cut off and the sand was poured out. The entire process,
including preparation and handling, took 45 min.
Hot Versus Cold Bending. The selection of hot or cold bending can depend on available equipment, the cost of new
equipment, labor costs, the urgency of the job order, and the size of the production lot.
Bending and Forming of Tubing
Tube Stock
Tubes are classed as seamless, welded, lock-seam, butt-seam, and jacketed.
Steel tubing is available both seamed and seamless. Seamed tubing with internal flash demands special consideration
when a mandrel is to be used in bending (see the section "Bending Tubing With a Mandrel" in this article).
Lock-seam tubing can be bent if the seams are tight. A test is to twist a 914 mm (3 ft) long section of tubing in the hands;
any grating or slipping indicates a seam too loose to make good bends.
Butt-seam tubing is similar to welded tubing but with no weld at the joint; it is seldom used. To make good bends, it must
be accurate in dimensions, have no scale, and be bent with the seam in the plane of the bend. A mandrel must always be
used. It is more economical to use welded tubing.
Stainless steel jacketed tubing is made by roll forming a sheet of stainless steel onto a butt-seam tube of low-carbon steel.
The stainless steel jacket is rolled into a lock seam in the open seam of the inner tubing. For best bending, the stainless
steel jacket should be at least 0.51 mm (0.020 in.) thick, and the two layers should be rolled tightly together. Tools for
bending such jacketed tubing cost more than tools for bending plain tubing; an aluminum bronze wiper die, a hardened
steel mandrel, and unusually high pressure on all tools are required, and all of these add to the cost of the tooling. In
addition, the seam must be in the plane of the bend, either inside or outside.
Galvanized steel tubing can be bent to a radius as small as four times the outside diameter. For tube to be bent to smaller
radii, galvanizing should be done after bending, because the galvanized coating is likely to flake if galvanized stock is
used.
Aluminum-coated tubing (hot dipped) can be bent by essentially the same techniques used for uncoated tubing of the
same diameter and wall thickness, using slightly higher clamping pressures to avoid slipping. Additional information is
available in the article "Press Forming of Coated Steel" in this Volume.
Seamless tubing should be free of scale or rust. Wall thickness, concentricity, and hardness vary in seamless steel tubing.
These variations are likely to cause variable springback, wrinkles, and excessive flattening. Common pipe in all sizes and
thicknesses is easily bent if it is clean and free of rust or scale, inside and out.
Stainless steel tubing can be bent to a greater angle, at a given radius, than low-carbon steel. Austenitic types in the
300 series are most commonly bent because they are strong and ductile. Tubing in a stabilized condition at a temper no
higher than quarter hard will make good bends with low scrap rates. Both welded and seamless tubing are available. Thin-
wall tubes should have the exact diameter and wall thickness specified. Annealing is usually recommended after bending
operations.
Copper alloy tubing is usually extruded. It is easily bent in the annealed condition, and it has little springback. Copper
and some brasses may not need to be annealed. Copper-nickel alloys, however, are more difficult to bend and have
greater springback.
When copper alloys are annealed, as most of them are, oxides should be removed by pickling before the tube is bent to
protect the tooling. Oxides increase friction and wear in bending.
Aluminum alloy tubing, like copper alloy tubing, is usually extruded, or extruded and drawn. Soft aluminum may tear
or collapse upon bending. The oxide coating that forms on exposed surfaces of aluminum alloys is abrasive to tooling.
Lubrication prolongs tool life.
Anodized aluminum and decorated aluminum can usually be bent without damaging the finish. Aluminum pipe is bent by
hand to a radius usually not less than four times the outside diameter. The bending of aluminum tubing is discussed in the
article "Forming of Aluminum Alloys" in this Volume.
Bending and Forming of Tubing
Bending Thin-Wall Tubes
The techniques used to bend thin-wall tubes are the same as those used to bend standard tube and pipe, but they are more
carefully applied. A tube can be classified as thin wall if the ratio of outside diameter to wall thickness (D/t) is greater
than 30 to 1. The wall thickness, if not related to the tube diameter, is a meaningless measure. For example, a tube wall
0.51 mm (0.020 in.) thick would be a standard wall thickness for a tube 3.2 mm ( in.) in outside diameter, but for a 152
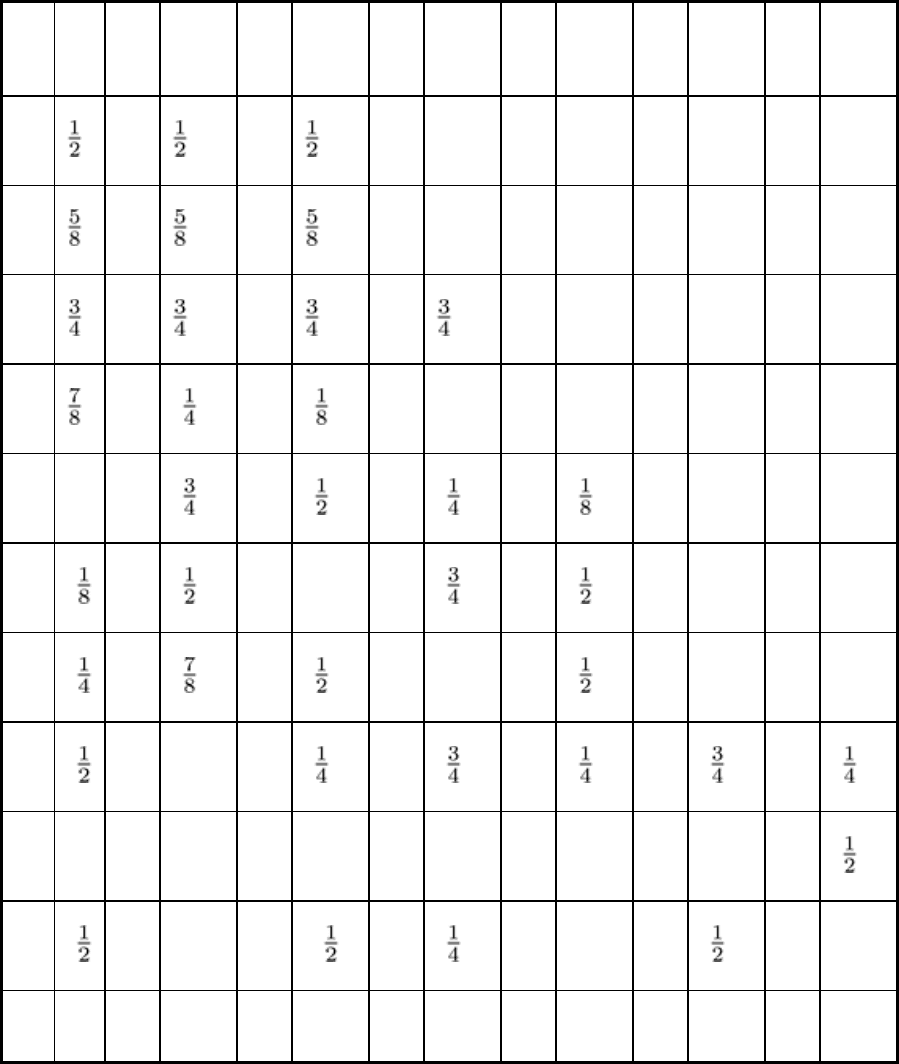
mm (6 in.) tube it would be a very thin wall. The centerline radii given in Table 5 for bending tubing of various D/t ratios
with a ball mandrel and a wiper die are conservative and are often exceeded.
Table 5 Average practical centerline radii for bending thin-
wall steel tubing with a ball mandrel and wiper
die
Tubing
outside
Average centerline radii for tubing with wall thickness, mm (in.), of:
mm
in. 0.89
mm
(0.035)
in.
1.24
mm
(0.049)
in.
1.65
mm
(0.065)
in.
2.11
mm
(0.083)
in.
2.36
mm
(0.093)
in.
3.05
mm
(0.120)
in.
13
13
(a)
13
(a)
. . . . . . . . . . . . . . . . . . . . .
. . .
16
16
(a)
16
(a)
. . . . . . . . . . . . . . . . . . . . .
. . .
19
19
19
(a)
19
(a)
. . . . . . . . . . . .
22
32
1
29
1
25 1
(a)
. . . . . . . . . . . . . . .
. . .
25 1 44
1
38
1
32
1
29
1
(a)
. . . . . . . . .
. . .
29
1
64
2
50 2 44
1
38
1
. . . . . . . . .
. . .
32
1
98
3
89
3
75 3 64
2
50 2 . . .
. . .
38
1
127 5 108
4
95
3
83
3
70
2
57
2
50 2 229 9 203 8 178 7 152 6 127 5 89
3
64
2
305 12 267
10
235
9
203 8 165
6
127
5
75 3 381 15 330 13 279 11 254 10 229 9 203 8
(a)
No wiper die required
Machines used to bend thin-wall tubing have a greater capacity than necessary so that they will be stable and rigid.
Their bending action must be smooth and steady. Run-out on machine spindles should not exceed 0.013 mm (0.0005 in.).
Mandrel rods must be heavy enough so that they do not stretch or buckle when the slip-fitting mandrel is inserted into the
tubing.
Auxiliary equipment includes:
•
A means for pressurizing the tubes with air or hydraulic oil (hydrostatic mandrel) to keep them from
necking after they are drawn past the last mandrel ball
• Hydraulic feed on pressure dies to hold tubes in compression

• Mandrel oscillators that move the mandrel back and forth to keep the tubes from necking down
The amplitude of mandrel oscillation can be adjusted from 3.2 to 25 mm ( to 1 in.); frequency, from 1 to 500 cpm.
Tools for bending thin-wall tubes must be more accurately made than those for standard tubes. The form block or
bending die should have a run-out at the bottom of the groove of not more than 0.025 mm (0.001 in.). The depth of the
groove should equal 55% of the outside diameter of the tube. The width of the groove should equal the outside diameter
of the tube plus 10% of the wall thickness. The width of the clamping groove on the bending die should equal the outside
diameter of the tube minus 10% of the wall thickness. The length of the clamping groove should be five to six times the
outside diameter of the tube unless special clamping provisions such as flaring or clamping cleats are included. The clamp
and the bending die can be keyed or doweled for perfect alignment. Clamping plugs are sometimes used; these should
either be slip fitted in the tube or expandable.
The pressure die should have a groove wider than the tube outside diameter by an amount equal to 15% of the wall
thickness. The width should not vary from end to end by more than 0.013 mm (0.0005 in.). Variation in the groove will
cause a pinching or relieving effect. If all tools are properly adjusted, only light pressure is needed on the pressure die,
which can be adjusted against a solid bar with the same diameter as the outside diameter of the tube.
The wiper die has a groove whose width is equal to the outside diameter of the tube plus 10% of the wall thickness. The
groove should be highly polished and have a thin coat of light oil. Too much or too heavy oil will cause wrinkles. The
groove must be a full half-circle in cross section to support the entire inner half of the tube. The groove must also fit
closely to the form die for at least 15° back of the point of bend so that it cannot be forced away by the pressure buildup
of the compressed inner wall of the bend. Failure to maintain the position of the wiper die can cause wrinkles.
Multiball mandrels are generally used with thin-wall tubes. They have a clearance no greater than 10% of the wall
thickness of the tube. The mandrel must be positioned very carefully so that the full diameter of the body is just at the
start of the bend (first ball of cable or ball-socket mandrels at the bend tangent). A template should be used to set the
mandrel. If auxiliary oil or air pressure in the tube is not used, there must be enough balls to reach completely around the
bend.
Interlock tooling is sometimes used for bending thin-wall tubes. The clamp is keyed to the form block, the wiper die is
locked to the pressure die, and the pressure die is locked into alignment with the form block. Interlock tooling was
specifically developed for automatic bending; but it has some advantages for general bending. The tools will not crush or
mark the work, and setup time and scrap can be reduced.
Material should be especially uniform in thin-wall tubing that is to be bent and should all be from the same source--
preferably the same heat. Because tooling dimensions are held closely, close-tolerance tubing is recommended despite its
added cost.
Production Example. Thin-wall tubing is frequently bent to elbows that have a centerline radius equal to the diameter,
and it is not uncommon for the diameter to be as much as 90 times greater than the wall thickness--for example, a 152
mm (6 in.) diam tube with a 1.65 mm (0.065 in.) thick wall. Many such elbows are used in vacuum-line service, an
application in which no wrinkles are permitted. They are commonly made from 1020 steel tubing in the as-received
condition. Bends are made with ball mandrels, wiper dies, and an oil-base lubricant. Some manufacturers of elbows use
chromium-plated tools to minimize tool wear.
It is often difficult to prevent thin-wall tubing from slipping during bending. Methods used to provide adequate clamping
are described in the following example.
Example 13: Procedures to Prevent Slipping of Tubes During Bending.
The tube shown in Fig. 11 was used in a high-pressure hydraulic circuit of an earthmover. Five bends, ranging from
approximately 20 to 86°, were made in a powered compression bender. All bends were made on a 152 mm (6 in.)
centerline radius.
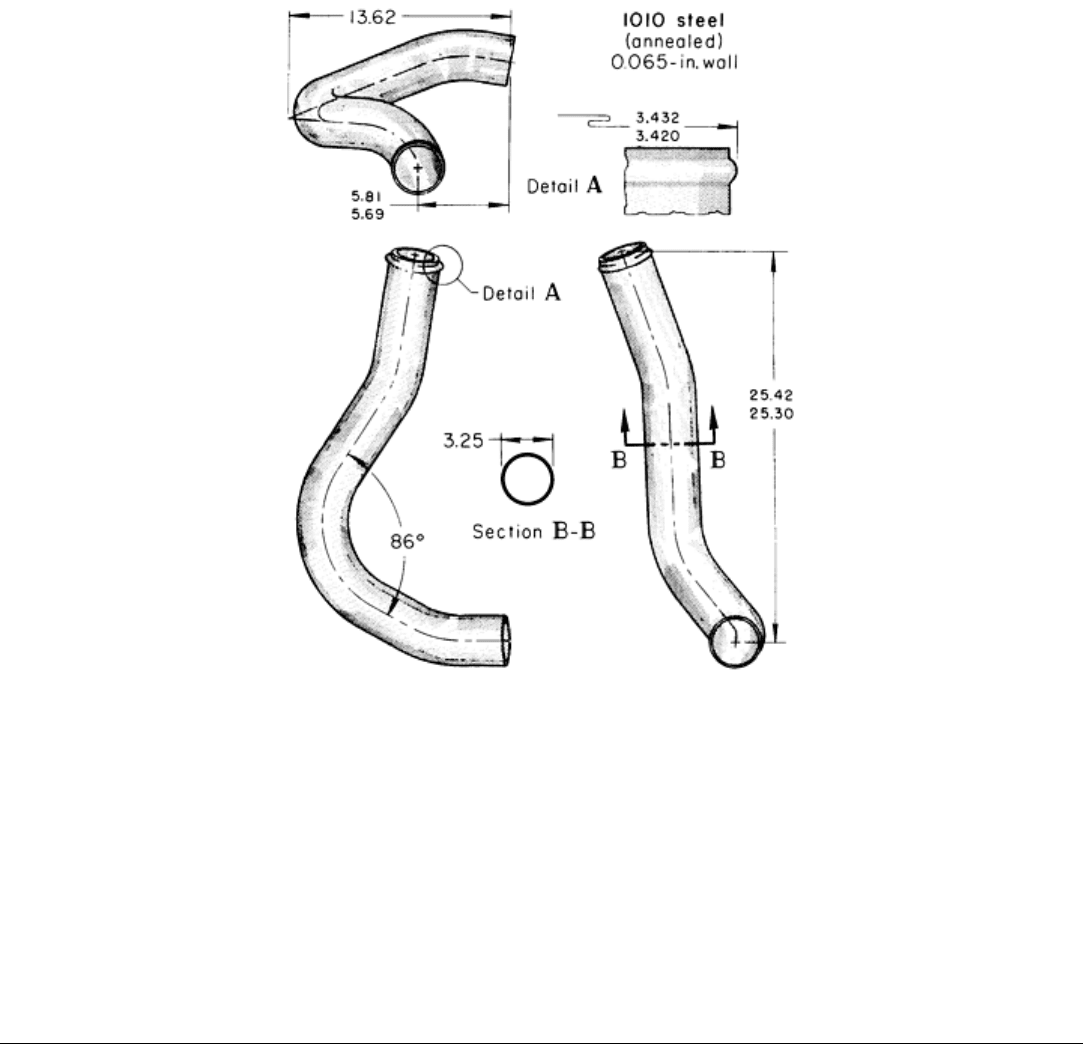
Fig. 11 Component of a hydraulic system that required five bends. Dimensions given in inches.
The 86° bend posed a problem because only 127 mm (5 in.) of tube was available for clamping; adjacent bends were in
other planes. Surfaces of the clamps were rough, but the tube slipped during bending, causing unacceptable bends. The
first approach was to line the clamps with emery cloth, but this did not add enough friction to prevent slipping. A second
approach was to increase the force on the clamp. Until a hydraulic cylinder could be installed to provide this force, a
factory lift truck was used. Acceptable bends were produced by increasing the force on the pressure die.
The tubing had a phosphate coating. A three-ball mandrel with an oil hole provided a constant supply of lubricant (a
mixture of lard oil and mineral oil) to the inside of the tube. Tools were of W1 or W2 tool steel, hardened.
Bending and Forming of Tubing
Lubrication for Tube Bending
Where a mandrel is used, both the mandrel and the interior of the tube are heavily coated with a thick lubricant.
Pigmented lubricants are useful for adding body between the mandrel and the tube. Thick lubricants are sometimes heated
to 120 °C (250 °F) and sprayed onto the inner surface of the tube. An oil hole in a mandrel can be used to lubricate the
inside of a tube during bending (Example 13).
The wiper die, on the other hand, needs only a very light lubricant, applied sparingly, if at all. Nothing must interfere with
the close fit between wiper die and tube, which prevents compression wrinkles.
Not all metals react to lubricants in the same way. In general, mineral oils are always acceptable, as are organic fats.
Certain sulfur and chlorine additives can stain or corrode stainless steel or copper and should be used with caution. For
aluminum, special additives have been developed for use with light or medium mineral oil; the same formulations work
well on copper and brass.

Tube Spinning
Revised by Jack D. Stewart, Sr., Stewart Enterprises, Inc.
Introduction
TUBE SPINNING is a rotary-point method of extruding metal much like cone spinning, except that the sine law (see the
article "Spinning" in this Volume) does not apply. Because the half angle of a cylinder is zero, tube spinning follows a
purely volumetric rule, depending on the practical limits of deformation that the metal can stand without intermediate
annealing. Tube spinning is also limited by the smallest percentage reduction in thickness that will ensure complete flow
of the metal. This minimum reduction is usually 15 to 25%, depending on the metal and on the thickness of the original
tube.
Applicability. Spinning is one method of reducing the wall thickness of tubular shapes and increasing their strength,
particularly for aircraft and aerospace applications. Producing specific shapes from tubing is a major function of tube
spinning. For example, one or more flanges can be spun at selected areas on a tube, often at a savings in labor and
material costs when compared with other processes such as machining. Tube spinning has also been used because ring
forgings having the desired relationship between wall thickness and length were not available.
All ductile work metals are suitable for tube spinning; the practical ranges of compositions and strengths are
approximately the same as for the power spinning of cones. Metals as hard as 35 HRC have been successfully spun. Most
tube spinning is accomplished without heating the workpiece.
The amount of wall reduction that can be accomplished without intermediate annealing is given for a number of metals in
Table 2 in the article "Spinning" in this Volume. The amount of permissible reduction is often greater for the spinning of
tubes than for the spinning of cones or hemispheres, particularly in the case of backward spinning.
The range of tube sizes that can be spun depends primarily on the available equipment. Tubelike preforms that have an
inside diameter in a range from 4.75 mm to 3 m (0.187 to 120 in.) have been successfully spun. Wall thicknesses of the
starting tubes are often as great as 25.4 mm (1.0 in.) for steel and 31.8 mm (1.25 in.) for aluminum and under ideal
circumstances have exceeded 41.3 mm (1 in.) for steel and 63.5 mm (2 in.) for aluminum.
The minimum size of tube that can be spun is more likely to be a limiting factor than the maximum size, because of
machine characteristics. For example, a large machine is not well suited to spinning small tubing, because it has
insufficient spindle speed. The relationship between spindle speed and tube size should be such that a minimum of 120
m/min (400 sfm) can be obtained. Very small (<9.5 mm, or 0.38 in., diam) tubes are usually spun on machines that hold
the tube stationary while the tool rings rotate around it.
Preform Requirements. Preform is the name commonly applied to a tube or a tubular shape before it is spun. A
preform may be a straight, symmetrical tube, or it may have been changed in shape by the addition of an internal flange
for clamping. Tubular shapes used for spinning include forged or centrifugally cast tubes (both of which are completely
machined before spinning), welded tubing, seamless tubing, and extruded tubing.
For spinning, the inside diameter should vary no more than ±0.051 mm (±0.002 in.) on tubes up to 76 mm (3 in.) in inside
diameter or no more than ±0.152 mm (±0.006 in.) on tubes with inside diameters of 75 to 510 mm (3 to 20 in.).
Tolerances of +0.5, -0 mm (+0.020, -0 in.) are typical for tubes 635 mm to 1.27 m (25 to 50 in.) in diameter; tolerances of
+0.75, -0 mm (+0.030, -0 in.) are used for larger sizes. The roundness and wall thickness of the preform will also affect
tolerance. A 41.3-mm (1 -in.) wall thickness, 3-m (120-in.) preform will usually have at least 1.7 mm (0.067 in.), and
frequently 4.75 mm (0.187 in.), of positive tolerance to permit loading.
The wall thickness of the preform should be within ±0.075 mm (±0.003 in.) unless the preform is machined all over in
which case wall thickness should be within ±0.025 mm (±0.001 in.). Ovality should be within 0.05 mm (0.002 in.) for
small-diameter preforms within 0.30 mm (0.012 in.) for large diameters.
Tube Spinning
Revised by Jack D. Stewart, Sr., Stewart Enterprises, Inc.
Methods of Tube Spinning
Two distinctly different techniques are used for tube spinning; namely, backward and forward. They are so termed
because of the directional relationships between metal flow and tool travel. In both methods, the workpiece is fixed in one
position at one end, and the remaining length is free to slide along the mandrel.
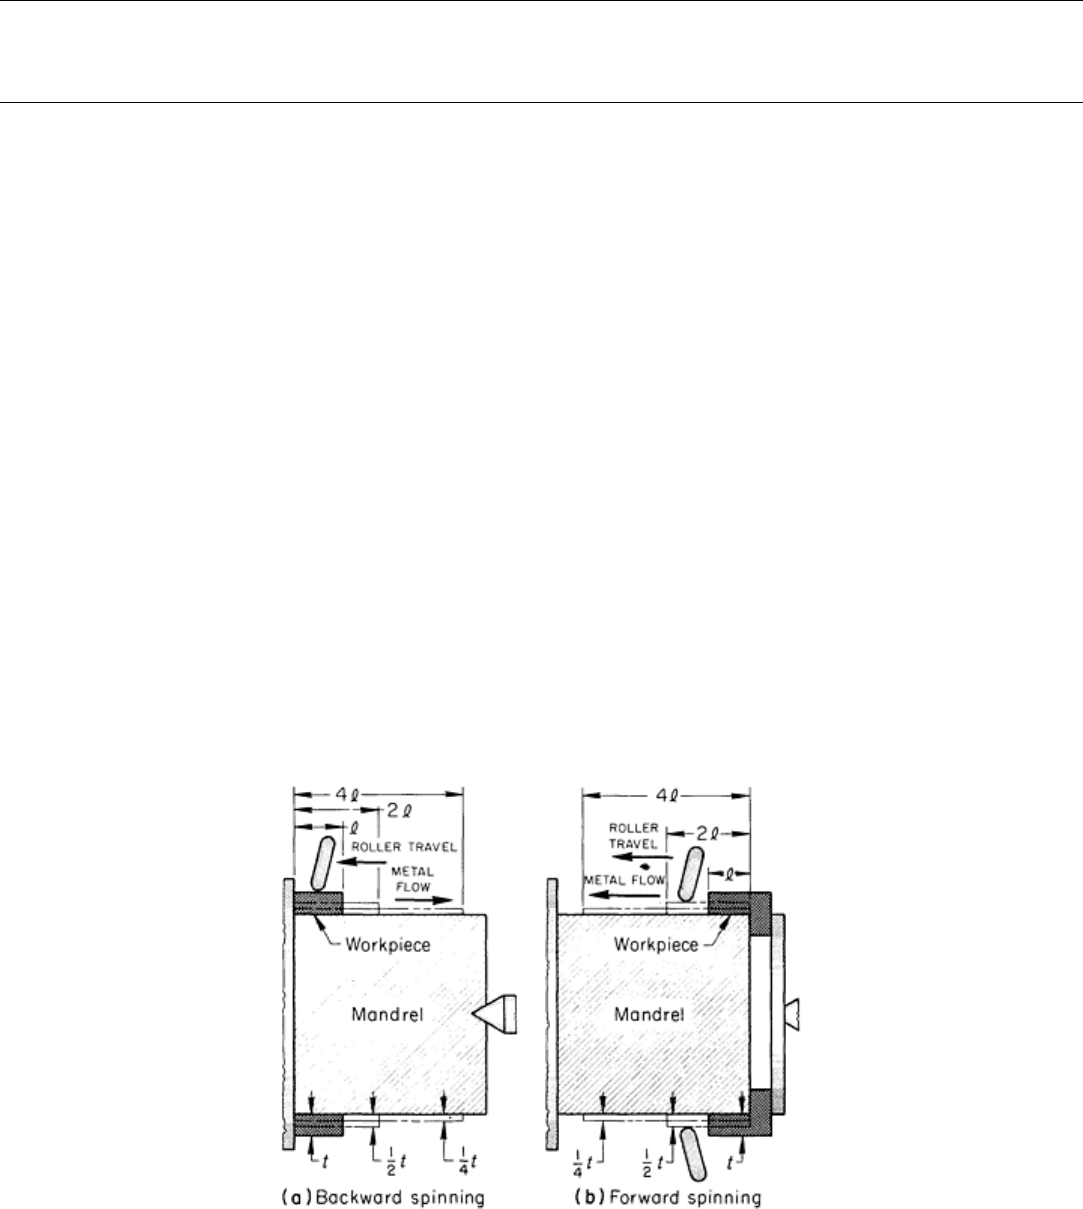
Backward Spinning. In backward spinning, the workpiece is held against a fixture on the headstock, the roller
advances toward the fixed end of the workpiece, and the work metal flows in the opposite direction (Fig. 1a). Two
advantages of backward spinning over forward spinning are:
•
The preform is simpler for backward spinning because it slides over the mandrel and does not require an
internal flange for clamping
• The roller traverses only 50% of the length of the finished
tube in making a 50% reduction of the tube
wall, and only 25% of the final length for a 75% reduction
The latter advantage not only increases production but also allows workpieces to be spun that are beyond the normal
capacity of the machine. For example, a machine having only a 1.27-m (50-in.) length of stroke can produce a workpiece
2.54 m (100 in.) long using a 50% reduction. Backward tube spinning is also unique in that the majority force distribution
is compressive. Consequently, metals with relatively low ductility can sometimes be backward spun to significant
reductions.
Fig. 1 Metal flow and roller travel in backward and forward tube spinning.
The major disadvantage of backward tube spinning is that the first portion of the spun tube must travel the greatest
distance and is therefore the most susceptible to distortion (Fig. 2). This disadvantage is seldom critical when spinning
tubes of constant wall thickness. However, when the preform has weld sculptures of substantially greater thickness than
the tube wall (as in solid fuel rocket cases), distortion can be a problem. For example, in backward spinning of the tube
shown in Fig. 2, one side became an inch longer than the other, even though the preform was essentially perfect and the
mandrel was accurate within 0.038 mm (0.0015 in.) total indicator reading.
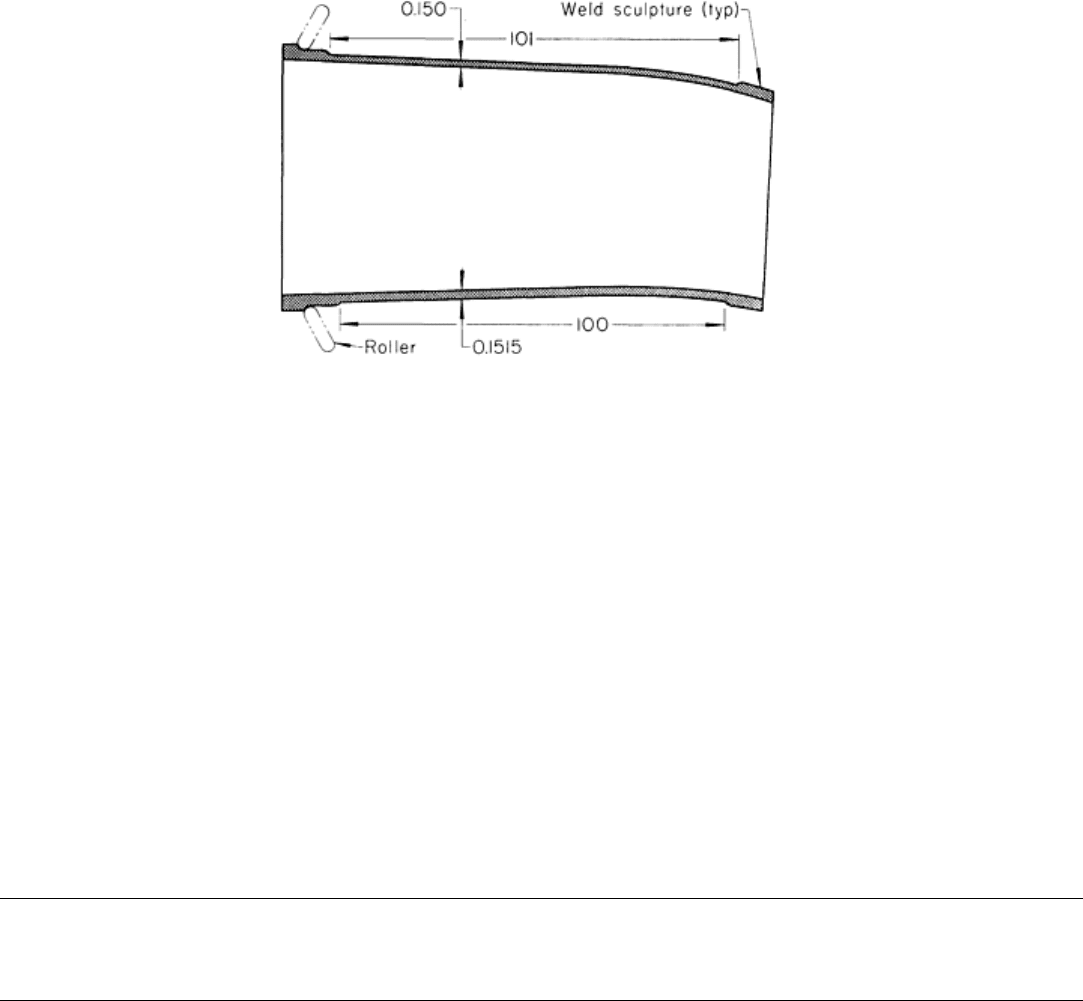
Fig. 2 Example of distortion in backward tube spinning. See text for explanation. Dimensions given in inches.
Forward Spinning. In forward spinning, the roller moves away from the fixed end of the workpiece, and the work
metal flows in the same direction as the roller, usually toward the headstock (Fig. 1b). The main advantage in forward
spinning as compared to backward spinning is that forward spinning will overcome the problem of distortion (Fig. 2). In
forward spinning, closer control of length is possible because as metal is formed under the rollers it is not required to
move again, and any variation caused by the variable wall thickness of the preform is continually pushed ahead of the
rollers, eventually becoming trim metal beyond the finished length.
The disadvantages of forward spinning are that:
• Some arrangement such as the one illustrated in Fig. 1
(b) must be made for clamping the preform to the
mandrel at the tailstock end
• Production is slower in forward spinning because the roller must traverse the finished le
ngth of the
workpiece
Tube Spinning
Revised by Jack D. Stewart, Sr., Stewart Enterprises, Inc.
Machines for Tube Spinning
Machines used for tube spinning are usually the same as those used for the power spinning of cones or other shapes. The
few special features required for tube spinning are normally specified and can be supplied on all power spinning
machines. A power spinning machine will have the same size capacity for tube spinning as for cone spinning. A 1.9 ×
2.5-m (75 × 100-in.) machine has the capacity to spin a tube 1.9 m (75 in.) in diameter 2.5 m (100 in.) long. Machines
available have the capacity to spin tubes ranging in size from 457 mm (18 in.) in diameter to 3.8 m (150 in.) long. The
length dimension applies to the travel of the roller, or tool carriage, so that by using backward tube spinning it is possible
to produce a workpiece much longer than is indicated by the size of the machine. The maximum size of the workpiece
that can be produced using the backward technique is limited by two considerations:
•
The amount of reduction that can be taken on the final spinning operation (a 50% reduction would result
in a tube twice as long). The machine force capacity and work metal characteristics will determine the
possible reduction
• The clearance
provided for workpiece removal. A machine with a capacity of 1.27 m (50 in.) usually
