McInnes K. Rockstar Icon Designer
Подождите немного. Документ загружается.

View Points141
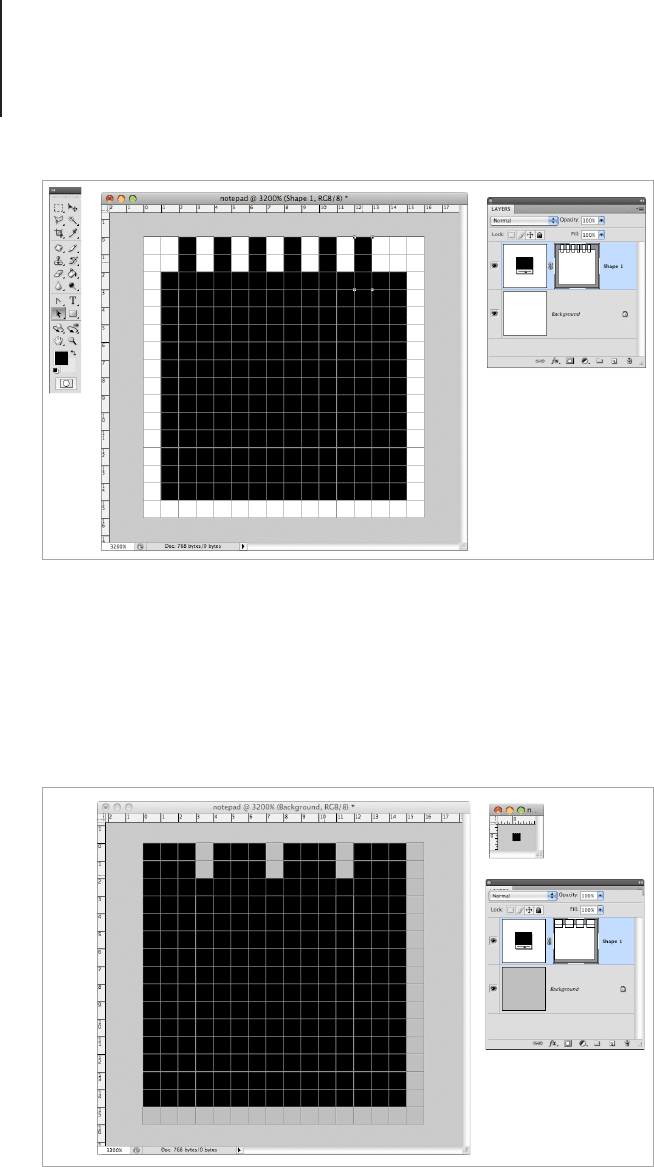
Let’s tweak the design a bit. Take the Direct Selection tool (the
white arrow) and select the points you want to move. If you have
the Snap to Grid tool on, this will help the shape align with the
pixel grid. You can select more than one point at the same time by
holding down shift as you click the points with the Direct Selection
tool.
Add the rest of the rings by copying the first ring.
Tweak the design using the Direct Selection tool.

View Points142
Here’s a little trick I like to use when I’m creating small scale icons
in Photoshop. Go to Preferences > Interface and select “None”
from the border drop down menu next to Standard Screen Menu.
This will take the drop shadow away from the canvas you’re
working on. Then, go back to your artwork and sample the grey
background from around the canvas and color the background
layer with it. You can now turn the background on and off when
you want to preview how the icon will look on a plain background.
Then, go to Window > Arrange and navigate to the option “New
Window” this will open a new window with the same artwork as
the one you’re working on. Set the view to Actual Size and move
it to your second screen if you’re using one, or tile the windows
of Photoshop so you can work on the icon and look at a real size
preview as you work.
Note: If you’re using shapes or vectors, select the background
layer when you want to review the artwork. When shapes are being
worked on, they will display the outline and the preview version of
your icon will show them too.
Now we need to cut out the middle part to show the background.
By using the shape settings this is pretty easy to do. Select the
Exclude Overlapping Shape Area button from the top of the
program window (the shape tool must be selected for this to show
up), and draw a rectangle the size of the cutout area, you will notice
that this setting will change the rectangle into a cut out area.
View Points143
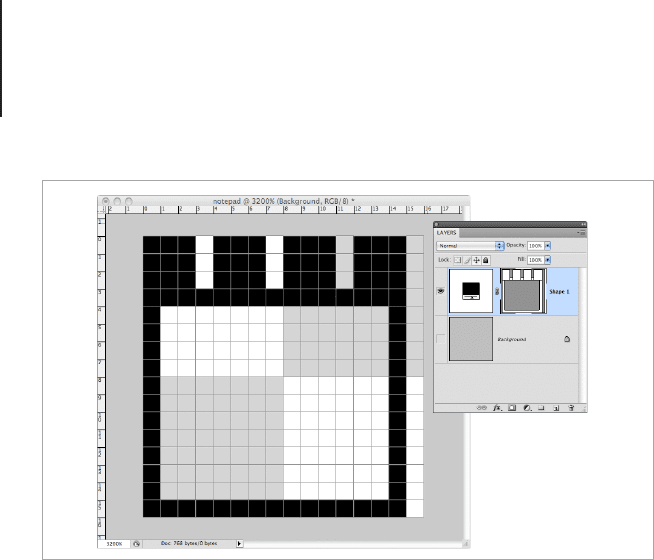
You can also make cut out shapes by drawing a shape into the
layer while holding down the Option key. Cut out shapes can be
duplicated in the same way as regular shapes by selecting them
with the Direct Selection key and holding down Shift as you drag
the duplicates into place. I’ve done this with the cut out shapes on
the top section of the design. To add the lines to represent text I
selected the Add To Shape Area (+) option and drew them in as I
would with a normal shape. The icon design is now completed.
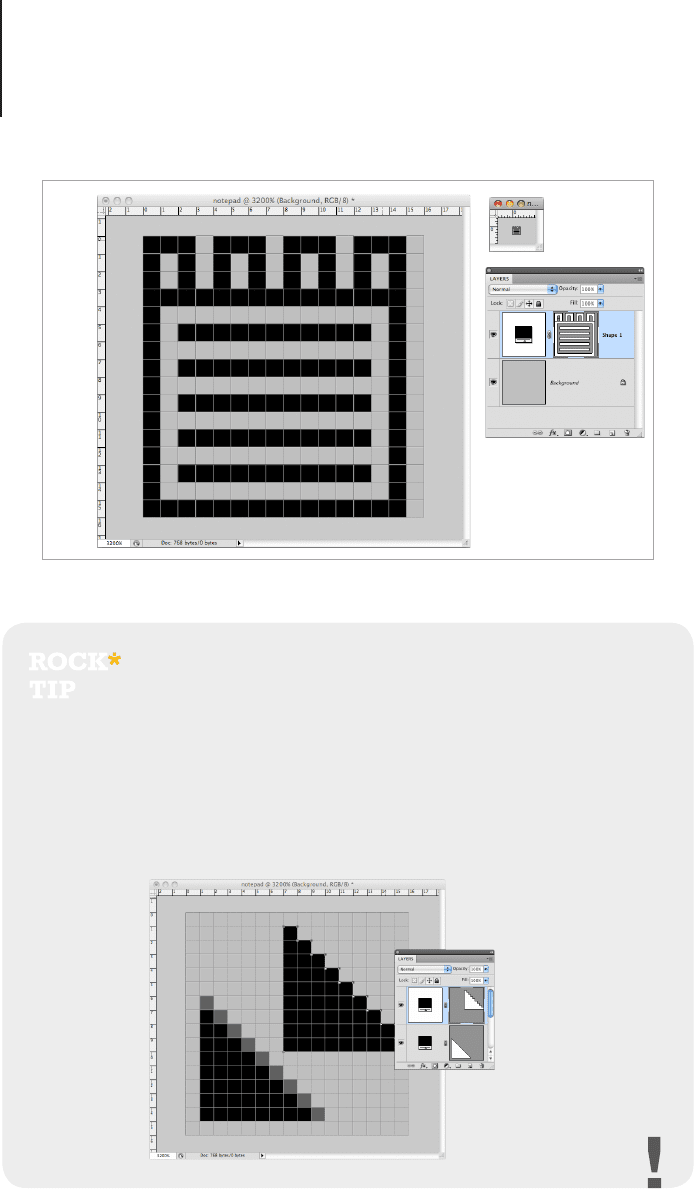
One nal step is to tidy up the shape. Take the Direct Selection
tool and Shift + Click the outline shapes that you want to join
together. In this case, I will join the top lines with the main body of
the notepad. Once they’re selected, click the Combine button at
the top of the application window. Note that you can only combine
shapes that share a layer. Once the shapes are combined you
will see that the shape is much cleaner, but isn’t as easy to edit
as it was before. This step should only be done when the icon is
complete.
The icon design with a grey background and a preview window set to
actual size.
View Points144
Pixel Style Angled Lines
If you’re making a pixel style icon with angled edges, you will need to place squares
along the jagged edge and then combine it with the main shape that you’re creating.
Save this for the very last step – using the antialiasing to hold the place of the pixel
cubes – any angle changes you will need to make to the line will be easier with a
single line.
Cut out the ring shapes and add lines.
View Points145
Select the entire shape by dragging a selection area with the Direct
Selection tool around the icon and using the Delete Anchor Point
tool, delete any stray points. You should only have points that
dene the shape of the icon, any additional points can slightly warp
the lines and cause the icon to render blurry.
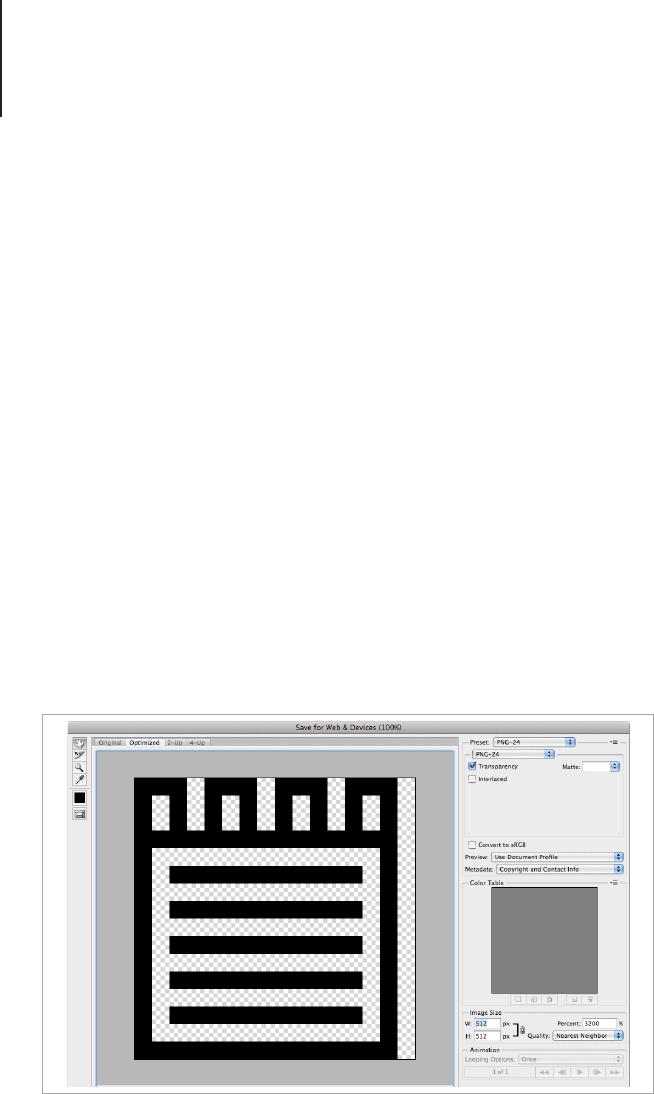
Saving and Scaling
There’s a fun trick to scaling this style of icon in Photoshop.
Because the only data that needs to be re-interpreted is the sharp
edges and lines, when you save the icon in the Save For Web
dialogue, at the right side of the window you will see some scaling
options. In here you can change the scale you want the icon to be
when you save it. With detailed pixel images, such as video game
style sprites and isometric pixel drawings, using a percentage
to scale the icons is the best method. Sometimes scaling these
images with exactly the size you want will change the thickness of
some pixel lines a little bit differently from others. So, if your icon is
complex, scale it using even number percentages.
Saving different scales using the export for web dialogue.

View Points146
In the case of this icon, because it’s fairly bold and all of the lines
run horizontal and vertical, you can input any pixel size you wish
to save the icon in. Just be sure to lock the proportions, and also
ensure that the lines of the shape are perfectly lined up with the
pixel grid, as even a small error in the shape which you may not
be able to see at a small scale, will turn into a block of color when
Photoshop tries to render the shape on a larger scale.
End Result
Finally, you can add all types of special nishes and layer effects to
your icon to nish it off. I’ve used a subtle gradient from light grey
to dark grey with an angle of 135 degrees. Small scale icons, like
the 16px icon will only be able to have very subtle effects added
because of the tiny viewing space, but if you have some larger
icons, you can add effects such as an outline, a color, texture or
gradient ll, drop shadows, glows and the list goes on.
Once you have a style you like, select the layer that it’s applied to
and click the “Create New Style” icon at the bottom of the Styles
palette. Remembering to save styles as you make them will save
you time in creating new styles every time you need one.
Special finishes and effects can be applied using layer styles.

View Points147
Tips to Create a Flat View Pictogram Set with
Adobe Illustrator CS4 and Above
Because more emphasis is put on the shape rather than the nish
of Pictogram icons they are best created as vector shapes in a
program such as Adobe Illustrator.
For a quick overview on creating pictogram icons, we will begin
from stage one of computer rendering which should only begin
after you have a completed list of icons to be made and a sketch of
each design.
Setting the Canvas Space
First set the canvas to the mid-size you need to create. So, if you
need to make a 48px to 16px set, create the 32px icon rst. This
will help with scaling the icon later on. The most common sizes
for this style of icon range from 48px to 16px. I’ll be using Adobe
Illustrator CS4 which has support for multiple art boards, so I will
be creating art boards for each icon I need to make and begin with
the 32px size.
Adobe Illustrator CS4 and above supports multiple canvas and
pixel preview, which when combined, are a fantastic combination
for icon design. Inkscape has an icon template that has a special
scaling algorithm that optimizes each size of icon a little bit better
than some other image editors, but again, if you’re comfortable
with a particular software package, you'll most likely be able to
make better icon designs than you would with software that is
unfamiliar to you.
Let’s move on. Set the width and height of the art board in pixels
and make sure that the color space is set to be RGB. If you’re
working in Photoshop, it’s also handy to have the background set
to transparent so you can see exactly where the art space begins
and ends.
View Points148
If you are using Photoshop, set the document grid to represent
pixels. You can do this by setting the gridline to every 10 pixels with
a sub division of 10. This will show you where the pixel boundaries
are and help you to make shapes that will clearly render along
these lines.
If you haven’t done so already, turn on the grid view for the
artboard and set the artwork to “Snap to Grid.” These two settings
will make it easier to t the icon to the artboard and will help to
create a pixel perfect design.
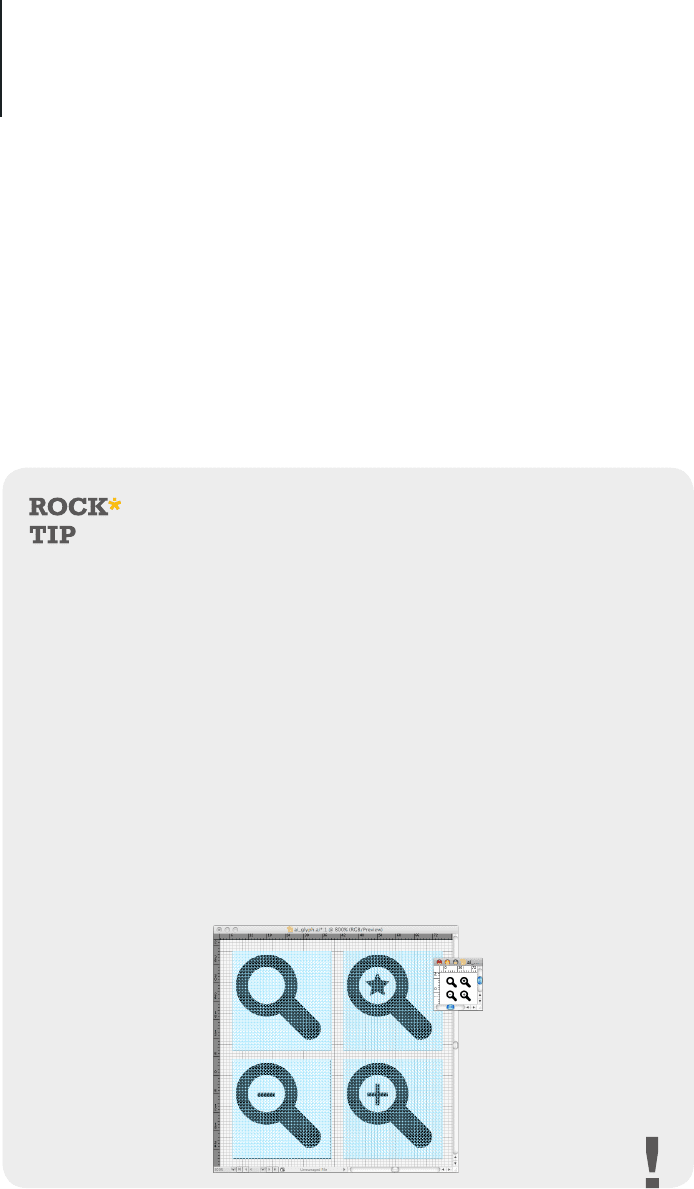
Adobe Illustrator
If you’re using Adobe Illustrator to
make icons, you can use this handy tip
to preview the icons as you work. First,
set the Artboards that you will be using
and any guides that you need. Then
go to Window > New Window. This will
duplicate your working space. In this
new window set the preview mode to
Pixel Preview (View > Pixel Preview) and
the zoom to Actual Size. (View > Actual
Size). Then turn off the visibility of the
artboards (View > Hide Artboards)
Once the second window is set properly,
arrange the two windows next to each
other, or for people with two monitors,
you can put the 2nd window on the 2nd
monitor.
Leave the 2nd window and go back to
the first. In the first window zoom in
as close as you want to work. Begin
to draw your icon. You will notice that
the drawing you’re making on the first
window is being duplicated in the 2nd
window at real size in a view similar to
what you can expect when you output
the icon to raster format.
This tip is particularly useful for glyph
icons as they need to be extremely
precise and have a uniform appearance
to others in the set.

View Points149
Using a Grid
This is an additional step I like to use for glyph icons when I’m
working in Adobe Illustrator. To make drawing glyphs even easier
I like to use a le that has horizontal, vertical and diagonal guide
lines added. Illustrator gives you the option to add custom guides.
Using these guides, will not only ensure that the shapes are
rendering perfectly along the pixels, it will help you plan the visual
balance of the glyphs.
If you have the time to make a document with these guides you will
have an invaluable resource for your glyph designs.
How to Set Custom Guides in Adobe Illustrator
1. Turn on the gridlines. Mine are set to be 1px squares. Draw
a diagonal line from one side of the grid line to the other.
Make a larger one from the bottom left of the artboard to
the top right of the artboard, and make another line the
same size as the rst one in the bottom right pixel square.
Create three diagonal lines to make a blend with.
View Points150
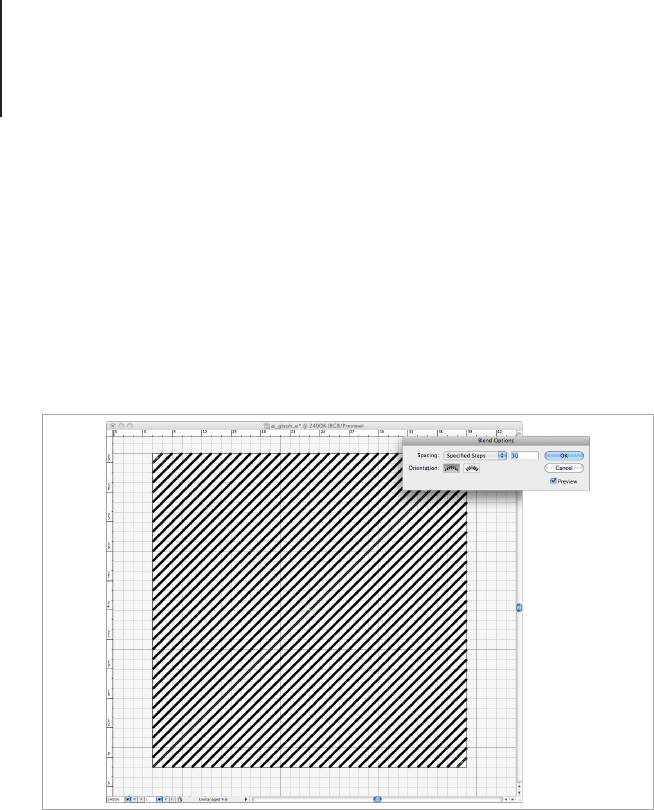
2. Make a blend between the three shapes using the Blend
tool (W) and set the Specied Steps to the number you
need to intersect each pixel square. My artboard is 32px so
I will be using 30 steps, which will draw 30 lines between
each blend line. You will then have 32 lines across the top
(the small line + 30 blend lines + the large line) and 32 lines
down the side (the large line + 30 blend lines + the second
small line).
3. With the Blend selected, go to Object > Blend > Expand to
expand the blend. Turn these lines into guides by selecting
them and going to View > Guides > Make Guides. Keep
the guides selected, make sure Lock Guides is turned off
and double click on the Rotation tool ( R) and make a 180
degree copy of the lines. You will now have the diagonal
guidelines.
Define the steps for the blend depending on the size of the artboard. For a
32px artboard, make a 30 step blend.