McInnes K. Rockstar Icon Designer
Подождите немного. Документ загружается.

Perspective111
As mentioned in the introduction, one of the best things about
planometric icons is the angle in which they are drawn. We don’t
have to make any settings to create a 45 degree line as one can
be made by a pixel lined up corner to corner diagonally across the
page.
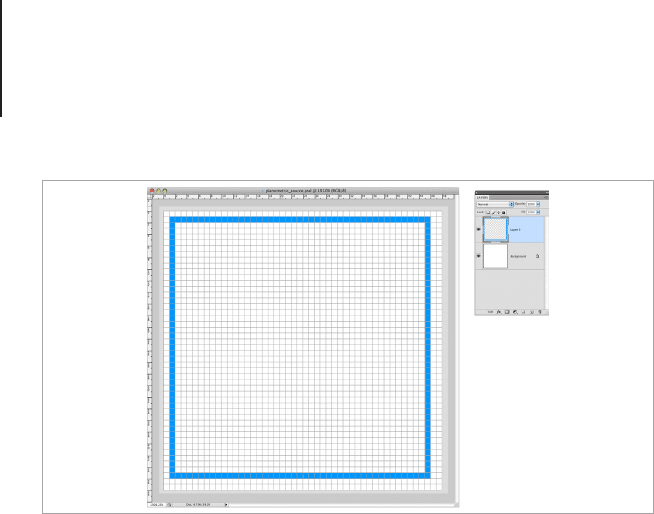
Take the Pencil tool and draw a single pixel in the top left corner
of the square we have marked out, then hold down Shift and draw
another single pixel into the bottom right corner. This will draw a 45
degree line from one corner of the square to the other. Repeat this
step with the top right corner of the square. You will now have the
middle point of the square marked out.
Use the Pencil tool to draw a square.
Perspective112
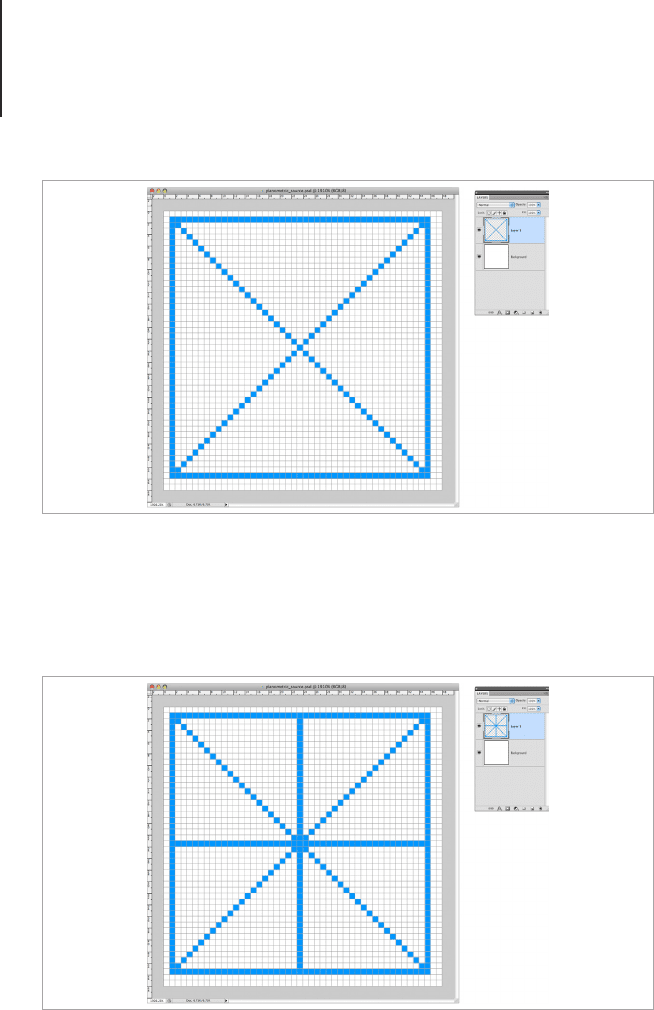
Then take a horizontal and vertical line from the middle point that
you have marked. This will help you work out where to draw the
planometric square.
Make another layer and in a contrasting color draw diagonal lines
between each middle point, you should now have a set of guides
that resembles a dissected diamond.
Use the center of the square to add horizontal and vertical lines.
Diagonal lines mark the center of the square.
Perspective113
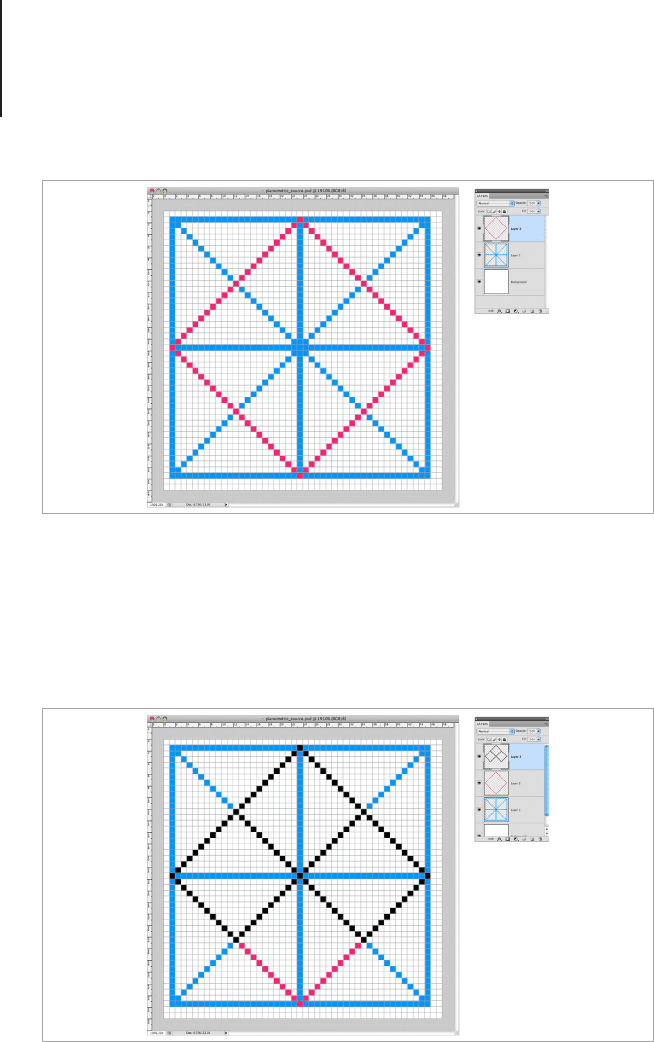
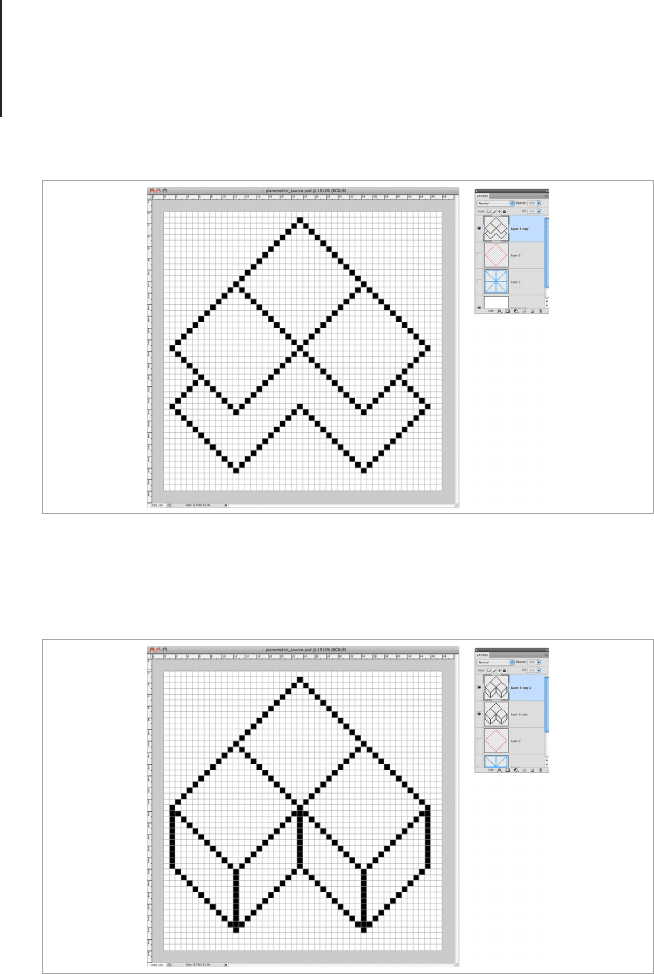
Draw the Basic Shape
Make another layer above the guide layers and change the Pencil
color to black. Use the guidelines to make three diamond shapes
at the top of the canvas.
Turn off the visibility to the guidelines and make a duplicate of the
diamond shapes you have just drawn. You can do this by dragging
the layer into the little page icon (Create New Layer button) at the
Add the diamond shaped guide in a contrasting color.
Draw three diamond shapes on a new layer.
Perspective114
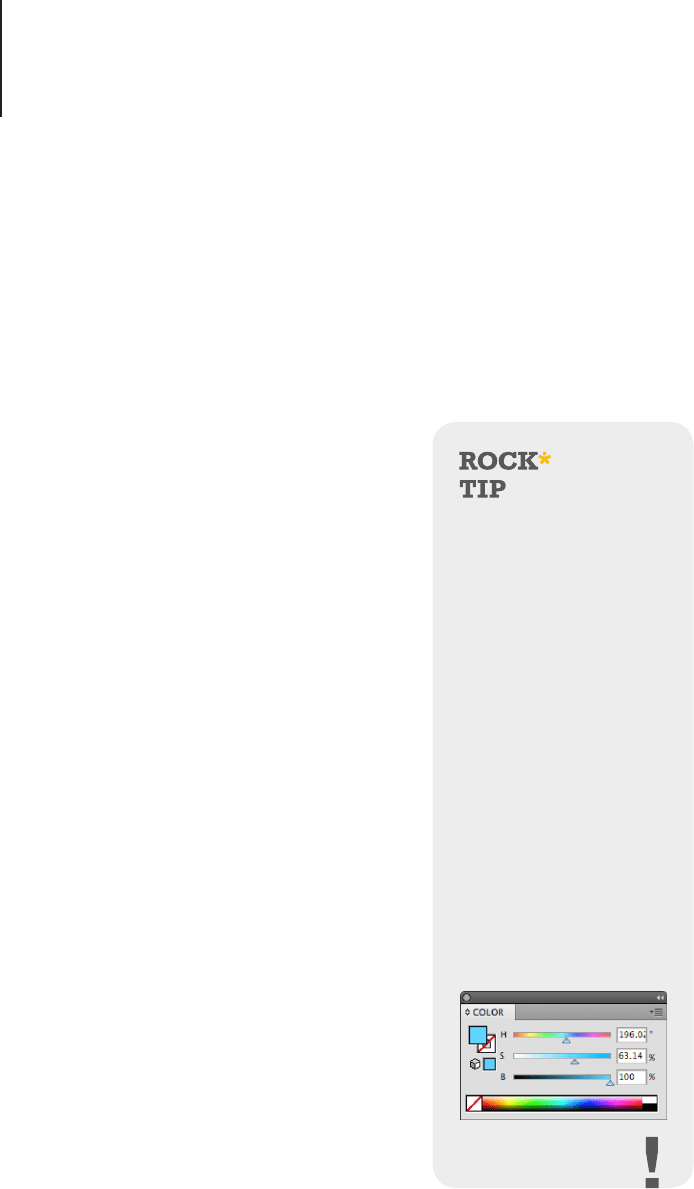
bottom of the layers pallet. This will make a copy of the layer above
the original layer, so click on the bottom of the two diamond shape
layers and using the arrow key on your keyboard move it down four
or ve times. This will make the side of the cubes, so the further
down you move the shapes the taller the cubes will appear to be.
I’m going to leave the bottom clear so I can add a few pixels of
shadow at the end.
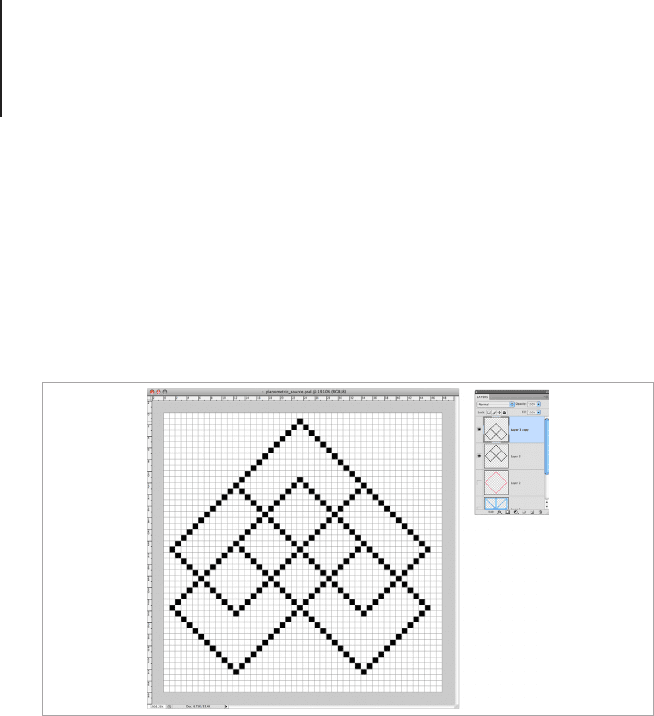
Once you have moved the duplicate layer into a position that
you’re happy with, it’s time to merge the layers. Select both layers
by clicking on them and holding down the shift button. Go to the
y out panel menu at the side of the layers palette (the small icon
at the top right of the menu) and navigate to the “Merge Layers”
option. This will merge any layers that you currently have selected.
Go to the Tools menu and select the Eraser tool, in the menu at
the top of the program window, change the settings to Pencil with
a 1px size. Erase the lines on the inside of the main diamonds we
marked out for the rst shape and the cross-over shape on the
bottom part. You should have a shape with three diamonds at the
top and a W shape at the bottom.
Duplicate the diamond shapes onto a new layer and move them down.
Perspective115
Take a line from each corner of the W shape to make the sides and
corners of the cubes and erase the extra lines that remain inside.
Duplicate the layer and drag the duplicate into the Add Layer Mask
button (the icon of a circle on a square) at the bottom of the layers
pallet. Using the layer mask we will color in some of the outline
to create a softer look on the bottom lines of the diamonds. This
is a good method for re-coloring pixels with a large brush as the
layer mask will keep the shape intact and lets you “wash” the
Merge the two layers and erase unnecessary lines.
The cubes take shape with the addition of vertical lines.
Perspective116
background with whatever color, gradient or texture you like. First
we will plan the main colors and return to this layer later.
Color and Tone
A really handy feature in Photoshop is the ability to draw and select
objects with or without anti-aliasing. Select the Paint Bucket tool
(G). If you look at the menu at the top of the Application Window,
you will see a checkbox with anti-alias next to it. Uncheck this box
and select the layer with the main body
of the cubes. We will now use the paint
bucket to color the cubes.
Go to Window > Color and in the y
out menu set the color mode to HSB.
Select the rst color you want to use for
the top box - for this tutorial keep the
Brightness Slider at 100% - and then
use the Paint Bucket tool to ood the
space with color.
You will notice that the lled space is
nice and sharp. If you left anti-alias on,
there’s a chance that the ll color would
have some semi-transparent pixels
around the outside. When working with
the Selection, Drawing and Color tools
to create pixel style icons it’s always
best to change the settings for each
tool to anti-alias, this way everything
you create will be in a sharp pixel style.
Chose the color for the top of the box
on the left hand side from the HSB
sliders by changing the H (hue) slider,
this will keep the tone of the top of the
HSB ColorMode
Sometimes called HSL
or HSV, HSB is a color
blending tool commonly
used with RGB graphics.
You can use HSB in the
Adobe suite to blend
colors by controlling
three sliders. H for Hue,
S for saturation and B
for brightness. Creating
colors in this way is
particularly useful for
icons as the Hue and
Saturation of a color can
be retained while the
brightness can be altered
to create different shades.
Using HSB will result in
a more uniform range of
tones compared to using
the color picker or RGB
color sliders.

Perspective117
box uniform. Then, choose another hue and ll the top of the right
hand box.
Select the Eyedropper tool and sample the top of the left box you
colored. Go back to the HSB color slider and change the saturation
(S slider) to create a lighter color variation of the side. Fill the side
with this color.
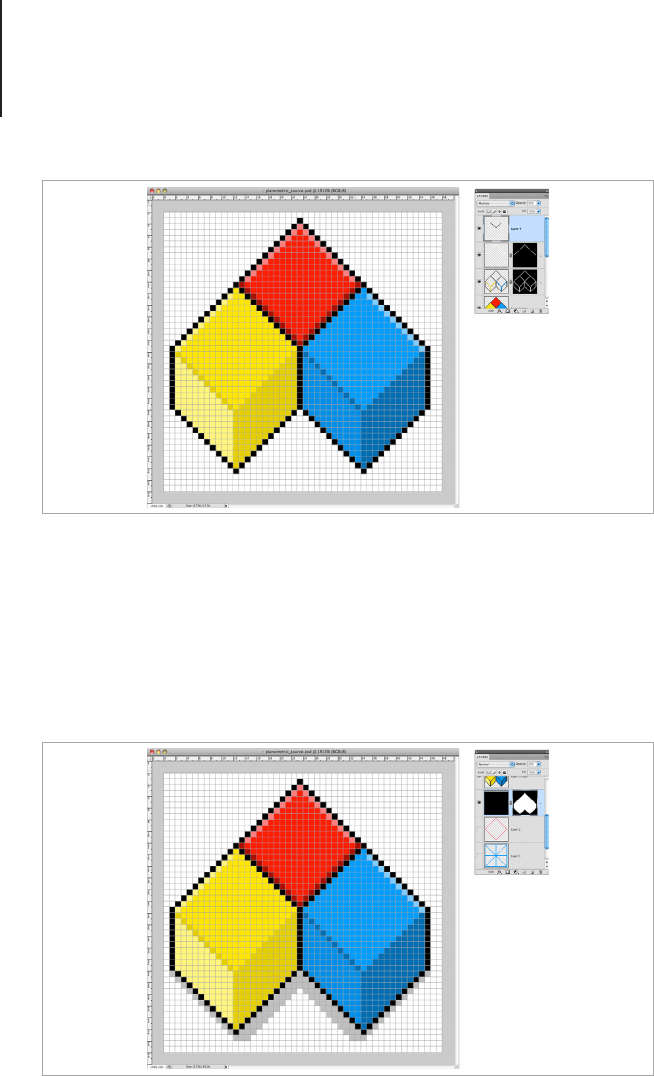
Use the paint bucket to fill the top shapes with color from the HSB sliders.
Adjust the HSB colors to make a highlight shade for the left side of the
bottom diamonds.
Perspective118
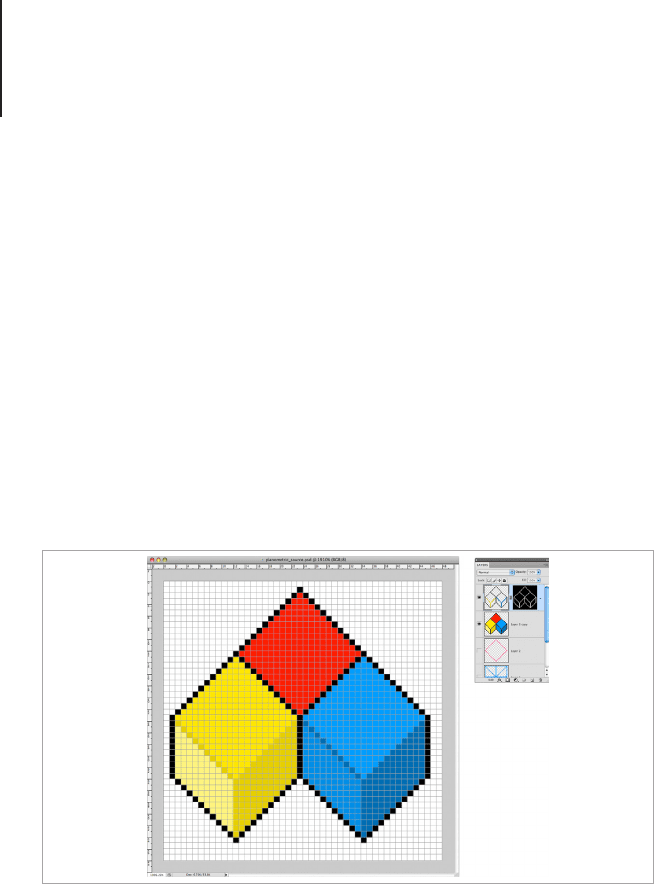
Select the top color once more and change the brightness (B) to
be slightly darker and ll the right side of the shape. Remember the
brightness percentage and select the top of the cube on the right.
Enter the percentage for the brightness and ll the left side of the
cube. Reduce the brightness some more and ll the right side of
the cube. You will have something that represents three cubes put
together with light coming from the top left hand side of the image.
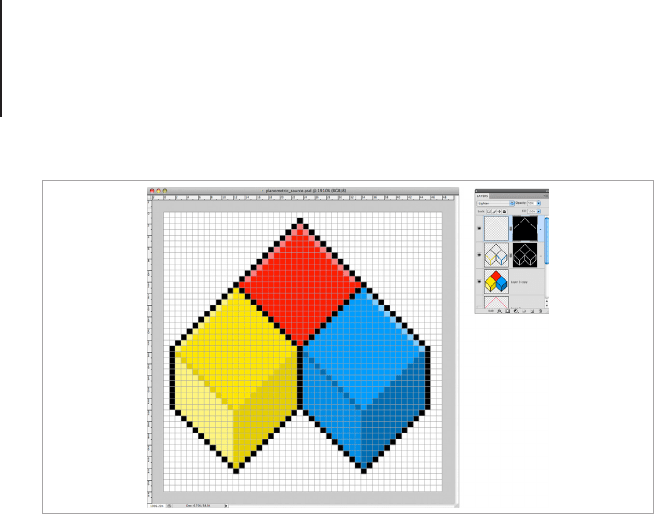
We will now go back to the layer with the outlines. Using the mask
to make this step a bit quicker and easier, take the darker shade
of color from the two front cubes and ll in the inner lines. This
will create a softer nish for the object, especially when viewed at
100%.
Make a layer above the image and draw a white line around the
top two diagonal sides of the object, 1px in from the outline. Make
a mask of the layer and then set the layer mode to “Lighten” with
50% opacity. Click into the Layer Mask, this will put a highlight
around the mask area on the layer you’re working with to let you
know that you’re now working with the layer mask.
Adjust the HSB colors to make a darker shade for the right side of the
bottom diamonds and lines on the Mask layer.
Perspective119
Take the Pencil tool and set the color to Black. Add a black pixel to
the top point of the left and right cube and the middle points on the
top cube. This will hide the pixels with the layer mask, but leave the
option to put them back in without much hassle.
Using a mask to subtract areas of an icon is handy when you’re
working on detailed or small designs. By using a mask you can
hide and reveal pixels without having to remix colors or draw areas
back into the image.
Make another layer and draw a black line along the bottom of
the top cube, 1px in from the outline and set the blending mode
to Multiply with 35% opacity. This will add form to the cube and
balance out the highlight area.
Add a highlight along the top edges on a new layer.
Perspective120
Command + click the main object layer and make a new layer.
With the selection still active, click the Mask button and drag the
layer underneath the other layers for your document. Select the
Move tool (V) and without clicking away from the layer press the
down button two or three times. Fill the layer with black and set the
opacity to 25%. You will now have a shadow for the cubes.
If you want to alter the shade like I have, click into the mask area
and ll the areas you want to hide with black. I’ve reduced the left
Add a shadow along the bottom edges of the top diamond.
Use a selection of the entire shape to make a shadow area.