McInnes K. Rockstar Icon Designer
Подождите немного. Документ загружается.

View Points161
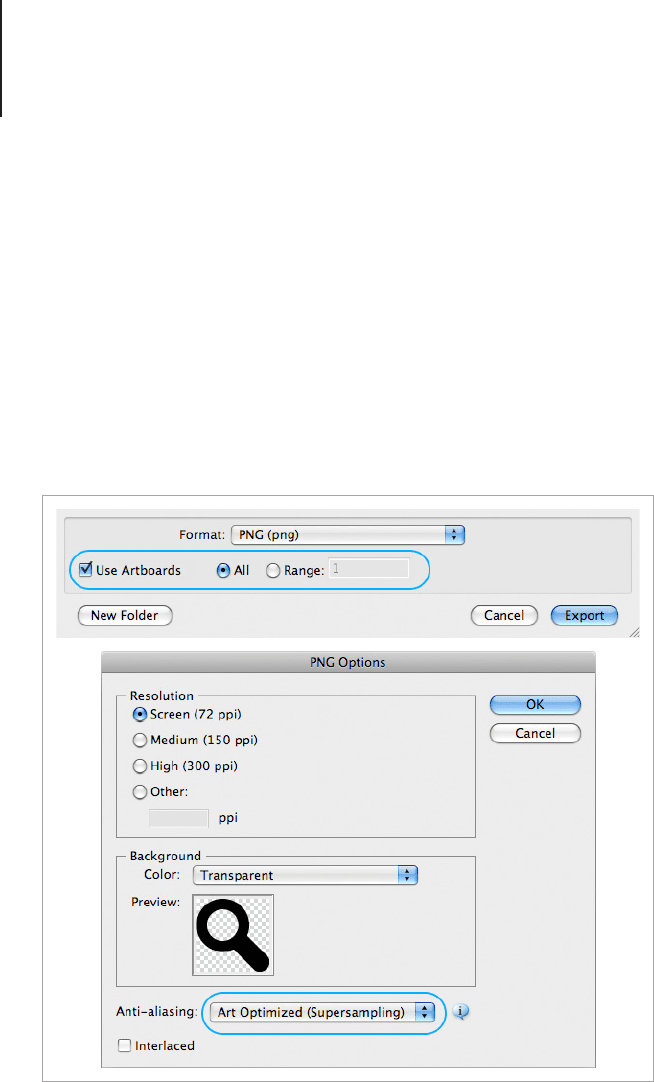
to Art Optimized, for all versions make sure that the background is
set to transparent and the resolution is set to your target output.
Setting the resolution of the output can be a handy tool when
creating icons as both interface elements and illustration. Which is
sometimes the case when designers need to supply image assets
for both screen and print.
Another handy feature in Illustrator CS4 and above is the ability
to export images from multiple artboards at once. You can make
these setting adjustments in the Export dialogue options.
Export images from multiple artboards.
View Points162
Creating a Graphic Set for Illustrator and a
Symbol Set for Photoshop
Illustrator
You can also use vector objects from Adobe Illustrator in symbol
libraries for both Adobe Photoshop and Adobe Illustrator. Making
libraries is a good way to have all the icons you need ready to use
at the click of a button.
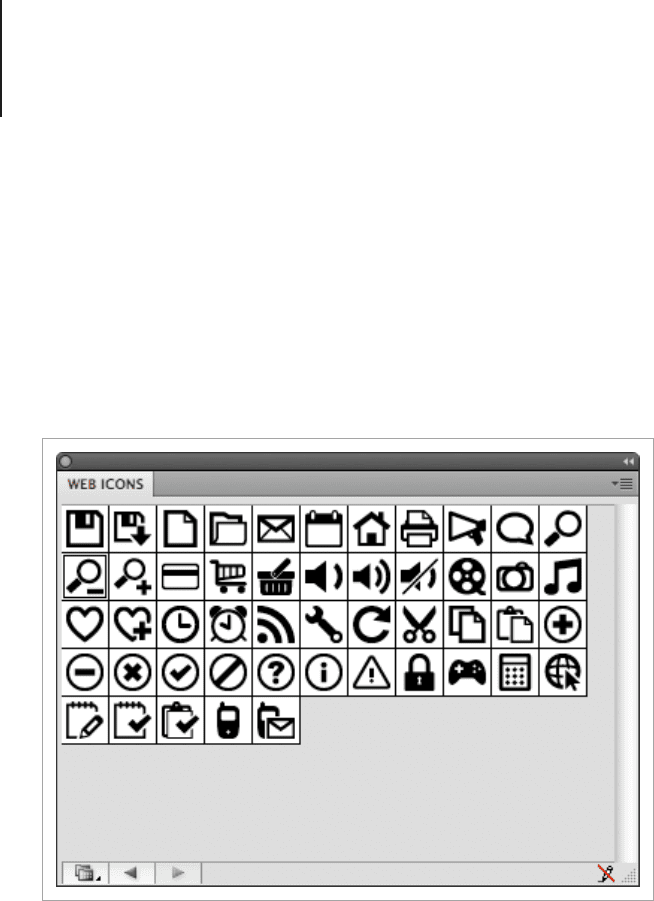
To make icon libraries in Illustrator is easy, select the icon you
would like to use and drag it into the Symbols library or press F8.
Once you have the symbols that you want to make into a library,
delete the symbols you don’t want and then save the custom icons
into a library by going to Save Symbol Library from the Symbols
panel menu.
Web icons in Adobe Illustrator.
View Points163
Photoshop
To make symbols from Illustrator shapes in Photoshop is a little bit
trickier, but not totally impossible. To make symbols from Illustrator
shapes, rst make a new document in Photoshop, any size is ne,
as long as it’s large enough for all of the designs you want to use.
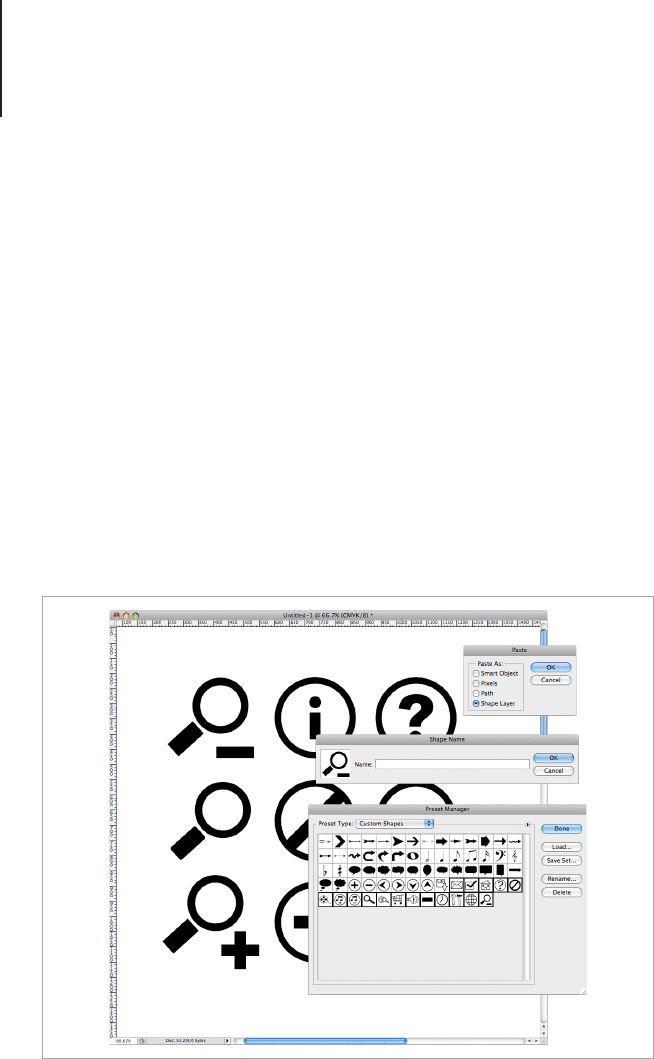
Then copy the glyphs you want to use in Illustrator and go into
Photoshop and paste them into the new document you made.
You will be prompted to paste the icons in a few different ways,
choose the paste as Shape Layer and click OK. With the Direct
Selection tool (A) select the symbol you would like to make into a
custom shape and go to Edit > Dene Custom Shape. You will be
prompted to name the shape, do that and press OK. You will now
have a custom icon shape. Repeat this for each icon and you will
have a custom set of glyphs for Adobe Photoshop.
To save these icons as a set that you can load whenever you need,
go to Edit > Preset Manager and select Custom Shapes from the
Creating a symbol set in Adobe Photoshop.
View Points164
drop down menu. Hold Command and click on the designs you
want to include in the set or Shift to select a range of designs.
When you’re nished you can save the set. If you save your les to
the default preset location you will be able to navigate to your icons
from the drop down menu in Photoshop. (You can of course save
the le to any location you like.)
Front View Icons
A front view icon, as opposed to a zero-point perspective icon
is drawn in a similar style without any distinguishable vanishing
points, but has added light and shade to create depth and the
illusion of space. If you’re drawing icons for a mobile device, then
zero-point perspective is the best method as the various mobile
operating systems will add shadow effects to the icon in-program.
Front view icons were made popular with Mac OS X, but the same
principles applies to Toolbar icons for Microsoft and Linux-style
icons. Make sure that you check the different specications before
you begin as each OS species a slightly different light source
which will change the lighting and shade effects you apply.
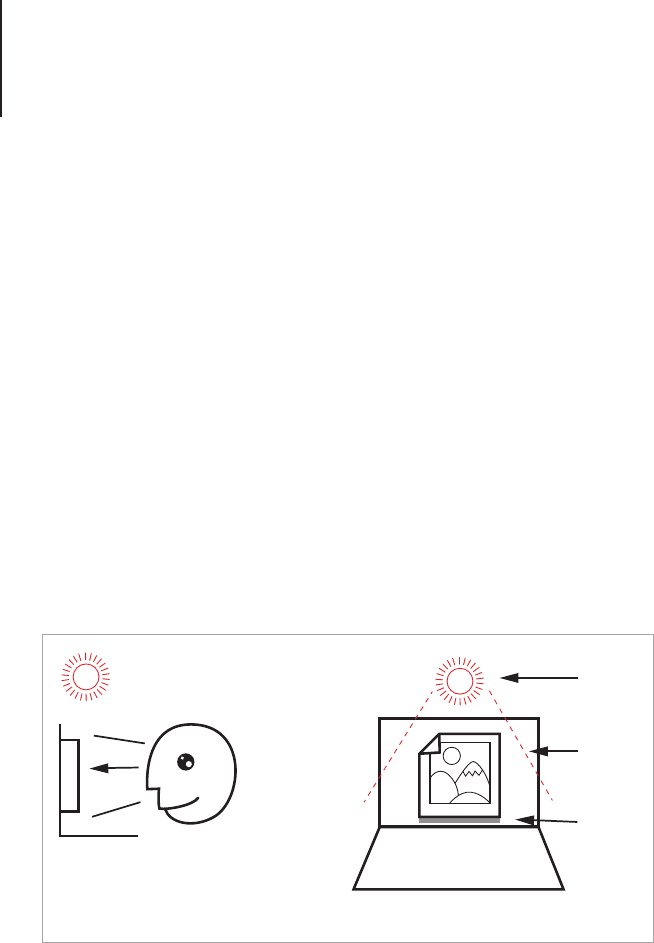
Flat Front View
Light
Wall
Shade
The viewing angle for front view icons.

View Points165
Imagine that your icon is on a at surface with a wall behind it and
that you are viewing it directly from the front. This is the “front
view” theory of icon design.
You should draw the object to be at with a subtle lighting effect
from the top of the object and a slight shadow at the bottom where
the light ends. This extremely subtle lighting effect gives the icon
depth and helps it stand out from the background. It also makes
the icon appear to be slightly tangible which helps user interaction.
Tips for Drawing a Front View Icon
Front view icons are commonly used for Toolbar, system and
document icons. In this tutorial I’ll show you how to draw a basic
Toolbar icon with a bold nish. The output is going to be 32px
and 16px. You can use whichever program you feel the most
comfortable with, but I’ll be using Photoshop. Personally I use
Photoshop for this style of icon because it has good pixel control,
it can scale styles well, can put gradients on strokes, and simply
outputs nice crisp small-scale icons.
Plan the Image
Before you draw anything you should have an idea of what you
would like to include in the design. For tips on sketching icon
designs refer back to the "Zero-Point Perspective" section in this
book.
For this tutorial we will be drawing a house. I’ve chosen a house
because it’s really simple to draw and can be made from a few
shapes. Before you begin, take some time to plan the details
you would like your house to have, such as the placement of the
windows and door.
View Points166
Set the Canvas Size
Because we will be outputting the icon to two sizes, 32 and 16px
we will begin by creating the 32px icon. Once we’re nished the
16px can be made by tweaking the scale using a handy trick I will
show you at the end of this tutorial.
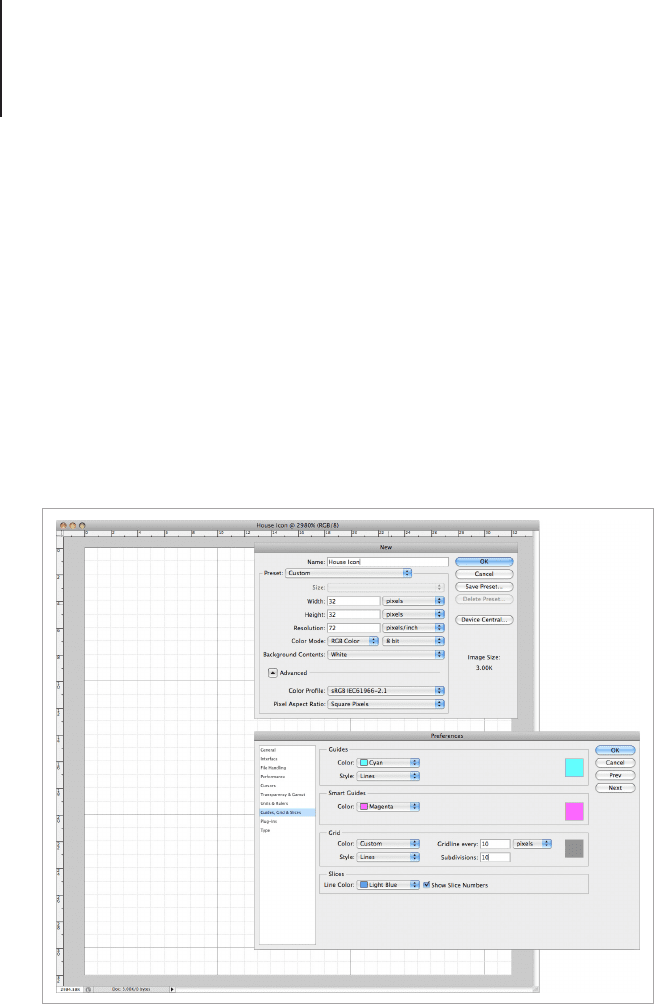
Set your canvas to 32px, RGB 72dpi and make the grid visible.
Make sure that the units for your work is set to pixels, and that
the grid is measured to have a guideline every 10 pixels with 10
subdivisions. This will set gridlines to mark out the pixels on your
canvas.
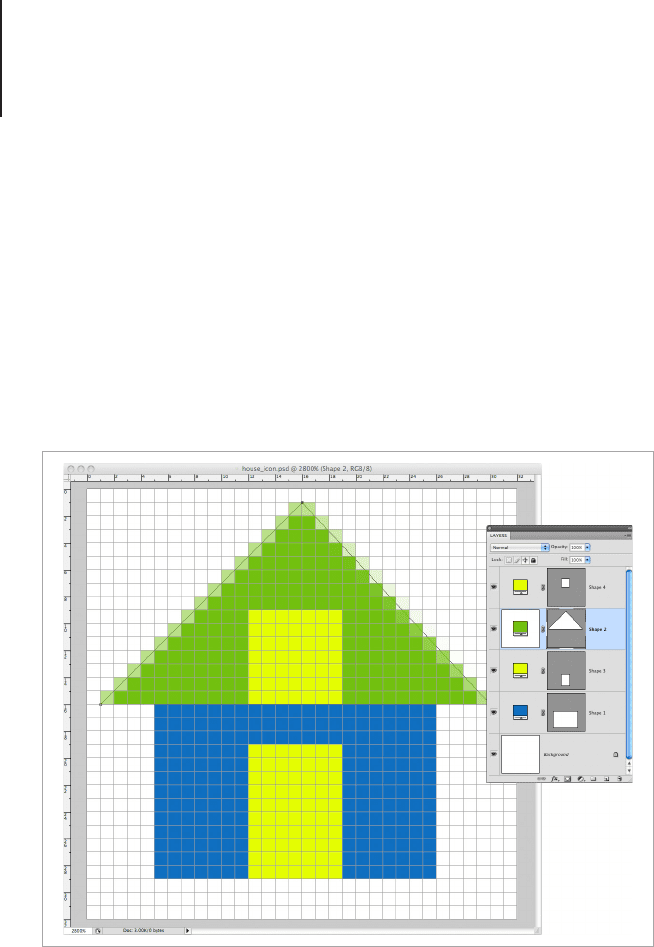
Draw the Basic Shapes
Take a look at the sketch for your house and break the image down
into the basic shapes. For the house I’m drawing I have a triangle, a
square and some rectangles.
Set the canvas and grid preferences for the icon.
View Points167
Place the Shapes
I’m using the vector drawing tools in Adobe Photoshop. I’ve set my
document to “Snap to Grid” which will help to make the shapes
pixel perfect and crisp. Go ahead and draw the shapes into the
32px canvas you set earlier. Be sure to leave 1px to 2px clear on
the sides (2px if you’re creating an icon with a drop shadow to the
side, but 1px is ok if the shadow is below only). 1px at the top of
the design and 3px at the bottom, this will reduce the likelihood of
clipping.
Clipping happens when a semi-transparent pixel made by anti-
aliasing or a layer effect renders as a sharp line because there
weren't enough pixels to accommodate it. To avoid clipping, you
will need sufcient space around all sides of the design to make
sure that all lighting and shade effects have the space to fade out
to 0% opacity.
Create some basic shapes to block out the icon design.
View Points168
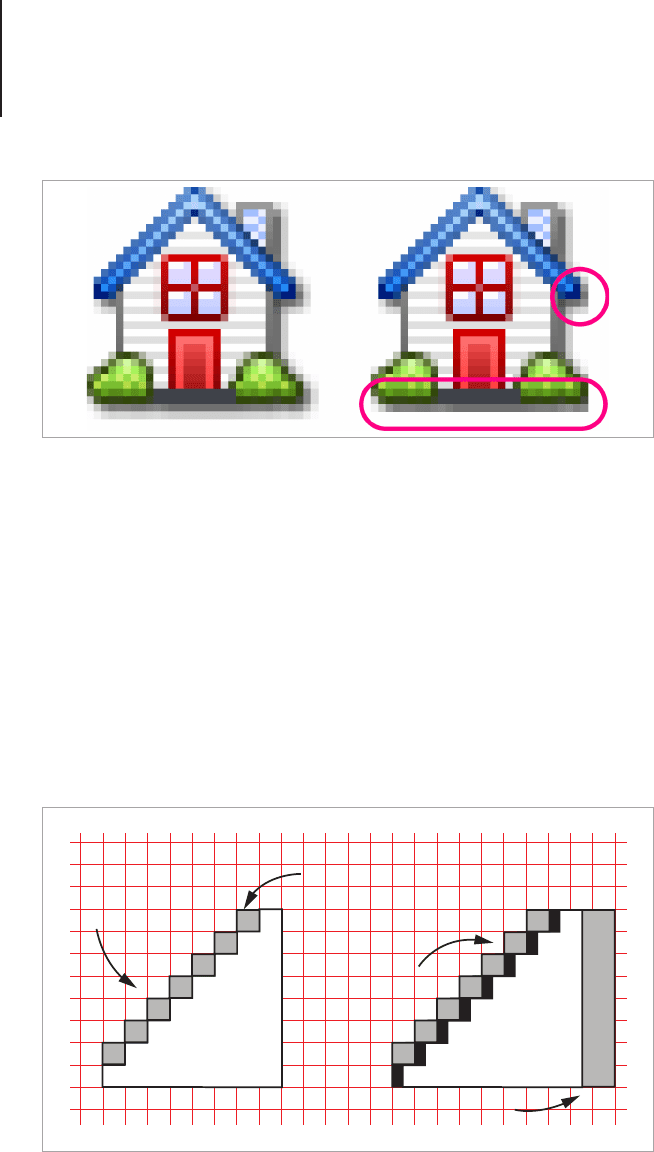
Another thing to keep in mind is the angles of the lines you’re
using. By placing the drawing lines along diagonal and horizontal
axis you will reduce the blurry effect of a badly anti-aliased line. In
the image below you will see that a line that cuts an exact diagonal
through the pixel grid will have an additional line of semitransparent
pixels. If the line doesn’t cut a direct line through the pixel grid, the
anti-aliasing can get a bit confusing and you will end up with two or
more additional pixels with varying degrees of opacity. A moderate
degree of anti-aliasing looks ne on larger scale images, but with
small icons it can make the line value thicker than intended or
cause the icon to appear blurry.
Pixel Perfect
anti-aliasing
diagonal
against
pixel line
not on Pixel
grid. 2x anti-
alias pixels
Not On Pixel Line
half pixel line
Leave sufficient space around the icon for shadows or effects.
How line angles affect anti-aliasing.
View Points169
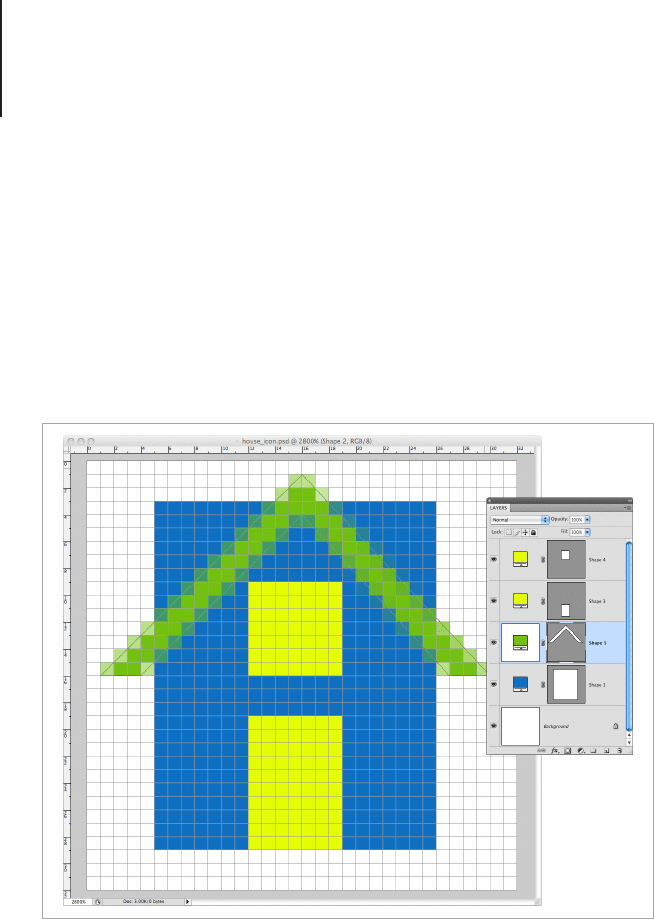
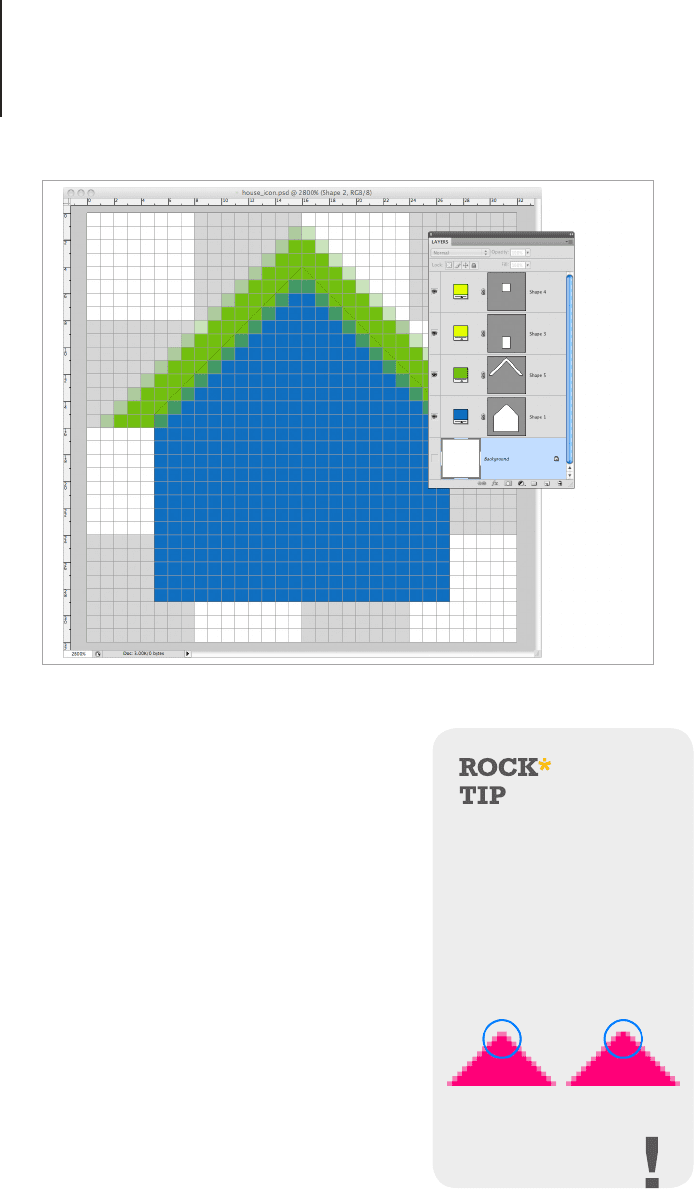
Modify the Basic Shapes
This is where a bit of planning comes in. In the image below you
will see that the roof and the body of the house overlap. I want the
roof of the house to have a line running diagonal to the pixel grid so
that the anti-aliasing is kept to a neat 1px. So I’ve added points in
the shape where I want the roof to have corners and aligned them
neatly to the pixel grid. Once that’s done I repeat the same thing
with the body of the house.
As you can see, when the background is turned off there are some
transparent pixels where the house body and the roof meet. To x
this I’m going to move the lines on the roof in order to further rene
the shape and ll the pixel gap between it and the house.
Modify the basic shapes by adding and moving points.
View Points170
Take special care when arranging the
points of your shapes. Sometimes the
limited number of pixels will require
some compromise with the design.
For example, I’ve designed my house
to have a window in the middle of the
front wall. For the visual balance to
be maintained I will need to line it up
with the gable of the roof. My rst roof
shape was made from a point aligned
between two pixels, this then required
me to either change the style of the
gable to have a at 1px shape in the
middle, or to draw the window with a
3px windowsill. Because I only have
a 32px icon to work with I will have
When designing icons at a
small scale such as 32, 24
or 16px it’s ideal to make
any sharp points into flat
lines. This will create a
visual point with the pixels
even if it isn’t a true point
in the artwork.
Move the lines to further refine the shape and fill pixel gaps.