FTA (изд-во). Flexography: Principles And Practices. Vol.1-6
Подождите немного. Документ загружается.

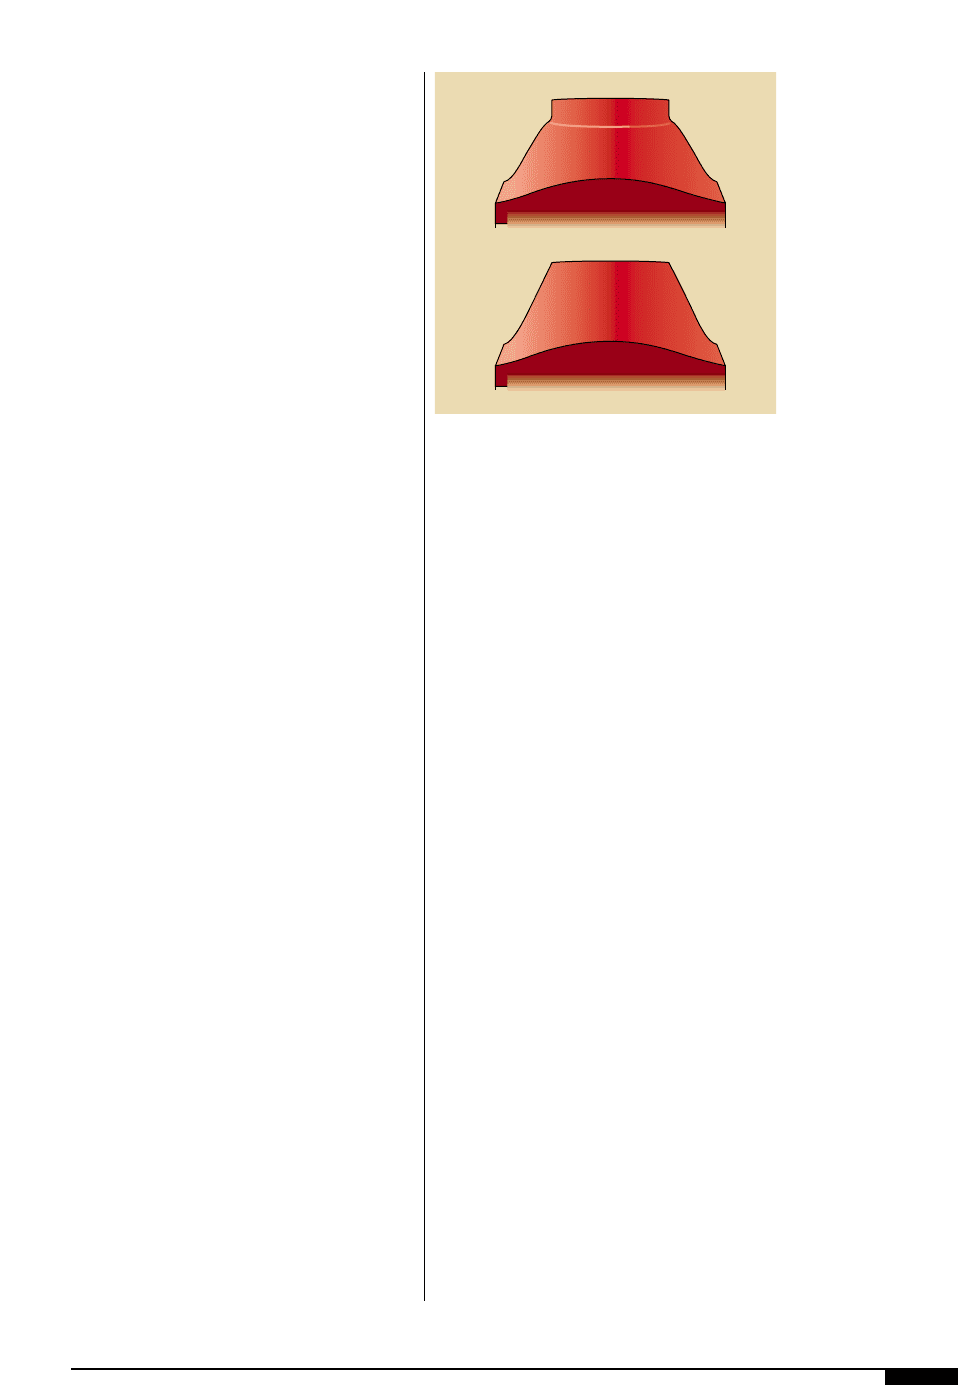
Plate Construction
In most common applications, photopoly-
mer material is supported by a transparent
and dimensionally stable polyester backing
sheet. The polyester sheet is generally be-
tween 0.004" to 0.010" thick. In some special
applications, the polyester sheet may be
removable. Some manufacturers of sheet
photopolymer offer a metal backing for use
on magnetic or mechanical lock-up printing
cylinders. These metal-backing materials are
not transparent to ultraviolet light and are
supplied with a preset relief depth. These
materials have a limited shelf life and should
be used soon after receipt.
Special Plate Construction
Both liquid and sheet photopolymer man-
ufacturers offer materials with special con-
structions. The following paragraphs de-
scribe several examples of special-construc-
tion plates.
Image Contrast. In this construction, the top,
or imaging layer, is of a different color than
the base photopolymer. Consequently, once
the plate is processed, the image surface is
of a different and contrasting color from the
base of the plate. This aids in aligning the
plates when mounting on the plate cylinder.
Dual Durometer (Capped Plate). In dual
durometer plates, a thin (0.004" to 0.010"),
harder image surface lies atop a lower-
durometer polymer base. The image surface
may also produce a steeper character shoul-
der. Figure
1)
shows a photomicrograph of
a capped and uncapped plate.
Strippable. This construction allows removal
of the polyester base following plate produc-
tion. These plates are generally used when
the plate is laminated to sheet steel for
mounting on magnetic cylinders and in non-
critical register applications.
Compressible Construction. Compressible
plate construction is available in both sheet
(as supplied) and liquid (as produced) pho-
topolymer systems. These plates have a com-
pressible foam layer within the plate – be-
tween the photopolymer image layer and the
dimensionally stable polyester backing – that
control image gain with printing impression.
Aqueous Processing. Liquid photopolymer
systems utilize water and detergent solu-
tions for plate processing. Most sheet pho-
topolymers are processed in an organic sol-
vent that require special processing equip-
ment with aqueous chemistry.
Jumbo Plate Sizes. The most common
platemaking equipment size, liquid or sheet,
is 30" x 40". Recent demands on manufactur-
ers have extended these capabilities to sheet
sizes of 52" x 110" and even larger for special
applications. Special processing equipment
and handling techniques are required for
plate production of these extraordinary sizes.
Demand for these sizes is driven by corrugat-
ed linerboard, large point-of-purchase dis-
plays, and stepping of multiple repeating
images on plates for general flexo converting.
PHOTOPOLYMER PLATES:
AN OVERVIEW
The following is a brief overview of gener-
ally accepted benefits of using photopoly-
mer plates.
General Factors:
• Better Print Quality. Produces sharp line
PLATES 25
1)
A capped and uncapped
plate. In durometer
plates, a thin (0.004" to
0.010"), harder image
surface lies atop a
lower-durometer poly-
mer base. The image
surface may also pro-
duce a steeper character
shoulder during plate
development.
Capped
Uncapped
1)

26 FLEXOGRAPHY: PRINCIPLES & PRACTICES
images, excellent ink transfer and pre-
dictable halftone results.
• Large Plates. Sizes up to 52" x 110" are pos-
sible.
• Plate Mounting. Efficient process to mount
plates, especially when pin or microdot
registration systems are employed.
• Allows Step and Repeat. Plates can carry
multiple images.
• Filing Space. Film requires less space than
metal and rubber molds. Negatives will
not deteriorate like metal or rubber molds
and can be easily duplicated.
Accuracy Factors:
• Predictable Plate Gain. Plate gain can accu-
rately be determined and compensated for
in art.
• Better Registration. Because of stable
backing, a 90% coverage plate will now
register with a 10% coverage plate.
• Accurate Prepress Proofing. Off-press proofs
are accurate reproductions from the film
used for plates. Photopolymer prepress
proofs provide accurate rendition of speci-
fied job.
Time-saving Factors:
• Time Trimmer. A 6-color, 4-up job can be
mounted with pin registered photopoly-
mer plates in about 30 minutes as opposed
to 8 hours or more for rubber.
• More Efficient. Eliminates the mounter-
proofer operation.
• Economical. Downtime is minimized to
reregister plates.
• Fewer Steps. Process work can be done in
half the time (or less) than it takes to
make copper engravings, molds and rub-
ber-plates, and can be stepped and repeat-
ed in multiple images, so there are fewer
plates to register.
• Easier. When rubber plates are mounted
on a mounter-proofer, they may not regis-
ter on press.
• Faster. Plate production is faster than for
metal, molds and rubber.
Cost-saving factors:
• Longer Plate Life. Lasts about twice that of
rubber plates.
• Eliminates Need for Engraving or Mold.
• Allows Reuse. Plates are more reusable
due to less distortion.
• Better Production Capability. More photo-
polymer can be made per man-hour using
relatively unskilled labor. Process work
will cost about half as much as molded
rubber for initial printing plates to press.
HOUSEKEEPING
Maintaining a clean, dust-free environ-
ment in the platemaking area cannot be
overstated. Photopolymer materials in the
uncured state are susceptible to contamina-
tion and damage by dirt and other foreign
particles.
Materials and solvents used in photopoly-
mer platemaking should be handled carefully.
Physical Hazard of UV Radiation
The photopolymer platemaking sequence
uses several sources of high-energy ultravio-
let (UV) radiation that may present a hazard
to the platemaker. The exposure equipment
supplied provides sufficient protection to the
operator during normal platemaking. Safety
interlocks should be maintained at all times.
Ultraviolet Light. The high-energy lamps used
in the exposure, post-exposure and light fin-
ishing units of the platemaking system emit
ultraviolet energy, as well as visible-light
energy. The proportion of ultraviolet light
energy is far higher than the visible light,
therefore, the human eye is a bad judge of
how bright the light is. Special UV-blocking
glasses are needed to provide adequate eye
protection and the protective quality of
these lenses need to match the wavelength
of the UV light source. Platemakers taking
certain prescription medications should
avoid UV light as those medications can
amplify skin photosensitivity.

Short-wavelength Ultraviolet (UV-C). UV-C
has a wavelength bandwidth of 180 to 280
nanometers. This light is used in the light-fin-
ishing process of photopolymer platemak-
ing. UV-C lamps, generally referred to as ger-
micidal lamps, emit very little visible light,
but can cause severe burns to both skin and
eyes from very short exposures.
Medium-wavelength Ultraviolet (UV-B). UV-B
has a wavelength bandwidth of 280 to 320
nanometers and is not normally found in
platemaking equipment.
Long-wavelength Ultraviolet (UV-A). UV-A has
a wavelength bandwidth of 320 to 400
nanometers – visible light starts at about 380
to 400 nanometers. This light is used in the
back-, main- and post-exposure processes of
photopolymer platemaking. UV-A lamps,
typically found in commercial sun beds, emit
a fairly large amount of visible light.
Prolonged exposure can cause severe sun-
burn and eye damage.
FILM NEGATIVE
PREPARATION AND HANDLING
The film negative is the single most impor-
tant element in photopolymer plate prepara-
tion. Necessity for the care in preparation,
handling and storage of these critical imaging
tools cannot be overstated. Negatives used in
photopolymer platemaking should meet the
following requirements as summarized in
Table 6.
PRINCIPLES OF PHOTOPOLYMER
PLATE EXPOSURES
The basic process of making a printing
plate is similar for liquid and sheet photo-
polymer. In both cases, the back is exposed to
UV light to establish the floor. The face is then
exposed through the film negative, which sets
the printing surface. As a final step in the
platemaking process, the plate is “light fin-
ished” to cure all remaining photopolymer.
PLATES 27
Table 6
■ Negatives must be high contrast film,
free of dirt, kinks, nicks and pin holes
■ Matte-surface films are mandatory for
sheet photopolymers to ensure good
contact between negatives and plate
during exposure.
■ Nonmatte films should be used for liquid
photopolymer platemaking
■ Optical density of the film should be
– 4.0 or greater in the nonimage
(opaque) areas
– 0.05 or less in the image (clear) areas
■ Image orientation must be correct and
provide for emulsion-to-plate contact
■ Images must be
– right-reading, emulsion side
for face printing
– wrong-reading, emulsion side
for back or reverse printing
■ Images should be clean, fringe-free
and sharply defined with no broken letters
or lines
■ Colloidal black opaques are recommended.
Avoid red opaques which have a tendency to
flake.
■ Opaque on the
– emulsion side of negatives only
for liquid polymer platemaking
– back side of negatives only
for sheet polymer platemaking
■ Opaque only in the nonimage areas no closer
than 0.1" to an image area
■ Prevent kinks from developing in the image
areas. Film thickness of 0.007" is preferred
■ Prevent scratches in image areas. Scribing
or scraping of the emulsion must not rough-
en the surface
MAKING NEGATIVES FOR
PHOTOPOLYMER PLATEMAKING
28 FLEXOGRAPHY: PRINCIPLES & PRACTICES
Back Exposure
This simple step is necessary to fully
attach the floor layer of the plate to the poly-
ester backing and establish the relief depth.
No negative is used during back exposure
and the photopolymer is cured (cross-
linked) by exposure to high intensity ultravi-
olet light through the polyester backing
sheet. During the back exposure, the poly-
mer is cured to form a solid in a progressive
migratory manner. The longer the exposure
or more UV-A energy absorbed, the thicker
the floor becomes. Variables that can effect
proper exposure include differences in UV
sensitivity for the photopolymer, and UV
energy output, especially as the UV lamps
age. Back-exposure tests should be conduct-
ed regularly to establish the rate of cure for
particular combinations of photopolymer
materials and exposure equipment.
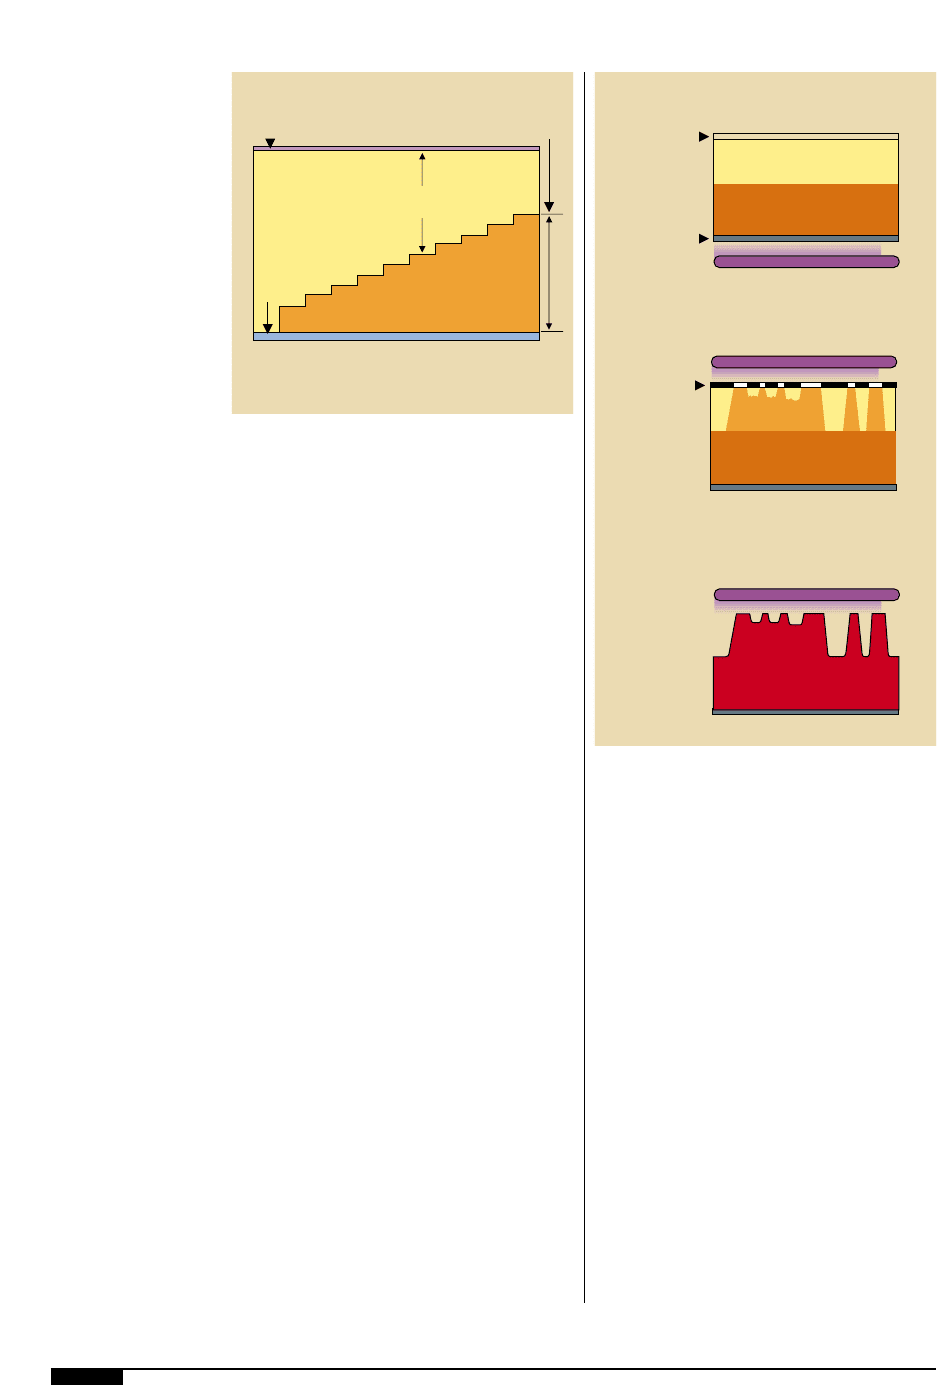
Back-exposure Test
This simple test exposes a sample of the
plate material through the polyester back-
ing sheet on the exposure equipment. The
exposure times are stepped according to
the plate material and the equipment manu-
facturer’s recommendations (Figure
1!
).
The resulting thickness steps produced in
the plate material are recorded and charted
to form a back-exposure guide for the par-
ticular material and machine.
Face or Image Exposure
This exposure transfers the image from
the photographic negative to the printing
face of the photopolymer. This is done by
selectively curing the photopolymer with UV
light through the clear areas of the negative.
As with the back exposure, the curing is pro-
gressive and the rate of cure is dependent on
many factors: clear area in the film, trans-
parency of the film, sensitivity of the pho-
topolymer, image detail and ultraviolet ener-
gy output of the exposure unit. The depth of
photopolymer to be cured during the face
exposure is dependent on the overall plate
thickness and the amount of floor that was
cured during the back exposure (Figure
1@
).
1!
During back exposure,
polymer is cured to
form a solid. The plate
floor is thickened via
absorption of UV-light
energy. Relief depth is
charted to measure
curing rate. Data
collected in this
process form as a
back-exposure guide
for the material and
machine. Depth of the
photopolymer cured in
the face-exposure test
depends on plate thick-
ness and results of the
back-exposure test.
1@
Capped plates are
relief printing plates
composed of two levels
of photopolymer. The
cap layer may be of
harder durometer and
different photosensitivity
than the base layer.
Advantages include
wider exposure latitude
and less distortion.
684 1012141618202224
Cover
Sheet
Seconds Back Exposure
More exposure = Less relief
Polyester
Backing
Sheet
Relief
Depth
Cured Photopolymer
Polymer removed
during processing
Floor
Thickness
1!
Cover
Sheet
UV Back Exposure
UV Face Exposure
UV Post Exposure
1. Proper Back Exposure
Relief Layer
Backing Layer
Stable
Polyester
Backing
Sheet
Negative
2. Proper Face Exposure
Acceptable Plate
3. Proper Washout
4. Proper Drying
5. Proper Post Exposure & Light Finishing
1@
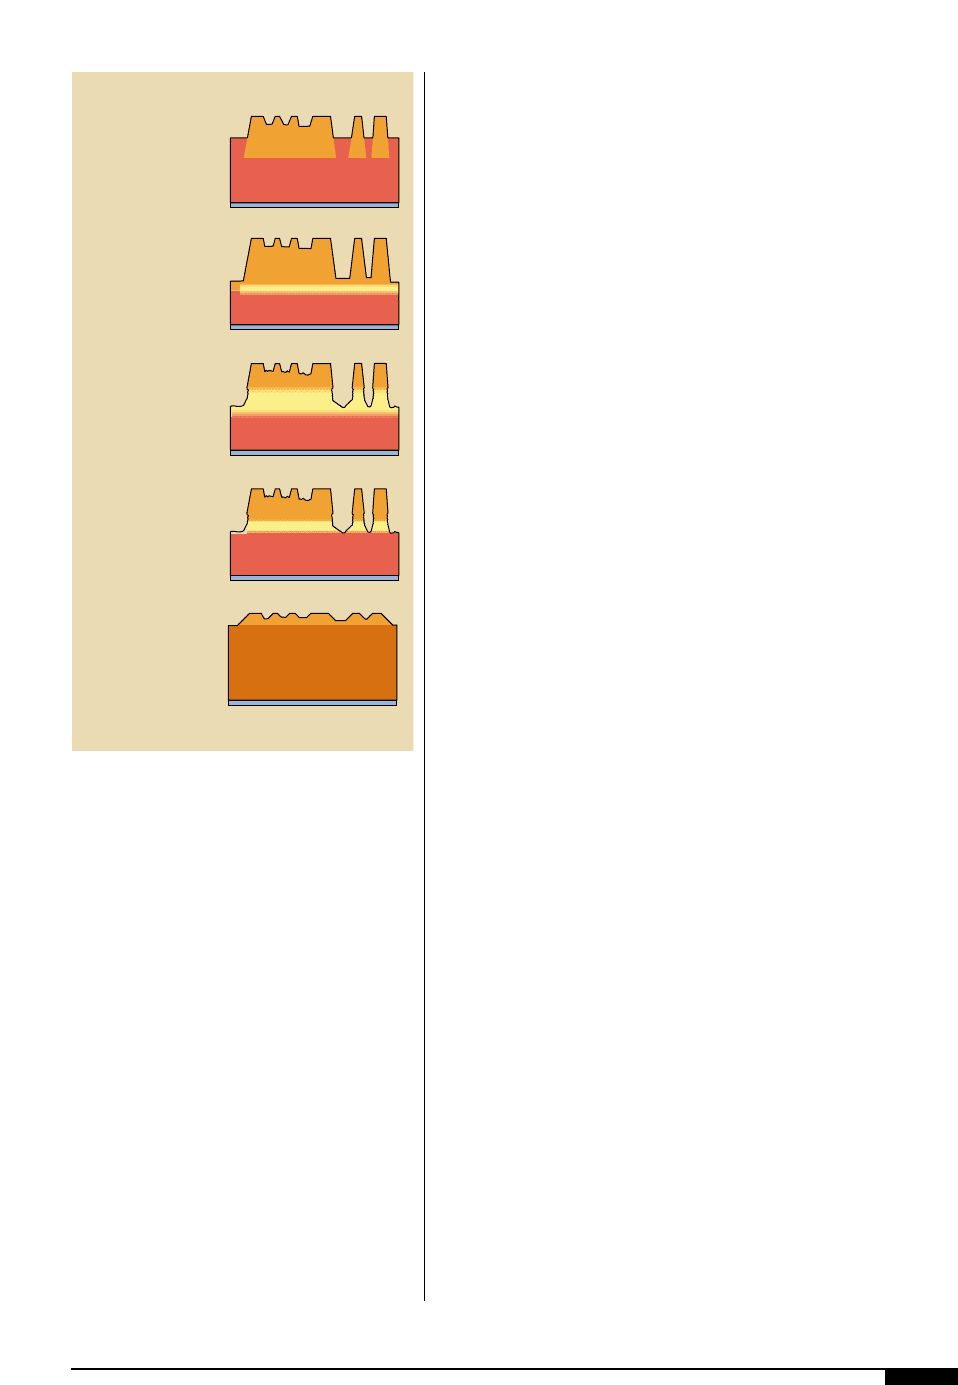
These complex relationships can only be
resolved by conducting a face exposure test.
Figure
1#
illustrates some of the problems
with incorrect face and back exposures.
Face- or Image-exposure Test
Image-stepped test negatives containing a
variety of copy detail and tonal values are
available from the various plate material
suppliers. Once the desired back-exposure is
established, these images are face-exposed
for various periods to establish the times
necessary for plate production.
Post-exposure or Light Finishing
During the plate processing, areas of par-
tially cured photopolymer are exposed on
the floor and flanks of the relief image. These
tacky areas are rendered tack-free by further
exposure to high energy ultraviolet light. In
most photopolymers, the presence of oxygen
inhibits the curing action from the standard
exposure lamps. Therefore, special short-
wave UV-C lamps are used to “light finish”
the plate’s surface. The combination of light
finishing, and/or post-exposure, ensures the
entire plate is fully cured and has the opti-
mum physical properties for printing.
Light Intensity
Exposure times effected by light intensity.
Light intensity falls as lamps age and conse-
quently, exposure times must be increased
to achieve the correct amount of energy.
Exposure lamps should be checked at 20-
hour intervals and replaced when the inten-
sity falls below the recommended level, usu-
ally about 75% to 80% of peak emission.
Main- and back-exposure lamps should be
replaced as a set to maintain uniform light
intensity over the exposure area. New lamps
require a burning-in period of 15 to 20 min-
utes to stabilize output before plate expo-
sures are made.
LIQUID PHOTOPOLYMER
PLATEMAKING
The liquid photopolymer platemaking sys-
tem is versatile, reliable and efficient for
plate manufacturing. Liquid photopolymers
are washed out with a water and detergent
solution, which makes them environmentally
safe and user-friendly. Most liquid photpoly-
mers are designed for use with water-based
ink systems, but there are liquid systems that
can be used in solvent-printing applications.
Systems are available to manufacture
plates in sizes from 18" x 26" up to 52" x 110".
They can be used to produce direct-printing
plates for flexographic, as well as letterpress
and molding applications. The platemaking
system uses a viscous liquid photopolymer
resin, which is cast in the imaging unit by the
plate operator and then processed into a fin-
PLATES 29
1#
Exposure problems
caused by incorrect face
and back exposures.
Too Much
Back Exposure
Radiation overcured the
relief area. Washout
produced too little relief.
Inadequate
Back Exposure
Properly cured face is
riding in a soft layer of
uncured material. Plate
will swell during wash-
out and printing.
Inadequate Face
and Back Exposure
Plate has an uncured
midsection, vulnerable
to both washout sol-
vents and ink solvents.
Inadequate
Face Exposure
Fine type distorted and
highlight halftone dots
are highly susceptible
to damage and may
disappear.
Too Much
Face Exposure
Plate will fill in,
especially noticeable in
reverse areas.
1#

30 FLEXOGRAPHY: PRINCIPLES & PRACTICES
ished plate. Under ordinary lighting condi-
tions, liquid photopolymer is stable and safe
to handle at room temperature
The plate-backing material is a manufac-
tured polyester sheet, specially coated on
one side for bonding to the photopolymer.
This provides a dimensionally stable base for
the finished printing plate. No solvents are
used in the process, so plates can be manu-
factured and press-ready in under one hour.
Equipment
The standard system includes four or five
pieces of equipment, described below, that is
used with some types of liquid polymers.
The Exposure Unit. Casts the polymer in a pre-
cise thickness over the protected film nega-
tive and exposes the photopolymer material.
The exposure unit consists of a pair of preci-
sion-ground glasses which are responsible
for the accurate plate tolerance. Exposure
units are available in both state-of-the-art
computer-controlled and manual models.
The Reclaim Unit. An automated device
which removes the unexposed (still liquid)
photopolymer and collects it for reuse dur-
ing another platemaking cycle.
The Washout Unit. Cleans the plate and
removes the residual unexposed polymer
from between the image elements.
The Post Exposure/Dryer Unit. Finishes the
plate with ultraviolet light to cure the floor
of the plate, and the dryer evaporates the
water from the plate.
The Light Finishing Unit. Provides a final cure
to the plate, leaving a tack-free, press-ready
printing surface.
THE LIQUID
PLATEMAKING SEQUENCE
The section on principles of photopolymer
plate exposures covered the basic theory
and steps involved in exposing any pho-
topolymer plate. This section will detail the
steps for the liquid plate.
Casting the Plate
With the liquid photopolymer system, the
plate operator casts the raw photopolymer
material to form the finished plate thickness.
The equipment supplier sets the exposure
unit during installation and provides the nec-
essary information to manufacture the range
of desired plate thickness. The following are
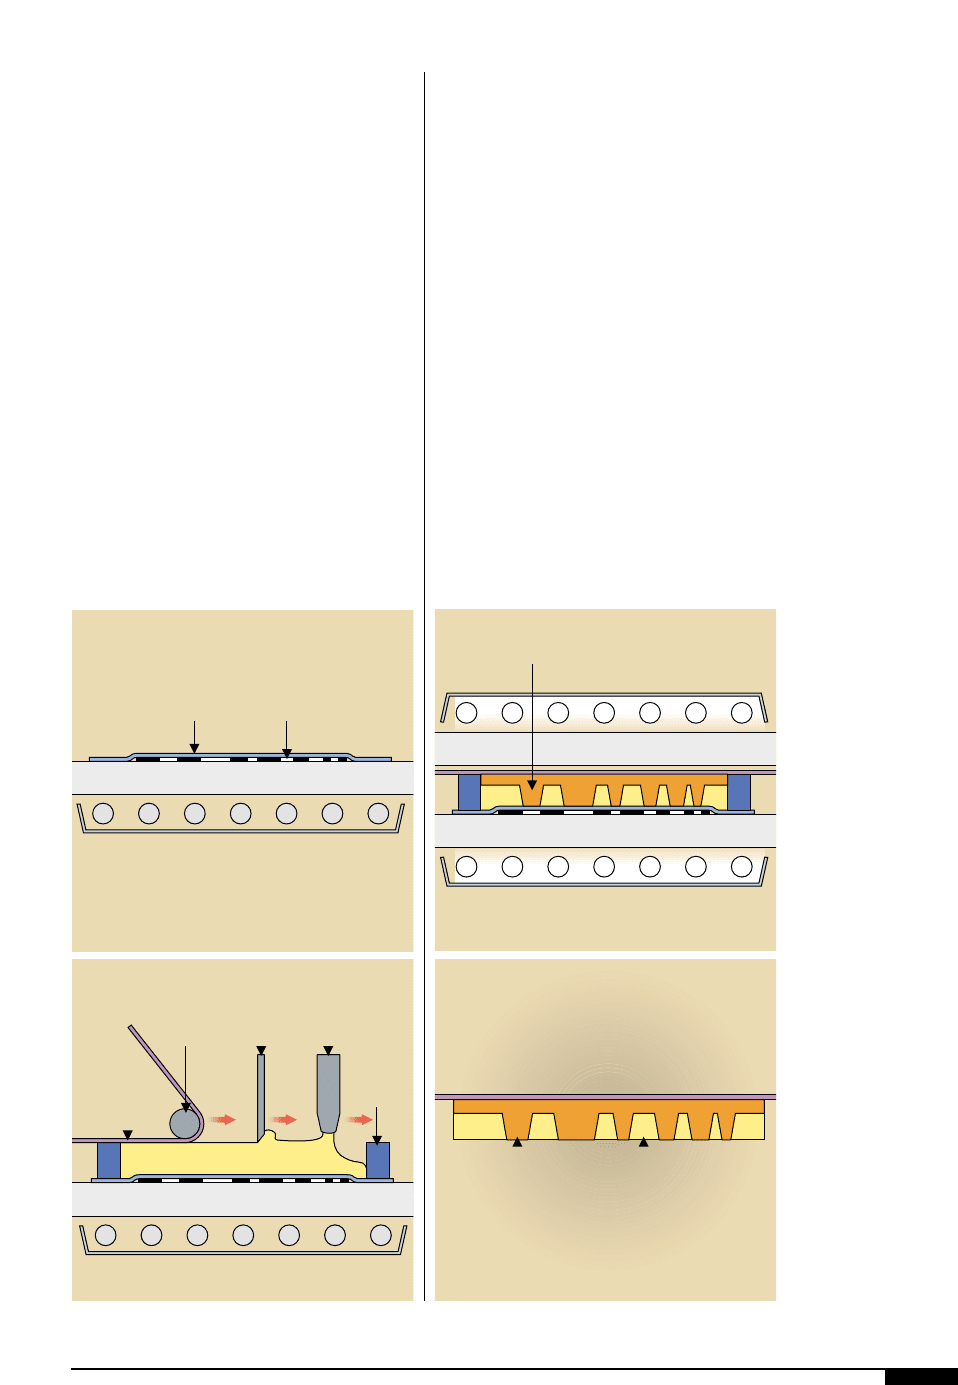
steps necessary in casting a plate:
• Enter the desired plate thickness into
the system and set the machine to spec-
ification.
• Place the film negative emulsion-side
up on the bottom glass and cover with a
thin protective cover-film (Figure
1$
).
• Turn the vacuum on to draw the air out
from between the lower glass, negative
film and cover-film.
• Cast the photopolymer over the
protected film negative to the appropri-
ate thickness.
• Laminate the dimensionally stable back-
ing sheet to the upper surface of the liq-
uid polymer. Doctor the cast polymer to
a controlled thickness (Figure
1%
).
• Lower the upper glass until it makes
contact with the backing sheet and the
thickness gauging system.
• To ensure good tolerance at the thick-
ness required, apply the vacuum to the
upper glass and backing sheet.
Back Exposure
The back, or T1, exposure is responsible
for establishing the relief depth and floor
thickness of the finished plate, increasing
adherence to the polyester backing sheet,
and presensitizing the material for shorter
main-exposure times. A negative is not used
during back exposure. The exact back-expo-
sure time needed to obtain the desired floor
thickness in the plate is determined by using
a back-exposure step-test procedure. The
longer the T1 time, the thicker the floor of
the plate and consequently the shallower the
relief (Figure
1^
).
Face Exposure
The face, or T2, exposure is responsible
for the imaging characteristics of the plate.
The length of the T2 exposure is determined
by the type of copy on the negative. Fine
lines and screens require more exposure
than do solids and fine reverses.
When the plate material is exposed through
the negative with UV light, the areas corre-
sponding to clear areas on the photographic
negative are hardened. The areas, corre-
sponding to the black areas in the negative,
are not exposed and remain in a liquid state
(Figure
1&
).
Exposure-control Guides
It is essential to use exposure-control
guides to determine the proper amount of
face exposure, especially when making
process-color plates. These guides, supplied
by the material manufacturer, are small-test
negatives available in different line screens.
They are imaged using a calibrated glass
screening process for accuracy. The guide
incorporates highlights and reverses, as well
as lines and reverse lines. To use the control
guide, the plate is exposed only until the
smallest desired image on the control guide
is held. Exposure times and data from the
test is recorded for future reference. Since
the output of lamps in the exposure unit will
decline with age, exposure control guides
assist in ensuring consistent imaging.
Reclaim
After exposure, the plate is removed from
PLATES 31
1$
Casting the plate.
the film negative is
placed emulsion-side
up on the bottom glass
and covered with a thin
protective cover-film.
1%
The dimensionally
stable backing sheet is
laminated to the upper
surface of the liquid
polymer. The cast poly-
mer is doctored to a
controlled thickness.
1^
The exact back-expo-
sure or T1 time needed
to obtain the desired
floor thickness in the
plate is determined by
using a back-exposure
step-test procedure. The
longer the T1 time, the
thicker the floor of the
plate and consequently
the shallower the relief.
1&
When the plate material
is exposed through the
negative with UV light,
the areas corresponding
to clear areas on the
photographic negative
are hardened. The areas,
corresponding to the
black areas in the nega-
tive, are not exposed
and remain in a liquid
state.
Lower Optical Glass
Plate-making
Film
Cover
Film
Relief Exposure Lamps
1$
Lower Optical Glass
Polyester
Backing
Sheet
Relief Exposure Lamps
Doctor
Blade
Backing
Sheet
Applicator
Polymer
Supply
Contain-
ment
Dams
1%
Lower Optical Glass
Upper Optical Glass
Relief Exposure Lamps
Back Exposure Lamps
Hardened
Photopolymer
1^
Exposed
Hardened
Photopolymer
Unexposed
Liquid
Photopolymer
1&

32 FLEXOGRAPHY: PRINCIPLES & PRACTICES
the exposure unit and placed on the reclaim
unit. The cover-film, which protected the
negative, is removed at this point. The
reclaim unit collects the unexposed liquid
material for reuse, which offers substantial
cost savings, and minimizes the amount of
waste going into the environment.
After reclaim, the plate is ready for further
processing in the washout unit.
Plate Washout
This unit washes the plate with a warm,
mild detergent-and-water solution to remove
any remaining unexposed resin.
Post-exposure/Plate Drying
After washout, a post-exposure step using
UV light hardens the floor of the finished
plate. At this point, the plate is placed in the
dryer to remove rinse water from its surface.
Light Finishing
After the plate is dry, it is moved to the
light-finishing unit, where it is exposed to
shortwave UV (germicidal) light. This step
gives the plate a final, tack-free surface.
SPECIAL LIQUID
PLATE-MAKING TECHNIQUES
Special techniques for liquid photopoly-
mers include makeready, capping and
image-positioned plates.
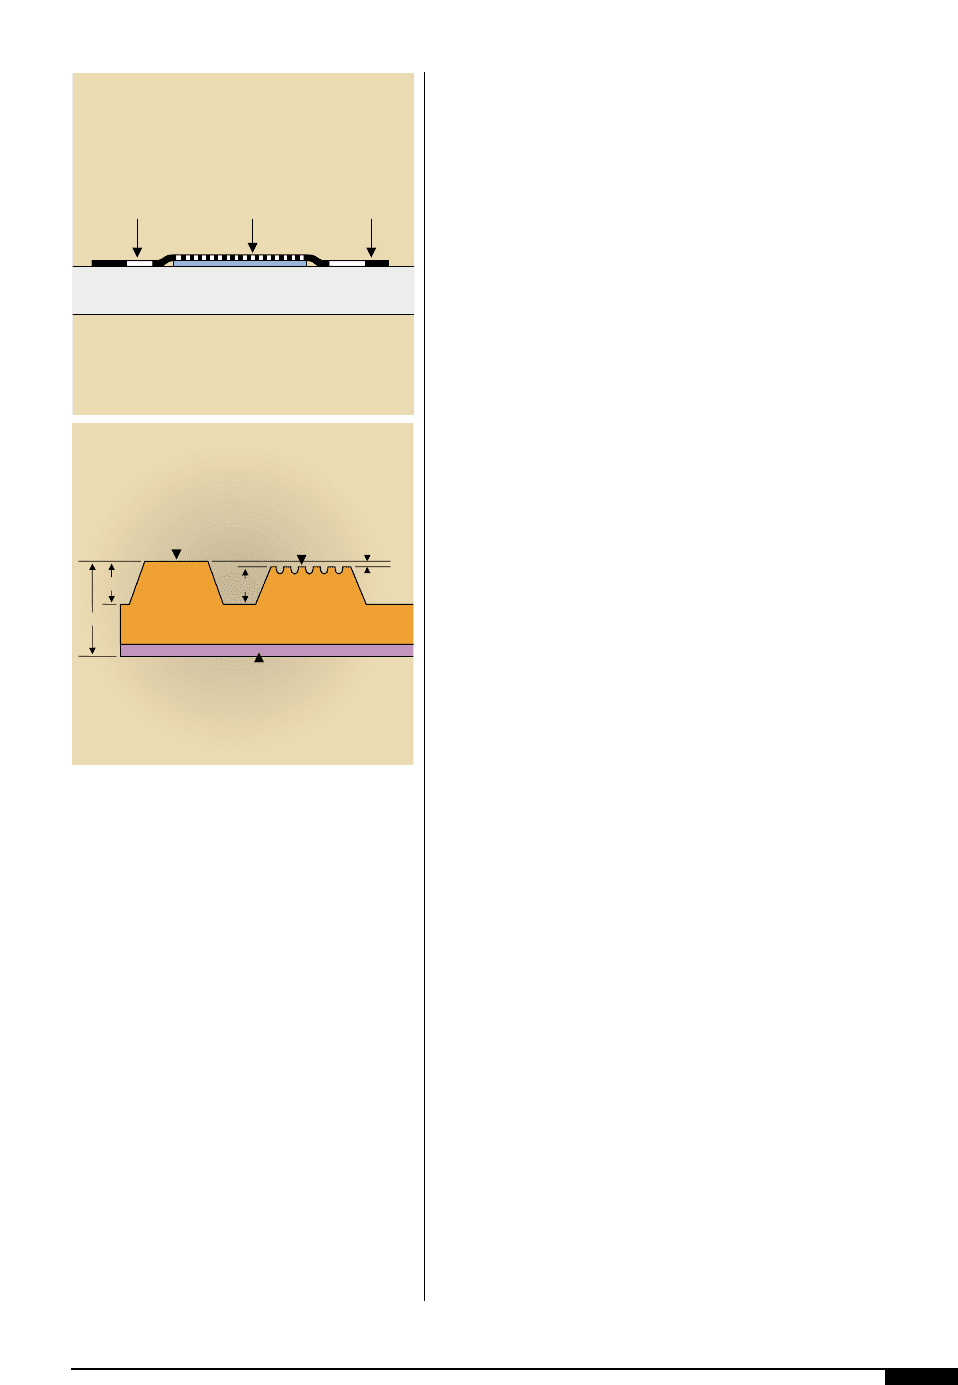
Prepress Makeready
Prepress makeready is a technique that
allows the platemaker to selectively reduce
the thickness in isolated areas within a sin-
gle plate. Using this technique, press impres-
sion can be optimized when printing fine
type adjacent to large solids by reducing the
plate caliper of the fine images. It can also be
used to compensate for thickness loss dis-
tortion, which occurs when the plate made
in the flat is wrapped around a cylinder.
In the liquid platemaking system, the thick-
ness of the film negative directly affects the
plate thickness. If the film negative thickness
is increased in certain areas by transparent
shimming, the additional thickness will dis-
place liquid resin and cause the finished plate
to be thinner in those areas by a like amount.
Any transparent shim material may be used
as long as the optical density is satisfactory
for UV-light transmission. Shim material
should be placed on the back (nonemulsion)
side of the negative, so that the emulsion
remains as close as possible to the pho-
topolymer (separated only by the protective
cover-film over the negative). Figure
1*
shows an enlarged area of Figure
1$
with the
makeready in place and Figure
1(
shows the
final plate with typical dimensions.
Capping
Capped plates are relief-printing plates
composed of two layers of photopolymer.
The cap layer may be of a harder durometer
and different photosensitivity than the base
layer. As plates are made, two layers of dif-
ferent liquid photopolymers are either man-
ually or automatically cast – one on top of
the other. Advantages of the capped plate
include wider exposure latitude, less distor-
tion on the printing surface, deep reverse-
etch depth and lower press-gain from plate
to printed product.
Image-positioned Plates
Image-positioned plates are large, one-
piece plates with all images in register. The
plates are assembled directly on a 10-mil car-
rier sheet. This eliminates later mounting of
several smaller plate pieces on 30-mil PVC or
similar carrier sheet that is typically used in
corrugated printing.
A full-size, one-piece negative is made for
each color to be printed. Each color is pre-
pared in register to the others, and the nega-
tives are produced with register marks that
are in perfect parallel with the required
plate-trimming line.
A back-mask negative may also be used to
prevent background buildup in nonimage
areas of the plate, thus increasing the
amount of polymer reclaim. Using the pre-
press software, a “white plate” or trap is eas-
ily created around each image area. The
back mask can then be made in any conven-
tional film imagesetter, or cut on a sample
die table from any opaque film or paper. The
back mask is placed between the plate sub-
strate and the background exposure source
during plate exposure, thus preventing poly-
mer cure and background buildup except in
the image area. Plate exposure and process-
ing is the same as for conventional plates.
After platemaking, each one-piece printing
plate is registered and trimmed in position.
Lock-up strips are attached, and the plates
are ready for press. Advantages of image-
positioned plates are excellent registration,
reduced time to press, elimination of plate-
mounting materials, and light, flexible plates
that allow easy handling and storage. While
image-positioned plates can be made with
sheet photopolymer, the ability to reclaim
and reuse uncured polymer makes their
manufacture more conducive to liquid-pho-
topolymer systems.
SHEET PHOTOPOLYMER
PLATEMAKING
The sheet photopolymer system offers high
quality plates for direct flexographic printing
applications. Many sheet photopolymers are
washed out with a solvent system. Water
washout sheet systems are available, offering
environmental and operator benefits.
Platemaking systems can be purchased to
manufacture plate sizes up to 52" x 80" of spe-
cific thicknesses for each application. They
can be used to produce direct-printing plates
for both flexography and letterpress.
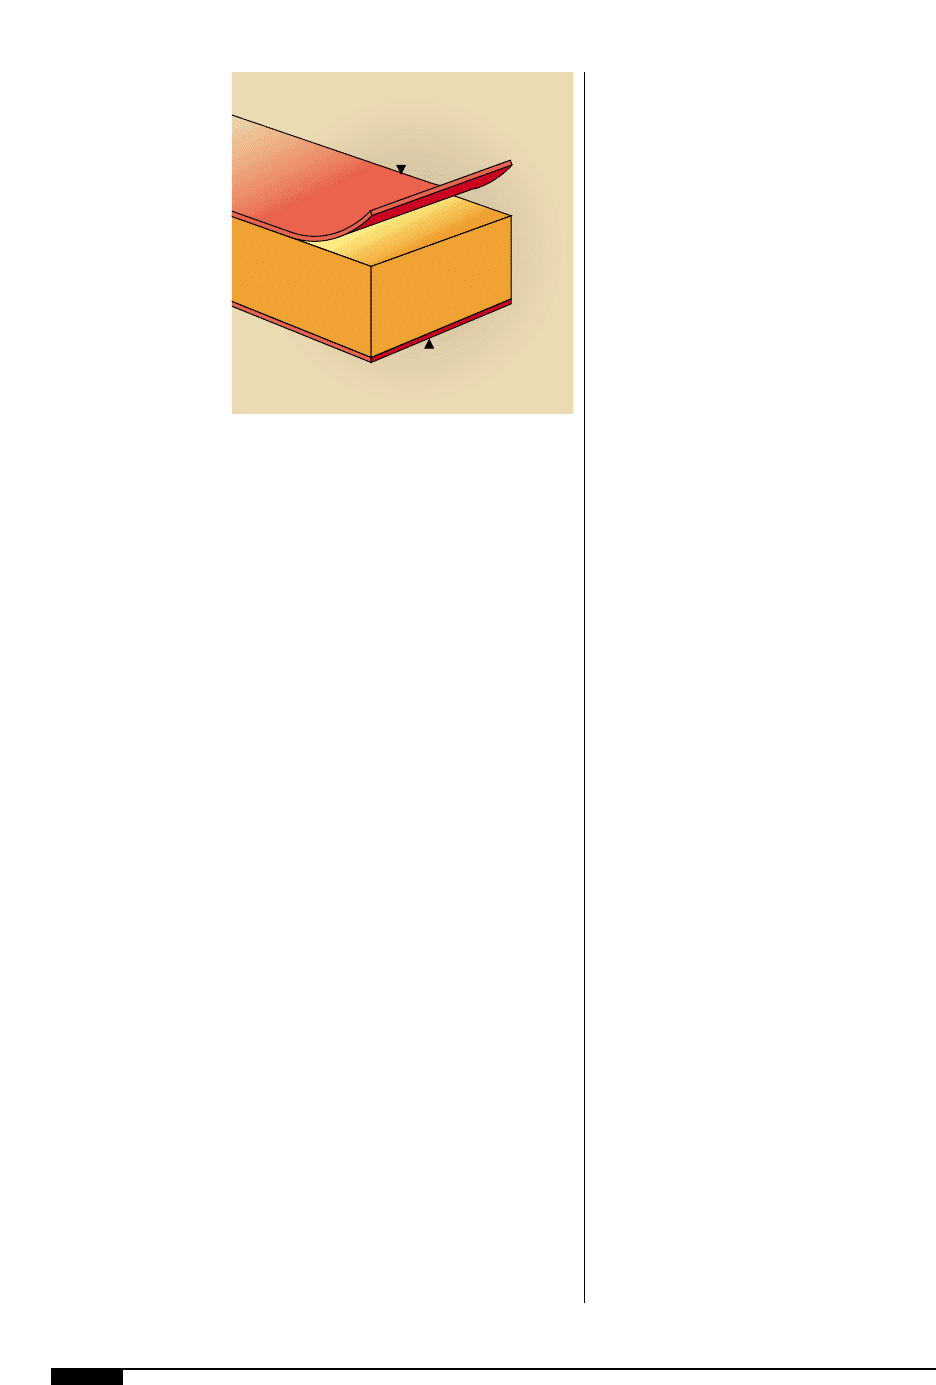
The plate material (Figure
2)
) consists of
three layers: a polyester backing sheet, a
photopolymer layer, to which the backing
sheet is bonded, and a cover sheet to protect
the printing and image face.
The polyester backing sheet provides a
dimensionally stable base for the finished
printing plate. The photopolymer layer is a
super-viscous liquid which, under normal con-
ditions, is dimensionally stable. Under either
heat or pressure, the polymer may be perma-
nently deformed producing low spots in the
finished plate.
Unexposed plate material should be stored
and handled with care. Boxes of material and
individual plates should be stored absolutely
flat – never on end. Smaller sheets or boxes
should not be stacked on larger sizes. All
platemaking materials must be stored away
from sources of heat
The cover sheet provides protection to the
PLATES 33
Lower Optical Glass
Plate-
making
Film
Large
Solids
Area
Fine Type
Area
1*
Large
Solid
Area
Fine
Type
Area
Premake-
ready
Polyester
Backing Sheet
0.067"
0.035"
0.035"
0.004"
1(
34 FLEXOGRAPHY: PRINCIPLES & PRACTICES
image surface of the plate material. When
the cover sheet is removed prior to placing
the negative in position, a thin “slip film”
remains to ensure that the negative does not
bond to the polymer during exposure. Large
sheets and narrow strips of plate material
should be handled with care to prevent pre-
mature delamination of the cover sheet.
The sheet photopolymer is stable and safe
to handle at room temperature in a safe-light
(UV-screened) environment. The precast
sheet is exposed and developed by the
platemaker into a finished plate. Because
solvents are used in the development of
these plates, they may take a few hours to
manufacture, due to the long drying times.
Equipment
The standard system includes four pieces
of equipment: an exposure unit, a processing
or washout unit, a dryer unit and a light-fin-
ishing unit. The exposure unit exposes the
photopolymer sheet and transfers the image
from the negative or exposure mask.
Exposure units are available in both manual
and state-of-the-art, computer-controlled
models. The processing or washout unit
cleans the plate and removes the residual
unexposed polymer between image ele-
ments. The dryer unit removes the solvent,
which has absorbed into the surface of the
plate during washout, and dries the plate.
The light-finishing unit eliminates the sur-
face tack, and then post-exposes the fin-
ished plate with UV light to cure the floor of
the plate. On newer machinery these two
steps can be performed simultaneously.
SHEET PLATEMAKING SEQUENCE
Steps for making sheet photopolymer
plates follows.
Material Preparation
Unexposed plate material should be cut
carefully to minimize waste. Typically, on a
sheet of raw photopolymer, there is a small
border of cured material around the edges of
the sheet.
The film negative size is transferred to the
plate material, which is then placed face-up
on the sheet-cutter board. Smooth, clean
cuts should be made either with a sharp
knife or a “hot knife”, allowing a 1" border
around the copy to provide a clamping edge.
It is more practical if several negatives can
be grouped together to form a single sheet
exposure, thus eliminating the necessity to
cut individual sheets of raw material. When
grouping negatives together, it is recom-
mended that the negatives do not overlap.
UV-opaque adhesive tape should be used to
eliminate gaps and to ensure that the nega-
tives are kept flat.
Back Exposure
The back exposure is completed first. The
sheet material is placed base-side up on the
exposure unit and exposed to UV light.
Some automated systems are equipped with
dual light sources. In that case, the sheet is
placed base-side-down over the bottom set
of lamps. The back exposure is responsible
for the relief depth and floor thickness of the
finished plate, increasing adherence to the
polyester backing sheet, and presensitizing
the material for shorter main exposure
2)
Plate material consists
of three layers: a poly-
ester backing sheet, a
photopolymer layer to
which the backing sheet
is bonded, and a cover
sheet to protect the
printing and image face.
Polyester
Backing Sheet
Polyester
Cover
Sheet
Photopolymer
Layer
2)
