Clarke Joe, Lynch Colleen C. M&R Professional Screen Printing Series
Подождите немного. Документ загружается.

a. Carriage drive and platen are parallel - no adjustment required.
b. Floodbar / platen separate in the front - adjust head support legs.
c. Floodbar / platen separate at rear - adjust indexer downward.
d. Floodbar / platen separate 1 side front or rear - adjust Tol-o-matic.
18. Check level of carriage rail or drill rod(s) on all heads.
a. All are high in frontdrop support legs (not on Gauntlets).
b. All are high in reardrop indexer.
c. One is high in frontdrop support legs on Challenger. (Shim Gauntlet)
d. One is high in rearraise support legs on Challenger. (Shim Gauntlet)
19. Select a level head and make it number one.
Press Calibration
Set Squeegee Stroke
Length At Maximum
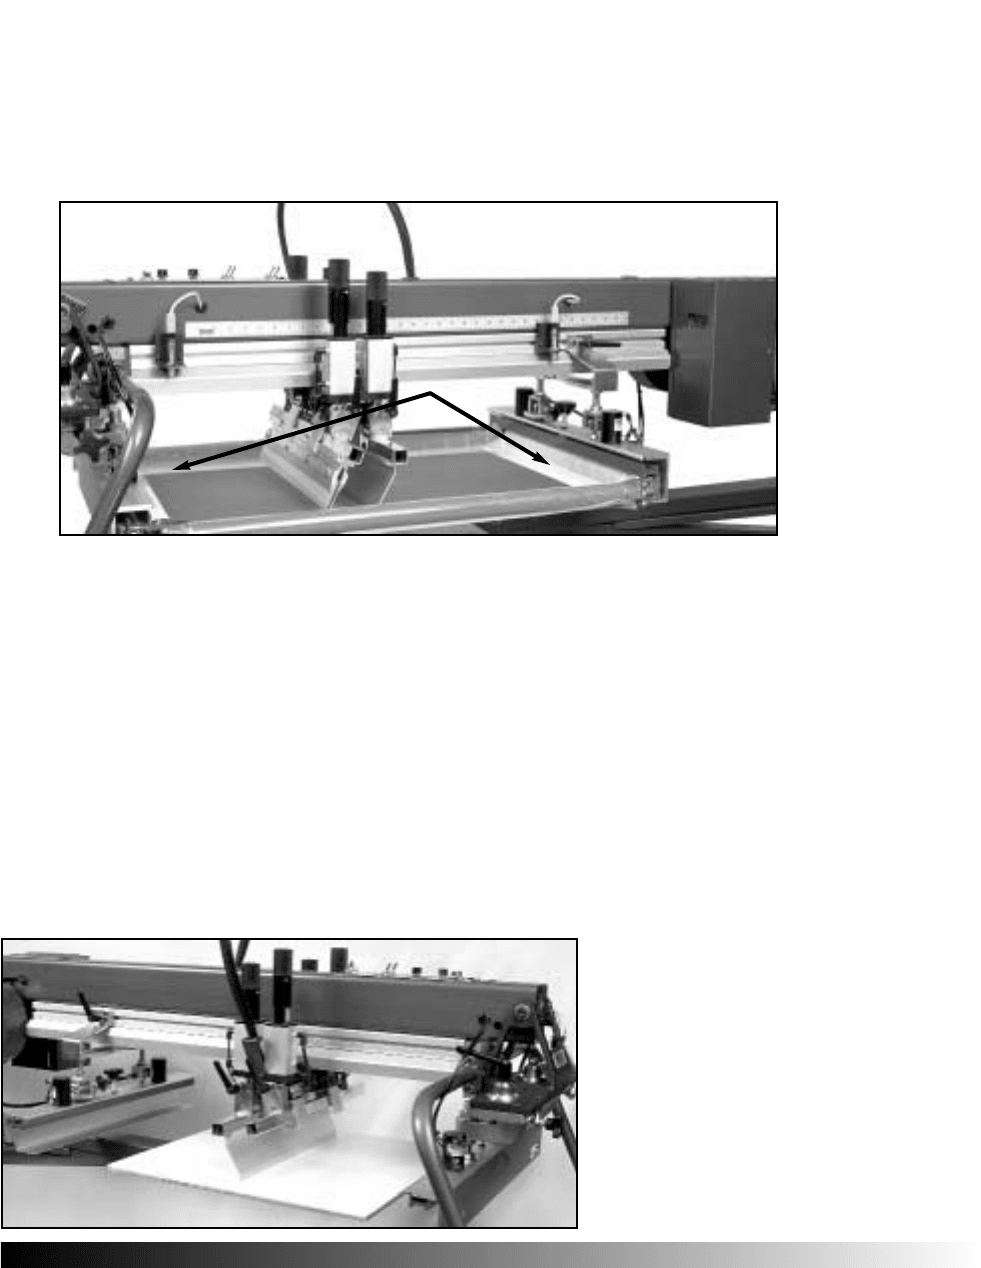
Figure 4.14 This shows the stroke length adjustments on a Challenger II press. The proximity switches
sense the presence of the carriage and are infinitely adjustable with in the stroke limits. For calibration pur-
poses, run the longest stroke length possible.
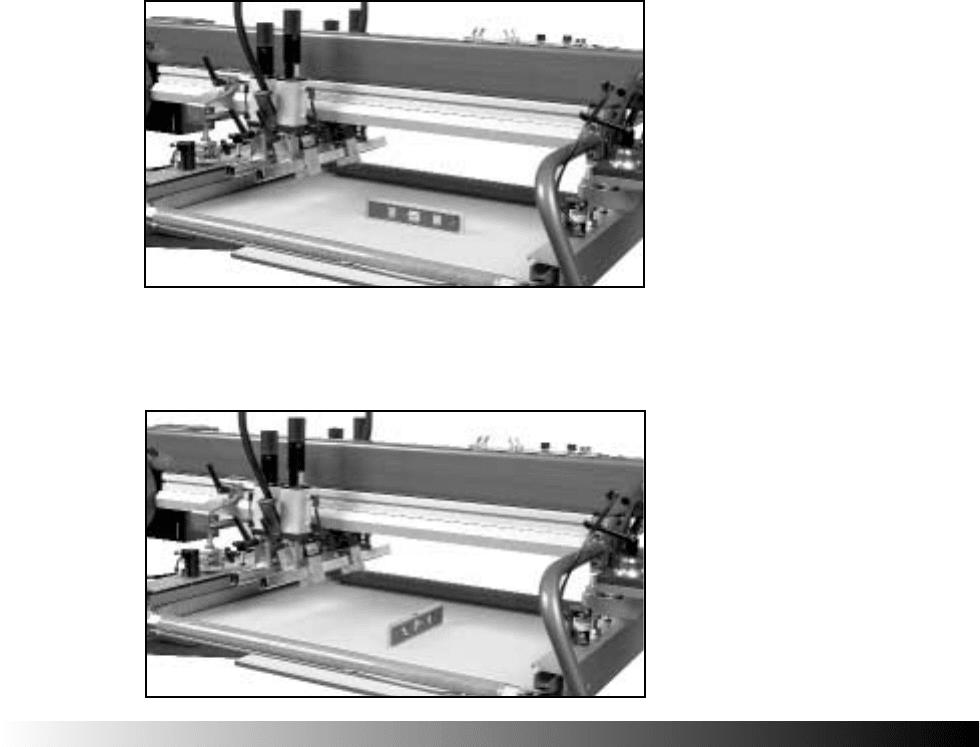
Figure 4.15 This shows
the floodbar in position
to test the parallelism of
the platens. This test
should be run in
sequence here for the
calibration process. It
should also be run at
the weeks end to check
for any inconsistencies
between platen settings
and carriage drives.
Use Floodbar To Check
Consistent Platen Height
PAGE
44
. 19
PAGE
44
. 20
20. Insert a flood bar on the squeegee bar in press-head number 1.
21. Set the stroke length at maximum.
22. Raise the carousel.
23. Lower the flood bar to barely in contact with platen number 1.
24. Manually push carriage front to rear to check for parallelism.
25. Remove floodbar.
SSeett SSccrreeeenn HHoollddeerrss LLeevveell
26. Place tensioned screen in screen holders do not clamp screen in.
27. The screen must be perfectly flat.
28. Place torpedo level front to rear on screen mesh.
29. Adjust screen holders until mesh reads level.
30. Place level side to side and adjust until mesh reads level.
Chapter 4
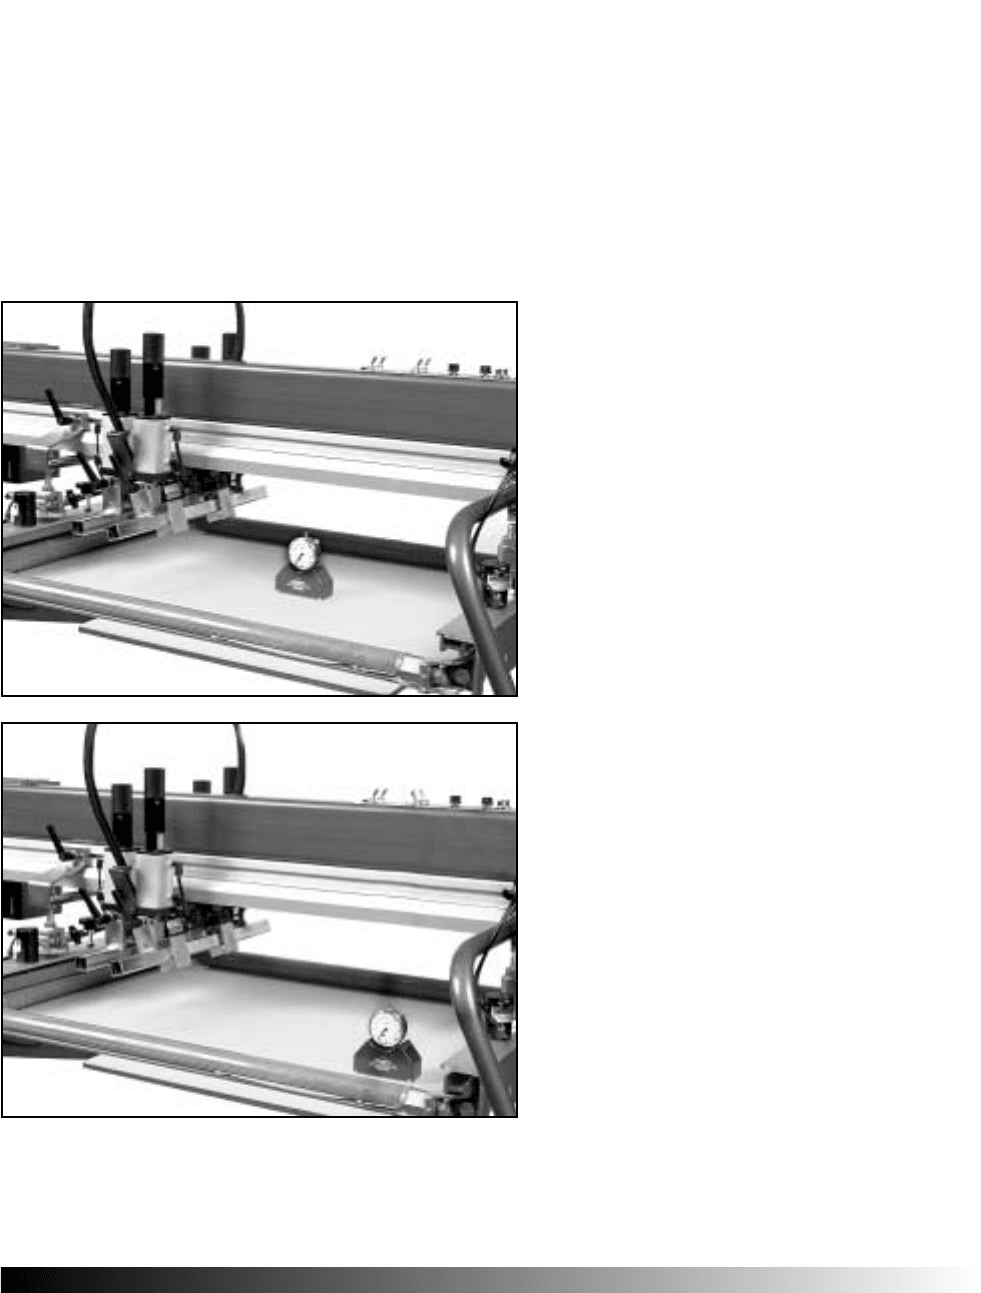
Figure 4.16a This shows the torpedo level
on the mesh checking the level front to rear.
Set this direction to level before setting the
side-to-side. Before locking screen into place,
be certain that the screen is flat on both the
front and rear holders.
Figure 4.16 b This shows the torpedo
level set to check the side-to-side level of the
mesh. Side-to-side level should be set after
front-to-rear level.
PAGE
44
. 21
31. Recheck sides adjust if needed.
32. Recheck sided to side.
33. Once level check for gaps between screen and either holder.
34. Adjust holders to eliminate gap.
35. Recheck level both directions.
36. Use a tension meter to see a change if holders or frame are racked.
SSeett TThhee OOffff-CCoonnttaacctt DDiissttaannccee
37. If you will use shims read on. If you will use a meter see step 38a below.
Press Calibration
Figure 4.17a If the screen is racked
(not flat) or the screen holders are not per-
fectly on the same plane or if both condi-
tions exist, there will be a proportional
change in screen tension. This happens if
the frame is twisted into fitting into the
holders. As the tension goes up in one
area, it will go down in another and this
leads to severe tension loss during a press
run.
Figure 4.17b Shows the meter at the
corner of the screen for a before and after
test. Lay the screen into the screen holders,
measure the tension, clamp the screen into
position and take another measurement. If
there is a tension shift, the worst location
for change will be at the corners. Try this
on all four corners if you suspect that the
planes of the screen and the screen holders
are not parallel.
PAGE
44
. 22
38. Insert a tensioned screen in head one.
39. Refer to the table on off-contact distance (page 4.9).
40. 3/32-inch (0.093) is typical for 20 30 N/cm² screens.
41. Place four shims 1.5-inches from each corner of the platen.
42. Move platen one into position under head one.
43. Raise the carousel and feel for the shims under the mesh.
44. Adjust head until four shims touch the mesh without protruding.
45. Use the threaded rod adjustments on the frame holders.
46. Engage the front and rear screen clamps to check your accuracy.
47. There should be a dull thud, no frame ringing or movement.
48. Once you have set the height, securely tighten the jam nuts.
CCoomm
pplleettee HHeeaadd AAnndd PPllaatteenn SSeettttiinnggss
49. Repeat steps 19 to 35 for all heads.
50. Reinsert flood bar as in head 1, and check parallelism of platen to carriage.
51. Readjust heads if needed.
52. Check with flood bar weekly.
SSeett TThhee OOffff-CCoonnttaacctt DDiissttaannccee UUssiinngg AA MM
eetteerr
38a. Set central off-contact at its highest position.
39a. Refer to figures 4.4 and 4.5 for off-contact distance.
Chapter 4
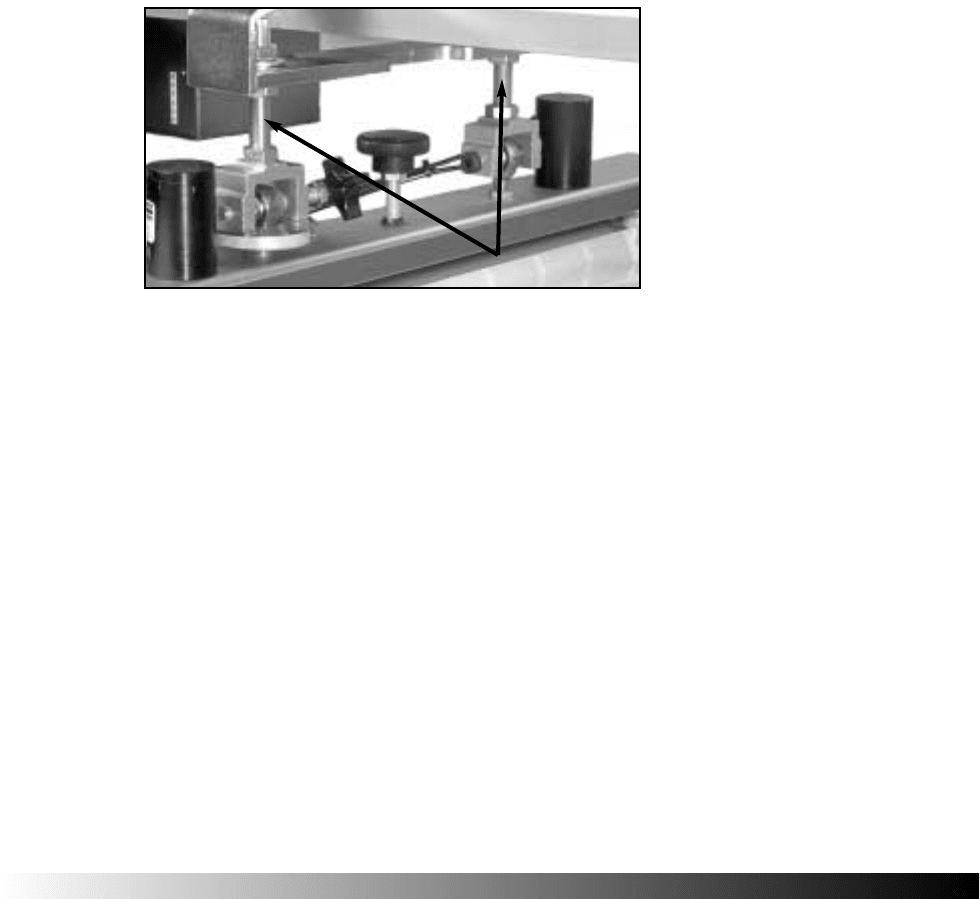
Figure 4.18 This shows the rear
screen holders threaded rods
used to adjust the off-contact dis-
tance. There is a similar pair for
the adjustment of the front screen
holder. The rear holder should be
off of the platen when its height
and level are set.
Threaded Shafts
PAGE
44
. 23
40a. Use off-contact meter to set off-contact distance.
41a. Use a Sharpie marker to mark the center of the mesh.
42a. Place meter on center mark.
43a. Raise or lower screen to the required distance.
44a. One complete revolution on the bolts = 0.060.
45a. Recheck level of screen.
46a. Repeat off-contact setting and leveling if necessary.
An off-contact meter is a simple
device that allows very accurate
settings of the screens and
platens. To determine if you
should use a meter you must char-
acterize your operation and cur-
rent conditions versus the time
invested in custom tuning the
press.
You can best gauge the need by
appraising the number of ripped
screens, the interruptive downtime
that occurs, the frequency of
troublesome platens or heads
that just dont print the same as
the rest.
Coins and washers have been used
for years and even those printers
might get good prints but they
will not be as accurate as those
who meter the results. The indus-
try used to use coins to check the
tension of the screenssome still
do!
There are four types of meters:
analog dial indicators (as shown),
digital dial indicators and electron-
ic position meters. These are listed
as to price with the electronic
meters as the most costly.
Before you choose one be sure
that it fits the level of technical
accuracy of the balance of your
process and beware that it takes
more time to custom calibrate
with a meter than with washers or
coins, but if your needs are high,
you will be glad that you took the
time.
Press Calibration
Of
Of
f-Contact Me
f-Contact Me
t
t
er
er
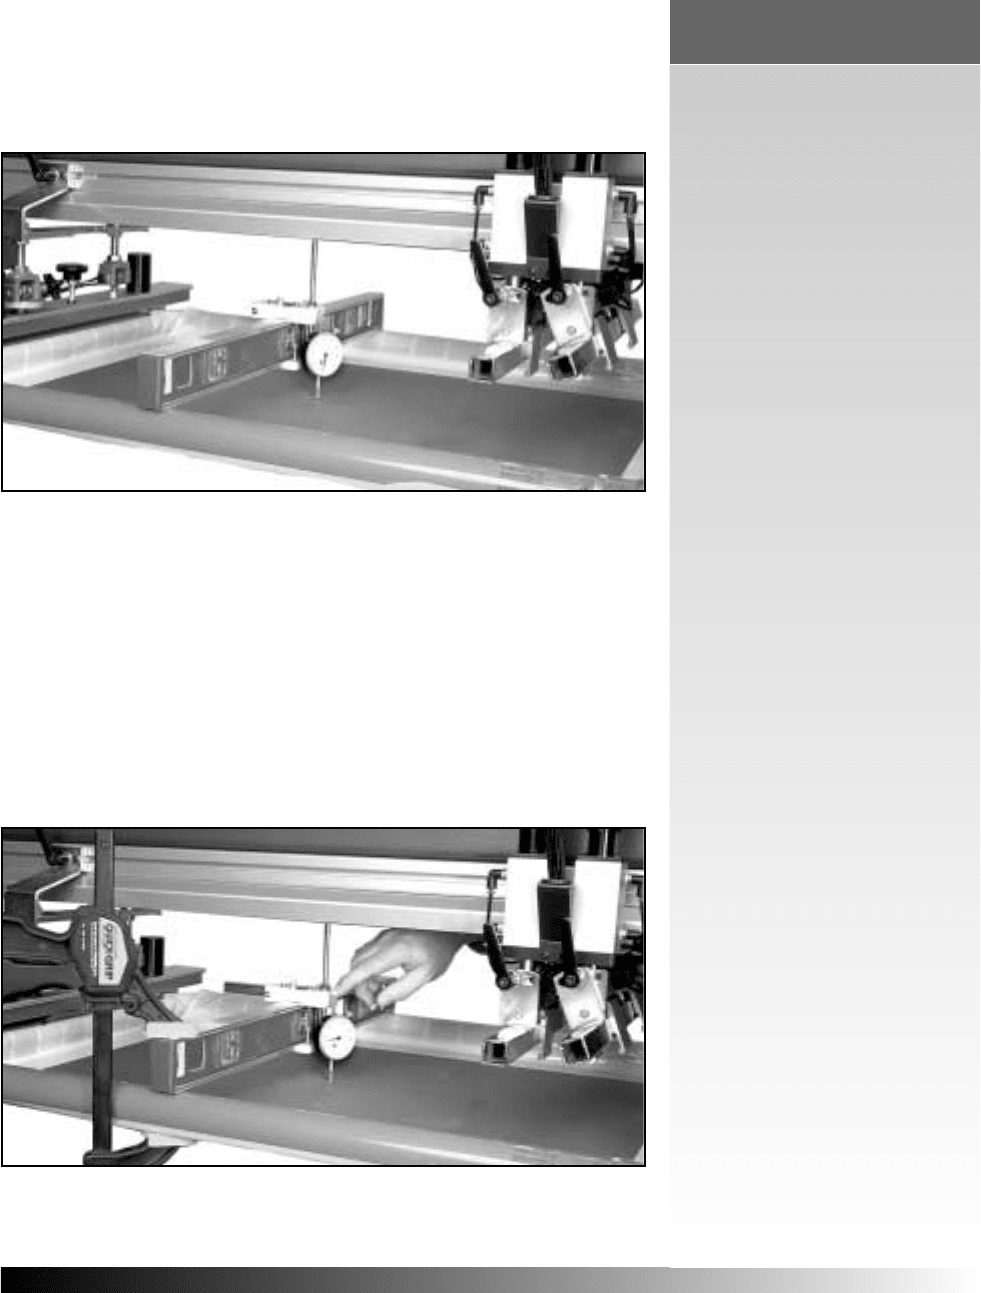
Figure 4.19 This shows the Challenger II head with a frame, level and off-contact meter.
The meter should be located over a center spot on the mesh, marked with an ink pen for accurate
relocation once the meter is moved.
Figure 4.20 This is a photo of the off-contact meter clamped into position. The meter is set
to zero; the top of the dial indicator is depressed until the mesh reaches the platen. The differ-
ence in the zero setting and the new distance is the off-contact distance.
PAGE
44
. 24
47a. Now set the platen height and level.
48a. Adjust the height of platen number one to the preferred distance.
49a. Now reset its level, front to rear and side-to-side.
50a. Recheck its height once again and adjust if needed. If the height is moved,
you must recheck the level.
51a. Repeat this process until the height is correct and the platen is level.
CChheecckk PPllaatteenn HHeeiigghhtt
Once all platens are leveled use the following procedure to check the results.
52a. Remove off-contact meter and tensioned screen.
53a. Insert flat open screen and replace meter.
Chapter 4
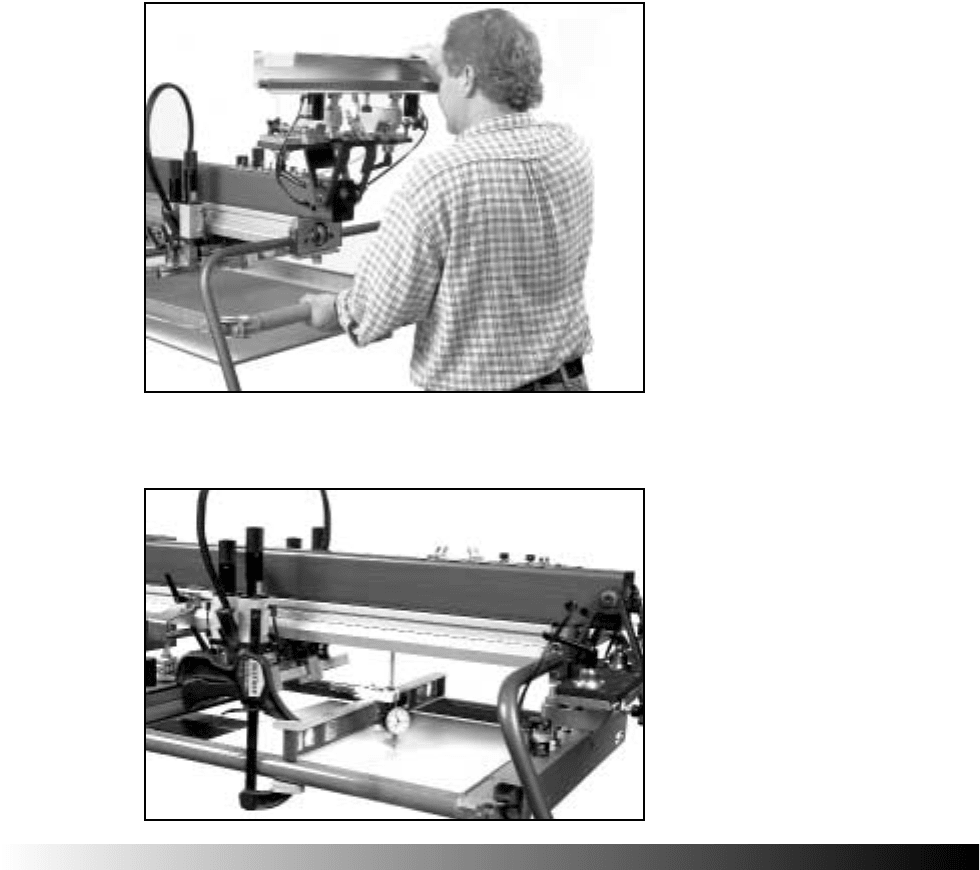
Figure 4.21 Before you proceed to set the
platen height remove the tensioned screen and
meter from the press. You will need the screen
later and the meter immediately following this
step.
Figure 4.22 This is a shot of an open
screen without mesh. The screen must be flat
and is used to set the precise height of the
platens. Put a mark on the platen center for
reference. Insert the screen and meter, clamp
both into position. Raise the needle of the
meter and then raise the platens. Let the nee-
dle go and read the distance
PAGE
44
. 25
54a. Measure the distance to platen 1 and record it.
55a. Check to see that all platens are at the same height and level.
56a. Remove open screen and meter.
57a. Reinsert flood bar as before and check parallelism of platen to carriage.
58a. Readjust platens if needed.
Squeegee Blade
The squeegee blade tends to be under estimated and over worked. It has the abili-
ty to control the quality of the print if the operator accurately interprets the con-
ditions on press. All too often it gets folded in half due to a lack of press cali-
bration, small side ink wells and a very large dose of force.
Perhaps you have noticed that the same blades that you used to use on your man-
ual press dont work as well on an automaticif so there are good reasons:
1. The press does not get tired.
2. The press is insensitive to blade flexure.
3. There is no too little pressure.
4. The press may be out of calibration.
5. The inkwells are (generally) smaller.
6. There is no prescription for selecting or setting the blade.
It is these six points that we will address in this chapter. The finesse of a manual
printer is at times that of an artist or craftsman but the forte of an automatic is
high-speed replication of any image that has been well engineered. The variables
Press Calibration
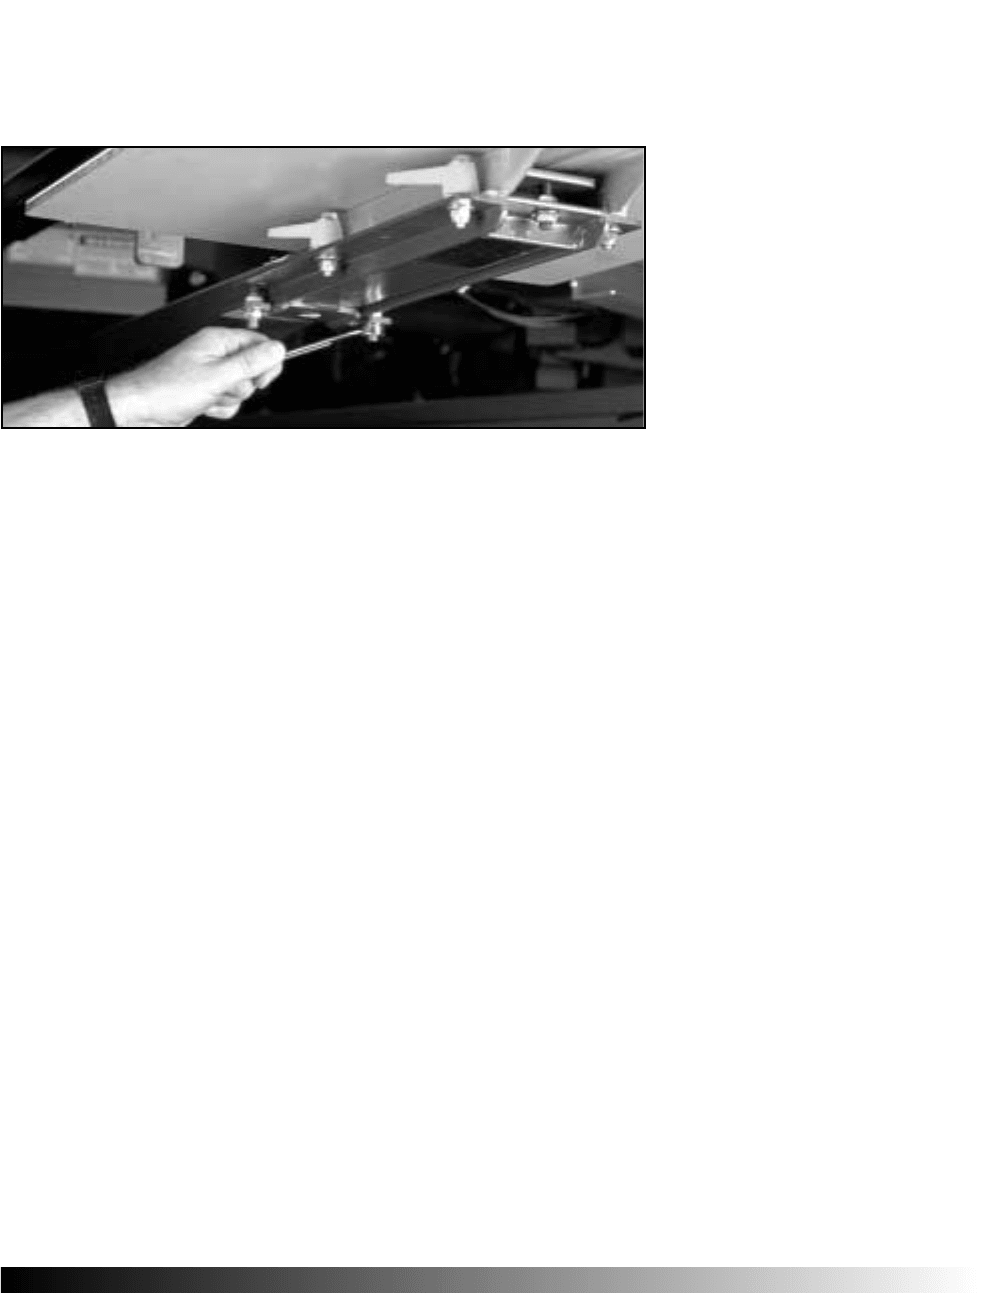
Figure 4.23 This
shows the technician
adjusting the level and
height of the platen
from the underside. It is
best to adjust side-to-
side level and then to
set the height with the
front to rear
adjustment.
PAGE
44
. 26
and parameters of the squeegee are at the core of this engineering and that is our
focus here.
PPuurrppoossee
The purpose of the squeegee blade is to:
1. Contact mesh to platen.
2. Develop constant pressure across mesh.
3. Inject ink into mesh openings.
4. Clean residual ink from mesh surface without leaving ink trails.
5. Apply zero force on the platen.
1. Contact mesh to platen this always happens or the ink would not transfer
through the mesh and onto the garment. However it is a prerequisite for the
squeegee. Not only should the blade contact the mesh to the platen but also it
should do so consistently from end to midpoint of the blade.
2. Develop constant pressure across mesh this one rarely happens particu-
larly with a large squeegee on a screen with a small ink well or on an uncalibrated
Chapter 4
1
5
4
3
2
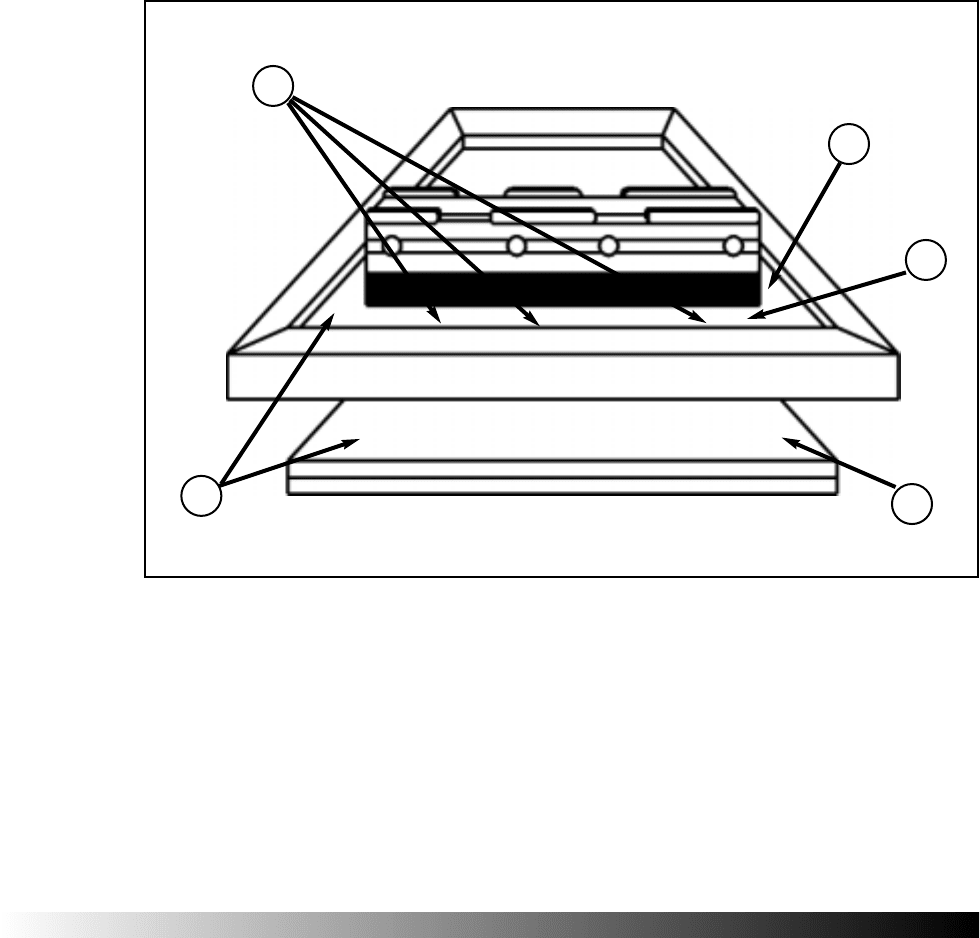
Illustrated Model Of Squeegee Blade
Figure 4.24 This is a model of the elements listed above as the purpose of the squeegee blade. The explanations for these
facets of the blade function follow.

PAGE
44
. 27
press. This pressure variance is the cause of a lot of problems, ink deposit,
ripped screens and image distortion.
3. Inject ink into mesh openings if numbers one and two in this list occur
then you will be injecting the ink into the mesh openings as opposed to wiping
the edge of the blade onto the rim of the mesh. The blade must exert enough
shear stress on the ink to drop its viscosity sufficiently to cause it to flow through
the tunnel of the mesh.
4. Clean residual ink from mesh surface without leaving ink trails this
facet insures that the blade is not hydroplaning across the ink surface but rather
coming into intimate contact with the surface of the mesh. Also that the edge of
the blade fits the surface of the mesh well enough to keep all ink in front of the
blade.
5. Apply zero force on the platen this is the ideal setting. If the blade does
not deflect initially (under the load of the mesh) and the ink well is large enough,
it is possible to achieve the setting. The balance between blade pressures, mesh
tension and off-contact distance must all be accurately set.
To achieve the five goals requires that the blade be selected with the process limi-
tations in mind. To assist you in the selection we have detailed the facets of the
blade in the next paragraphs.
HHaavvee EEnnoouugghh BBllaaddeess OOnn HHaanndd
Too many printers have only one set of squeegees, just like an auto mechanic
having only one wrench in his toolbox, a ½-inch open-end wrench. And then
insisting Ill make it fit all the nuts and bolts in your car. When he needs a ¾
inch wrench he angles the ½ inch very steep. For the time he needs a 9/16 he
applies more force to the half-inch wrench. He goes slowly and turns twice as
much when he needs a 3/8-inch open end and speeds up and grinds some off
the edge for a ¼ inch nut. Of course this is ridiculous but in our case because we
can force the fit, we tend to ignore the fit of the blade to meet the needs of the
set-up and the demands of the print. The mechanic that we would allow to work
on our car selects the proper tool for the job and on press, you should do the
same by having adequate blades and holders.
To allow quick set-ups and optimal print results with a selection of blade length
(refer to page 4.29) you should have a back up set or two. It is always wise to use
the shortest blade length possible. There may come a time when you need to
dress the edge of the blade, sharp or dull to accommodate your ink deposit. But
Press Calibration

PAGE
44
. 28
never have the press waiting while you cut the length or dress
the edge of a blade. If your press is reasonably calibrated you
will find that a set of seventy durometer blades and a set of
eighties will suffice for all of your needs. These three factors,
length, edge and durometer indicate that you should have sev-
eral back-up blades. Keep in mind that if you continually
switch out polyurethane blades in the holders, you should
sharpen the blade prior to use at every change.
CChhaarraacctteerriissttiiccss OOff TThhee OOrriiggiinnaall BBllaaddee
We caution you to not confuse the concept of a recipe and its
ingredients when selecting a squeegee blade. The component
parts of the blade all interrelate and taken out of the context
of your printing environment, they are relatively meaningless.
For example if you are preoccupied with durometer and insist
on a 65° blade you might consider the following: what you are
probably looking for is the proper flexure of the blade and
not its durometer. Flexure is comprised of the unsupported
height (out of the squeegee holder), the thickness, the shape of
the blade and oh yes, the durometer. We will define the param-
eters of the blade and then offer a method of evaluation,
selection and usage of the squeegee. Characteristics of the
Original Blade is the first of three categories which includes
Prepared to Print and On-Press Performance.
Durometer is the measure of hardness of the blade.
Durometer is often but incorrectly viewed as the single influ-
ence of the blades tendency to deflect. Durometer is very sig-
nificant but as a singular predictor of blade performance, it is
totally inadequate.
This general grade of polyurethane is gauged on a Shore A
scale developed to measure plastics of this range of hardness.
The scale runs to 100 at that point the blade would be so hard
that another index or standard would be needed to measure its
hardness. Most screen-printing is done with single durometer
blades between 65° and 80° durometer, the higher the number
the harder the material.
With high tack plastisols, small inkwells and the multi-color
The blade comes into contact
with the mesh and continues to
push the mesh to the plane of the
platen without [the blade] deflect-
ing. At the point that the mesh
contacts the platen, the pressure
injects the ink into the mesh
openings. The pressure between
the blade and the mesh is equal
across their interface and the
force of the blade on the platen is
zero.
It is this condition that we strive
for but if you are still striving for
this condition you must first have
many other aspects into calibra-
tion.
Of course the press must have the
three critical planes parallel to
each other: the platens, the car-
riage drives and the screen holders
(refer to page 4.15 for details).
The tension and the off-contact
must combine to create consistent
pressure at all points where the
blade and the mesh come into
contact (refer to page 4.38 for
details). The ink should have a
low tack level and be very shear
thinning (refer to page 3.30 for
details).
Such a scenario will allow you to
run hassle free at top press speeds
with a minimum of downtime.
Each shirt would be a carbon-
copy of any other and the quality
opportunities would meet the
most demanding job.
If you are still searching for this
setting, study this chapter but only
after Chapters 1, 2, 3 and 4.
Chapter 4
The Ideal Scenario
The Ideal Scenario
