Clarke Joe, Lynch Colleen C. M&R Professional Screen Printing Series
Подождите немного. Документ загружается.

PAGE
33
. 51
most accurate but it has trade-offs. It cannot be staged prior to the run, you will
need a gram scale and it requires an accurate estimate of grams per gallon per
color.
Method Two is simpler, can be done in plant and requires a very accurate gram
scale (tenths of a gram resolution). Consistency is implied in this test so it is very
important that you do not vary in the test methods. A swatch is run through the
dryer to remove all moisture, it is immediately printed and fused and then the
swatch is weighed again. The difference is then taken as a percentage of the
weight of a gallon of ink.
Method Three is to estimate the mileage by image dimensions. This is often times
the most real-world of the three for it is fast, reasonably accurate and can be
done anywhereany time. It implies the reality that the unit cost of ink is
insignificant in the big picture of screen printing. It uses an estimate of deposit
and an estimate of the area of the image per-color and computes a quantity of
ink. This method is only as accurate as the estimates used.
Inks
0
40
80
120
160
200
240
280
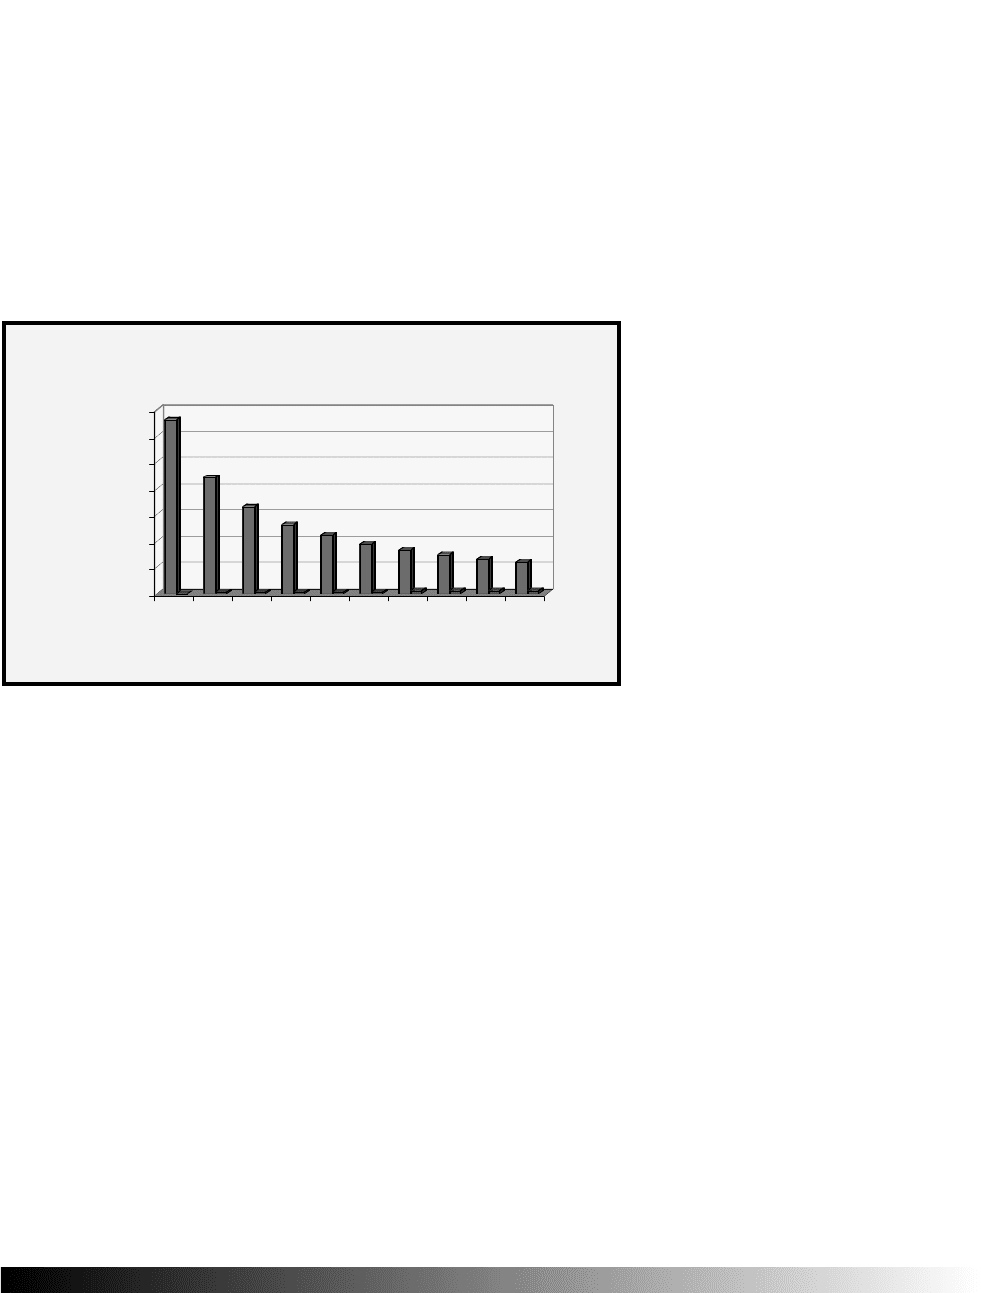
Dozens Per Gallon
1.0 1.5 2.0 2.5 3.0 3.5 4.0 4.5 5.0 5.5
Approximate Mils Deposit
Dozen Per Gallon @ 50% Coverage
Figure 3.30 Dozens
per Gallon per color is the
final graph in the chapter.
The horizontal axis ranges
from one to five and a half
mils deposit. The vertical
axis ranges up to 280
dozen. It is an estimator of
a color at a nominal one
half square foot of cover-
age. So 89 dozen shirts
could be printed at 3 mils
deposit and 50% coverage.
Chapter
4
PRESS
CALIBRATION
II..PPrreessss CCaalliibbrraattiioonn
OOffff-CCoonnttaacctt
RRaannggee OOff OOffff-CCoonnttaacctt DDiissttaanncceess
OOffff-CCoonnttaacctt AAnndd 6655 LLppii HHaallffttoonneess
CCeennttrraall OOffff-CCoonnttaacctt AAddjjuussttmmeenntt
TTeennssiioonn AAnndd OOffff-CCoonnttaacctt DDiissttaanncceess
PPeeeell RRaattee
IIII.. AAlliiggnniinngg TThhee PPrreessss
HHooww TToo CCaalliibbrraattee AA PPrreessss
IIIIII.. SSqquueeeeggeeee BBllaaddee
PPuurrppoossee
HHaavvee EEnnoouugghh BBllaaddeess OOnn HHaanndd
CChhaarraacctteerriissttiiccss OOff TThhee OOrriiggnnaall BBllaaddee
PPrreeppaarriinngg TToo PPrriinntt
OOnn-PPrreessss PPeerrffoorrmmaannccee
TThhee SSoolluuttiioonnNNoott TThhee PPrroobblleemm
IIVV.. RReeggiissttrraattiioonn
TTrrii-LLoocc RRaappiidd RReeggiissttrraattiioonn SSyysstteemm
IIssssuueess NNoott SSoollvveedd BByy TTrrii-LLoocc

PAGE
44
. 3
Press Calibration
Press calibration is the process of interpreting your printing
standards and establishing a press setting that optimizes those
standards. Because the standards vary from shop to shop and
many operators do not adhere to a standard specification,
M&R has developed the Gauntlet and Challenger presses to
offer selective control to compensate for any deficiencies in
your set-up. Calibration is not a setting or a position but a con-
dition that improves over time.
Press calibration is done in part by the installer as they insure
the level of the indexer, center shaft, press heads and platens.
On a micro level it is wise to custom calibrate your press to
print with optimum efficiency under your conditions. You
should first characterize your printing needs, image tolerances
and dimensions and the like. As your standards change so does
the need to calibrate your press. Those who are doing higher
speed, higher resolution and more sophisticated printing will
find a greater need to custom calibrate than a shop that is
comfortable at a lower standard. Press calibration includes the
following parameters:
1. Indexer levelthe center shaft of the indexer must
be plumb or risk undue stress on the bearings and
none of the other elements of press calibration can
be set with only a level.
2. Carriage levelthe carriage drives the squeegee and
floodbar and must run parallel to the plane of the
mesh and the plane of the platens.
3. Platen positions level and set to a relative height.
This is most critical on a multi-colored automatic
press. All platens must not only be flat and level but
must all be on the same plane.
4. Screen position left to right front to back, level
and set to a relative height. Specifically the mesh
must be parallel to the carriage, and to the platens.
5. Squeegee stroke length, speed, angle and pressure.
Setting the off-contact distance is
unquestionably the most critical
adjustment on the press since it
determines ink transfer, image
registration and screen life. Both
the Challenger and the Gauntlet
have as standard, no-tools off-
contact adjustment. This is to
make the change to a different
off-contact setting quick and easy,
it is not intended as a per-print
repair tactic. You want the press to
print as much of the day as possi-
ble, so remember you make zero
profits while you are adjusting the
off-contact setting. You will want
to reduce or eliminate the need to
adjust the off-contact distance on
individual heads by adhering to
the following list:
1. Standardize the screen sizes as
recommended, refer to Screens
chapter.
2. Calibrate your press as needed.
3. Minimize the range of tension
+/- 2 N/cm², refer to Screens
chapter.
4. Use a squeegee 1 longer than
the image.
5. Select a mesh that eases ink
transfer, refer to Screens chap-
ter.
6. Select ink that transfers easily.
7. Select a blade with minimal
deflection.
8. Off-contact distance set with
max stroke lengths.
9. Use single point off-contact
adjustment on the indexer.
Press Calibration
Tips To Reduce Off-
Contact Adjustments

PAGE
44
. 4
Although many of these are adjusted frequently try to keep the fre-
quency to a minimum.
Press calibration is intended to become a macro standard, which is it is done
on regular intervals and therefore eliminates a lot of time wasting when you
should be printing. Press calibration on a micro level would include a lengthy
list of adjustment features for your Gauntlet and Challenger press and these are
detailed in this chapter. These are for on-site re-calibration of the press to com-
pensate for any errors or shortcomings in your set-up. You would never want to
own a press that did not have this ability to adapt on the spot. But it is wise to
rely on these infrequently only as needed and not to make all possible adjust-
ments a part of your press set-up ritual. If it does not add value directly to your
printed image, try and eliminate it.
OOffff-CCoonnttaacctt
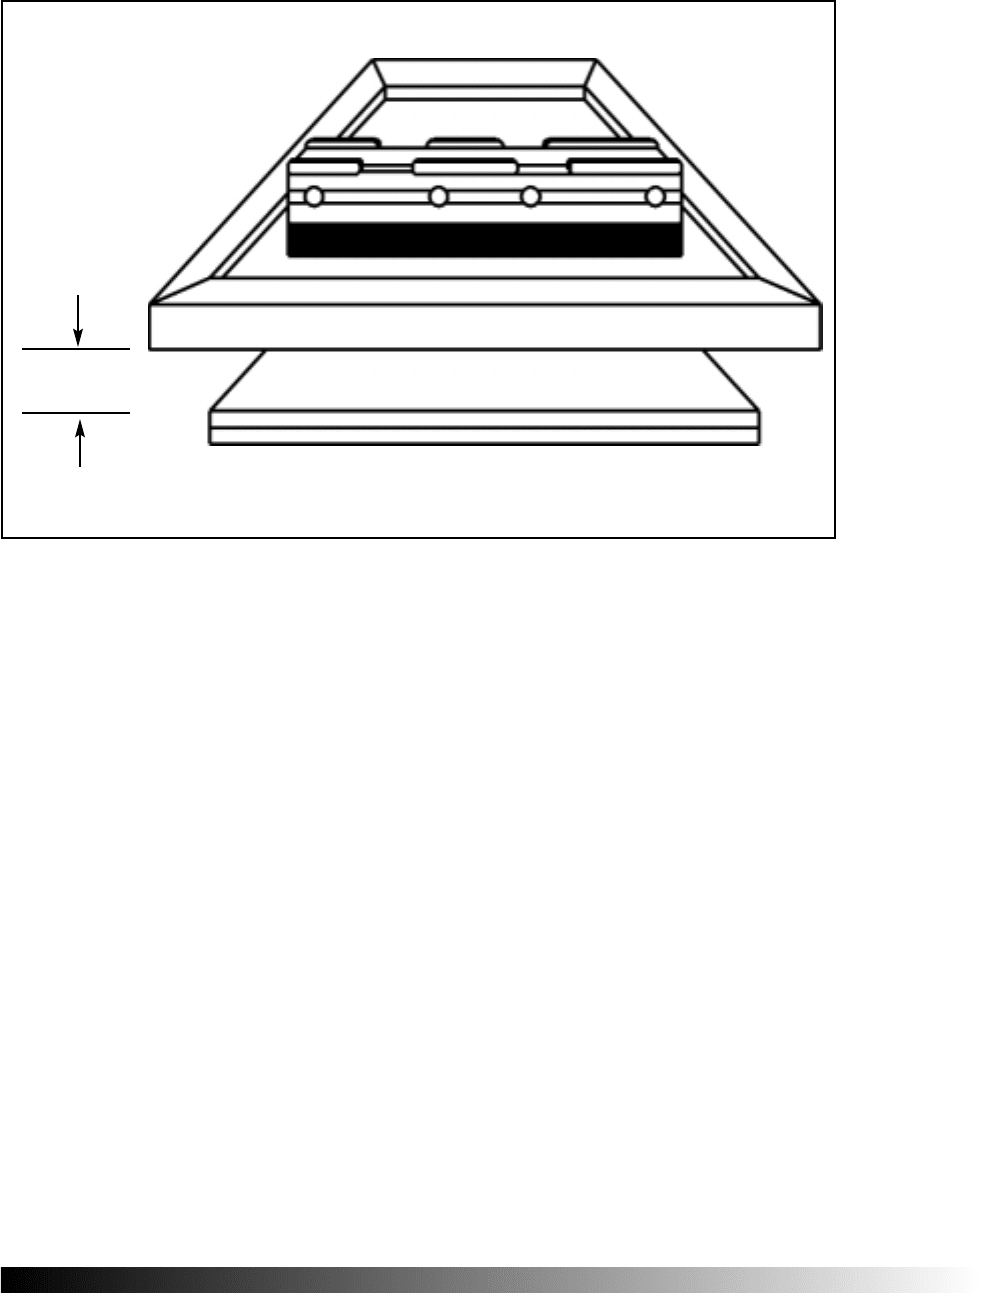
Off-contact distance is the gap between the bottom of the stencil and the surface
of the platen. The gap is necessary for several reasons:
1. Remove the mesh from wet ink after the blade passes over or mesh
marks and smearing would be the result. This will occur if the off-con-
tact setting is too low.
2. Eliminate image stretch in the stroke direction so that the image is
accurately sized. If the off-contact distance is too low, image stretch in
the stroke direction is a result.
3. Increase the force between the blade and mesh at the midpoint of the
blade. Even on a perfectly consistent screen with no variance in ten-
sion, the tension increase at the ends of the blade is far greater than at
the middle of the blade. The off-contact distance must be sufficient to
raise this midpoint to a minimum for ink transfer.
4. Equalize the force between end and midpoint of the blade. In addition
to number three immediately above the force against the mesh at the
ends of the blade should be as close as possible to the force against the
mesh at the middle of the blade.
Although there is only one perfect off-contact distance in any given condition,
that is not a real world approach. We have listed the process of defining your set-
tings so that you can use one off-contact distance and simply adjust with single
point adjusting on the indexer. This device moves the platen up stop position
higher or lower in increments of 1/16 inch (0.063). Once the press is set it is
Chapter 4
PAGE
44
. 5
easy
to shift for fleece, a set of lower tensioned screens or an unusual substrate thick-
ness.
RRaannggee ooff OOffff-CCoonnttaacctt DDiissttaanncceess
There is an infinite range of off-contact distances but only one distance that is
precisely correct for your image tolerance, ink well and tension specifications.
Fortunately we can help you find a setting that allows you to use that one point
for a wide range of press, ink and screen conditions. Below we have listed several
milestones for off-contact distances:
The ideal off-contact distance for image accuracy would be equal to the wet ink
film thickness. After all the mesh would not rest in the wet ink and potential
image sizing would be excellent, and these are two of the criteria of an off-con-
tact gap. Unfortunately conditions are unlikely to permit such a close setting. In
the real world, there are several downsides to this extreme: First there would be
insufficient contact pressure between the mesh and the blade at its mid-point.
Second at all but extreme tension levels, there would likely be excessive drag of
the mesh and the image would mis-register in the stroke direction. Third none of
the press conditions or settings is likely to operate at such a tolerance.
Press Calibration
Off-Contact Distance
Figure 4.1 This illustrates the gap between the bottom of the screen and the top of the platen, the off-contact distance.
Off-contact distance is one of the first settings on press; it must be uniform and the proper distance on all platens.
PAGE
44
. 6
The off-contact distance is insufficient if and when there is image stretch in print
stroke direction. This causes misregistration and smearing of the details or edges
of the image on the far edge of the stroke. This ranges from the wet ink film dis-
tance up to the level of mini-
mal contact pressure between
blade and mesh.
The minimum off-contact
distance is that gap between
mesh and platen, where the
contact pressure between
blade and mesh is sufficient at
the midpoint of the blade. It
is apparent that this distance
will occur closer to the platen
as the tension level of the
screen increases but this is
not an absolute. Tension
alone is not enough to equal-
ize the squeegee / mesh pres-
sure at the midpoint of the
blade.
The optimum off-contact dis-
tance is that plane below the
image tolerance based on ink
well. It raises the static ten-
sion of the mesh to dynamic
tension without image stretch
and equalizes contact pressure
between the ends and the
midpoint of the blade and
mesh. As this is the most crit-
ical setting on any press, it is
wise to choose your products
and tailor your processing to
accommodate the optimum
distance.
The maximum off-contact distance is that which will achieve the image tolerance
but any more than this will exceed the image tolerance. It is predicated on the
Chapter 4
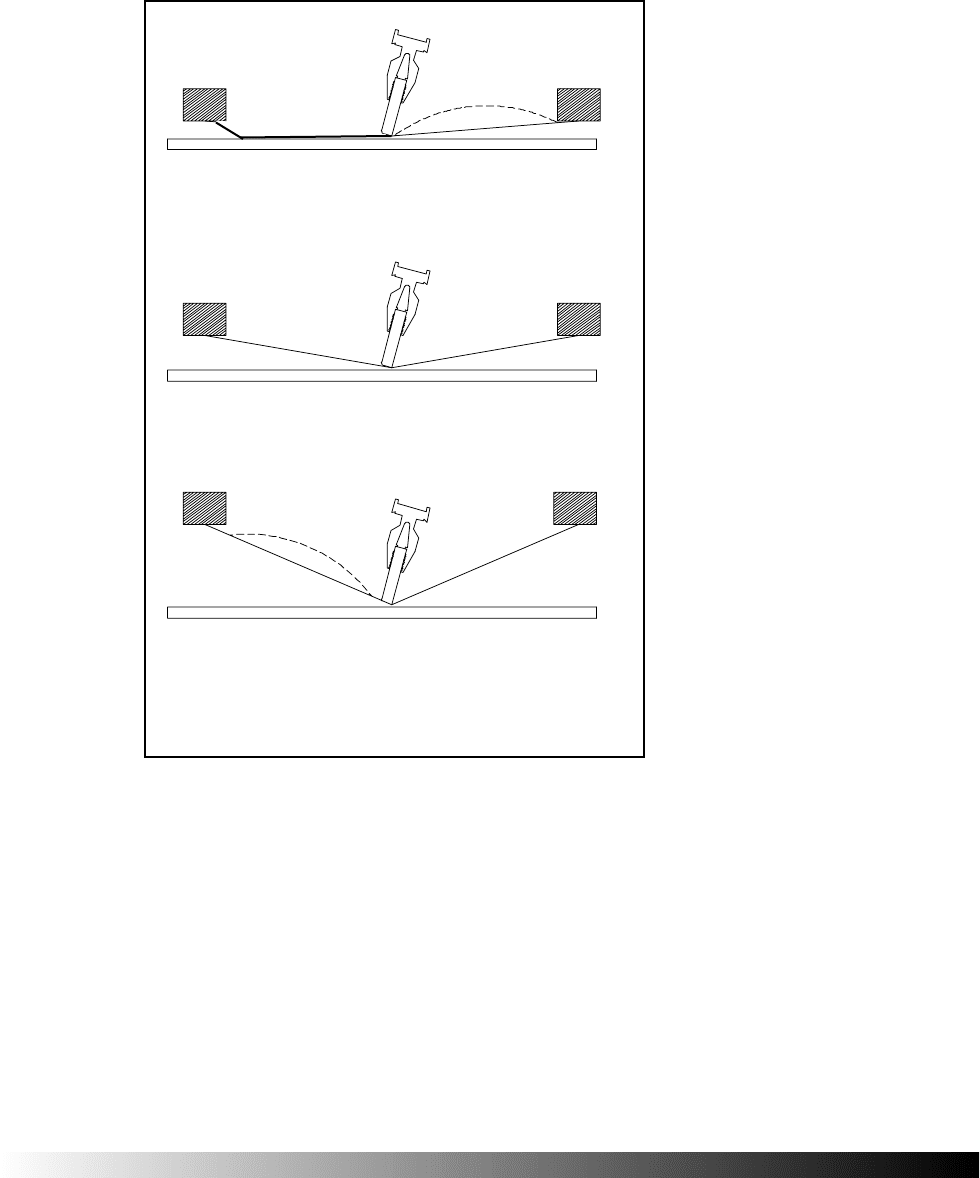
Figure 4.2 This drawing shows positive screen lag is a result of insuf-
ficient off-contact distance and tension for the conditions. It results in the
screen sticking to the shirt after the squeegee passes. The result is mesh
marks, smearing and blurring. Zero screen lag is a condition that exists
when the speed at which the screen mesh lifts from the image is exactly the
same as the squeegee speed. This is the goal and an indication that the off-
contact and tension are in balance with your press and ink. Negative
screen lag is a result of excess tension and off-contact distance. This one
requires a trained eye focused on the blade and mesh. It is difficult to see
but causes problems nonetheless. It is a symptom of ripped and burst
screen mesh.
Permit Zero Screen Mesh Lag
a. positive
b. ideal (zero lag)
c. negative
PAGE
44
. 7
size of the minimum ink well, and the tolerance of the image. It is wise to run as
close to the maximum distance as possible so that the blade / mesh pressure is
equalized from the blade ends to its midpoint.
An excessive off-contact dis-
tance is that which due to the
ink well size will not permit
accurate register of the image.
When printed, the image is
reproportioned as in a photo-
graphic spread. The image is
too large on all four sides, not
only in the stroke direction.
Also this distance accelerates
stencil wear, increases dot
gain and leads to early screen
fatigue. If you are printing
process, it is a setting that will
insure progressive moiré.
The ideal off-contact distance
for image accuracy equals the
wet ink film thickness. The
off-contact distance is insuffi-
cient if and when there is
image stretch in the print
stroke direction. The mini-
mum off-contact distance
where the contact pressure
between blade and mesh is
sufficient at the midpoint of
the blade. The optimum the
plane below image tolerance
based on ink well. It raises
tension without image stretch
and equalizes contact pressure
between the blade and mesh. The maximum off-contact distance is that which
will achieve the image tolerance but any more than this will exceed the image tol-
erance. An excessive off-contact distance is that which due to the ink well size will
not permit accurate register of the image.
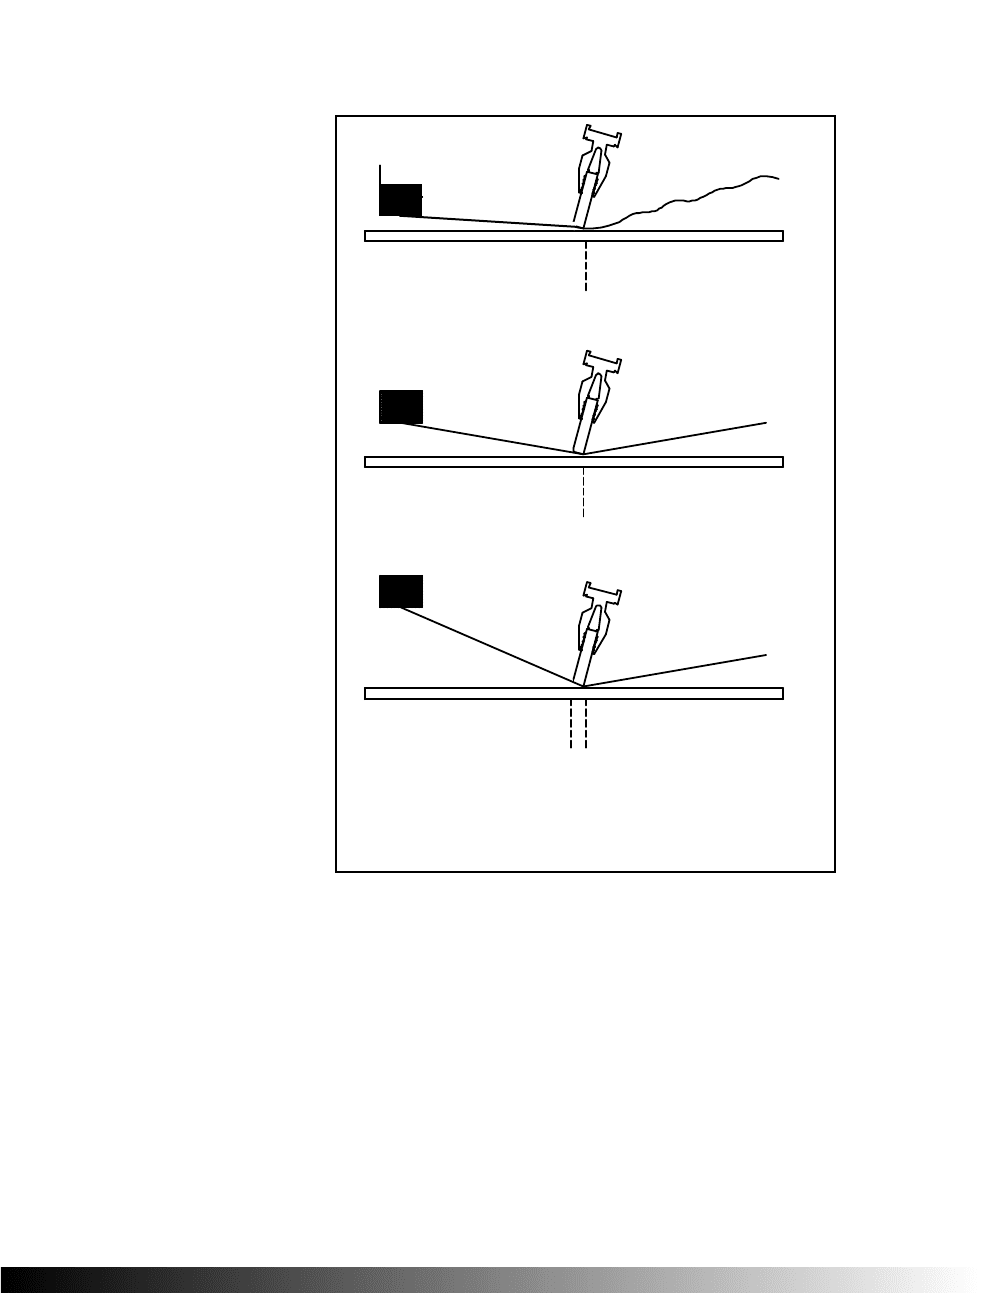
Press Calibration
Three Off-Contact Settings And Image Size
Figure 4.3 This illustrates the effect of the three possibilities of off-
contact distance; too low, correct and too high. The drawing at the top
shows an off-contact distance that is too low and resulting in image stretch
in the squeegee stroke direction. The middle drawing shows the correct off-
contact distance and the image is relatively un-distorted. The bottom draw-
ing shows excessive off-contact distance and results in an oversized image
on both sides of the blade. This re-proportioning is similar to a choke or
spread image in pre-press.
c. high
b. ideal
a. low

PAGE
44
. 8
OOffff-CCoonnttaacctt AAnndd 6655 LLppii HHaallffttoonneess
The following graph is offered as a guideline to allow you to
see the requirements for off-contact distances to hold maxi-
mum tolerances for a 65-line halftone print. Note that this
does not insure minimum tolerances (see above). The reason
that it does not is that the press conditions and the screen ten-
sion level must support a minimal distance.
CCeennttrraall OOffff-CCoonnttaacctt AAddjjuussttmmeenntt
Standard on M&R Gauntlets and Challengers is central off-
contact adjustments. In practice it allows you to standardize
your off-contact distances as prescribed in this manual and
then with the shift of a lever, below the indexer, the off-con-
tact is changed for the entire press. This allows you to run vir-
tually any group of screen tensions on any apparel such as
fleece, bandanas and tee shirts. Each notch that the lever can
be set into moves the off-contact 0.063 or 63 mils. You may
find that bandanas run best on one level and then one notch
up for tees and a second notch up for fleece. Also you will
want to reset your squeegee pressures and the distance of your
flash units to accommodate the new off-contact setting.
TTeennssiioonn AAnndd OOffff-CCoonnttaacctt DDiissttaanncceess
Static screen tension should support the off-contact distance; it
is not the other way around. The graph below plots screen ten-
sion from 10 to 60 N/cm² against a range of off-contact dis-
tances up to 0.400 or 400 mils. Of course lower tension
screens must be run at higher off-contact distances. But as you
can see in the graph, the slope of the curve flattens as the rela-
tionship between tension and off-contact gap becomes less
extreme.
PPeeeell RRaattee
This section is offered for the M&R Formula and Ultimate
press owners where automatic peel is standard. Peel is the jar-
gon for the incremental lifting of the screen during the print
stroke, directly proportional to the stroke position of the
squeegee. It is comprised of two facets, starting point and rate
Chapter 4
IInnccrreeaassee IIff::
For closer tolerance artwork, a
closer off-contact setting may be
required. Note you may be too
closeyour off-contact distance
may be too lowif and when:
1. Tension is too low.
2. Ink tack is too high.
3. Ink well is very large.
4. Build-up occurs initially in the
central areas of the subsequent
screens.
5. Observe excessive stretch in
the stroke direction.
6. Screen sticks in the center.
7. Squeegee is too soft and
flexible.
DDeeccrreeaassee IIff::
For artwork that is forgiving, clos-
er off-contact may not be needed.
Note your off-contact distance
may be too great if and when:
1. The image is reproportioned
larger.
2. Initial tension is very high.
3. Screen fatigue is rapid.
4. Build-up occurs initially at the
perimeter of subsequent
screens.
5. The ink well is very small.
6. The squeegee is inflexible.
7. You prefer to run a high level
of peel.
Increase Or Decrease
Off-Contact Settings?
