Bhushan B. Nanotribology and Nanomechanics: An Introduction
Подождите немного. Документ загружается.

60 Bharat Bhushan and Othmar Marti
the system. Fast imaging rates are not just a matter of convenience,since the effects
of thermal drifts are more pronounced with slow scanning speeds. The combined
requirements of a low spring constant and a high resonant frequency are met by re-
ducing the mass of the cantilever. The quality factor Q (= ω
R
/(c/m), where ω
R
is the
resonant frequency of the damped oscillator, c is the damping constant and m is the
mass of the oscillator) should have a high value for some applications. For example,
resonance curve detection is a sensitive modulation technique for measuring small
force gradients in noncontact imaging. Increasing the Q increases the sensitivity of
the measurements. Mechanical Q values of 100–1000 are typical. In contact modes,
the Q value is of less importance. A high lateral cantilever spring constant is desir-
able in order to reduce the effect of lateral forces in the AFM, as frictional forces
can cause appreciable lateral bending of the cantilever. Lateral bending results in
erroneous topography measurements. For friction measurements, cantilevers with
reduced lateral rigidity are preferred. A sharp protruding tip must be present at the
end of the cantilever to provide a well-defined interaction with the sample over
a small area. The tip radius should be much smaller than the radii of the corruga-
tions in the sample in order for these to be measured accurately. The lateral spring
constantdepends critically on the tip length.Additionally, the tip should be centered
at the free end.
In the past, cantilevers have been cut by hand from thin metal foils or formed
from fine wires. Tips for these cantileverswere prepared by attaching diamond frag-
ments to the ends of the cantilevers by hand, or in the case of wire cantilevers, elec-
trochemically etching the wire to a sharp point. Several cantilever geometries for
wire cantilevers have been used. The simplest geometry is the L-shaped cantilever,
which is usually made by bending a wire at a 90
◦
angle. Other geometries include
single-V and double-V geometries, with a sharp tip attached at the apex of the V,
and double-X configuration with a sharp tip attached at the intersection [31,138].
These cantilevers can be constructed with high vertical spring constants. For ex-
ample, a double-cross cantilever with an effective spring constant of 250N/mwas
used by Burnhamand Colton [31]. The small size and low mass needed in the AFM
make hand fabrication of the cantilever a difficult process with poor reproducibility.
Conventionalmicrofabricationtechniquesare ideal forconstructing planar thin-film
structureswhich have submicron lateral dimensions.The triangular (V-shaped) can-
tilevers have improved (higher) lateral spring constants in comparison to rectangu-
lar cantilevers. In terms of spring constants, the triangular cantilevers are approxi-
mately equivalent to two rectangular cantilevers placed in parallel [137]. Although
the macroscopic radius of a photolithographically patterned corner is seldom much
less than about 50nm, microscopic asperitieson the etched surfaceprovide tips with
near-atomic dimensions.
Cantilevers have been used from a whole range of materials. Cantilevers made
of Si
3
N
4
, Si, and diamond are the most commonl. The Young’s modulus and the
density are the material parameters that determine the resonant frequency, aside
from the geometry. Table 2.2 shows the relevant properties and the speed of sound,
indicative of the resonant frequency for a given shape. Hardness is an important

2 Scanning Probe Microscopy 61
Table 2.2. Relevant properties of materials used for cantilevers
Property Young’s Modulus (E)Density(ρg) Microhardness Speed of sound (
E/ρ)
(GPa) (kg/m
3
)(GPa) (m/s)
Diamond 900–1050 3515 78.4–102 17,000
Si
3
N
4
310 3180 19.6 9900
Si 130–188 2330 9–10 8200
W 350 19,310 3.2 4250
Ir 530 −≈3 5300
indicator of the durability of the cantilever, and is also listed in the table. Materials
used for STM cantilevers are also included.
Silicon nitride cantilevers are less expensive than those made of other materials.
They are very rugged and well suited to imaging in almost all environments. They
are especially compatible with organic and biological materials. Microfabricated
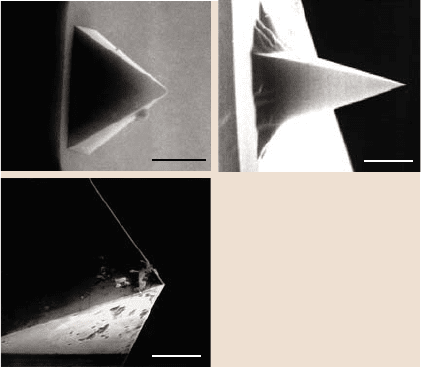
triangular silicon nitride beams with integrated square pyramidal tips made using
plasma-enhanced chemical vapor deposition (PECVD) are the most common[137].
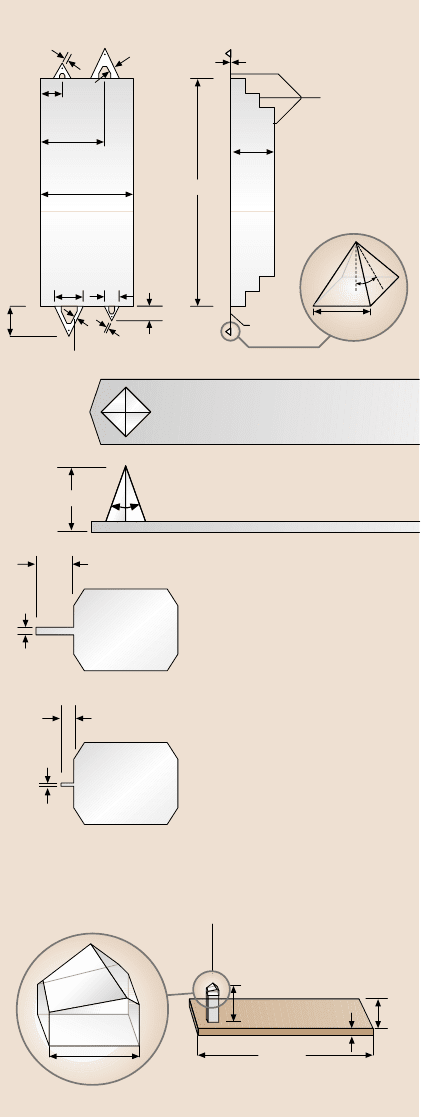
Four cantilevers, marketed by Digital Instruments, with different sizes and spring
constants located on cantilever substrate made of boron silicate glass (Pyrex), are
shown in Figs. 2.15a and 2.16. The two pairs of cantilevers on each substrate meas-
ure about 115 and 193 µm from the substrate to the apex of the triangular cantilever,
with base widths of 122 and 205µm, respectively. The cantilever legs, which are of
the same thickness (0.6µm) in all the cantilevers, are available in wide and narrow
forms. Only one cantilever is selected and used from each substrate. The calculated
spring constants and measured natural frequencies for each of the configurations
are listed in Table 2.3. The most commonly used cantilever beam is the 115µm-
long, wide-legged cantilever (vertical spring constant= 0.58N/m). Cantilevers with
smaller spring constants should be used on softer samples. The pyramidal tip is
highly symmetric, and the end has a radius of about 20–50nm. The side walls of
the tip have a slope of 35deg and the lengths of the edges of the tip at the cantilever
base are about 4 µm.
An alternative to silicon nitride cantilevers with integrated tips are microfabri-
cated single-crystal silicon cantilevers with integrated tips. Si tips are sharper than
Si
3
N
4
tips because they are formed directly by anisotropic etching of single-crystal
Table 2.3. Measured vertical spring constants and natural frequencies of triangular (V-
shaped) cantilevers made of PECVD Si
3
N
4
(data provided by Digital Instruments, Inc.)
dimension Spring constant (k
z
) (N/m) Natural frequency (ω
0
) (kHz)
115-µm long, narrow leg 0.38 40
115-µm long, wide leg 0.58 40
193-µm long, narrow leg 0.06 13–22
193-µm long, wide leg 0.12 13–22
62 Bharat Bhushan and Othmar Marti
a)
Top view Side view
15 nm Au
on this
surface
Square pyramidal
tip (111) face
Pyrex
0.55 mm
Si
3
N
4
0.55 mm
1.05 mm
1.6 mm
3.6 mm
36 μm
21 μm
205μm
122μm
115μm
15μm20μm
193μm
4μm
35°
0.6μm
Contact AFM cantilevers
Length = 450 μm
Width = 40 μm
Thickness =1– 3μm
Resonance
frequency = 6–20 kHz
Spring constant = 0.22– 0.66 N/m
Tapping mode AFM cantilevers
Length =125 μm
Width = 30 μm
Thickness =3–5μm
Resonance
frequency = 250– 400 kHz
Spring constant =17– 64 N/m
Material: Etched single-crystal n-type silicon;
resistivity = 0.01– 0.02
Ω/cm
Tip shape:
10 nm radius of curvature, 35° interior angle
b)
450 μm
40 μm
30 μm
125 μm
10 –15 μm
35°
Gold-plated
304 stainless steel cantilever
Diamond tip
bonded with epoxy
20 mm
0.2 mm
0.2 – 0.4 mm
20 μm
0.15 mm
c)
Fig. 2.15. Schematics of (a)
triangular cantilever beam
with square-pyramidal tips
made of PECVD Si
3
N
4
,(b)
rectangular cantilever beams
with square-pyramidal tips
made of etched single-crystal
silicon, and (c) rectangular
cantilever stainlesssteel beam
with three-sided pyramidal
natural diamond tip
2 Scanning Probe Microscopy 63
2μm
5μm
10μm
a) b)
c)
Fig. 2.16. SEM micro-
graphs of a square-pyramidal
PECVD Si
3
N
4
tip (a),
a square-pyramidal etched
single-crystal silicon tip (b),
and a three-sided pyramidal
natural diamond tip (c)
Si, rather than through the use of an etch pit as a mask for the deposited mate-
rial [139]. Etched single-crystal n-type silicon rectangular cantilevers with square
pyramidal tips of radii <10nm for contact and tapping mode (tapping-mode etched
silicon probe or TESP) AFMs are commercially available from Digital Instruments
and Nanosensors GmbH, Aidlingen, Germany, Figs. 2.15b and 2.16. Spring con-
stants and resonant frequencies are also presented in the Fig. 2.15b.
Commercial triangular Si
3
N
4
cantilevers have a typical width:thickness ratio of
10 to 30,which results inspring constantsthat are 100to 1000times stiffer in the lat-
eral direction than in the normal direction. Therefore, these cantilevers are not well
suited for torsion. For friction measurements, the torsional spring constant should
be minimized in order to be sensitive to the lateral force. Rather long cantilevers
with small thicknesses and large tip lengths are most suitable. Rectangular beams
have smaller torsional spring constants than the triangular (V-shaped) cantilevers.
Table 2.4 lists the spring constants (with the full length of the beam used) in three
directionsfor typicalrectangular beams.We note that the lateraland torsionalspring
constants are about two orders of magnitude larger than the normal spring con-
stants. A cantilever beam required for the tapping mode is quite stiff and may not
be sensitive enough for friction measurements. Meyer et al. [140] used a specially
designed rectangular silicon cantilever with length= 200µm, width= 21µm, thick-
ness= 0.4µm, tip length= 12.5µm and shear modulus= 50 GPa, giving a normal
spring constant of 0.007N/m and a torsional spring constant of 0.72N/m, which
gives a lateral force sensitivity of 10 pN and an angle of resolution of 10
−7
rad.
Using this particular geometry, the sensitivity to lateral forces can be improved by
about a factor of 100 compared with commercialV-shaped Si
3
N
4
or the rectangular
Si or Si
3
N
4
cantilevers used by Meyer and Amer [8], with torsional spring constants
of ∼ 100 N/m. Ruan and Bhushan [136] and Bhushan and Ruan [9] used 115µm-
long, wide-legged V-shaped cantilevers made of Si
3
N
4
for friction measurements.

64 Bharat Bhushan and Othmar Marti
Table 2.4. Vertical (k
z
), lateral (k
y
), and torsional (k
yT
) spring constants of rectangular can-
tilevers made of Si (IBM) and PECVD Si
3
N
4
(source: Veeco Instruments, Inc.)
Dimensions/stiffness Si cantilever Si
3
N
4
cantilever
Length (L)(µm) 100 100
Width (b)(µm) 10 20
Thickness (h)(µm) 1 0.6
Tip length ()(µm) 5 3
k
z
(N/m) 0.4 0.15
k
y
(N/m) 40 175
k
yT
(N/m) 120 116
ω
0
(kHz) ∼90 ∼ 65
Note: k
z
= Ebh
3
/4L
3
, k
y
= Eb
3
h/4
3
, k
yT
= Gbh
3
/3L
2
,andω
0
= [k
z
/(m
c
+ 0.24bhLρ)]
1/2
,
where E is Young’s modulus, G is the modulus of rigidity [= E/2(1+ ν), ν is Poisson’s ratio],
ρ is the mass density of the cantilever, and m
c
is the concentrated mass of the tip (∼ 4ng)
[94]. For Si, E = 130 GPa, ρg = 2300 kg/m
3
,andν = 0.3. For Si
3
N
4
, E = 150 GPa, ρg =
3100 kg/m
3
,andν = 0.3
For scratching, wear and indentationstudies, single-crystalnatural diamond tips
ground to the shape of a three-sided pyramid with an apex angle of either 60
◦
or
80
◦
and a point sharpened to a radius of about 100nm are commonly used [4,10]
(Figs. 2.15c and 2.16). The tips are bonded with conductive epoxy to a gold-plated
304 stainless steel spring sheet (length= 20mm, width= 0.2 mm, thickness= 20 to
60µm) which acts as a cantilever. The free length of the spring is varied in order
to change the beam stiffness. The normal spring constant of the beam ranges from
about 5 to 600N/mfora20µm-thick beam. The tips are produced by R-DEC Co.,
Tsukuba, Japan.
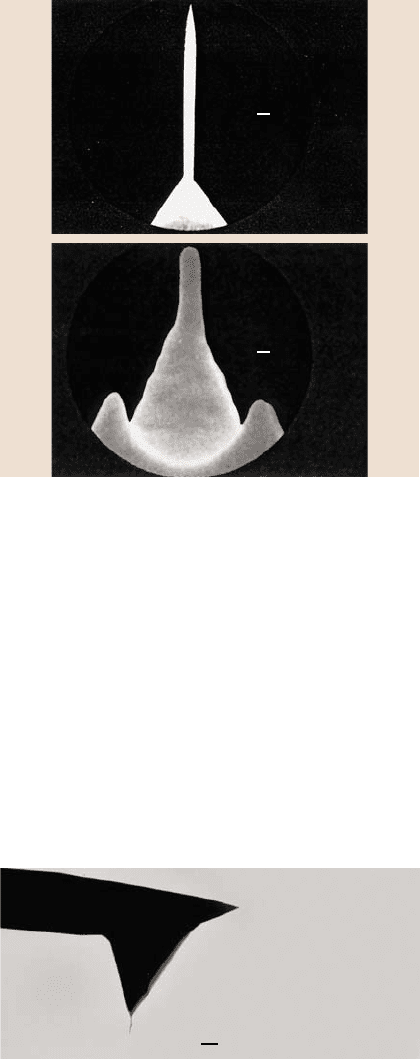
High aspect ratio tips are used to image within trenches. Examples of two probes
used areshownin Fig. 2.17.These highaspect ratio tip(HART) probesare produced
from conventional Si
3
N
4
pyramidal probes. Through a combination of focused ion
beam (FIB) and high-resolution scanning electron microscopy (SEM) techniques,
a thin filament is grown at the apex of the pyramid. The probe filament is approx-
imately 1µm long and 0.1µm in diameter. It tapers to an extremely sharp point
(with a radius that is better than the resolutions of most SEMs). The long thin
shape and sharp radius make it ideal for imaging within “vias” of microstructures
and trenches (> 0.25µm). This is, however, unsuitable for imaging structures at the
atomic level, since probe flexing can create image artefacts. A FIB-milled probe is
used for atomic-scale imaging, which is relatively stiff yet allows for closely spaced
topography. These probes start out as conventionalSi
3
N
4
pyramidal probes, but the
pyramid is FIB-milled until a small cone shape is formed which has a high aspect
ratio and is 0.2–0.3 µm in length. The milled probes permit nanostructure resolu-
tion without sacrificing rigidity. These types of probes are manufactured by various
manufacturers including Materials Analytical Services.
2 Scanning Probe Microscopy 65
a)
b)
100 nm
100 nm
Fig. 2.17. Schematics of
(a) HART Si
3
N
4
probe, and
(b) an FIB-milled Si
3
N
4
probe
Carbon nanotube tips with small diameters and high aspect ratios are used for
high-resolution imaging of surfaces and of deep trenches, in the tapping mode
or the noncontact mode. Single-wall carbon nanotubes (SWNTs) are microscopic
graphitic cylinders that are 0.7 to 3 nm in diameter and up to many microns in
length. Larger structures called multiwall carbon nanotubes (MWNTs) consist of
nested, concentrically arranged SWNTs and have diameters of 3 to 50nm. MWNT
carbon nanotube AFM tips are produced by manual assembly [141], chemical va-
por deposition (CVD) synthesis, and a hybrid fabrication process [142]. Figure 2.18
shows a TEM micrograph of a carbon nanotube tip, ProbeMax, commercially pro-
duced by mechanical assembly by Piezomax Technologies, Inc. (Middleton, WI,
USA). To fabricate these tips, MWNTs are produced using a carbon arc and they are
physically attached to the single-crystal silicon, square-pyramidal tips in the SEM,
using a manipulator and the SEM stage to independently control the nanotubes and
200 nm
Fig. 2.18. SEM micrograph
of a multiwall carbon nano-
tube (MWNT) tip physically
attached to a single-crystal
silicon, square-pyramidal
tip (courtesy of Piezomax
Technologies, Inc.)
66 Bharat Bhushan and Othmar Marti
the tip. When the nanotube is first attached to the tip, it is usually too long to image
with. It is shortened by placing it in an AFM and applying voltage between the tip
and the sample. Nanotube tips are also commercially produced by CVD synthesis
by NanoDevices (Santa Barbara, CA, USA).
2.3.4 Friction Measurement Methods
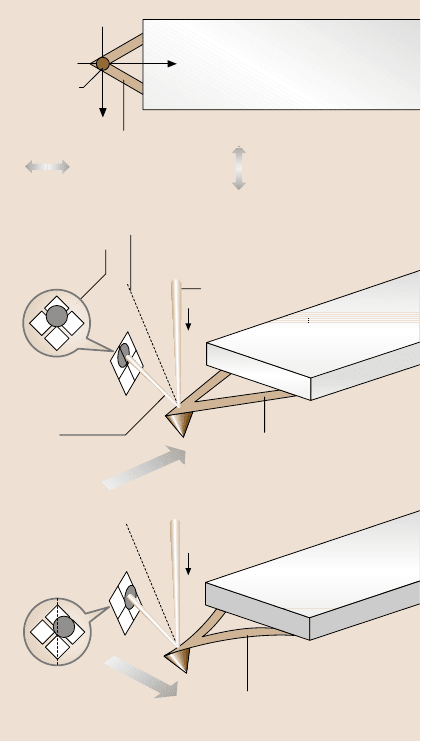
The two methods for performing friction measurements that are based on the work
by Ruan and Bhushan [136] are now described in more detail (also see [8]). The
scanning angle is defined as the angle relativeto the y-axis in Fig. 2.19a. This is also
the long axis of the cantilever. The zero-degree scanning angle corresponds to the
sample scan in the y-direction, and the 90-degree scanning angle corresponds to the
a)
Cantilever
substrate
Sample traveling
direction in method 2
Sample traveling
direction in method 1
Flexible cantilever
Laser
beam spot
x
y
b)
Photodetector
Cantilever
normal direction
Incident beam
Cantilever
substrate
Cantilever
Tip
Reflected
beam
Traveling direction of the sample (y)
T
L
B
R
Method 1
Method 2
Twisted cantilever
Tip
Traveling direction of the sample (x)
T
L
B
R
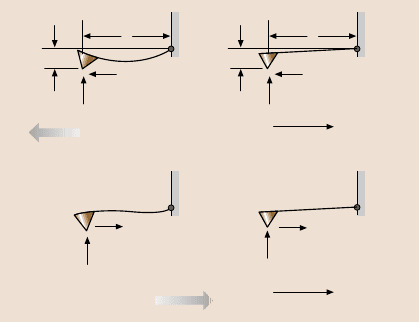
Fig. 2.19. (a) Schematic
defining the x-andy-
directions relative to the
cantilever, and showing the
direction of sample travel in
two different measurement
methods discussed in the text.
(b) Schematic of deforma-
tion of the tip and cantilever
shown as a result of sliding
in the x-andy-directions.
A twist is introduced to the
cantilever if the scanning is
performed in the x-direction
((b), lower part) [136]
2 Scanning Probe Microscopy 67
sample scan perpendicular to this axis in the xy-plane (along x-axis). If both the y-
and −y-directions are scanned, we call this a “parallel scan”. Similarly, a “perpen-
dicular scan” means that both the x-and−x-directions are scanned. The direction
of sample travel for each of these two methods is illustrated in Fig. 2.19b.
Using method 1 (“height” mode with parallel scans) in addition to topographic
imaging, it is also possible to measure friction force when the sample scanning
direction is parallel to the y-direction (parallel scan). If there was no friction force
between the tip and the moving sample, the topographic feature would be the only
factor that would cause the cantilever to be deflected vertically. However, friction
force does exist on all surfaces that are in contact where one of the surfaces is
moving relative to the other. The friction force between the sample and the tip will
also cause the cantilever to be deflected. We assume that the normal force between
the sample and the tip is W
0
when the sample is stationary (W
0
is typically 10nN to
200nN), and the friction force between the sample and the tip is W
f
as the sample is
scannedby the tip. The directionof the friction force(W
f
) is reversedas the scanning
direction of the sample is reversedfrom the positive(y) to thenegative(−y) direction
(W
f(y)
= −W
f(−y)
).
When the vertical cantilever deflection is set at a constant level, it is the total
force (normal force and friction force) applied to the cantilever that keeps the can-
tilever deflection at this level. Since the friction force is directed in the opposite
direction to the direction of travel of the sample, the normal force will have to be
adjusted accordingly when the sample reverses its traveling direction, so that the
total deflection of the cantilever will remain the same. We can calculate the differ-
ence in the normal force between the two directions of travel for a given friction
force W
f
. First, since the deflection is constant, the total moment applied to the can-
tilever is constant. If we take the reference point to be the point where the cantilever
joins the cantilever holder (substrate), point P in Fig. 2.20, we have the following
a)
l
L
P
W
f
W
0
l
L
P
W
f
W
0
–ΔW
1
Sliding direction
of the sample
y
b)
PW
f
W
0
Sliding direction
of the sample
P
W
f
W
0
+ ΔW
2
y
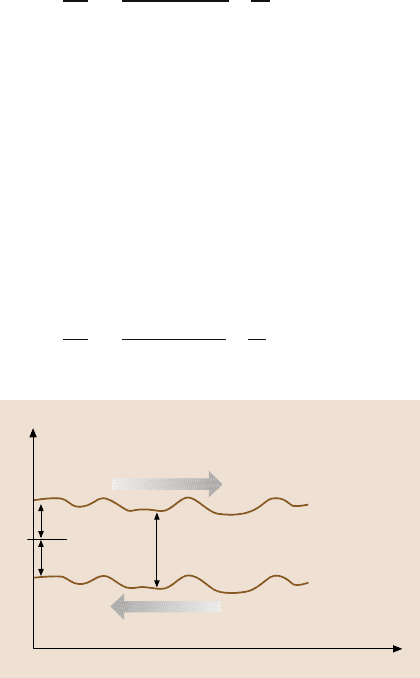
Fig. 2.20. (a) Schematic
showing an additional bend-
ing of the cantilever due
to friction force when the
sample is scanned in the
y-or−y-directions (left).
(b)Thiseffect can be can-
celed out by adjusting the
piezo height using a feedback
circuit (right) [136]
68 Bharat Bhushan and Othmar Marti
relationship:
(W
0
−ΔW
1
)L+ W
f
= (W
0
+ΔW
2
)L−W
f
(2.1)
or
(ΔW
1
+ΔW
2
)L = 2W
f
. (2.2)
Thus
W
f
= (ΔW
1
+ΔW
2
)L/(2), (2.3)
where ΔW
1
and ΔW
2
are theabsolute valuesof the changesin normalforce whenthe
sample is traveling in the −y-andy-directions, respectively, as shown in Fig. 2.20;
L is the length of the cantilever; is the vertical distance between the end of the tip
and point P. The coefficient of friction (μ) between the tip and the sample is then
given as
μ =
W
f
W
0
=
(ΔW
1
+ΔW
2
)
W
0
L
2
. (2.4)
There are adhesive and interatomic attractive forces between the cantilever tip
and the sample at all times. The adhesiveforce can be due to waterfrom the capillary
condensation and other contaminants present at the surface, which form meniscus
bridges [4, 143, 144] and the interatomic attractive force includes van der Waals
attractions [18]. If these forces (and the effect of indentation too, which is usu-
ally small for rigid samples) can be neglected, the normal force W
0
is then equal
to the initial cantilever deflection H
0
multiplied by the spring constant of the can-
tilever. (ΔW
1
+ΔW
2
) can be derived by multiplying the same spring constant by the
change in height of the piezo tube between the two traveling directions (y-and−y-
directions) of the sample. This height difference is denoted as (ΔH
1
+ΔH
2
), shown
schematically in Fig. 2.21. Thus, (2.4) can be rewritten as
μ =
W
f
W
0
=
(ΔH
1
+ΔH
2
)
H
0
L
2
. (2.5)
PZT height H
Sliding distance y
(ΔW
1
+ ΔW
2
)=k (ΔH
1
+ ΔH
2
)
(ΔH
1
+ ΔH
2
)
ΔH
2
ΔH
1
H
0
Fig. 2.21. Schematic illustra-
tion of the height difference
for the piezoelectric tube
scanner as the sample is
scanned in the y-and−y-
directions
2 Scanning Probe Microscopy 69
Since the vertical position of the piezo tube is affected by the topographic profile
of the sample surface in addition to the friction force being applied at the tip, this
difference must be found point-by-pointat the same location on the sample surface,
as shown in Fig. 2.21. Subtraction of point-by-point measurements may introduce
errors, particularly for rough samples. We will come back to this point later. In
addition, precise measurements of L and (which should include the cantilever
angle) are also required.
If the adhesive force between the tip and the sample is large enough that it can-
not be neglected, it should be included in the calculation. However, determinations
of this force can involve large uncertainties, which is introduced into (2.5). An al-
ternative approach is to make the measurements at different normal loads and to use
Δ(H
0
)andΔ(ΔH
1
+ΔH
2
) in (2.5). Another comment on (2.5) is that, since only the
ratio between (ΔH
1
+ΔH
2
)andH
0
enters this equation, the vertical position of the
piezo tube H
0
and the difference in position (ΔH
1
+ΔH
2
) can be in volts as long
as the vertical travel of the piezo tube and the voltage applied to have a linear rela-
tionship. However, if there is a large nonlinearity between the piezo tube traveling
distance and the applied voltage, this nonlinearity must be included in the calcula-
tion.
Itshould also bepointedout that(2.4)and (2.5)are derivedunderthe assumption
that the friction force W
f
is the same for the two scanning directions of the sample.
This is an approximation, since the normal force is slightly different for the two
scans and the friction may be direction-dependent.However, this difference is much
smaller than W
0
itself. We can ignore the second-order correction.
Method 2 (“aux” mode with perpendicular scan) of measuring friction was sug-
gested by Meyer and Amer [8]. The sampleis scanned perpendicularto the long axis
of the cantilever beam (along the x-or−x-direction in Fig. 2.19a) and the outputs
from the two horizontal quadrants of the photodiode detector are measured. In this
arrangement,as the sample movesunder the tip,the frictionforce will causethe can-
tilever to twist. Therefore, the light intensity between the left and right (L and R in
Fig. 2.19b, right) detectors will be different. The differential signal between the left
and right detectors is denoted the FFM signal [(L−R)/(L+ R)]. This signal can be
relatedto the degreeof twisting,and hence to the magnitudeof friction force.Again,
because possible errors in measurements of the normal force due to the presence of
adhesive force at the tip–sample interface, the slope of the friction data (FFM signal
vs. normal load) needs to be measured for an accurate value of the coefficient of
friction.
While friction force contributes to the FFM signal, friction force may not be the
only contributing factor in commercial FFM instruments (for example, NanoScope
IV). One can see this if we simply engange the cantilever tip with the sample. The
left and right detectors can be balanced beforehand by adjusting the positions of the
detectors so that the intensity difference between these two detectors is zero (FFM
signal is zero). Once the tip is engaged with the sample, this signal is no longer zero,
even if the sample is not moving in the xy-plane with no friction force applied. This
