Bhushan B. Nanotribology and Nanomechanics: An Introduction
Подождите немного. Документ загружается.


90 Bharat Bhushan and Othmar Marti
A
x
R
x
b
2s
x
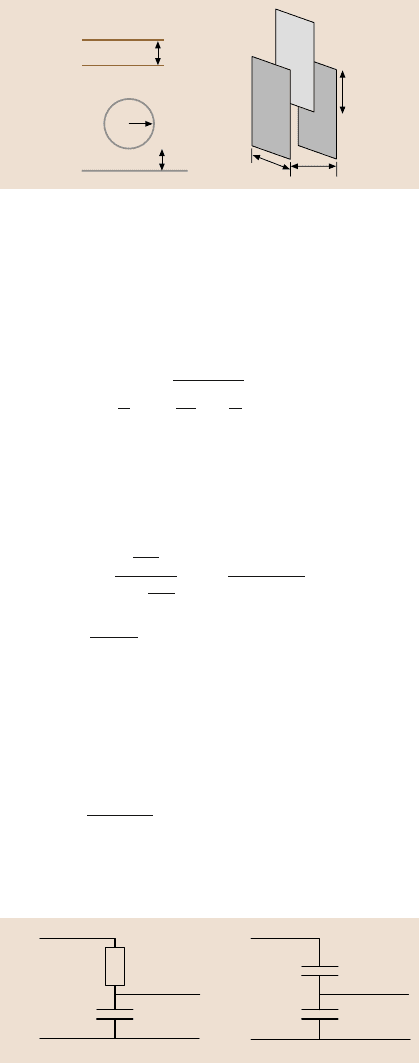
Fig. 2.31. Three possible arrangements of a capacitive readout. The upper left diagram shows
a cross-section through a parallel plate capacitor. The lower left diagram shows the geometry
of a sphere versus a plane. The right-hand diagram shows the linear (but more complicated)
capacitive readout
where R is the radius of the sphere, and α is defined by
α = ln
⎛
⎜
⎜
⎜
⎜
⎜
⎝
1+
z
R
+
z
2
R
2
+ 2
z
R
⎞
⎟
⎟
⎟
⎟
⎟
⎠
. (2.66)
One has to bear in mind that the capacitance of a parallel plate capacitor is a non-
linear function of the separation. One can circumvent this problem using a voltage
divider. Figure 2.32a shows a low-pass filter. The output voltage is given by
U
out
= U
≈
1
jωC
R+
1
jωC
= U
≈
1
jωCR+ 1
U
≈
jωCR
.
(2.67)
Here C is given by (2.64), ω is the excitation frequency and j is the imaginary unit.
The approximate relation at the end is true when ωCR 1. This is equivalent to
the statement that C is fed by a current source, since R must be large in this set-up.
Plugging (2.64) into (2.67) and neglecting the phase information, one obtains
U
out
=
U
≈
x
ωRεε
0
A
, (2.68)
which is linear in the displacement x.
a) b)
C
1
C
2
U
≈
U
out
U
≈
C
U
out
R
Fig. 2.32. Measuring the
capacitance. (a)Lowpass
filter, (b) capacitive divider.
C (left)andC
2
(right)arethe
capacitances under test

2 Scanning Probe Microscopy 91
Normalized output voltage (arb. units)
Normalized position (arb. units)
0.60.5 0.7 0.8 0.9 1 1.1 1.2 1.3 1.4 1.5
1.0
0.8
0.6
0.4
0.2
0.0
–0.2
–0.4
–0.6
–0.8
–1.0
Reference
Capacitor
1 nF
100 pF
10 pF
1 pF
0.1 pF
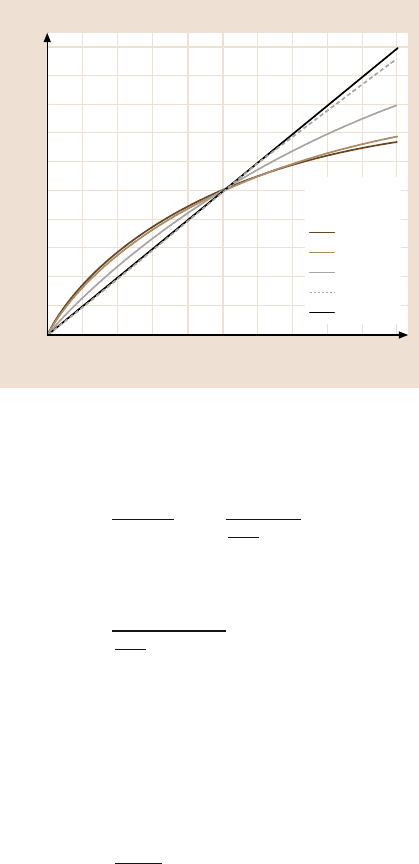
Fig. 2.33. Linearity of the ca-
pacitance readout as a func-
tion of the reference capacitor
Figure 2.32b shows a capacitive divider. Again the output voltage U
out
is given
by
U
out
= U
≈
C
1
C
2
+ C
1
= U
≈
C
1
εε
0
A
x
+ C
1
. (2.69)
If there is a stray capacitance C
s
then (2.69) is modified as
U
out
= U
≈
C
1
εε
0
A
x
+ C
s
+ C
1
. (2.70)
Provided C
s
+ C
1
C
2
, one has a system which is linear in x. The driving voltage
U
≈
must be large (more than 100V) to gave an output voltage in the range of 1V.
The linearity of the readout depends on the capacitanceC
1
(Fig. 2.33).
Another idea is to keep the distance constant and to change the relative overlap
of the plates (see Fig. 2.31, right side). The capacitance of the moving center plate
versus the stationary outer plates becomes
C = C
s
+ 2
εε
0
bx
s
, (2.71)
where the variables are defined in Fig. 2.31. The stray capacitance comprises all
effects, including the capacitance of the fringe fields. When the length x is compa-
rable to the width b of the plates, one can safely assume that the stray capacitance is
constant and independent of x. The main disadvantage of this set-up is that it is not
as easily incorporated into a microfabricated device as the others.
Sensitivity. The capacitance itself is not a measure of the sensitivity, but its deriva-
tive is indicative of the signals one can expect. Using the situation described in

92 Bharat Bhushan and Othmar Marti
Fig. 2.31 (upper left) and in (2.64), one obtains for the parallel plate capacitor
dC
dx
= −
εε
0
A
x
2
. (2.72)
Assuming a plate area A of 20 µmby40µm and a separation of 1µm, one obtains
a capacitance of 31fF (neglecting stray capacitance and the capacitance of the con-
nection leads) and a dC/ dx of 3.1×10
−8
F/m = 31fF/µm. Hence it is of paramount
importance to maximize the area between the two contacts and to minimize the dis-
tance x. The latter however is far from being trivial. One has to go to the limits of
microfabrication to achieve a decent sensitivity.
If the capacitance is measured by the circuit shown in Fig. 2.32, one obtains for
the sensitivity
dU
out
U
≈
=
dx
ωRεε
0
A
. (2.73)
Using the same value for A as above, setting the reference frequency to 100 kHz,
and selecting R = 1GΩ, we get the relative change in the output voltage U
out
as
dU
out
U
≈
=
22.5×10
−6
Å
× dx. (2.74)
A driving voltage of 45V then translates to a sensitivity of 1mV/Å. A problem in
this set-up is the stray capacitances. They are in parallel to the original capacitance
and decrease the sensitivity considerably.
Alternatively, one could build an oscillator with this capacitance and measure
the frequency. RC-oscillators typically have an oscillation frequency of
f
res
∝
1
RC
=
x
Rεε
0
A
. (2.75)
Again the resistance R must be of the order of 1 GΩ when stray capacitancesC
s
are
neglected.HoweverC
s
is of the order of 1pF. Thereforeone gets R = 10 MΩ.Using
these values, the sensitivity becomes
df
res
=
Cdx
R
(
C+ C
s
)
2
x
≈
0.1Hz
Å
dx. (2.76)
The bad thing is that the stray capacitances have made the signal nonlinear again.
The linearized set-up in Fig. 2.31 has a sensitivity of
dC
dx
= 2
εε
0
b
s
. (2.77)
Substituting typical values (b= 10µm, s = 1µm),onegets dC/ dx= 1.8×10
−10
F/m.
It is noteworthy that the sensitivity remains constant for scaled devices.

2 Scanning Probe Microscopy 93
Implementations. Capacitance readoutcan be achieved in differentways [123,124].
All include an alternating current or voltage with frequencies in the 100kHz to
100 MHz range. One possibility is to build a tuned circuit with the capacitanceof the
cantilever determining the frequency. The resonance frequency of a high-quality Q
tuned circuit is
ω
0
=
(
LC
)
−1/2
. (2.78)
where L is the inductance of the circuit. The capacitance C includes not only the
sensorcapacitancebutalsothe capacitanceofthe leads.The precisionof afrequency
measurement is mainly determined by the ratio of L and C
Q =
L
C
1/2
1
R
. (2.79)
Here R symbolizes the losses in the circuit. The higher the quality, the more precise
the frequency measurement. For instance, a frequency of 100MHz and a capaci-
tance of 1 pF gives an inductance of 250µH. The quality then becomes 2.5×10
8
.
This value is an upper limit, since losses are usually too high.
Using a value of dC/ dx = 31fF/µm, one gets ΔC/Å = 3.1aF/Å. With a capac-
itance of 1pF, one gets
Δω
ω
=
1
2
ΔC
C
,
Δω = 100 MHz×
1
2
3.1aF
1pF
= 155Hz. (2.80)
This is the frequency shift for a deflection of 1 Å. The calculation shows that this
is a measurable quantity. The quality also indicates that there is no physical reason
why this scheme should not work.
2.4.3 Combinations for 3-D Force Measurements
Three-dimensional force measurements are essential if one wants to know all of
the details of the interaction between the tip and the cantilever. The straightforward
attempt to measure three forces is complicated, since force sensors such as interfer-
ometers or capacitive sensors need a minimal detection volume, which is often too
large. The second problem is that the force-sensing tip has to be held in some way.
This implies that one of the three Cartesian axes is stiffer than the others.
However, by combining different sensors it is possible to achieve this goal.
Straight cantileversare employed for these measurements, because they can be han-
dled analytically. The key observation is that the optical lever method does not de-
termine the position of the end of the cantilever. It measures the orientation. In the
previous sections, one has always made use of the fact that, for a force along one of
the orthogonalsymmetry directionsat the end of the cantilever(normal force, lateral
force, force along the cantileverbeam axis), there is a one-to-one correspondenceof

94 Bharat Bhushan and Othmar Marti
the tilt angle and the deflection. The problem is that the force along the cantilever
beam axis and the normal force create a deflection in the same direction. Hence,
what is called the normal force component is actually a mixture of two forces. The
deflection of the cantilever is the third quantity, which is not considered in most of
the AFMs. A fiber-optic interferometer in parallel with the optical lever measures
the deflection. Three measured quantities then allow the separation of the three or-
thonormal force directions, as is evident from (2.27) and (2.33) [12–16].
Alternatively, one can put the fast scanning direction along the axis of the can-
tilever. Forward and backward scans then exert opposite forces F
x
. If the piezo
movement is linearized, both force components in AFM based on optical lever de-
tection can be determined. In this case, the normal force is simply the average of the
forces in the forward and backward direction. The force, F
x
, is the difference in the
forces measured in the forward and backward directions.
2.4.4 Scanning and Control Systems
Almost all SPMs use piezo translators to scan the tip or the sample. Even the first
STM [1, 103] and some of its predecessors [153,154] used them. Other materials
or set-ups for nanopositioning have been proposed, but they have not been success-
ful [155,156].
Piezo Tubes
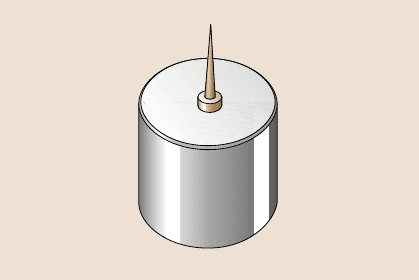
A popular solution is tube scanners (Fig. 2.34). They are now widely used in SPMs
due to their simplicity and their small size [133,157]. The outer electrode is seg-
mented into four equal sectors of 90 degrees. Opposite sectors are driven by sig-
nals of the same magnitude, but opposite sign. This gives, through bending, two-
dimensionalmovementon (approximately)a sphere.The innerelectrodeis normally
driven by the z signal. It is possible, however, to use only the outer electrodes for
scanningand for thez-movement.The maindrawbackof applyingthe z-signalto the
outer electrodes is that the applied voltage is the sum of both the x-ory-movements
z inner
electrode
–y
+x
+y
Fig. 2.34. Schematic draw-
ing of a piezoelectric tube
scanner. The piezo ceramic
is molded into a tube form.
The outer electrode is sep-
arated into four segments
and connected to the scan-
ning voltage. The z-voltage is
applied to the inner electrode

2 Scanning Probe Microscopy 95
and the z-movement.Hence a largerscan size effectivelyreduces the available range
for the z-control.
Piezo Effect
An electric field applied across a piezoelectric material causes a change in the crys-
tal structure, with expansion in some directions and contraction in others. Also,
a net volume change occurs [132]. Many SPMs use the transverse piezo electric ef-
fect, where the applied electric field E is perpendicularto the expansion/contraction
direction.
ΔL = L
(
E·n
)
d
31
= L
V
t
d
31
, (2.81)
where d
31
is the transverse piezoelectric constant, V is the applied voltage, t is the
thickness of the piezo slab or the distance between the electrodes where the voltage
is applied, L is the free lengthof the piezo slab, andn is the direction of polarization.
Piezo translators based on the transverse piezoelectric effect have a wide range of
sensitivities, limited mainly by mechanical stability and breakdown voltage.
Scan Range
The the scanning range of a piezotube is difficult to calculate [157–159]. The bend-
ing of the tube depends on the electric fields and the nonuniform strain induced.
A finite element calculation where the piezo tube was divided into 218 identical
elements was used [158] to calculate the deflection. On each node, the mechani-
cal stress, the stiffness, the strain and the piezoelectric stress were calculated when
a voltage was applied on one electrode. The results were found to be linear on the
first iteration and higher order corrections were very small even for large electrode
voltages. It was found that, to first order, the x-andz-movement of the tube could
be reasonably well approximated by assuming that the piezo tube is a segment of
a torus. Using this model, one obtains
dx =
(
V
+
−V
−
)
|d
31
|
L
2
2td
, (2.82)
dz =
(
V
+
+ V
−
−2V
z
)
|d
31
|
L
2t
, (2.83)
where |d
31
| is the coefficient of the transversal piezoelectric effect, L is the tube’s
free length, t is the tube’s wall thickness, d is the tube’s diameter, V
+
is the voltage
on the positive outer electrode, while V
−
is the voltage of the opposite quadrant
negative electrode and V
z
is the voltage of the inner electrode.
The cantilever or sample mounted on the piezotube has an additional lateral
movementbecause the point of measurementis not in the endplane of the piezotube.
The additional lateral displacement of the end of the tip is sinϕ ≈ ϕ,where is
the tip length and ϕ is the deflection angle of the end surface. Assuming that the
sample or cantilever is always perpendicular to the end of the walls of the tube, and

96 Bharat Bhushan and Othmar Marti
calculating with the torus model, one gets for the angle
ϕ =
L
R
=
2dx
L
, (2.84)
where R is the radius of curvature of the piezo tube. Using the result of (2.84), one
obtains for the additional x-movement
dx
add
= ϕ =
2dx
L
= (V
+
−V
−
)|d
31
|
L
td
(2.85)
and for the additional z-movement due to the x-movement
dz
add
= − cosϕ =
ϕ
2
2
=
2
(
dx
)
2
L
2
= (V
+
−V
−
)
2
|d
31
|
2
L
2
2t
2
d
2
. (2.86)
Carr [158] assumed for his finite element calculations that the top of the tube was
completely free to move and, as a consequence, the top surface was distorted, lead-
ing to a deflection angle that was about half that of the geometrical model. Depend-
ing on the attachment of the sample or the cantilever, this distortion may be smaller,
leading to a deflection angle in-between that of the geometrical model and the one
from the finite element calculation.
Nonlinearities and Creep
Piezo materials with a high conversion ratio (a large d
31
or small electrode separa-
tions with large scanning ranges) are hampered by substantial hysteresis resulting
in a deviation from linearity by more than 10%. The sensitivity of the piezo ceramic
material (mechanical displacement divided by driving voltage) decreases with re-
duced scanning range, whereas the hysteresis is reduced. Careful selection of the
material used for the piezo scanners, the design of the scanners, and of the operat-
ing conditions is necessary to obtain optimum performance.
Passive Linearization: Calculation. The analysis of images affected by piezo non-
linearities [160–163] shows that the dominant term is
x = AV + BV
2
, (2.87)
where x is the excursion of the piezo, V is the applied voltage and A and B are
two coefficients describing the sensitivity of the material. Equation (2.87) holds for
scanning from V = 0tolargeV. For the reverse direction, the equation becomes
x =
˜
AV −
˜
B
(
V −V
max
)
2
, (2.88)
where
˜
A and
˜
B are the coefficients for the back scan and V
max
is the applied voltage
at the turning point. Both equations demonstrate that the true x-travel is small at the

2 Scanning Probe Microscopy 97
beginning of the scan and becomes larger towards the end. Therefore, images are
stretched at the beginning and compressed at the end.
Similar equations hold for the slow scan direction. The coefficients, however,
are different. The combined action causes a greatly distorted image. This distortion
can be calculated. The data acquisition systems record the signal as a function of V.
However the data is measured as a functionof x. Therefore we have to distribute the
x-values evenly across the image. This can be done by inverting an approximation
of (2.87). First we write
x = AV
1−
B
A
V
. (2.89)
For B A we can approximate
V =
x
A
. (2.90)
We now substitute (2.90) into the nonlinear term of (2.89). This gives
x = AV
1+
Bx
A
2
,
V =
x
A
1
(1+ Bx/A
2
)
≈
x
A
1−
Bx
A
2
. (2.91)
Hence an equation of the type
x
true
= x
(
α −βx/x
max
)
with 1 = α −β (2.92)
takes out the distortion of an image. α and β are dependent on the scan range, the
scan speed and on the scan history, and have to be determined with exactly the same
settings as for the measurement. x
max
is the maximal scanning range. The condition
for α and β guarantees that the image is transformed onto itself.
Similar equations to the empirical one shown above (2.92) can be derived by
analyzing the movements of domain walls in piezo ceramics.
Passive Linearization: Measuring the Position. An alternative strategy is to meas-
ure the positions of the piezo translators. Several possibilities exist.
1. The interferometers described above can be used to measure the elongation of
the piezo elongation. The fiber-optic interferometer is especially easy to im-
plement. The coherence length of the laser only limits the measurement range.
However, the signal is of a periodic nature. Hence direct use of the signal in
a feedback circuit for the position is not possible. However, as a measurement
tool and, especially, as a calibration tool, the interferometer is without compe-
tition. The wavelength of the light, for instance that in a HeNe laser, is so well
defined that the precision of the other components determines the error of the
calibration or measurement.

98 Bharat Bhushan and Othmar Marti
2. The movement of the light spot on the quadrant detector can be used to meas-
ure the position of a piezo [164]. The output current changes by 0.5A/cm×
P(W)/R(cm). Typical values (P = 1mW, R = 0.001cm) give 0.5A/cm. The
noise limit is typically 0.15 nm×
Δ f(Hz)/H(W/cm
2
). Again this means that
the laser beam above would have a 0.1 nm noise limitation for a bandwidth of
21Hz. The advantage of this method is that, in principle, one can linearize two
axes with only one detector.
3. A knife-edgeblockingpart of a light beam incident ona photodiodecan be used
to measure the position of the piezo. This technique, commonly used in optical
shear force detection [75,165],has a sensitivity of better than 0.1nm.
4. The capacitive detection [166,167] of the cantilever deflection can be applied
to the measurement of the piezo elongation. Equations (2.64) to (2.79) apply
to the problem. This technique is used in some commercial instruments. The
difficulties lie in the avoidance of fringe effects at the borders of the two plates.
While conceptually simple, one needs the latest technology in surface prepa-
ration to get a decent linearity. The electronic circuits used for the readout are
often proprietary.
5. Linear variable differential transformers (LVDT) are a convenientway to meas-
ure positions down to 1 nm. They can be used together with a solid state joint
set-up, as often used for large scan range stages. Unlike capacitive detection,
there are few difficulties in implementation. The sensors and the detection cir-
cuits LVDTs are available commercially.
6. A popular measurement technique is the use of strain gauges. They are espe-
cially sensitive when mounted on a solid state joint where the curvature is max-
imal. The resolution depends mainly on the induced curvature. A precision of
1nm is attainable. The signals are low – a Wheatstone bridge is needed for the
readout.
Active Linearization. Active linearization is done with feedback systems. Sensors
need to be monotonic. Hence all of the systems described above, with the exception
of the interferometers, are suitable. The most common solutions include the strain
gauge approach, capacitance measurement or the LVDT, which are all electronic
solutions. Optical detection systems have the disadvantage that the intensity enters
into the calibration.
Alternative Scanning Systems
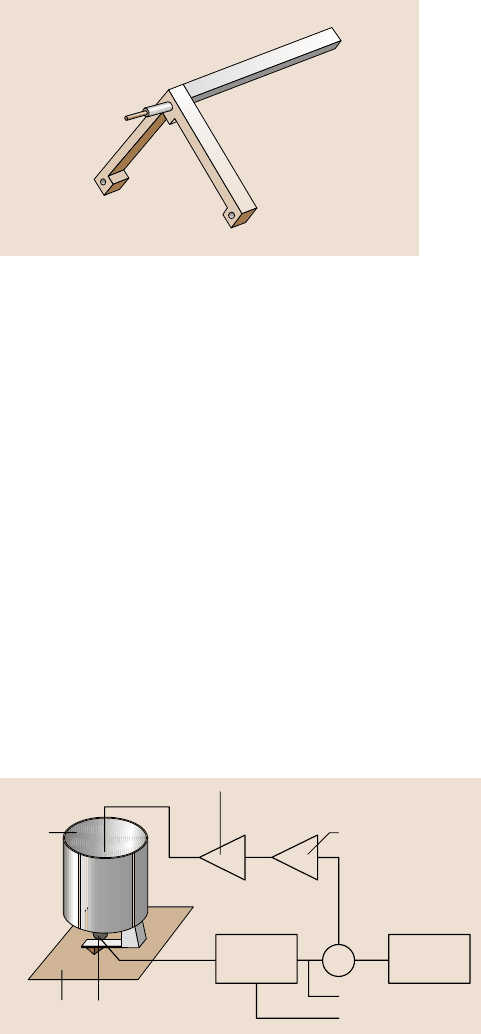
The first STMs were based on piezo tripods [1]. The piezo tripod (Fig. 2.35) is an
intuitive way to generate the three-dimensional movement of a tip attached to its
center. However, to get a suitable stability and scanning range, the tripod needs to
be fairly large (about 50mm). Some instruments use piezo stacks instead of mono-
lithic piezoactuators. They are arranged in a tripod. Piezo stacks are thin layers of
piezoactivematerials glued together to form a device with up to 200µm of actuation
range. Preloading with a suitable metal casing reduces the nonlinearity.
If one tries to construct a homebuilt scanning system, the use of linearized scan-
ning tables is recommended. They are built around solid state joints and actuated

2 Scanning Probe Microscopy 99
xy
z
Fig. 2.35. An alternative type
of piezo scanner: the tripod
by piezo stacks. The joints guarantee that the movement is parallel with little devi-
ation from the predefined scanning plane. Due to the construction it is easy to add
measurement devices such as capacitive sensors, LVDTs or strain gauges, which are
essential for a closed loop linearization.Two-dimensionaltables can be boughtfrom
several manufacturers. They have linearities of better than 0.1% and a noise level of
10
−4
to 10
−5
for the maximal scanning range.
Control Systems
Basics. The electronics and software play an important role in the optimal perfor-
mance of an SPM. Control electronics and software are supplied with commercial
SPMs. Electronic control systems can use either analog or digital feedback. While
digital feedback offers greater flexibility and ease of configuration, analog feedback
circuits might be better suited for ultralow noise operation. We will describe here
the basic set-ups for AFMs.
Figure2.36showsa block schematicof a typicalAFM feedbackloop.The signal
from the force transducer is fed into the feedback loop, which consists mainly of
a subtraction stage to get an error signal and an integrator. The gain of the integrator
(high gain corresponds to short integration times) is set as high as possible without
High voltage amplifier
Integrator
Error
Force
preset
Readout
electronics
Normal force
Lateral force
Piezo
Distance sensorSample
z
+
Fig. 2.36. Block schematic of the feedback control loop of an AFM
