Bhushan B. Nanotribology and Nanomechanics: An Introduction
Подождите немного. Документ загружается.

50 Bharat Bhushan and Othmar Marti
to get a suitable range. Its size and asymmetric shape makes it susceptible to thermal
drift. Tube scanners are widely used in AFMs [133]. These provide ample scanning
range with a small size. Electronic control systems for AFMs are based on either
analog or digital feedback. Digital feedback circuits are better suited for ultralow
noise operation.
Images from the AFMs need to be processed. An ideal AFM is a noise-free
device that images a sample with perfect tips of known shape and has a perfectly
linear scanning piezo. In reality, scanning devices are affected by distortions and
these distortions must be corrected for. The distortions can be linear and nonlinear.
Linear distortions mainly result from imperfections in the machining of the piezo
translators, causing cross-talk between the Z-piezo to the x-andy-piezos, and vice
versa. Nonlinear distortions mainly result from the presence of a hysteresis loop in
piezoelectric ceramics. They may also occur if the scan frequency approaches the
upper frequency limit of the x-andy-drive amplifiers or the upper frequency limit
of the feedback loop (z-component). In addition, electronic noise may be present in
the system. The noise is removed by digital filtering in real space [134] or in the
spatial frequency domain (Fourier space) [135].
Processed data consists of many tens of thousand of points per plane (or data
set). The outputsfrom the first STM and AFM images were recorded on an x-y chart
recorder, with the z-value plotted against the tip position in the fast scan direction.
Chart recordershaveslow responses,so computersare used to display the data these
days. The data are displayed as wire mesh displays or grayscale displays (with at
least 64 shades of gray).
2.3.1 The AFM Design of Binnig et al.
In the first AFM design developed by Binnig et al. [2], AFM images were obtained
by measuring the force exerted on a sharp tip created by its proximity to the surface
of a sample mounted on a 3-D piezoelectric scanner. The tunneling current between
the STM tip and the backside of the cantilever beam to which the tip was attached
wasmeasured to obtainthe normalforce. Thisforce was kept at a constant levelwith
a feedback mechanism. The STM tip was also mounted on a piezoelectric element
to maintain the tunneling current at a constant level.
2.3.2 Commercial AFMs
A review of early designs of AFMs has been presented by Bhushan [4]. There
are a number of commercial AFMs available on the market. Major manufac-
turers of AFMs for use in ambient environments are: Digital Instruments Inc.,
Topometrix Corp. and other subsidiaries of Veeco Instruments, Inc., Molecular
Imaging Corp. (Phoenix, AZ, USA), Quesant Instrument Corp. (Agoura Hills,
CA, USA), Nanoscience Instruments Inc. (Phoenix, AZ, USA), Seiko Instruments
(Chiba, Japan); and Olympus (Tokyo, Japan). AFM/STMs for use in UHV envi-
ronments are manufactured by Omicron Vakuumphysik GMBH (Taunusstein, Ger-
many).
2 Scanning Probe Microscopy 51
We describe here two commercial AFMs – small-sample and large-sample
AFMs – for operation in the contact mode, produced by Digital Instruments, Inc.,
with scanning lengths ranging from about 0.7µm (for atomic resolution) to about
125µm [9,111,114,136].The originaldesign of these AFMscomes from Meyer and
Amer [53]. Basically, the AFM scans the sample in a raster pattern while outputting
the cantilever deflection error signal to the control station. The cantilever deflec-
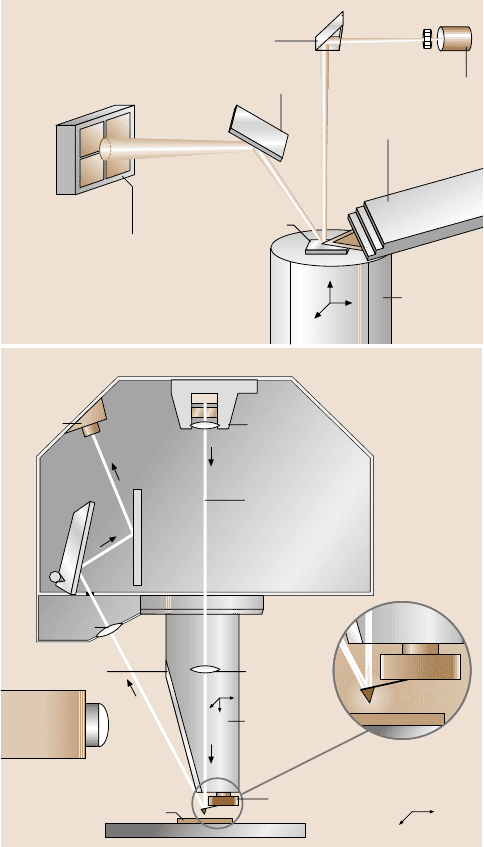
tion (or the force) is measured using a laser deflection technique (Fig. 2.9). The
DSP in the workstation controls the z position of the piezo based on the cantilever
deflection error signal. The AFM operates in both “constant height” and “constant
force” modes. The DSP always adjusts the distance between the sample and the tip
according to the cantilever deflection error signal, but if the feedback gains are low
the piezo remains at an almost “constant height” and the cantilever deflection data is
collected. With high gains, the piezo height changesto keepthe cantilever deflection
nearly constant (so the force is constant),and the change in piezo height is collected
by the system.
In the operation of a commercial small-sample AFM (as shown in Fig. 2.9a),
the sample (which is generally no larger than 10mm×10mm) is mounted on a PZT
tube scanner, which consists of separate electrodes used to precisely scan the sam-
ple in the x–y plane in a raster pattern and to move the sample in the vertical (z)
direction. A sharp tip at the free end of a flexible cantilever is brought into contact
with the sample. Features on the sample surface cause the cantilever to deflect in the
vertical and lateral directions as the sample moves under the tip. A laser beam from
a diode laser (5mW max peak output at 670nm) is directed by a prism onto the
back of a cantilever near its free end, tilted downward at about 10
◦
with respect to
the horizontal plane. The reflected beam from the vertex of the cantilever is directed
through a mirror onto a quad photodetector (split photodetector with four quad-
rants) (commonly called a position-sensitive detector or PSD, produced by Silicon
Detector Corp., Camarillo, CA, USA). The difference in signal between the top and
bottom photodiodes provides the AFM signal, which is a sensitive measure of the
cantilever vertical deflection. The topographic features of the sample cause the tip
to deflect in the vertical direction as the sample is scanned under the tip. This tip
deflection will change the direction of the reflected laser beam, changing the inten-
sity difference between the top and bottom sets of photodetectors (AFM signal). In
a mode of operationcalled the height mode,used for topographicimaging or for any
other operation in which the normal forceapplied is to be kept constant, a feedback
circuit is used to modulate the voltage applied to the PZT scanner in order to adjust
the height of the PZT, so that the cantileververtical deflection (givenby the intensity
difference between the top and bottom detector) will remain constant during scan-
ning. The PZT height variation is thus a direct measure of the surface roughness of
the sample.
In a large-sample AFM, force sensors based on optical deflection methods or
scanning units are mounted on the microscope head (Fig. 2.9b). Because of the un-
wanted vibrations caused by cantilever movement, the lateral resolution of this de-
sign is somewhat poorer than the design in Fig. 2.9a in which the sample is scanned
52 Bharat Bhushan and Othmar Marti
AFM signal
(A+B)–(C+D)
Mirrored
prism
Diode laser
& lens
Cantilever
& substrate
xyz
PZT tube
scanner
Split-diode
photo-
detector
FFM
signal
(A+C)–(B+D)
Mirror
Sample
A
B
C
D
x
y
z
a)
Laser diode,
collimator &
lens
Laser path
Fixed
Mirror
Adjust-
able
mirror
Split-diode
photo-
detector
Lens
Mirror Lens
Camera
objective
lens
Sample
Cantilever holder
Motorized
stage
xyz PZT
tube scanner
x
y
z
x
y
b)
Fig. 2.9. Principles of operation of (a) a commercial small-sample AFM/FFM, and
(b) a large-sample AFM/FFM
instead of the cantilever beam. The advantage of the large-sample AFM is that large
samples can be easily measured.
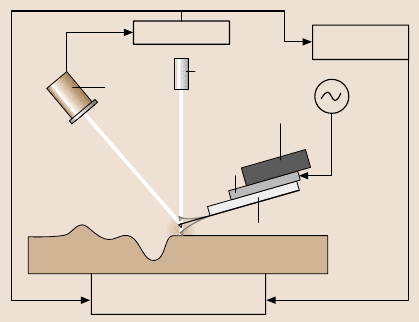
Most AFMs can be used for topography measurements in the so-called tapping
mode (intermittent contact mode), in what is also referred to as dynamic force mi-
croscopy. In the tapping mode, during the surface scan, the cantilever/tip assembly
2 Scanning Probe Microscopy 53
Feedback
Computer
Photo-
detector
Sample
xy controlz control
xyz piezo
Canti-
lever
piezo
Substrate
holder
Cantilever substrate
Laser
Fig. 2.10. Schematic of tap-
ping mode used for surface
roughness measurements
is sinusoidally vibrated by a piezo mounted above it, and the oscillating tip slightly
taps the surface at the resonant frequencyof the cantilever (70–400kHz) with acon-
stant (20–100nm) amplitude of vertical oscillation, and a feedback loop keeps the
average normal force constant (Fig. 2.10). The oscillating amplitude is kept large
enough that the tip does not get stuck to the sample due to adhesive attraction. The
tappingmodeis used in topographymeasurementsto minimizethe effects of friction
and other lateral forces to measure the topography of soft surfaces.
Topographic measurements can be made at any scanning angle. At first glance,
the scanning angle may not appear to be an important parameter. However, the fric-
tion force between the tip and the sample will affect the topographic measurements
in a parallel scan (scanning along the long axis of the cantilever). This means that
a perpendicular scan may be more desirable. Generally, one picks a scanning angle
which gives the same topographic data in both directions; this angle may be slightly
different to that for the perpendicular scan.
The left-hand and right-handquadrants of the photodetectorare used to measure
the friction force applied at the tip surface during sliding. In the so-called friction
mode, thesample is scanned back and forthin a direction orthogonalto the long axis
of the cantilever beam. Friction force between the sample and the tip will twist the
cantilever. As a result, the laser beam will be deflected out of the plane defined by
the incident beam and the beam is reflected vertically from an untwisted cantilever.
This produces a difference in laser beam intensity between the beams received by
the left-hand and right-hand sets of quadrants of the photodetector. The intensity
difference between the two sets of detectors (FFM signal) is directly related to the
degree of twisting and hence to the magnitude of the friction force. This method
provides three-dimensional maps of the friction force. One problem associated with
this method is that any misalignment between the laser beam and the photodetector
axis introduces errors into the measurement. However, by following the procedures
developed by Ruan and Bhushan [136], in which the average FFM signal for the
sample scanned in two opposite directions is subtracted from the friction profiles of
54 Bharat Bhushan and Othmar Marti
Fast scan direction Slow scan
direction
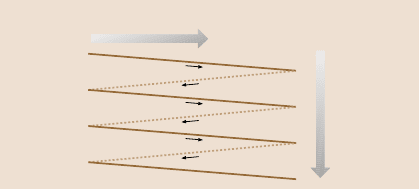
Fig. 2.11. Schematic of tri-
angular pattern trajectory of
the AFM tip as the sample is
scanned in two dimensions.
During imaging, data are only
recorded during scans along
the solid scan lines
each of the two scans, the misalignment effect can be eliminated. By following the
friction force calibration procedures developed by Ruan and Bhushan [136], volt-
ages correspondingto friction forces can be converted to force units. The coefficient
of friction is obtained from the slope of the friction force data measured as a func-
tion of the normal load, which typically ranges from 10 to 150nN. This approach
eliminates any contributions from adhesive forces [10]. To calculate the coefficient
of friction based on a single point measurement, the friction force should be divided
by the sum of the normalload applied and the intrinsic adhesive force. Furthermore,
it should be pointed out that the coefficient of friction is not independent of load for
single-asperity contact,. This is discussed in more detail later.
The tip is scannedin such a way that its trajectoryon the sampleforms a triangu-
lar pattern (Fig. 2.11). Scanning speeds in the fast and slow scan directions depend
on the scan area and scan frequency. Scan sizes ranging from less than 1 nm×1nm
to 125µm×125µm and scan rates of less than 0.5 to 122Hz are typically used.
Higher scan rates are used for smaller scan lengths. For example, the scan rates in
the fast and slow scan directions for an area of 10µm×10µm scanned at 0.5Hzare
10µm/s and 20nm/s, respectively.
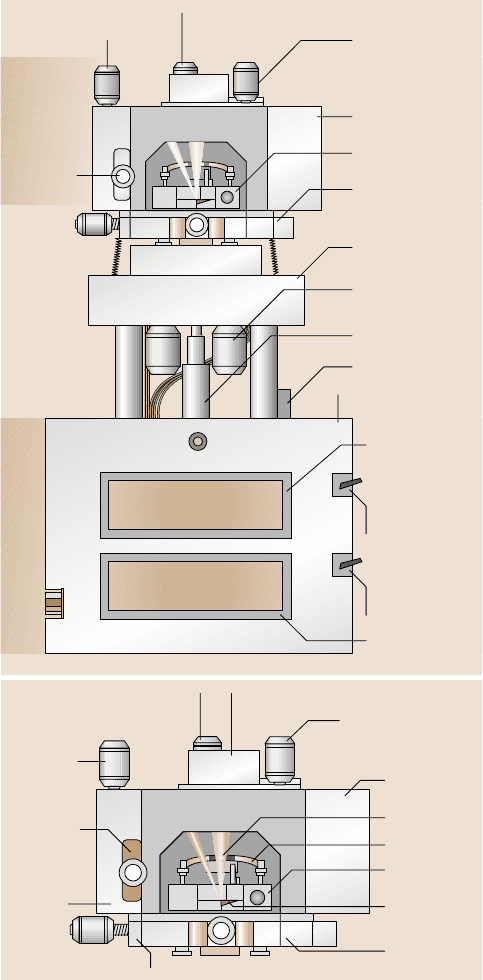
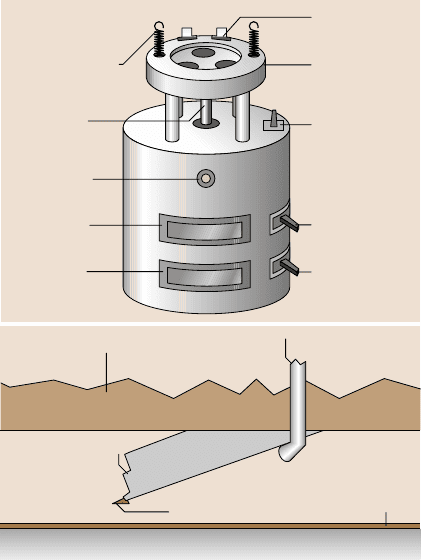
We now describe the construction of a small-sample AFM in more detail. It
consists of three main parts: the optical head which senses the cantilever deflection;
a PZT tube scanner which controls the scanning motion of the sample mounted on
one of its ends; and the base, which supports the scanner and head and includes cir-
cuits for the deflection signal (Fig. 2.12a). The AFM connects directly to a control
system. The optical head consists of a laser diode stage, a photodiode stage preamp
board, the cantilever mount and its holding arm, and the deflected beam reflecting
mirror, which reflects the deflected beam toward the photodiode (Fig. 2.12b). The
laser diode stage is a tilt stage used to adjust the position of the laser beam relative to
the cantilever. It consists of the laser diode, collimator, focusing lens, baseplate, and
the x and y laser diode positioners.The positionersare used to place the laser spot on
the end ofthe cantilever. The photodiodestage is an adjustablestage used to position
the photodiode elements relative to the reflected laser beam. It consists of the split
photodiode, the base plate, and the photodiode positioners. The deflected beam re-
flecting mirror is mounted on the upperleft in the interior of the head. The cantilever
mount is a metal (for operation in air) or glass (for operation in water) block which
holds the cantilever firmly at the proper angle (Fig. 2.12d). Next, the tube scan-
ner consists of an Invar cylinder holding a single tube made of piezoelectric crystal
2 Scanning Probe Microscopy 55
AFM photodiode
positioner
Laser diode
x positioner
Laser diode
y positioner
FFM
photodiode
positioner
Optical
head
Scanner
Base
Preamp housing
Cantilever mount
x–y Positioning
stage
Scanner support
ring
Coarse adjust
screws
Motor control
switch
Motor drive shaft
Motor housing
AFM DVM
control switch
AFM voltmeter
FFM DVM
control switch
FFM voltmeter
Laser Power
a)
AFM photo-
diode
positioner
Laser diode
x positioner
Laser diode
y positioner
FFM
photodiode
positioner
Preamp
housing
Beam path
x–y Positioning stage
Photo-
diode
housing
Cantilever
mount
Holding arm
Cantilever
Interlock
sensor
Viewing
window
b)
Fig. 2.12a,b. Schematics of a commercial AFM/FFM made by Digital Instruments Inc.
(a) Front view, (b) optical head
56 Bharat Bhushan and Othmar Marti
Electrical
connectors
Head stabilizing
springs
Scanner
support ring
Stepper motor
control switch
AFM DVM
Control switch
Drive shaft
Laser power
indicator
AFM DVM
display
FFM DVM
display
FFM DVM
Control switch
c)
Cantilever mount Cantilever clip
Substrate
Cantilever Sample
Ledges
d)
Fig. 2.12c,d. Schematics of a commercial AFM/FFM made by Digital Instruments Inc.
(c) base, and (d) cantilever substrate mounted on cantilever mount (not to scale)
which imparts the necessary three-dimensional motion to the sample. Mounted on
top of the tube is a magnetic cap on which the steel sample puck is placed. The tube
is rigidly held at one end with the sample mounted on the other end of the tube. The
scanner also contains three fine-pitched screws which form the mountfor the optical
head. The optical head rests on the tips of the screws, which are used to adjust the
position of the head relative to the sample. The scanner fits into the scanner support
ring mounted on the base of the microscope (Fig. 2.12c). The stepper motor is con-
trolled manually with the switch on the upper surface of the base and automatically
by the computer during the tip-engage and tip-withdraw processes.
The scan sizes available for these instruments are 0.7 µm, 12µm and 125µm.
The scan rate must be decreased as the scan size is increased. A maximum scan
rate of 122Hz can be used. Scan rates of about 60Hz should be used for small
scan lengths (0.7 µm). Scan rates of 0.5 to 2.5Hz should be used for large scans
on samples with tall features. High scan rates help reduce drift, but they can only
be used on flat samples with small scan sizes. The scan rate or the scanning speed
(length/time)in the fast scan direction isequal to twice the scanlength multiplied by
the scan rate in Hz, and in the slow direction it is equal to the scan length multiplied
2 Scanning Probe Microscopy 57
by the scan rate in Hz divided by number of data points in the transverse direction.
For example, for a scan size of 10µm×10 µm scanned at 0.5 Hz, the scan rates in
the fast and slow scan directions are 10 µm/s and 20 nm/s, respectively. Normally
256×256 data points are taken for each image. The lateral resolution at larger scans
is approximately equal to the scan length divided by 256. The piezo tube requires
x–y calibration, which is carried out by imaging an appropriate calibration standard.
Cleaved graphite is used for small scan heads, while two-dimensionalgrids (a gold-
plated rule) can be used for long-range heads.
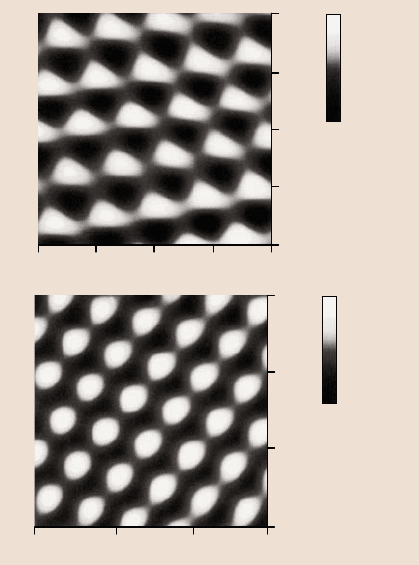
Examples of AFM images of freshly cleaved highly oriented pyrolytic (HOP)
graphite and mica surfaces are shown in Fig. 2.13 [50,110,114].Images with near-
atomic resolution are obtained.
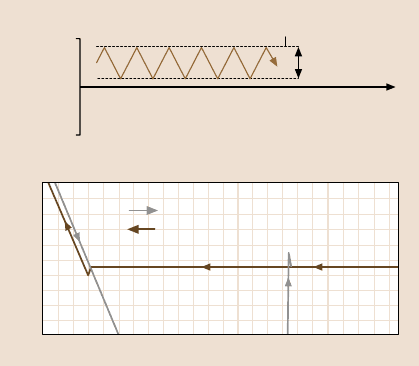
The force calibration mode is used to study interactions between the cantilever
and the sample surface. In the force calibration mode, the x and y voltages applied
to the piezo tube are held at zero and a sawtooth voltage is applied to the z electrode
of the piezo tube, Fig. 2.14a. At the start of the force measurement the cantilever is
in its rest position. By changing the applied voltage, the sample can be moved up
and down relative to the stationary cantilever tip. As the piezo moves the sample up
and down, the cantilever deflection signal from the photodiode is monitored. The
force–distance curve, a plot of the cantilever tip deflection signal as a function of
a)
b)
1.00
0.75
0.50
0.25
0
0 0.25 0.50 0.75 1.00
nm
0.2nm
0.1nm
0.0nm
0.5nm
0.25nm
0.0nm
3.00
2.00
1.00
0
0 1.00 2.00 3.00
nm
Fig. 2.13. Typical AFM
images of freshly-cleaved
(a) highly oriented pyrolytic
graphite and (b)micasur-
faces taken using a square
pyramidal Si
3
N
4
tip
58 Bharat Bhushan and Othmar Marti
z voltage (V)
z scan start
+ 220
– 220
z scan
size
Time
Tip deflection (6 nm/div)
PZT vertical position (15 nm/div)
a)
b)
Retracting
Extending
C
B
A
Fig. 2.14. (a) Force cali-
bration Z waveform, and
(b) a typical force–distance
curve for a tip in contact with
a sample. Contact occurs at
point B; tip breaks free of
adhesive forces at point C as
the sample moves away from
the tip
the voltage applied to the piezo tube, is obtained. Figure 2.14b shows the typical
features of a force–distance curve. The arrowheads indicate the direction of piezo
travel. As the piezo extends, it approaches the tip, which is in mid-air at this point
and hence shows no deflection. This is indicated by the flat portion of the curve. As
the tip approaches the sample to within a few nanometers (point A), an attractive
force kicks in between the atoms of the tip surface and the atoms of the surface
of the sample. The tip is pulled towards the sample and contact occurs at point B
on the graph. From this point on, the tip is in contact with the surface, and as the
piezo extends further,the tip gets deflected further. This is representedby the sloped
portion of the curve. As the piezo retracts, the tip moves beyond the zero deflection
(flat) line due to attractive forces (van der Waals forces and long-range meniscus
forces), into the adhesive regime. At point C in the graph, the tip snaps free of the
adhesive forces, and is again in free air. The horizontal distance between points
B and C along the retrace line gives the distance moved by the tip in the adhesive
regime. Multiplying this distance by the stiffness of the cantilever gives the adhesive
force. Incidentally, the horizontal shift between the loading and unloading curves
results from the hysteresis in the PZT tube [4].
Multimode Capabilities
The multimode AFM can be used for topographymeasurementsin the contact mode
and tappingmode,describedearlier,and for measurementsof lateral(friction) force,
electric force gradients and magnetic force gradients.
The multimode AFM, when used with a grounded conducting tip, can be used
to measure electric field gradients by oscillating the tip near its resonant frequency.
When the lever encounters a force gradient from the electric field, the effective
spring constant of the cantilever is altered, changing its resonant frequency. De-
pending on which side of the resonance curve is chosen, the oscillation amplitude
2 Scanning Probe Microscopy 59
of the cantilever increases or decreases due to the shift in the resonant frequency.
By recording the amplitude of the cantilever, an image revealing the strength of the
electric field gradient is obtained.
In the magnetic force microscope (MFM), used with a magnetically coated tip,
static cantilever deflection is detected when a magnetic field exerts a force on the
tip, and MFM images of magnetic materials can be obtained. MFM sensitivity can
be enhanced by oscillating the cantilever near its resonant frequency. When the tip
encounters a magnetic force gradient, the effective spring constant (and hence the
resonant frequency)is shifted. By driving the cantilever above or below the resonant
frequency, the oscillation amplitude varies as the resonance shifts. An image of the
magnetic field gradient is obtained by recording the oscillation amplitude as the tip
is scanned over the sample.
Topographic information is separated from the electric field gradient and mag-
netic field images using the so-called lift mode. In lift mode, measurements are
taken in two passes over each scan line. In the first pass, topographical information
is recorded inthe standardtapping mode,where the oscillatingcantileverlightlytaps
the surface. In the second pass, the tip is lifted to a user-selected separation (typi-
cally 20–200nm) between the tip and local surface topography. By using stored
topographical data instead of standard feedback, the tip–sample separation can be
kept constant. In this way, the cantilever amplitude can be used to measure electric
field force gradients or relatively weak but long-range magnetic forces without be-
ing influenced by topographic features. Two passes are made for every scan line,
producing separate topographic and magnetic force images.
Electrochemical AFM
This option allows one to perform electrochemical reactions on the AFM. The tech-
nique involves a potentiostat, a fluid cell with a transparent cantilever holder and
electrodes, and the software required to operate the potentiostat and display the re-
sults of the electrochemical reaction.
2.3.3 AFM Probe Construction
Various probes (cantilevers and tips) are used for AFM studies. The cantilever sty-
lus used in the AFM should meet the following criteria: (1) low normal spring con-
stant (stiffness); (2) high resonant frequency; (3) high cantilever quality factor Q;
(4) high lateral spring constant (stiffness); (5) short cantilever length; (6) incorpo-
ration of components (such as mirror) for deflection sensing, and; (7) a sharp pro-
truding tip [137]. In order to register a measurable deflection with small forces, the
cantilever must flex with a relatively low force (on the order of few nN), requiring
vertical spring constants of 10
−2
to 10
2
N/m for atomic resolution in the contact
profiling mode. The data rate or imaging rate in the AFM is limited by the mechan-
ical resonant frequency of the cantilever. To achieve a large imaging bandwidth,
the AFM cantilever should have a resonant frequency of more than about 10kHz
(30–100kHz is preferable), which makes the cantilever the least sensitive part of
