ASM Metals HandBook Vol. 8 - Mechanical Testing and Evaluation
Подождите немного. Документ загружается.

number is based on the average of these two measurements. Table 5 provides a simple way to convert the
indentation diameter to the Brinell hardness number.
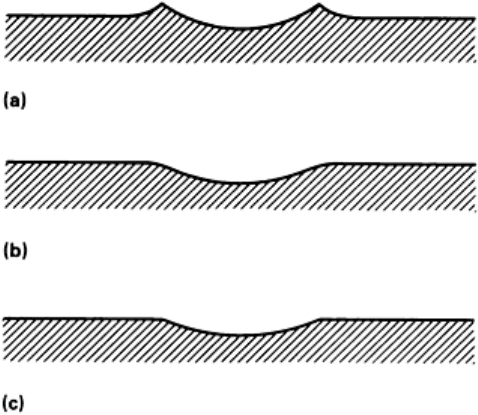
The indentations produced in Brinell hardness tests may exhibit different surface characteristics. In some
instances there is a ridge around the indentation that extends above the surface of the workpiece. In other
instances the edge of the indentation is below the original surface. Sometimes there is no difference at all. The
first phenomenon, called “ridging,” is illustrated in Fig. 13(a). The second phenomenon, called “sinking,” is
illustrated in Fig. 13(b). An example of no difference is shown in Fig. 13(c). Cold-worked metals and
decarburized steels are those most likely to exhibit ridging. Fully annealed metals and light case-hardened steels
more often show sinking around the indentation.
Fig. 13 Sectional views of Brinell indentations. (a) Ridging-type Brinell impression. (b) Sinking-type
Brinell impression. (c) Flat-type Brinell impression
The Brinell hardness number is related to the surface area of the indentation. This is obtained by measuring the
diameter of the indentation, based on the assumption that it is the diameter with which the indenter was in
actual contact. However, when either ridging or sinking is encountered there is always some doubt as to the
exact part of the visible indentation with which the actual contact was made. When ridging is present, the
apparent diameter of the indentation is greater than the true value, whereas the reverse is true when sinking
occurs.
Because of the above conditions, measurements of indentation diameters require experience and some judgment
on the part of the operator. Experience can be gained by measuring calibration indents in the standardized test
block.
Even when all precautions and limitations are observed, the Brinell indentations for some materials vary in
shape. For example, materials that have been subjected to unidirectional cold working often exhibit extreme
elliptical indentations. In such cases, where best possible accuracy is required, the indentation is measured in
four directions approximately 45° apart, and the average of these four readings is used to determine the Brinell
hardness number. Other techniques such as Rockwell-type depth measurements are often used with high-
production equipment.
Semiautomatic Indent Measurements. In an effort to reduce measurement errors, image analysis systems are
available for the measurement of the indent area. The systems normally consist of a solid-state camera mounted
on a flexible probe, which is typically manually placed over the indent (Fig. 14). A computer program then
analyzes the indent and calculates the size and Brinell number. The advantage of these systems is that they can
reduce the errors associated with the optical measurements done by an operator. The surface finish
requirements are frequently higher as the computer can have difficulty measuring noncircular indents or jagged
edges for which an experienced operator could make judgments and correct as needed.
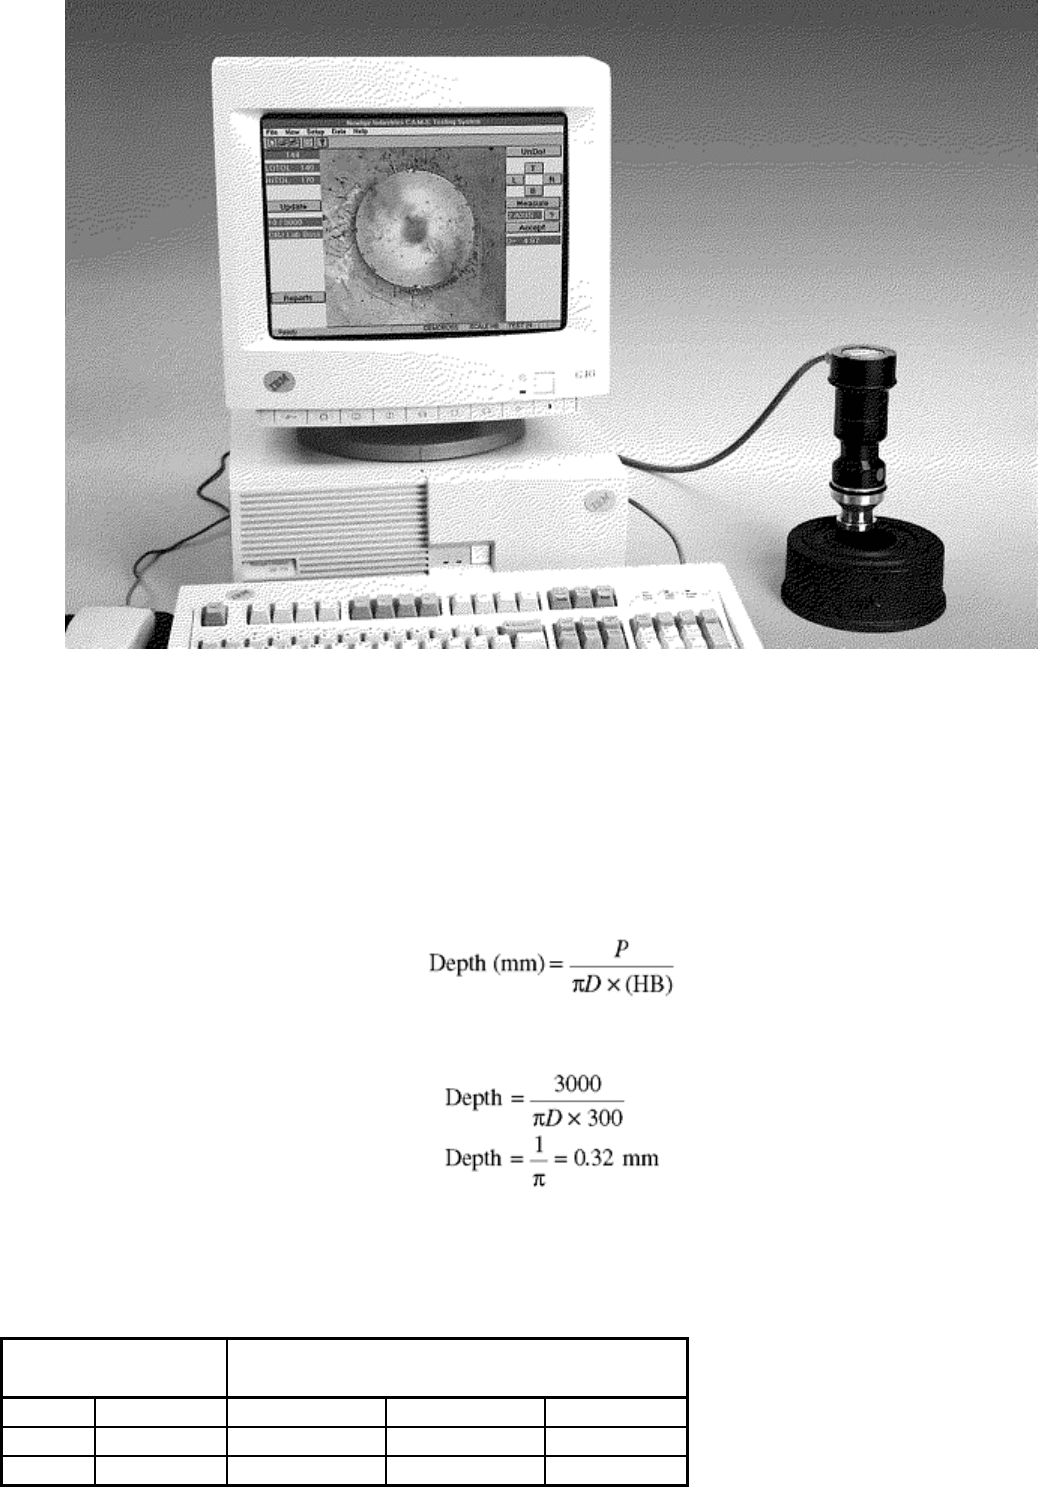
Fig. 14 Computerized Brinell hardness testing optical scanning system
General Precautions and Limitations
To avoid misapplication and errors in Brinell hardness testing, the fundamentals and limitations of the test must
be thoroughly understood. The following precautions should be observed before testing.
Thickness of the testpiece should be such that no bulge or other marking showing the effect of the load appears
on the side of the piece opposite the impression. The thickness of the specimen should be at least ten times the
depth of the indentation. Depth of indentation may be calculated from the formula:
where P is load in kgf, D is ball diameter in mm, and HB is Brinell hardness number. For example, a reading of
300 HB indicates:
Therefore, the minimum thickness of the workpiece is 10 × 0.32 or 3.2 mm (0.125 in.). Table 8 gives minimum
thickness requirements.
Table 8 Minimum thickness requirements for Brinell hardness tests
Minimum thickness
of specimen
Minimum hardness for which the
Brinell test may be made safely
mm in. 3000 kgf load
1500 kgf load
500 kgf load
1.6 0.0625 602 301
100
3.2 0.125 301 150
50
4.8 0.1875 201 100
33
6.4 0.250 150 75
25
8.0 0.3125 120 60
20
9.6 0.375 100 50 17
Test surfaces that are flat give best results. Curved test surfaces of less than 25 mm (1 in.) radius should not be
tested.
Spacing of Indentations. For accurate results, indentations must not be made near the edge of the workpiece.
Lack of sufficient supporting material on one side will result in abnormally large, unsymmetrical indentations.
In most instances the error in Brinell hardness number will not be significant if the distance from the center of
the indentation to any edge of the workpiece is more than three times the diameter of the indentation.
Similarly, Brinell indentations must not be made too close to one another. The first indentation may cause cold
working of the surrounding area that could affect the subsequent test if made within this affected region. It is
generally agreed that the distance between centers of adjacent indentations should be at least three times the
diameter of the indentation to eliminate significant errors.
Anviling. The part must be anviled properly to minimize workpiece movement during the test and to position
the test surface perpendicular to the test force within 2°.
Surface Finish. The degree of accuracy attainable by the Brinell test can be greatly influenced by the surface
finish of the workpiece. The surface of the workpiece should be milled, ground, or polished so that the
indentation is defined clearly enough to permit accurate measurement. Care should be taken to avoid
overheating or cold working the surface, as that may affect the hardness of the material. In addition, for
accurate results, the workpiece surface must be representative of the material. Decarburization or any form of
surface hardening must be removed prior to testing.
Testing Machines
Various kinds of Brinell testers are available for laboratory, production, automatic, and portable testing. These
testers commonly use deadweight, hydraulic, pneumatic, elastic members (i.e., springs), or a closed-loop load-
cell system to apply the test loads. All testers must have a rigid frame to maintain the load and a means of
controlling the rate of load application to avoid errors due to impact (500 kgf/s maximum). The loads must be
consistently applied within 1.0% as indicated in ASTM E 10. In addition, the load must be applied so that the
direction of load is perpendicular to the workpiece surface within 2° for best results.
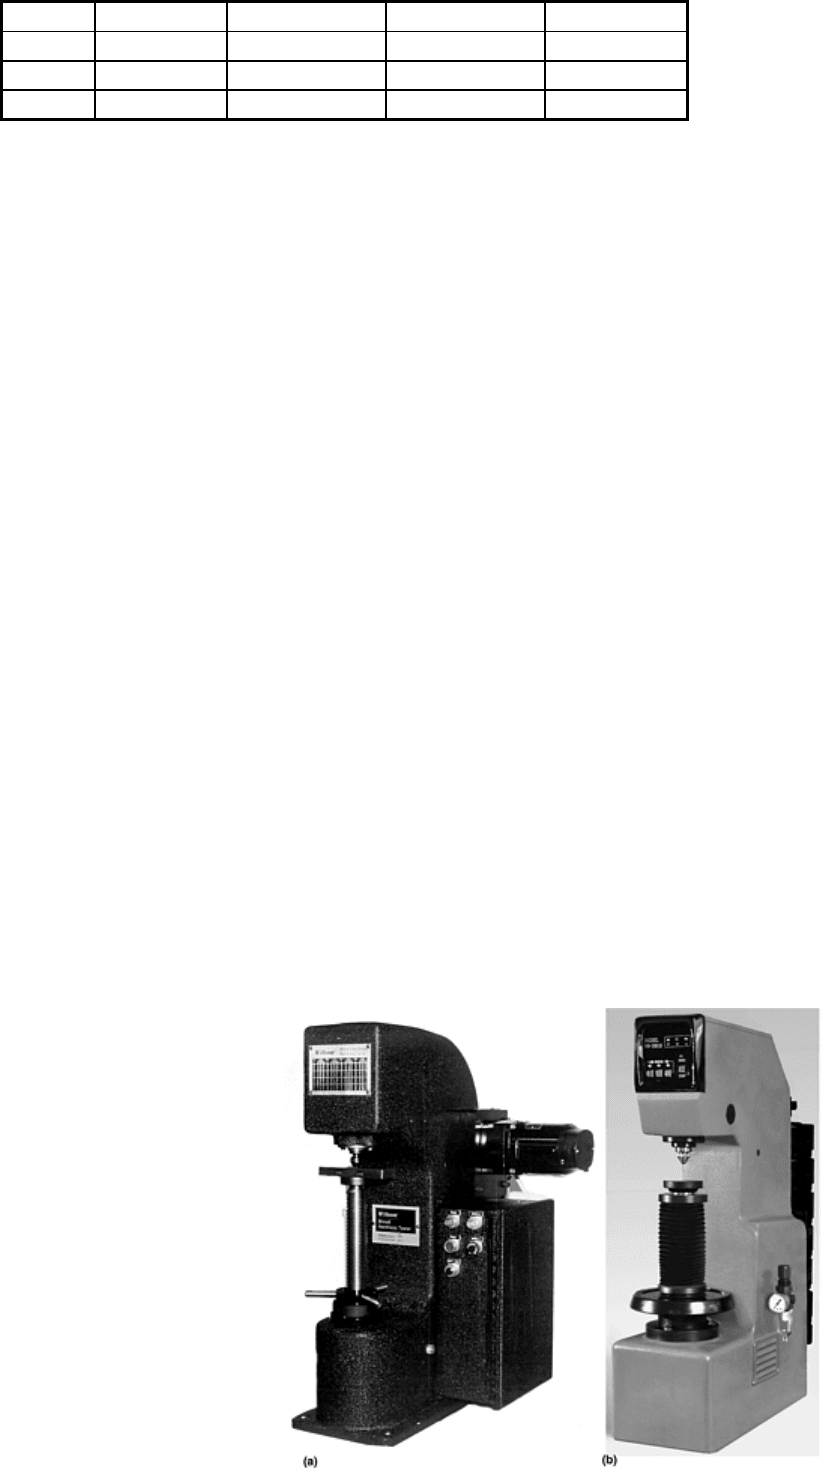
Bench units for laboratory testing are available with deadweight loading and/or pneumatic loading. Because of
their high degree of accuracy, deadweight testers are most commonly used in laboratories and shops that do
low- to medium-rate production. These units are constructed with weights connected mechanically to the
Brinell ball indenter. Minimum maintenance is required because there are few moving parts. Figure 15(a) is an
example of a motorized deadweight tester.
Fig. 15 Bench-type Brinell testers. (a) Motorized tester with deadweight loading. Courtesy of Wilson
Instruments. (b) Brinell tester with combined deadweight loading and pneumatic operation. Courtesy of
NewAge Industries
Bench units are also available with pneumatic load application or a combination of deadweight/pneumatic
loading. Figure 15(b) shows an example of the latter, where the load can be applied by release of deadweights
or by pneumatic actuation.
In both deadweight and pneumatic bench units, the testpiece is placed on the anvil, which is raised by an
elevating screw until the testpiece nearly touches the indenter ball. Operator controls initiate the load, which is
applied at a controlled rate and time duration by the test machine. The testpiece is then removed from the anvil,
and the indentation width is measured with a Brinell scope, typically at 20× power. Testing with this type of
apparatus is relatively slow and prone to operator influence on the test results.
Machines for Production Testing. Hydraulic testers were developed to reduce testing time and operator fatigue
in production operations. Advantages of hydraulic testers include operating economy, simplicity of controls,
and dependable accuracy. The controls prevent the operator from applying the load too quickly and thus
overloading. The load is applied by a hydraulic cylinder and monitored by a pressure gage. Normally the
pressure can be adjusted to apply any load between 500 and 3000 kgf. Hydraulic machines for production are
available as bench-top or floor units (Fig. 16).
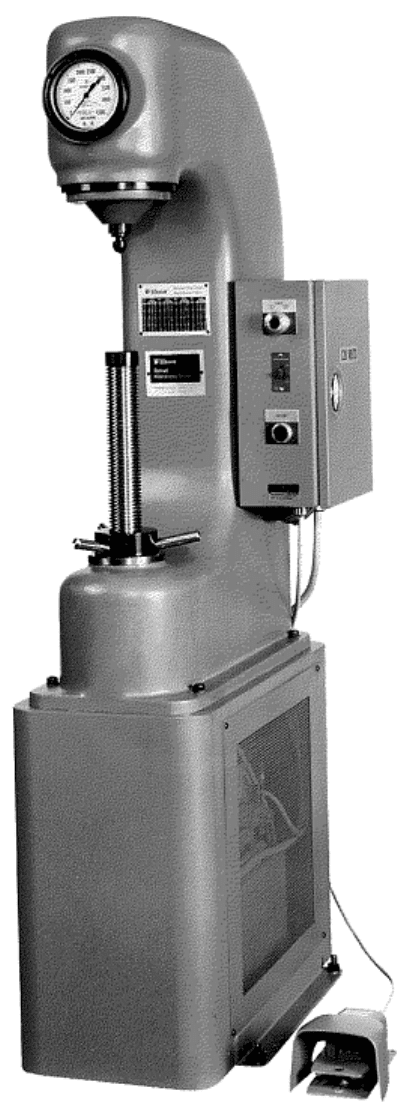
Fig. 16 Hydraulic Brinell tester. Courtesy of Wilson Instruments
Automatic Testers. Many types of automatic Brinell testers are currently available. Most of these testers (such
as the one shown in Fig. 17) use a depth-measurement system to eliminate the time-consuming and operator-
biased measurement of the diameters. All of these testers use a preliminary load (similar to the Rockwell
principle) in conjunction with the standard Brinell loads. Simple versions of this technique provide only
comparative “go/no-go” hardness indications; more sophisticated models offer a microprocessor-controlled
digital readout to convert the depth measurement to Brinell numbers. Conversion from depth to diameter
frequently varies for different materials and may require correlation studies to establish the proper relationship.
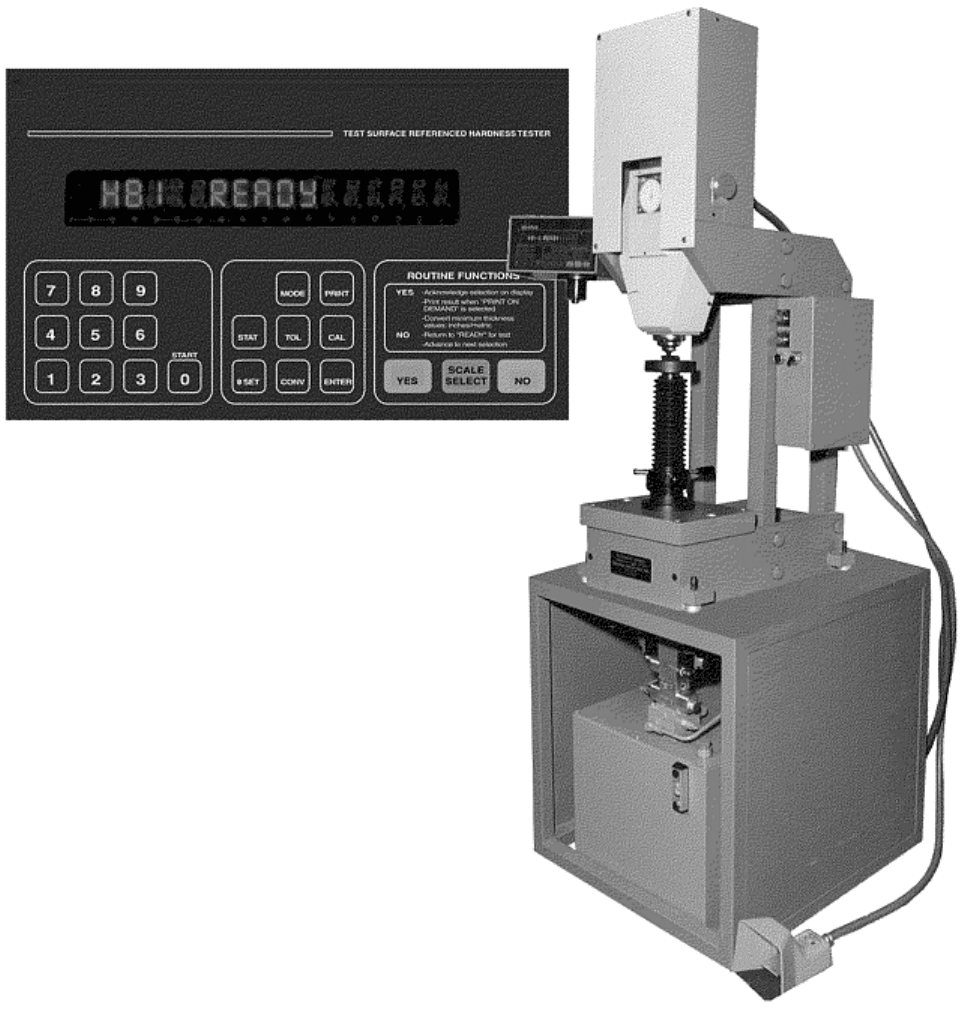
Fig. 17 Automatic Brinell hardness tester with digital readout. Courtesy of NewAge Industries
These units can be fully automated to obtain production rates up to 600 tests per hour and can be incorporated
into in-line production equipment. The high-speed automatic testers typically comply with ASTM E 103,
“Standard Method of Rapid Indentation Hardness Testing of Metallic Materials.”
Portable Testing Machines. The use of conventional hardness testers may occasionally be limited because the
work must be brought to the machine and because the workpieces must be placed between the anvil and the
indenter. Portable Brinell testers that circumvent these limitations are available. A typical portable instrument is
shown in Fig. 18. This type of tester weighs only about 11.4 kg (25 lb), so it can be easily transported to the
workpieces. Portable testers can accommodate a wider variety of workpieces than can the stationary types. The
tester attaches to the workpiece as would a C-clamp with the anvil on one side of the workpiece and the
indenter on the other. For very large parts, an encircling chain is used to hold the tester in place as pressure is
applied.
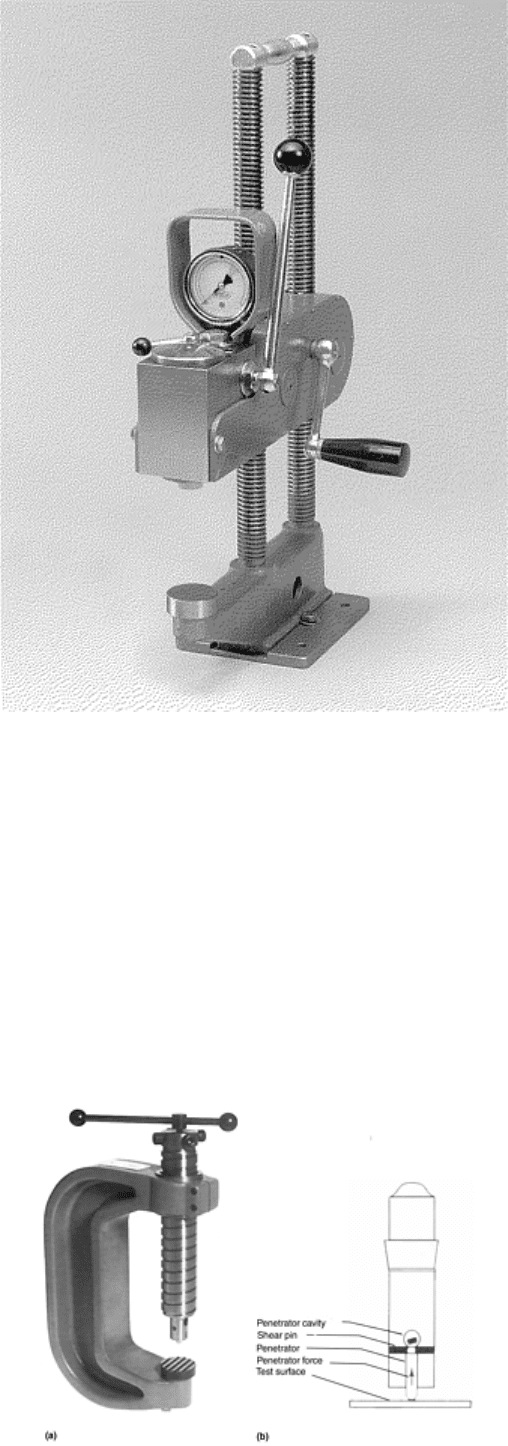
Fig. 18 Hydraulic, manually operated portable Brinell hardness tester
Portable testers generally apply the load hydraulically, employing a spring-loaded relief valve. The load is
applied by operating the hydraulic pump until the relief valve opens momentarily. With this type of tester, the
hydraulic pressure should be applied three times when testing steel with a 3000 kgf load. This is equivalent to a
holding time of 15 s, as required by the more conventional method. For other materials and loads, comparison
tests should be made to determine the number of load applications required to give results equivalent to the
conventional method.
A comparison-type tester that uses a calibrated shear pin is shown in 19Fig. 19. In this method, a small pin of a
known shear load is placed in the indenter assembly against the indenter (Fig. 19b). Through hammer impact or
static clamping load, the indenter is forced into the material only as far is it takes to shear the pin. Excessive
force is absorbed after shear by upward movement of the indenter into an empty cavity. The resulting
impression is measured by the conventional Brinell method. This method does not comply with ASTM E 10.
Fig. 19 Pin Brinell hardness tester. (a) Clamp loading tester. (b) Schematic of pin Brinell principle
Equipment Maintenance. To maintain accurate results from Brinell testing, equipment must be calibrated and
serviced regularly, especially when machines are exposed to shop environments. The frequency of servicing
depends on whether the testers are used in a production line or for making an occasional test. However, it is
important that they be serviced and calibrated on a regular basis. Regular checking of the ball indenter for
deformation is particularly important. Indenters are susceptible to wear as well as to damage. When an indenter
becomes worn or damaged so that indentations no longer meet the standards, it must be replaced. Under no
circumstances should attempts be made to compensate for a worn or damaged indenter.
Verification of Loads, Indenters, and Microscopes. As with any procedure that is dependent on several
components, the accuracy of each must be verified to determine the accuracy of the result. In the case of Brinell
hardness testing, load, indenter, and microscope accuracies must lie within a specified tolerance to ensure
accurate results.
Load Verification. ASTM E 10 specifies that a Brinell hardness tester is acceptable for use over a load range
within which the load error does not exceed ±1%. Test loads should be checked by periodic calibration with a
proving ring or load cell, the accuracy of which is traceable to the National Institute of Standards and
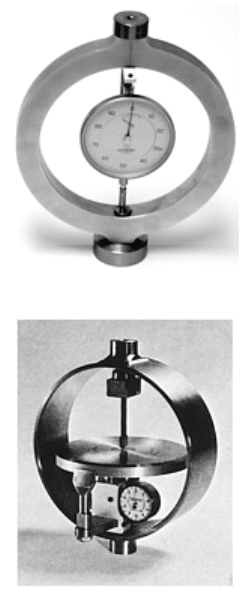
Technology (NIST). Proving rings (see Fig. 20) are an elastic calibration device that is placed on the anvil of
the tester. The deflection of the ring under the applied load is measured either by a micrometer screw and a
vibrating reed or a reading dial gage. The amount of elastic deflection is then converted into load in kilograms
and compared with required accuracies.
Fig. 20 Proving rings used for calibrating Brinell hardness testers
Ball Indenter Verification. The ball indenter must be accurate within ±0.0005 mm of its nominal diameter. It is
very difficult for the user to measure the ball in enough locations to guarantee the correct shape. Therefore, a
close visual inspection is normally done, and any sign of damage will require replacement. A performance test
(indirect verification) using test blocks is the best way to verify the ball. When in doubt, the ball should be
replaced with a new ball certified by the manufacturer to meet all of the requirements in ASTM E 10.
Microscope Verification. The measuring microscope or other device used for measuring the diameter of the
impression should be verified at five intervals over the working range by the use of a scale of known accuracy
such as a stage micrometer. The adjustment of the micrometer microscope should be such that, throughout the
range covered, the difference between the scale divisions of the microscope and of the calibrating scale does not
exceed 0.01 mm.
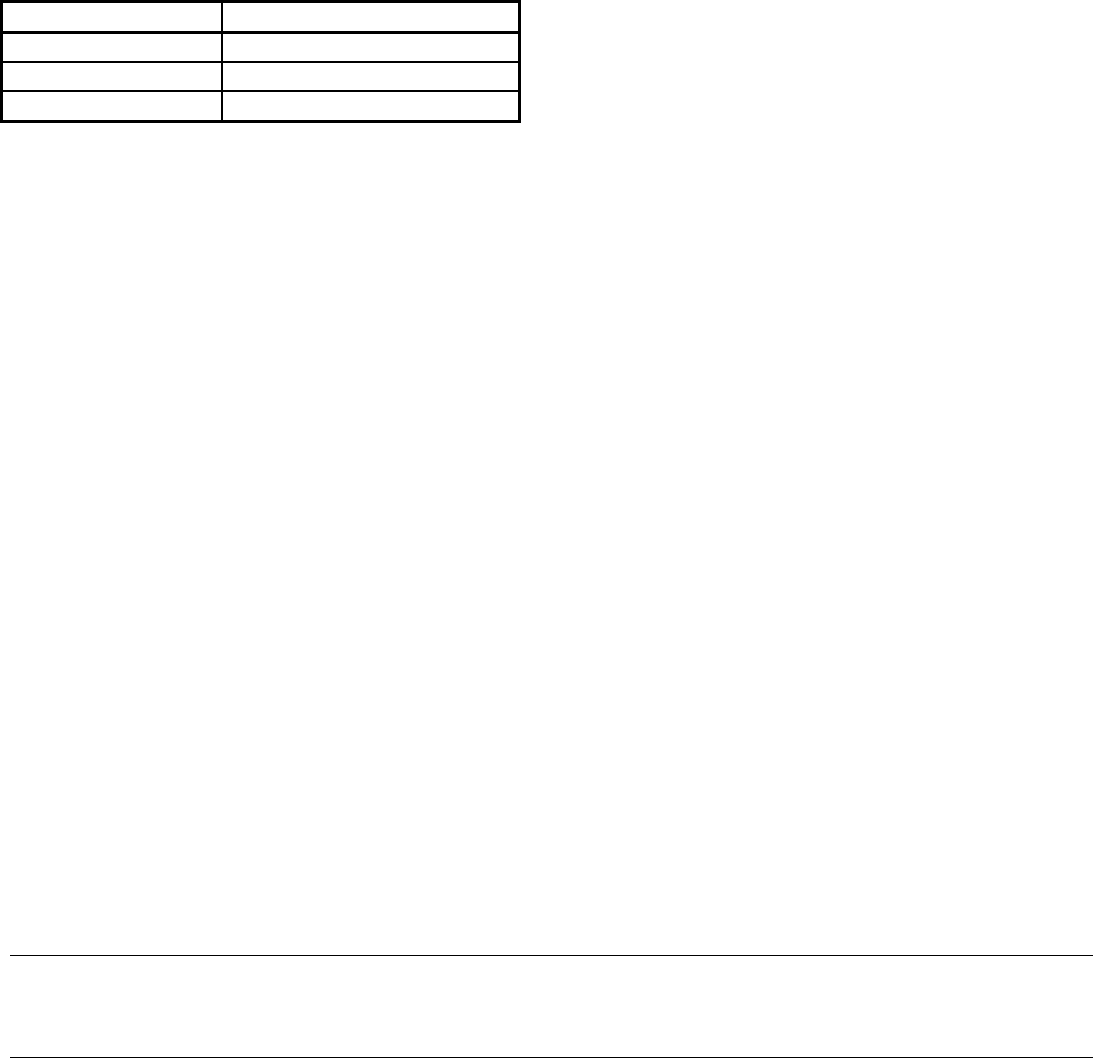
Verification by Test Block (Indirect Verification). Standardized Brinell test blocks are available so that the
accuracy of the Brinell hardness tester can be indirectly verified at the hardness level of the work being tested.
Commonly available hardnesses are:
Test block material
Hardness, HB
Steel
500, 400, 350, 300, 250, 200
Brass
90
Aluminum 140
Good practice is to verify the tester throughout the hardness range encountered. This ensures that all test
parameters are within tolerance.
Application for Specific Materials
As is true for other indentation methods of testing hardness, the most accurate results are obtained when testing
homogeneous materials, regardless of the hardness range.
Steels. Virtually all hardened-and-tempered or annealed steels within the range of hardness mentioned provide
accurate results with the Brinell test. However,a s a rule, case-hardened steels are totally unsuitable for Brinell
testing. In most instances, the surface hardness is above the practical range and is rarely thick enough to provide
the required support for a Brinell test. Thus, “cave in” results, and grossly inaccurate readings are obtained.
Cast Irons. The large area of the test serves to average out the hardness difference between the iron and graphite
particles present in most cast iron. This averaging effect allows the Brinell test to serve as an excellent quality-
control tool.
Nonferrous metals (especially the wrought types) are generally amenable to Brinell testing, usually with the 500
kgf load, but occasionally with the 1500 kgf load. Some high-strength alloys such as titanium- and nickel-base
alloys that are phase-transformation- or age-hardened can utilize the 3000 kgf load. In this situation, practical
limits must be observed and some testing may be required to establish the optimal technique for testing a
specific metal or alloy.
There are certain multiphase cast nonferrous alloys that are simply too soft for accurate Brinell testing.
Microhardness testing is then employed. The lower limit of 16 HB with a 500 kgf load must always be
observed.
Powder Metallurgy Parts. Testing of P/M parts with a Brinell tester (or any sort of macro-hardness tester)
involves the same problem as encountered with cast iron. Instead of a soft graphite phase (some P/M parts also
contain free graphite), P/M parts contain voids that may vary widely in size and number. Light-load Brinell
testing is sometimes used successfully for testing of P/M parts, but its only real value is as a quality-control tool
in measuring the apparent hardness of P/M parts (see the article “Selection and Industrial Applications of
Hardness Tests” for more information on P/M hardness testing.)
Macroindentation Hardness Testing
Edward L. Tobolski, Wilson Instruments Division, Instron Corporation; Andrew Fee, Consultant
Vickers Hardness Testing
The Vickers hardness was first introduced in England in 1925 by R. Smith and G. Sandland (Ref 5). It was
originally known as the 136° diamond pyramid hardness test because of the shape of the indenter. The
manufacture of the first tester was a company known as Vickers-Armstrong Limited, of Crayford, Kent,
England. As the test and the tester gained popularity, the name Vickers became the recognized designation for
the test.
The Vickers test method is similar to the Brinell principle in that a defined shaped indenter is pressed into a
material, the indenting force is removed, the resulting indentation diagonals are measured, and the hardness
number is calculated by dividing the force by the surface area of the indentation. Vickers testing is divided into
two distinct types of hardness tests: macroindentation and microindentation tests. These two types of tests are
defined by the forces. Microindentation Vickers (ASTM E 384) is from 1 to 1000 gf and is covered in detail in
the article “Microindentation Hardness Testing.” this section focuses on the macroindentation range with test
forces from 1 to 120 kgf as defined in ASTM E 92. Selected international standards for Vickers hardness
testing are listed in Table 9.
Table 9 Selected Vickers hardness testing standards
Standard No.
Title
ASTM E 92
Standard Test Method for Vickers Hardness of Metallic Materials
BS EN ISO 6507-
1
Metallic Materials—Vickers Hardness Test—Part 1: Test Method
BS EN ISO 6507-
2
Metallic Materials—Vickers Hardness Test—Part 2: Verification of Testing
Machines
BS EN ISO 6507-
3
Metallic Materials—Vickers Hardness Test—Part 3: Calibration of Reference
Blocks
EN 23878
Hardmetals—Vickers Hardness Test
JIS B 7725
Vickers Hardness—Verification of Testing Machines
JIS B 7735
Vickers Hardness Test—Calibration of the Reference Blocks
JIS Z 2244
Vickers Hardness Test—Test Method
JIS Z 2252 Test Methods for Vickers Hardness at Elevated Temperatures
Test Method
As mentioned previously, the principle of the Vickers test is similar to the Brinell test, but the Vickers test is
performed with different forces and indenters. The square-base pyramidal diamond indenter is forced under a
predetermined load ranging from 1 to 120 kgf into the material to be tested. After the forces have reached a
static or equilibrium condition and further penetration ceases, the force remains applied for a specific time (10
to 15 s for normal test times) and is then removed. The resulting unrecovered indentation diagonals are
measured and averaged to give a value in millimeters. These length measurements are used to calculated the
Vickers hardness number (HV).
The Vickers hardness number (formerly known as DPH for diamond pyramid hardness) is a number related to
the applied force and the surface area of the measured unrecovered indentation produced by a square-base
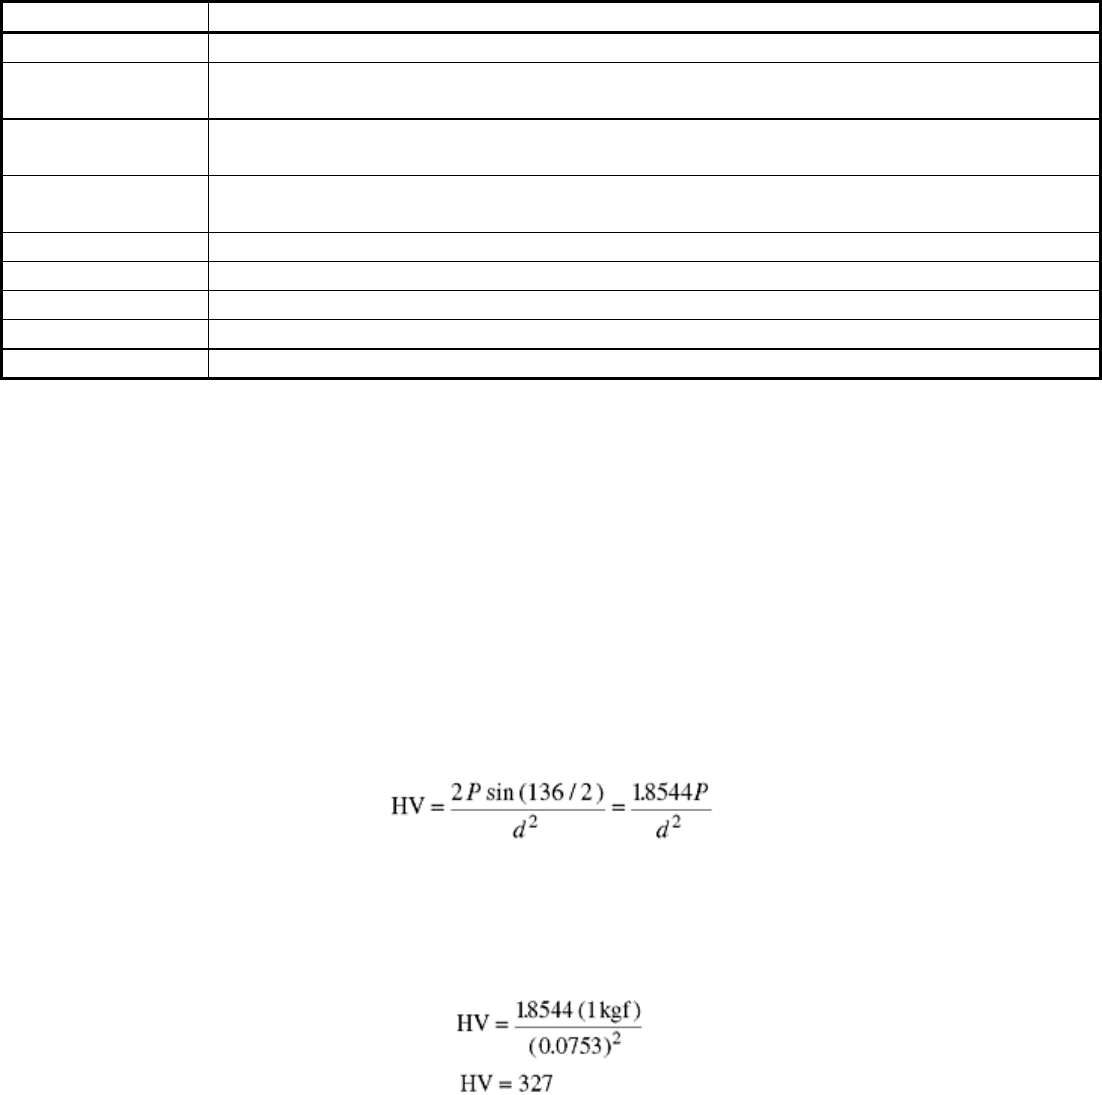
pyramidal diamond indenter. The Vickers indenter has included face angles of 136° (Fig. 21), and the Vickers
hardness number (HV) is computer from the following equation:
where P is the indentation load in kgf, and d is the mean diagonal of indentation, in mm. This calculation of
Vickers hardness can be done directly from this formula or from Table 10 (lookup table in ASTM E 92). This
table contains calculated Vickers numbers for a 1 kgf load, so that it is not necessary to calculate every test
result. For example, if the average measured diagonal length, d, is 0.0753 mm with a 1 kgf load, then the
Vickers number is:
This value can be obtained directly from the lookup table. For obtaining hardness numbers when other loads are
used, simply multiply the number from the lookup table by the test load.
