ASM Metals HandBook Vol. 8 - Mechanical Testing and Evaluation
Подождите немного. Документ загружается.

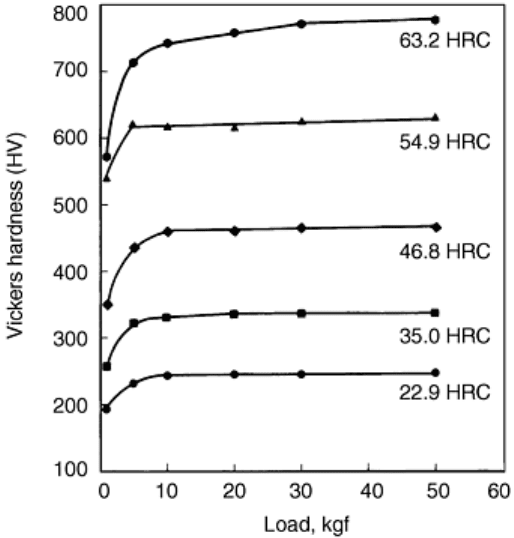
It is widely claimed in the literature that the Vickers hardness is constant with test force in the macro force
range (≥1 kgf). However, a search in the literature for data to prove this point yielded very little evidence.
Reference 3 gives measurements made on five polished HRC test blocks, with hardnesses ranging from 22.9 to
63.2 HRC, using six test forces from 1 to 50 kgf. At each force, six impressions were made, and the mean
results are in Fig. 12. The Filar micrometer used a magnification of 100×. Note that the HV is essentially
constant for forces of 10 kgf and greater. For each test block, the hardness decreased for test forces less than 10
kgf. The degree of decrease increased with increasing hardness. Thus, for this macro Vickers tester, HV was
not constant but exhibited trend 2, the most commonly observed trend for studies of MHT and HV force.
Fig. 12 Measured Vickers macrohardness for five steel test blocks using test forces from 1-50 kgf.
Source: Ref 3
The exact same steel test blocks were also subjected to Vickers microindentation hardness tests using nine
different forces from 5 to 500 gf (Ref 3). Again, six impressions were made at each test force, and the mean
values are plotted in Fig. 13. These impressions were measured at 500×. Again, the same basic trend is
observed. In most cases, HV is essentially constant at forces down to 100 gf, then the hardness decreases. The
magnitude of this decrease again increases with increasing specimen hardness. For several of the data, the
hardness appears to rise slightly as the force drops below 100 gf, and then it decreases (trend 4). Thus, for the
work detailing MHT in HV versus the test forces, both trends 2 and 4 were obtained.
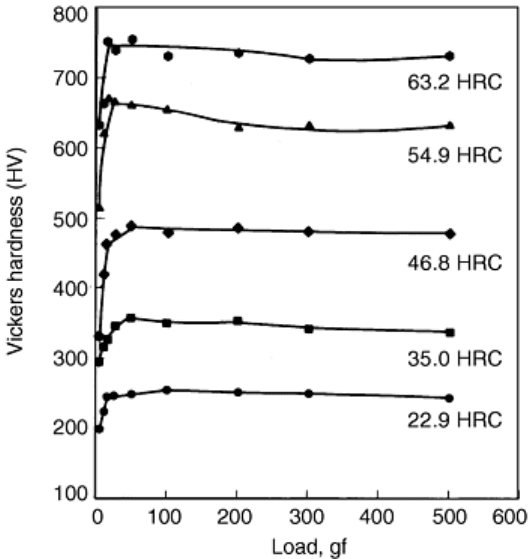
Fig. 13 Measured Vickers microindentation hardness for five steel test blocks using test forces from 5-
500 gf. Source: Ref 3
These results, using the same set of five specimens with a wide range of hardnesses and tests with both micro-
and macro-Vickers units, revealed basically the same trend. At small indent sizes for both testers,
measurements yielded lower hardness (indents being oversized) than they should. This can only be due to
visual perception problems in sizing small indents at the tester magnifications employed (100× for the macro
system and 500× for the micro system). No material characteristic can possibly explain this problem.
To further demonstrate that the observed trends of HV versus test force (load) are due to measurement
difficulties, the results of an ASTM Committee E-4 interlaboratory round-robin test program is cited (Ref 6, 7).
In this study, one person indented three ferrous and four nonferrous specimens at test forces of 25, 50, 100, 200,
500, and 1000 gf (five times at each force). Then, twenty-four people measured the indents: thirteen measured
all of the Knoop and Vickers indents in the ferrous specimens (fourteen actually measured specimen F1), and
eleven measured the Knoop and Vickers indents in the nonferrous specimens. Agreement was best for the low
hardness specimens, as would be expected, because they had the largest indents and the effect of small
measurement errors is minimal. The Vickers hardness, in most cases, decreased with forces below 100 gf, but
all four possible trends reported in the literature can be seen in the measurement data for the same indents.
As an example, Fig. 14 shows the data for nine of the fourteen people who measured the Vickers indents in the
hardest ferrous specimen (specimen F1). The overall trend for the data is trend 2. However, examination of the
data shows that test lab 8 followed trend number 1, lab 1 followed trend 3, and lab 3 followed trend 4.
Statistical analysis of all of the test data suggested that these nine people obtained essentially the same test
results while some or all of the data from the other five people represented “outlier” conditions. Figure 15
shows the data for the five outlier labs for the F1 specimen (where lab F was defined as an outlier lab based on
results for other specimens—their results for specimen F1 were marginal). The “good max” and “good min”
lines in Fig. 15 encompass the range of “good” data shown in Fig. 14. Again, several HV-versus-force trends
are observed: labs E, H, and J follow trend 1, and labs F and M follow trend 2. Because exactly the same
indents were measured, these variations in test results come only from measurement inconsistencies. This study
reveals that the most commonly obtained trend was trend 2, decreasing HV with decreasing test force, and this
is the most commonly reported trend in the literature. Thus, it is more likely for an operator to oversize small
Vickers indents than to undersize them or to measure their true size.
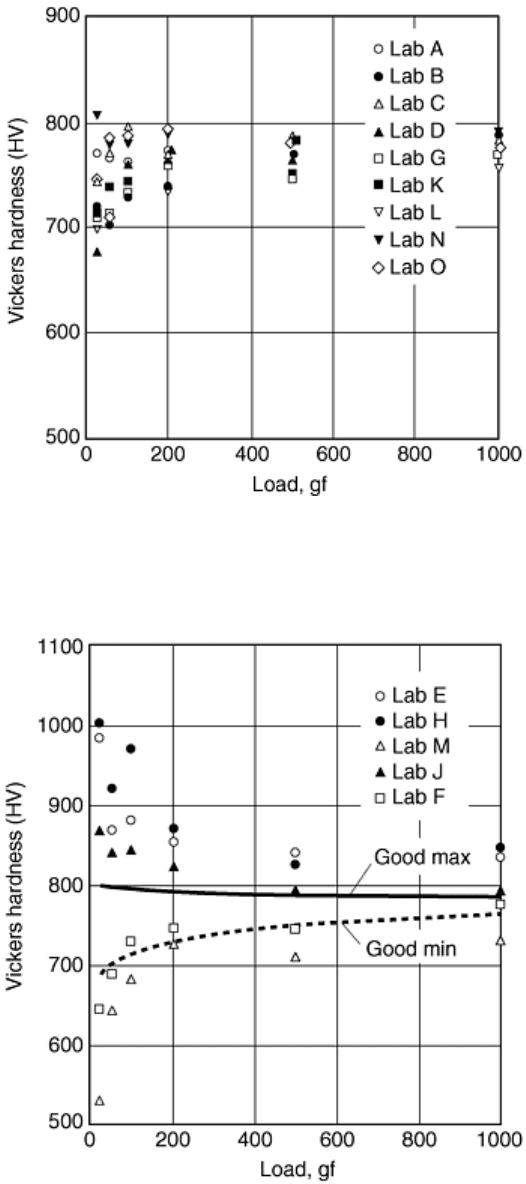
Fig. 14 ASTM E-4 round-robin interlaboratory Vickers microindentation hardness-testing data for the
hardest (F1) test specimen and nine people (measuring the same indents) who produced “good” data for
test loads from 25-1000 gf. Source: Ref 6, 7
Fig. 15 Data shown in Fig. 14 (all points fall within the two lines) plus the individual data from four
“outlier” raters. Source: Ref 6, 7
Measurements of the Knoop indents also reveal substantial variations in the data. In most cases, the HK rose as
the test force decreased, with most of the increase occurring at forces less than 200 gf. In general, HK results
were statistically identical for each specimen at forces from 200 to 1000 gf. For the nonferrous specimens, one
rater consistently obtained the very unusual trend of decreasing HK with forces less than 200 gf. One other rater
obtained a similar, but less pronounced, decrease in HK with decreasing test forces; but this was only for the
hardest nonferrous specimen (mean hardness, approximately 330 HK).
The visibility of the tips of the long diagonal on the Knoop indent is poorer than for Vickers indents. Thus, for
Knoop indents, undersizing the indent is far more likely than oversizing. However, it is clear that one of the
eleven people who measured the Knoop indents in this study consistently oversized the Knoop indents. At test
forces above 200 gf, this person's results agreed with the mean results in two cases, were below the mean in one
case, and were above the mean in another case. A calibration error would produce a consistent bias in all of the
data; however, this could not be the case for this person's test results. Interestingly, this person was an
experienced metallographer, not a novice.
There are times when the hardness tester can be the source of a variation in the load-hardness relationship.
Before using a new MHT unit, it is a good practice to select a specimen with a homogeneous microstructure
and a known hardness and then perform a series of tests using the full range of applied test forces available for
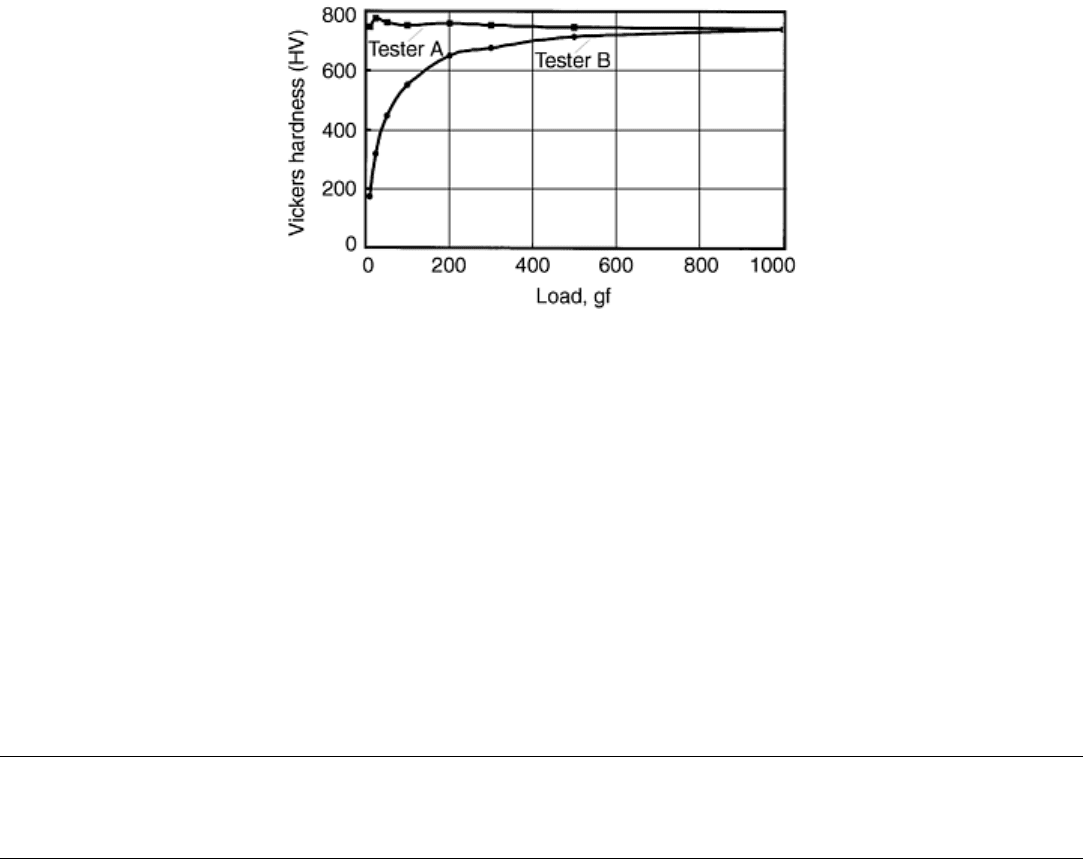
the unit. To obtain good statistics, make a number of impressions at each load. As an illustration of this
problem, two testers were evaluated over their full ranges using a hardened specimen of type 440C martensitic
stainless steel. For tester A, six indents were made at each available test load, while for tester B, only three
indents were made at each load due to time limitations with the unit. The mean results are plotted in Fig. 16.
While tester A produced virtually identical results over the full load range, it is clear that tester B was applying
excessively high test forces at all loads under 1000 gf. Clearly this was a machine problem because the same
person performed both sets of measurements on the same specimen. Verification of the instrument using
properly calibrated test blocks should help identify this type of problem.
Fig. 16 Curves showing load versus Vickers hardness for two testers (with the same operator) evaluating
the hardness of the same type 440C martensitic stainless steel specimen (62.7 HRC)
References cited in this section
3. G. F. Vander Voort, Metallography: Principles and Practice, McGraw-Hill, 1984; reprinted by ASM
International, 1999, p 356, 381
6. G.F. Vander Voort, “Results of an ASTM E-4 Round-Robin on the Precision and Bias of Measurements
of Microindentation Hardness Impressions,” ASTM STP 1025, “Factors that Affect the Precision of
Mechanical Tests,” ASTM, 1989, p 3–39
7. G.F. Vander Voort, “Operator Errors in the Measurement of Microindentation Hardness,” ASTM STP
1057, “Accreditation Practices for Inspections, Tests and Laboratories,” ASTM, 1989, p 47–77
Microindentation Hardness Testing
George F. Vander Voort, Buehler Ltd.
Repeatability and Reproducibility

Appendix X2 of ASTM E 384, along with Ref 6 and 7, describes the results of an ASTM interlaboratory round-
robin program used to determine the precision of measuring Knoop and Vickers indents and the repeatability
and reproducibility of such measurements. Repeatability is a measure of how well an individual operator can
replicate results on different days with the same specimen and the same equipment. Reproducibility measures
the ability of different operators, in different laboratories, to obtain the same results, within statistical limits.
Repeatability and reproducibility were best for low-hardness specimens and got poorer as the hardness
increased; that is, as the indent size decreased. Repeatability was always somewhat better than reproducibility,
as might be expected. For a material with a hardness of 900 HV, repeatability for a 25 gf load was
approximately ±170 HV, and for a 1000 gf load it was approximately ±25 HV, while reproducibility for a 25 gf
load was approximately ±220 HV, and for a 1000 gf load it was approximately ±40 HV. For a material with a
hardness of 900 HK, repeatability for a 25 gf load was approximately ±75 HK, and for a 1000 gf load it was
approximately ±25 HK, while reproducibility for a 25 gf load was approximately ±105 HK, and for a 1000 gf
load it was approximately ±40 HK. This shows that the repeatability and reproducibility values at the highest
loads were similar for both types of indents, but as the test load decreased, the longer Knoop indent (at each
load) yielded better repeatability and reproducibility than the smaller Vickers indent at the same load. These
trends again highlight the importance of trying to use the greatest possible load for any test.
References cited in this section
6. G.F. Vander Voort, “Results of an ASTM E-4 Round-Robin on the Precision and Bias of Measurements
of Microindentation Hardness Impressions,” ASTM STP 1025, “Factors that Affect the Precision of
Mechanical Tests,” ASTM, 1989, p 3–39
7. G.F. Vander Voort, “Operator Errors in the Measurement of Microindentation Hardness,” ASTM STP
1057, “Accreditation Practices for Inspections, Tests and Laboratories,” ASTM, 1989, p 47–77
Microindentation Hardness Testing
George F. Vander Voort, Buehler Ltd.
Applications
Because hardness tests are a quick and convenient way to evaluate the quality or characteristics of a material,
hardness testing is widely used in quality-control studies of heat treatment, fabrication, and materials
processing. It is also a key test used in failure analysis work.
Microindentation hardness testing provides the same benefit as bulk hardness testing, but with a much smaller
indent. Because the indents are small, MHT can be used for many parts or material forms that are too small or
too thin to test with bulk test procedures. Likewise, MHT allows hardness measurements of microstructural
constituents. For example, the determination of hardness of specific types of carbides, nitrides, borides,
sulfides, or oxides in metals has been widely performed, particularly in wear and in machinability research.
There is a long list of applications where MHT is indispensable. A few examples are described in this section.
The examples are just a few of the many that could be chosen to demonstrate the value of MHT. To a large
extent, MHT can be considered as simply an extension of bulk hardness testing, in that it can be used for all the
same purposes as bulk hardness tests. However, due to the very small size of the indent, MHT has a host of
applications that cannot be performed with bulk tests. It can also be considered as a strength microprobe and,
thus, an extension of tensile testing. When properly used, MHT is a great asset in any laboratory.
Hardness Testing of Thin Products
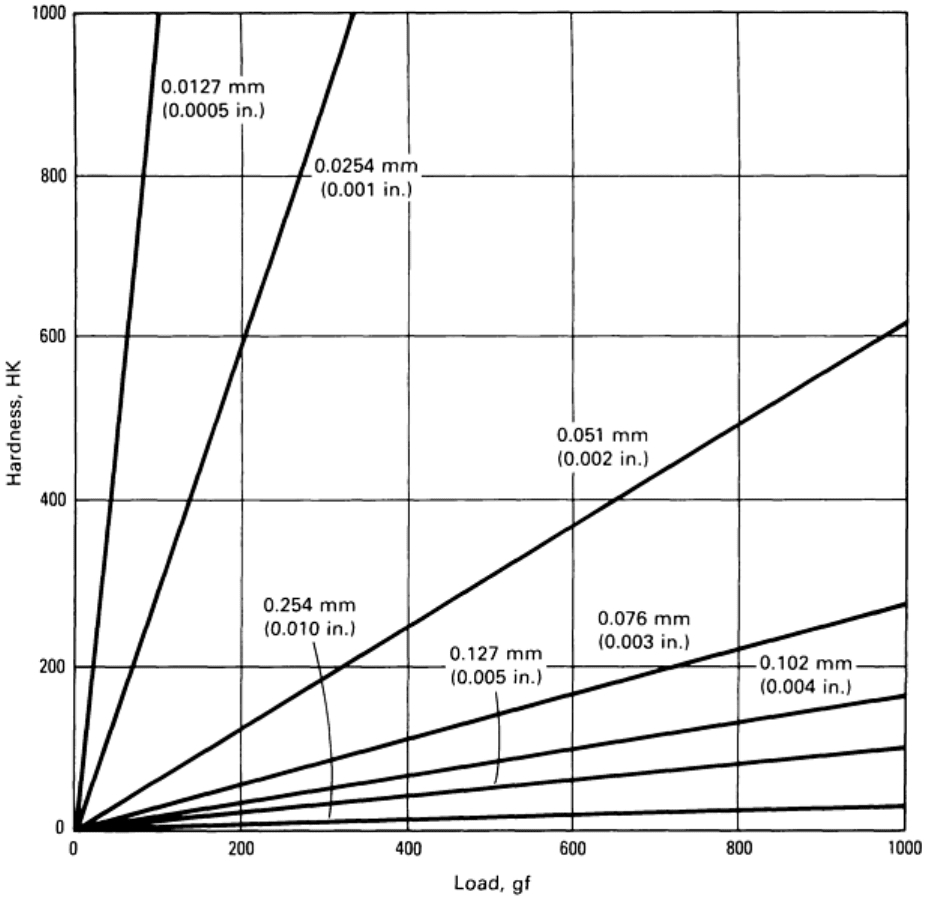
Foil or wire product forms depend on MHT in quality-control programs. In general, the indent depth should be
no more than 10% of the thickness or diameter of the products. Figure 17 shows the relationship among the
minimum foil thickness that can be tested, the applied force, and the Knoop hardness. As this figure shows, for
thicknesses less than 0.010 in. (254 μm), test-force selection becomes more critical as the thickness decreases
and the hardness decreases. For example, for a foil 0.002 in. thick (51 μm) with high hardness (e.g., greater than
500 HK), test forces up to 800 gf can be used. However, if the hardness is not known, and a 500 gf load
indicates a hardness of approximately 200 HK, then it would be advisable to retest the foil using a force of, at
most, 300 gf because the test at 500 gf may not be valid.
Fig. 17 Minimum thickness of test specimens for the Knoop test as a function of applied force (load) and
Knoop hardness
Hardness tests of thin materials and thin coatings often require very low applied forces (loads). As already
demonstrated, it is quite difficult to measure very small indents. MHT units are readily available for making
impressions at forces down to 1 gf, and special testers are available that can indent at even lower forces. (These
devices are not discussed in this article, however.) In the case of MHT systems using indenting forces less than
25 gf and indents between 1 and 25 μm, it may be advisable to place the tester on an antivibration platform and
to use at least 60× objectives with a high numerical aperture for measurements. Oil-immersion objectives may
be required, particularly for materials with poor light reflectivity.
Case Hardness Measurement
Perhaps the classic application of MHT is the assessment of changes in surface hardness: usually increases due
to surface treatments, such as carburizing, nitriding, or localized surface-hardening processes, are analyzed, but
decreases in hardness due to local chemistry changes (decarburization) or localized heating are also examined.
While these changes are usually detectable by eye on a properly prepared metallographic cross-section,
hardness traverses define the magnitude and extent of such changes with greater precision and detail. It is not
uncommon for quality-control tests to require determination of the depth to a specific hardness for a carburized
or nitrided part.
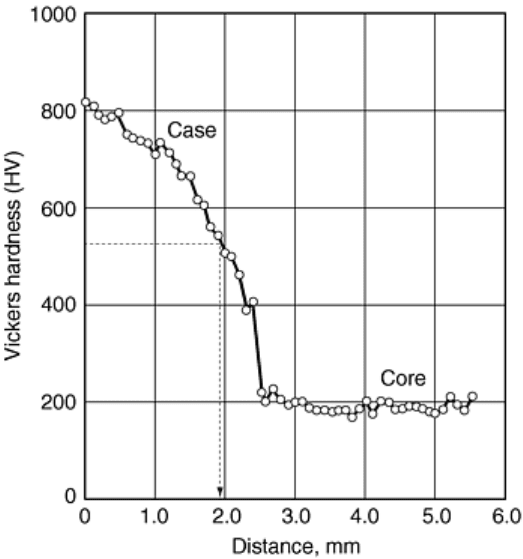
Figure 18 demonstrates the measurement of case depth by a series of indentations that traverse a cross-section
from a flame-hardened SAE 8660 specimen. The hardness traverses used a Vickers tester with the fully
automated device (Fig. 4b) and a 300 gf load. The surface hardness is approximately 830 HV, and the hardness
drops steadily until, at 2.5 mm depth, the core hardness (~200 HV) is reached. The effective case depth (the
depth to 550 HV) occurs at a depth of 1.95 mm.
Fig. 18 Vickers traverse showing the hardness profile results from a flame-hardened SAE 8660 gear
using a fully automated microindentation hardness-testing system
Figure 19 shows the hardness profile for an induction-hardened SAE 1053 carbon-steel gear using the fully
automated system and a 300 gf load. Note that the surface hardness increased slowly from the surface to a depth
of 4.1 mm. In this specimen, the microstructure contained at the surface substantial retained austenite, which
decreased until it was undetectable at a depth of approximately 3 mm. The prior-austenitic grain size was coarse
at the surface and decreased in size through the hardened case. These trends are caused by the temperature
profile from induction heating. The hardness drops rapidly in the depth range of 4 to 4.6 mm, and the
microstructure changes from predominantly martensite to ferrite and pearlite with a hardness of approximately
230 HV.
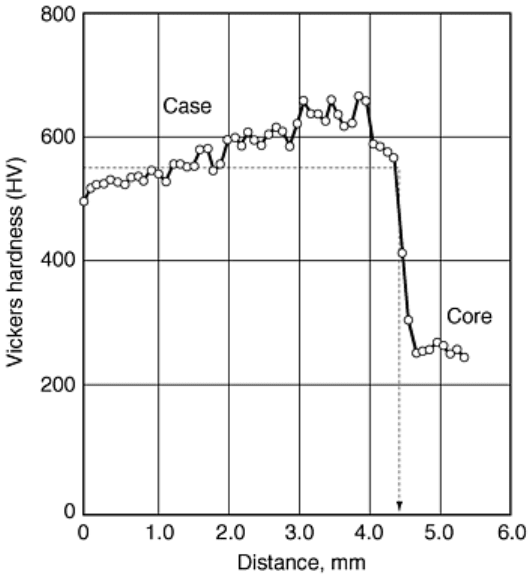
Fig. 19 Vickers traverse showing the hardness profile results from an induction-hardened SAE 1053
gear using a fully automated microindentation hardness-testing system
When manual MHT systems are used to determine the effective case depth, it is quite common to etch the
specimen and find the depth where the microstructure changes from hardened to unhardened. Then, the
operator places a few indents in this region and interpolates the depth to the desired hardness, most often 500 or
550 HV, depending on the carbon content. Of course, the very interesting rise in hardness (Fig. 19) from the
surface to 4.1 mm would not be detected. This may have an adverse effect on the wear behavior and presents a
dilemma for the analyst because the surface hardness is less than the hardness criteria for the effective case
depth. Note that the surface does not exceed 550 HV until a depth of approximately 1.5 mm. Then, the hardness
raises to approximately 680 HV at approximately 4 mm depth. The hardness falls again to 550 HV at
approximately 4.5 mm depth. The detailed variation of hardness with depth can be observed more easily with
automated traverse hardness tests.
Figure 20 shows a hardness traverse for a carburized SAE 8620 mold that exhibited substantial retained
austenite in the hardened case. Again, the specimen was evaluated with the fully automated system in Fig. 5
with a 300 gf load. Note that the hardness is somewhat erratic in the fully hardened surface layer (surface to
approximately 1.8 mm depth). This is due to the presence of retained austenite in this zone, which is
substantially lower in hardness than plate martensite. If a lower test force were used, the scatter would be
greater. Very low test forces, producing very small indents, might produce a hardness variation of several
hundred HV in the case. The effective case depth (depth to 550 HV) is at 2.1 mm, and the core is reached at
approximately 2.5 mm (~400 HV). Again, if testing were performed manually and only in the transition zone,
the metallographer would not have observed the variability in hardness in the fully hardened zone.
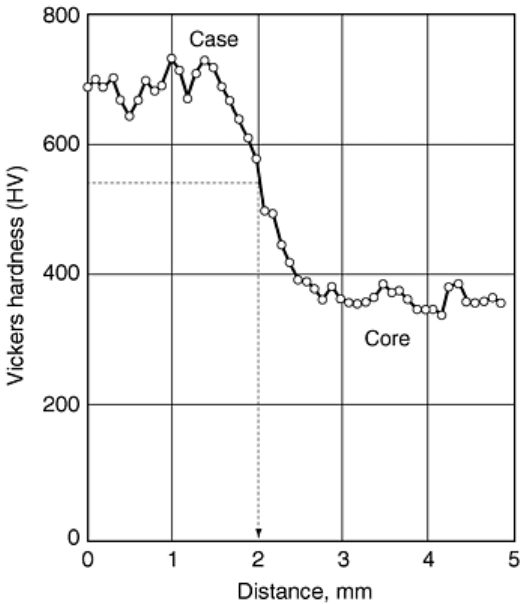
Fig. 20 Vickers traverse showing the hardness profile results from a carburized and hardened SAE 8620
mold using a fully automated microindentation hardness-testing system
Alloy Phase Hardness Measurements
Microindentation hardness testing has been widely used in alloy development research, particularly in
multiphase alloy studies. Because hardness can be correlated to strength, MHT can be used to determine the
properties of phases or constituents. Some such examples are described here.
Example 1: Hardness Measurement on Ferrite and Austenite Grains in Dual Phase Steel. Microindentation
testing was performed on the ferrite and austenite grains in a specimen of hot-rolled dual-phase stainless steel.
The specimen was prepared so that a plane parallel to the hot-working direction could be observed. Because the
phases were elongated rather than equiaxed, the Knoop indenter was used (with a 50 gf load). The specimen
was lightly etched electrolytically with 20% nitric acid, which colors the ferrite grains. Indents were made in a
number of grains (six or more indents per constituent type, as a rule) to calculate the mean, standard deviation,
and the 95% confidence interval. The ferrite had a hardness of 263.5 ± 5 HK
50
(mean ±95% confidence
interval), while the austenite had a hardness of 361.8 ± 18.6 HK
50
. This difference was significant at the 99.9%
confidence level. Figure 21 shows the microstructure of this specimen along with a number of Knoop indents.
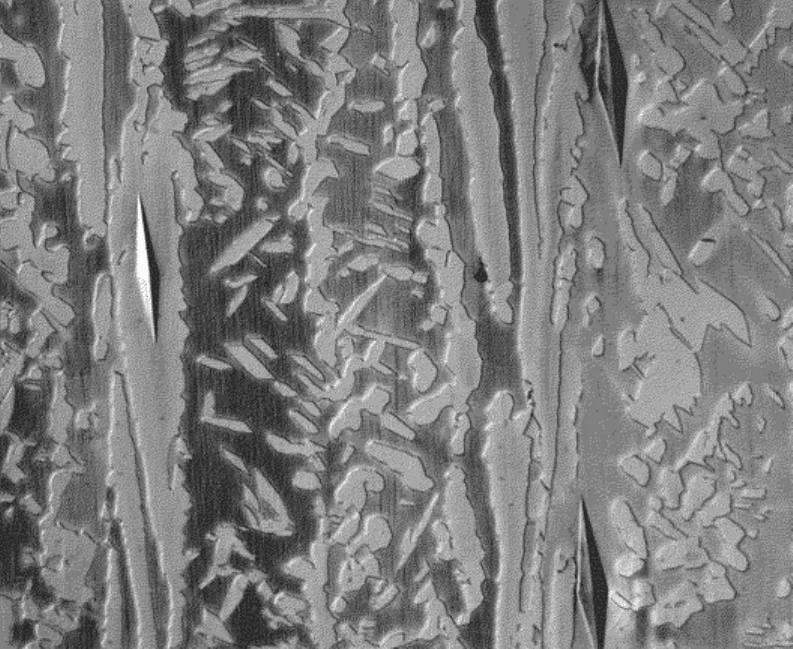
Fig. 21 Knoop indents in ferrite (dark) and austenite (white) grains in a dual-phase stainless steel
(differential interference contrast illumination, aqueous 20% nitric acid, 3 V dc). 500×
Example 2: Hardness Measurement on Alpha and Beta Phases in Naval Brass. Microindentation testing with a
Knoop indenter was performed on the alpha and beta phases in a specimen of naval brass (C 46400). A
longitudinally oriented test plane was evaluated, and the Knoop indentor was used due to the elongated shape of
the grains. A test load of 50 gf was used to keep the indents within the grains. The specimen was tint etched
with Klemm's I, which colors the beta phase. Again, indents were made on a number of grains of each phase.
The alpha phase had a hardness of 178.1 ± 8.8 HK
50
, while the beta phase had a hardness of 185.4 ± 13.7 HK
50
.
The difference in hardness between alpha and beta phases was not statistically significant. Figure 22 shows the
microstructure of this specimen and several of the Knoop indents.
