ASM Metals HandBook Vol. 8 - Mechanical Testing and Evaluation
Подождите немного. Документ загружается.

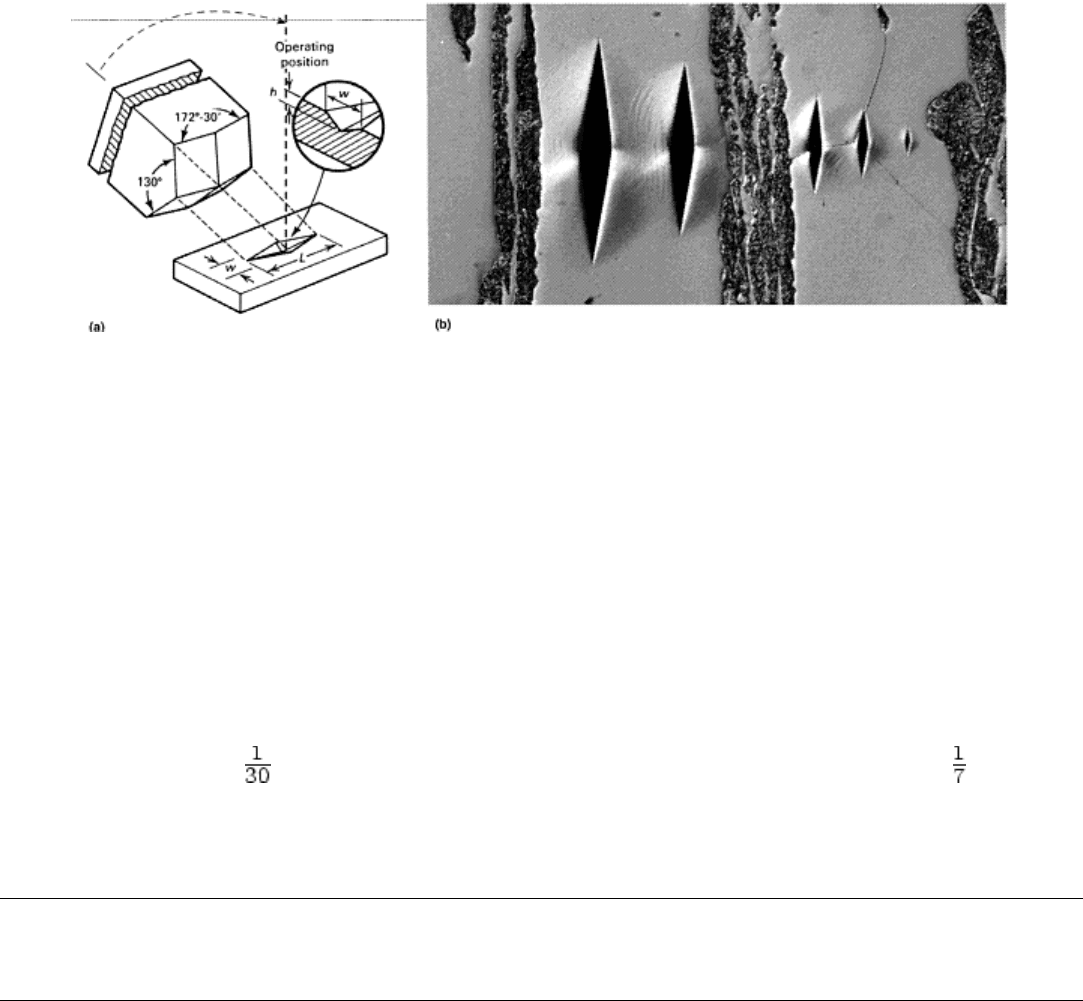
Fig. 2 Knoop hardness test. (a) Schematic of the rhombohedral-shaped diamond indenter used for the
Knoop test and an example of the indentation it produces. (b) Knoop indents made in ferrite in a ferritic-
martensitic high-carbon version of 430 stainless steel using (left to right) 500, 300, 100, 50, and 10 gf test
forces (differential interference contrast illumination, aqueous 60% nitric acid, 1.5 V dc). 300×
The Knoop indenter has a polished rhombohedral shape with an included longitudinal angle of 172° 30′ and an
included transverse angle of 130° 0′. The narrowness of the indenter makes it ideal for testing specimens with
steep hardness gradients. In such specimens, it may be impossible to get valid Vickers indents as the change in
hardness may produce a substantial difference in length of the two halves of the indent parallel to the hardness
gradient. With the Knoop test, the long diagonal is set perpendicular to the hardness gradient and the short
diagonal is in the direction of the hardness gradient.
For the same test force, Knoop indents can be more closely spaced than Vickers indents, making hardness
traverses easier to perform. The Knoop indenter is a better choice for hard brittle materials where indentation
cracking would be more extensive using the Vickers indenter at the same load. The Knoop indent is shallower
(depth is approximately the long diagonal) than the Vickers indent (depth is approximately the average
diagonal). Hence, the Knoop test is better suited for testing thin coatings. On the negative side, the Knoop
hardness varies with test load and results are more difficult to convert to other test scales.
Microindentation Hardness Testing
George F. Vander Voort, Buehler Ltd.
Expression of Test Results
Historically, the official way in which Vickers and Knoop hardness numbers have been presented has varied
with time, although many users seem to be unaware of the preferred style. The acronyms VHN and KHN were
introduced many years ago and stand for Vickers hardness number and Knoop hardness number. DPN, for
diamond-pyramid hardness number, was introduced at approximately the same time. While some have claimed
the DPN and VHN are not the same, this is not true. In the early 1960s, ASTM initiated a more modern,
systematic approach for all hardness tests and adopted the acronyms HV and HK for the two tests, yet the
former acronyms are still widely used (as are many other obsolete acronyms, like BHN and R
C
instead of HB
and HRC). Style guides for many publications do not seem to track these changes carefully.
For stating the actual hardness results, ASTM advocates the following approach. ASTM E 384 recommends
expressing a mean hardness of 425 in the Vickers test using a 100 gf applied force as 425 HV
100
, while by ISO
rules, it would be expressed as 425 HV
0.1
(because 100 gf would be expressed as 0.1 kgf). ASTM Committee E-
4 is currently recommending adoption of a slightly different approach: 425 HV 100 gf. While it has proven
difficult to get people to adopt a unified expression style, it is important that the stated results indicate the mean
value, the test used, and the test force as a minimum.
Microindentation Hardness Testing
George F. Vander Voort, Buehler Ltd.
Microindentation Hardness-Testing Equipment
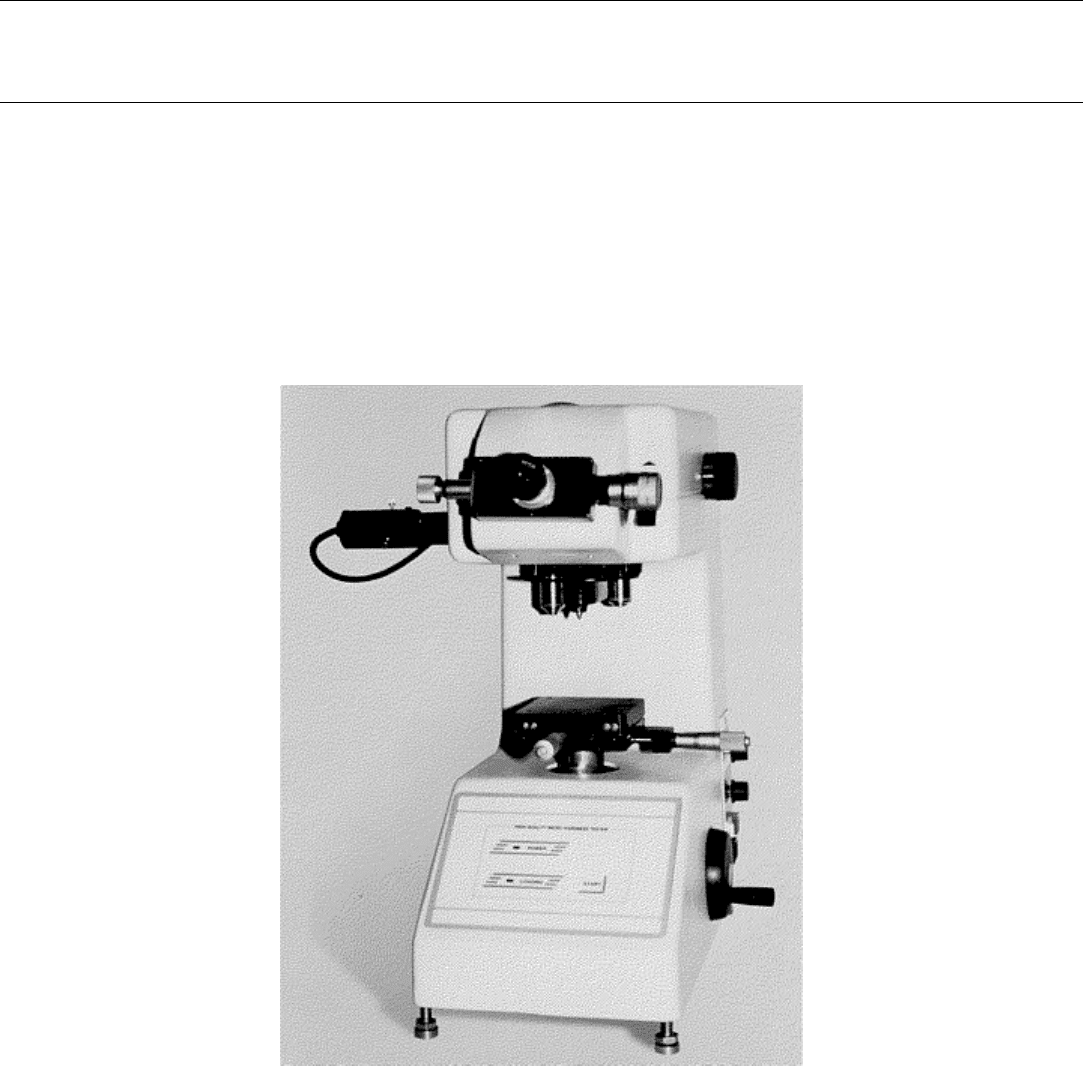
A variety of microindentation test machines are produced, ranging from relatively simple, low-priced units
(Fig. 3) to semiautomated systems (Fig. 4a) and fully automated systems (Fig. 4b). In most cases, either a
Knoop or a Vickers indenter can be used with the same machine, and it is a relatively simple matter to
exchange indenters. The force is applied either directly as a dead weight or indirectly by a lever and lighter
weights. New testers using a closed-loop load-cell system (Fig. 5) are also available. The magnitude of the
weights and force application must be controlled precisely (refer to ASTM E 384).
Fig. 3 Example of a simple, low-cost manual microindentation hardness-testing unit with a Filar
micrometer for measurements but no automation
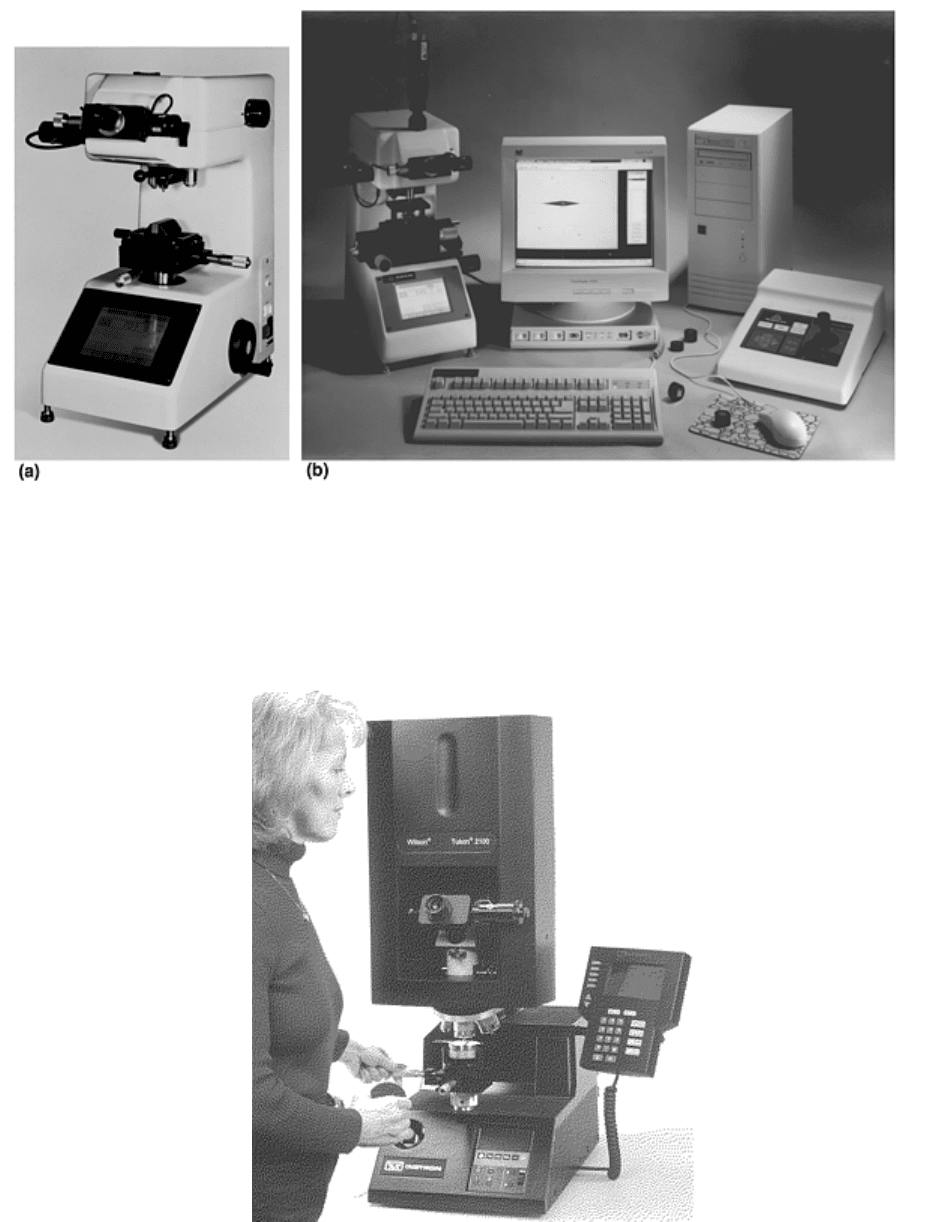
Fig. 4 Semiautomated and fully automated microindentation hardness testers. (a) Semiautomated tester
with a Filar micrometer for measurements, automated readout of the test results with its equivalent
hardness in another selected scale. (b) Fully automated tester interfaced to an image analyzer to control
indenting, measurement, and data manipulation
Fig. 5 Closed-loop load-cell microindentation hardness tester
Most tester systems use an automated test cycle of loading, applying the load for the desired time, and
unloading to ensure reproducibility in the test. Vibrations must be carefully controlled, and this becomes even
more important as the applied force decreases. Manual application and removal of the applied force is not
recommended due to the difficulty in preventing vibrations that will enlarge the indent size.
The indenter must be perpendicular to the test piece. An error of as little as 2° from perpendicular will distort
the indentation shape and introduce errors. A larger tilt angle may cause the specimen to move under the
applied force. To aid in controlling this problem, most testers come with a device that can be firmly attached to
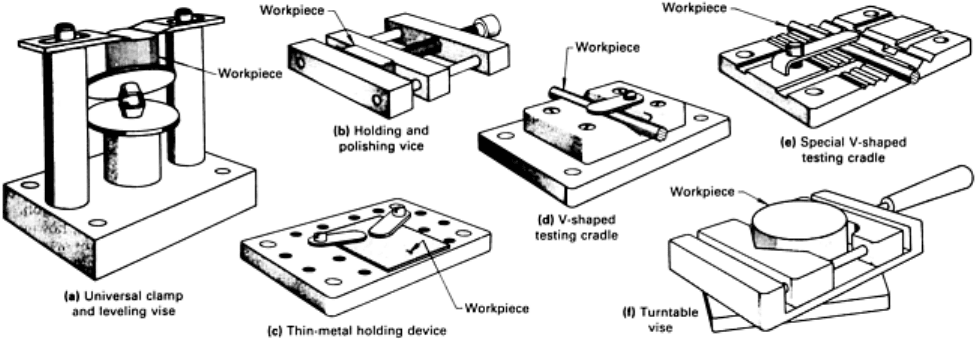
the stage (Fig. 6). The mounted specimen, or a bulk unmounted specimen of the proper size, can be placed
within this device and the plane-of-polish is automatically indexed perpendicularly to the indenter. Historically,
it has been a common practice to simply place a specimen on the stage and proceed with indentation, but if the
plane-of-polish is not parallel to the back side of the specimen, it will not be perpendicular to the indenter,
introducing tilt errors.
Fig. 6 Examples of fixtures for holding test pieces for microindentation hardness testing
The stage is an important part of the tester. The stage must be movable and movement is usually controlled in
the x and y directions by micrometers. Once the specimen is placed in the top-indexed holder, the operator must
move the stage micrometers to select the desired location for indenting. If a traverse of several hardness
readings is desired at inward intervals from a side surface of the specimen (as in case-depth measurements),
then the surface of interest should be oriented in the holder so that it is perpendicular to either the x or y
direction of the traverse. If the Knoop indenter is chosen, its long diagonal must also be parallel to the surface
of interest. For example, if the Knoop long axis is in the direction going from the front to the back of the tester,
then the surface of interest must also be aligned in the same direction. Accordingly, the x-axis (left to right)
micrometer is used to select the desired indentation positions. The micrometers are ruled in either inches or
millimeters and are capable of making very precise movement control.
Because the diagonals must be measured after the force has been removed, the tester is equipped with at least
two metallurgical objectives (i.e., reflected light), usually 10× and 40×. Some systems may have a third or
fourth objective on the turret. For measurement of small indents (<20 μm in diagonal length), a higher-power
objective (60×, 80×, or 100×) can be used in place of the 40× objective if the tester has places for only two
objectives. The objectives should have a reasonably high numerical aperture for their magnifications to give the
best resolution. The 10× objective is usually used as a spotter, that is, simply to find the desired test location.
The measuring eyepiece is generally 10×. Naturally, the optical system must be carefully calibrated using a
stage micrometer. In general, indents are measured to the nearest 0.1 μm with an accuracy of no more than ±0.5
μm in length. A proper Köhler illumination system is necessary to fully illuminate the specimen. In general, a
magnification that makes the diagonal between 25% and less than 75% of the field width is ideal; however, it is
not always possible to follow this rule.
Calculation of the hardness is based on the length of the diagonals. The major problem is defining where the
indent tips are located. This requires proper illumination, adjustment of the optics for best resolution and
contrast, and careful focusing. Every laboratory should have a regular schedule for cleaning the optical
components of their MHT apparatuses, as well as for verifying their calibration. A Filar micrometer is used for
the diagonal measurement. The micrometer lines have a finite thickness, which requires use of a systematic
measurement scheme. Several indent measurement approaches can be used. One popular approach is to bring
the two Filar lines just into contact and then zero the micrometer. The interior sides of the Filar lines are then
adjusted so that the indent tips just touch the inside of each line.
In recent years, the MHT system has been automated by coupling it to an image analyzer (Fig. 4b). The image-
analysis system software is used to control all of the functions regarding indent location, indent spacing,
number of indents, indenting, measurement of the indents, calculation of hardness values, and data plotting. For
those who perform a substantial number of hardness traverses, this equipment is very useful because the test
work is automated, allowing the metallographer to do other tasks.
Microindentation Hardness Testing
George F. Vander Voort, Buehler Ltd.
Hardness Conversions
Sometimes it is desirable to know the equivalent hardness in a scale other than the Vickers or Knoop. It is not
uncommon for product specifications to define the hardness for a case depth in the Rockwell C scale, which, of
course, is a bulk test scale unsuitable for case depth determination. Although this seems (and is) illogical, it is
widely practiced, probably because designers are not familiar with the Vickers or Knoop scales. Hardness
conversions are developed empirically, and there is a degree of error associated with all conversions. The
primary source for hardness conversions is ASTM E 140, which lists the conversions in tabular form and also
contains equations based on the tabular data. Some MHT units have these tables or the equations built in and
will list an equivalent hardness of your choice with each measurement. The most common conversion is from a
Vickers or Knoop scale to a Rockwell C scale. In general, these conversions are most commonly available for
steels, aluminum alloys, and nickel alloys. Conversions between various scales may be material sensitive.
Conversion of Vickers data to other scales is more straightforward than converting Knoop data to other scales.
Basically, the ASTM E 140 conversions between Vickers and other scales can be used for any test force greater
than 100 gf. Conversions of Knoop to other scales are problematic because Knoop hardness varies more with
load. If the published conversion is for a 500 gf applied load, then this conversion is best for that load and
reasonably accurate for loads slightly lower and generally adequate for greater loads, as the Knoop hardness is
reasonably constant for loads of 500 gf and above. Aside from the E 140 conversions, two published conversion
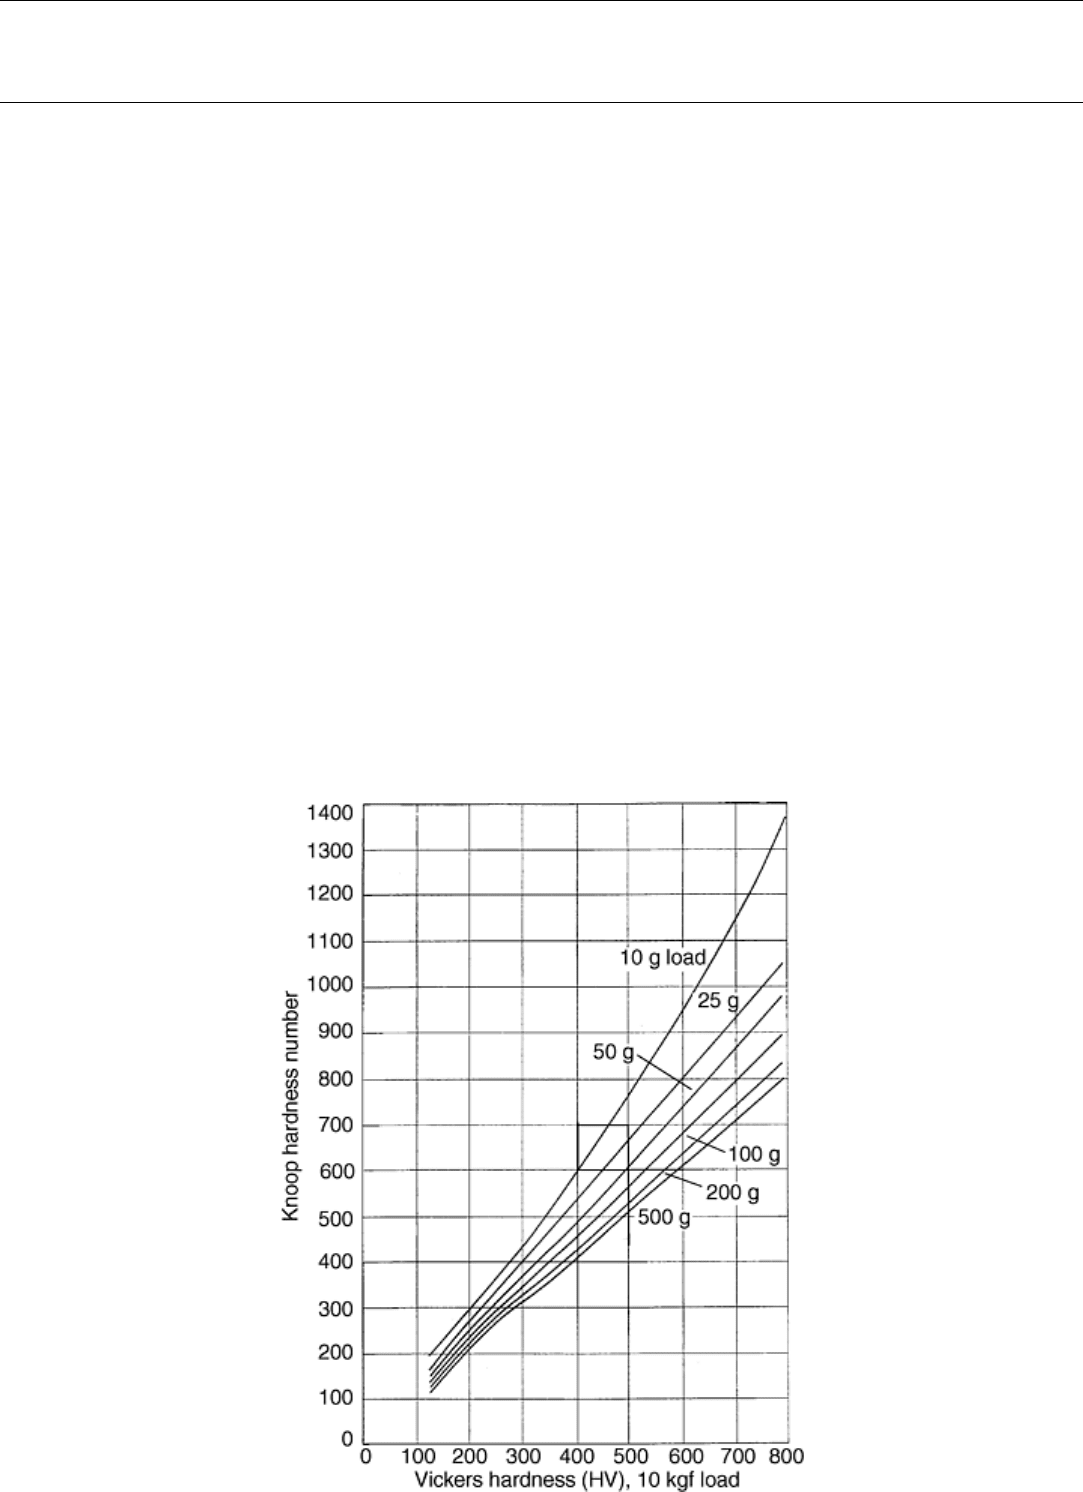
charts are worth noting. First, Emond (Ref 1) published a correlation chart of Vickers hardness (10 kgf load) to
Knoop hardness at loads of 10, 25, 50, 100, 200, and 500 gf (Fig. 7). Second, Batchelder (Ref 2) published
conversions from Knoop hardness, with loads of 15, 25, 50, 100, 200, 300, 500, and 1000 gf, to Rockwell C
(Fig. 8). Before using these conversions, it is a good practice to test your material with both scales to see how
well the conversion chart agrees with your bulk test specimens before utilizing the conversions.
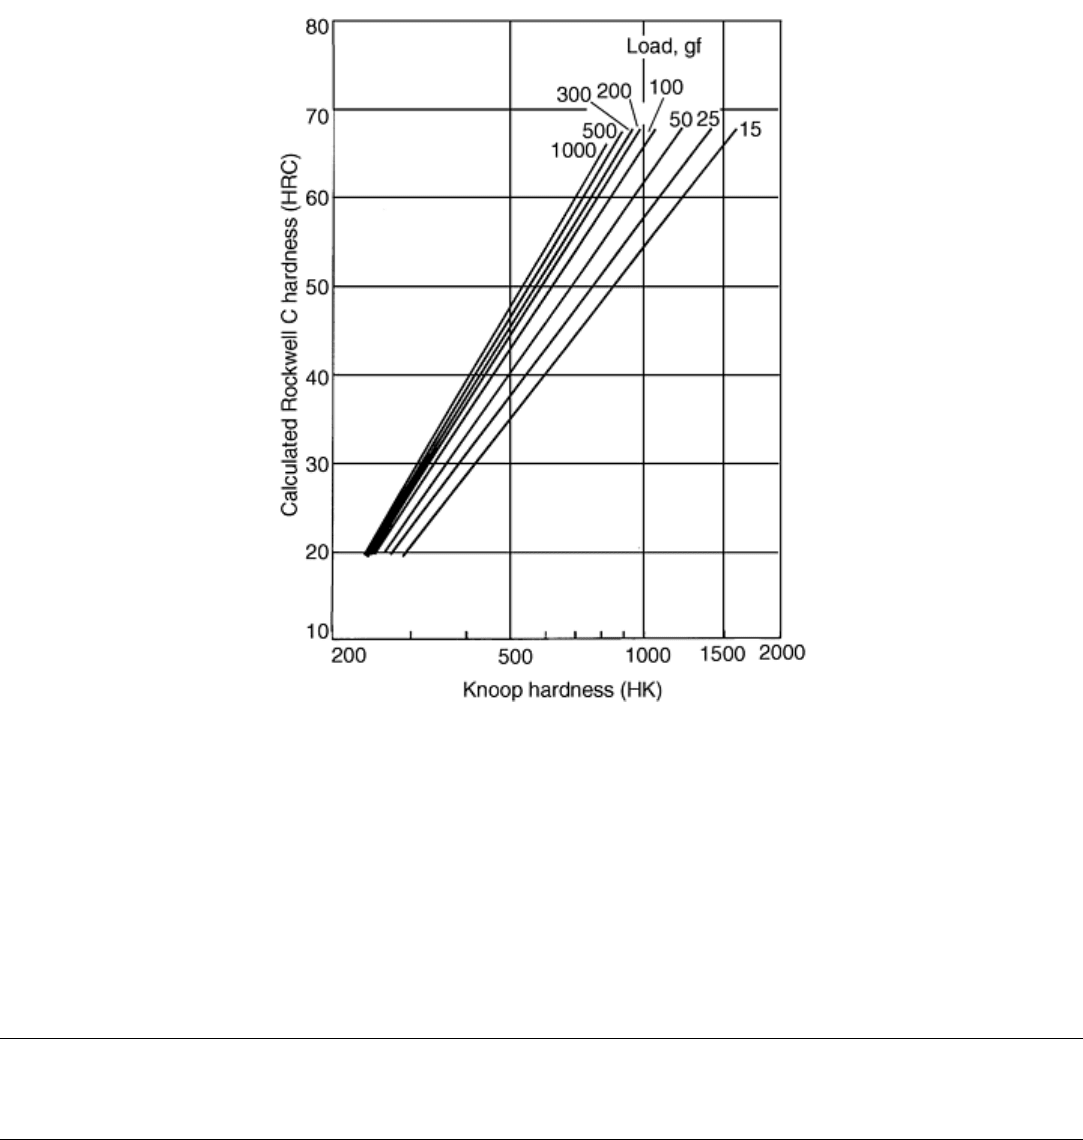
Fig. 7 Correlations between Vickers hardness determined with a 10 kgf load and Knoop hardness
determined with loads from 10-500 gf. Source: Ref 1
Fig. 8 Correlations between Knoop hardness at loads form 15-1000 gf and Rockwell C hardness. Source:
Ref 2
References cited in this section
1. L. Emond, Vickers-Knoop Hardness Conversion, Met. Prog., Vol 74, Sep 1958, p 97, 96B; Vol 76, Aug
1959, p 114, 116, 118
2. G.M. Batchelder, The Nonlinear Disparity in Converting Knoop to Rockwell C Hardness, ASTM Mater.
Res. Stand., Vol 9, Nov 1969, p 27–30
Microindentation Hardness Testing
George F. Vander Voort, Buehler Ltd.
Specimen Preparation
Specimen preparation for microindentation hardness testing is not a trivial matter and becomes more critical as
the applied force decreases. Further, if testing is to be done near an edge, then edge preservation (i.e., flatness
out to the edge) is also required. For relatively high test forces, for example, 300 to 1000 gf, a perfectly
prepared specimen is not required. However, this does not mean that sectioning and grinding damage need not
be removed. Rather, the normal preparation procedure could be stopped after grinding and polishing down to a
6, 3, or 1 μm diamond finish. For lower loads, it is advisable to completely prepare the specimen to a damage-

free condition. Excessive residual damage from sectioning and grinding will influence test results and produce
erroneous hardness values. Depending on the nature of the specimen, preparation damage can cause either an
increase or a decrease in the apparent hardness relative to the true hardness. Guidelines for preparing
metallographic test specimens are given in ASTM E 3 and in standard textbooks (Ref 3) and handbooks (Ref 4,
5).
Microindentation hardness testing near the edge of a specimen is used frequently to determine the hardness of
coatings or to evaluate the extent of the increase in surface hardness due to treatments such as induction
hardening, carburizing, or nitriding, or due to the loss in hardness because of decarburization. A variety of
procedures have been developed to provide good edge retention. Today, with a good thermosetting epoxy resin
(for best results, cool back to ambient temperature under pressure during mounting), automated preparation
equipment, and modern consumable products (use napless cloths for best results), adequate edge retention is
readily achievable without requiring protective surface platings (e.g., electroless nickel). It is also possible to
prepare unmounted bulk specimens with adequate edge retention using automated equipment and consumables.
References cited in this section
3. G. F. Vander Voort, Metallography: Principles and Practice, McGraw-Hill, 1984; reprinted by ASM
International, 1999, p 356, 381
4. Metallography and Microstructures, Vol 9, ASM Handbook, ASM International, 1985
5. G.F. Vander Voort, Ed., Metallography, Metals Handbook Desk Edition, 2nd ed., ASM International, p
1356–1409
Microindentation Hardness Testing
George F. Vander Voort, Buehler Ltd.
Important Test Considerations
All tests require both properly operating equipment and knowledge of how to use it. To obtain precise, unbiased
hardness data, a properly prepared specimen must be tested in the correct manner using a properly operating,
calibrated tester. ASTM E 384 provides guidance on operating variables developed both theoretically and
empirically over a long period of time. Conservative application of these rules is advisable.
Indent Size. In general, the larger the indent is, the better the precision will be. Due to the mathematical
approach to defining the Vickers and Knoop hardnesses (Eq 1 and 2, where the denominator is d
2
), the curves
of diagonal length versus HV or HK get steeper as the test force decreases, as shown in Fig. 9 and 10. Note that
as the test force decreases, smaller and smaller variations in diagonal length correlate to larger and larger
variations in hardness.
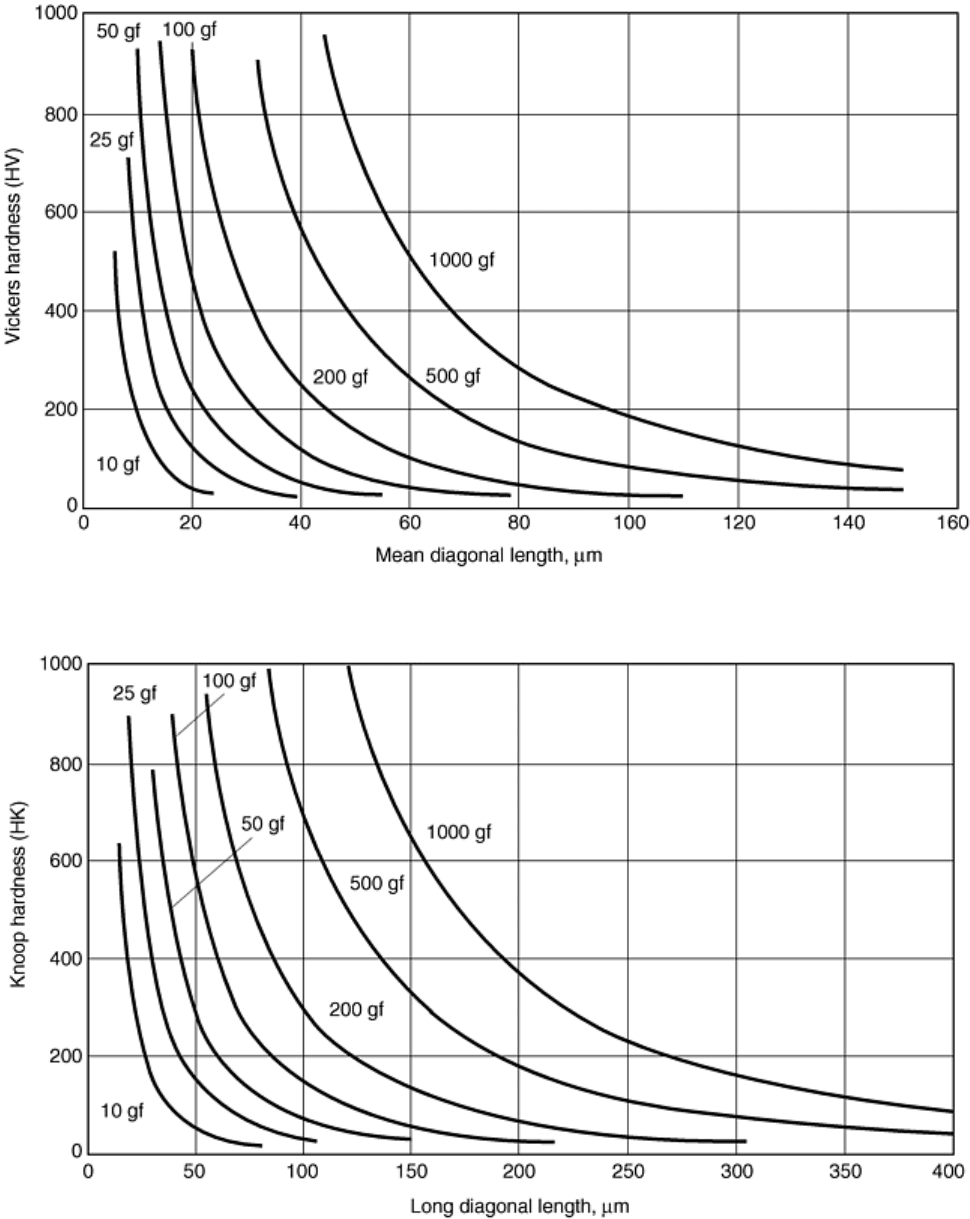
Fig. 9 Relationships between the mean diagonal length and the Vickers hardness for loads of 10-1000 gf
Fig. 10 Relationships between the long diagonal length and the Knoop hardness for loads of 10-1000 gf
Experience has shown that a single operator typically exhibits a ±0.5 μm variation when measuring the same
indent over a period of time, while multiple operators exhibit approximately a ±1.0 μm variation over time.
Larger variations have also been observed (Ref 6, 7). A ±0.5 μm variation in the measured diagonal has a
greater influence on hardness as the test load decreases, that is, as the diagonal size decreases.
As an example, Fig. 11 shows the change in Vickers hardness when 0.5 μm is either added to, or subtracted
from, the diagonal measurement for diagonals ≤40 μm in length. Note that subtracting 0.5 μm has a greater
effect on the calculated HV than adding 0.5 μm. This is again due to the d
2
divisor in Eq 1. The graph shows
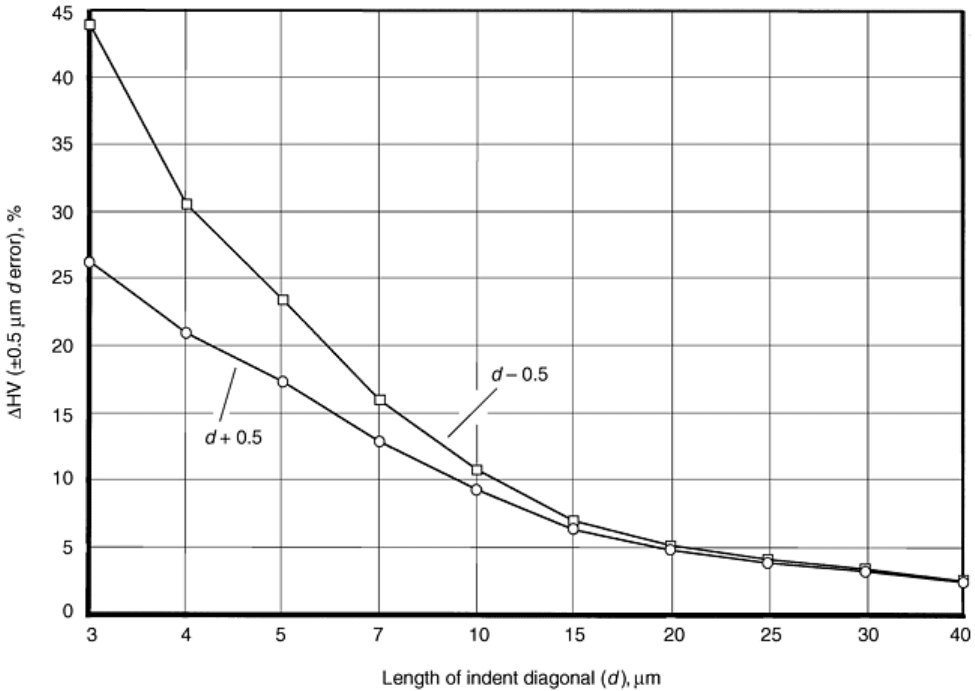
that for a Vickers indent with a 10 μm average diagonal, a ±0.5 μm measurement variation can produce
approximately a 10% rise or drop in the hardness. If the hardness is low, this is not too much of a problem, but
for high-hardness specimens, a ±10% variation is substantial.
Fig. 11 Influence of a measurement error of ±0.5 μm on the calculated Vickers hardness as a function of
diagonal length
ASTM E 384 recommends that the operator should try to keep indents larger than 20 μm in d. Figure 11
demonstrates the reason for this recommendation. A similar graph could be constructed for the Knoop test. In
general, determining the location of the tips of the Knoop indent to measure the long diagonal is more difficult
than with a Vickers indent because the contrast at the Knoop indent tips is not as strong. The ±0.5 μm
measurement variability for the same person as a function of time may be a bit conservative for the Knoop test.
If the operator has a rough idea of the hardness of the test piece, then a good estimate can be made of the
appropriate test load to choose. The harder the specimen, the greater the test load needed to keep d greater than
20 μm. Figures 9 and 10 can be used as a guide. For example, assume that a hardness traverse is to be made on
an induction-hardened specimen that is expected to vary in hardness from approximately 750 HV at the surface
to 250 HV in the core. Figure 9 says that an applied force of 200 gf will produce approximately a 22 μm
diagonal indent for a 750 HV steel and close to a 40 μm diagonal indent for a 250 HV steel. For a 100 gf
applied force, the diagonal for 750 HV is less than 16 μm, so it would be best to use a higher load. A 300 gf
applied force produces approximately a 27 μm diagonal for 750 HV and approximately a 47 μm diagonal at 250
HV, and it may be a better choice than a 200 gf or 100 gf load. If the hardened case is rather shallow, it may be
necessary to space indents along several different parallel traces at different depths so that the gradient can be
assessed satisfactorily without tight indent spacing adversely influencing the test data.
The opposite problem, that of an excessively large (d > 75% of the field width) indent is less common, but may
arise depending on test conditions. In general, MHT is performed in an effort to measure spatial variations in
hardness or the hardness of small regions. But sometimes it is used as a convenient substitute for a bulk
hardness test on a small specimen of homogenous nature at the same time as the structure is examined. In that
case, the indent size is not too critical as long as a ±0.5 μm measurement variation has only a small influence on

the calculated HV. With a very soft material, the indent should be small enough that it can be kept entirely in
the field of view of the optics.
Indent Spacing. In general, the same guidelines used in bulk hardness tests are used for MHT. Indenting creates
both elastic and plastic deformation and a substantial strain field around the indent. If a second indent is made
too close to a prior indent, its shape will be distorted on the side toward the first indent. This produces
erroneous test results.
In general, the spacing between indents should be at least 2.5 times the d length for the Vickers test and at least
twice the length of the short diagonal for the Knoop test. The minimum spacing between the edge of a specimen
and the center of an indent should be 2.5d, although values as low as 1.8d have been demonstrated to be
acceptable.
References cited in this section
6. G.F. Vander Voort, “Results of an ASTM E-4 Round-Robin on the Precision and Bias of Measurements
of Microindentation Hardness Impressions,” ASTM STP 1025, “Factors that Affect the Precision of
Mechanical Tests,” ASTM, 1989, p 3–39
7. G.F. Vander Voort, “Operator Errors in the Measurement of Microindentation Hardness,” ASTM STP
1057, “Accreditation Practices for Inspections, Tests and Laboratories,” ASTM, 1989, p 47–77
Microindentation Hardness Testing
George F. Vander Voort, Buehler Ltd.
Hardness versus Applied Test Force
For the Vickers test, especially in the macro applied force range, it is commonly stated that the hardness is
constant as the load is changed. For microindentation tests, the Vickers hardness is not constant over the entire
range of test forces. For Vickers tests with an applied force of 100 to 1000 gf, the measured hardnesses are
usually equivalent within statistical precision. The Vickers indent produces a geometrically similar indent shape
at all loads, and a log-log plot of applied force (load) versus diagonal length should exhibit a constant slope, n,
of 2 for the full range of applied force (Kick's Law); however, this usually does not occur at forces under 100
gf.
Reference 6 shows four trends for force (load) and Vickers MHT data:
• Trend 1: HV increases as force decreases (n < 2.0).
• Trend 2: HV decreases as force decreases (n > 2.0).
• Trend 3: HV essentially constant as force varies (n = 2.0).
• Trend 4: HV increases, then decreases with decreasing force.
Trends 1, 2, and 4 are more easily detected in hard specimens than on soft specimens where trend 3 is observed.
Many publications, particularly those reporting trends 1 and 2, have attributed these trends to material
characteristics.
The Knoop indenter does not produce geometrically similar indents, so the hardness should increase with
decreasing test force. Due to the poor image contrast at the Knoop indent tips (long diagonal), it is far more
likely that d will be undersized, leading to a higher hardness number. Consequently, the Knoop hardness
increases with decreasing test force, and the magnitude of the increase rises with increasing hardness. However,
a few studies reported a variation in this trend: HK increased with decreasing force and then decreased at the
lowest applied force.
