ASM Metals HandBook Vol. 8 - Mechanical Testing and Evaluation
Подождите немного. Документ загружается.

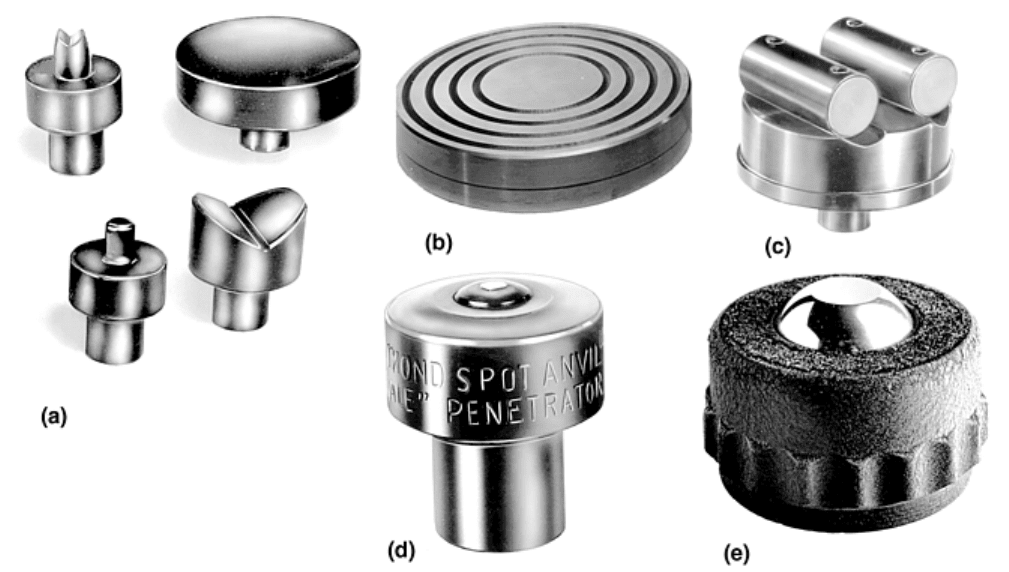
Fig. 7 Typical anvils for Rockwell hardness testing. (a) Standard spot, flat, and V anvils. (b) Testing
table for large workpieces. (c) Cylinder anvil. (d) Diamond spot anvil. (e) Eyeball anvil
Sheet metal and small workpieces that have flat undersurfaces are best tested on a spot anvil with a small,
elevated, flat bearing surface (Fig. 7a). Workpieces that are not flat should have the convex side down on the
bearing surface. Round workpieces should be supported in a V-slot anvil (Fig. 7a and c). Diamond spot anvils
(Fig. 7d) are used only for testing very thin sheet metal samples in the HR15T and HR30T scales.
Other anvil designs are available for a wide range of odd-shaped parts, such as the eyeball anvil (Fig. 7e) that is
used for tapered parts. Special anvils to accommodate specific workpiece configurations can be fabricated.
Regardless of anvil design, rigidity of the part to prevent movement during the test is absolutely essential for
accurate results, as is cleanliness of the mating faces of the anvil and its supporting surface.
Specimen Surface Preparation. The degree of workpiece surface roughness that can be tolerated depends on the
Rockwell scale being used. As a rule, for a load of 150 kgf on a diamond indenter, or 100 kgf on a ball indenter,
a finish ground surface is sufficient to provide accurate readings. As loads become lighter, surface requirements
become more rigorous. For a 15 kgf load, a polished or lapped surface usually is required.
Surfaces that are visibly ridged due to rough grinding or coarse machining offer unequal support to the indenter.
Loose or flaking scale on the specimen at the point of indenter contact may chip and cause a false test. Scale
should be removed by grinding or filing. Decarburized surface metal must also be removed to permit the
indenter to test the true metal beneath.
Workpiece Mounting. An anvil must solidly support the test specimen. The movement of the plunger rod
holding the indenter measures the depth of indentation when the major load is applied; any slippage or
movement of the workpiece will be followed by the plunger rod. The motion will be transferred to the
measuring system. Errors of this type always produce softer hardness values. Because one point of hardness
represents a depth of only 0.002 mm (0.00008 in.), a movement of only 0.025 mm (0.001 in.) could cause an
error of more than 10 Rockwell points.
Integral Clamping Systems. Some testers are designed with a clamping surface that surrounds the indenter
either built into the test head or as a removable assembly (Fig. 8). These clamps can be helpful if a rapid test
cycle is desired or the test point is on the end of a long overhung part. The anviling surface on the part is less
critical; however, any movement of the part during the test will cause errors in the test results.
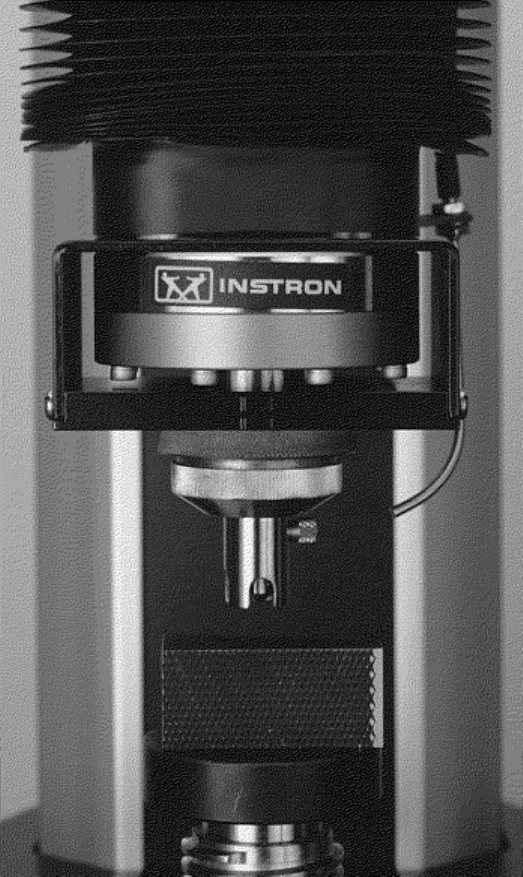
Fig. 8 Rockwell tester with removable clamping assembly
Angle of Test Surface. The test surface should be perpendicular to the indenter axis. Extensive experimentation
has found errors of 0.1 to 1.5 HRC, depending on the hardness range being tested, with a 3° angle deviation.
Such errors produce softer hardness values.
Load Application. The minor load should be applied to the test specimen in a controlled manner, without
inducing impact or vibration. With manually operated testing machines, the measuring device must then be set
to zero datum, or set point, position. The major load is then applied in a controlled fashion.
During the test cycle on a manually operated tester, the operator should not force the crank handle because
inaccuracies and damage to the tester may result. When the large pointer comes to rest or slows appreciably, the
full major load has been applied and should dwell for up to 2 s. The load is then removed by returning the crank
handle to the latched position. The hardness value can then be read directly from the measuring device.
Semiautomatic digital testers perform most of these steps automatically.
Homogeneity. A Rockwell tester measures the hardness of a specimen at the point of indentation, but the
reading is also influenced by the hardness of the material under and around the indentation. The effects of
indentation extend about 10 times the depth of the indentation. If a softer layer is located in this depth, the
impression will be deeper, and the apparent hardness will be less.
The factor must be taken into account when testing material with a superficial hardness such as case-hardened
work. To obtain the average hardness of materials such as cast iron with relatively large graphite particles, or
nonferrous metals with crystalline aggregates that are greater than the area of the indenter, a larger indenter
must be used. In many instances, a Brinell test may be more valid for this type of material.
Spacing of indentations is very important. The distance from the center of one indentation to another must be at
least three indentation diameters, and the distance to the edge should be a minimum of 2.5 diameters. Readings
from any indentation spaced closer should be disregarded. These guidelines apply for all materials.
Configuration Adjustments
When performing a Rockwell test, specimen size and configuration may require that modifications in the test
setup be made. For example, large specimens and thin-wall rings and tubing may need additional support
equipment, and test results obtained from curved surfaces may require a correction factor.
Large Specimens. Many specially designed Rockwell hardness testers that have been developed to
accommodate the testing of large specimens cannot conveniently be brought to or placed in a bench-type tester.
For large and heavy workpieces, or workpieces of peculiar shape that must rest in cradles or on blocks, use of a
large testing table is recommended.
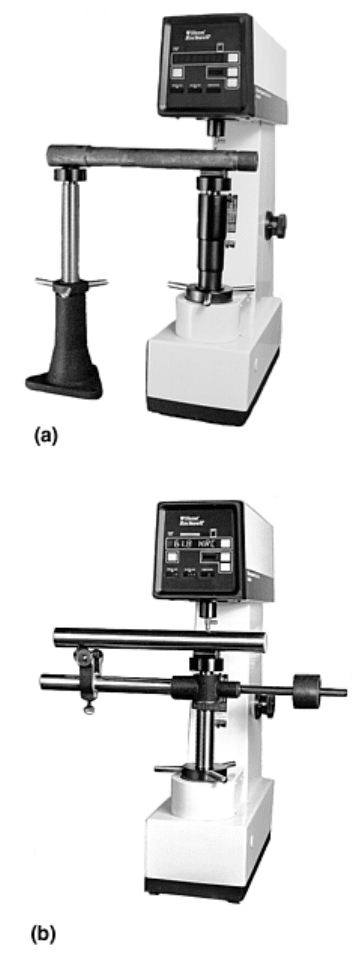
Long Specimens. Work supports are available for long workpieces that cannot be firmly held on an anvil by the
minor load. Because manual support is not practical, a jack-rest should be provided at the overhang end to
prevent pressure between the specimen and the penetrator. Figure 9 illustrates methods for testing long, heavy
workpieces.
Fig. 9 Rockwell test setups for long testpieces. (a) Jack setup. (b) Variable rest setup
Workpieces with Curved Surfaces. When an indenter is forced into a convex surface, there is less lateral
support supplied for the indenting force; consequently, the indenter will sink farther into the metal than it would
into a flat surface of the same hardness. Therefore, for convex surfaces, low readings will result. On the other
hand, when testing a concave surface, opposite conditions prevail; that is, additional lateral support is provided,
and the readings will be higher than when testing the same metal with a flat surface.
Results from tests on a curved surface may be in error and should not be reported without stating the radius of
curvature. For diameters of more than 25 mm (1 in.), the difference is negligible. For diameters of less than 25
mm (1 in.), particularly for softer materials that involve larger indentation, the curvature, whether concave or
convex, must be taken into account if a comparison is to be made with different diameters or with a flat surface.
Correction factors should be applied when workpieces are expected to meet a specified value. Typical
correction factors for regular and superficial hardness values are presented in the article “Selection and
Industrial Applications of Hardness Tests” in this Volume (see Table 4 in that article). The corrections are
added to the hardness value when testing on convex surfaces and subtracted when testing on concave surfaces.
On cylinders with diameters as small as 6.35 mm (0.25 in.), standard Rockwell scales can be used; for the
superficial Rockwell test, correction factors for diameters as small as 3.175 mm (0.125 in.) are given in the
article “Selection and Industrial Applications of Hardness Tests” in this Volume (see Table 4 in that article).
Diameters smaller than 3.175 mm (0.125 in.) should be tested by microindentation methods (see the article
“Microindentation Hardness Testing” in this Section).
When testing cylindrical pieces such as rods, the shallow V or standard V anvil should be used, and the indenter
should be applied over the axis of the rod. Care should be taken that the specimen lies flat, supported by the
sides of the V. 10 Figure 10 illustrates correct and incorrect methods of supporting cylindrical work while
testing.
Fig. 10 Anvil support for cylindrical workpieces. (a) Correct method places the specimen centrally under
indenter and prevents movement of the specimen under testing loads. (b) Incorrect method of supporting
cylindrical work on spot anvil. The testpiece is not firmly secured, and rolling of the specimen can cause
damage to the indenter or erroneous readings.
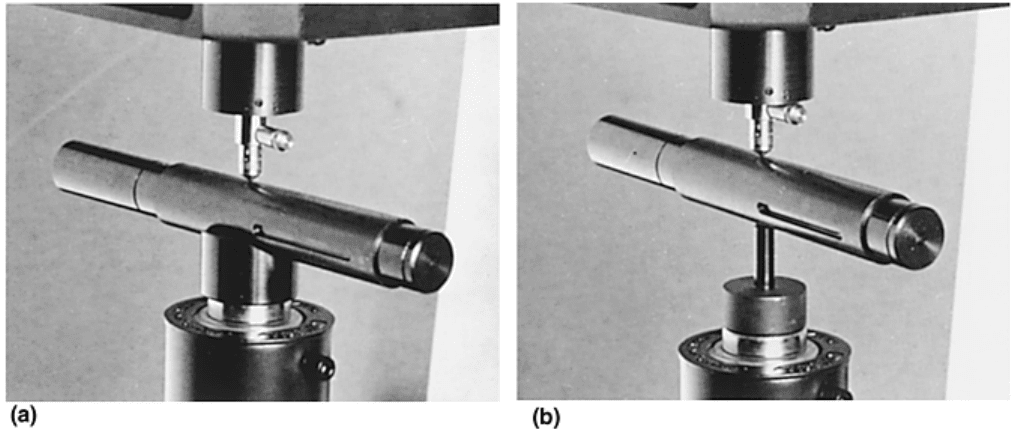
Inner Surfaces. The most basic approach to Rockwell hardness testing of inner surfaces is to use a gooseneck
adapter for the indenter, as illustrated in Fig. 12. This adapter can be used for testing in holes or recesses as
small as 11.11 mm (0.4375 in.) in diameter or height. Some testers are designed with an extended indenter
holder to allow easier internal testing.
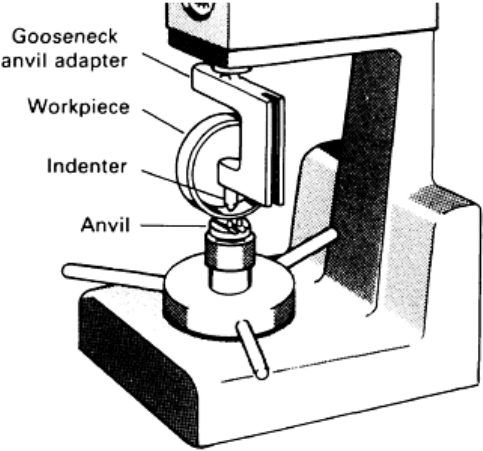
Fig. 11 Setup for Rockwell hardness testing of inner surfaces of cylindrical workpieces, using a
gooseneck adapter
Thin-Wall Rings and Tubes. When testing pieces such as thin-wall rings and tubing that may deform
permanently under load, a test should be conducted in the usual manner to see if the specimen becomes
permanently deformed. If it has been permanently deformed either an internal mandrel on a gooseneck anvil or
a lighter test load should be used.
Excessive deformation of tubing (either permanent or temporary) can also affect the application of the major
load. If through deformation the indenter travels to its full extent, complete application of the major load will be
prevented, and inaccurately high readings will result.
Gears and other complex shapes often require the use of relatively complex anvils in conjunction with holding
fixtures. When hardness testing workpieces that have complex shapes—for example, the pitch lines of gear
teeth—it is sometimes necessary to design and manufacture special anvils and fixtures; specially designed
hardness testers may be required to accommodate these special fixtures.
Testing at Elevated Temperatures
Several methods have been devised to determine hardness at elevated temperatures, but a modified Rockwell
test is used most often. Elevated-temperature testing typically consists of a Rockwell tester with a small furnace
mounted on it. The furnace has a controlled atmosphere, usually argon, although a vacuum furnace may be
used. Testing up to 760°C (1400°F) is possible; however, diamond indenters have a very limited life at high
temperatures.
High-temperature test setups may also feature an indexing fixture that makes it possible to bring any area of the
specimen under the indenter without contaminating the atmosphere or disturbing the temperature equilibrium.
This arrangement permits several tests to be made on a single specimen while maintaining temperature and
atmosphere.
In addition to modified Rockwell testers, hot hardness testers using a Vickers sapphire indenter with provisions
for testing in either vacuum or inert atmospheres have also been described (Ref 1, 2). An extensive review of
hardness data at elevated temperatures is presented in Ref 3. The development and design of hot hardness
testing furnaces is described in Ref 4.
Rockwell Testing of Specific Materials
Most homogeneous metals or alloys, including steels of all product forms and heat treatment conditions and the
various wrought and cast nonferrous alloys, can be accurately tested by one or more of the 30 indenter-load
combinations listed in Tables 2 and 3. However, some nonhomogeneous materials and case-hardened materials
present problems and therefore require special consideration.

Cast irons, because of graphite inclusions, usually show indentation values that are below the matrix value. For
small castings or restricted areas in which a Brinell test is not feasible, tests may be made with either the
Rockwell B or C scale. If the hardness range permits, however, the Rockwell E or K scale is preferred, because
the 3.175 mm ( in.) diam ball provides a better average reading.
Powder metallurgy (P/M) parts usually are tested on the Rockwell F, H, or B scale. Where possible, the
Rockwell B scale should be used. In all instances, the result is apparent hardness because of the voids present in
the P/M parts. Therefore, indentation testing does not provide accurate results of matrix hardness, although it
serves well as a quality-control tool.
Cemented carbides are usually tested with the Rockwell A scale. If voids exist, the result is apparent hardness,
and matrix evaluations are possible only by microhardness testing.
Case-Hardened Parts. For accuracy in testing case-hardened workpieces, the effective case depth should be at
least 10 times the indentation depth. Generally, cases are quite hard and require the use of a diamond indenter;
thus, a choice of six scales exists, and the scale should be selected in accordance with the case depth.
If the case depth is not known, a skilled operator can, by using several different (sometimes only two) scales
and making comparisons on a conversion table, determine certain case characteristics. For example, if a part
shows a reading of 91 HR15N and 62 HRC, this indicates a case that is hard at the surface, as well as at an
appreciable depth, because the equivalent of 62 HRC is 91 HR15N. However, if the reading shows 91 HR15N
and only 55 HRC, this indicates that the indenter has broken through a relatively thin case.
Decarburization can be detected by the indentation hardness test, essentially by reversing the technique
described above for obtaining an indication of case depth. Two indentation tests—one with the Rockwell 15N
scale and another with the Rockwell C scale—should be performed. If the equivalent hardness is not obtained
in converting from the Rockwell 15N to the Rockwell C scale, a decarburized layer is indicated. This technique
is most effective for determining very thick layers of decarburization, 0.1 mm (0.004 in.) or less. When
decarburization is present, other methods such as microindentation hardness testing should be used to determine
the extent.
References cited in this section
1. F. Garofalo, P.R. Malenock, and G.V. Smith, Hardness of Various Steels at Elevated Temperatures,
Trans. ASM, Vol 45, 1953, p 377–396
2. M. Semchyshen and C.S. Torgerson, Apparatus for Determining the Hardness of Metals at
Temperatures up to 3000 °F, Trans. ASM, Vol 50, 1958, p 830–837
3. J.H. Westbrook, Temperature Dependence of the Hardness of Pure Metals, Trans. ASM, Vol 45, 1953, p
221–248
4. L. Small, “Hardness—Theory and Practice,” Service Diamond Tool Company, Ferndale, MI, 1960, p
363–390
Macroindentation Hardness Testing
Edward L. Tobolski, Wilson Instruments Division, Instron Corporation; Andrew Fee, Consultant
Brinell Hardness Testing
The Brinell test is a simple indentation test for determining the hardness of a wide variety of materials. The test
consists of applying a constant load (force), usually between 500 and 3000 kgf, for a specified time (10 to 30 s)
using a 5 or 10 mm (0.2 or 0.4 in.) diam tungsten carbide ball on the flat surface of a workpiece (Fig. 12a). The
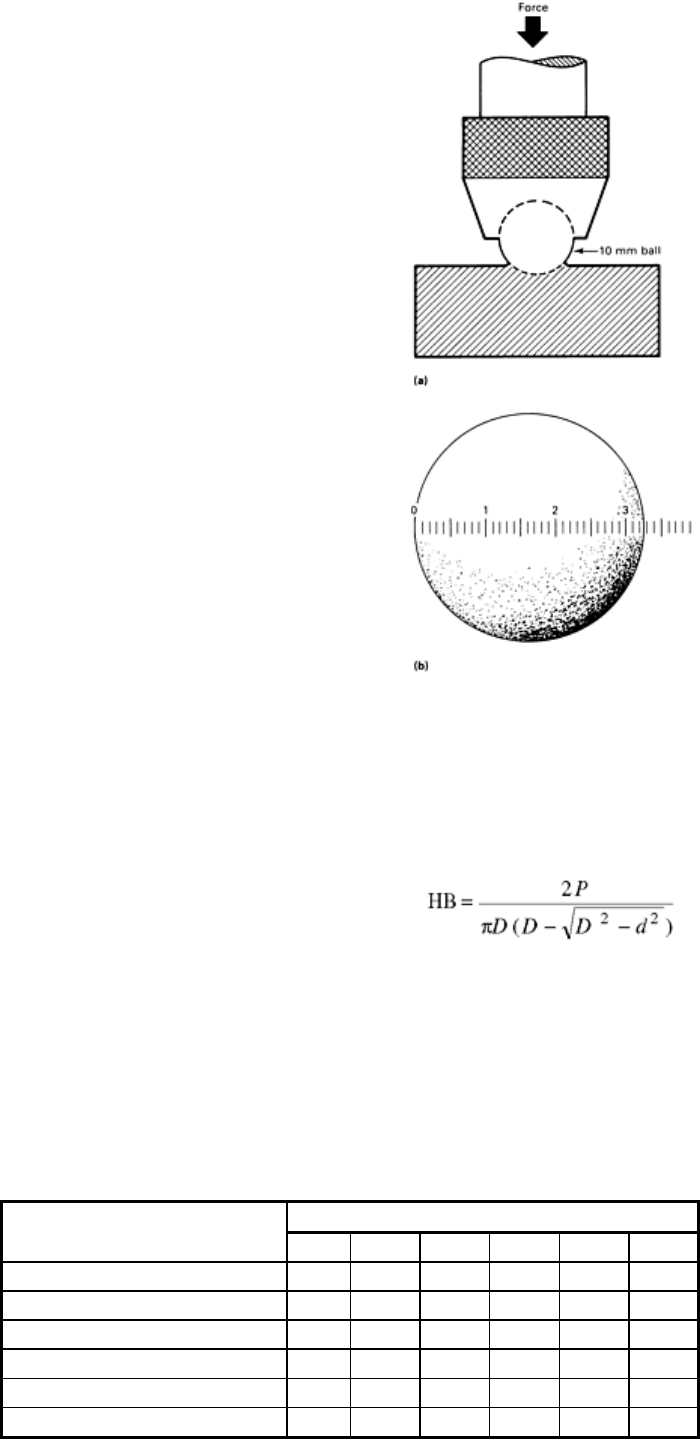
load time period is required to ensure that plastic flow of the metal has ceased. After removal of the load, the
resultant recovered round impression is measured in millimeters using a low-power microscope (Fig. 12b).
Fig. 12 Brinell indentation process. (a) Schematic of the principle of the Brinell indentation process. (b)
Brinell indentation with measuring scale in millimeters
Hardness is determined by taking the mean diameter of the indentation (two readings at right angles to each
other) and calculating the Brinell hardness number (HB) by dividing the applied load by the surface area of the
indentation according to the following formula:
where P is load (in kgf), D is ball diameter (in mm), and d is diameter of the indentation (in mm).
It is not necessary to make the above calculation for each test. Calculations have already been made and are
available in tabular form for various combinations of diameters of impressions and load. Table 5 lists Brinell
hardness numbers for indentation diameters of 2.00 to 6.45 mm for 500, 1000, 1500, 2000, 2500, and 3000 kgf
loads.
Table 5 Brinell hardness numbers
Ball diameter, 10 mm
Brinell hardness number at load, kgf
Ballimpression,diam, mm
500 1000
1500
2000
2500
3000
2.00 158 316 473 632 788
945
2.05 150 300 450 600 750
899
2.10 143 286 428 572 714
856
2.15 136 272 408 544 681
817
2.20 130 260 390 520 650
780
2.25 124 248 372 496 621
745

2.30 119 238 356 476 593
712
2.35 114 228 341 456 568
682
2.40 109 218 327 436 545
653
2.45 104 208 313 416 522
627
2.50 100 200 301 400 500
601
2.55 96.3
193 289 385 482
578
2.60 92.6
185 278 370 462
555
2.65 89.0
178 267 356 445
534
2.70 85.7
171 257 343 429
514
2.75 82.6
165 248 330 413
495
2.80 79.6
159 239 318 398
477
2.85 76.8
154 230 307 384
461
2.90 74.1
148 222 296 371
444
2.95 71.5
143 215 286 358
429
3.00 69.1
138 207 276 346
415
3.05 66.8
134 200 267 334
401
3.10 64.6
129 194 258 324
388
3.15 62.5
125 188 250 313
375
3.20 60.5
121 182 242 303
363
3.25 58.6
117 176 234 293
352
3.30 56.8
114 170 227 284
341
3.35 55.1
110 165 220 276
331
3.40 53.4
107 160 214 267
321
3.45 51.8
104 156 207 259
311
3.50 50.3
101 151 201 252
302
3.55 48.9
97.8 147 196 244
293
3.60 47.5
95.0 142 190 238
285
3.65 46.1
92.2 138 184 231
277
3.70 44.9
89.8 135 180 225
269
3.75 43.6
87.2 131 174 218
262
3.80 42.4
84.8 127 170 212
255
3.85 41.3
82.6 124 165 207
248
3.90 40.2
80.4 121 161 201
241
3.95 39.1
78.2 117 156 196
235
4.00 38.1
76.2 114 152 191
229
4.05 37.1
74.2 111 148 186
223
4.10 36.2
72.4 109 145 181
217
4.15 35.3
70.6 106 141 177
212
4.20 34.4
68.8 103 138 172
207
4.25 33.6
67.2 101 134 167
201
4.30 32.8
65.6 98.3 131 164
197
4.35 32.0
64.0 95.9 128 160
192
4.40 31.2
62.4 93.6 125 156
187
4.45 30.5
61.0 91.4 122 153
183
4.50 29.8
59.6 89.3 119 149
179
4.55 29.1
58.2 87.2 116 145
174
4.60 28.4
56.8 85.2 114 142
170
4.65 27.8
55.6 83.3 111 139
167
4.70 27.1
54.2 81.4 108 136
163
4.75 26.5
53.0 79.6 106 133
159
4.80 25.9
51.8 77.8 104 130
156

4.85 25.4
50.8 76.1 102 127
152
4.90 24.8
49.6 74.4 99.2 124
149
4.95 24.3
48.6 72.8 97.2 122
146
5.00 23.8
47.6 71.3 95.2 119
143
5.05 23.3
46.6 69.8 93.2 117
140
5.10 22.8
45.6 68.3 91.2 114
137
5.15 22.3
44.6 66.9 89.2 112
134
5.20 21.8
43.6 65.5 87.2 109
131
5.25 21.4
42.8 64.1 85.6 107
128
5.30 20.9
41.8 62.8 83.6 105
126
5.35 20.5
41.0 61.5 82.0 103
123
5.40 20.1
40.2 60.3 80.4 101
121
5.45 19.7
39.4 59.1 78.8 98.5
118
5.50 19.3
38.6 57.9 77.2 96.5
116
5.55 18.9
37.8 56.8 75.6 95.0
114
5.60 18.6
37.2 55.7 74.4 92.5
111
5.65 18.2
36.4 54.6 72.8 90.8
109
5.70 17.8
35.6 53.5 71.2 89.2
107
5.75 17.5
35.0 52.5 70.0 87.5
105
5.80 17.2
34.4 51.5 68.8 85.8
103
5.85 16.8
33.6 50.5 67.2 84.2
101
5.90 16.5
33.0 49.6 66.0 82.5
99.2
5.95 16.2
32.4 48.7 64.8 81.2
97.3
6.00 15.9
31.8 47.7 63.6 79.5
95.5
6.05 15.6
31.2 46.8 62.4 78.0
93.7
6.10 15.3
30.6 46.0 61.2 76.7
92.0
6.15 15.1
30.2 45.2 60.4 75.3
90.3
6.20 14.8
29.6 44.3 59.2 73.8
88.7
6.25 14.5
29.0 43.5 58.0 72.6
87.1
6.30 14.2
28.4 42.7 56.8 71.3
85.5
6.35 14.0
28.0 42.0 56.0 70.0
84.0
6.40 13.7
27.4 41.2 54.8 68.8
82.5
6.45 13.5
27.0 40.5 54.0 67.5 81.0
Before using the Brinell test, several points must be considered. The size and shape of the workpiece must be
capable of accommodating the relatively large indentation and heavy test loads. Because of the large
indentation, some workpieces may not be usable after testing and others may require further machining. In
addition, the maximum range of Brinell hardness values is 16 HB for very soft aluminum to 627 HB for
hardened steels (approximately 60 HRC).
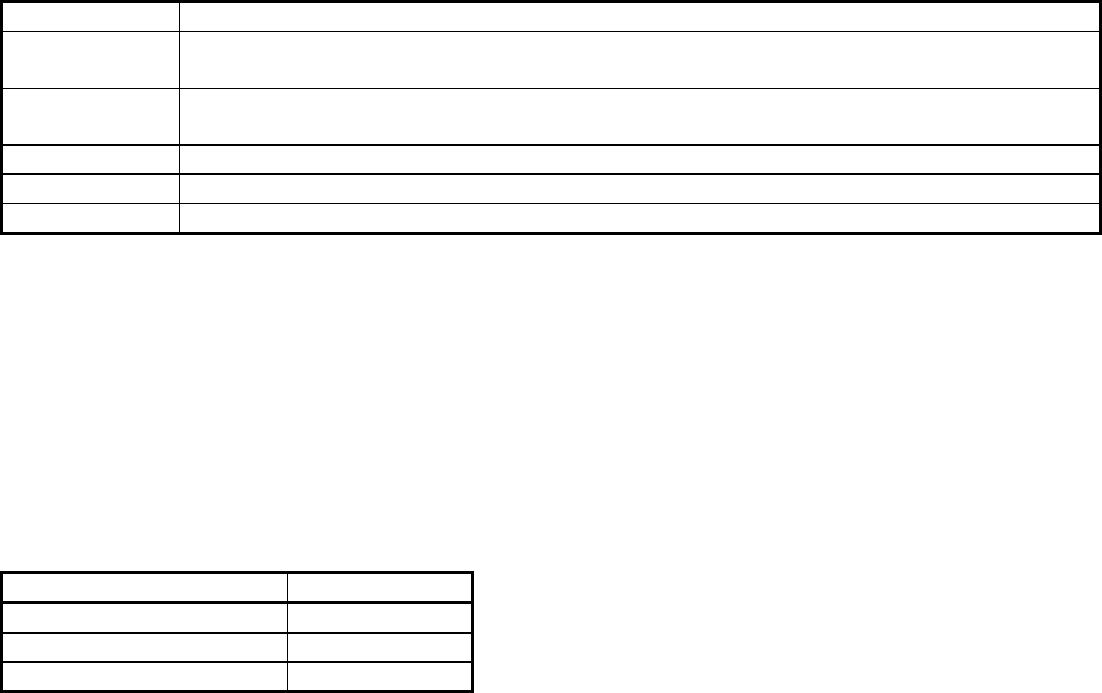
Several standards specify requirements for Brinell hardness testing. Table 6 is a partial list of several Brinell
standards, which should be compared in detail if equivalency is being considered.
Table 6 Selected Brinell hardness test standards
Standard No.
Title
ASTM E 10
Standard Test Method for Brinell Hardness of Metallic Materials
BS EN ISO
6506–1
Metallic Materials—Brinell Hardness Test—Test Method
BS EN ISO
6506–2
Metallic Materials—Brinell Hardness Test—Verification and Calibration of Brinell
Hardness Testing Machines
BS EN ISO
6506–3
Metallic Materials—Brinell Hardness Test—Calibration of Reference Blocks
DIN EN
Brinell Hardness Test—Test Method
10003–1
DIN EN
10003–2
Metallic Materials—Brinell Hardness Test—Verification of Brinell Hardness Testing
Machines
DIN EN
10003–3
Metallic Materials—Brinell Hardness Test—Calibration of Standardized Blocks to be
Used for Brinell Hardness Testing Machines
JIS B 7724
Brinell Hardness Testing Machines
JIS B 7736
Standardized Blocks of Brinell Hardness
JIS Z 2243 Method of Brinell Hardness Test
Indenter Selection and Geometry
The standard ball for Brinell hardness testing is 10.0 mm (0.39 in) in diameter. ASTM E 10, “Standard Test
Method for Brinell Hardness of Metallic Materials,” specifies that the 10 mm ball indenter shall not deviate
more than ±0.005 mm in any diameter. When balls smaller than 10 mm in diameter are used, both the test load
and ball size should be specifically stated in the test report. The tolerance for balls differing in size from the
standard 10 mm ball should conform to standard limits, such as those in Table 7 from ASTM E 10. When using
a different size ball, more comparable results can be obtained if the load to diameter squared ratios are similar.
Table 7 Tolerances for Brinell indenter balls other than standard
Ball diameter, mm
Tolerance
(a)
, mm
1–3, inclusive
±0.0035
More than 3–6, inclusive
±0.004
More than 6–10, inclusive
±0.0045
(a) Balls for ball bearings normally satisfy these tolerances.
Source: ASTM E 10
Hardened steel balls have been used in the past for testing material up to 444 HB (2.90 mm diam indentation).
Testing at higher hardness with steel balls may cause appreciable error due to the possible flattening and
permanent deformation of the ball. Therefore, the latest ASTM standards require the use of only tungsten
carbide balls with a minimum hardness of 1500 HV10. Tungsten carbide ball indenters are usable up to 627 HB
(2.40 mm diam indentation). The user is cautioned that slightly higher hardness values result when using
carbide balls instead of steel balls because of the difference in elastic properties between these materials. To
avoid any confusion, whenever a steel ball is used, the hardness is reported as HBS, and when a carbide ball is
used the HBW designation is required.
Load Selection and Impression Size
While theoretically any load can be used, the loads considered standard are 500, 1000, 1500, 2000, 2500, and
3000 kgf. The test load used is dependent mainly on size of impression, specimen thickness, and test surface.
The 500 kgf load is usually used for testing relatively soft metals such as copper and aluminum alloys. The
3000 kgf load is most often used for testing harder materials such as steels and cast irons.
It is recommended that the test load be of such magnitude that the diameter of the impression be in the range
2.40 to 6.00 mm (24.0–60.0% of ball diameter). Upper and lower limits of impression diameters are necessary
because the sensitivity of the test is reduced as impression size exceeds the limits specified above. In addition,
the upper limit may be influenced by limitations of the travel of the indenter in certain types of testers. Other
nonstandard lighter loads can be used as required on softer or thinner materials.
Indentation Measurement
The diameter of the indentation is frequently measured to the nearest 0.01 mm by means of a specially designed
microscope having a built-in millimeter scale. To eliminate error in the measurements due to slightly out-of-
round impressions, two diameter measurements should be taken at 90° to each other. The Brinell hardness
