ASM Metals HandBook Vol. 8 - Mechanical Testing and Evaluation
Подождите немного. Документ загружается.

H18 1t 1t
1 t 2t
3t
t
4t
4 t
O 0 0 0
t
1t 1t
2 t
4t
T3
1 t 2t
3t 4t 5t 5t 6t 7t
T4
1 t 2t
3t 4t 5t 5t 6t 7t
2014
T6 3t 4t 4t 5t 6t 8t
8 t 9t
O 0 0 0
t
1t 1t
2 t
4t
T3
2 t
3t 4t 5t 5t 6t 7t
7 t
T361
(a)
3t 4t 5t 6t 6t 8t
8 t 9t
T4
2 t
3t 4t 5t 5t 6t 7t
7 t
T81
4 t 5t
6t
7 t
8t 9t 10t
10 t
2024
T861
(a)
5t 6t 7t
8 t 9t
10t
11 t 11 t
2036
T4 … 1t 1t … … … … …
O 0 0 0 0
t
1t 1t
1 t
H12 0 0 0
t
1t 1t
1 t
2t
H14 0 0 0 1t 1t
1 t
2t
2 t
H16
t
1t 1t
1 t 2t
3t
3 t
4t
3003
H18 1t
1 t
2t
2 t 3t 4t 5t 6t
O 0 0 0
t
1t 1t 1t
1 t
H32 0 0
t
1t 1t
1 t 1t
2t
H34 0 1t 1t
1 t 1t 2t 2t
3t
H36 1t 1t
1 t 2t
3t
t
4t
4 t
3004
H38 1t
1 t 2t
3t 4t 5t
5 t 6t
3105
H25 …
t t
… … … … …
O 0 0 0 0
t
1t 1t
1 t
H12 0 0 0
t
1t 1t
1 t
2t
H14 0 0 0 1t
1 t
t
2t
2 t
H16
t
1t 1t
1 t 2t
3t
3 t
4t
H18 1t
1 t
2t
2 t 3t 4t 5t 6t
H32 0 0 0
t
1t 1t
1 t
2t
H34 0 0 0 1t
1 t 1t 2t 2t
H36
t
1t 1t
1 t 2t
3t
3 t
4t
5005
H38 1t
1 t
2t
2 t 3t 4t 5t 6t
O 0 0 0
t
1t 1t … …
H32 0 0 0 1t 1t
1 t
… …
5050
H34 0 0 1t
1 t 1t
2t … …
H36 1t 1t
1 t
2t
2 t
3t … …
H38 1t
1 t 2t
3t 4t 5t … …
O 0 0 0
t
1t 1t
1 t 1t
H32 0 0 1t
1 t 1t 1t 1t
2t
H34 0 1t
1 t
2t 2t
2 t 2t
3t
H36 1t 1t
1 t 2t
3t
3 t
4t
4 t
5052
H38 1t
1 t 2t
3t 4t 5t
5 t 6t
O … …
t
1t 1t 1t
1 t 1t
5083
H321 … … 1t
1 t 1t 1t
2t
2 t
O 0 0
t
1t 1t 1t
1 t 1t
H32 0
t
1t
1 t 1t
2t
2 t
3t
H34
t
1t
1 t
2t
2 t
3t
3 t
4t
5086
H36 … … … 3t
3 t
4t
4 t
5t
O 0 0
t
1t 1t 1t
1 t 1t
H32 0
t
1t
1 t 1t
2t
2 t 3t
H34
t
1t
1 t
2t
2 t
3t
3 t
4t
H36 1t
1 t
2t 3t
3 t
4t
4 t
5t
5154
H38
1 t 2t
3t 4t 5t 5t
6 t 6t
H25 0 0 1t 2t … … … …
5252
H28 1t
1 t 2t
3t … … … …
O 0 0
t
1t 1t 1t
1 t 1t
H32 0
t
1t
1 t 1t
2t
2 t 3t
H34
t
1t
1 t
2t
2 t
3t
3 t
4t
H36 1t
1 t
2t 3t
3 t
4t
4 t
5t
5254
H38
1 t 2t
3t 4t 5t 5t
6 t 6t
O 0
t
1t 1t 1t
1 t 1t
2t
H32
t t
1t 2t 2t
2 t
3t 4t
5454
H34
t
1t
1 t
2t
2 t
3t
3 t
4t
O … … … 1t
1 t 1t
2t 2t
5456
H321 … … … 2t 2t
2 t
3t
3 t
5457
O 0 0 0
t
1t 1t 1t
1 t
O 0 0 0
t
1t 1t
1 t 1t
H32 0 0 1
1 t 1t 1t 1t
2t
H34 0 1t
1 t
2t 2t
2 t 2t
3t
5652
H36 1t 1t
1 t 2t
3t
3 t
4t
4 t
H38 1t
1 t 2t
3t 4t 5t
5 t 6t
H25 0 0 0 1t … … … …
5657
H28 1t
1 t 2t
3t … … … …
O 0 0 0 1t 1t 1t
1 t
2t
T4 0 0 1t
1 t, 2 t 2t
3t
3 t
4t
6061
(b)
T6 1t 1t
1 t 2t
3t
3 t 4t
5t
O 0 0 … … … … … …
H12 0 0 … … … … … …
H14 0 0 … … … … … …
H16 0
t
… … … … … …
7072
H18 1t 1t … … … … … …
O 0 0 1t 1t
1 t 2t 3t
4t
7075
(b)
T6 3t 4t 5t 6t 6t 8t 9t
9 t
O 0 0 1t
1 t 1t 2t 3t
4t
7178
(b)
T6 3t 4t 5t 6t 6t 8t 9t
9 t
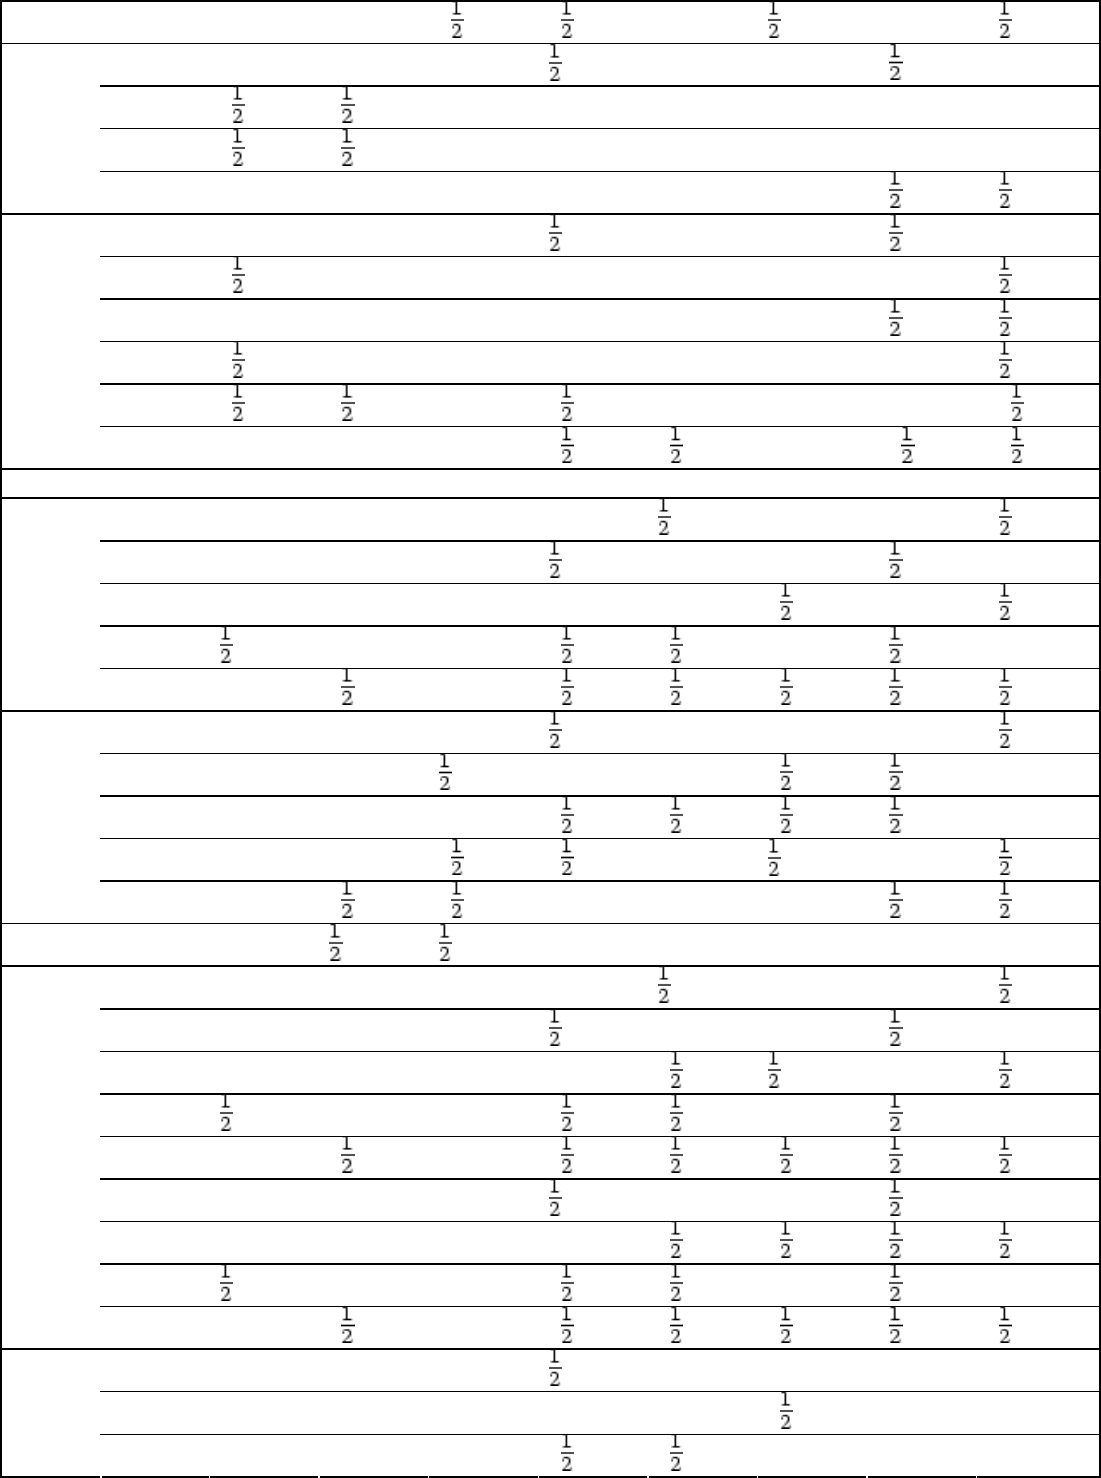
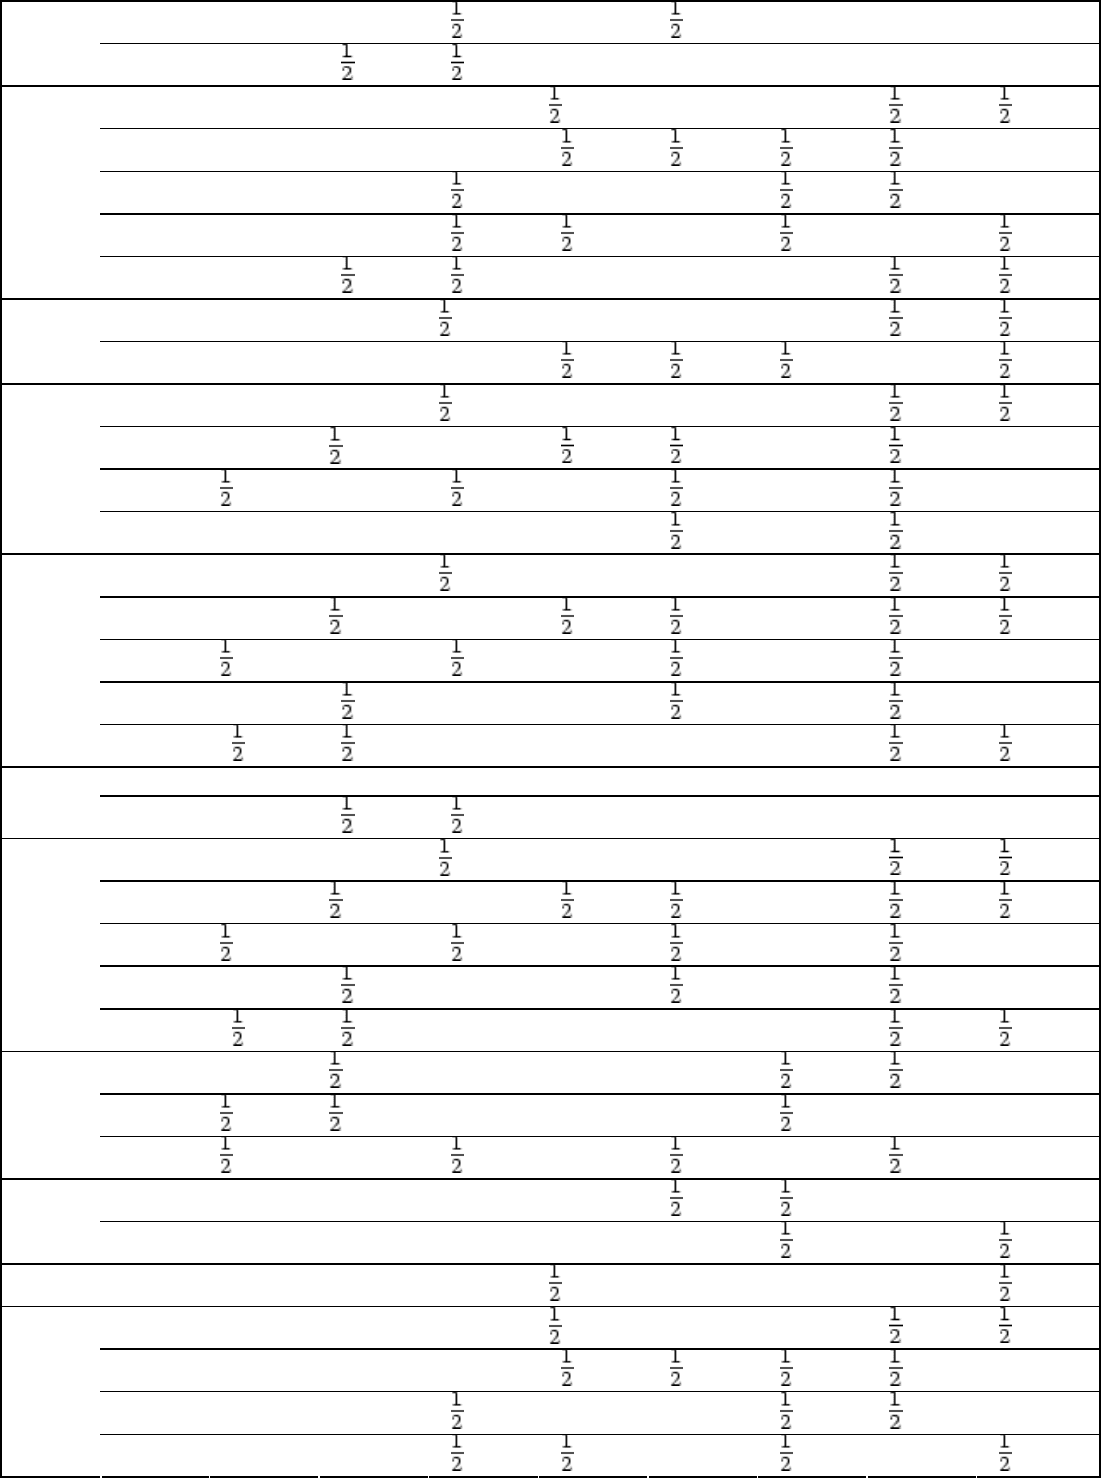
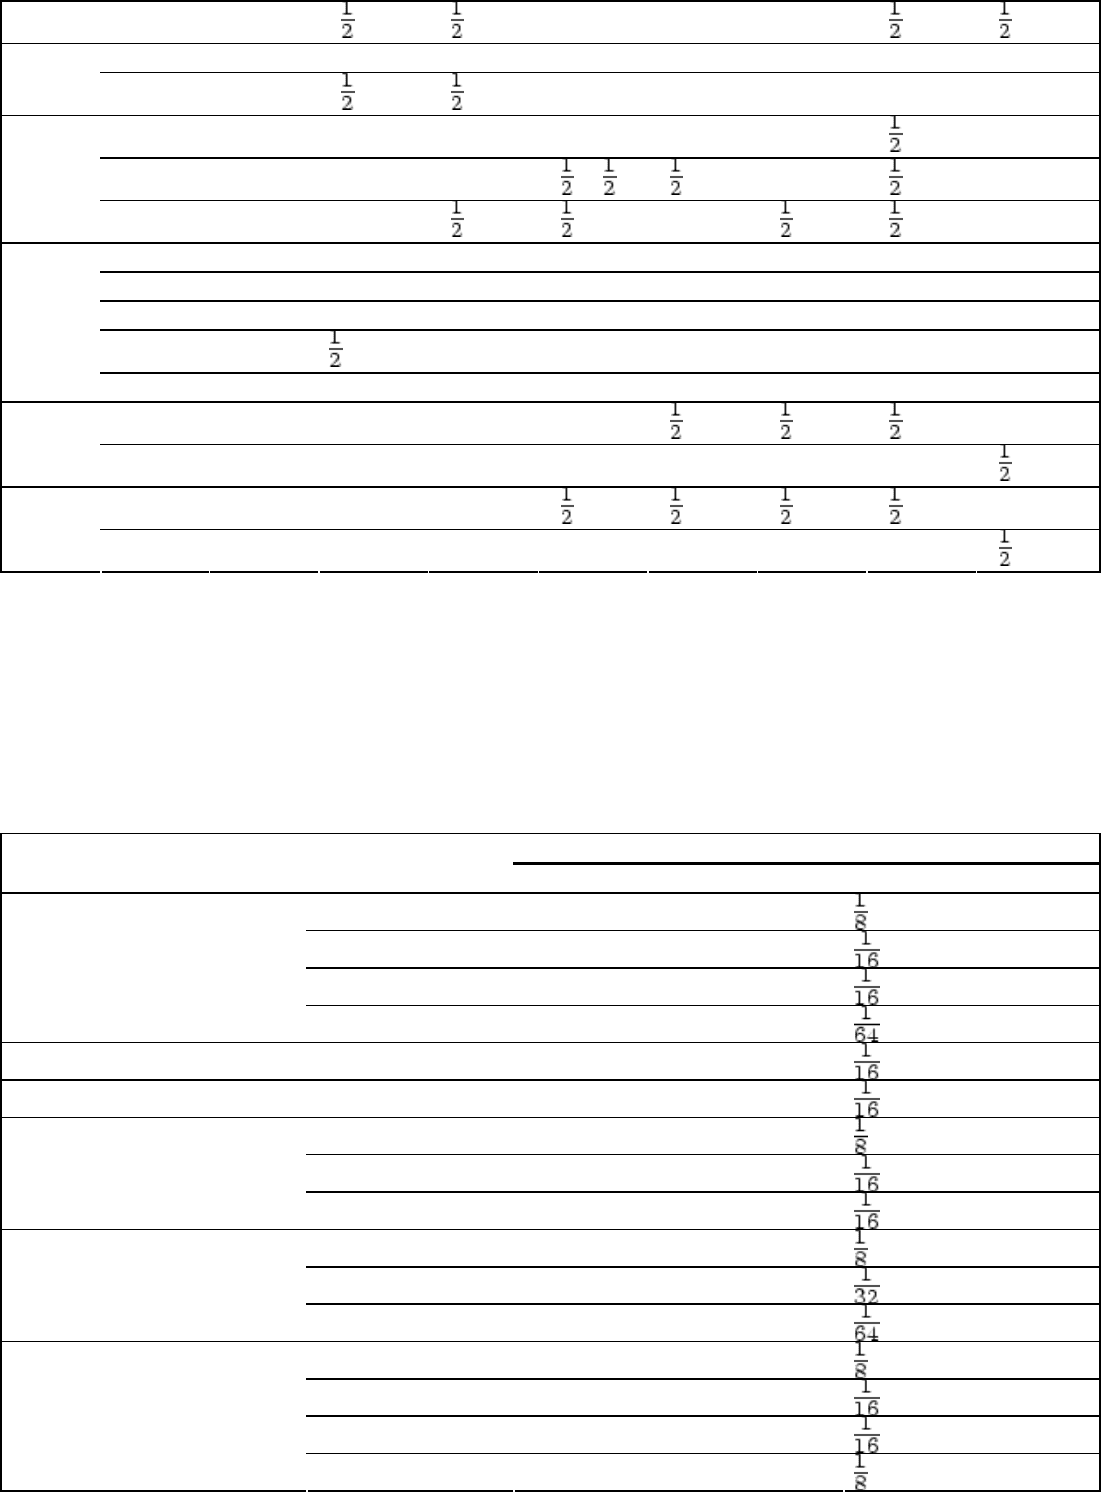
(a) The radii listed are the minimum recommended for bending sheets and plates without fracturing in a
standard press brake with air bend dies. Other bending operations may require larger radii or permit smaller
radii. The minimum permissible radii also vary with the design and condition of the tooling.
(b) Tempers T361 and T861 formerly designated T36 and T86, respectively.
(c) Alclad sheet in the heat treatable alloys can be bent over slightly smaller radii than the corresponding
tempers of the bare alloy.
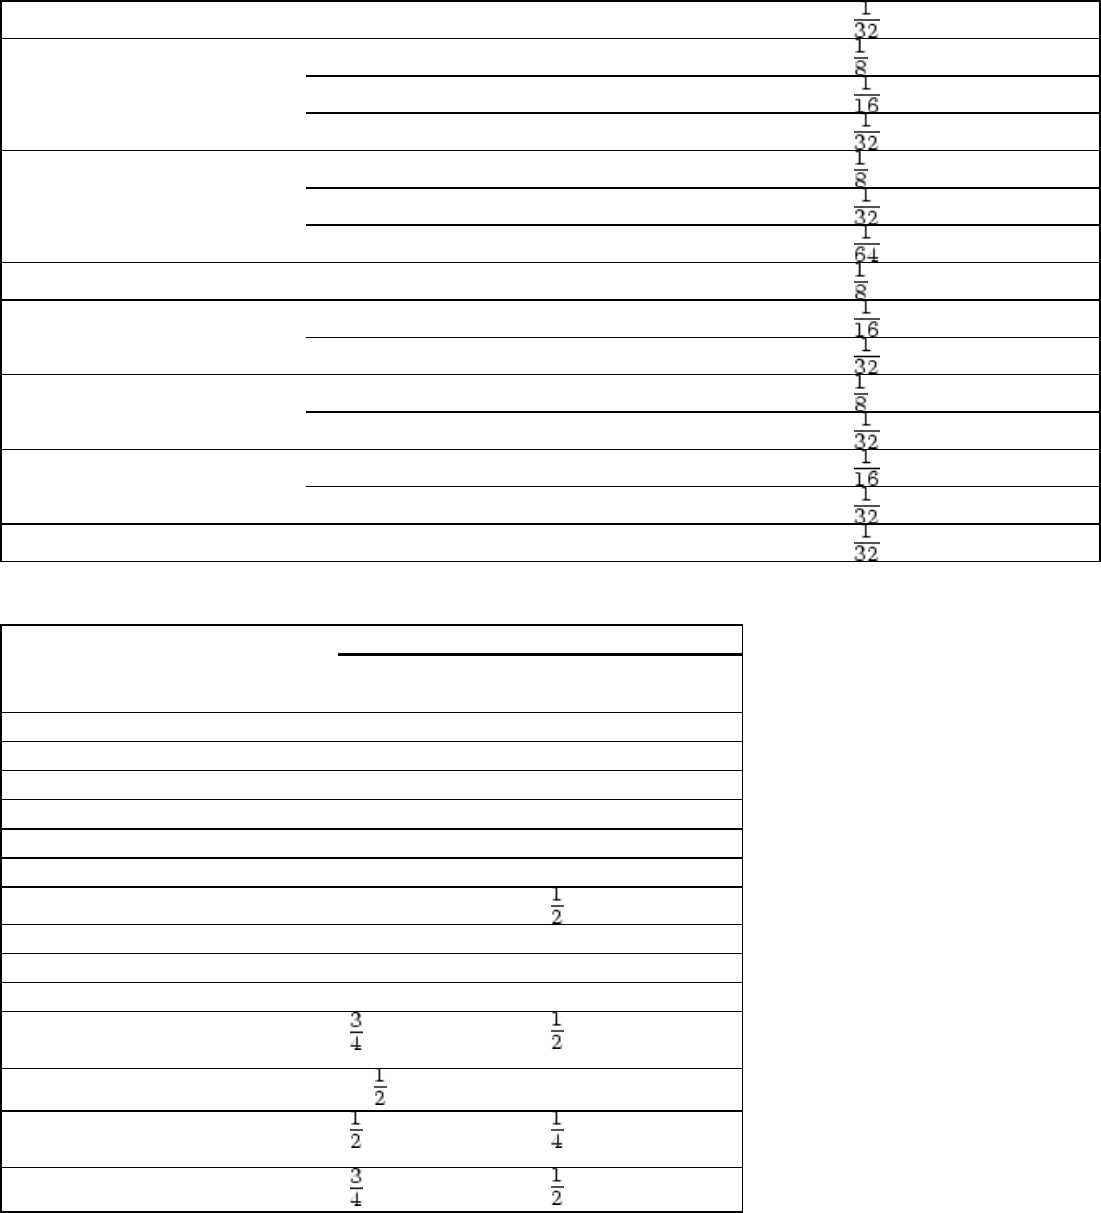
Table 2 Maximum thicknesses of aluminum alloy sheet that can be cold bent 180° over
zero radius
Maximum sheet thickness Alloy Temper
mm in.
O 3.2
H12 1.6
H14 1.6
1100
H16 0.4
Alclad 2014
O 1.6
2024
O 1.6
O 3.2
H12 1.6
3003
H14 1.6
O 3.2
H32 0.8
3004
H34 0.4
O 3.2
H12 1.6
H14 1.6
5005
H32 3.2
H34 0.8
O 3.2
H32 1.6
5050
H34 0.8
O 3.2
H32 0.8
5052
H34 0.4
5086
O 3.2
O 1.6
5154
H32 0.8
O 3.2
5457
H25 0.8
O 1.6
6061
T4 0.8
7075
O 0.8
Table 3 Minimum bend radii for 1008 or 1010 steel sheet
Minimum bend radius Quality
or temper
Parallel to rolling
direction
Across rolling
direction
Cold rolled
Commercial
0.25 mm (0.01 in.)
0.25 mm (0.01 in.)
Drawing, rimmed
0.25 mm (0.01 in.)
0.25 mm (0.01 in.)
Drawing, killed
0.25 mm (0.01 in.)
0.25 mm (0.01 in.)
Enameling
0.25 mm (0.01 in.)
0.25 mm (0.01 in.)
Cold rolled, special properties
Quarter hard
(a)
1t
Half hard
(b)
NR 1t
Full hard
(c)
NR NR
Hot rolled
Commercial
Up to 2.3 mm (0.090 in.)
t
t
More than 2.3 mm (0.090 in.)
1– t
1t
Drawing
Up to 2.3 mm (0.090 in.)
t t
More than 2.3 mm (0.090 in.)
t
t
(a) Note: t, sheet thickness; NR, not recommended.
(b) 60–75 HRB.
(c) 70–85 HRB.
(d) 84 HRB min

Table 4 Typical bending limits for six commonly formed stainless steels
Minimum bend radius
Quarter hard, cold rolled
Type
Annealed to
4.7 mm
(0.187 in.)
thick
(180° bend)
To
1.27 mm
(0.050 in.)
thick
(180° bend)
1.3 to 4.7 mm
(0.051 to
0.187 in.)
thick
(90° bend)
301, 302, 304
t t
1t
316
t
1t 1t
410, 430
1t … …
Note: t, stock thickness

Introduction to Hardness Testing
Gopal Revankar, Deere & Company
Introduction
THE TERM HARDNESS, as it is used in industry, may be defined as the ability of a material to resist
permanent indentation or deformation when in contact with an indenter under load. Generally a hardness test
consists of pressing an indenter of known geometry and mechanical properties into the test material. The
hardness of the material is quantified using one of a variety of scales that directly or indirectly indicate the
contact pressure involved in deforming the test surface. Since the indenter is pressed into the material during
testing, hardness is also viewed as the ability of a material to resist compressive loads. The indenter may be
spherical (Brinell test), pyramidal (Vickers and Knoop tests), or conical (Rockwell test). In the Brinell, Vickers,
and Knoop tests, hardness value is the load supported by unit area of the indentation, expressed in kilograms
per square millimeter (kgf/mm
2
). In the Rockwell tests, the depth of indentation at a prescribed load is
determined and converted to a hardness number (without measurement units), which is inversely related to the
depth.
Hardness tests are no longer limited to metals, and the currently available tools and procedures cover a vast
range of materials including polymers, elastomers, thin films, semiconductors, and ceramics. Hardness
measurements as applied to specific classes of materials convey different fundamental aspects of the material.
Thus, for metals, hardness is directly proportional to the uniaxial yield stress at the strain imposed by the
indentation. This statement, however, may not apply in the case of polymers, since their yield stress is ill
defined. Yet hardness measurement may be a useful characterization technique for different properties of
polymers, such as storage and loss modulus. Similarly, the measured hardness of ceramics and glasses may
relate to their fracture toughness, and there appears to be some correlation between microhardness and
compressive strength (Ref 1).
The consequence of material hardness also depends on its application in industry. For example, a fracture
mechanics engineer may consider a hard material as brittle and less reliable under impact loads; a tribologist
may consider high hardness as desirable to reduce plastic deformation and wear in bearing applications. A
metallurgist would like to have lower hardness for cold rolling of metals, and a manufacturing engineer would
prefer less hard materials for easy and faster machining and increased production. These considerations lead,
during component design, to the selection of different types of materials and manufacturing processes to obtain
the required material properties of the final product, which are, in many cases, estimated by measuring the
hardness of the material.
Hardness, though apparently simple in concept, is a property that represents an effect of complex elastic and
plastic stress fields set up in the material being tested. The microscopic events such as dislocation movements
and phase transformations that may occur in a material under the indenter should not be expected to exactly
repeat themselves for every indentation, even under identical test conditions. Yet experience has shown that the
indentations produced under the same test conditions are macroscopically nearly identical, and measurements
of their dimensions yield fairly repeatable hardness numbers for a given material. This observation by James A.
Brinell in the case of a spherical indenter led to the introduction of the Brinell hardness test (Ref 2). This was
followed by other tests (already mentioned) with unique advantages over the Brinell indenter, as described in
the various articles of this Section.
Hardness testing is perhaps the simplest and the least expensive method of mechanically characterizing a
material since it does not require an elaborate specimen preparation, involves rather inexpensive testing
equipment, and is relatively quick. The theoretical and empirical investigations have resulted in fairly accurate
quantitative relationships between hardness and other mechanical properties of materials such as ultimate
tensile strength, yield strength and strain hardening coefficient (Ref 3, 4), and fatigue strength and creep (Ref
5). These relationships help measure these properties with an accuracy sufficient for quality control during the
intermediate and final stages of manufacturing. Many times hardness testing is the only nondestructive test
alternative available to qualify and release finished components for end application.

References cited in this section
1. R.W. Rice, The Compressive Strength of Ceramics in Materials Science Research, Vol 5, Ceramics in
Severe Environments, W.W. Kriegel and H. Palmour III, Ed., Plenum, 1971, p 195–229
2. J.A. Brinell, II Cong. Int. Méthodes d' Essai (Paris), 1900
3. M.O. Lai and K.B. Lim, J. of Mater. Sci., Vol 26 (1991), p 2031–2036
4. S.C. Chang, M.T. Jahn, C.M. Wan, J.Y.M. Wan, and T.K. Hsu, J. Mater. Sci., Vol 11, 1976, p 623
5. W. Kohlhöfer and R.K. Penny, Int. J. Pressure Vessels Piping, Vol 61, 1995, p 65–75
Introduction to Hardness Testing
Gopal Revankar, Deere & Company
Principles of Hardness Testing (Ref 6)
Brinell versus Meyer Hardness. In the Brinell hardness test, a hard spherical indenter is pressed under a fixed
normal load onto the smooth surface of a material. When the equilibrium is reached, the load and the indenter
are withdrawn, and the diameter of the indentation formed on the surface is measured using a microscope with
a built-in millimeter scale. The Brinell hardness is expressed as the ratio of the indenter load W to the area of
the concave (i.e., contact) surface of the spherical indentation that is assumed to support the load and is given as
Brinell hardness number (BHN) denoted by HB. Thus:
(Eq 1)
where W is the load in kilograms, and d and D are the diameters of the indentation and the indenter,
respectively, in millimeters.
However, BHN, though widely and universally accepted in manufacturing practice, is not considered a
satisfactory concept, since it does not represent the mean pressure over the curved area (see the following
discussion). Consideration of equilibrium of the indenter (sphere) under load would show (Ref 6) that the mean
pressure over the indentation spherical area is given by load divided by the projected area of indentation, or:
P = W/(πd
2
/ 4)
(Eq 2)
where P is the Meyer hardness (Ref 7), also expressed in kilograms per square millimeter (kgf/mm
2
). A more
fundamental relationship between the load and the indentation diameter is given by Meyer's law, which states
that:
W = cd
n
(Eq 3)
where c and n are constants for a given material. The value of n generally varies between 2 and 2.5; it is
approximately 2.6 for fully annealed metals and approximately 2.0 for fully cold worked metals. It may be
mentioned here that fully annealed metals tend to work harden whereas the highly cold worked metals have a
near ideal plastic behavior; that is, they do not work harden.
If D
1
, D
2
, D
3
, … are the diameters of the indenters producing indentations of diameters d
1
, d
2
, d
3
, … produced
by the same load, then Meyer's law states that:
W = = = =…
(Eq 4)
Meyer determined experimentally that, for a given material, the value of n is almost independent of D, and that
c and D are inversely related such that:
A = c
1
D
1
n-2
= c
2
D
2
n-2
= c
3
D
3
n-2
…= constant
Equation 4 then becomes:
W = / = /
= / …
(Eq 5)
This relationship may be expressed in two useful forms:
W/d
2
= A(d/D)
n-2
(Eq 6)
and
W/D
2
= A (d/D)
n
(Eq 7)
where A is a constant.
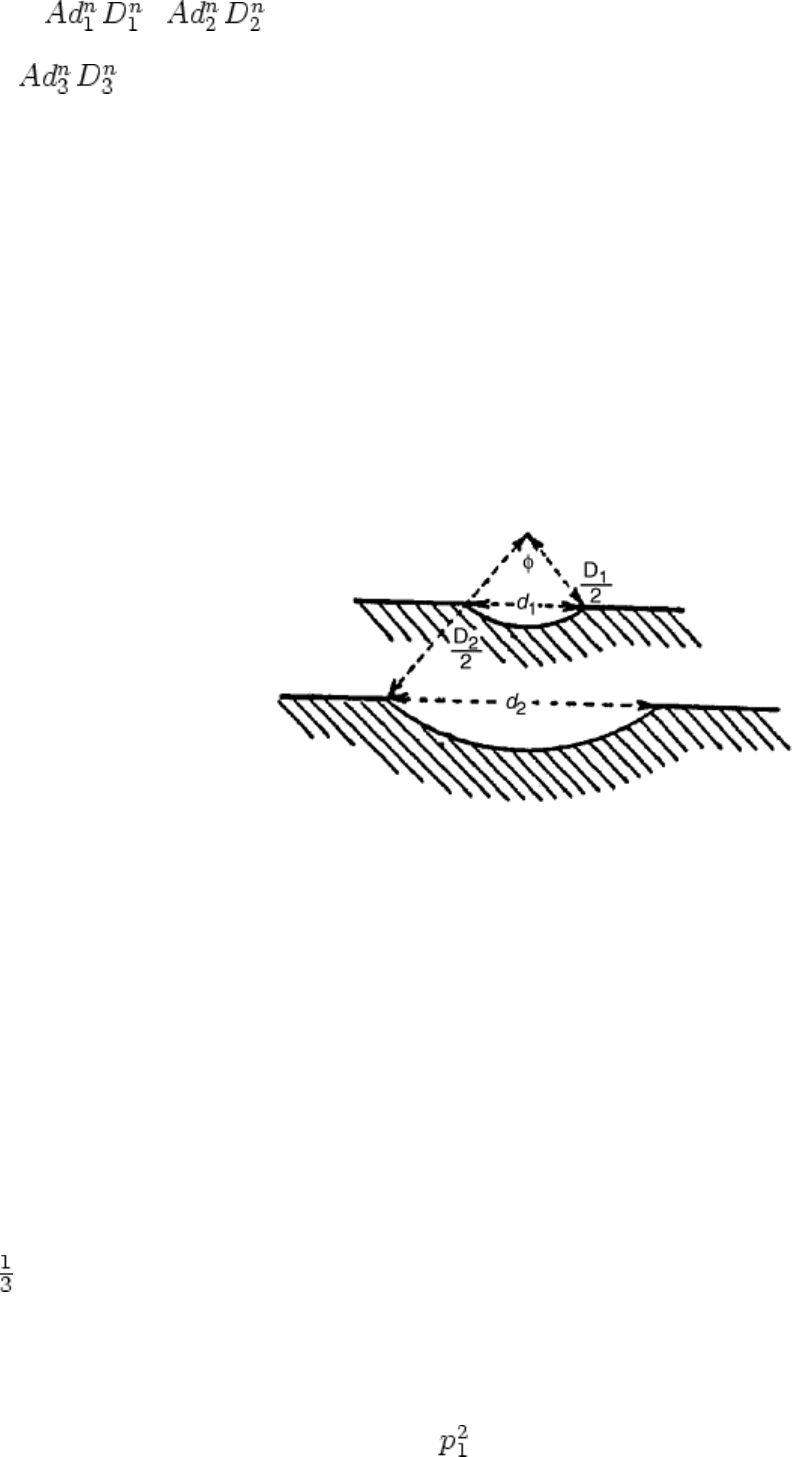
Equation 6 shows that, for geometrically similar indentations (see Fig. 1) for which d/D is fixed, the ratio W/d
2
,
and, hence, Meyer hardness, which is proportional to this ratio, will be constant. Similarly, the Brinell hardness
values, which are related to Meyer hardness through a constant, will also be constant. According to Eq 7, the
indentations produced by using different values of W and D will be geometrically similar (i.e., d/D = a constant)
and will give the same hardness values if the ratio W/D
2
is held constant. This concept is used in practical
hardness measurements when the load, and, hence, D, need to be varied depending on the type of material and
the shape and size of the component. Thus hardness values obtained using a 3000 kg load and 10 mm diameter
ball would be practically the same as when a 750 kg load and a 5 mm diameter ball are used, since W/D
2
= 30
in both cases.
Fig. 1 Geometrically similar indentations produced by spherical indenters of different diameters. Note
that the solid angle φ and the ratio d/D are the same for both the indentations
In the case of highly cold worked metals, it is experimentally observed that Meyer hardness is independent of
the applied load; that is, the mean pressure resisting deformation is approximately constant. Brinell hardness,
however, is nearly constant at smaller loads but decreases as the load is increased, indicating incorrectly that the
materials soften at higher indentation loads. Similarly, for fully annealed metals (which undergo work
hardening during the indentation process), Meyer hardness is found to increase steadily with load, suggesting
the presence of work hardening. Brinell hardness would, however, rise at first and then fall as the load
increases, again suggesting material softening. Meyer hardness, which is an expression of the mean yield
pressure, is therefore considered a more appropriate and satisfactory measure of resistance to indentation (see
also further discussion that follows and “Summary” in this article).
Plastic Deformation of Ideal Plastic Metals under an Indenter. The complex stresses set up in a material due to
indentation and immediately next to the indenter can be resolved into three principal stresses, p
1
, p
2
, and p
3
, and
it has been shown empirically that, for the onset of plastic deformation:
[(p
1
- p
2
)
2
+ (p
2
- p
3
)
2
+ (p
3
- p
1
)
2
] = constant
(Eq 8)
For uniaxial stresses as in a tensile test, p
2
= p
3
= 0 and p
1
= Y at the onset of yielding, where Y is the yield
stress. Equation 8 gives:
⅓(2 ) = ⅓(2Y
2
) = constant
This leads to the equation:
(p
1
- p
2
)
2
+ (p
2
- p
3
)
2
+ (p
3
- p
1
)
2
= 2Y
2
(Eq 9)
which is the Huber-Mises criterion for the onset of plasticity.
An alternative criterion, due to Tresca and Mohr, is based on the assumption that plastic deformation occurs
under the action of three principle stresses, p
1
> p
2
> p
3
, when the maximum shear stress, ½(p
1
- p
3
), exceeds a
critical value. The value of this stress can be obtained, again, by considering uniaxial loading with p
2
= p
3
= 0,
when the maximum shear stress is ½p
1
. Since p
1
= Y at yielding:
½(p
1
- p
3
) = ½Y or
p
1
- p
3
= Y, when p
1
> p
2
> p
3
(Eq 10)
It may be shown for a two dimensional plastic flow, that is, under plane strain conditions of deformation, that p
2
= (p
1
+ p
3
), with zero strain in the direction of p
2
. Substituting this in Eq 9 yields:
p
1
- p
3
= (2/ )Y
(Eq 11)
Thus, according to the Huber-Mises criterion, the plasticity under the indenter occurs when (p
1
- p
3
) reaches the
value (2/ ) Y (or 1.15 Y), which is 15% higher than that for Tresca or Mohr criterion.
When plastic strain occurs in a plane (plane strain), the system of stresses can be represented by the sum of a
hydrostatic pressure, p, and a maximum shear stress, k, where 2k = 1.15 Y or Y (depending on the criterion
chosen) at every point in the plastically deformed region of the material. Since the hydrostatic component does
not produce deformation, only the shear stress may be considered responsible for the plastic strain. The stress
field in the deformed material volume may therefore be represented by the maximum shear stresses in the form
of slip lines (see Fig. 2). These lines should not be confused with the slip lines associated with dislocation
movements under the action of stresses, which appear on the metal surface, or the dislocation images observed
as lines in transmission electron microscopy.
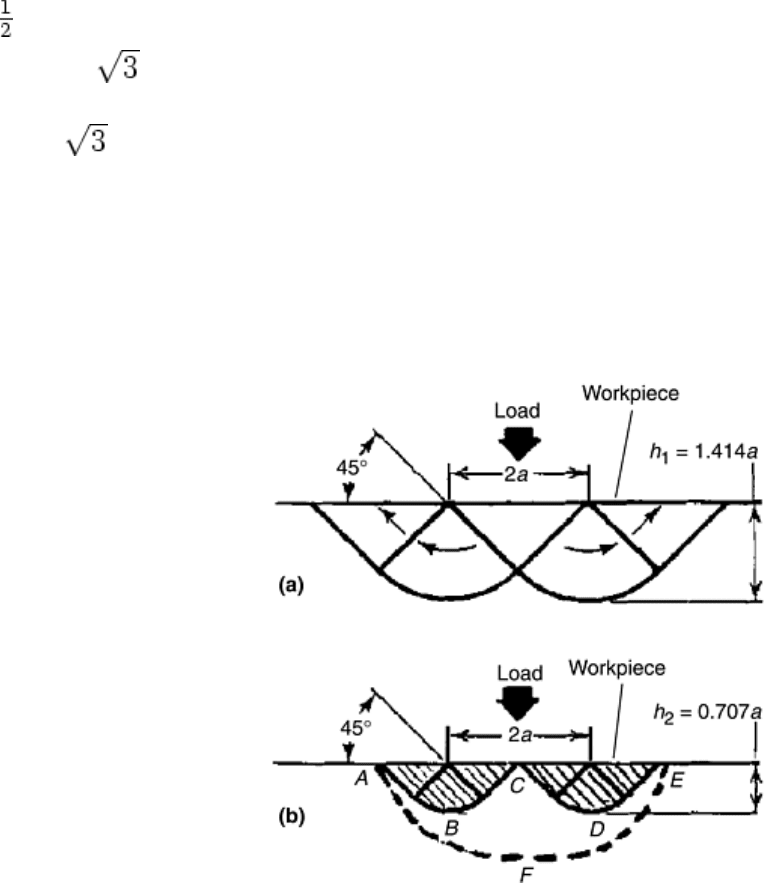
Fig. 2 Slip-line field solutions for a flat-ended, two-dimensional punch having a width 2a. (a) Prandtl's
flow pattern. Flow in the center area is downward and to the left and right, as indicated by arrows in the
adjoining areas. (b) Hill's flow pattern. Flow is to left and right in directions indicated by arrows in (a),
but is separated. The dashed line AFE has been added to 3(a) to approximately suggest areas of elastic-
plastic and elastic strain regions. Strain between ABCDE and AFE is partly plastic and partly elastic,
and that below AFE is mostly elastic. Source: Ref 6
Deformation of an Ideal Plastic Metal by a Flat Punch (Two Dimensional Deformation). The rigorous solutions
for the problem of plastic indentation have been possible only for the case of a two-dimensional deformation.
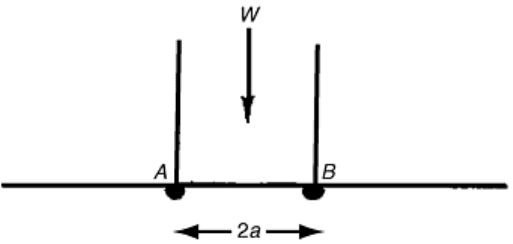
When a load is first applied to an infinitely long and rigid punch with uniform width and negligible thickness,
the shear stresses in an ideal plastic metal at the punch edges A and B (Fig. 3) will be very high, and these
points will reach a plasticity state much earlier than the rest of the contact length. As the load is increased, the
plasticity region expands outward from these edges until it covers the whole width of the punch. The pressure
on the punch face at this state of plastic deformation was first derived by Prandtl (Ref 8) and later by Hill (Ref
9) through the slip line analysis already mentioned, and the corresponding slip line patterns are shown in Fig. 2.
Fig. 3 Two-dimensional deformation (plain strain) of an ideal plastic semi-infinite metal by a rigid flat
punch of width 2a. The onset of plasticity occurs at the edges A and B. Source: Ref 6
The slip line analysis of plastic deformation shows that the mean normal pressure, P
m
, on the punch is given by:
P
m
= 2k(1 + ½π)
(Eq 12)
where k is the magnitude of maximum shear stress, equal to Y/2 if Tresca or Mohr criterion is used and
(1.15Y)/2 if Huber-Mises criterion is used. The Tresca or Mohr criterion holds for fully annealed mild steel,
whereas the Huber-Mises criterion is applicable to most other metals. The mean pressure on the punch,
therefore, would be between 2.6Y and 3.0Y. The shaded region in Fig. 2(b) represents the volume of plastic
deformation where elastic strains may be neglected, and the region between ABCDE and AFE may be
considered to have both plastic and elastic deformation. The volume below AFE may be considered a region of
totally elastic strain.
An approximate extension of the above analysis for a two-dimensional flat punch to the case of a three-
dimensional circular punch has shown that the pressure is not uniform over the area of the circular punch (as it
is slightly higher at the center than at the edges) and that the mean pressure, P
m
, over the face of the punch
when the material under the punch is plastically deformed is still given by the same relationship, P
m
≈ 3Y. Note
that P
m
is a quantity similar to Meyer hardness discussed previously.
Deformation of Ideal Plastic Metal by Spherical Indenters. The preceding analysis of plastic deformation under
the flat and circular punches may now be used to understand the stress field under a spherical indenter pressed
into the surface of an ideal plastic metal.
Based on Tresca or Huber-Mises criterion, Timoshenko (Ref 10) showed that when a sphere is pressed into a
metal under load, the maximum shear stress and, hence, the plastic deformation starts at a depth equal to 0.5a
where 2a is the indentation diameter, as at X in Fig. 4. The maximum shear stress at this point has been shown
to be 0.47 P
m
where P
m
is the mean pressure on the indenter. From Tresca-Mohr criterion, it is obvious, the
plastic transformation would start at X when 0.47 P
m
= ½Y, or P
m
= 1.1Y. Figure 4 also shows contours (Ref 11)
of shear stress expressed in terms of P
m
as a function of the distance from X.
