ASM Metals HandBook Vol. 8 - Mechanical Testing and Evaluation
Подождите немного. Документ загружается.

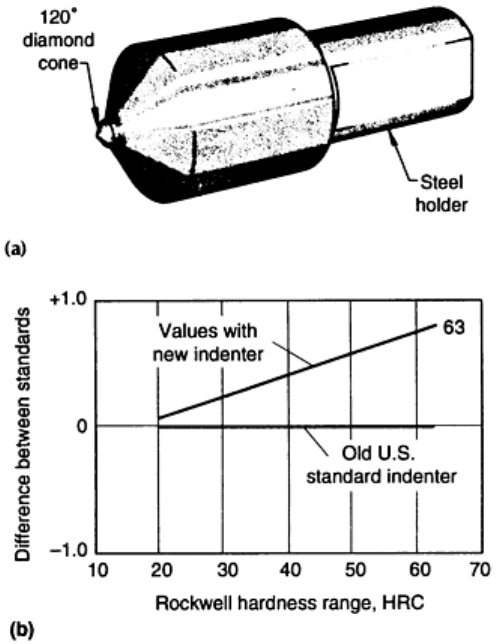
Rockwell diamond indenters are used mainly for testing hard materials such as hardened steels and cemented
carbides. “Hard materials” are those with hardness greater than 100 HRB and greater than 83.1 HR30T (see the
section “Rockwell Scales” in this article for further explanation).
The Rockwell diamond indenter is a spheroconical shape with a 120° cone and a spherical tip radius of 200 μm
(Fig. 2a). Older standard indenters in the United States had a nominal radius closer to 192 μm, which was
within ASTM specifications (200 ± 10 μm); standard indenters in the rest of the world have been closer to 200
μm. While not out of tolerance, the old U.S. standard indenter is at the low end of the specification. This led to
a change in tip radius closer to 200 μm used in the rest of the world.
Fig. 2 Rockwell indenter. (a) Diamond-cone Brale indenter (shown at about 2×). (b) Comparison of old
and new U.S. diamond indenters. The angle of the new indenter remains at 120°, but has a larger radius
closer to the average ASTM specified value of 200 μm; the old indenter has a radius of 192 μm. The
indenter with the larger radius has a greater resistance to penetration of the surface.
A comparison of the old (192 μm) U.S. standard diamond indenter and the current (200 μm tip) U.S. indenter is
shown in Fig. 2(b). The larger radius increases the resistance of the indenter to penetration into the surface of
the testpiece. At higher Rockwell C hardness, most of the indenter travel is along the radius; whereas at the
lower hardnesses, more indenter travel is along the angle. This is why the hardness shift from old to new has
been most significant in the 63 HRC range and not the 25 HRC range.
Rockwell Scales
Rockwell hardness values are expressed as a combination of hardness number and a scale symbol representing
the indenter and the minor and major loads. The Rockwell hardness is expressed by the symbol HR and the
scale designation. For example, 64.0 HRC represents the Rockwell hardness number of 64.0 on the Rockwell C
scale; 81.3 HR30N represents the Rockwell superficial hardness number of 81.3 on the Rockwell 30N scale.
Because of the changeover to carbide balls, the designation for the ball scales will require the use of an S or W
to indicate the ball used. For example, a HRB scale reading of 80.0 obtained using a steel ball would be labeled
80.0 HRBS, while the same result using a carbide ball would be designated 80.0 HRBW.

There are 30 different scales, defined by the combination of the indenter and the minor and major loads (Tables
2 and 3). In many instances, Rockwell hardness tolerances are specified or are indicated on drawings. At times,
however, the Rockwell scale must be selected to suit a given set of circumstances.
Table 2 Rockwell standard hardness
Scale
symbol
Indenter Major
load, kgf
Typical applications
A Diamond (two
scales—carbide and
steel)
60
Cemented carbides, thin steel, and shallow case-hardened
steel
B
1
16
in. (1.588 mm)
ball
100
Copper alloys, soft steels, aluminum alloys, malleable iron
C Diamond 150
Steel, hard cast irons, pearlitic malleable iron, titanium,
deep case-hardened steel, and other materials harder
than 100 HRB
D Diamond 100
Thin steel and medium case-hardened steel and pearlitic
malleable iron
E
⅛ in. (3.175 mm)
ball
100
Cast iron, aluminum and magnesium alloys, bearing
metals
F
1
16
in. (1.588 mm)
ball
60
Annealed copper alloys, thin soft sheet metals
G
1
16
in. (1.588 mm)
ball
150
Phosphor bronze, beryllium copper, malleable irons.
Upper limit 92 HRG to avoid possible flattening of ball
H
⅛ in. (3.175 mm)
ball
60
Aluminum, zinc, lead
K
⅛ in. (3.175 mm)
ball
150
Bearing metals and other very soft or thin materials. Use
smallest ball and heaviest load that do not produce anvil
effect.
L ¼ in. (6.350 mm) ball 60
Bearing metals and other very soft or thin materials. Use
smallest ball and heaviest load that do not produce anvil
effect.
M ¼ in. (6.350 mm) ball 100
Bearing metals and other very soft or thin materials. Use
smallest ball and heaviest load that do not produce anvil
effect.
P ¼ in. (6.350 mm) ball 150
Bearing metals and other very soft or thin materials. Use
smallest ball and heaviest load that do not produce anvil
effect.
R ½ in. (12.70 mm) ball 60
Bearing metals and other very soft or thin materials. Use
smallest ball and heaviest load that do not produce anvil
effect.
S ½ in. (12.70 mm) ball 100
Bearing metals and other very soft or thin materials. Use
smallest ball and heaviest load that do not produce anvil
effect.
V ½ in. (12.70 mm)
ball
150 Bearing metals and other very soft or thin materials. Use
smallest ball and heaviest load that do not produce anvil
effect.
Source: ASTM E 18
Table 3 Rockwell superficial hardness scales
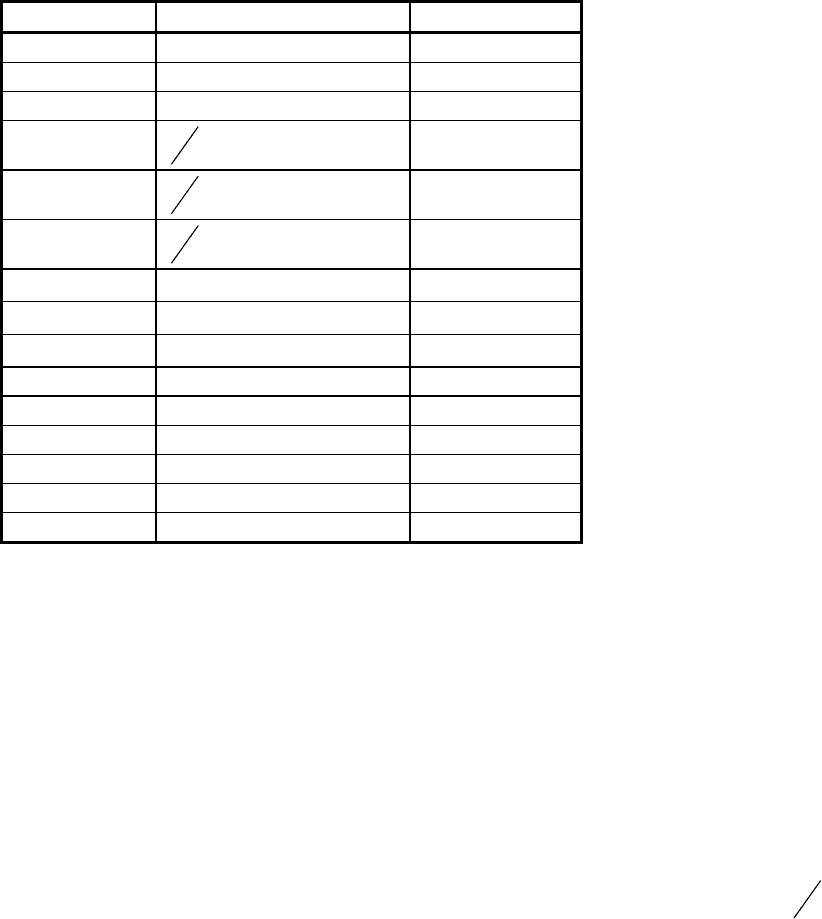
Scale symbol
Indenter
Major load, kgf
15N Diamond
15
30N Diamond
30
45N Diamond
45
15T
1
16
in. (1.588 mm) ball
15
30T
1
16
in. (1.588 mm) ball
30
45T
1
16
in. (1.588 mm) ball
45
15W
⅛in. (3.175 mm) ball
15
30W
⅛in. (3.175 mm) ball
30
45W
⅛in. (3.175 mm) ball
45
15X ¼in. (6.350 mm) ball
15
30X ¼in. (6.350 mm) ball
30
45X ¼in. (6.350 mm) ball
45
15Y ½in. (12.70 mm) ball
15
30Y ½in. (12.70 mm) ball
30
45Y ½in. (12.70 mm) ball 45
Note: The Rockwell N scales of a superficial hardness tester are used for materials similar to those tested on the
Rockwell C, A, and D scales, but of thinner gage or case depth. The Rockwell T scales are used for materials
similar to those tested on the Rockwell B, F, and G scales, but of thinner gage. When minute indentations are
required, a superficial hardness tester should be used. The Rockwell W, X, and Y scales are used for very soft
materials. The letter N designates the use of the diamond indenter; the letters T, W, X, and Y designate steel
ball indenters. Superficial Rockwell hardness values are always expressed by the number suffixed by a number
and a letter that show the load and indenter combination. For example, 80 HR30N indicates a reading of 80 on
the superficial Rockwell scale using a diamond indenter and a major load of 30 kgf
The majority of applications for testing steel, brass, and other materials are covered by the Rockwell C and B
scales. However, the increasing use of materials other than steel and brass as well as thin materials necessitates
a basic knowledge of the factors that must be considered in choosing the correct scale to ensure an accurate
Rockwell test. The choice is not only between the regular hardness test and superficial hardness test, with three
different major loads for each, but also between the diamond indenter and the
1
16
, ⅛, ¼, and ½ in. (1.588,
3.175, 6.35, and 12.7 mm) diam ball indenters.
If no specification exists or there is doubt about the suitability of the specified scale, an analysis should be made
of the following factors that control scale selection:
• Type of material
• Specimen thickness or the thickness of a hardened layer on the surface of the part
• Test location
• Scale limitations
In general, the best results are obtained using the highest loads that the specimen will allow.
Selection of Scale Based on Material Type. Standard Rockwell scales and typical materials for which these
scales are applicable are listed in Table 2. For example, when a hard material such as steel or tungsten carbide
is tested, a diamond indenter would be used. This automatically limits the choice of scale to one of six:
Rockwell C, A, D, 45N, 30N, or 15N. The next step is to determine which scale will provide the best accuracy,
sensitivity, and repeatability. Typically, as the thickness of the sample decreases the major load should also
decrease.
Effect of Specimen Thickness. The material immediately surrounding a Rockwell indentation is cold worked.
The extent of the cold-worked area depends on the type of material and previous work hardening of the test
specimen. The depth of material affected has been found by extensive experimentation to be on the order of 10
to 15 times the depth of the indentation. Therefore, unless the thickness of the material being tested is at least
10 times the depth of the indentation, an accurate Rockwell test cannot be ensured. This “minimum thickness
ratio” of 10 to 1 should be regarded only as an approximation.
The depth of the indentation can be determined as follows. One Rockwell number is equal to 0.002 mm
(0.00008 in.). When the reading is taken with a diamond indenter, the Rockwell hardness number obtained on
the sample is subtracted from 100, and the result multiplied by 0.002 mm. Therefore, a reading of 60 HRC
indicates an indentation depth from minor to major load of:
(100 - 60) × 0.002 mm = 0.08 mm
Depth = 0.08 mm (0.003 in.)
When a ball indenter is used, the hardness number is subtracted from 130; therefore, for a dial reading of 90
HRB, the depth is determined by:
(130 - 80) × 0.002 mm = 0.10 mm
Depth = 0.10 mm (0.004 in.)
In Rockwell superficial tests, regardless of the type of indenter used, one number represents an indentation of
0.001 mm (0.00004 in.). Therefore, a reading of 80 HR30N indicates a depth of indentation from minor to
major load of:
(100 - 80) × 0.001 mm = 0.02 mm
Depth = 0.02 mm (0.0008 in.)
As indicated above, computation of the depth of penetration for any Rockwell test requires only simple
arithmetic. However, in actual practice, computation is not necessary because minimum thickness values have
been established (Table 4). These minimum thickness values generally follow the 10-to-1 ratio, but they are
based on experimental data accumulated for varying thickness of low-carbon steels and of hardened-and-
tempered strip steel.
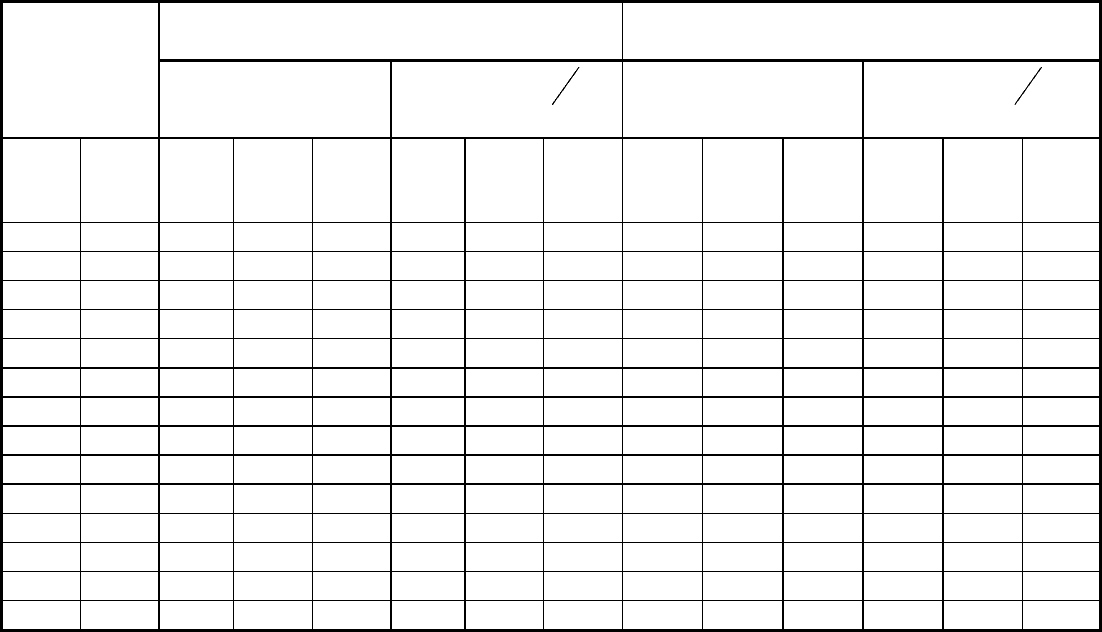
Table 4 Minimum work metal hardness values for testing various thicknesses of metals with standard
and superficial Rockwell hardness testers
Minimum hardness for standard hardness
testing
Minimum hardness for superficial hardness
testing
Metal
thickness
Diamond indenter
Ball indenter,
1
16
in. (1.588 mm)
Diamond indenter
Ball indenter,
1
16
in.
(1.588 mm)
mm in. A
(60
kgf)
D
(100
kgf)
C
(150
kgf)
F
(60
kgf)
B
(100
kgf)
G
(150
kgf)
15 N
(15
kgf)
30 N
(30
kgf)
45 N
(45
kgf)
15 T
(15
kgf)
30 T
(30
kgf)
45 T
(45
kgf)
0.127 0.005 … … … … … … … … … 93 …
…
0.152 0.006 … … … … … … 92 … … … …
…
0.203 0.008 … … … … … … 90 … … … …
…
0.254 0.010 … … … … … … 88 … … 91 …
…
0.305 0.012 … … … … … … 83 82 77 86 …
…
0.356 0.014 … … … … … … 76 78.5 74 81 80
…
0.381 0.015 … … … … … … … … … … …
…
0.406 0.016 86 … … … … … 68 74 72 75 72
71
0.457 0.018 84 … … … … …
(a)
66 68 68 64
62
0.508 0.020 82 77 … 100 … …
(a)
57 63
(a)
55
53
0.559 0.022 78 75 69 … … …
(a)
47 58 … 45
43
0.610 0.024 76 72 67 98 94 94
(a)
(a)
51 … 34
31
0.635 0.025 … … … … … …
(a)
(a)
…
(a)
(a)
…
0.660 0.026 71 68 65 91 87 87
(a)
(a)
37 … …
18

0.711 0.028 67 63 62 85 … 76
(a)
(a)
20 … …
4
0.762 0.030 60 58 57 77 71 68
(a)
(a)
(a)
(a)
(a)
(a)
0.813 0.032
(a)
51 52 69 62 59
(a)
(a)
(a)
… …
…
0.864 0.034
(a)
43 45 … 52 50
(a)
(a)
(a)
… …
…
0.889 0.035 … … …
(a)
… …
(a)
(a)
(a)
(a)
(a)
(a)
0.914 0.036
(a)
(a)
37 … 40 42
(a)
(a)
(a)
… …
…
0.965 0.038
(a)
(a)
28 … 28 31
(a)
(a)
(a)
… …
…
1.016 0.040
(a)
(a)
20
(a)
… 22
(a)
(a)
(a)
(a)
(a)
(a)
Note: These values are approximate only and are intended primarily as a guide; see text for example of use.
Material thinner than shown should be tested with a microhardness tester. The thickness of the workpiece
should be at least 1.5 times the diagonal of the indentation when using a Vickers indenter, and at least one-half
times the long diagonal when using a Knoop indenter.
(a) No minimum hardness for metal of equal or greater thickness.
Consider a requirement to check the hardness of a strip of steel 0.36 mm (0.014 in.) thick with an approximate
hardness of 63 HRC. According to the established minimum thickness values, material in the 63 HRC range
must be approximately 0.71 mm (0.028 in.) thick for an accurate Rockwell C scale test. Therefore, 63 HRC
must be converted to an approximate equivalent hardness on other Rockwell scales. These values, taken from a
conversion table, are 73 HRD, 82.8 HRA, 69.9 HR45N, 80.1 HR30N, and 91.4 HR15N. Hardness conversion
tables are provided in the article “Hardness Conversions for Steels” in this Volume.
Referring to Table 4, there are only three appropriate Rockwell scales—45N, 30N, and 15N—for hardened
0.356 mm (0.014 in.) thick material. The 45N scale is not suitable because the material should be at least 74
HR45N. The 30N scale requires the material to be at least 80 HR30N; on the 15N scale, the material must be at
least 76 HR15N. Therefore, either the 30N or 15N scale can be used.
If a choice remains after all criteria have been applied, then the scale applying the heavier load should be used.
A heavier load produces a larger indentation covering a greater portion of the material, as well as a Rockwell
hardness number more representative of the material as a whole. In addition, the heavier the load, the greater
the sensitivity of the scale.
In the example under consideration, a conversion chart will indicate that, in the hard steel range, a difference in
hardness of one point on the Rockwell 30N scale represents a difference of only 0.5 points on the Rockwell
15N scale. Therefore, smaller differences in hardness can be detected when using the 30N scale. This approach
also applies when selecting a scale to accurately measure hardness when approximate case depth and hardness
are known.
Minimum thickness charts and the 10-to-1 ratio serve only as guides. After determining which Rockwell scale
should be used based on minimum thickness values, an actual test should be performed, and the side directly
beneath the indentation should be examined to determine whether the material was disturbed or a bulge exists.
If so, the material is not sufficiently thick for the applied load. This results in a condition known as “anvil
effect.” When anvil effect or flow exists, the Rockwell hardness number obtained may not be a true value. The
Rockwell scale applying the next lighter load should then be used.
Use of several specimens, one on top of the other, is not allowed. Slippage between the contact surfaces of the
specimens makes a true value impossible to obtain. The only exception is in the testing of plastics; use of
several thicknesses for elastomeric materials when anvil effect is present is recommended in ASTM D 785,
“Standard Test Method for Rockwell Hardness of Plastics and Electrical Insulating Materials.” Testing
performed on soft plastics may not have an adverse effect when the test specimen is composed of a stack of
several pieces of the same thickness, provided that the surfaces of the pieces are in total contact and not held
apart by sink marks, buffs from saw cuts, or other protrusions.
When testing specimens for which the anvil effect results, the condition of the supporting surface of the anvil
must be observed carefully. After several tests, this surface may become marred, or a small indentation may be
produced. Either condition affects the Rockwell test, because under the major load the test material will sink
into the indentation in the anvil and a lower reading will result. If a specimen is found to have been too thin
during testing, the anvil surface should be inspected; if damaged, it should be relapped or replaced.
When using a ball indenter and a superficial scale load of 15 kgf on a specimen in which anvil effect or material
flow is present, a diamond spot anvil can be used in place of the standard steel anvil. Under these conditions,
the hard diamond surface is not likely to be damaged when testing thin materials. Furthermore, with materials
that flow under load, the hard polished diamond provides a somewhat standardized frictional condition with the
underside of the specimen, which improves repeatability of readings.
Additional information is provided in the section “Anvil Effect” in the article “Selection and Industrial
Application of Hardness Tests” in this Volume.
Test Location
If an indentation is placed too close to the edge of a specimen, the workpiece edge may bulge, causing the
Rockwell hardness number to decrease accordingly. To ensure an accurate test, the distance from the center of
the indentation to the edge of the specimen must be at least 2.5 times the diameter of the indent. Therefore,
when testing in a narrow area, the width of this area must be at least five diameters when the indentation is
placed in the center. The appropriate scale must be selected for this minimum width. Although the diameter of
the indentation can be calculated, for practical purposes the minimum distance can be determined visually.
An indentation hardness test cold works the surrounding material. If another indentation is placed within this
cold-worked area, the reading usually will be higher than that obtained had it been placed outside this area.
Generally, the softer the material, the more critical the spacing of indentations. However, a distance three
diameters from the center of one indentation to another is sufficient for most materials.
Scale Limitations
Because diamond indenters are not calibrated below values of 20, they should not be used when readings fall
below this level. If used on softer materials, results may not agree when the indenters are replaced, and another
scale—for example, the Rockwell B scale—should be used.
There is no upper limit to the hardness of a material that can be tested with a diamond indenter. However, the
Rockwell C scale should not be used on tungsten carbide because the material will fracture or the diamond life
will be reduced considerably. The Rockwell A scale is the accepted scale in the carbide products industry. Due
to the unique requirements for the Rockwell testing of carbide materials, a separate ASTM test method has been
developed. That test method, ASTM B 294, defines the tighter requirements necessary when testing carbide.
The carbide hardness levels have been established and are maintained by the Cemented Carbide Producers
Association (CCPA). Standard test blocks and indenters traceable to the CCPA standards are available. The
user should note that diamond indenters for carbide testing are different than normal HRA scale testing
indenters and should not be mixed. Because of the high stress on the tip of the indenter, the life of carbide
indenters is normally much shorter than other Rockwell indenters.
Although scales that use a ball indenter (for example, the Rockwell B scale) range to 130, readings above 100
are not recommended, except under special circumstances. Between approximately 100 and 130, only the tip of
the ball is used. Because of the relatively blunt shape in that part of the indenter, the sensitivity of most scales is
poor in this region.
Also, with smaller diameter indenters, flattening of the ball is possible because of the high stress developed at
the tip. However, because there is a loss of sensitivity as the size of the ball increases, the smallest possible ball
should be used. If values above 100 are obtained, the next heavier load, or next smaller indenter, should be
used. If readings below 0 are obtained, the next lighter load, or next larger indenter, should be used. Readings
below 0 are not recommended on any Rockwell scale, because misinterpretation may result when negative
values are used. On nonhomogeneous materials, a scale should be selected that gives relatively consistent
readings. If the ball indenter is too small in diameter or the load is too light, the resulting indentation will not
cover an area sufficiently representative of the material to yield consistent hardness readings.
Rockwell Testing Machines
Many different types of Rockwell testers are currently produced. Test loads can be applied in a number of
ways; most utilize deadweight, springs, or closed-loop load-cell systems. Many testers use a dial (analog)
measuring device. However, digital-readout testers are becoming the norm because of improved readability and
accuracy. Some testers use microprocessors to control the test process, and such testers can be used to interface
with computers. These testers can have significantly greater capabilities such as automatic conversions,
correction factors, and tolerance limits. Most digital units now have outputs to interface with a host computer or
printer.
Various methods for performing the function of a Rockwell test have been developed by manufacturers.
Generally, different machines are used to make standard Rockwell and superficial Rockwell tests. However,
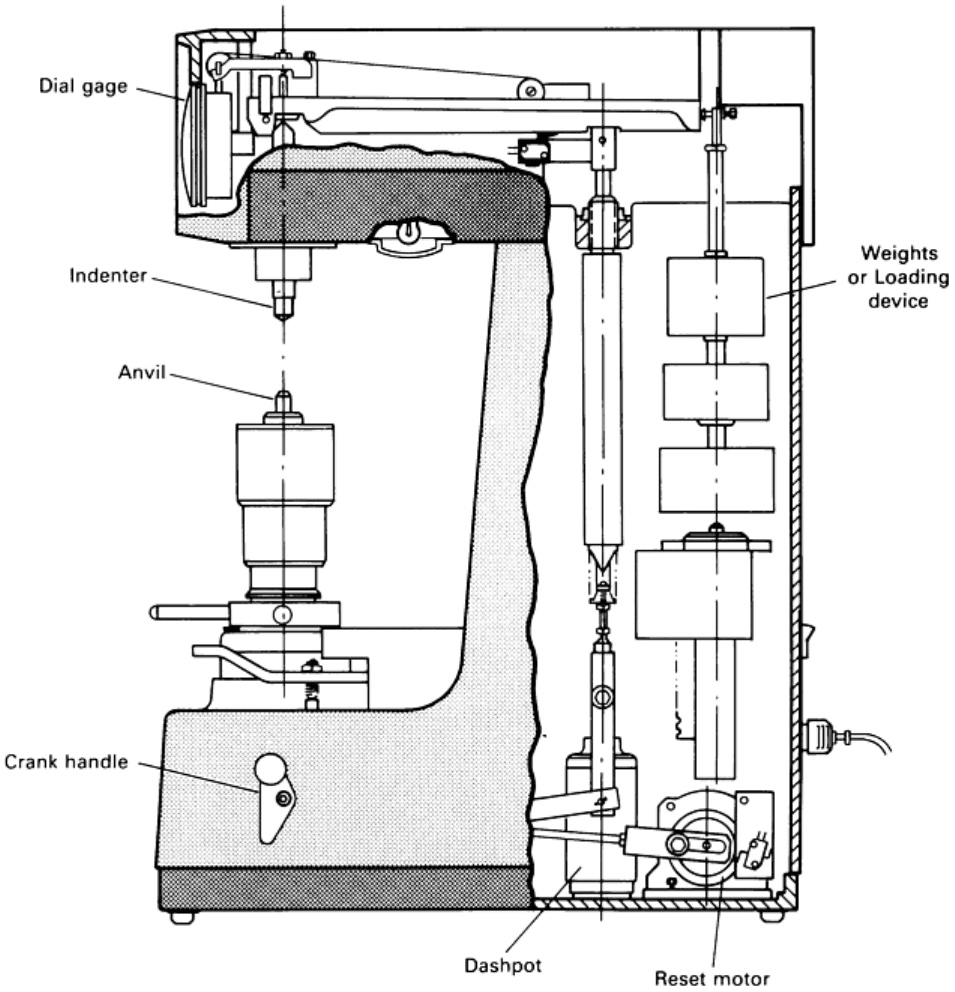
there are combination (twin) machines available that can perform both types of tests. The principal components
of a deadweight type Rockwell tester are shown in Fig. 3.
Fig. 3 Schematic of Rockwell testing machine
Bench-Type Testing Machines. Routine testing is commonly performed with bench-type machines (Fig. 4),
which are available with vertical capacities of up to 400 mm (16 in.). A machine of this type can accommodate
a wide variety of part shapes by capitalizing on standard as well as special anvil designs. The usefulness of this
standard type of machine can be greatly extended by the use of various accessories, such as:
• Outboard or counterweighted anvil adapters for testing unwieldy workpieces such as long shafts
• Clamps that apply pressure on the part, which are particularly suited for testing parts that have a large
overhang or long parts such as shafts
• Gooseneck anvil adapters for testing inner and outer surfaces of cylindrical objects
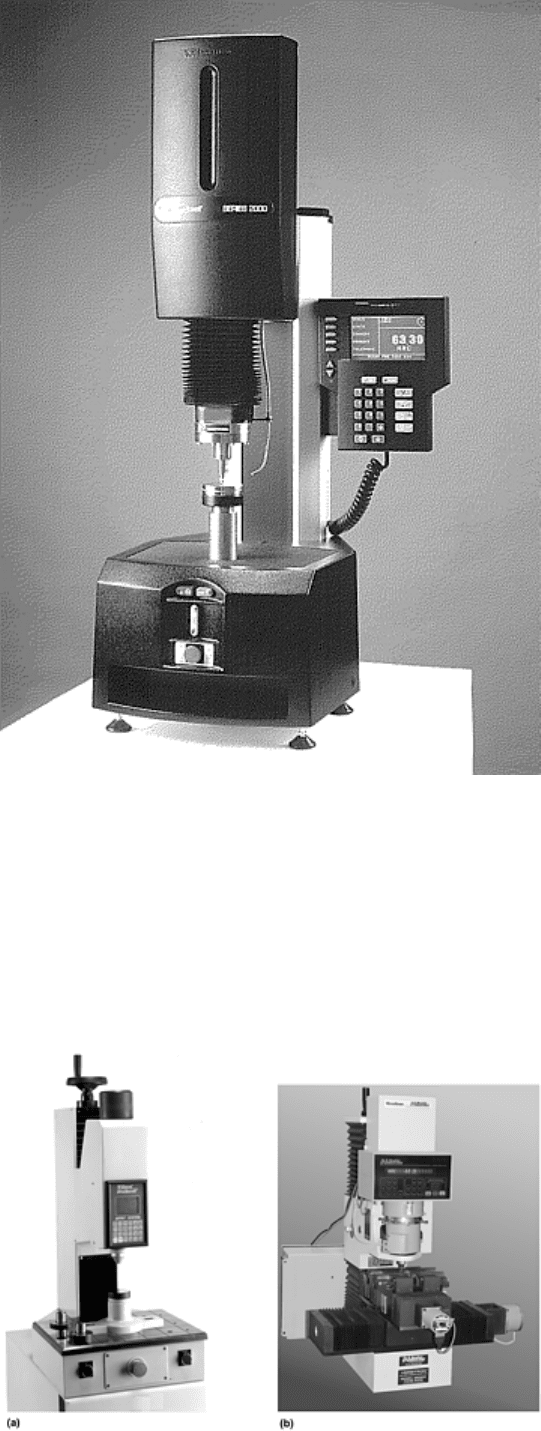
Fig. 4 Bench-type Rockwell tester
Production Testing Machines. When large quantities of similar workpieces must be tested, conventional
manually operated machines may not be adequate. With a motorized tester, hourly production can be increased
by up to 30%.
To achieve still greater production rates, high-speed testers ( 5) are used. High-speed testers can be automated
to include automatic feeding, testing, and tolerance sorting. Upper and lower tolerance limits can be set from an
operator control panel. These testers allow test loads to be applied at high speed with short dwell times. Up to
1000 parts per hour can be tested. These testers are normally dedicated to specific hardness ranges.
Fig. 5 Production Rockwell testers. (a) High-speed Rockwell tester. (b) Automated Rockwell tester for
high-rate testing, such as the setup shown for Jominy end-quench hardenability testing
Computerized Testing Systems. With the use of microprocessors in digital testers, the ability to add computer
control is possible. The computer can be programmed to perform a series of tests such as a case-depth study or
a Jominy test. Using a motorized stage, any combination of test patterns can be performed with little operator
effort. Automatic test reports and data storage are normally part of the program.
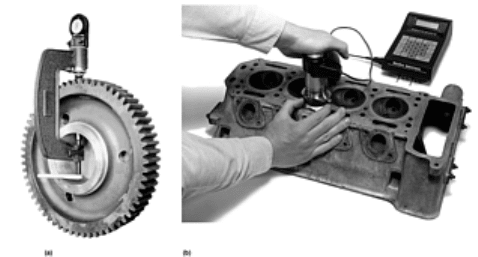
Portable Testing Machines. For hardness testing of large workpieces that cannot be moved, portable units are
available in most regular and superficial scales and in a wide range of capacities (up to about a 355 mm, or 14
in., opening between anvil and indenter). Most portable hardness testers follow the Rockwell principle of minor
and major loads, with the Rockwell hardness number indicated directly on the measuring device. Both digital
and analog models are available. In Fig. 6(a), the workpiece is clamped in a C-clamp arrangement, and the
indenter is recessed into a ring-type holder that is part of the clamp. The test principal is identical to that of
bench-type models. The workpiece is held by the clamp between what is normally the anvil and the holder
(which, in effect, serves as an upper anvil). The indenter is lowered to the workpiece through the holder. Other
types of portable units (Fig. 6b) use the near-Rockwell method, where the diamond indenter is a truncated cone.
Fig. 6 Portable Rockwell testers. (a) C-clamp setup with a portable tester. (b) Portable near-Rockwell
hardness tester
Calibration
If a Rockwell testing system is in constant use, a calibration check should be performed daily. Testers not used
regularly should be checked before use. This check uses standardized test blocks to determine whether the
tester and its indenter are in calibration.
Rockwell test blocks are made from high-quality materials for uniformity of test results. To maintain the
integrity of the test block, only the calibrated surface can be used. Regrinding of this surface is not
recommended due to the high possibility of hardness variations between the new and original surfaces.
If a tester is used throughout a given hardness scale, the recommended practice is to check it at the high,
middle, and low ranges of the scale. For example, to check the complete Rockwell C scale, the tester should be
checked at values such at 63, 45, and 25 HRC. On the other hand, if only one or two ranges are used, test blocks
should be chosen that fall within 5 hardness numbers of the testing range on any scale using a diamond indenter
and within 10 numbers on any scale using a ball indenter.
A minimum of five tests should be made on the standardized surface of the block. The tester is in calibration if
the average of these tests falls within the tolerances indicated on the side of the test block. For best results, a
pedestal spot anvil should be used for all calibration work.
If the average of the five readings falls outside the Rockwell test block limits, the ball in the ball indenter
should be inspected visually; in the case of a diamond indenter, the point should be examined using at least a
10× magnifier. If there is any indication of damage, the damaged component must be replaced.
Rockwell Hardness Level National Standards. For more than 75 years, the producers of test blocks held the
Rockwell hardness standards. While this worked well when there was only one manufacturer, the situation
changed as more and more companies produced test blocks. To make matters worse, the U.S. standard did not
match that used in the rest of the world and could not be traced to a government agency. In general, HRC
hardness results with the old U.S. indenter appeared slightly softer (Fig. 2).
With involvement of the National Institute of Standards and Technology (NIST), a new U.S. Rockwell hardness
standard was created. As expected, the level is very close to the other standardizing laboratories around the
world. As soon as NIST released the new standard, many of the manufacturers started to calibrate their test
blocks to the new standard. At the same time, ASTM Subcommittee E-28.06 started working on revisions to
ASTM E 18 to require the use of NIST traceable test blocks in the calibration of the blocks and testers. NIST
initially released the Rockwell C scale, but they will eventually maintain standards for most of the commonly
used scales (HRB, HRA, HR30N, HR30T, HR15N, and HR15T).
The impact of the new Rockwell C scale standards is that scales are shifted up slightly. The shift is greater in
the high ranges (Fig. 2). For example, a piece of hardened steel that was determined to be 63.0 HRC under the
old standard is now 63.6 HRC. This shift will impact some users more than others. The shift at the low end of
the C scale is much less and will not be a problem to most users. The benefit to the new standard is that testers
in the United States now have traceability, and results are comparable to those in the rest of the world.
Gage Repeatability and Reproducibility (GRR) Studies. Computerized statistical process control (SPC)
techniques are used more and more by industry to control the manufacturing process. Gage repeatability and
reproducibility studies are commonly used to evaluate the performance of gages.
Because hardness testers can be considered as gages, there have been some efforts by manufacturers and users
of hardness testers to use GRR studies to determine what percent of the part tolerance is being used up by tester
variations (see the article “Gage Repeatability and Reproducibility in Hardness Testing” in this Volume). The
major problem associated with doing this type of study on any material testing instrument is that the material
being tested can contribute significantly to the final results. This is due to unavoidable variations inherent in the
material being tested. It is also not possible to test the exact same spot, and no material has completely uniform
hardness. To obtain reasonable GRR results of hardness testing, material variability must be addressed. Test
blocks that have known good uniformity should be used. Normally, blocks in the 63 HRC range with a
reasonable tolerance will work. Using 63 HRC test blocks with low variations and a tolerance of ±3 HRC
points, it is possible to achieve GRR results in the 10% range or better. Good basic techniques must also be
used to eliminate any other factors that could affect the results.
Testing Methodology
Although the Rockwell test is simple to perform, accurate results depend greatly on proper testing methods.
Indenters. The mating surfaces of the indenter and plunger rod should be clean and free of dirt, machined chips,
and oil, which prevent proper seating and can cause erroneous test results. After replacing an indenter, a ball in
a steel ball indenter, or an anvil, several tests should be performed to seat these parts before a hardness reading
is taken. Indenters should be visually inspected to determine whether any obvious physical damage is present
that may affect results.
Anvils should be selected to minimize contact area of the workpiece while maintaining stability. Figure 7
illustrates several common types of anvils that can accommodate a broad range of workpiece shapes. An anvil
with a large flat surface (Fig. 7b) should be used to support flat-bottom workpieces of thick section. Anvils with
a surface diameter greater than about 75 mm (3 in.) should be attached to the elevating screw by a threaded
section, rather than inserted in the anvil hole in the elevating screw.
