Murray J. Clifford. Angiogenesis Protocols - Methods in Molecular Medicine, Vol. 46
Подождите немного. Документ загружается.

Dorsal Skinfold Chamber 97
and one tension ring to keep the sterile cover slip in position after closing of the
chamber preparation.
2. Sterile cover slips (diameter 11.75 mm, circular, Assistent, D-97647 Sontheim,
Germany).
3. Special pair of pliers (Garant
®
, Germany) to bring the tension ring in position to
keep the chamber closed and to remove it again, respectively.
4. Wrench (CHR-VAN, size 4, SKG, Germany).
2.1.4. Surgical Instruments
1. Electric hair clipper (Electra
®
II, GH 204 or 201; Aesculap
®
, Aesculap AG and
CO. KG, D-78532 Tuttlingen, Germany) equipped with a 1/20-mm cutting head
(GH 700; Aesculap).
2. 2 Delicate hemostatic forceps (Baby-Mosquito, BH 115, Aesculap).
3. 1 Needle holder (Castroviejo, BM 2, Aesculap).
4. 1 Delicate dissecting forceps (Micro-Adson, BD 220, Aesculap).
5. 2 Microforceps (BD 331, Aesculap).
6. 1 Pair of dissecting scissors, fine patterns (Cottle-Masing, sharp, OK 365,
Aesculap).
7. 1 Pair of microscissors (spring type) with round handles (FD 103, Aesculap
®
).
8. 1 Pair of microscissors (spring type) with flat handles and cross-serration
(Vannas, FD 15, Aesculap).
9. Sterile scalpel blades (#15, BB 515, Aesculap).
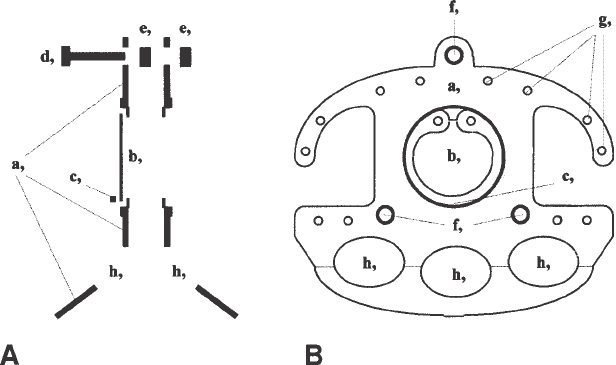
Fig. 1. Construction plan of the dorsal skinfold chamber. (A) Cross-section. (B)
Lateral view: a, titanium frame; b, cover slip; c, tension ring; d, screw; e, nut; f, screw
hole; g, bore holes for holding sutures; h, holes for weight reduction of the chamber.
98 Sckell and Leunig
10. Sutures: Polypropylene (4-0 U.S.P., 1.5 metric, DSM 13P, Sharpoint, Surgical
Specialities Corporation, Reading, PA).
2.1.5. Other Materials
1. Mouse (body weight 25–30 g, age 6–12 wk); depending on the research goal,
inbred, outbred, immune-competent, immune-deficient, and so on.
2. One cage per animal (see Note 1).
3. Syringes (1 mL).
4. 26G-Needles (26G3/8, 0.45 × 10).
5. Sterile nonwoven swabs (5 × 5 cm).
6. Sterile Q-tips (cotton pads on wooden sticks).
7. Fine black waterproof permanent pen.
8. Surgical masks.
9. Rubber gloves.
10. 70% Alcohol to disinfect skin of the mouse, surgical instruments, and rubber
gloves.
2.1.6. Additional Equipment for Tissue Implantation
1. Custom-made device consisting of a slitted polycarbon tube (internal diameter
24 mm, length 120 mm) and a special mounting stage to fix the tube with the
animal in it (Workshop, Institute for Surgical Research, Klinikum Grosshadern,
University of Munich, D-81377 Munich, Germany).
2. Adhesive tape (Transpore™ 3M, Hypoallergenic, 51.2 mm × 9.1 m, 3M Medical-
Surgical Division, St. Paul, MN).
3. Hanks’ balanced salt solution (H-9269, 100 mL, Sigma-Aldrich Co., LTD, Irvine
KA, UK) stored at 6°C.
4. Sterile Petri dishes (diameter: 5100 × 20 mm).
3. Methods
3.1. Surgical Preparation of Dorsal Skinfold Chamber
A scheme of the setup for the surgical preparation of the dorsal skinfold
chamber is shown in Fig. 2. All surgical procedures should be performed under
aseptic conditions (see Note 2).
1. Anesthetize the mouse by an injection of a mixture of ketamine (100 mg/kg body
weight) and Xylazine (10 mg/kg body weight) im into the limb (see Note 3).
2. For depilation of the entire dorsum of the mouse, carefully shave the anesthetized
mouse with the electric hair clipper. Put the mouse on a thermal pad outside the
hood and apply a thick layer (1–2 mm) of depilatory cream on the shaved skin
area. After the cream was allowed to take effect for 5–10 min (see Note 4), it can
be easily removed using a non-woven swab soaked in hand-warm germ-free
water, wiping in the caudal-to-cranial direction (see Notes 5 and 6).

Dorsal Skinfold Chamber 99
3. Dry the wet depilated skin with a dry sterile swab and disinfect the skin with a
70% alcohol-soaked swab.
4. Place the mouse between the light transmission tube (tube #2) of the halogen
lamp (Fig. 2) and the surgeon, in a prone position on an opened sterile non-
woven swab lying on the thermal pad inside the hood. The longitudinal axis of
the mouse (with its head lined up to the left-hand side of the surgeon) should be
parallel to the frontal plane of the surgeon. Illuminate the mouse from the top
with the light transmission tube (tube #1) of the halogen lamp. Adjust tube #2
with its central light ~2 cm parallel to the surface of the thermal pad and perpen-
dicular to the longitudinal axis of the mouse (Fig. 2).
5. Lift up a fold of the depilated dorsal skin. This fold, running from the sacrum to
the neck of the mouse, should be located directly over, and parallel to, the spine.
Adjust the fold under transillumination (tube #2) in such a way that both sides of
the skinfolds become congruent (see Note 7). Then spread the skin in the upright
position by fastening two holding threads (polypropylene 4-0; no knots but one
Baby-Mosquito each fixed at their ends) at the edge of the skinfold (see Note 8)
and hanging them over the two flexible swan-necks of the custom-made skin
spreading device (Fig. 2; see Note 9).
6. Fix the first titanium frame of the chamber to the side of the skinfold facing
away from the surgeon with two temporary holding sutures (polypropylene
4-0) through both of the borehole pairs, left and right of the apical screw (see
Notes 10–12).
Fig. 2. Setup for the surgical preparation inside the hood: a, mouse; b, swan-neck
light transmission tube #2 (for transillumination from behind); c, halogene lamp;
d, thermal pad; e, swan-neck light transmission tube #1 (for epi-illumination from
above); f, skinfold; g, holding thread; h, Baby-Mosquito; i, flexible swan-necks of the
skin spreading device.
100 Sckell and Leunig
7. Remove the two holding threads completely and make two small incisions (using
a pair of Cottle-Masing scissors or a #15 scalpel blade) perforating the entire
skinfold to let the two lower screws of the titanium frame come through (see
Notes 13 and 14). The fixation of the latter two screws using the Baby-Mosquitos
helps to adapt the skinfold temporarily to the titanium frame facilitating further
surgical preparations. The bent tip of the Baby-Mosquito should then point
towards the mouse and not the surgeon.
8. Use the cranial Baby-Mosquito to turn the back titanium frame in a perpendicular
position to the transilluminating light. The edge of the circular area being pro-
jected through the central window of the back titanium frame to the skin facing
the surgeon can now be easily marked with a dotted line using a fine black per-
manent pen.
9. Place the mouse in right lateral position under the dissecting microscope (~6-fold
magnification; see Note 15) with the skinfold pointing to the surgeon.
10. Using delicate dissecting forceps (Micro-Adson) and micro scissors (FD 103),
remove all layers of the skin completely (epidermis, dermis, subcutis, cutaneous
muscle, parts of the subcutaneous fatty tissue) along the marked dotted line (see
Notes 16 and 17).
11. Stop possible bleeding along the edge of the wound gently by using sterile Q-tips
slightly moistened with saline. Now allow 3–5 min to elapse to ensure that no
further after-bleedings take place. Meanwhile, to avoid drying out of the opera-
tion field, perfuse the area with isotonic saline (see Note 18).
12. Absorb excess saline with dry Q-tips (see Note 19) and put the optical magnifica-
tion on ~10-fold. The next step is probably the most critical step of the chamber
preparation: Use microforceps (BD 331) and a pair of microscissors (Vannas) to
carefully remove the last layer of subcutaneous fatty tissue which is connected to
the underlying cutaneous muscle of the opposite skin (see Notes 20–22).
13. Close the chamber preparation like a sandwich with the second titanium frame:
First connect the lower two screws to the corresponding holes of the second frame
and then the apical one (see Note 23). If no air bubbles are visible between the
cover slip and the underlying cutaneous muscle, screw on the nuts to finally fix
the two frames of the chamber together (see Notes 24 and 25).
14. Perform four holding sutures (polypropylene 4-0) to spread and fix the edges of
the sandwiched skinfold to all four pairs of boreholes left and right from the
apical screw in both chamber frames. After stitching but before closing the knots
of the two central holding sutures, cut the old temporary holding sutures from
step 6 and remove them completely (see Note 26).
15. Place the operated mouse in its cage and leave it on a thermal pad outside the
hood at least until the mouse has regained consciousness (see Note 27).
3.2. Tissue Implantation into the Chamber Preparation
In the following, the explantation of a solid tumor from a donor mouse and
the consecutive implantation of a chunk of this tumor into the dorsal skinfold
preparation of a recipient mouse is described (see Notes 28 and 29):
Dorsal Skinfold Chamber 101
1. Allow at least 48 h to elapse for the animals to recover completely from surgery
before implantation of any tissue into the dorsal skinfold chamber preparation.
Exclude all animals from further treatment and sacrifice them when there are
signs of bleeding, inflammation, or any other irritation at the implantation site
(see Note 30). Only chambers meeting criteria of intact microcirculation (8)
should be used as sites for implantation.
2. Sacrifice the donor mouse bearing a solid subcutaneous tumor according to offi-
cial Guidelines for Care and Use of Experimental Animals. For 2–3 min, com-
pletely insert the dead animal into a 70% alcohol solution for disinfection. Excise
the desired tumor surgically under aseptic conditions in the hood and put it into a
sterile Petri dish previously filled with cold (~6°C) Hanks’ balanced salt solution.
3. The dissecting microscope is only needed for this step of the protocol (magnifi-
cation ~10-fold). Remove the capsule and all hemorrhagic or necrotic parts of the
tumor with the help of microforceps and a pair of microscissors. Cut the remain-
ing tumor into small chunks of a diameter no greater than ~0.5–1 mm (see Note 31).
4. Put the nonanesthetized recipient mouse in the slitted polycarbon tube (Fig. 3).
An adhesive tape fixed across the slit right behind the chamber jutting out will
prevent the animal escaping from the tube (see Note 32). Then fix the chamber in
a horizontal position in the special mounting stage, which will also serve as a
stage to perform intravital microscopy of the implant at a later time (Fig. 3).
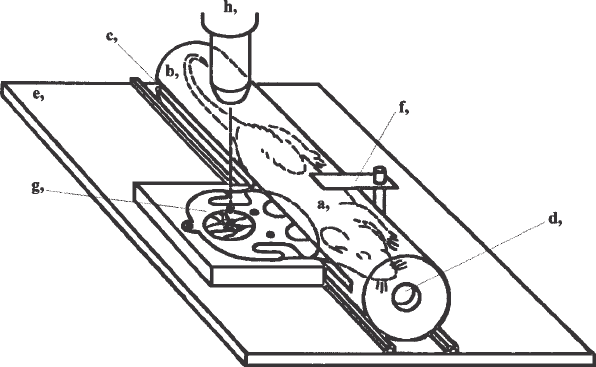
Fig. 3. A mouse fitted with a dorsal skinfold chamber inside a polycarbon tube
fixed on the special mounting stage: a, mouse; b, slitted polycarbon tube; c, slit; d,
breathing hole; e, special mounting stage; f, device to fix the polycarbon tube on the
mounting stage; g, dorsal skinfold chamber preparation; h, objective of the intravital
microscope.
102 Sckell and Leunig
5. Remove the tension ring with the wrench. Use a 26G needle as lever to lift the
cover slip a few millimeters, finally grasping and removing it with microforceps.
6. Transfer one of the tumor chunks with another set of sterile microforceps onto
the cutaneous muscle in the center of the open chamber (see Note 33).
7. With a new, sterile cover slip, reclose the chamber preparation. Before inserting
the tension ring to fix the cover slip in position, make sure that there are no
persisting air bubbles. These air bubbles can be removed with a Q-tip (see Notes
24 and 34).
8. Cover the central window of the back titanium frame, which has no cover slip
inserted, with a piece of adhesive hypoallergenic tape (see Notes 35 and 36) and
release the mouse back into its cage after removing the other adhesive tape from
the tube.
9. Intravital microscopy of the implanted tumor chunk can be performed now
repeatedly in the conscious or anesthetized animal, by means of normal light and
transillumination, or by means of epi-illumination from a mercury lamp and a
fluorescent filter set in combination with appropriate fluorescent dyes injected iv
into the animal.
4. Notes
1. For optimal quality of chamber preparation, one of the basic requirements is that
the area of the dorsal skin associated with the chamber preparation lacks any
injuries, scars, or other irritations. Therefore, prior to surgery, only mice from
one brood should be held together in one cage, since mice from different broods
tend to cause injury to one another. After chamber implantation the animals must
be housed separately in single cages; otherwise, they may destroy each other’s
chamber preparations by scratching and biting.
2. Work under a laminar flow hood and wear a surgical mask as well as rubber
gloves to minimize the possibility of bacterial contamination of the chamber
preparation. Between preparation of two different animals, all surgical instru-
ments should be first cleaned mechanically with sterile nonwoven swabs soaked
in alcohol and then sterilized with a dry sterilizer. The gloves should be washed
with alcohol and changed from time to time.
3. To avoid cooling down of the body temperature of the mouse, the anesthetized
animal should be placed on a thermal pad (~37°C) whenever possible.
4. While the depilatory cream is taking effect, clean and prepare the surgical instru-
ments for the following chamber preparation.
5. To avoid irritation of the skin, wipe gently but unsparingly with fresh water
soaked swabs.
6. It is important to use depilatory cream as needed to remove all hairs. Otherwise
during later transillumination microscopy, the remaining hair roots will show up
as dark shadows, decreasing the optical quality of the region of interest.
7. Points of reference are the larger vessels of the skin, which run symmetrically to
each other on the left and right side of the sagittal plane of the mouse.
Dorsal Skinfold Chamber 103
8. The chamber should fit between the two holding sutures.
9. The weight of a Baby-Mosquito fixed at the end of each holding thread is heavy
enough to keep the skinfold in an upright position.
10. If possible, place the central window of this frame in a manner that it is lying
centrally between the two main vascular trunks coming from caudal and cranial.
11. The skin between the two sutures should be unstressed and the apical screw of
the chamber frame should just jut over the upper edge of the skinfold.
12. Because the two holding sutures have to be removed at a later time (see step 14)
and to avoid local skin necrosis do not make these sutures too tight.
13. The location of larger skin vessels may be controlled with transilluminating light.
These vessels should not be cut or damaged by the incisions.
14. There should not be any tension on the skin area between the two screws and
holding sutures.
15. The two Baby-Mosquitos may be used to adjust the skinfold and keep it level,
parallel to the surface of the thermal pad.
16. Be sure to remove all macroscopic particles left inside or around the marked skin area
before cutting. Loose hairs or small fibers of the nonwoven swab may be detected
easily under the dissecting microscope and can be removed using microforceps.
17. Avoid hurting the underlying inside of the opposite skinfold. It may be advanta-
geous to perform the initial incision in the center of the marked area. Then con-
tinue cutting towards and along the dotted line, respectively.
18. Allow enough time for bleeding to stop. The last layer of subcutaneous fatty
tissue still protects the underlying cutaneous muscle of the opposite skin, which
will later serve as the site of tissue implantation. After-bleeding at a later time
onto the unprotected cutaneous muscle can easily destroy the chamber preparation.
19. Place the Q-tip close to the edge of the operation field. In doing so, touching of
the vulnerable inside of the underlying skin is avoided.
20. Be sure to dissect the subcutaneous fatty tissue from the underlying cutaneous
muscle by cutting, and not by pulling it away. Too much pulling may lead to
disruption of small vessels of the muscle and thus to uncontrolled micro-bleeding.
21. Steps 12 and 13 have to be performed as free of interruption as possible, to avoid
drying and damage to the tissue layer (cutaneous muscle), which will later be
used as a bed for implanting other tissues.
22. To save time, it may be advantageous to remove all remaining subcutaneous fatty
tissue in toto, starting from caudal and toward cranial if you are cutting right-handed.
23. At the time of closure of the chamber preparation, the cover slip should already
be inserted and fixed in the second titanium frame with the tension ring.
24. Usually the cutaneous muscle should stick to the cover slip solely by adhesion
forces, automatically expelling remaining air. After closure of the two chamber
frames small, persisting air bubbles may be carefully “pushed out” of the cham-
ber from behind through the central window of the first titanium frame with a dry
Q-tip. If you fail to remove all air bubbles, open the slit between both titanium
frames for some millimeters, insert a few drops of saline between the cover slip
104 Sckell and Leunig
and the cutaneous muscle using a 26G needle to drive out remaining air bubbles,
and close the chamber again.
25. The first nut should be screwed onto the apical screw. Make sure not to tighten
the nuts too much. This could result in local skin necrosis or a deficient blood
flow to and from the skin being part of the chamber preparation.
26. Make at least 6–8 knots in each of the four holding sutures, since the mice some-
times try to chew through sutures.
27. It will take a maximum of 1–2 d for the mouse to get completely accustomed to
its new “knapsack.” To allow the mouse to eat easily during these first days after
surgery, some food may be put directly on the floor of the cage. After this time
period the mouse should show normal behavior again, e.g. cleaning itself, eating,
drinking, sleeping, playing, and climbing around in the cage.
28. To avoid immune reactions between the recipient animal and the tumor use either
iso-grafted mouse carcinomas or immune-deficient mice as recipients (e.g.,
severe combined immunodeficient [SCID] mice).
29. Only fast-growing tumors are suitable for implantation since the mice must be
sacrificed (on average) less than 30 d after the initial chamber implantation.
Stimulated by the weight of the chamber, new skin will grow and lead to a lateral
tipping over of the chamber preparation causing a reduced blood flow to and
from the skinfold sandwiched between the two titanium frames. As a rule of
thumb, solid tumors reaching visible size within 1–3 wk after sc implantation
may be suitable for implantation into the chamber preparation.
30. Daily weight monitoring may help to appraise the general state of health of the
animal. After an initial loss of weight (less than 10%) mice should stabilize again
within the first 48 h after surgery. When bearing a tumor, a further loss of weight
might be observed in these animals with increasing tumor volume over the time.
31. To avoid warming of the tumor chunks before implantation in different animals
put the Petri dish on ice from time to time.
32. Since it may be stressful for mice to be inserted into a tube during experiments, it
is recommended to leave a tube in the cage one or two weeks prior to the chamber
implantation so that they become accustomed to it.
33. To avoid drying of the cutaneous muscle and to facilitate air-bubble-free reclosure
of the chamber, moisten it with few drops of saline.
34. Be sure that the tumor chunk implanted does not move away from its position in
the center of the chamber.
35. The growing tumor may sometimes provoke an itching stimulus at the site of
implantation. Using a tape may prevent injuries to the skin and implant of the
mice caused by scratching.
36. Avoid direct contact between the tape and the skin of the mouse.
References
1. Sandison, J. C. (1924) A new method for the microscopic study of living growing
tissues by the introduction of a transparent chamber in the rabbit’s ear. Anat. Rec.
28, 281–287.
Dorsal Skinfold Chamber 105
2. Menger, M. D. and Lehr, H. A. (1993) Scope and perspectives of intravital
microscopy—bridge over from in vitro to in vivo. Immunol. Today 14, 519–522.
3. Leunig, M. and Messmer, K. (1995) Intravital microscopy in tumor biology:
Current status and future perspectives (review). Int. J. Oncol. 6, 413–417.
4. Jain, R. K., Schlenger, K., Höckel, M., and Yuan, F. (1997) Quantitative angio-
genesis assays: Progress and problems. Nature Med. 3, 1203–1208.
5. Leunig, M., Yuan, F., Menger, M. D., Boucher, Y., Goetz, A. E., Messmer, K.,
and Jain, R. K. (1992) Angiogenesis, microvascular architecture, microhemo-
dynamics, and interstitial fluid pressure during early growth of human adenocar-
cinoma LS174T in SCID mice. Cancer Res. 52, 6553–6560.
6. Leunig, M., Yuan, F., Berk, D. A., Gerweck, L. E., and Jain, R. K. (1994) Angio-
genesis and growth of isografted bone: Quantitative in vivo assay in nude mice.
Lab. Invest. 71, 300–307.
7. Endrich, B., Asaishi, K., Goetz, A. E., and Messmer, K. (1980) Technical report:
A new chamber technique for microvascular studies in unanesthetized hamsters.
Res. Exp. Med. 177, 125–134.
8. Sewell, I. A. (1966) Studies of the microcirculation using transparent tissue
observation chambers inserted in the hamster cheek pouch. J. Anat. 100, 839–856.

CAM Assay 107
107
From:
Methods in Molecular Medicine, Vol. 46: Angiogenesis Protocols
Edited by: J. C. Murray © Humana Press Inc., Totowa, NJ
9
Angiogenesis Assays Using Chick Chorioallantoic
Membrane
David C. West, W. Douglas Thompson, Paula G. Sells,
and Mike F. Burbridge
1. Introduction
The study of the angiogenic process and the search for novel therapeutic
agents to inhibit, or stimulate, angiogenesis has employed a wide range of
in vivo ‘angiogenesis’ assays (reviewed in refs. 1–3). These differ greatly in
their difficulty, quantitative nature, rapidity, and cost. The classical in vivo
models include the rabbit ear chamber, hamster cheek pouch, dorsal skin cham-
ber, dorsal skin and air-sac model, anterior chamber/iris and avascular corneal
pocket assay, and the chick embryo chorioallantoic membrane (CAM) assay.
More recent methods involve the implantation of preloaded Matrigel or algi-
nate plugs, or collagen or polyvinyl sponges (1). Largely owing to its simplic-
ity and low cost, the CAM is the most widely used in vivo model for the study
of both angiogenesis and antiangiogenesis (1,4)
Originally the tool of the embryologist, the chick embryo chorioallantoic
membrane was adapted as an angiogenesis assay by Folkman and coworkers
(5–9), initially to examine the angiogenic activity of tumor tissues. Two
complementary methods were developed. Possibly the simplest and most
widely used form of the assay is performed with the CAM in situ, the samples
(up to two per egg) being applied through a window made in the shell. The
alternative form of the assay, the shell-less CAM, involves transfer of the early,
3- or 4-days-old, embryo and its extraembryonic membranes to a glass Petri
dish for further development. This gives a wider surface area, allowing mul-
tiple sample application on the same egg, and easier viewing and photography,
but suffers from poor embryo viability. Consequently, several modifications
have been introduced in an effort to increase the time-span of embryo viability