Korb K.B., Nicholson A.E. Bayesian Artificial Intelligence
Подождите немного. Документ загружается.


complex polytree produced by clustering. This approach has not developed as a
serious contender to the clustering methods implemented in BN software.
Another exact inference algorithm implemented in some current BN software is
variable elimination for updating the belief of a single query node (and a variant,
bucket elimination), based on product and marginalization operators; a clear expo-
sition is given in [238]. Note that some software (e.g., JavaBayes) also refers to
“bucket tree elimination,” a somewhat confusing name for what is essentially a junc-
tion tree approach.
The logic sampling method was developed by Henrion [106], while likelihood
weighting was developed in [87, 248]. Other approximation methods based on
stochastic sampling not covered in this book include Gibbs sampling [128], self-
importance sampling and heuristic-importance sampling [248], adaptive importance
sampling [43], and backward sampling [88].
There have been a number of other approximate inference methods proposed.
These include state space abstraction [297], localized partial evaluation [76], weak
arc removal [148] and using a mutual information measure to guide approximate
evaluation [133]. It has also been shown that applying Pearl’s polytree algorithm to
general networks, as suggested by Pearl [217], — so-called loopy propagation —
can be a both fast and accurate approximate method [197]. To our knowledge, none
of these methods have been implemented in widely available BN software. Hugin
implements an approximation scheme that involves setting very small probabilities
in the junction tree tables to zero, which in turns allows more compression to take
place.
Cooper [52] showed that the general problem of inference in belief networks is
NP hard, while Dagum and Luby [64] showed the problem of approximating the
new beliefs to within an arbitrary tolerance is also NP hard.
3.11 Problems
Message passing
Problem 1
Consider (again — see Problem 2.8, Chapter 2) the belief network for another ver-
sion of the medical diagnosis example, where B=Bronchitis, S=Smoker, C=Cough,
X=Positive X-ray and L=Lung cancer and all nodes are Booleans. Suppose that the
prior for a patient being a smoker is 0.25, and the prior for the patient having bron-
chitis (during winter in Melbourne!) is 0.05.
© 2004 by Chapman & Hall/CRC Press LLC

A Quick Guide to Using Hugin
Installation: Web Site www.hugin.com. Download Hugin Lite, which is avail-
able for MS Windows (95 / 98 / NT4 / 2000 / XP), Solaris Sparc, Solaris X86
and Linux. This gives you HuginLite63.exe, a self-extracting zip archive.
Double-clicking will start the extraction process.
Network Files: BNs are stored in .net files, with icon
. Hugin comes with a
samples folder of example networks. To open an existing network, select
, or select File Open menu option, or double-click on the file.
Compilation: Once a Hugin BN has been opened, before you can see the initial be-
liefs or add evidence, you must first compile it (which they call “switch to run
mode”): click on
, or select Network Run(in edit mode), or Recompile
(in run mode) menu option.
This causes another window to appear on the left side of the display (called
the Node Pane List), showing the network name, and all the node names.
You can display/hide the states and beliefs in several ways. You can select
a particular node by clicking on the ‘+’ by the node name, or all nodes with
View
Expand Node List, or using icon . Unselecting is done simi-
larly with ‘-’, or View
Collapse Node List, or using icon .
Selecting a node means all its states will be displayed, together with a bar and
numbers showing the beliefs. Note that Hugin beliefs are given as percentages
out of 100, not as direct probabilities (i.e., not numbers between 0 and 1).
Editing/Creating a BN: You can only change a BN when you are in “edit”
mode, which you can enter by selecting the edit mode icon
, or selecting
Network
Edit. Double-clicking on a node will bring up a window showing
node features, or use icon
.
Add a node by selecting either (for discrete node) or (for continuous
node), Edit
Discrete Chance Tool or Edit Continuous
Chance Tool. In each case, you then “drag-and-drop” with the mouse.
Add an arc by selecting either ,orEdit Link Tool, then left-click
first on the parent node, then the child node.
Click on the icon to split the window horizontally between a Tables Pane
(above), showing the CPT of the currently selected node, and the network
structure (below).
Saving a BN: Select
,ortheFile Save menu option. Note that the Hugin Lite
demonstration version limits you to networks with up to 50 nodes; for larger
networks, you need to buy a license.
Junction trees: To change the triangulation method select Network
Network
Properties
Compilation, then turn on “Specify Triangula-
tion Method.” To view, select the Show Junction Tree option.
FIGURE 3.14
A quick guide to using Hugin.
© 2004 by Chapman & Hall/CRC Press LLC
C
B
S
X
L
Suppose that evidence is obtained that a patient has a positive X-ray result and a
polytree message passing algorithm was to be used to perform belief updating.
1. Write down the
and values for the following nodes: S, B, C, X.
2. Show the 3 stages of data propagation by the message passing algorithm in
terms of the
and messages.
3. Suppose that a doctor considered that smoking was a contributing factor to-
wards getting bronchitis as well as cancer. The new network structure reflect-
ing this model is as follows.
C
B
S
X
L
Why is the polytree message passing algorithm unsuitable for performing be-
lief updating on this network?
Virtual / Likelihood evidence
Problem 2
A description of how to enter so-called likelihood evidence in both Netica and Hugin
software is given in Figure 3.15. In
3.4 we only looked at an example where we
added virtual evidence for a root node; however it can be added for any node in
the network. Consider the cancer example from Chapter 2 (supplied as Netica file
cancer.dne). Suppose that the radiologist who has taken and analyzed the X-ray
in this cancer example is uncertain. He thinks that the X-ray looks positive, but is
only 80% sure.
Add this evidence as a likelihood ratio of 4:1.
Work out the likelihood ratio that needs to be used to produce a new belief of
X-ray
Add this likelihood ratio as evidence to confirm your calculations.
Add an explicit virtual node V to represent the uncertainty in the observation.
Confirm that adding specific evidence for V gives the same results as adding
the likelihood evidence.
© 2004 by Chapman & Hall/CRC Press LLC
Adding virtual evidence
Suppose you want to add uncertain evidence for node
with values and
that you have worked out that the w that the likelihood ratio vector is (
)
(as described in
3.4).
Netica
Right click on node and select the likelihood option. This will bring up a series
of windows, the first of which asks you to provide a probability (default is 1) for
.
Here you should enter the probability
. Note that this is a probability, unlike
everywhere else in Netica, where probabilities are given as values out of 100. You are
asked for a series of these probabilities, one for each possible value of
.
If you try to re-enter likelihood evidence for a node, you will be asked if you want
to discard previous evidence. If you do not, both the old and new evidence will be
incorporated, equivalent to using multiple virtual nodes for each piece of evidence.
Hugin
To add evidence in Hugin, you have the following options.
With a node selected, select Network Enter Likelihood.
Right click on belief bar/belief/state entry, and then choose the Enter Like-
lihood option.
Click on the icon .
This brings up a window, showing each state with a horizontal bar whose length rep-
resents the evidence with a value from 0 to 1. The default for all states is 1.
To set specific evidence, set a single value to 1.0, and all the others to 0.
To set negative evidence, set a single value to 0, and leave all the others 1.
To set likelihood evidence, set each value corresponding to the ratio that
you have previously determined.
FIGURE 3.15
Adding virtual evidence in Netica and Hugin.
© 2004 by Chapman & Hall/CRC Press LLC
Clustering
Problem 3
Consider the BNs for the “Asia” problem described in
2.5.3.
XRay
TB
Asia
Smoker
XRay
Dyspnoea
Bronchitis
Cancer
Pollution
Asia
TB
Smoker
Pollution
Bronchitis
Dyspnoea
Cancer
TBorC
1. Use the Jensen junction tree algorithm (Algorithm 3.2) to construct a junction
tree from both these networks, drawing (by hand) the resultant junction trees.
2. Load these networks (asia1.dne and asia2.dne in the on-line material)
into Netica.
(a) Compile the networks using standard Netica compilation.
(b) Inspect the junction tree by selecting Report
Junction tree menu
option, and note the elimination ordering (used in Netica’s junction tree
algorithm) by selecting Report
Elimination Ordering menu
option. How do the junction trees produced by Netica compare to the
ones you computed using Algorithm 3.2? What are the junction tree
costs of each?
(c) Re-compile the networks using the Network
Compile Optimiz-
ing menu option. Inspect again the junction trees and the elimination
orderings. How much do they differ?
3. Now load the Hugin versions of these networks (asia.net and asia2.net
in the on-line material), and compile them with varying settings of the triangu-
lation heuristic. (See A Quick Guide to Using Hugin Expert in Figure 3.14.)
(a) Clique Size
(b) Clique Weight
(c) Fill-in Size
(d) Fill-in Weight
(e) Optimal Triangulation
How do the resultant junction trees differ in structure and corresponding junc-
tion tree cost
(a) From each other?
(b) From the those you obtained executing the algorithm by hand?
(c) From those obtained from Netica’s standard and optimized compilation?
© 2004 by Chapman & Hall/CRC Press LLC

Approximate inference
Problem 4
The on-line material for this text provides a version of both the Logic Sampling
algorithm (Algorithm 3.3) and the Likelihood Weighting algorithm (Algorithm 3.4).
Take an example BN (either provided with the online material, or that you’ve
developed for the problems set in Chapter 2) and do the following.
1. Run the BN software to obtain the exact inference result.
2. Run the LS Algorithm, printing out the approximate beliefs every 10 iterations
and stopping when a certain level of convergence has been achieved.
3. Do the same for the LW algorithm.
4. As we have seen, the Kullback-Leibler divergence (
3.6.5) can be used to mea-
sure the error in the beliefs obtained using an approximate inference algorithm.
Compute and plot the KL error over time for both the LS and LW algorithm.
5. Investigate what effect the following changes may have on the error for the
LW algorithm.
Vary the priors between (i) more uniform and (ii) more extreme.
Vary the location of the evidence (i) root, (ii) intermediate and (iii) leaf.
Set evidence that is more or less likely.
Problem 5
As mentioned in the Bibliographic Notes, Hugin implements an approximation scheme
that involves setting very small probabilities in the junction tree tables to zero, which
in turns allows more compression to take place.
To turn on the approximation scheme, select Network
Network Proper-
ties
Compilation, then check the approximate optimization box.
As for the previous problem, select an example BN and perform an investigation
of the effect of varying the approximation threshold on the belief updating, again
using the KL divergence measure.
Causal reasoning
Problem 6
Take Pearl’s earthquake example. Suppose there is an intervention on JohnCalls.
1. Use ordinary observation and updating. What is Bel(Burglary)?
2. Use Pearl’s cut-link method. What is Bel(Burglary)? this case?
3. Use the augmented model with 0.9 effectiveness. What is Bel(Burglary)?
Now add an independent observation for MaryCalls=T. Parts 4, 5 and 6 of this
problem involve repeating the parts 1, 2 and 3 for this new situation.
© 2004 by Chapman & Hall/CRC Press LLC

4
Decision Networks
4.1 Introduction
By now we know how to use Bayesian networks to represent uncertainty and do
probabilistic inference. In this chapter we extend them to support decision making.
Adding an explicit representation of both the actions under consideration and the
value or utility of the resultant outcomes gives us decision networks (also called in-
fluence diagrams [115]). Bayesian decision networks combine probabilistic reason-
ing with utilities, helping us to make decisions that maximize the expected utility,
as described in
1.5.3.
We will begin with utilities and then describe how they are represented together
with probabilities in decision networks. Then we present the algorithm for evaluating
a decision network to make individual decisions, illustrating with several examples.
We are also interested in determining the best sequences of decisions or actions,
that is to say, with planning. First, we will use a decision network for a “test-then-
act” combination of decisions. Then, we introduce dynamic Bayesian networks for
explicitly modeling how the world changes over time. This allows us to generalize
decision networks to dynamic decision networks, which explicitly model sequential
decision making or planning under uncertainty.
4.2 Utilities
When deciding upon an action, we need to consider our preferences between the
different possible outcomes of the available actions. As already introduced in
1.5.3,
utility theory provides a way to represent and reason with preferences. A utility
function quantifies preferences, reflecting the “usefulness” (or “desirability”) of the
outcomes, by mapping them to the real numbers.
Such a mapping allows us to combine utility theory with probability theory. In
particular, it allows us to calculate which action is expected to deliver the most value
(or utility) given any available evidence
in its expected utility:
(4.1)
© 2004 by Chapman & Hall/CRC Press LLC
where
E is the available evidence,
A is a non-deterministic action with possible outcome states ,
is the utility of each of the outcome states, given that action is
taken,
is the conditional probability distribution over the possible out-
come states, given that evidence
is observed and action taken.
The principle of maximum expected utility asserts that an essential part of the
nature of rational agents is to choose that action which maximizes the expected util-
ity. In the following section we will see how to extend Bayesian networks to model
such rational decision making.
First, however, we will point out a few pitfalls in constructing utility functions.
The simplest, and very common, way of generating utilities, especially for business
modeling, is to equate utilities with money. Indeed, in the case of business modeling
this may well be satisfactory. Perhaps the most obvious caveat is that there is a time
value associated with money, so if some outcome delivers money in the future, it
should be discounted in comparison with outcomes delivering money in the present
(with the discount being equal to standard interest/discount rates). A slightly more
subtle point is that even discounted money is rarely just identical to utility. In fact, the
relation between money and utility is represented in Figure 4.1, with the dashed line
representing the abnormal case where money and utility are identical. The solid line
represents the more usual case, which can readily be understood at the extremities:
after losing enough money, one is bankrupt, so losing more does not matter; after
earning enough money, one is retired, so earning more does not matter. In short, the
marginal value of money declines, and this needs to be kept in mind when generating
utility functions.
0
utility
−
$
1M
$
0
$
1M
FIGURE 4.1
The utility of money.
© 2004 by Chapman & Hall/CRC Press LLC

Over and above such considerationsare others that are possibly less rational. Thus,
cognitive psychologists have discovered that most people are risk averse, meaning
that they will forgo a significant gain in expected value in order to reduce their un-
certainty about the future. For example, many people will prefer to keep $10 in their
hand, rather than buy a lottery ticket with an expected value of $20 when the proba-
bility of losing the $10 is, say, 0.999. Of course, many others are risk prone and will
happily part with $1 day after day in the hopes of becoming a millionaire, even when
the expected value of the gamble is -95 cents. Such behavior may again be explained,
in part, through differences between utility and money. However, there does appear
to be residual risk aversion and risk proneness which resists such explanation, that
is, which remains even when matters are carefully recast in terms of utilities alone
[18].
In generating utilities the choice of unit is arbitrary, as utility functions differing
only in scale result in the same decisions. The range of utilities can be set by estab-
lishing a scale from the best possible outcome U(
), to some neutral outcome,
down to the worst case U(
). We discuss how to assess utilities further in
9.3.7.
4.3 Decision network basics
A decision network is an extension of Bayesian networks that is able to represent
the main considerations involved in decision making: the state of the world, the
decisions or actions under consideration, the states that may result from an action
and the utility of those resultant states.
4.3.1 Node types
A decision network consists of three types of nodes, as shown in Figure 4.2.
Decision UtilityChance
FIGURE 4.2
Decision network node types.
Chance nodes: These have an oval shape and represent random variables, exactly
as in Bayesian networks. Each has an associated conditional probability table
(CPT), giving the probability of the variable having a particular value given a
© 2004 by Chapman & Hall/CRC Press LLC
combination of values of its parents. Their parent nodes can be decision nodes
as well as other chance nodes.
Decision nodes: These have a rectangular shape and represent the decision being
made at a particular point in time. The values of a decision node are the ac-
tions that the decision maker must choose between. A decision node can have
chance nodes as a special kind of parent, indicating that evidence about the
parent nodes will be available at the time of decision (see
4.3.4). A decision
network representing a single decision has only one decision node, represent-
ing an isolated decision. When the network models a sequence of decisions
(see
4.4), decision nodes can have other decision nodes as parents, represent-
ing the order of decisions.
Utility nodes: These have a diamond shape and represent the agent’s utility func-
tion. They are also called value nodes. The parents of a utility node are the
variables describing the outcome state that directly affect the utility and may
include decision nodes. Each utility node has an associated utility table with
one entry for each possible instantiation of its parents, perhaps including an
action taken. When there are multiple utility nodes, the overall utility is the
sum of the individual utilities.
We will now see how these node types can be used to model a decision problem
with the following simple example.
4.3.2 Football team example
Clare’s football team, Melbourne, is going to play her friend John’s team, Carlton.
John offers Clare a friendly bet: whoever’s team loses will buy the wine next time they
go out for dinner. They never spend more than
$
15 on wine when they eat out. When
deciding whether to accept this bet, Clare will have to assess her team’s chances of
winning (which will vary according to the weather on the day). She also knows that
she will be happy if her team wins and miserable if her team loses, regardless of the
bet.
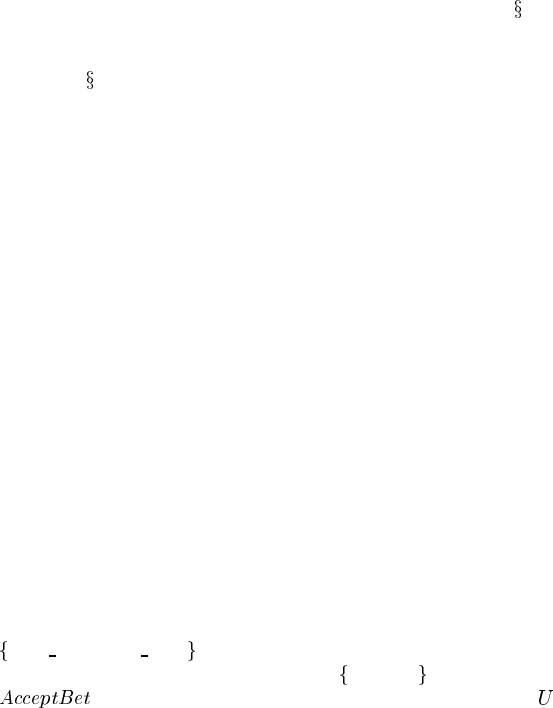
A decision network for this problem is shown in Figure 4.3. This network has
one chance node Result representing whether Clare’s team wins or loses (values
melb wins, melb loses ), and a second chance node Weather which represents whe-
ther or not it rains during the match (values
rain, dry ). It has a binary decision node
representing whether or not she bets and a utility node that measures
the decision maker’s level of satisfaction.
The priors for the Weather reflect the typical match conditions at this time of year.
The CPT for Result shows that Clare expects her team to have a greater chance of
winning if it doesn’t rain (as she thinks they are the more skillful team).
There are arcs from Result and AcceptBet to U, capturing the idea that Clare’s sat-
isfaction will depend on a combination of the eventual match winner and the betting
decision. Her preferences are made explicit in the utility table. The numbers given
indicate that the best outcome is when her team wins and she accepted the bet (utility
= 40) while the next best outcome is her team wins but she didn’t bet on the result
© 2004 by Chapman & Hall/CRC Press LLC