Jones D.S.J., Pujado P.R. Handbook of Petroleum Processing
Подождите немного. Документ загружается.

180 CHAPTER 3
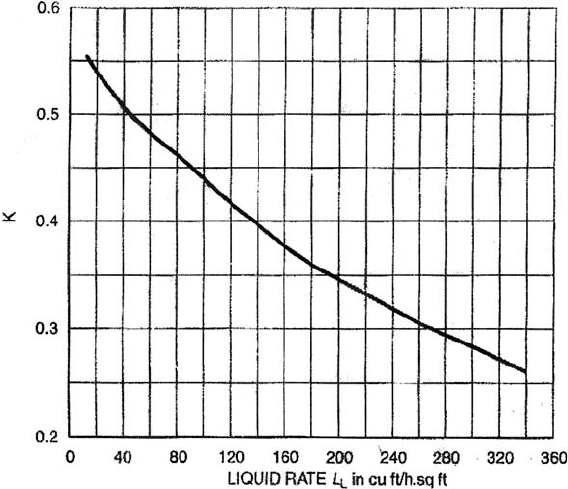
Figure 3.32. Capacity factor ‘K’ V ’s liquid rate.
Step 4. Using the liquid load as calculated in step 3, read off the value for ‘K ’ from
Figure 3.32.
Calculate the linear velocity of the vapor at flood from the expression
K = V
f
√
ρ
v
/(ρ
l
− ρ
v
)
where:
V
f
=Vapor velocity at flood in ft/sec.
ρ
v
=Density of vapor in lbs/cuft at section conditions of temperature and
pressure
ρ
l
=Density of liquid in lbs/cuft at section conditions.
Step 5. Calculate the actual vapor velocity required by multiplying the calculated
velocity at flood by percent of flood permissible if this is to be a new design. The
design cross sectional area of the tower is then the calculated vapor load in cuft/sec
divided by the actual vapor velocity. If the unit is existing divide the vapor loading
in cuft/sec by the cross sectional area of the tower to arrive at the actual vapor
velocity in ft/sec. The existing unit operation as a percent of flood will be the actual
velocity divided by the calculated flood velocity times 100.
THE ATMOSPHERIC AND VACUUM CRUDE DISTILLATION UNITS 181
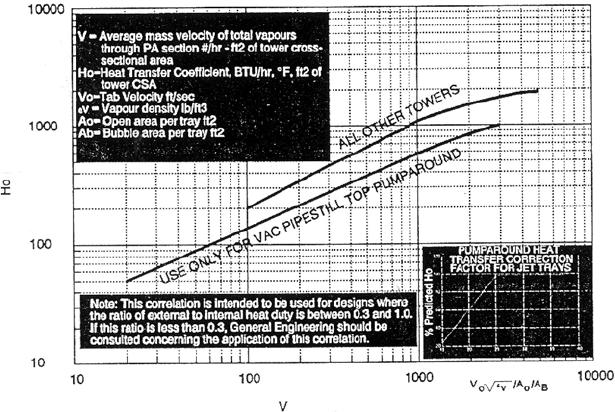
Figure 3.33. Transfer coefficient H
o
V ’s mass velocity for pumparound zones.
Step 6. Estimate the HETP (height equivalent to a theoretical tray) as being between
1.5 and 2.0 ft. Use the higher figure for vapor percent of flood 50–95% or higher
and the lower value for vapor flood below 50%.
Step 7. Calculate the height of the packed section required for heat transfer using
the quantity of heat to be transferred as being the pumparound duty in Btu/hr.
Then treat the section above the pumparound draw off as a simple heat exchanger.
Use the liquid flow to this section and the pumparound flow as calculated in the
previous section (as part of the tower liquid load). The inlet temperature to the
section can be taken as that for the pumparound liquid flow into the tower and
the temperature out of the section as the pumparound draw-off temperature.
Step 8. Read off an overall heat transfer coefficient Ho from Figure 3.33.
Calculate the LMTD over the section from the temperatures used in the previous
section on pumparound etc. Then calculate the total area of tower required for the
heat transfer from the expression:
Q = AH
o
t
m
where
Q = Heat duty in Btu/hr
A = Heat transfer area in sqft
H
o
=Overall heat transfer coefficient in Btu/sqft·hr·
◦
F
t
m
=Log mean temperature difference in
◦
F.
182 CHAPTER 3
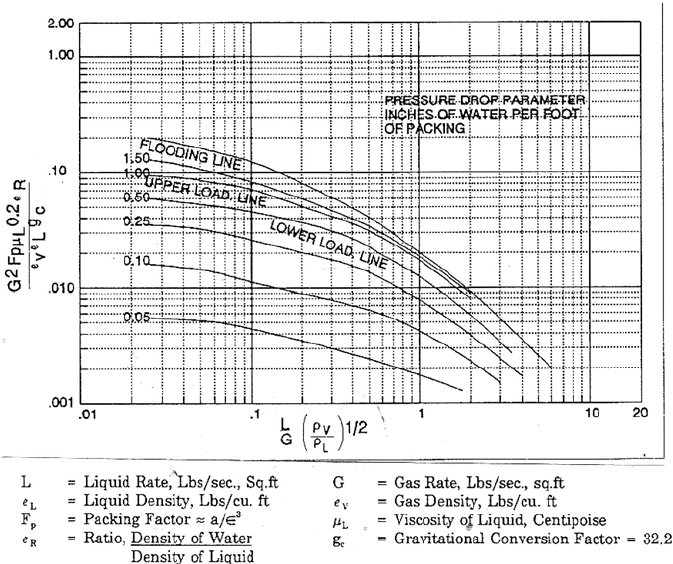
Figure 3.34. Pressure drop through grid in inches of hot liquid per foot height.
Step 9. Calculate the theoretical number of trays required by dividing the total area
calculated in step 8 by the design cross sectional area (step 5). Multiply these
number of trays by the selected HETP to give the height of packing.
Step 10. Calculate the pressure drop through the grid using the actual vapor velocity
in cuft/sec in the equation K = V
a
√
ρ
v
(ρ
l
− ρ
v
) to determine the constant K the
read off the pressure drop in inches of hot liquid per foot height from Figure 3.34.
To express this pressure drop in mmHg multiply by the SG of the hot liquid and 1.865.
Appendix
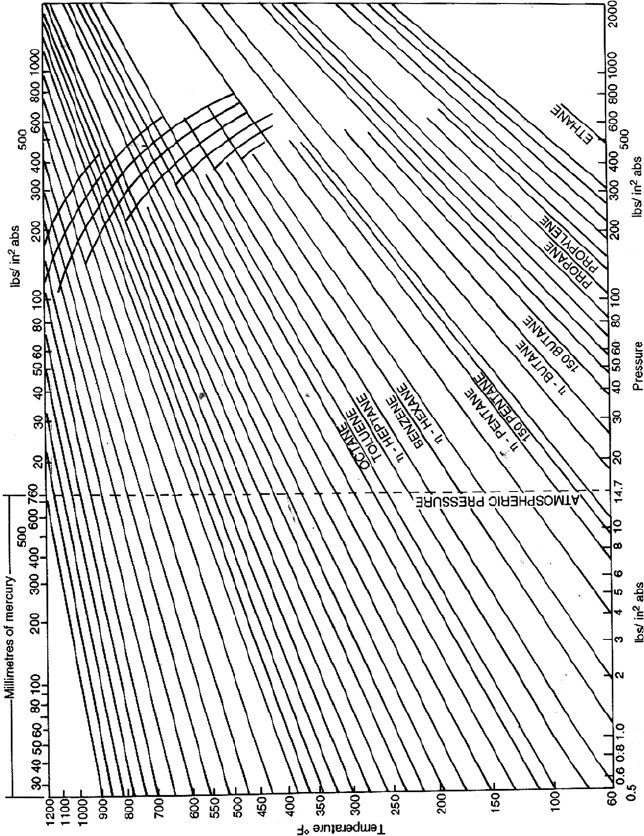
Figure 3.A.1. Pressure temperature curves (2 Pages).
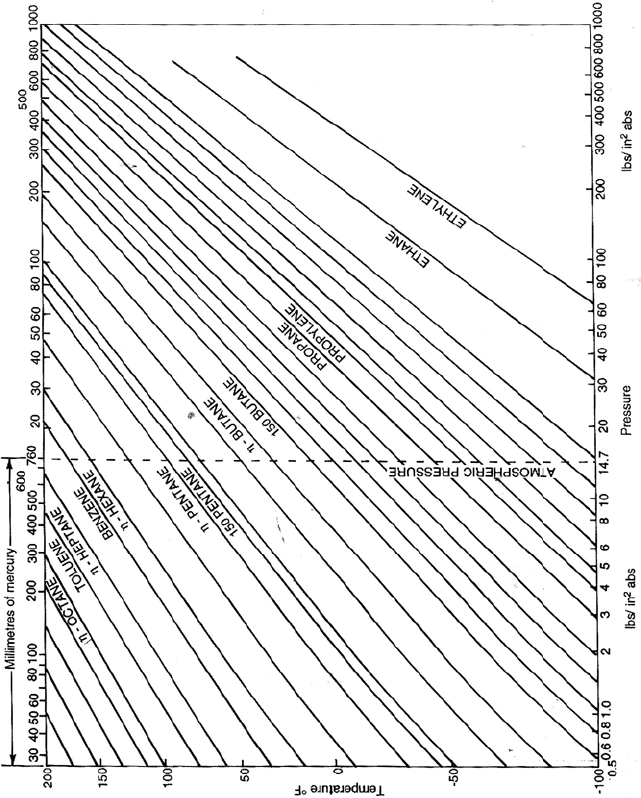
Figure 3.A.1. (Cont.)
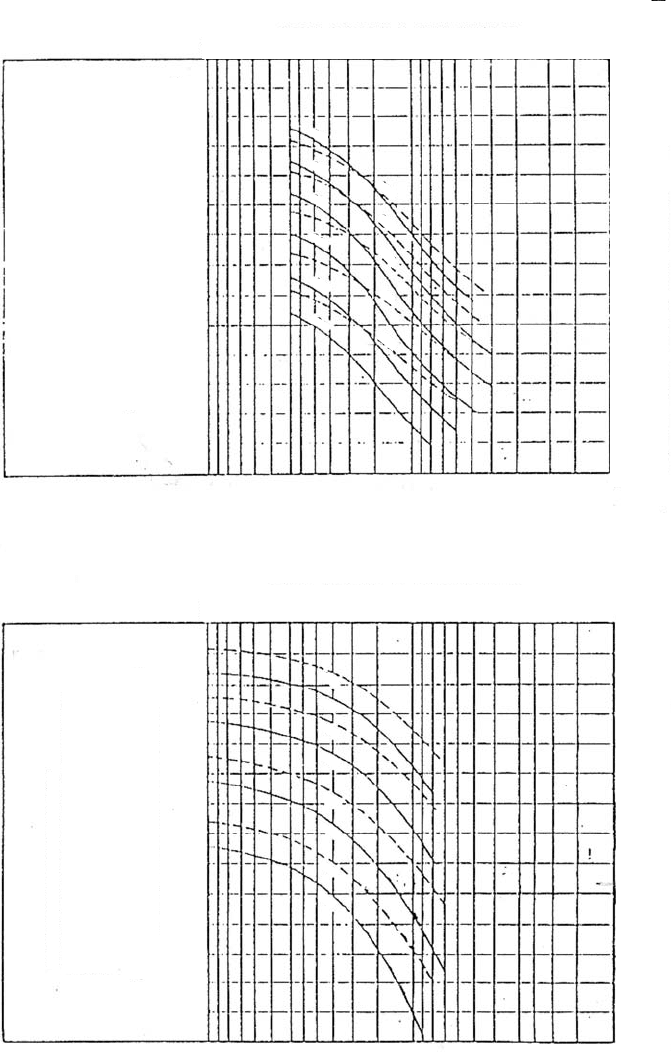
1. FOR OVHO–TCP SIDESTREAM ONLY
2. SOLID CURVES FOR NO STEAM – DOTTED CURVES
FOR MAX. STRIPPING STEAM GENERALLY USED
3. NUMBERS ON CURVES REPRESENT °F DIFF. IN 50%
DISTILLATION POINTS BETWEEN OVHO AND TOP SS.
*NOTE: REFLUX RATIO - GALS HOT OVERFLOW/TOT. GALS
PRODUCT VAPORS ENTERING TCP PLATE.
1. FOR SIDESTREAM – SIDESTREAM ONLY
2. SOLID CURVE FOR NO STEAM STRIPPING – DOTTED
CURVES FOR MAX. STRIPPING STEAM GENERALLY USED
3. NUMBERS ON CURVES REPRESENT °F DIFF. IN 50%
DISTILLATION POINTS BETWEEN TOTAL PROD. VAPORS
ENTERING THE UPPER SIDESTREAM DRAW OFF PLATE
AND LIQUID DRAWN OFF AT LOWER SIDESTREAM
*NOTE: REFLUX RATIO - GALS. HOT OVERFLOW/TOT. GALS.
PRODUCT VAPORS ENTERING TCP SS. DRAWOFF PLATE.
100
100
100
150
150
200
200
250
250
150
200
300
350
250
100
150
200
300
250
Fractionation Curves for Overhead to Top Sidestream Products.
FRACTIONATION: 6% – 95% DISTILLATION POINTS
−50 −40 −30 −20 −10 0 10 20 30 40 50 60 70 80 90
2
3
4
5
6
7
8
9
10
20
30
40
50
60
70
80
90
100
F - REFLUX RATIO X NUMBER OF PLATES
Fractionation Curves for Sidestream to Sidestream Products.
FRACTIONATION: 6% – 95% DISTILLATION POINTS
−50 −40 −30 −20 −10 0 1020 30405060708090
2
3
4
5
6
7
8
9
10
20
30
40
50
60
70
80
90
100
F - REFLUX RATIO X NUMBER OF PLATES
Figure 3.A.2. ASTM gaps and overlaps.
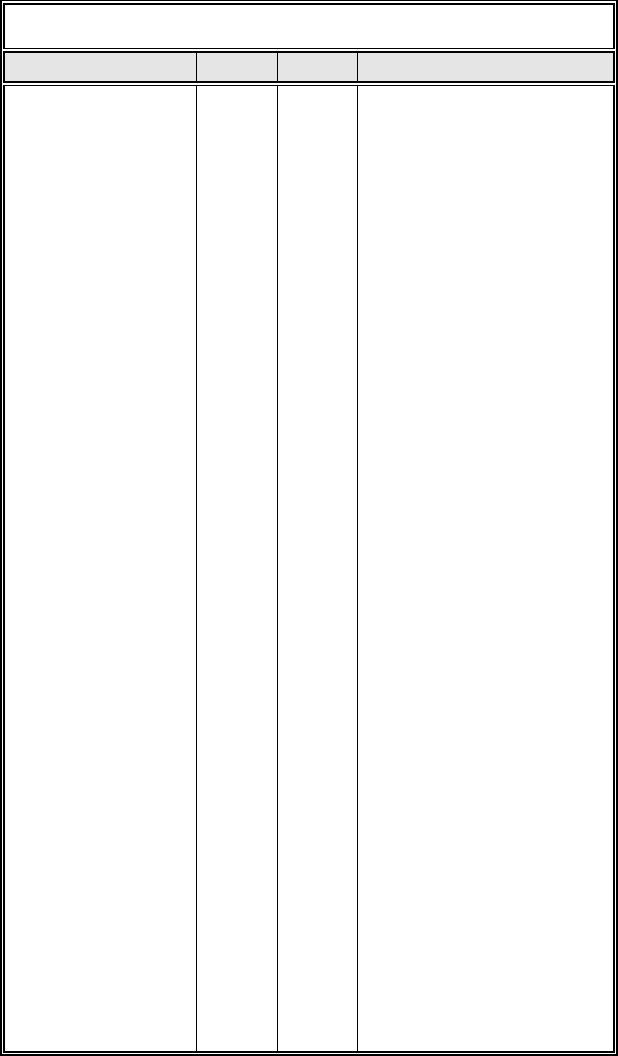
FIGURE A 3.0
VALVE TRAY DESIGN PRINCIPLES
Design Feature Suggested
Value
Alternate
Values
Comment
1. Valve Size and Layout
a. Valve diameter – Valve diameter is fixed by the vendor
b. Percent Hole Area, A
O
/A
B
12 8 to 15 Open area should be set by the designer. In general,
the lower and open area, the higher the efficiency
and flexibility, and the lower the capacity (due to
increased pressure drop). At values of open area
toward the upper end of the range (say 15%), the
flexibility and efficiency are approaching sieve tray
values. At the lower end of the range, capacity and
downcomer filling becomes limited
c. Valve Pitch/diam. ratio – Valve pitch is normally triangular. However, this
variable is usually fixed by the vendor
d. Valve distribution- -
On trays with flow path length ≥ 5', and for liquid
rates > 5000 GPH/ft. (diameter) on trays with flow
path length < 5', provide 10% more valves on the
inlet half of the tray than on the outlet half
e. Bubble Area, A
B
– Bubble area should be maximised
f. Plate efficiency – Valve tray efficiency w ill be about equal to sieve
tray efficiency provided there is not a blowing or
flooding limitation
g. Valve blanking – This should not generally be necessary unless tower
is being sized for future service at much higher
rates. Blanking strips can then be used. Blank within
bubble area, not around periphery to maintain best
efficiency
2. Tray Spacing, Inches - 12 to 36 Generally economic to use min. values given on p.
III-E-2 which are set by maintenance requirements.
Other considerations are downcomer filling and
flexibility. Use of variable spacings to
accommodate loading changes from section to
section should be considered.
3. Number of Liquid Passes 11 to 2M ultipassing improves liquid handling capacity at
the expense of vapour capacity for a given diameter
column and tray spacing. Cost is apparently no
greater - at least, for tower diameters < 8 ft.
4. Downcomers and Weirs
a. Allowable Downcomer inlet
velocity, ft/sec of
clear liq.
0.3 to 0.4 Lower value recommended for absorbers or other
systems of known high frothiness
b. Type downcomer Chord hord, Arc in. chord length should be 65% of tray diameter
for good liquid distribution. Sloped downcomers
can be used for high liquid rates - with maximum
outlet velocity = 0.6 ft/sec. Arc downcomers may be
used alternatively to give more bubble area (and
higher capacity) but are somewhat more expensive.
Min. width should be 6 in. for latter
c. Inboard Downcomer Width
(Inlet and Outlet)
Min. 8 inches Use of a 14-16" "jump baffle" suspended lengthwise
in the centre of the inboard downcomer and
extending the length of the downcomer is suggested
to prevent possible bridging over by fro th entering
the downcomer from opposite sides. Elevation of
base of jump baffle should be level with outlet
weirs. Internal accessway must be provided to allow
passage from one side to another during inspection
d. Outlet Weir Height 2" 1" to 4" Weir height can be varied with liquid rate to give a
total liquid head on the tray (h
c
) in the range of 2.5"
- 4" whenever possible. Lower values suggested for
vacuum towers, higher ones for long residence time
applications
e. Clearance under
downcomer, in.
1.5" 1" min Set clearance to give head loss of approximately 1
inch. Higher values can be used if necessary to
assure sealing of downcomer
f. Downcomer Seal
(Inlet or outlet weir height
minus downcomer
clearance)
Use outlet
weir to give
min. _" seal in
plate liquid
Inlet weir or
recessed inlet
box
In most cases plate liquid level can be made high
enough to seal the downcomer through use of outlet
weir only. Inlet weirs add to downcomer build up;
in some cases they may be desirable for 2-pass trays
to ensure equal liquid distribution. Recessed inlets
are more expensive but may be necessary in cases
where an operating seal would require an
excessively high outlet weir
g. Downcomer filling, % of
tray spacing
40 to 50 Use the lower value for high pressure towers,
absorbers, vacuum towers, known foaming systems,
and also for tray spacings of 18" or lower
C
M
Figure 3.A.3. Valve tray design details.
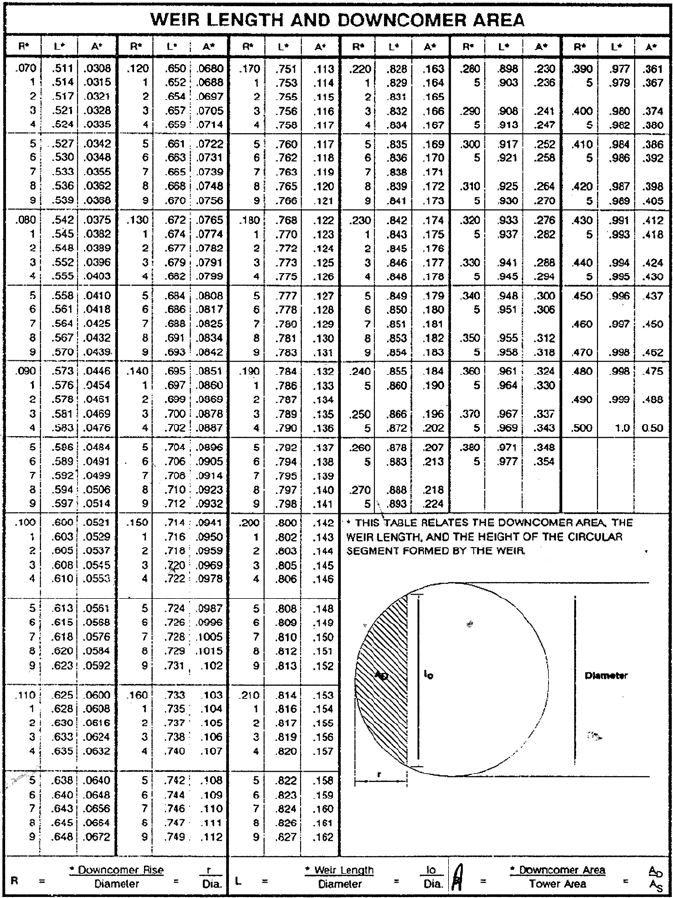
THE ATMOSPHERIC AND VACUUM CRUDE DISTILLATION UNITS 187
Figure 3.A.4. Chord height, area, and lengths.
Chapter 4
The distillation of the ‘Light Ends’ from crude oil
D.S.J. Jones
The ‘light ends’ unit is the only process in a refinery configuration that is designed
to separate ‘almost’ pure components from the crude oil. Its particular growth has
resulted from the need of those components such as the butanes and propanes to
satisfy a market of portable cooking fuel and industrial fuels. That these products
can be suitably compressed and stored in small, easily handled containers at ambi-
ent temperatures provided the market popularity for these products, suitably titled
Butane LPG and Propane LPG. The term LPG referring to Liquefied Petroleum
Gas.
The introduction of the ‘No Lead’ in gasoline program during the late 1960s set the
scene for the need of Octane sources additional to the Aromatics provided by high
severity catalytic reforming. A source of such high-octane additives is found in some
isomers of butane and pentane. This added to the need for light end processes which
in many cases included the separation of iso butanes from the butane stream and also
iso pentanes from the light naphtha stream.
A process description of a ‘light ends’ unit
The ‘light ends’ of crude oil is considered as those fractions in the crude that have a
boiling point below cyclo-hexane. The ‘light ends’ distillation units however include
the separation of the light naphtha cut, which is predominately pentanes and cyclo-
pentanes, from heavy naphtha which contains the hexanes and heavier hydrocarbons
necessary for the catalytic reformer feed. The feed to the ‘light ends’ distillation pro-
cess is usually the full range naphtha distillate from the atmospheric crude distillation
unit overhead condensate drum. In many cases the distillates from stabilizing cracker
and reformer products are added to the crude unit overhead distillate to be included
in the ‘light end’ unit feed.
189
190 CHAPTER 4
Crude Unit O/heads
CW
DEBUTANISER NAPHTHA SPLITTER DEPROPANISER DE ETHANISER
Propane LPG
Butane LPG
Platformer Feed
CW
CW
LSR
Naphtha
Fuel Gas
CW
Figure 4.1. A typical light end unit configuration.
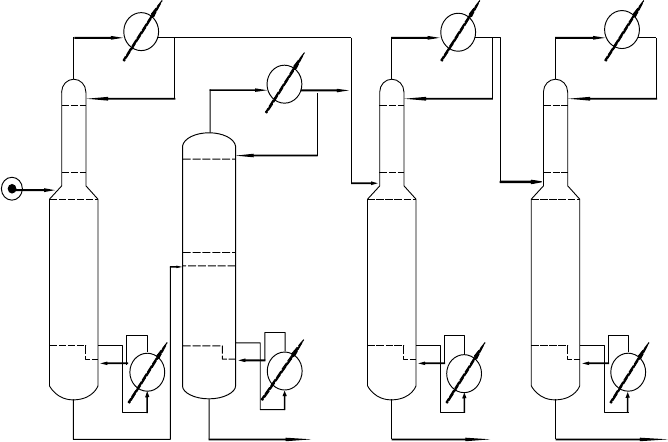
A typical process configuration for this unit is given in the flow diagram Figure 4.1.
In this configuration the total feed to the unit is debutanized in the first tower. The
butanes and lighter hydrocarbons are totally condensed and collected in the column’s
overhead drum. Part of this condensate is returned to the tower top tray as reflux.
The remainder is routed to a de-propanizer column. The bottom product from the
de-butanizer is the full range naphtha product. This enters a naphtha splitter column
where it is fractionated to give an overhead distillate of light naphtha and a bottom
product of heavy naphtha.
The de-propanizer separates the debutanizer overhead distillate to give a propane
fraction as an overhead distillate stream and the butane fraction (butane LPG) as the
bottom product. The overhead distillate is fractionated in a de-ethanizer column to
produce a rich propane stream (propane LPG) as the bottom product. The overheads
from this column is predominately hydrocarbons lighter than propane. This stream is
only partially condensed to provide reflux for the tower. The uncondensed vapor is
normally routed to the refinery’s fuel gas system.
The products from the ‘light ends’ unit are as follows:
