Hammond C. The Basics of Crystallography and Diffraction
Подождите немного. Документ загружается.

244 X-ray diffraction of polycrystalline materials
However, in situations in which the crystals are not randomly orientated the diffracted
intensity in the cones will not be uniform and in order to determine the extent of the ‘non-
randomness’ the whole, or a large part, of the cones needs to be recorded. In metallurgy
and materials science the ‘non-randomness’ of crystals is known as texture or preferred
orientation whereas in earth science it is known as fabric or petrofabric. (The word
texture in earth science has quite a different meaning and refers rather generally to grain
shapes and grain size distributions—a different nomenclature which is a possible source
of confusion.)
The analysis of preferred orientation (texture or fabric) is important since it
almost invariably arises as a consequence of the processes of crystallization and
re-crystallization, sintering, extrusion and hot deformation which occur either in the
short time-scale in materials processing or in the long time-scale in the earth’s crust
and mantle. The simplest experimental techniques are the ‘fibre’ X-ray techniques in
which the crystals are orientated with a particular crystallographic direction (or direc-
tions) along the fibre axis. In the case of rolled/recrystallized metal sheets or strata in the
earth’s crust the analysis is more complicated—in addition to preferred orientation along
some reference (e.g. rolling or shear) direction there may also be preferred orientation of
the crystals with respect to the plane of the metal sheet or rock strata. Such textures may
be represented by stereographic projections referred to as pole figures, fabric or petro-
fabric diagrams (Section 10.4) or, more quantitatively, by what are known as orientation
distribution functions.
Fibre techniques play an essential experimental part in the determination of the struc-
tures of long-chain organic molecules in which the aim is to draw out a fibre from a
solution which contains a sufficient number of molecules, all perfectly aligned along the
fibre axis, and which give rise to reflections of measurable intensity. A simple descrip-
tion of the structure of DNA, which was discovered by such a technique, is given in
Section 10.5.
Finally, X-ray (and neutron)powder diffractiontechniques arebeing used increasingly
in crystal structure determination, once the sole preserve of single crystal techniques.
This has arisen from the necessity of determining the structures of the many materials of
technological importance—e.g. clay minerals, ferrihydrites, etc.—which are finely crys-
talline and/or poorly ordered and which cannot be grown into crystals of large enough
size (∼0.2 mm) to be investigated by single crystal techniques. However, powder tech-
niques are only able to deal with situations in which the structure (depending on its
complexity) is known approximately and are thus better described as structure refine-
ment techniques. The principal of these—known as the Rietveld method—is outlined in
Section 10.6.
10.2 The geometrical basis of polycrystalline (powder) X-ray
diffraction techniques
We begin, perhaps rather surprisingly, with a theorem which we learned off-by-heart
(or should have done) in our early geometry lessons at school—never imagining that
it would ever come in useful! The theorem comes from The Elements of Euclid, the
mathematics textbook which has remained in print ever since it was first written in
10.2 X-ray diffraction 245
Source
S
Divergence slit
Focused
reflection
D
(inset)
Reflecting planes
Polycrystalline
specimen
P
S
D
P
(a) (b)
x
x
2u
(180°–2u)
(180°–2u)
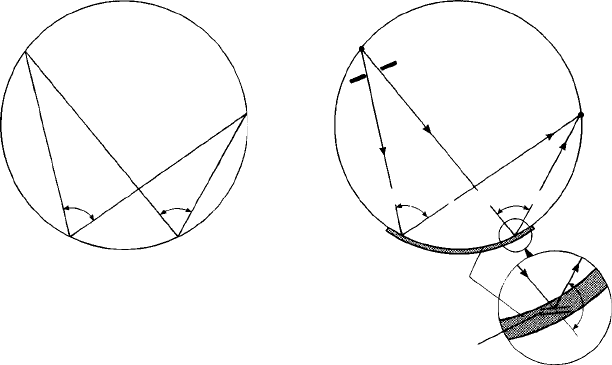
Fig. 10.1. (a) The geometrical basis of X-ray powder diffraction techniques; for two given points S
and D on the circle, the angle x at the circumference is constant, irrespective of the position of P. (b)
Application to an X-ray focusing camera. S is a source of monochromatic X-rays, the angular spread of
which is collimated by a divergence slit to strike a thin layer of a powder specimen on the circumference
at P…P. Angle x = (180
◦
− 2θ), hence any crystal planes in the right orientation for Bragg’s law to be
satisfied reflect to give a focused beam (as shown in the inset for a particular d
hkl
-spacing). Note that the
reflecting planes are not in general tangential to the circumference of the camera, although in practice
they are closely so.
c. 300 B.C. The theorem, which is proved in Proposition 21, Book III of The Elements,
states that ‘the angles in the same segment of a circle are equal to one another’. It follows
the other equally well known theorem (Proposition 20) that ‘the angle at the centre of a
circle is double that of the angle at the circumference on the same base, that is, on the
same arc’.
The former theorem is illustrated (without Euclid’s proof) in Fig. 10.1(a) and may
be simply restated by saying that for any two points S and D on the circumference of a
circle, the angle shown as x is constant irrespective of the position of point P. Now let
us make use of this geometry in devising an X-ray camera (Fig. 10.1 (b)). Let S be a
point or slit source of monochromatic X-rays (the slit being perpendicular to the plane
of the paper) and let part of the circumference P… P be ‘coated’ with a thin film of a
polycrystalline specimen.
The X-rays diverge from the source S and in order that they should only strike the
specimen we limit or collimate them with a (divergence) slit as shown. Now the angle
x is, in terms of Bragg’s law, the angle (180
◦
–2θ)—and whenever this is the cor-
rect Bragg angle for reflection for a particular set of hkl planes, reflections occur from
all those crystals in the specimen which are in the right orientation and the reflected
beams, as proved by Euclid, all converge to point D. In short D is a point where all the
reflected beams for a particular d
hkl
spacing are focused. Different positions of D on the
246 X-ray diffraction of polycrystalline materials
circumference correspond to different x, hence different (180
◦
–2θ) values. Hence we
will have a series of focused diffraction lines, one for each d
hkl
-spacing in the specimen,
around the circumference of the circle.
The Bragg reflecting geometry is shown in detailinthe little ‘inset’diagram below Fig.
10.1(b) which shows the orientation of the reflecting planes in one part of the specimen
and the angle 2θ between the direct and reflected beams. Notice that the reflecting planes
are not (except for some particular part of the specimen) tangential to the circumference.
A film placed around the rest of the circumference of the circle will record all the
reflected beams and this arrangement is the basis of the Seeman–Bohlin camera and the
variants of it devised by Guinier and Hägg. They are called focusing X-ray methods
because they exploit the focusing geometry of Euclid’s circle which is thus called the
focusing circle.
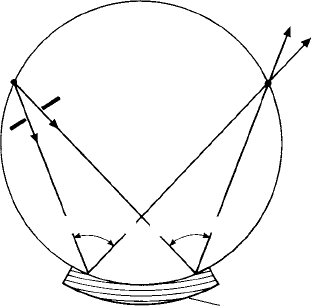
The focusing geometry can also be used to provide a monochromatic source of X-rays
(Fig. 10.2). The source S is now the line focus of an X-ray tube from which a spectrum of
X-ray wavelengths (the ‘white’radiation with superimposed characteristic wavelengths,
Kα
1
,Kα
2
,Kβ etc.) is emitted. A single plate-shaped crystal is cut such that a set of
strongly reflecting planes is parallel to the surface. The crystal iscurved or bent to a radius
of curvature twice that of the focusing circle and then (ideally) is shaped or ‘hollowed
out’ such that its inner surface lies along that of the focusing circle. The position of the
source S, and hence the angle (180
◦
–2θ) is, together with the d
hkl
spacing of the crystal
planes, chosen to reflect, say, only the strong Kα
1
component of the whole X-ray spec-
trum which is focused to a point or line D, symmetrical with the source S. D becomes, in
Polychromatic
source
of X-rays
S
Divergence slit
(180°–2u) (180°– 2u)
Focused
monochromatic
(Ka
1
)X-ray
beam
D
Curved and shaped crystal,
the reflecting planes are at
angle u to the incident and
diffracted beams
Fig. 10.2. The principle of the X-ray monochromator. The crystal planes are curved to a radius twice
that of the focusing circle such that they make the same angle (θ ) to the divergent incident beam. The
surface of the crystal is also shaped so as to lie precisely on the focusing circle. The source and focus
of the reflected beams are symmetrical (i.e. equal distances) with respect to the crystal and θ and the
d
hkl
-spacing of the crystal planes are chosen such that only the strong Kα
1
X-ray wavelength component
is reflected.
10.2 X-ray diffraction 247
effect, the line source of a beam of monochromatic X-rays, which can be used ‘upstream’
of the Seeman–Bohlin camera as the source S of monochromatic X-rays.
The symmetrical arrangement is also made use of in the X-ray diffractometer, which
has become by far the most important classical X-ray powder diffraction technique. The
diffractometer has become, in effect, the X-ray data acquisition end of a computer in
which the data can be stored, analysed, plotted, compared with standard powder data
files, etc. The advantages are enormous; the disadvantage, if it can be called such, is
that students may simply regard the diffractometer as a ‘black box’ to generate data,
without understanding the principles on which the instrument works, nor the parameters
underlying the data analysis procedures.
The symmetricalor Bragg–Brentano focusinggeometry of thediffractometer isshown
in Figs 10.3(a) and (b). As described in Section 9.6, the source of monochromatic
X-rays, S (from a monochromator upstream of the diffractometer) is at an equal distance
Arc centred on specimen
Flat specimen: centre
lies within the focusing
circle
Focusing circle
S
D
a
Focusing circles
S
S
(a) (b)
(c)
D
D
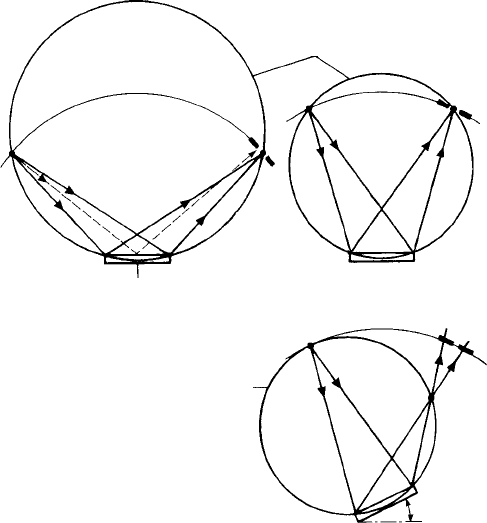
Fig. 10.3. The principle of the X-ray diffractometer. The source–specimen and specimen–detector
slit distances are fixed and equal, (a) The situation for a small θ angle and (b) for a large θ angle, the
source and detector moving round the arc of a circle centred on the specimen. Notice the change in the
diameter of the focusing circle and the fact that, since the specimen is flat, complete focusing conditions
are not achieved (dashed line in (a)), (c) An asymmetrical specimen arrangement for the same 2θ angle
as in (b), the position and diameter of the focusing circle have changed such that the detector slit is no
longer coincident with it. The reflecting planes are now those which make (approximately) angle α to
the specimen surface (see Fig. 9.20).
248 X-ray diffraction of polycrystalline materials
and equal angle to the specimen surface as D, the ‘receiving slit’ of the detector (a
proportional counter). The 2θ angle is continuously varied by the source and detector
slit tracking round the arc of a circle centred on (and therefore at a fixed distance from)
the specimen. Figure 10.3(a) shows the situation at a low θ angle and Fig. 10.3(b) shows
the situation at a high θ angle. In some instruments the specimen is fixed and the source
and detector slit rotate in opposite senses; in others the source is fixed and the specimen
and detector slit rotate in the same sense, the detector slit at twice the angular velocity
of the specimen—but the result geometrically is the same.
However, the important point to note is that the polycrystalline specimen as used in
a diffractometer is flat, and not curved to fit the circumference of the focusing circle.
Focusing therefore is not perfect—the reflected beams from across the whole surface of
the specimen do not all converge to the same point: those from the centre converge to a
point a little above those from the edges, as shown in Fig. 10.3(a). The diffractometer is
hence called a semi-focusing X-ray method. In practice the deviation from full focusing
geometry is onlyimportant (in the symmetrical arrangement) atlowθ anglesand in which
a large width of specimen contributes to the reflected beam. It is not however laziness or
experimental difficulty which prevents specimens being made to fit the circumference of
the focusing circle, but the fact that, unlike the situation for the Seeman–Bohlin camera,
the radius of the focusing circle changes with angle as is shown by a comparison with
Figs 10.3(a) and (b).
As pointed out above, in the symmetrical arrangement, in which the specimen surface
makes equal angles to the incident and reflected beams, the only crystal planes which
contribute to the reflections are those which lie (approximately) parallel to the specimen
surface, particularly when the divergence angle of the incident beam, and therefore the
irradiated surface of the specimen, is small. In situations in which the d
hkl
spacings
of planes which lie at large angles to the specimen surface need to be measured (e.g.
in determining the variation of lattice strains from planes in different orientations), the
specimen is rotated as shown in Fig. 10.3(c); the angle of rotation α is of course (approx-
imately) equal to the angle of the reflecting planes to the specimen surface (Fig. 9.20).
In doing so, however, the symmetrical Bragg–Brentano focusing geometry is lost; the
focusing circle changes both in diameter and position, as shown in Fig. 10.3(c), and
the detector slit is no longer at the approximate line of focus, but in this case beyond
it where the beam diverges and broadens. This deviation from the focusing geometry
may be serious because the observed ‘broadening’ at the detector slit could be misinter-
preted as arising from a variation in reflection angle as a result of a variation in lattice
strain. The problem may be partially overcome in two ways. First, the detector slit may
be moved along a sliding-arm arrangement so as to coincide more precisely with the
line of focus. However, this may itself introduce errors in the angular measurements
because of the difficulty of achieving a precise radial alignment of the slider. Second,
the angular divergence of the incident beam may be restricted to very low values—say
0.25
◦
–0.5
◦
—such that the broadening of the beam at the detector slit is very small, and
this is now the preferred option.
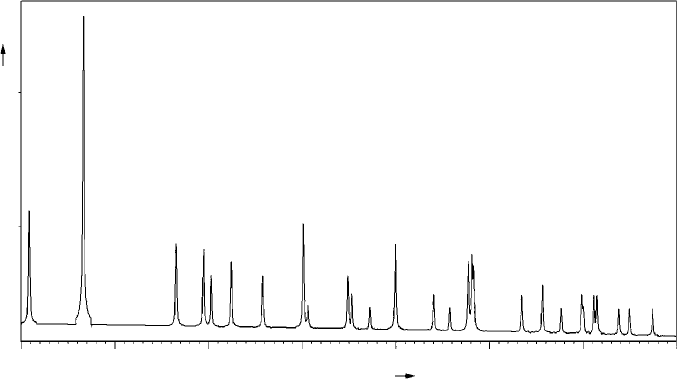
An example of an X-ray diffractometer chart or ‘trace’ for quartz (SiO
2
) is given in
Fig. 10.4. The d
hkl
-spacings and relative intensities of the reflections may be used to
identify the material, as described in Section 10.3 below.
10.2 X-ray diffraction 249
20
Square root of intensity (arbitary scale)
30
4.257[Å]
2.457[Å]
3.342[Å]
2.282[Å]
1.818[Å]
1.542[Å]
1.382[Å]
1.372[Å]
40 50 60 70 80 90
Diffraction Angle [°2u]
Fig. 10.4. An example of an X-ray diffractometer chart of intensity of the reflected beams (ordinate) vs
2θ angle (abscissa). The intensity scale is non-linear (square root) to emphasize the weaker reflections.
The specimen is polycrystalline SiO
2
(quartz), CuKα
1
, radiation (λ = 1.541 Å). The d-spacings (Å) of
the reflections are indicated (compare with Figs 10.7 and 10.8). (Courtesy of Mr. D. G. Wright.).
There are two other ‘classical’ X-ray powder techniques of interest—the back reflec-
tion method in which the whole or part of the diffraction cones are recorded on flat film
(an experimental arrangement identical to that for the Laue back reflection method) and
the Debye–Scherrer technique in which a thin rod-shaped specimen or a powder in a
capillary tube is set at the centre of a cylindrical camera.
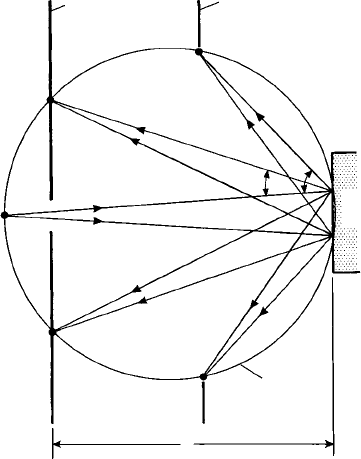
The geometry of the back reflection powder method is shown in Fig. 10.5. The
effective position of the source S is determined by the design of the collimator tube
which passes through a hole in the centre of the film. In practice the divergence angle is
very small, of the order 0.5
◦
–2
◦
. Notice that, like the diffractometer, it is a semi-focusing
method—all the reflected beams from the (flat) specimen surface focus approximately at
the circumference of the focusing circle. However, the flat film can be placed only at one
distance x from the specimen: if x is the focal distance of the high 2θ angle reflections
as shown, it will not be at the focal distance of the lower 2θ angle reflections. In practice
a ‘compromise’ value of x is chosen such that the diffraction rings of particular interest
are most sharply focused.
The great advantage of the Debye–Scherrer method over the diffractometer (and to a
lesser extent the Seeman–Bohlin method and its variants) is that only very small amounts
of material are required for, say, insertion into a capillary tube.
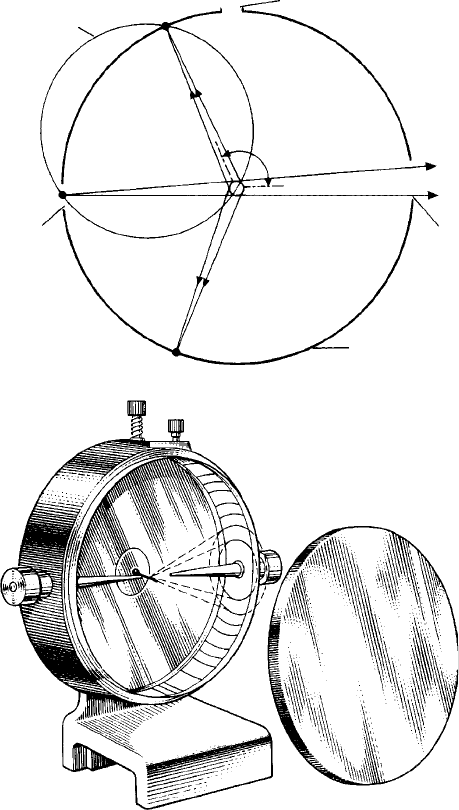
The geometry and specimen–film arrangement in the Debye–Scherrer camera are
shown in Fig. 10.6. The cylindrical specimen (a powder in a capillary tube or a cemented
powder in the form of a little rod) is placed at the centre of a cylindrical camera. The strip
of film may be fitted round the circumference of the camera in several ways: it may have
250 X-ray diffraction of polycrystalline materials
Film position for
focused higher
angle reflections
Source
Polycrystalline
specimen
Focusing
circle
x
S
Film position for
focused lower
angle reflections
Fig. 10.5. The geometry of the back reflection X-ray powder method; the diverging X-ray beam from
an (effective) source S passes through a hole at the centre of the film. The reflected beams for two
reflections are shown. The film is shown placed at a specimen–film distance x so as to intercept the
higher angle reflectionssuch that theyare sharply focused. Inorder to interceptthe lower anglereflections
such that they are sharply focused it would need to be moved closer to the specimen as indicated. In
practice a ‘compromise’ value for x is chosen which is acceptable since the divergence angle, and the
de-focusing of the incident beam, is small.
a single hole punched at its centre and so arranged to coincide with the ‘exit’ direction
of the X-ray beam (the ends of the film being each side of the ‘entrance’ direction of the
X-ray beam) or vice versa. However, the usual way is to punch two holes in the film, one
to match the ‘entrance’ and the other to match the ‘exit’ directions of the X-ray beam,
the two ends of the film now being at the ‘top’ or ‘bottom’ of the camera as shown. This
‘asymmetrical’ arrangement or ‘setting’ has the advantage that a complete range of 2θ
angles—from 0
◦
to 180
◦
—may be recorded on one side of the film without a ‘cut-off
occasioned by the presence of a film end. In this way accurate d
hkl
-spacings may be
determined and any effects of film shrinkage accounted for.
The position of the effective source S is determined by the design of the collimator.
The focusing circle for a particular reflection is shown; however, this only represents the
physical situation very approximately since the reflected beams arise to different extents
from the whole volume of the specimen and the position of the source S and the focusing
effect is by no means as precise as that drawn in Fig. 10.6.
An example of a Debye–Scherrer film (asymmetrical setting) is shown in Fig. 10.7.
The 2θ = 0
◦
and 2θ = 180
◦
positions can be worked out exactly by determining
10.2 X-ray diffraction 251
Focusing circle for
one reflected beam
Film ends
Exit hole
in film
Camera
circumference
2u
X-ray
source
Entrance
hole in film
(a)
(b)
S
Fig. 10.6. (a) The geometry of the Debye–Scherrer camera; the reflected beams from a cylindrical
specimen tend towards a focus on the film around the circumference of the camera and the focusing
circle for a particular reflected beam is shown. In practice deviations from this idealized situation occur
because the reflected beams originate with varying intensities from the whole volume of the specimen
and the effective source S may not coincide with the circumference of the camera. (b) The camera with
the light-tight lid removed showing the specimen at the centre, the collimator and receiving tube and
the (low angle) X-ray diffraction rings on the film. The screws at the top are for locating and fixing the
ends of the film (from Manual of Mineralogy, 21st edn, by C. Klein and C. S. Hurlbut Jr., John Wiley,
1993).

252 X-ray diffraction of polycrystalline materials
the centres of the ‘exit’ and ‘entrance’ rings, the distance between them
on the film corresponding to 180
◦
exactly. Hence the camera diameter
does not need to be known, although in practice cameras are made with
diameters 57.53 mm or 114.83 mm such that (and accounting for film
thickness) the circumference is 180 mm or 360 mm. Hence for quick
work the angles can simply read in terms of millimetres on the film.
It may be thought that the Debye–Scherrer method, as a film tech-
nique, has been supplanted by the diffractometer. This is by no means
the case: the ability of examining very small amounts of material and the
conversion of film data to digital data via the use of the microdensito-
meter has resulted in its use, for example, in Rietveld analysis (Section
10.6). In addition, film may be replaced by an array of position sensitive
detectors in both X-ray and neutron diffraction techniques.
10.3 Some applications of X-ray diffraction
techniques in polycrystalline materials
10.3.1 Accurate lattice parameter measurements
The accurate measurement of d
hkl
-spacings is now largely carried out
with the X-ray diffractometer using monochromatized (Kα
1
) radiation,
narrow divergence and receiving slit systems, internal calibration systems
and peak profile measurement procedures. However, as shown below, it
is the high 2θ angle reflections which are most sensitive to small vari-
ations in d
hkl
-spacings and for this reason the Debye–Scherrer powder
camera and back reflection flat film techniques in which 2θ angles up
to nearly 180
◦
can be recorded, are still used. By contrast, the largest
2θ angles measurable with a diffractometer are about 150
◦
because the
near approach and possible contact between the source and receiving slit
assemblies.
Given the crystal systemand the hkl values of the reflections, thelattice
parameter(s) can be determined using the appropriate equation (Appendix
A4.1). This procedure is clearly simplest for the cubic system in which
the d
hkl
-values depend only upon the one variable, a. In other systems
several d
hkl
-spacings need to be measured and the values inserted into
simultaneous equations from which values of the lattice parameters are
extracted.
Fig. 10.7. An example of a Debye–Scherrer X-ray film (CuKα X-radiation) for SiO
2
(quartz). S is the ‘entrance’ hole and O the ‘exit’ hole. The ‘spotty’ appearance of the
rings arises because of the relatively coarse crystallite size in the specimen. At high
2θ angles (near the entrance hole) the Kα
1
/Kα
2
doublets are resolved but at low 2θ
angles (near the exit hole) they are unresolved. The streaks around the exit hole arise
from the presence of residual ‘white’ X-radiation in the incident beam.
10.3 Applications of X-ray diffraction techniques 253
The sensitivity of change of the 2θ angle for a reflection with a change in d
hkl
-spacing
is a measure of the resolving power of the diffraction technique. The resolving power,
or rather the limit of resolution, δd /d, can be obtained by differentiating Bragg’s law
with respect to d and θ (λ fixed), i.e.
λ = 2d sin θ
differentiating:
0 = 2d cos θδθ + 2 sin θδd
hence
δd /d =−cot θδθ.
This equation may be ‘read’ in two ways. For a given value of 2δθ, which may be
expressed in terms of the minimum resolved distance between two reflections on the
film, chart, etc., for the smallest limit of resolution we want cot θ values to be as small as
possible; or, for a given value of δd /d , we want the angular separation of the reflections
2δθ to be as large, and hence again cot θ values to be as small as possible.
A glance at cotangent tables shows that cot θ values are high at low θ angles and
rapidly decrease towards zero as θ approaches 90
◦
. Hence d
hkl
-spacing measurements
are most accurate using high-angle X-ray diffraction methods and least accurate with
low-angle electron diffraction methods.
10.3.2 Identification of unknown phases
For powder specimens in which the crystals are randomly orientated, the set of d-
spacings and their relative intensities serves as a ‘fingerprint’ (or ‘genetic strand’) from
which the phase can be identified by comparison with the ‘fingerprints’ of phases in
the X-ray Powder Diffraction File—a data bank of over 250,000 inorganic and 300,000
organic and organometallic phases. The File is administered by the International Centre
for Diffraction Data (ICDD)—formerly the Joint Committee for Powder Diffraction
Standards (JCPDS)—and new and revised sets of data are published annually in book
form (replacing the original 5 inch by 3 inch cards) or as a computer database. In addition,
there are published Indexes with the phases arranged alphabetically by chemical name,
search manuals and abstracts from the File (including Indexes and Search Manuals) or
Frequently Encountered Phases (FEP).
The entry for each phase in the File or computer database (which differ slightly in
their layout) includes: file number, chemical formula and name, experimental conditions,
physical and optical data (where known), references and the set of d-spacings (given
in Å), their Laue indices and their relative intensities arranged in order of decreasing
d-spacing. Finally, the ICDD editors assign a ‘quality mark’ to indicate the reliability of
the data (e.g. a ‘*’ indicates that the chemistry, structure and X-ray data of the phase is
well characterized); or whether the X-ray data has been derived by calculation, rather
