Duan C.G., Karelin V.Y. Abrasive Erosion and Corrosion of Hydraulic machinery
Подождите немного. Документ загружается.

394 Abrasive Erosion and Corrosion of Hydraulic Machinery
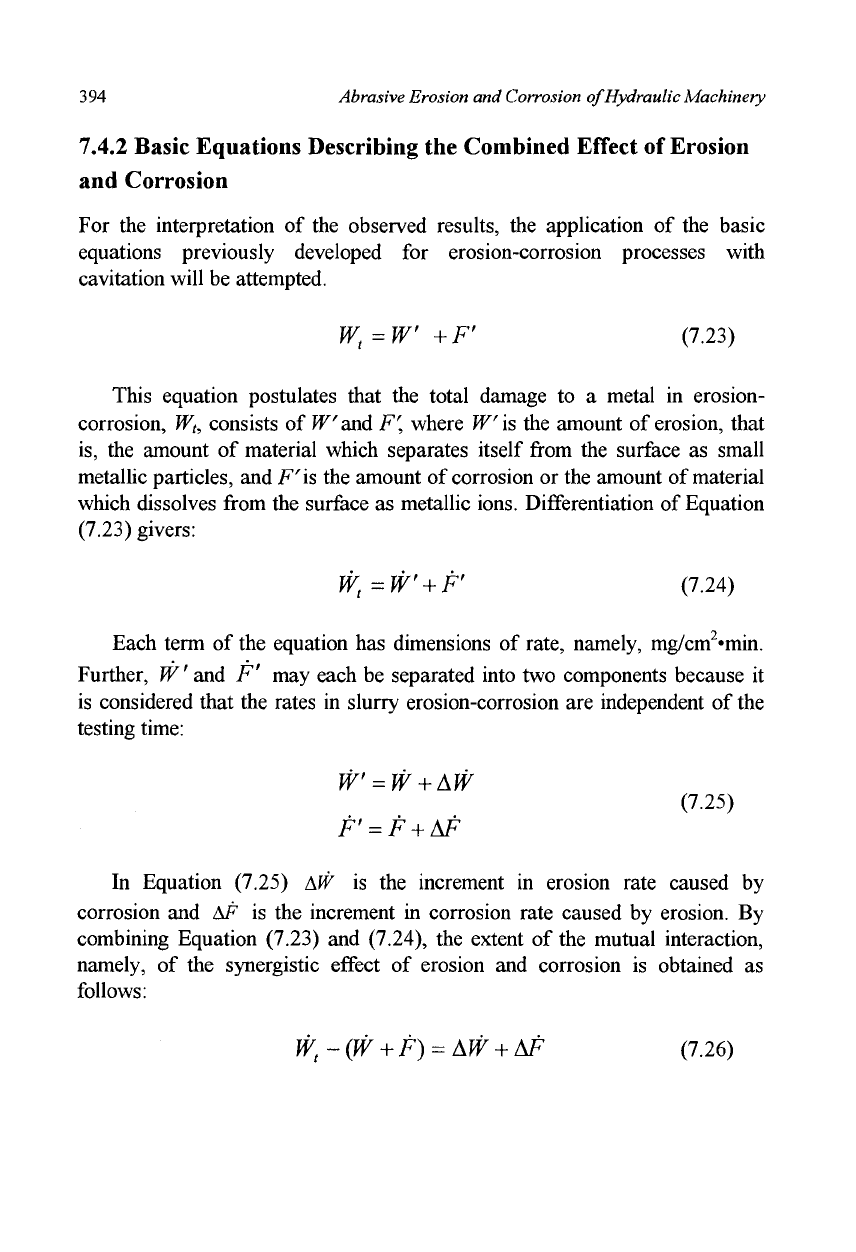
7.4.2 Basic Equations Describing the Combined Effect of Erosion
and Corrosion
For the interpretation of the observed results, the application of the basic
equations previously developed for erosion-corrosion processes with
cavitation will be attempted.
W
t
=W +F' (7.23)
This equation postulates that the total damage to a metal in erosion-
corrosion, W
t
, consists of W and F\ where W
is
the amount of erosion, that
is,
the amount of material which separates itself from the surface as small
metallic particles, and F'is the amount of corrosion or the amount of material
which dissolves from the surface as metallic ions. Differentiation of Equation
(7.23) givers:
W
t
=W'
+
F' (7.24)
Each term of the equation has dimensions of rate, namely, mg/cm
2,
min.
Further, W' and F' may each be separated into two components because it
is considered that the rates in slurry erosion-corrosion are independent of the
testing time:
W' = W + AW
(7.25)
F' = F + AF
In Equation (7.25) IsW is the increment in erosion rate caused by
corrosion and AF is the increment in corrosion rate caused by erosion. By
combining Equation (7.23) and (7.24), the extent of the mutual interaction,
namely, of the synergistic effect of erosion and corrosion is obtained as
follows:
W
t
- (W
+
F) = AW + AF (7.26)
Corrosion on Hydraulic Machinery
395
Of considerable interest is determination of the magnitude and sign of
AW and AF. In order to answer this question,
W'and
F" were
independently and quantitatively determined by using the method shown in
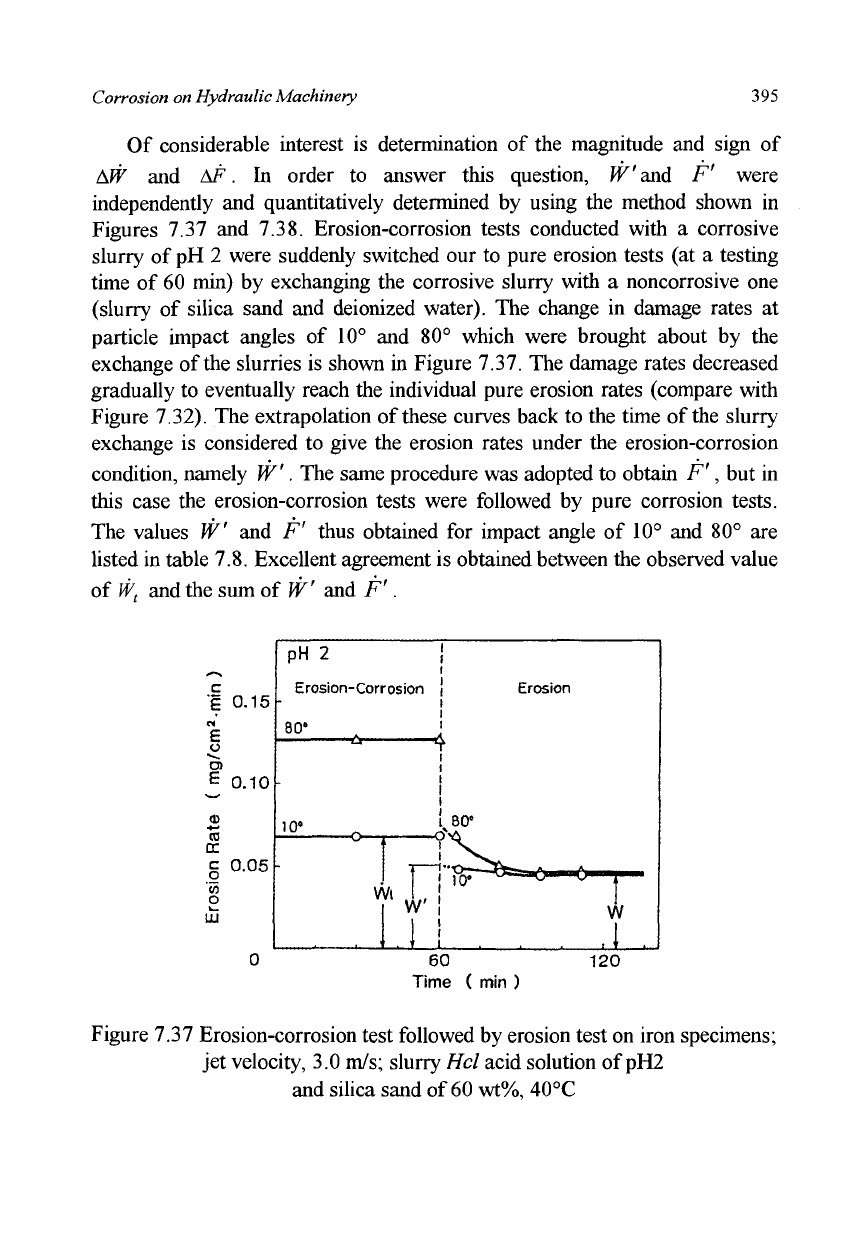
Figures 7.37 and 7.38. Erosion-corrosion tests conducted with a corrosive
slurry of pH 2 were suddenly switched our to pure erosion tests (at a testing
time of 60 min) by exchanging the corrosive slurry with a noncorrosive one
(slurry of silica sand and deionized water). The change in damage rates at
particle impact angles of 10° and 80° which were brought about by the
exchange of the slurries is shown in Figure 7.37. The damage rates decreased
gradually to eventually reach the individual pure erosion rates (compare with
Figure 7.32). The extrapolation of these curves back to the time of the slurry
exchange is considered to give the erosion rates under the erosion-corrosion
condition, namely W'. The same procedure was adopted to obtain F", but in
this case the erosion-corrosion tests were followed by pure corrosion tests.
The values W' and F" thus obtained for impact angle of 10° and 80° are
listed in table 7.8. Excellent agreement is obtained between the observed value
of
W,
and the sum of W' and F" .
1 0.15
£
o
*^
CO
E
0.10
m
en
g
0.05
05
O
i-
UJ
pH 2
Erosion-Corrosion
80"
Erosion
60
Time ( min )
120
Figure 7.37 Erosion-corrosion test followed by erosion test on iron specimens;
jet velocity, 3.0 m/s; slurry Hcl acid solution of pH2
and silica sand of
60
wt%, 40°C

396 Abrasive Erosion and Corrosion of Hydraulic Machinery
Table 7.8 Comparison of erosion-corrosion rates.
Impact angle
(cleg)
W
t
W'+F' W'
(mg/cm
2
«min)
F'
10
80
0.067
0.125
0.078
0.128
0.047
0.075
0.031
0.053
0.15
c
1
CM'
E
o
~*.
O)
£ 0.10
a.
o
o
0.05
pH 2
Erosion-Corrosion
80*
10*
Wl
80'
F'
Corrosion
60
Time (min)
-Or-
120
Figure 7.38 Erosion-corrosion test followed by erosion test
on iron specimens in environmental liquid of pH 2;
jet velocity, 3.0 m/s; temperature of liquid, 40°C
The results shown in Figures 7.37 and 7.38, and including Table 7.8
indicate the following:
i) The extrapolation method described above is useful for determining
each component for combined erosion and corrosion conditions.
ii) Equation (7.23) is considered to be valid for slurry erosion-corrosion of
commercially pure iron in the slurry of silica sand and hydrochloric acid
solutions.
iii) The negative mutual interaction in Figure 7.36 is to be attributed to the
effects of AF, because in Figure 7.38 F" is lower than F, thus AF is
negative. This means that corrosion is inhibited by erosion even though
Corrosion on Hydraulic Machinery
397
this appears to be contrary to common sense. This unexpected result is
supported by the experimental results, however. It appears that AF
takes on a larger negative value at the impact angle of 10° than at 80°
(Figure 7.38), in agreement with observed interaction as shown in
Figure 7.36. On the other hand, AW is positive for all impact angles as
may be observed in Figure 7.37.
7.4.3 Analysis on a Single Crater
(1) Crater formation by free-falling projectile:
The detailed mechanism of the observed interaction including the inhibiting
effect of erosion on corrosion, and even of
the
accelerating effect of corrosion
on erosion must be found. In order to do this, the process of crater surfaces
needs to be explained. The dimension of a crater formed by a single impact of
a silica sand particle is too small to be fully observed even though a SEM is
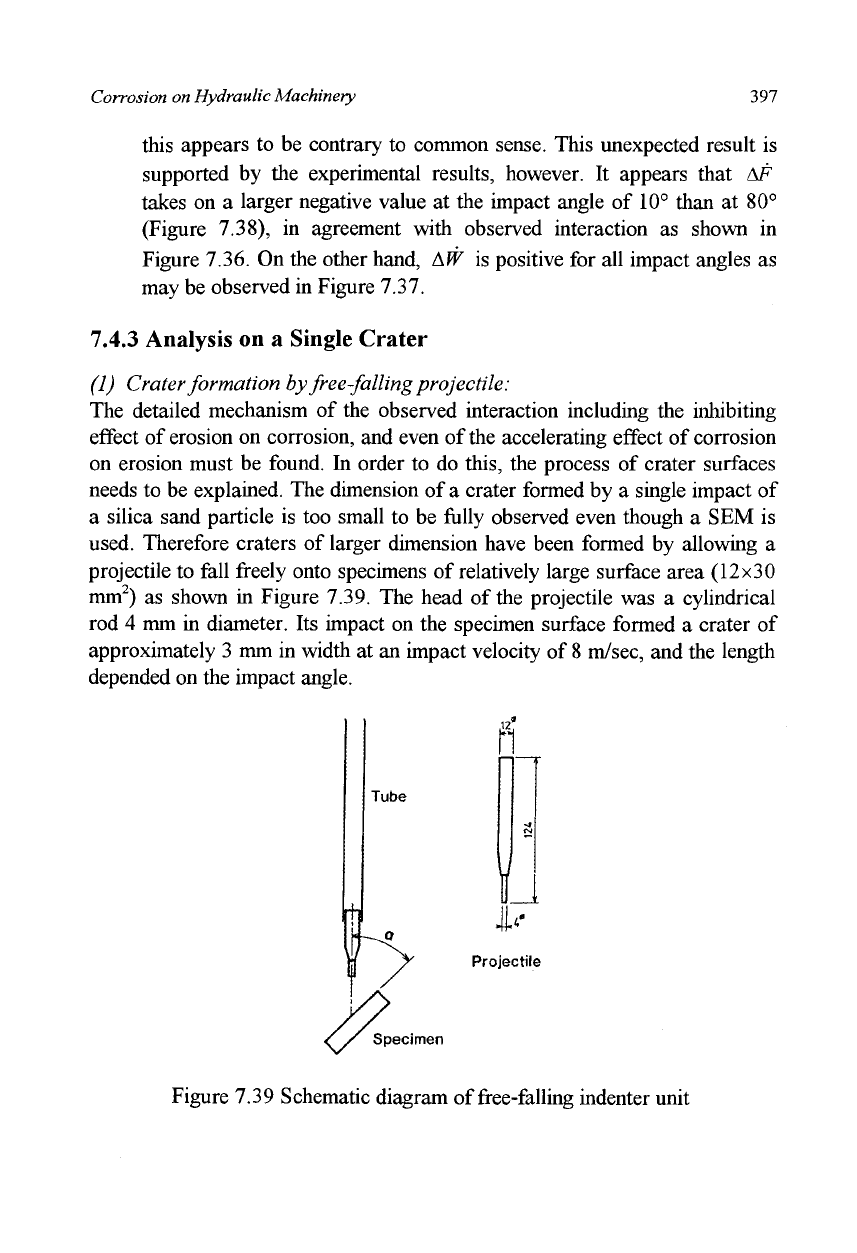
used. Therefore craters of larger dimension have been formed by allowing a
projectile to fall freely onto specimens of relatively large surface area (12x30
mm
2
) as shown in Figure 7.39. The head of the projectile was a cylindrical
rod 4 mm in diameter. Its impact on the specimen surface formed a crater of
approximately 3 mm in width at an impact velocity of
8
m/sec, and the length
depended on the impact angle.
Tube
Projectile
Specimen
Figure 7.39 Schematic diagram of free-falling indenter unit
398
Abrasive Erosion and Corrosion of Hydraulic Machinery
(2) Effect of dissolution on crater formation:
The acceleration effect of corrosion on erosion may be attributed to the
dissolution of
the
strain-hardened layer and the increase in surface roughness
accompanying the dissolution. Repeated impacts of particles are expected to
cause strain hardening of the surface and further impacts on this surface of
higher hardness will result in shallower and smaller craters. Dissolution of
this hardened surface layer by corrosion will accelerate erosion by causing the
formation of larger craters. The dissolution of the surface layer will also
result in the formation of
hills
and valleys on the surface, which, in turn, will
catch the particles or projectile and result in yet larger craters.
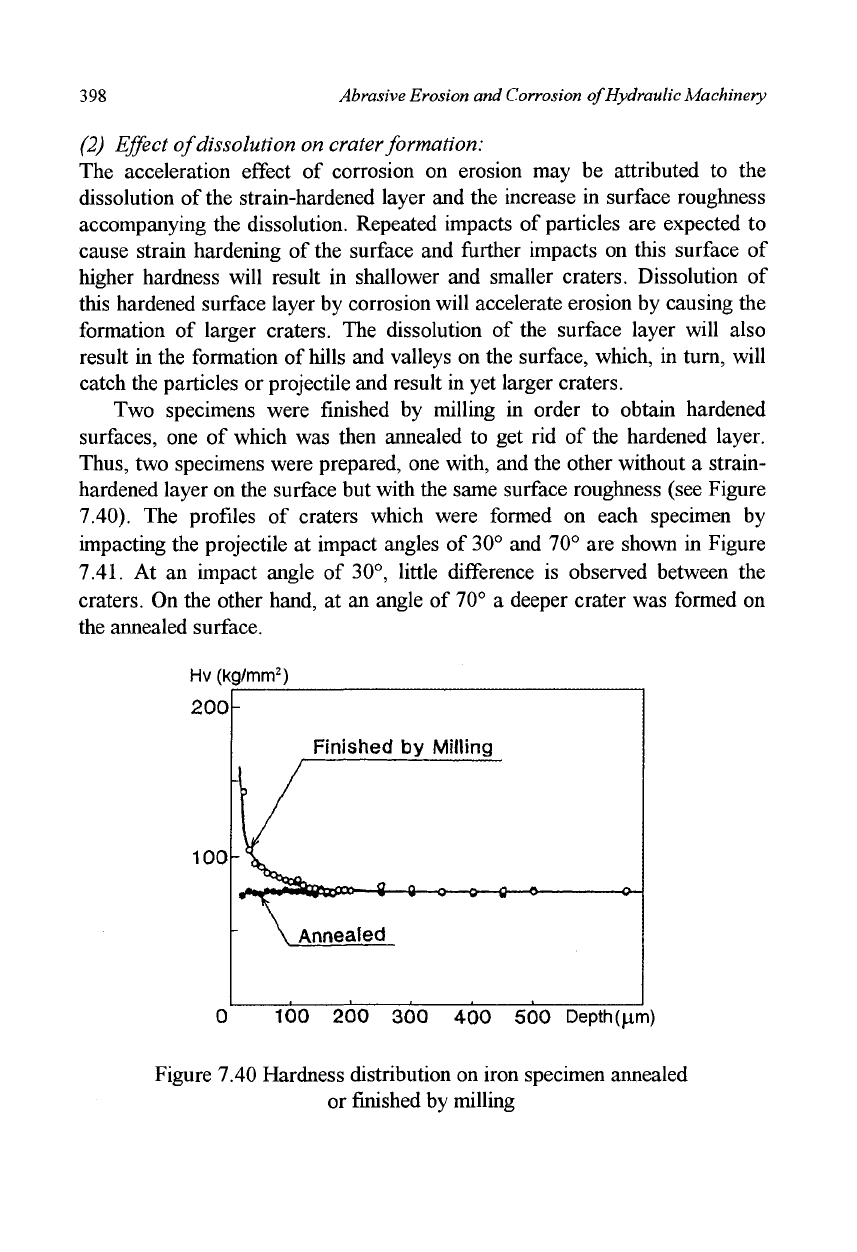
Two specimens were finished by milling in order to obtain hardened
surfaces, one of which was then annealed to get rid of the hardened layer.
Thus,
two specimens were prepared, one with, and the other without a strain-
hardened layer on the surface but with the same surface roughness (see Figure
7.40). The profiles of craters which were formed on each specimen by
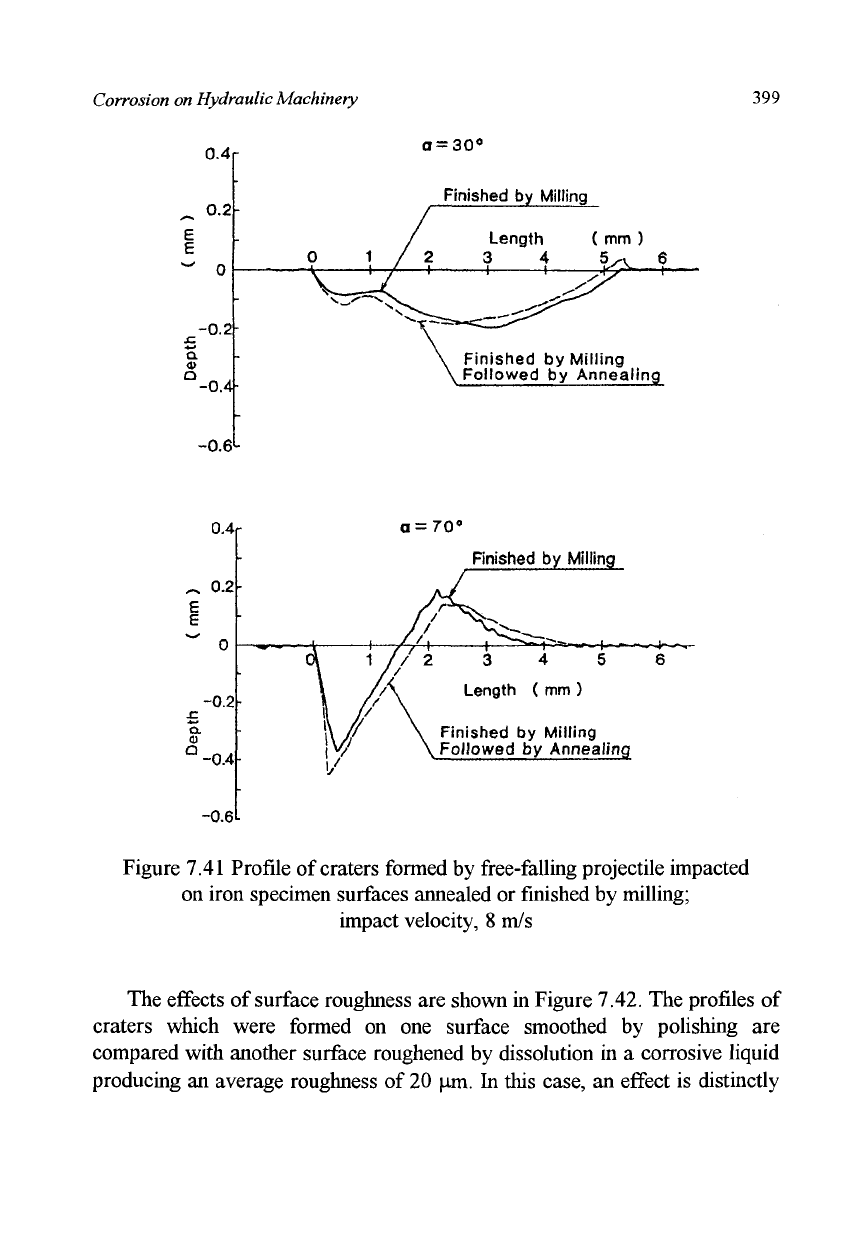
impacting the projectile at impact angles of 30° and 70° are shown in Figure
7.41.
At an impact angle of 30°, little difference is observed between the
craters. On the other hand, at an angle of 70° a deeper crater was formed on
the annealed surface.
Hv (kg/mm
2
)
200-
100
Finished by Milling
-fl—o—o—c—»-
Annealed
0 100 200 300 400 500
Depth
(jam)
Figure 7.40 Hardness distribution on iron specimen annealed
or finished by milling
Corrosion on Hydraulic Machinery
399
0.4r
0.2
E
£
-0.2
Q.
Q
■0.4
-0.6
L
a=30°
Finished
by
Milling
( mm
)
Finished
by
Milling
Followed
by
Annealing
~
0.2-
Q.
O
Q
Finished
by
Milling
inished
by
Milling
, Followed
by
Annealing
-0.61
Figure 7.41 Profile
of
craters formed by free-falling projectile impacted
on iron specimen surfaces annealed or finished by milling;
impact velocity,
8 m/s
The effects
of
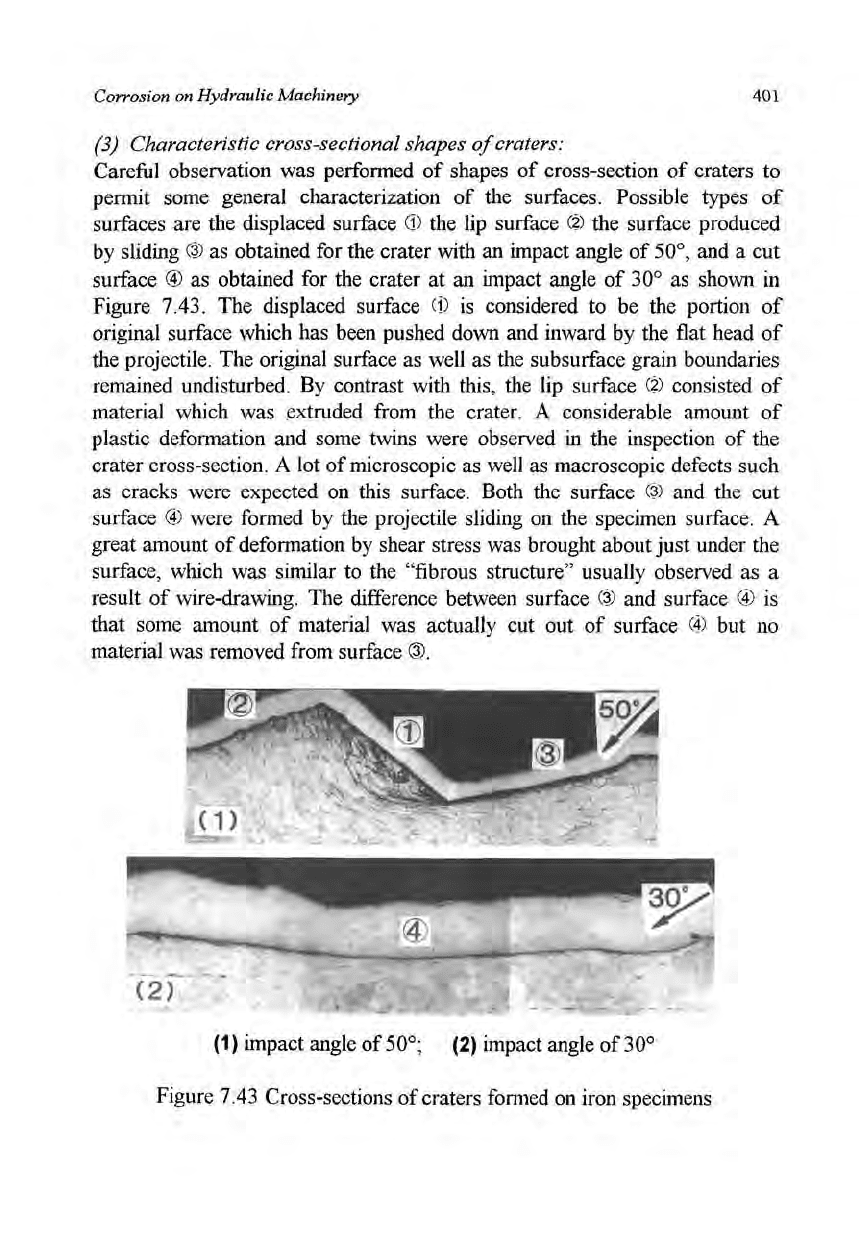
surface roughness are shown in Figure 7.42. The profiles
of
craters which were formed
on one
surface smoothed
by
polishing
are
compared with another surface roughened
by
dissolution
in a
corrosive liquid
producing
an
average roughness
of
20 \im.
In
this case,
an
effect
is
distinctly

400
Abrasive Erosion and Corrosion of Hydraulic Machinery
observed at an angle of 30°; a deeper crater was formed on the surface
roughened by corrosion.
Thus,
the dissolution of the hardened surface and the increase in surface
roughness are possible causes for acceleration of erosion by corrosion.
0.4r
~ 0.2
I
-0.2-
a
CD
a
-0.4
-0.6l
a = 30°
Polished and
Followed by Annealing
Length -(mm)
234
/W, 6
a = 70°
Polished and
Followed by Annealing
»»^T -*>-ui-is
2 3 4 5
Length (mm)
Corroded
Figure 7.42 Profile of craters formed by free-falling projectile impacted
on iron specimen surfaces in Hcl acid solution of
pH2;
impact velocity, 8 m/s
Corrosion on Hydraulic Machinery
401
(3) Characteristic cross-sectional shapes of craters:
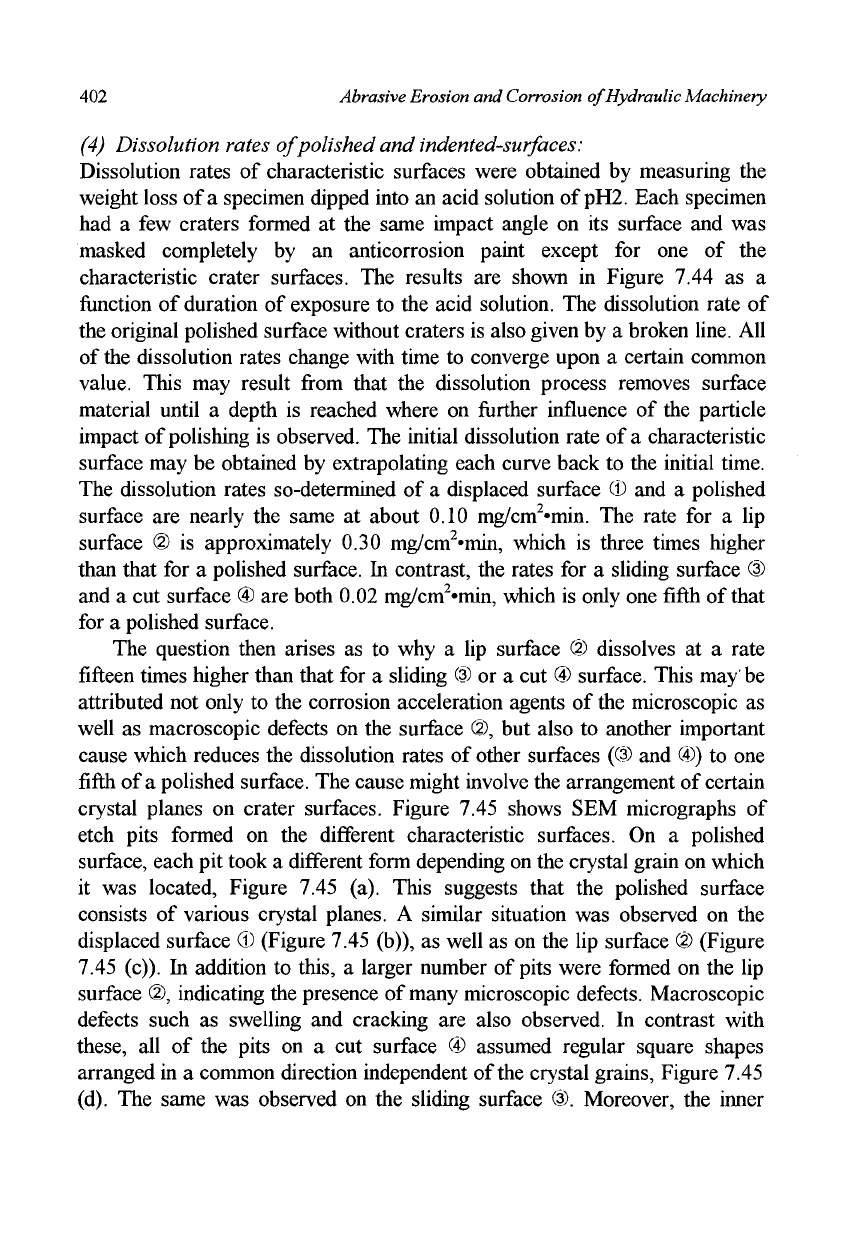
Careful observation was performed of shapes of cross-section of craters to
permit some general characterization of the surfaces. Possible types of
surfaces are the displaced surface ® the lip surface (?) the surface produced
by sliding ® as obtained for the crater with an impact angle of
50°,
and a cut
surface @ as obtained for the crater at an impact angle of 30° as shown in
Figure 7.43. The displaced surface (1) is considered to be the portion of
original surface which has been pushed down and inward by the flat head of
the projectile. The original surface as well as the subsurface grain boundaries
remained undisturbed. By contrast with this, the lip surface (?) consisted of
material which was extruded from the crater. A considerable amount of
plastic deformation and some twins were observed in the inspection of the
crater cross-section. A lot of microscopic as well as macroscopic defects such
as cracks were expected on this surface. Both the surface (?) and the cut
surface © were formed by the projectile sliding on the specimen surface. A
great amount of deformation by shear stress was brought about just under the
surface, which was similar to the "fibrous structure" usually observed as a
result of wire-drawing. The difference between surface ® and surface (4) is
that some amount of material was actually cut out of surface (4) but no
material was removed from surface ®.
(1) impact angle of
50°;
(2) impact angle of 30°
Figure 7.43 Cross-sections of craters formed on iron specimens
402
Abrasive Erosion and Corrosion of Hydraulic Machinery
(4) Dissolution rates of polished and indented-surfaces:
Dissolution rates of characteristic surfaces were obtained by measuring the
weight loss of a specimen dipped into an acid solution of
pH2.
Each specimen
had a few craters formed at the same impact angle on its surface and was
masked completely by an anticorrosion paint except for one of the
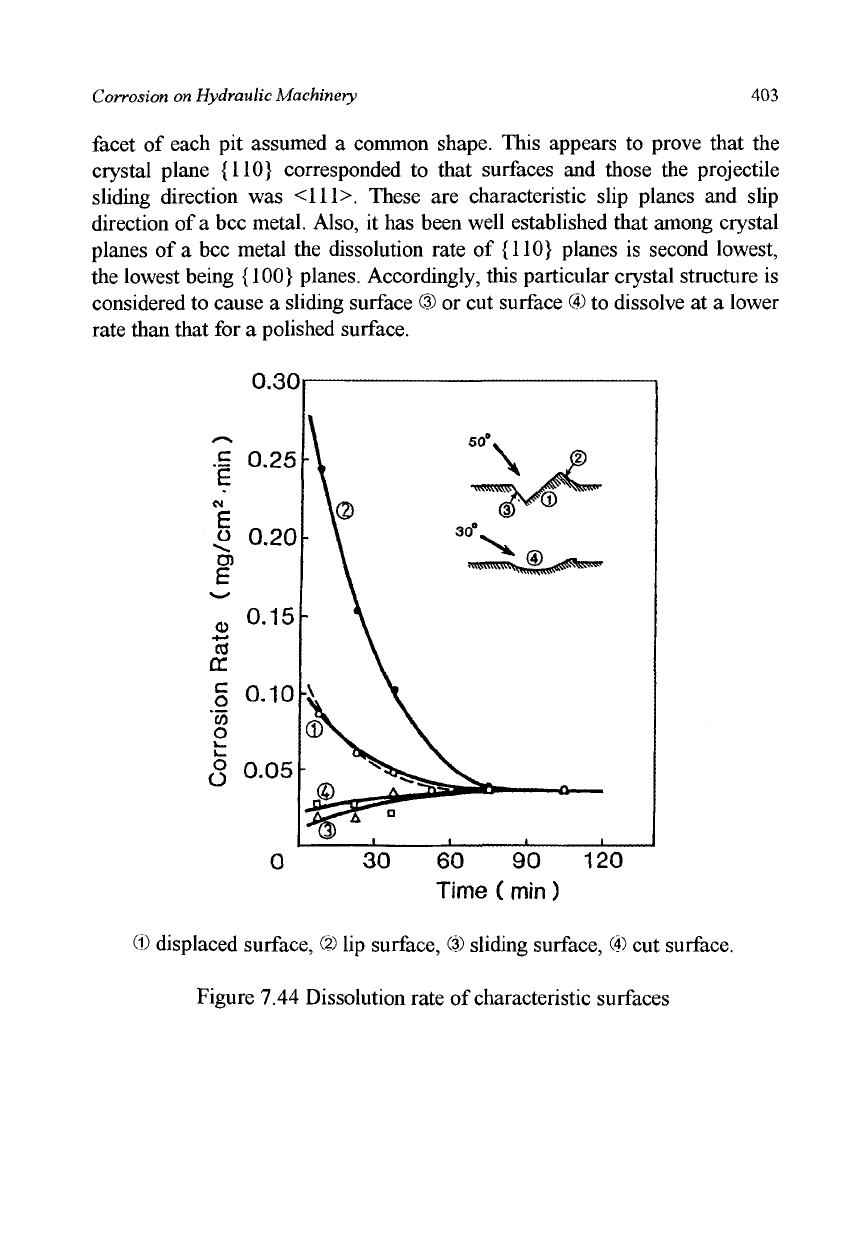
characteristic crater surfaces. The results are shown in Figure 7.44 as a
function of duration of exposure to the acid solution. The dissolution rate of
the original polished surface without craters is also given by a broken line. All
of the dissolution rates change with time to converge upon a certain common
value. This may result from that the dissolution process removes surface
material until a depth is reached where on further influence of the particle
impact of polishing is observed. The initial dissolution rate of a characteristic
surface may be obtained by extrapolating each curve back to the initial time.
The dissolution rates so-determined of a displaced surface
CD
and a polished
surface are nearly the same at about 0.10 mg/cm
2
*min. The rate for a lip
surface @ is approximately 0.30 mg/cm
2
«min, which is three times higher
than that for a polished surface. In contrast, the rates for a sliding surface ®
and a cut surface © are both 0.02 mg/cm
2,
min, which is only one fifth of that
for a polished surface.
The question then arises as to why a lip surface (?) dissolves at a rate
fifteen times higher than that for a sliding ® or a cut © surface. This may be
attributed not only to the corrosion acceleration agents of the microscopic as
well as macroscopic defects on the surface <S), but also to another important
cause which reduces the dissolution rates of other surfaces (® and ©) to one
fifth of a polished surface. The cause might involve the arrangement of certain
crystal planes on crater surfaces. Figure 7.45 shows SEM micrographs of
etch pits formed on the different characteristic surfaces. On a polished
surface, each pit took a different form depending on the crystal grain on which
it was located, Figure 7.45 (a). This suggests that the polished surface
consists of various crystal planes. A similar situation was observed on the
displaced surface © (Figure 7.45 (b)), as well as on the lip surface ® (Figure
7.45 (c)). In addition to this, a larger number of pits were formed on the lip
surface @, indicating the presence of many microscopic defects. Macroscopic
defects such as swelling and cracking are also observed. In contrast with
these, all of the pits on a cut surface © assumed regular square shapes
arranged in a common direction independent of the crystal grains, Figure 7.45
(d).
The same was observed on the sliding surface ®. Moreover, the inner
Corrosion on Hydraulic Machinery
403
facet of each pit assumed a common shape. This appears to prove that the
crystal plane {110} corresponded to that surfaces and those the projectile
sliding direction was <111>. These are characteristic slip planes and slip
direction of a bcc metal. Also, it has been well established that among crystal
planes of a bcc metal the dissolution rate of {110} planes is second lowest,
the lowest being {100} planes. Accordingly, this particular crystal structure is
considered to cause a sliding surface ® or cut surface © to dissolve at a lower
rate than that for a polished surface.
| 0.25
CM
| 0.20
E
v_*
« 0.15
§ 0.10
'w
o
<§ 0.05
\©
A \
50\
1 ,. . ,-,.!,. 1
0
30 60 90 120
Time (min)
© displaced surface, (?) lip surface, (?) sliding surface, © cut surface.
Figure 7.44 Dissolution rate of characteristic surfaces
