ASM Metals HandBook Vol. 8 - Mechanical Testing and Evaluation
Подождите немного. Документ загружается.


Example: Correction Factors for Vickers Hardness of a Concave Cylinder (One Diagonal Parallel
to Axis). The test conditions are:
Diameter of cylinder (D), mm 5
Vickers test load, kgf 30
Mean diagonal of indentation (d), mm
0.415
d/D 0.083 (i.e., 0.415/5)
With a mean diagonal of 415 μm and a test load of 30 kgf, the Vickers hardness number for a flat surface is 323 (per
ASTM E 92, Ref 3). From Table 7, the correction factor is 1.075 when d/D = 0.083. Thus, the hardness of the cylinder
after correction is 323 × 1.075 = 347 HV30.
Degree of Flatness. An absolutely flat surface is the ideal condition for hardness testing, and some methods are more
sensitive to this condition than are others. To obtain accurate readings from Brinell, Rockwell, Scleroscope, and
conventional microhardness testers, the surface being tested should be at least within 2 or 3° of flatness—that is, close to
90° of the direction of travel of the indenter. For example, when odd-shaped workpieces do not have any surfaces parallel
to the surface to be tested, it is often possible to provide adjustable fixtures, which can be tilted as required to allow a flat
surface for testing. This accommodation often is made with either the Brinell or the Rockwell tester.
In microhardness testing, securing and holding devices are used to attain a test surface that is sufficiently flat. Similar
approaches have been used for Brinell and Rockwell testing; frequently, devices are designed for specific workpieces.
Ultrasonic microhardness tests can be performed on surfaces that are not flat, however, because different principles are
involved.
Surface Condition
Surface condition is a term covering two different conditions, surface finish and surface composition, both of which can
affect the selection of the optimal method and/or testing technique.
Surface Finish. In general, the degree of surface smoothness required for accurate results is related directly to the size
of the indenter. Although the smoother finishes are highly desirable for any testing method, the Brinell test, which
involves a large indenter, can be made and read with a reasonable degree of accuracy when the finish is comparable to
finished-machined or rough-ground types. In Rockwell testing, a finished ground surface is generally the minimum
requirement, but polished surfaces are preferred. In Vickers testing through microhardness testing (including
Scleroscope), finish requirements are far more stringent. By comparison, in microhardness testing with very light loads
(less than 100 gf), the workpiece or specimen requires a surface finish equal to that used for microscopic examination at
high magnification. It is obvious that the degree of smoothness that can be obtained can have a profound effect on which
test method is selected.
Surface Composition. The other surface condition that can affect the selection of the hardness test method is surface
composition (generally unique to steels). Decarburization, retained austenite, carburization, or other composition changes
that result in a hard case are likely to influence selection. In many instances, differences in surface conditions require the
use of more than one method or scale.
Indent Location and Effects
Location. If an indentation is placed too close to the edge of a specimen the testpiece edge may bulge, causing a lower
hardness value because of improper support in the test area. To ensure an accurate test, the distance from the center of the
indentation to the edge of the testpiece shall be at least 2.5 times the diameter of the indentation. Therefore, when testing
in a narrow area, the width of the test area must be at least five diameters when the indentation is made in the center. The
appropriate scale or test force must be selected for this minimum width. Although the diameter of the indentation can be
calculated, for practical purposes the minimum distance can be determined visually.
Effect of Indentation Marks. An indentation hardness test cold works and/or work hardens the surrounding area. If
another indentation is made too close to this work-hardened area, the reading is usually higher in value than if placed
outside the hardened area. Generally, the softer the material, the more critical the spacing of the indentations. A distance
between the center of two adjacent indentations of at least three times the diameter of the indentations should be sufficient
for most materials.
The presence (or absence) of test marks on a part can also be a factor in selecting a test procedure. In most instances, the
presence of Brinell impressions on workpieces such as forgings and castings is not objectionable. On a finished part,
however, a mark as large as a Brinell impression might be undesirable from an appearance standpoint, or in some
instances, can interfere with its function. There are notable cases where analysis of a service failure proved that a fracture
was nucleated by a Brinell impression.
Rockwell indentation marks also can have a deleterious effect, although because the indentations are much smaller, the
likelihood of damage is usually less than that caused by Brinell marks. Generally, diamond indenter marks are not
sufficient to impair the function of a part, except in the case of precision parts used for purposes such as in fuel control
systems. Rarely are marks left by Scleroscope or microhardness testers objectionable.
Production Rates
The number of identical or similar parts being tested can also be a selection factor. The Scleroscope lends itself to very
rapid testing, when specific conditions exist, and is used frequently for high-production testing. Likewise, under certain
conditions, the ultrasonic hardness test can be used for microhardness testing of many identical parts.
As a rule, however, mass-production hardness testing is done with either the Brinell or the Rockwell tester. Either
instrument is available in partly or completely automated setups in which rejects are automatically separated.
References cited in this section
2. “Standard Test Method for Rockwell Hardness of Plastics and Electrical Insulating Materials,” D 785-98, Annual
Book of ASTM Standards, ASTM
3. “Standard Test Method for Vickers Hardness of Metallic Materials,” E 92-82(1997)e2, Annual Book of ASTM
Standards, ASTM

Selection and Industrial Applications of Hardness Tests
Andrew Fee, Consultant
Accuracy and Frequency of Calibration
Although the indentation-type test is a comparatively simple test to perform, reliable results depend a great deal
on the accuracy of the equipment and the proper test method. It is recommended the tester be checked each day
that hardness tests are to be made and whenever the indenter, anvil, or test force is changed.
Standardized test blocks should be used to monitor the performance of the tester daily. At least two test blocks
should be used with hardness levels that bracket below and above the range of hardness levels that are normally
tested. Prior to doing any testing, it is good practice to ensure that the tester is operating according to
manufacturer requirements and that the anvil and indenter are seated properly. At least three hardness
measurements should be made on any uniform specimen having a high hardness level in the scale to be
verified. The measurements should be continued until there is no trend (increasing or decreasing hardness) in
the measurement values. This technique implies that the tester's repeatability is consistent and that the indenter
and anvil are seated adequately. These results need not be recorded.
After the trial tests, at least three uniformly spaced hardness measurements should be made on each of the
standardized test blocks. If the average of the hardness measurements are within the tolerance marked on the
blocks, the tester may be regarded as performing satisfactorily. If not, an indirect verification should be
performed. In monitoring the tester in this manner it is recommended that these hardness measurements be
recorded using acceptable statistical process control techniques, such as X-bar charts (measurement averages),
R-charts (measurement ranges), gage repeatability and reproducibility (GRR) studies, and histograms (see the
article “Gage Repeatability and Reproducibility in Hardness Testing” in this Volume).
Most indentation-type testing should be carried out at a temperature within the limits of 10 to 35 °C (50–95 °F).
If there is a possibility of hardness variation within these test-temperature limits, users may choose to control
temperatures within a tighter range. A range of 18 to 23 °C (64–81 °F) is recommended. Tests performed
outside this temperature range should be considered suspect.
NIST-Traceable Test Blocks. Due to the empirical nature of hardness testing, the need for standardization of
hardness values is an area of continued attention. In many countries of Europe and Asia, for example, nationally
traceable hardness standards have been around for many years. Traceable standards can help resolve or reduce
differences in test results between vendors and customers, who each rely on their test block for machine
verification.
In 1990, after several meetings between the American Society for Testing and Materials (ASTM) and standards
groups from Europe and Asia, the U.S. government agreed to provide hardness standards for U.S.
manufacturers. The reason for the change is that hardness, though based on traceable parameters, has had no
absolute numbers. For example, the loads on a tester can be verified with a traceable load cell, but the hardness
values themselves are empirical; that is, hardness would not be directly traceable to any standard, national or
otherwise.
In order to evaluate the magnitude of variation, commercially available test blocks were evaluated by the
National Institute of Standards and Technology (NIST). A variation of 1.0 HRC was found to exist among test
blocks supplied by domestic manufacturers. A shift of almost 1.0 HRC also was realized versus standards from
other countries. This finding reinforced the need for standardization.
The hardness program at NIST involves traceable Standard Reference Material (SRM) blocks—or what
industry refers to as “NIST-traceable test blocks.” The SRMs are calibrated at NIST by means of a dead-weight
tester. Only two of these machines exist in the world. Other primary machines exist in other countries, but the
only exact duplicate of the NIST machine is located at IMGC, which is the NIST equivalent in Italy.
NIST-traceable test blocks are available for three nominal ranges in the Rockwell C scale:
• SRM 2810, “Rockwell C Scale Hardness—Low Range” (25 HRC nominal)
• SRM 2811, “Rockwell C Scale Hardness—Mid Range” (45 HRC nominal)
• SRM 2812, “Rockwell C Scale Hardness—High Range” (63 HRC nominal)

The new NIST-traceable blocks, at a nominal size of 60 mm (2.36 in.) diameter and 15 mm (0.6 in.) thick, are
larger than the typical Rockwell hardness test blocks. They are made of steel in the appropriate Rockwell C
range and have a polished mirrorlike surface. Although most ASTM-type Rockwell C test blocks are labeled
±0.5 HRC on the high end (60 HRC range), the NIST blocks have much tighter tolerances (down to 0.1). Test
locations are indicated on the block; associated hardness numbers and statistical information are listed on the
certificate, enabling the user to find more than just the arithmetic mean of the hardness.
Secondary traceable standards are available from commercial test block manufacturers. NIST standardized test
blocks are based on methods (especially on the diamond indenter) that are more closely aligned with those of
the national laboratories of other nations than with the values that were being used in North America. The most
dramatic change is tighter specification of indenter radius closer to the average ASTM-specified value of 200
μm. This is slightly larger than previous standard indenter radius of 192 μm. This change in indenter radius
shifts values at the upper end of the Rockwell C scale (59–63 HRC), where values shifted upward by 0.5 to 0.8
points HRC. From 46 to 58 HRC the shift was from 0.2 to 0.49 points, while the shift was insignificant below
46 HRC.
Selection and Industrial Applications of Hardness Tests
Andrew Fee, Consultant
Hardness Test Selection for Specific Materials
Generally, the scale to be used for a specified material is indicated on engineering design drawings or in the test
specifications. However, at times the scale must be determined and selected to suit a given set of circumstances.
In general, the scale using a diamond indenter (Rockwell and Vickers) are used for testing hardened steels and
alloys, while the ball indenters (Brinell and Rockwell) are used on more malleable materials.
Table 8 is a general guide relating materials and scales for regular Rockwell testing. As noted in Table 8, the
Rockwell superficial scales (N and T) are used for testing similar material that may be too thin to accommodate
the regular scales. In microindentation hardness testing, the Knoop and Vickers diamond indenters are used for
all testing. Additional details about these indentation hardness test methods are given in separate articles in this
Section of the Handbook.
Table 8 Typical applications of regular Rockwell hardness scales
Scale
(a)
Typical applications
B Copper alloys, soft steels, aluminum alloys, malleable iron
C Steel, hard cast irons, pearlitic malleable iron, titanium, deep case-hardened steel, and other
materials harder than 100 HRB
A Cemented carbides, thin steel, and shallow case-hardened steel
D Thin steel and medium case-hardened steel and pearlitic malleable iron
E Cast iron, aluminum and magnesium alloys, bearing metals
F Annealed copper alloys, thin soft sheet metals
G Phosphor bronze, beryllium copper, malleable irons. Upper limit is 92 HRG to avoid
flattening of ball.
H Aluminum, zinc, lead
K, L, M, P, R,
S, V
Bearing metals and other very soft or thin materials. Use smallest ball and heaviest load that
do not give anvil effect.
(a) The N scales of a superficial hardness tester are used for materials similar to those tested on the Rockwell C,
A, and D scales but of thinner gage or case depth. The T scales are used for materials similar to those tested on
the Rockwell B, F, and G scales but of thinner gage. When minute indentations are required, a superficial
hardness tester should be used. The W, X, and Y scales are used for very soft materials
Conversion from one hardness scale to another also depends on the material being tested. Therefore, this
section provides some hardness conversion data for materials other than steel. Hardness conversion tables for
steel are included in the article “Hardness Conversions for Steels.”
Steels
Forgings, Castings, and Plate Products. Annealed, hot-rolled, cold-finished, forged, or cast carbon and alloy
steels usually are tested by the Brinell or Rockwell B method. Because of the nature of forgings and most iron
and steel castings, the Brinell test is the preferred test method; the larger Brinell indentation gives a better
average value of the local surface and thus a truer homogentic hardness than would be expected with the
Rockwell test.
Rockwell testing is used on specimens with fine grain composition or those that lack sufficient area to
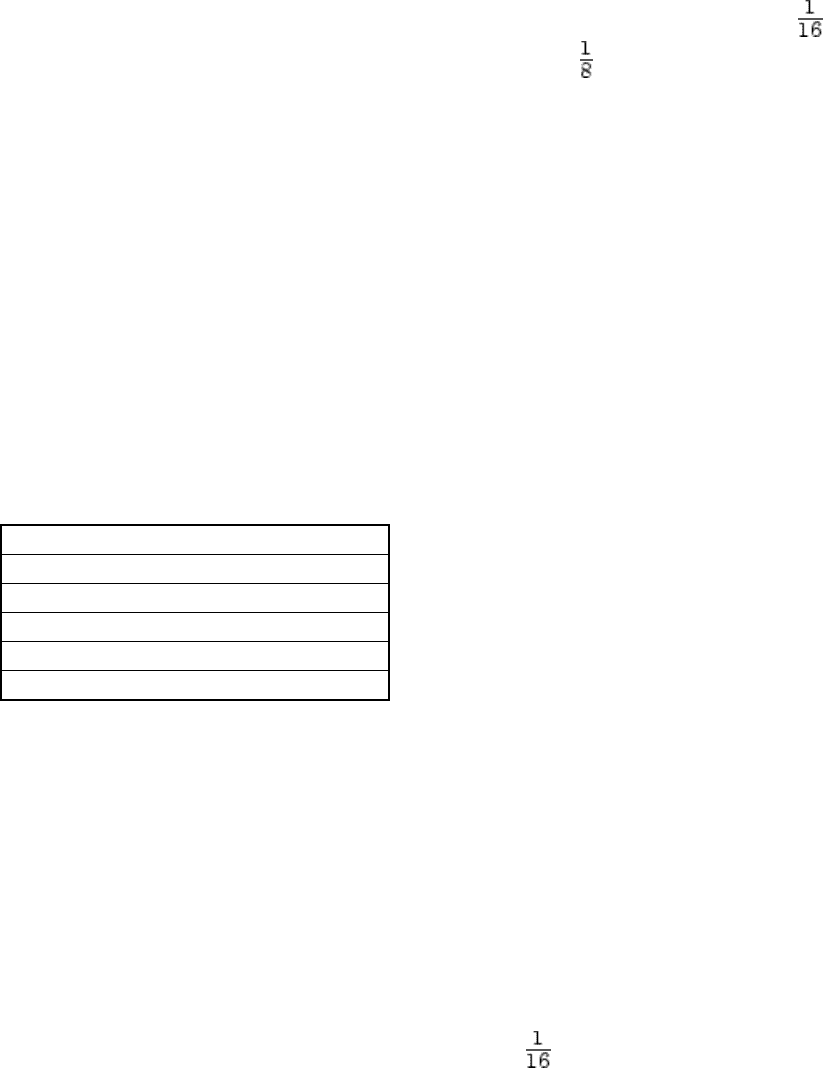
accommodate a Brinell test. Although the Rockwell B scale (1.59 mm, or in., ball indenter) is used
sometimes, the Rockwell E and K scales (3.175 mm, or in., ball indenter) are preferred because the larger
indenter gives a better average reading. The surface that is to be tested should be prepared, if needed, to allow
for a well-defined indentation for accurate measurement. Care should be taken to ensure that any surface
preparation will not influence the condition of the surface by overheating and cold working. To better correlate
between Rockwell and Brinell values, it is suggested that three to five Rockwell tests be made and averaged to
give a more representative hardness value because of the possible variations within the cast part. Hard white
iron castings and chilled rolls are usually tested using the Rockwell C and Vickers scales.
Hardened and Tempered Steels. The hardness of quenched-and-tempered carbon, alloy, tool, and stainless
steels is typically tested with a diamond indenter by Rockwell, Vickers, or microindentation techniques. The
Rockwell C test generally is used when conditions permit. Rockwell C readings of less than 20 (or its
equivalent in other scales) should not be considered valid, and some inaccuracy can be expected as the value
drops below 30 HRC. For hardenability testing, the Rockwell C scale is preferred (see the section
“Hardenability Testing” in this article).
Steel Sheet. Depending on the thickness of the sheet, hardness specifications are usually given in the Rockwell
B scale or a superficial Rockwell scale (HR30T or sometimes HR15T). Sheet metal is usually tested and
controlled for its drawing and stamping capabilities with the Rockwell test.
A common industry description of the various sheet steel tempers is:
Temper Hardness, HRB
No. 1 Hard 90 ± 5
No. 2 Half-hard 80 ± 5
No. 3 Quarter-hard
70 ± 5
No. 4 Soft 60 ± 5
No. 5 Dead-soft 45 ± 5
The verbal descriptions of the tempers involve wide tolerances, and a specification in the actual Rockwell
hardness gives a more precise and defined tolerance for control of the end product.
Powder Metallurgy (P/M) Steels. Because the density of P/M steels may vary from less than 7 g/cm
3
(0.25
lb/in.
3
) to a density approaching that of wrought steel (about 7.8 g/cm
3
, or 0.28 lb/in.
3
), the variation in hardness
can vary widely. Besides porosity, sintered P/M steels may also have inhomogeneous microstructures from
graphite. At least five consistent readings should be taken, in addition to any obviously high or low readings,
which should be discarded. The remaining five readings should be averaged.
Because of the variety of compositions and densities encountered in P/M materials, the recommendation for
suitable test methods may require preliminary trials. Generally, the Rockwell test, with its variety of scales, is
the usual choice. The Rockwell F, H, B, and the superficial T scales are generally used for hardness testing of
P/M materials. Heat treated P/M steels are sometimes tested in the Rockwell C scale (Table 9). Although not
widely used, the Rockwell B scale may be combined with a carbide ball for testing hardened parts. Data
scattering is minimized with a Rockwell B 1.59 mm ( in.) diameter ball, and it is useful up to 120 HRB.

Table 9 Common hardness scales used for P/M parts
Material Sintered
hardness scale
Heat treated
hardness scale
Iron HRH, HRB HRB, HRC
Iron-carbon HRB HRB, HRC
Iron-nickel-carbon
HRB HRC
Prealloyed steel HRB HRC
Bronze HRH …
Brass HRH …
Apparent Hardness. In powder metallurgy there are generally two types of hardness specified—apparent
hardness (macrohardness) and microhardness. The microhardness is the hardness of each particle of material,
and the apparent hardness is the hardness of the surface—bridging across many particles and the porosity, too.
Apparent hardness is typically measured according to Metal Powder Industries Federation (MPIF) Standard 43
(Ref 4). The procedure is relatively straightforward and quick. The basics are:
1. Obtain a sample part of adequate thickness and parallel configuration (or, for cylindrical parts, a
correction factor may be used).
2. The sample must be large enough so that the indenter marks from the hardness tester are at least three
indenter diameters from any edge or previous impression.
3. Sand each face of the sample so that no burrs are present (burrs will cause erroneous readings), or be
sure to use a holding fixture that avoids the burrs.
4. Take readings with a properly calibrated hardness tester.
5. Reject obvious outliers and report the average of at least five nonoutliers.
Typically, the outliers are on the low side. The cause of these occasional low readings is a chance happening
that the hardness indenter falls right into a pore.
Microhardness is usually measured according to MPIF Standard 51 (Ref 5). The determination of
microhardness is significantly more difficult than measuring apparent hardness and requires specialized
equipment that many P/M users do not have on-site. The procedure involves:
1. Sectioning the part and making a polished mount for the evaluation.
2. Placing the mount in a special microhardness testing machine.
3. Under magnification, orienting the mount and making a diamond indenter mark precisely over a particle
of the material.
4. Measuring the length of the penetration on the particle and converting this length to a hardness reading.
Microindentation hardness tests of porous materials can best be measured with Knoop or diamond pyramid
hardness indenters at loads of 100 gf or greater. In atomized irons, particles exhibit minimal porosity;
consequently, the Knoop indenter is suitable because it makes a very shallow indentation and is not frequently
disturbed by entering undisclosed pores. Care should be taken in preparing the sample surface. The diamond
pyramid indenter is particularly well suited to irons that contain numerous fine internal pores. Because of its
greater depth of penetration, the diamond pyramid indenter frequently encounters hidden pores. Microhardness
testing and the measurement of effective case depth are covered by MPIF standard 51 (Ref 6).
Cast Irons
Accurate hardness values often are difficult to attain when the material has an inhomogeneous structure and
composition. This applies to the complex metal-carbon structure of cast irons. Conventional hardness
measurements of cast irons thus tend to be lower values than the hardness of the metal portion. This
discrepancy, which is more pronounced in gray iron than in ductile and malleable irons, occurs because
conventional hardness readings are composite values that reflect the hardnesses of both the matrix metal and

soft graphite. Greater variations in hardness results may also occur from the inhomogeneous structure.
Therefore, a Brinell hardness test, by virtue of its indenter size, is preferred to provide more consistent average
hardness values. However, sometimes other scales may be required. For example, when determining the
hardness of small castings, it is often impossible to use a Brinell tester; a Rockwell tester must be used. Fine
grain structure, hard white-iron castings, and chilled rolls may also require the use of other scales, as previously
noted in the section “Forgings, Castings, and Plate Products” in this article.
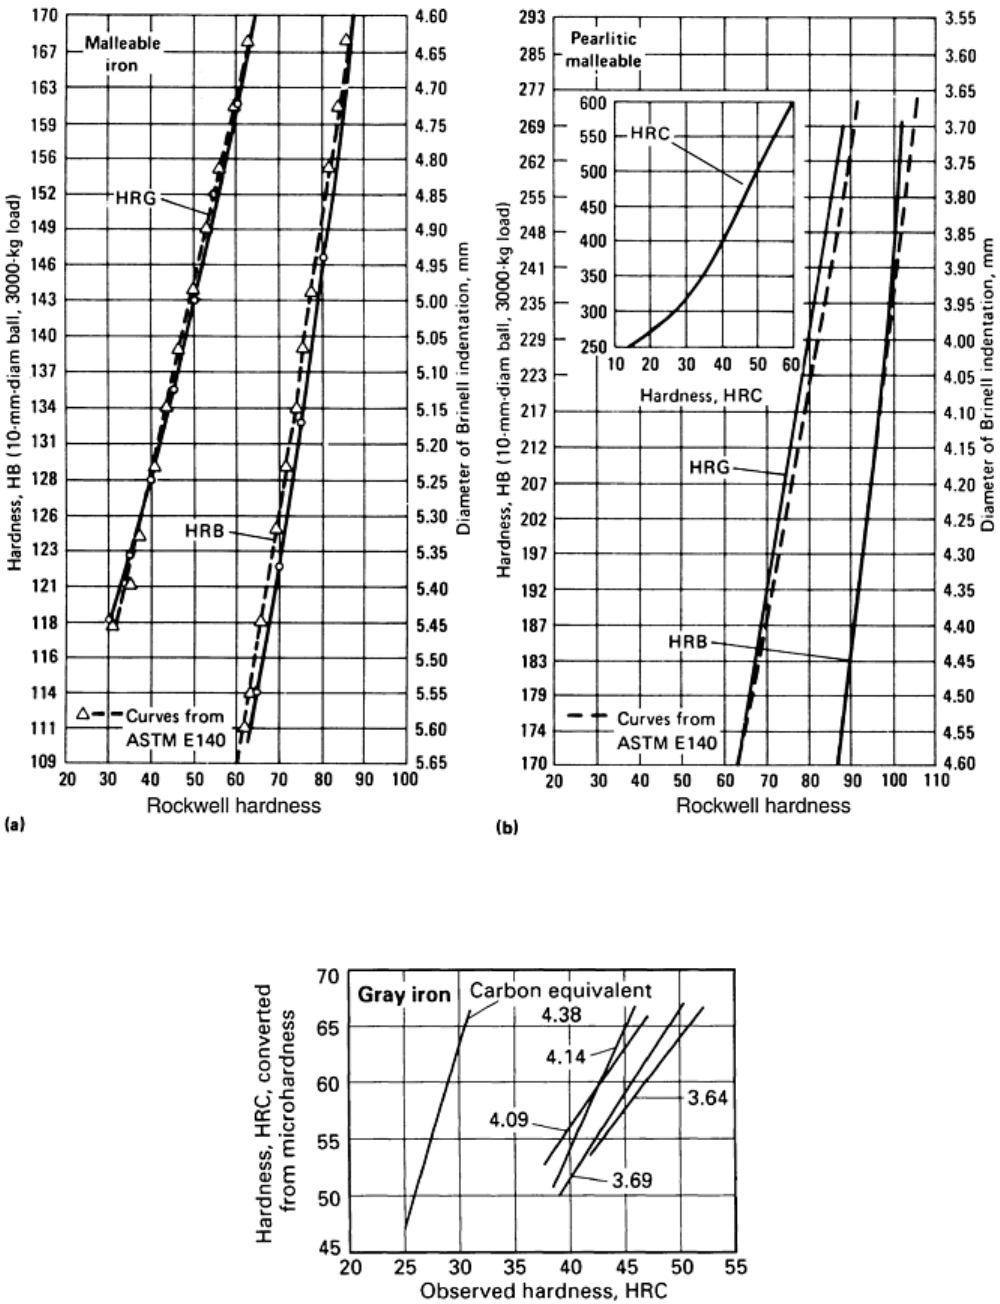
Conversions between different hardness scales have been developed for some types of cast irons. For example,
Fig. 6 shows conversions from Brinell to Rockwell B and G scales for malleable and pearlitic malleable irons,
respectively. Figure 6(b) shows Rockwell C equivalents for Brinell values of pearlitic malleable iron. These
conversions generally are accepted by producers of malleable iron. Reliable hardness conversion for other types
of cast irons, especially gray irons, is more difficult due to the variations in metallurgical conditions. For
example, Fig. 7 shows the relationship between observed Rockwell C readings and those converted from
microhardness values for five gray irons of different carbon equivalents. The wide variation illustrates the need
to know the carbon equivalent of the iron being tested before a conversion chart can be developed. For white
iron, conversions are shown in Table 10.
Table 10 Approximate equivalent hardness numbers of alloyed white irons
Vickers hardnessNo., HV50
Brinell hardness
No.
(a)
, HBW
Rockwell C hardness
No., HRC
1000 (903) 70
980 (886) 69
960 (868) 68
940 (850) 68
920 (833) 67
900 (815) 66
880 (798) 66
860 (780) 65
840 (762) 64
820 (745) 63
800 (727) 62
780 (710) 62
760 (692) 61
740 (674) 60
720 (657) 59
700 (639) 58
680 621 57
660 604 56
640 586 55
620 569 54
600 551 53
580 533 52
560 516 51
540 498 50
520 481 48
500 463 47
480 445 45
460 428 44
440 410 42
420 393 40
400 375 38
380 357 35
Note: Brinell hardness numbers in parentheses are beyond the normal range and are presented for information
only.
(a) 10 mm (0.4 in.) diam tungsten carbide ball; 3000 kgf load.
Source: ASTM E 140 (Ref 6)
Fig. 6 Hardness conversions for malleable iron. (a) Conversion from Brinell to Rockwell
G scales for malleable iron. (b) Conversion from Brinell to Rockwell B, C, and G scales
for pearlitic malleable iron
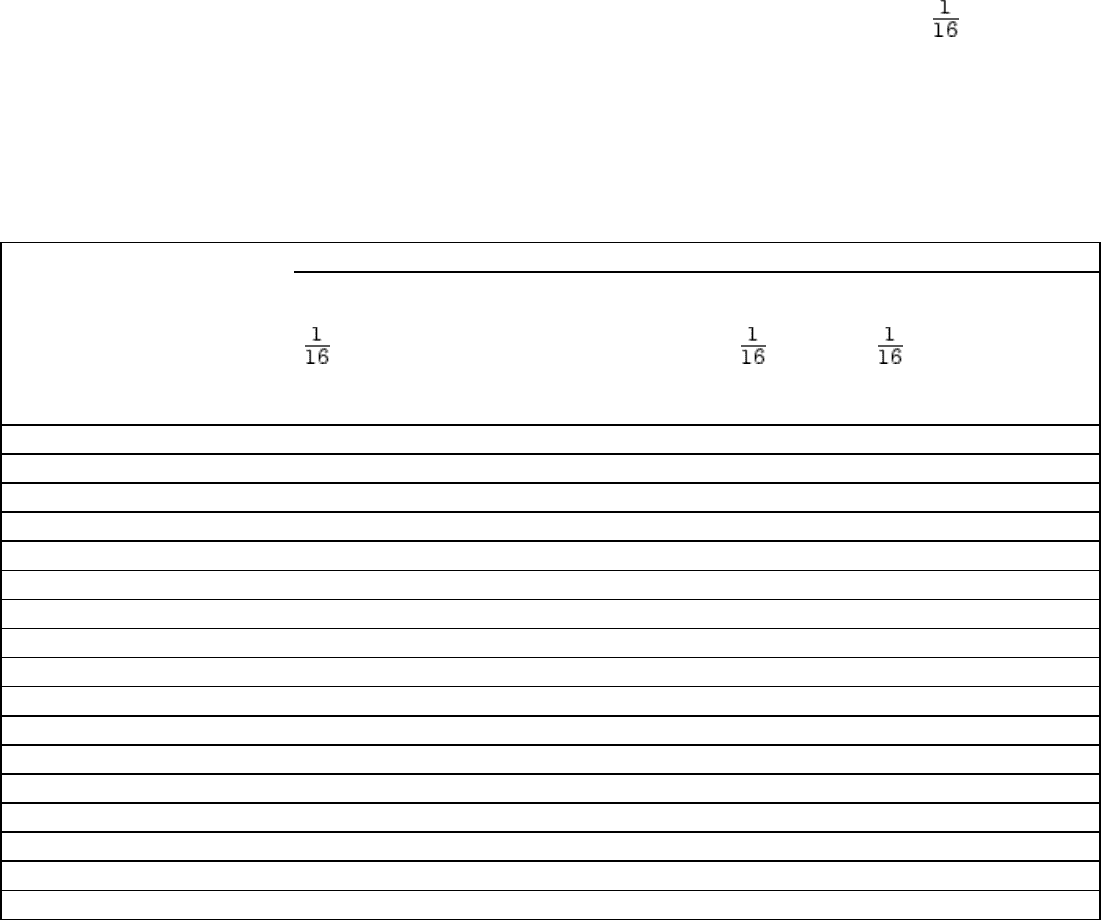
Fig. 7 Relationship between observed and converted hardness values, as influenced by
carbon equivalent, for gray iron containing type 3 graphite
Nonferrous Alloys
To a great extent, the same general guidelines apply to both nonferrous and ferrous materials. Indentation
spacing, proximity to edges, thickness of testing material, and the selection of indenter and load combinations
are all factors that influence hardness readings.
With very few exceptions, nonferrous metals are generally softer than steels and cast irons. Brinell testing and
Rockwell testing with ball indenters under a variety of test loads are most often used. Many of the higher
strength or higher hardness nonferrous metals can be accurately tested with the Brinell test method when the
workpiece is of sufficient thickness and size.
The Brinell test is the preferred test for wrought aluminum alloys and large nonferrous castings, which are
usually tested with the 500 kgf load. Some high-strength alloys such as titanium-base alloys that are phase
transformation or age hardened can be tested with the 3000 kgf load. Diamond indenters are sometimes used—
notably, the Rockwell A scale. Some multiphased cast nonferrous alloys that are too soft for Brinell testing will
require the Rockwell or Vickers test methods. Typical Rockwell scales used for a wide variety of nonferrous
metals and other materials are listed in Table 8. Very small nonferrous metal parts made of extremely thin
sheet, strip, or foil are tested by microindentation methods.
Aluminum and aluminum alloys are tested frequently for hardness to distinguish between annealed, cold-
worked, and heat treated grades. The Rockwell B scale (100 kgf load with a 1.58 mm, or in., steel ball
indenter) generally is suitable in testing grades that have been precipitation hardened to relatively high strength
levels. For softer grades and commercially pure aluminum, hardness testing usually is done with the Rockwell
F, E, and H scales. For hardness testing of thin gages of aluminum, the 15T and 30T scales of the Rockwell
superficial tester are recommended. Approximate hardness conversions for wrought aluminum are listed in
Table 11.
Table 11 Approximate equivalent hardness numbers for wrought aluminum products
Rockwell hardness No. Rockwell superficial hardness No. Brinell
hardness
No., 500 kgf,
1
0 mm ball,
HBS
Vickers
hardness
No.,
15 kgf, HV
B scale,
100 kgf,
in.
ball,
HRB
E scale,
100 kgf,
⅛in.
ball,
HRE
H scale,
60 kgf,
⅛in. ball,
HRH
15T scale,
15
kgf, in.
ball,
HR15T
30T scale,
30
kgf, in.
ball,
HR30T
15W scale,
15
kgf, ⅛in.
ball,
HR15W
160 189 91 … … 89 77 95
155 183 90 … … 89 76 95
150 177 89 … … 89 75 94
145 171 87 … … 88 74 94
140 165 86 … … 88 73 94
135 159 84 … … 87 71 93
130 153 81 … … 87 70 93
125 147 79 … … 86 68 92
120 141 76 101 … 86 67 92
115 135 72 100 … 86 65 91
110 129 69 99 … 85 63 91
105 123 65 98 … 84 61 91
100 117 60 … … 83 59 90
95 111 56 96 … 82 57 90
90 105 51 94 108 81 54 89
85 98 46 91 107 80 52 89
80 92 40 88 106 78 50 88

75 86 34 84 104 76 47 87
70 80 28 80 102 74 44 86
65 74 … 75 100 72 … 85
60 68 … 70 97 70 … 83
55 62 … 65 94 67 … 82
50 56 … 59 91 64 … 80
45 50 … 53 87 62 … 79
40 44 … 46 83 59 … 77
Source: ASTM E 140 (Ref 6)
Copper and Copper Alloys. Because copper alloys vary so widely in hardness, a wide range of indenters and
loads may apply to this family of alloys. Beginning at the top of the range, the precipitation-hardenable alloys
(such s C17000, C17200, and C17300) may be regarded as essentially the same as steel in their hardened
condition because they are generally within the range of 36 to 45 HRC. Therefore, these alloys can be tested
satisfactorily with the Rockwell C scale. For thinner gages, the 15H or 30H scale is used. The Brinell test, using
1500 to 3000 kgf loads, is also appropriate for testing the harder copper alloys. When these alloys are in the
annealed or cold-worked condition, the Rockwell B scale is recommended, or the 15T or 30T scale for very thin
sections. When the indenter is penetrating the test material too deeply with the B scale, a lighter load or larger
ball, such as that used for Rockwell E or F scale, must be used. Approximate hardness conversions for wrought
copper alloys and cartridge brass are listed in Tables 12 and 13, respectively.
