ASM Metals HandBook Vol. 8 - Mechanical Testing and Evaluation
Подождите немного. Документ загружается.


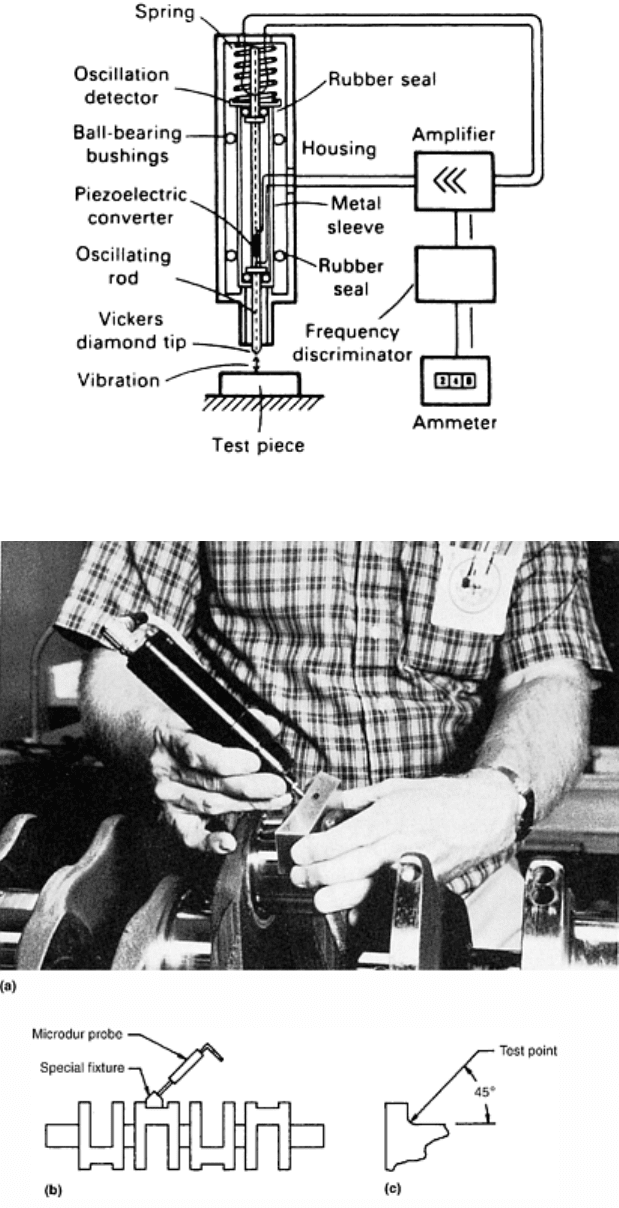
Fig. 8 Components of an ultrasonic hardness tester
Fig. 9 Ultrasonic hardness testing application. (a) Hardness testing of fillet radius on an engine
crankshaft. (b) Probe and special fixture. (c) Test location. Courtesy of Krautkramer Branson
Various types of probes are available, but one popular type has a round, flat end and can be handheld. This type
of instrument is most frequently used on flat workpieces. In one specific instance, a die casting plant was
experiencing problems with heat checking dies. The dies were made from H13 tool steel, quenched and
tempered. On-site hardness tests with an ultrasonic instrument proved that the superficial surface was quite soft
as a result of decarburization, even though Rockwell C readings (actual) were acceptable. The decarburized
layer was thus the cause of heat checking, and corrective measures were applied to the heat treating procedure.
Capabilities of Ultrasonic Microhardness Testing. There are several advantages of the ultrasonic hardness
testing system. With ultrasonic hardness testing, one advantage is the ability to measure the area of indentation
during loading. This differs from conventional microhardness tests, where the indent area is determined after
loading. This conventional method can lead to erroneous hardness values due to elastic recovery on unloading
(see Fig. 1 in the article “Selection and Industrial Applications of Hardness Tests” in this Volume).
As in conventional Vickers and Brinell hardness testing, a single loading force is used. Thus, in ultrasonic
hardness testing, no time is lost in consecutive load application as in Rockwell testing. Because only one test
load is used in ultrasonic testing, sensitive displacement-measuring instruments are not necessary, and rigid
machine frames are not required. In many instances, it is possible to perform the hardness measurement with
ultrasonic testing without clamping or rigidly supporting the test material, which simplifies design and
handling.
Because the sensitivity and resolving power of the ultrasonic instrument can be increased to high levels, it is
possible to measure even the smallest indentation. Hardness profile curves can be obtained by untrained
personnel automatically in a fraction of the time previously required. The digital display virtually eliminates
operator interpretation errors. A memory feature, which will hold the last reading displayed for up to 3 min or
until another reading is taken, facilitates any manual recording of data that is necessary.
A one-point calibration procedure allows the instrument to be set up quickly and easily. The few controls and
adjustments that are required, coupled with a motor-driven probe, facilitate repeatable test results. The
portability of ultrasonic microhardness testers allows hardness evaluations to be taken not only in a laboratory
environment but also on site, in the field, and in any specimen orientation. Inspection of large parts and on-line,
in-process inspection hardness testing is possible.
Typical applications of ultrasonic microhardness testing are in the automotive, nuclear, petrochemical,
aerospace, and machinery manufacturing industries, including finished goods with hardened surfaces, thin case-
hardened parts, thin sheet, strip, coils, platings, and coatings. Often, 100% inspection is possible on critically
stressed components. Small components and difficult-to-access parts can also be tested by the ultrasonic
microhardness method, either in a handheld or a fixtured mode.
Portability is one of the important advantages of ultrasonic microhardness testers. The entire assembly fits into
a convenient carrying case so that it can be easily hand carried. It is, by far, the most portable microhardness
tester and exceeds the Scleroscope in degree of portability. While it is preferable to hold the element in a fixture
and test on a flat surface, there are numerous other positions in which it can be used with a wide variety of
fixtures, or by hand with the probe. Thus, this type of instrument is not only a laboratory instrument but can
also be used as an on-site inspection tool.
Limitations of Ultrasonic Microhardness Testing. The principal disadvantage of the ultrasonic technique is the
lack of an optical system, a characteristic that is, in many cases, an advantage. Reading the indentations by an
optical system is slow and tedious, but it does permit precise location of the indenter in relation to locations on
the test metal. With the ultrasonic system, obtaining readings on microconstituents becomes difficult, because
there is no way to precisely spot the indenter.
This characteristic of ultrasonic testing is, in many instances, a drawback in making hardness traverses on case-
hardened steels. With the conventional Vickers or Knoop systems, common practice is to position the test piece
so that the first indentation is made at some prescribed distance from the edge, such as 0.05 or 0.10 mm (0.002
or 0.004 in.), for example, and then make a series of indentations at established intervals for the distance
required to determine the depth of hard case. With ultrasonic instruments, however, positioning the indenter to
obtain a near-the-edge reading is very difficult. This difficulty can be overcome by taking the first reading at an
appreciable distance from the edge (beyond the point at which the case exists), then working outward at
prescribed intervals toward the edge until a very soft reading occurs, thus indicating that the indenter has
reached the softer mounting material.
Surface Finish Requirements. Regardless of other variations, ultrasonic testing actually constitutes
microhardness testing, and as such, the surface finish of the test material must be taken into account. To
accurately measure any Vickers (diamond pyramid) indentation, it must be clearly defined. Therefore,
requirements for surface finish are stringent. These requirements become increasingly stringent as the load
decreases. Therefore, to accommodate the force used in ultrasonic testing, a metallographic finish is required.
When grinding or polishing, or when both operations are necessary for specimen preparation, care should be
taken to minimize heating and distortion of the specimen surface. Polishing should be performed according to
the procedures outlined in ASTM E 3, “Standard Practice for Preparation of Metallographic Specimens.” When

the specimen to be tested for microhardness will also be used for metallographic examination, mounting
(usually in plastic) and polishing are justified. In other instances, only polishing is required.
When mounting is not necessary, fixtures may be used for holding the specimens or workpieces. Most
workpieces can be adapted to any one of the commonly used fixture types. The fixture must maintain a rigid
surface perpendicular to the indenter. A holding and polishing vise can reduce preparation time because the
specimen can be polished and tested without removing it from the vise. A turntable vise fixture is convenient
for holding mounted specimens.
When ultrasonic readings are taken in the shop on actual workpieces, some means of obtaining a good surface
finish must be used. This goal usually can be accomplished by metallographic emery papers. As a rule, it is
desirable to avoid stock removal on actual parts that are scheduled to undergo hardness testing.
Miscellaneous Hardness Tests
Edward L. Tobolski, Wilson Instrument Division, Instron Corporation
Reference
1. “Standard Hardness Conversion Tables for Metals,” E 140, Annual Book of ASTM Standards, ASTM,
1997
Miscellaneous Hardness Tests
Edward L. Tobolski, Wilson Instrument Division, Instron Corporation
Selected References
• H. Chandler, Ed., Hardness Testing, 2nd Ed., ASM International, 1999
• V.E. Lysaght, Indentation Hardness Testing, Reinhold Publishing, New York, 1949
• V.E. Lysaght and A. DeBellis, Hardness Testing Handbook, American Chain and Cable Co.,
Bridgeport, CT, 1969
• L. Small, Hardness—Theory and Practice, Service Diamond Tool Co., Ferndale, MI, 1960
• “Standard Test Method for Equotip Hardness Testing of Steel Products,” A 956, Annual Book of ASTM
Standards, ASTM, 1998
• “Standard Test Method for Rubber Property—Durometer Hardness,” D 2240, Annual Book of ASTM
Standards, ASTM, 1999
• “Standard Test Method for Rubber Property—International Hardness,” D 1415, Annual Book of ASTM
Standards, ASTM, 1998
• G.V. Vander Voort, Hardness, Metallography: Principles and Practice, McGraw-Hill, 1984 (reprinted
by ASM International, 1999), p 334–409

Selection and Industrial Applications of Hardness
Tests
Andrew Fee, Consultant
Introduction
HARDNESS TESTING includes a variety of techniques that can be generally classified into the following
categories (Ref 1):
• Indentation tests (such as Brinell, Rockwell, Vickers, Knoop, and ultrasonic testing)
• Scratch tests (such as the Mohs test)
• Dynamic tests (such as the Shore test and Hopkinson pressure bar methods)
• Abrasion tests
• Erosion tests
The more common types of hardness tests are the indentation methods, described in previous articles in this
Section. These tests use a variety of indentation loads ranging from 1 gf (microindentation) to 3000 kgf
(Brinell). Low-and high-powered microscopes (Brinell, Vickers, and microindentation) also help measure the
resulting indentation diagonals from which a hardness number is calculated using a formula. In the Rockwell
test, the depth of indentation is measured and converted to a hardness number, which is inversely related to the
depth. Another type of indentation test is ultrasonic hardness testing, which is described further in the article
“Miscellaneous Hardness Tests” in this Volume.
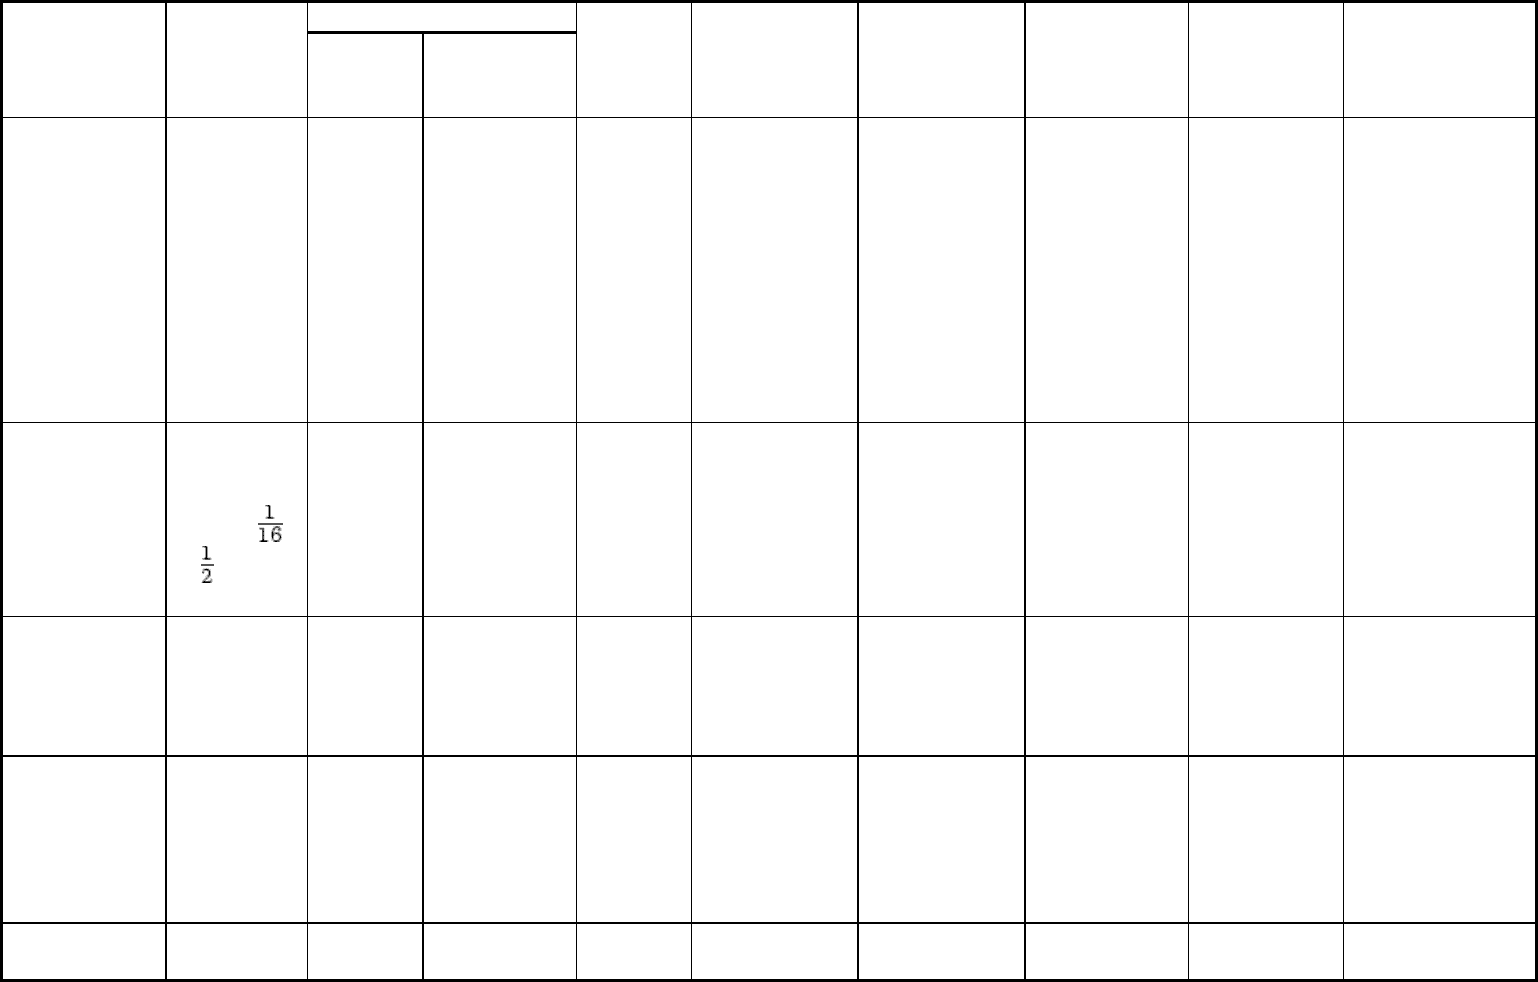
A general comparison of indentation hardness testing methods, including ultrasonic, is given in Table 1. This
article focuses principally on the selection and application of Brinell, Rockwell, Vickers, and Knoop methods.
However, ultrasonic hardness testing is also an important method, because the area of indentation is measured
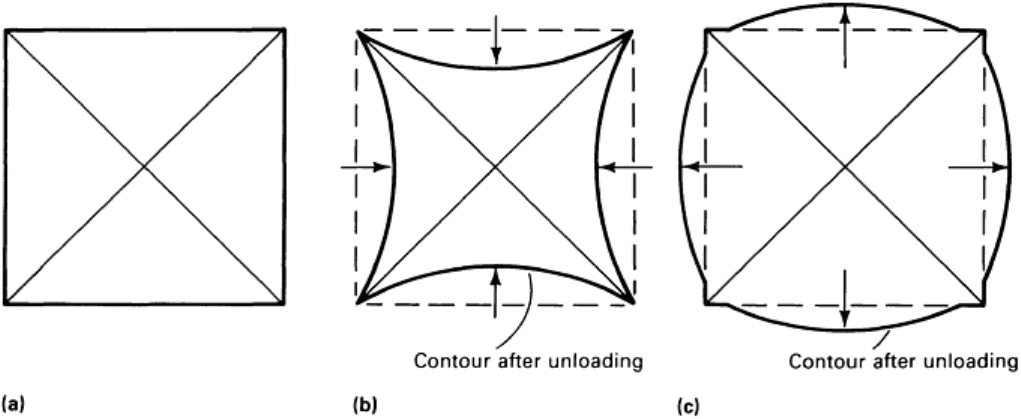
during the application of load. This is an important feature that is not affected by elastic recovery. For example,
a perfect indentation made with a perfect Vickers indenter would be a square (Fig. 1a). However, anomalies
may be observed with a pyramid indenter. The pincushion indentation (Fig. 1b) can occur from the inward
sinking of the metal around the flat faces of the pyramid. This condition is observed with annealed metals and
results in an overestimate of the diagonal length. The barrel-shaped indentation in Fig. 1(c) is found in cold-
worked metals. It results from ridging or piling up of the metal around the faces of the indenter. The diagonal
measurement in this case produces a low value of the contact area so that the hardness numbers are erroneously
high. These types of anomalies can be prevented in ultrasonic testing, which is based on measurement of the
indentation area under load.

Table 1 Comparison of indentation hardness tests
The minimum material thickness for a test is usually taken to be 10 times the indentation depth.
Indent Test Indenter(s)
Diagonal
or
diameter
Depth
Load(s) Method of
measurement
Surface
preparation
Tests per
hour
Applications
Remarks
Brinell Ball
indenter, 10
mm (0.4
in.) or 2.5
mm (0.1
in.) in
diameter
1–7 mm
(0.04–
0.28 in.)
Up to 0.3
mm (0.01
in.) and 1
mm (0.04
in.),
respectively,
with 2.5 mm
(0.1 in.) and
10 mm (0.4
in.) diam
balls
3000 kgf
for
ferrous
materials
down to
100 kgf
for soft
metals
Measure
diameter of
indentation
under
microscope;
read hardness
from tables
Specially
ground area
for
measurements
of diameter
50 with
diameter
measurements
Large forged
and cast parts
Damage to
specimen
minimized by
use of lightly
loaded ball
indenter. Indent
then less than
Rockwell
Rockwell 120°
diamond
cone, 1.6–
13 mm (
to in.)
diam ball
0.1–1.5
mm
(0.004–
0.06 in.)
25–375 μm
(0.1–1.48
μin.)
Major
60–150
kgf
Minor 10
kgf
Read hardness
directly from
meter or
digital display
No preparation
necessary on
many surfaces
300 manually
900
automatically
Forgings,
castings,
roughly
machined
parts
Measure depth
of penetration,
not diameter
Rockwell
superficial
As for
Rockwell
0.1–0.7
mm
(0.004–
0.03 in.)
10–110 μm
(0.04–0.43
μin.)
Major
15–45
kgf
Minor 3
kgf
As for
Rockwell
Machined
surface,
ground
As for
Rockwell
Critical
surfaces of
finished parts
A surface test of
case hardening
and annealing
Vickers 136°
diamond
pyramid
Measure
diagonal,
not
diameter
30–100 μm
(0.12–0.4
μin.)
1–120
kgf
Measure
indent with
low-power
microscope;
read hardness
from tables
Smooth clean
surface,
symmetrical if
not flat
Up to 180 Fine finished
surfaces, thin
specimens
Small indent but
high local
stresses
Microhardness
136°
diamond
40 μm
(0.16
1–4 μm
(0.004–0.016
1 gf-1
kgf
Measure
indentation
Polished
surface
Up to 60 Surface
layers, thin
Laboratory test
used on brittle

indenter or
a Knoop
indenter
μin.) μin.) with low-
power
microscope;
read hardness
from tables
stock, down
to 200 μm
materials or
microstructural
constituents
Ultrasonic 136°
diamond
pyramid
15–50
μm
(0.06–0.2
μin.)
4–18 μm
(0.016–0.07
μin.)
800 gf Direct
readout onto
meter or
digital display
Surface
better than
1.2 μm (0.004
μin.) for
accurate
work.
Otherwise, up
to 3 μm (0.012
μin.)
1200 (limited
by speed at
which
operator can
read display)
Thin stock
and finished
surfaces in
any position
Calibration for
Young's
modulus
necessary, 100%
testing of
finished parts.
Completely
nondestructive

Fig. 1 Distortion of diamond pyramid indentations due to elastic effects. (a) Perfect indentation. (b)
Pincushion indentation due to material sinking in and around the flat faces of the pyramid. (c) Barreled
indentation due to ridging of the material around the faces of the indenter
Reference cited in this section
1. G. Vander Voort, Metallography: Principles and Practice, McGraw-Hill, 1984 (reprinted by ASM
International, 1999), p 340 and 390–393

Selection and Industrial Applications of Hardness Tests
Andrew Fee, Consultant
General Factors
Selection of a hardness test is relatively straightforward if tests are conducted on simple, flat pieces with a minimum
thickness of about 3 mm (0.125 in.) and a homogeneous composition or microstructure. However, in actual applications
there are a number of factors that can have a significant effect on the method selected and the interpretation of test results.
General factors (not necessarily in order of importance) that influence the selection of hardness include:
• Hardness level (and scale limitations)
• Specimen thickness
• Size and shape of the workpiece
• Specimen surface flatness and surface condition
• Indent location
• Production rates
• Type of material being tested
The first six factors in this list are reviewed in this section; the remaining sections focus on selection for specific types of
materials and industrial applications of hardness tests.
Hardness Level and Scale Limitations
It is essential to select a suitable hardness scale for good repeatability of test results. Selection of an appropriate hardness
scale depends on the expected hardness range of the material being tested (which can be determined from its general
composition and processing history or some trial-and-error tests) and on the type of indenter.
Diamond Indenters. There is no upper hardness limit when using the diamond indenters for Rockwell, Vickers, and
Knoop scales. The only limitations are:
• Because Rockwell diamond indenters are not calibrated below 20 HRC, they should not be used when readings fall below
this level.
• When performing Vickers testing, hardness must be high enough so that only the diamond portion of the penetrator is in
contact with the material and not the mounting material.
Brinell Ball Indenters. For hard test materials, the ball indenter of the Brinell tester may undergo deformation. The
standard Brinell ball has been changed from steel to carbide to minimize permanent ball deformation when testing very
hard materials. Even when using a tungsten carbide ball, some elastic or temporary deformation will occur, but the extent
of this is small and will have only a negligible effect on the final results. For the Brinell test, it is recommended that the
test force be of such magnitude that it produces an indentation of 25 to 60% of the ball diameter; that is, the ideal
indentation for a 10 mm (0.4 in.) ball should range from 2.5 to 6.0 mm (0.10 to 0.24 in.) in diameter. The reading error of
the small diameters becomes very critical and the test becomes supersensitive as small changes in hardness create large
diameter changes. For indentation diameters greater than 6.0 mm (0.24 in.) the test becomes insensitive. Recommended
hardness ranges for various forces to produce the above range of indentation diameters (using a 10 mm, or 0.4 in., diam
ball) are:
Rockwell Ball Indenters. Rockwell scales using the ball indenters (e.g., Rockwell B) range from 0 to 130 points;
however, readings above 100 should be avoided, except under special circumstances. The ball indenter can be easily
damaged when testing material above 100; therefore it is necessary to change the ball

Load, kgf
Recommended hardness range, HB
3000 96–600
1500 48–300
500 16–100
frequently to avoid errors.
Between 100 and 130, the extreme tip of the ball is used. Because of the blunt shape of the ball at this location, the
sensitivity of most scales is poor. It should be realized that as the diameter of the ball is increased the sensitivity of the
test decreases. Therefore, it is recommended that the smallest diameter ball should always be used. On the other hand, if
Rockwell B readings are below 50, the indenter may be sinking too deeply for accurate readings, and the load should be
decreased or the size of the indenter should be increased. This also applies to the Rockwell E and F scales.
Specimen Thickness
The material immediately surrounding indentations is cold worked due to the flow of the material caused by the indenting
process. The extent of this cold-work area depends on the material and any previous work hardening of the test specimen.
The depth of material affected also extends down below the indentation. Studies and experiments indicate that the
affected zone is approximately 10 times the indentation depth. Therefore, as a rule it is recommended that the thickness of
the specimen be at least 10 times the depth of indentation with diamond indenters and 15 times with ball indenters. There
should not be any deformation or mark visible on the opposite side of the test specimen after testing, although not all such
markings are indicative of a bad test. Any bulging or marking on the underside of the specimen is commonly referred to
as “anvil effect,” (see the section “Anvil Effect” in this article).
Depth of the Brinell indentation can be calculated from:
where F is the force (in kgf), D is the ball diameter (in mm), and (HB) is the Brinell hardness number. Table 2 is a
summary of minimum thickness requirements for Brinell tests done at 500, 1500, and 3000 kgf with a 10 mm (0.4 in.)
ball; other forces and ball sizes can be calculated using the above formula.
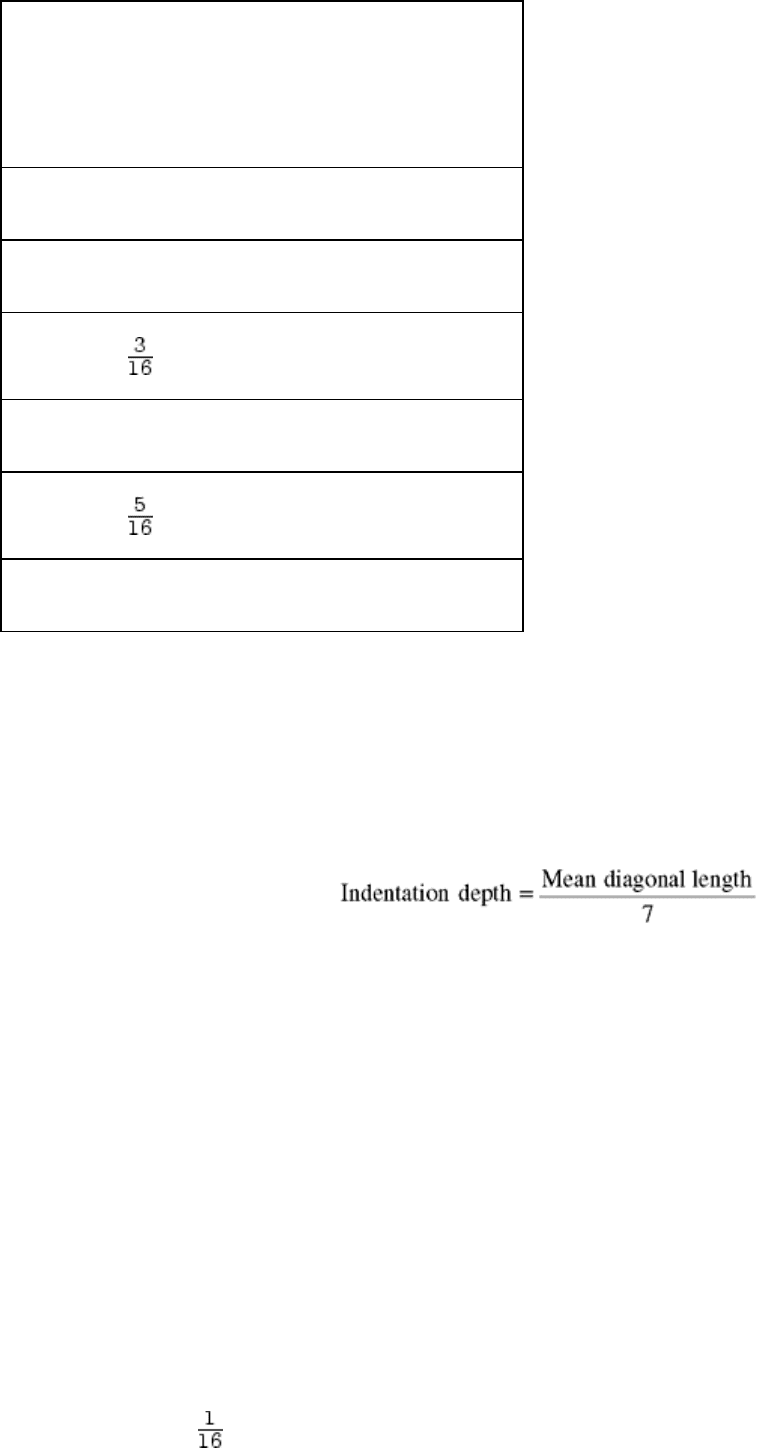
Table 2 Minimum thickness requirements for Brinell hardness tests using a 10 mm (0.4 in.) ball
indenter
Minimum thickness of
specimen
Minimum hardness for which the
Brinell test may safely be made at
indicated load
mm in. 3000 kgf 1500 kgf 500 kgf
1.6
602 301 100

Minimum thickness of
specimen
Minimum hardness for which the
Brinell test may safely be made at
indicated load
mm in. 3000 kgf 1500 kgf 500 kgf
3.2 ⅛ 301 150 50
4.8
201 100 33
6.4 ¼ 150 75 25
8.0
120 60 20
9.6 ⅜ 100 50 17
Microindentation hardness tests are routinely done on thin sheet metals and other small parts of 0.025 mm
(0.001 in.) or less thickness. The Vickers indenter makes an indentation with a depth of one-seventh of the length of the
mean diagonals. The Knoop indenter makes an indentation depth of one-thirtieth of the long diagonal. Generally, the
same ratio (10:1) of depth of indent to thickness follows the same criteria as the other tests. The following examples show
this calculation.
Because the depth of the Vickers test is one-seventh of the diagonal length, the depth calculation is simply as follows:
For example, if the Vickers indentation mean diagonal is measured at 0.074 mm, then the corresponding depth would be
0.0106 mm = 0.074 mm/7. The minimum thickness of the specimen thus should be 0.106 mm = 0.0106 mm × 10.
The depth of the Knoop indenter is one-thirtieth the longitudinal diagonal, and depth is calculated as follows: if the long
diagonal of a Knoop indentation is measured at 136.4 μm, then the indentation depth is 4.55 μm = 136.4 μm/30. The
minimum thickness of the specimen thus should be at minimum 46 μm = 4.55 μm × 10.
Depth of the Rockwell Test Indentations. When using the C, A, or D scales, the Rockwell number is subtracted
from 100 and the result is multiplied by 0.002 mm. Therefore, a reading of 60 HRC indicates an indentation increase in
depth from preliminary to total force:
Depth = (100 - 60) × 0.002 mm = 0.08 mm
When the 1.59 mm ( in.) ball indenter with the B, F, or G scale is used, the hardness number is subtracted from 130;
therefore, for a reading of 80 HRB the depth is determined by:
