ASM Metals HandBook Vol. 17 - Nondestructive Evaluation and Quality Control
Подождите немного. Документ загружается.

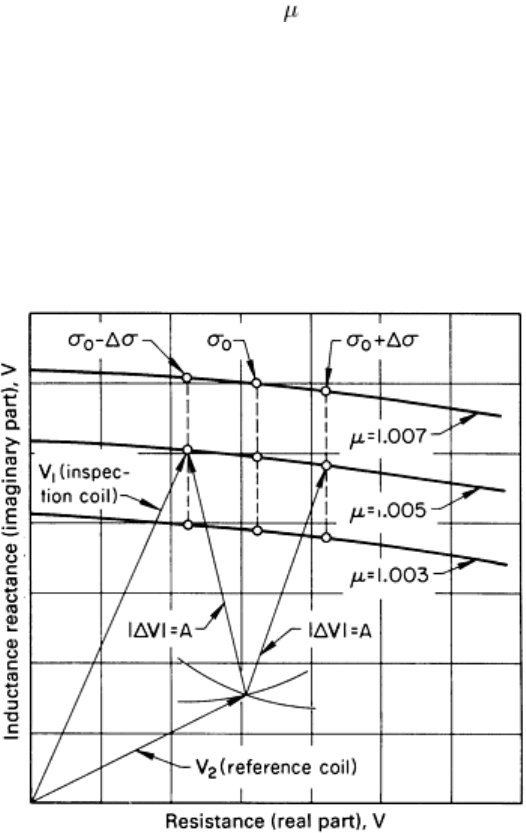
electrical conductivity, are shown. The voltage measured by the voltmeter is the magnitude of the difference between the
voltages of the inspection coil and the reference coil. The voltage of the reference coil can be moved to any point on the
diagram by varying the components in the bridge. For this particular inspection, the intent was to measure the small
permeability changes without being affected by the conductivity changes. If the bridge were balanced at the nominal
value so that the V
2
vector terminated on the point σ= σ
0
and = 1.005, changes in permeability would result in a large
change in the magnitude of the difference voltage, |ΔV|, but a similarly large change would result if the conductivity
varied. However, if the voltage of the reference coil were adjusted equidistant from σ= σ
0
- Δσand σ
0
+ Δσ, then the same
difference voltage will result for both points (for changes in conductivity), but a large change in difference voltage will
result with changes in permeability. If the line between σ
0
- Δσand σ
0
+ Δσis the arc of a circle and if the voltage of the
reference coil is adjusted to the center of that circle, then there will be no change in the magnitude of the difference
voltage as the conductivity varies between σ
0
- Δσto σ
0
+ Δσ, but the voltage will vary with permeability changes. Thus,
the effects of the undesired variable--conductivity--can be reduced or eliminated, and the measurement can be made
sensitive to the desired variable--permeability. This indicates how bridge unbalance is used to eliminate a single undesired
variable.
Fig. 26
Complex voltage diagram for an inspection coil and a reference coil. The voltage inspection values are for
nine different samples, representing three different levels of magnetic permeability and three different levels of
electrical conductivity.
A major limitation of this technique is that there are usually several undesirable variables in any eddy current inspection,
and not all of them can be eliminated completely. Normalized coil impedance variations with conductivity and lift-off
produce changes in impedance that are not parallel to each other. Regardless of where the reference-voltage point is set,
the effects of both variables cannot be eliminated completely. Thus, with a single-frequency inspection, it is preferable to
select operating conditions so that undesired variables are all approximately parallel to each other and perpendicular to the
variable to be measured. A two-frequency inspection would allow for the measurement of four variables.
In some applications, it is more desirable to measure the phase rather than the magnitude of the voltage difference. For
example, Fig. 27 shows how both the magnitude and phase of the unbalance voltage vary as functions of electrical
conductivity and lift-off. Thus, it is possible to measure the phase shift as a function of conductivity and be relatively
insensitive to changes in lift-off, the usual method of phase measurement. On the other hand, magnitude can be measured
as a function of lift-off and can be relatively insensitive to the conductivity. As a result, the unbalanced bridge can
function as a decoding network to separate the two variables.
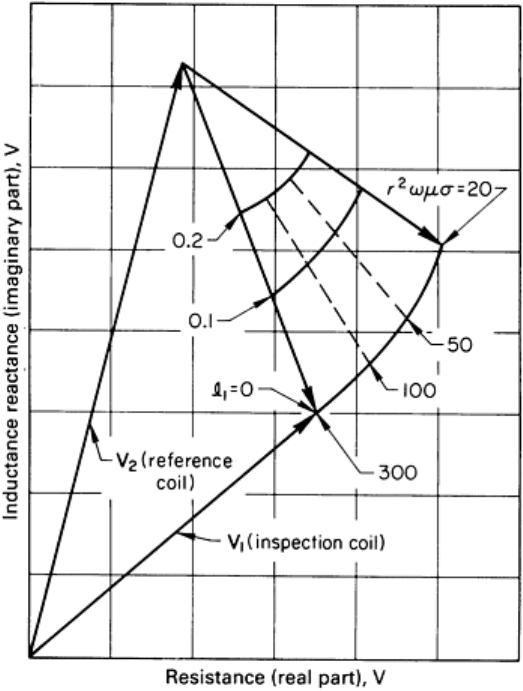
Fig. 27
Complex voltage diagram for inspection coil and reference coil for various electrical conductivities and
lift-off
Temperature stability is also more of a problem when the bridge is unbalanced. When the bridge is balanced and two
corresponding components in opposite legs of the bridge drift with exactly the same temperature coefficient, the bridge
remains in balance. However, when the bridge is operated in an unbalanced mode, the thermal drift in components fails to
cancel by an amount proportional to the amount of unbalance.
Another limitation in bridge unbalance procedures is the difficulty in finding the proper unbalance. There are many poor
choices for setting the reference voltage, and the few good choices are difficult to identify when only one meter is used to
monitor voltage.
Induction Bridge System. Another type of bridge system is an induction bridge, in which the power signal is
transformer-coupled into an inspection coil and a reference coil. In addition, the entire inductance-balance system is
placed in the probe, as shown in Fig. 28. The probe consists of a large transmitter, or driver, coil, and two small detector,
or pickup, coils wound in opposite directions as mirror images to each other. An alternating current is supplied to the
large transmitter coil to generate a magnetic field. If the transmitter coil is not in the vicinity of a conductor, the two
detector coils detect the same field, and because they are wound in opposition to each other, the net signal is zero.
However, if one end of the probe is placed near a metal surface, the field is different at the two ends of the probe, and a
net voltage appears across the two coils. The resultant field is the sum of a transmitted signal, which is present all the
time, and a reflected signal due to the presence of a conductor (the metal surface). The intensity of the transmitted signal
decreases rapidly as the distance between the coil and conductor is increased, and the intensity of the reflected wave does
the same. The detector coil nearer the conductor detects this reflected wave, but the other detector coil (the reference coil)
does not, because the amplitude of the wave has greatly decreased in the distance from the reflecting metal surface to the
rear detector coil.
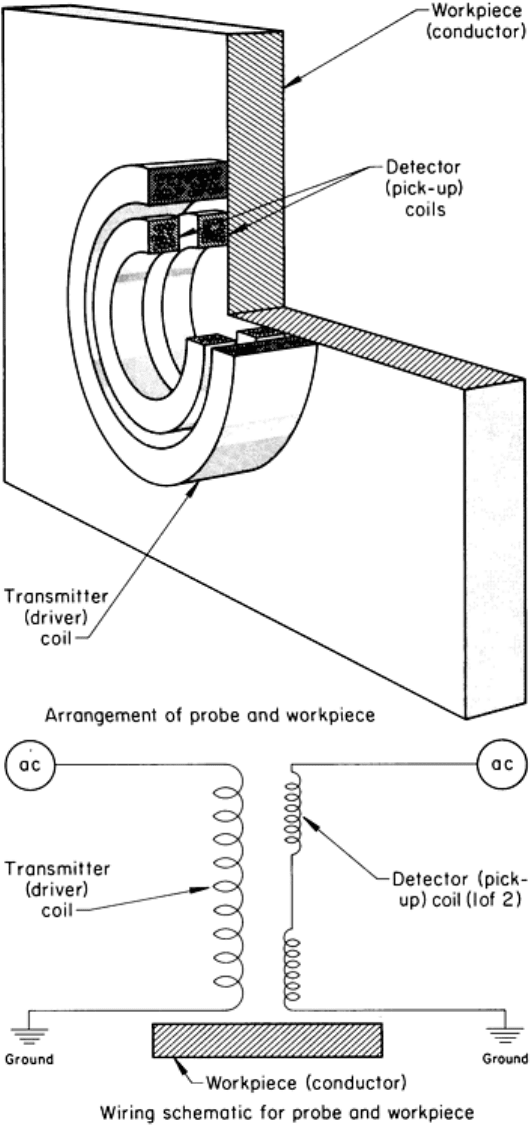
Fig. 28 Reflection (transmit-
receive) probe in place at the surface of a workpiece. Schematic shows how power
signal is transformer-coupled from a transmitter coil into two detector coils--
an inspection coil (at bottom) and
a reference coil (at top).
The magnitude and phase obtained for a system such as this are similar to those in a bridge unbalance system (Fig. 27)
with the reference coil in air. However, the effects of temperature variations of the probe can be completely eliminated
from the phase-shift measurements.
Through Transmission System. Another system of eddy current measurements is the through transmission system,
in which a signal is transmitted from a coil through a metal and detected by a coil on the opposite side of the metal. If the
distance between the two coils is fixed and the driving and detecting circuits have high impedances, the signal detected is

independent of position of the metal provided it remains between them. This type of measurement completely eliminates
lift-off but requires that the two coils be positioned.
Table 2 outlines the types of eddy current instruments commercially available and lists the capabilities. The features listed
are intended to cover all instruments of a given type. No one instrument includes all the features listed for a given type of
instrument; several manufacturers produce each of the types listed. Each manufacturer will provide more precise details
and specifications on instrument type, performance, and coil parameters.
Table 2 Types and capabilities of commercially available eddy current instruments
Type of instrument Frequency
range
Signals
measured
Simultaneous
frequencies
Features
Resistor and single coil 1 kHz to 5
MHz
Magnitude 1
Direct reading, analog meters
Inspection coil and
balance coil, bridge
unbalance
1 kHz to 5
MHz
Magnitude,
phase x
1
, x
r
1
Phase rotation of signals, storage scope, display of
impedance planes, continuously variable frequency, x-y
alarm gates. Portable up to 500 kHz
Inspection coil and
variable impedance,
bridge unbalance
1 kHz to 2
MHz
Magnitude,
phase x
1
, x
r
1
Direct digital readout of thickness and electrical
conductivity, binary coded decimal output
Induction bridge 100 Hz to 50
MHz
Magnitude,
phase
2 Simultaneous measurement of four variables, analog
computers, binary coded decimal output, direct digital
readout of thickness and lift-off. Portable up to 500
kHz
Readout Instrumentation
An important part of an eddy current inspection system is the instrument used for a readout. The readout device can be an
integral part of the system, an interchangeable plug-in module, or a solitary unit connected by cable. The readout
instrument should be of adequate speed, accuracy, and range to meet the inspection requirements of the system.
Frequently, several readout devices are employed in a single inspection system. The more common types of readout, in
order of increasing cost and complexity, are discussed in the following sections.
Alarm lights alert the operator that a test parameter limit has been exceeded.
Sound alarms serve the same purpose as alarm lights, but free the attention of the operator so that he can manipulate
the probe in manual scanning.
Kick-out relays activate a mechanism that automatically rejects or marks a part when a test parameter has been
exceeded.
Analog meters give a continuous reading over an extended range. They are fairly rapid (with a frequency of about 1
Hz), and the scales can be calibrated to read parameters directly. The accuracy of the devices is limited to about 1% of
full scale. They can be used to set the limits on alarm lights, sound alarms, and kick-out relays.
Digital meters provide much greater accuracy and range than analog meters. The chance of operator error is much less
in reading a digital meter, but fast trends are more difficult to interpret. Although many digital meters have binary coded
decimal output they are relatively slow.
X-y plotters can be used to display impedance-plane plots of the eddy current response. They are very helpful in
designing and setting up eddy current bridge unbalance inspections and in discriminating against undesirable variables.
They are also useful in sorting out the results of inspections. They are fairly accurate and provide a permanent copy.

X-y storage oscilloscopes are very similar to x-y plotters but can acquire signals at high speed. However, the signals
have to be processed manually, and the screen can quickly become cluttered with signals. In some instruments, high-
speed x-y gates can be displayed and set on the screen.
Strip chart recorders furnish a fairly accurate ( 1% of full scale) recording at reasonably high speed ( 200 Hz).
However, once on the chart, the data must be read by an operator. Several channels can be recorded simultaneously, and
the record is permanent.
Magnetic tape recorders are fairly accurate and capable of recording at very high speed (1 kHz). Moreover, the data
can be processed by automated techniques.
Computers. The data from several channels can be fed directly to a high-speed computer, either analog or digital, for
online processing. The computer can separate parameters and calculate the variable of interest and significance, catalog
the data, print summaries of the result, and store all data on tape for reference in future scans.
Eddy Current Inspection
Revised by the ASM Committee on Eddy Current Inspection
*
Discontinuities Detectable by Eddy Current Inspection
Basically, any discontinuity that appreciably alters the normal flow of eddy currents can be detected by eddy current
inspection. With the encircling coil inspection of either solid cylinders or tubes, surface discontinuities having a
combination of predominantly longitudinal and radial dimensional components are readily detected. When discontinuities
of the same size are located beneath the surface of the part being inspected at progressively greater depths, they become
increasingly difficult to detect and can be detected at depths greater than 13 mm ( in.) only with special equipment
designed for this purpose.
On the other hand, laminar discontinuities such as can be found in welded tubes may not alter the flow of the eddy
currents enough to be detected unless the discontinuity breaks either the outside or inside surfaces or unless it produces a
discontinuity in the weld from upturned fibers caused by extrusion during welding. A similar difficulty could arise in the
detection of a thin planar discontinuity that is oriented substantially perpendicular to the axis of the cylinder.
Regardless of the limitations, a majority of objectionable discontinuities can be detected by eddy current inspection at
high speed and at low cost. Some of the discontinuities that are readily detected are seams, laps, cracks, slivers, scabs,
pits, slugs, open welds, miswelds, misaligned welds, black or gray oxide weld penetrators, pinholes, hook cracks, and
surface cracks.
Reference Samples. A basic requirement for eddy current inspection is a reliable and consistent means for setting the
sensitivity of the tester to the proper level each time it is used. A standard reference sample must be provided for this
purpose. Without this capability, eddy current inspection would be of little value. In selecting a standard reference
sample, the usual procedure is to select a sample of product that can be run through the inspection system without
producing appreciable indications from the tester. Several samples may have to be run before a suitable one is found; the
suitable one then has reference discontinuities fabricated into it.
The type of reference discontinuities that must be used for a particular application are specified (for example, by the
American Society for Testing and Materials and the American Petroleum Institute). Some of the major considerations in
selecting reference discontinuities are that they:
• Must meet the required specification
• Should be easy to fabricate
• Should be reproducible
• Should be producible in precisely graduated sizes
•
Should produce an indication on the eddy current tester that closely resembles those reduced by the
natural discontinuities
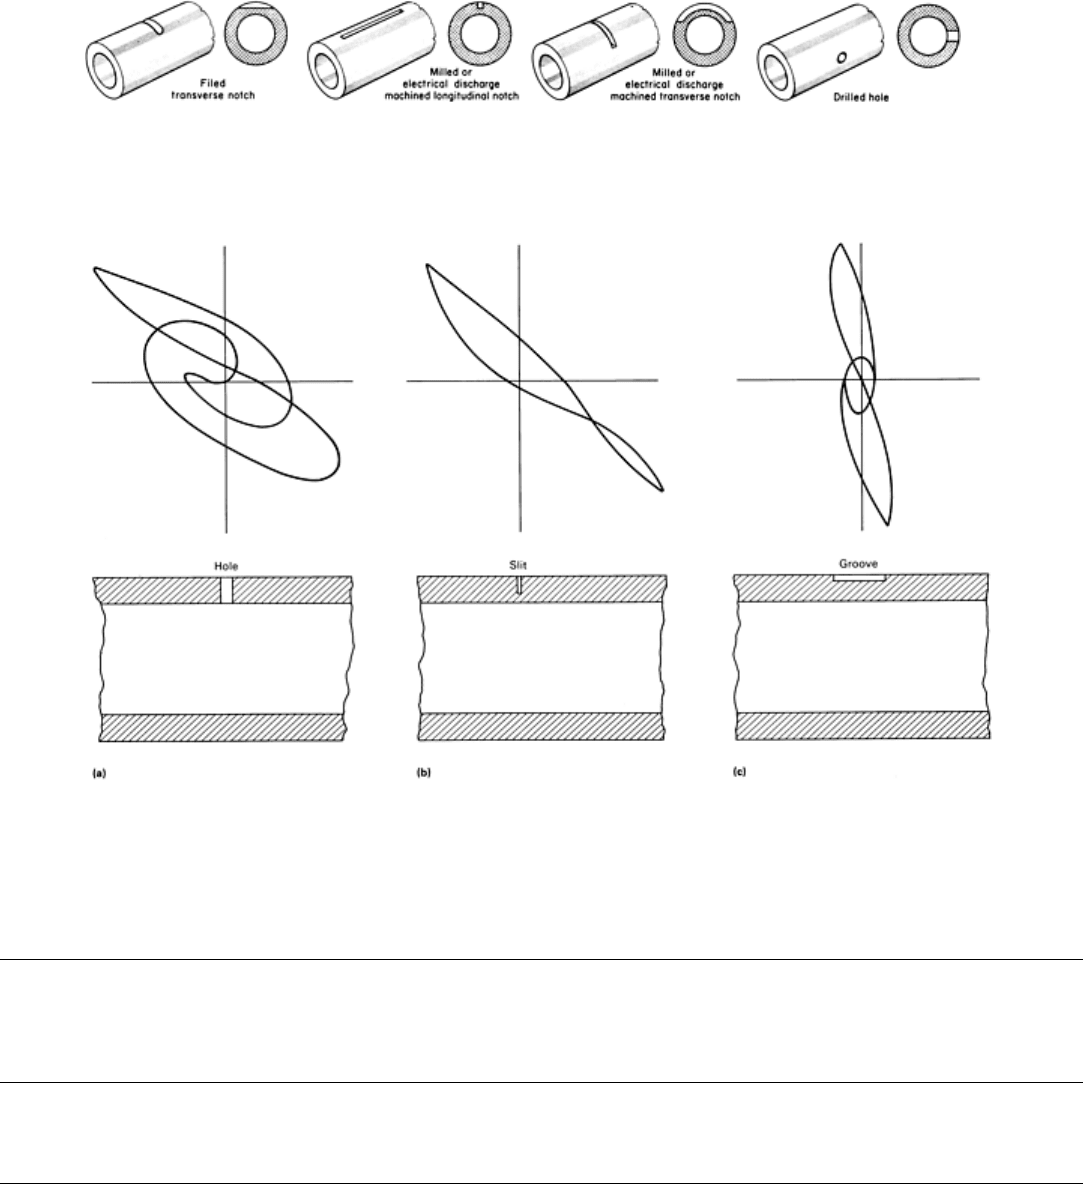
Several discontinuities that have been used for reference standards are shown in Fig. 29. These include a filed transverse
notch, milled or electrical discharge machined longitudinal and transverse notches, and drilled holes. Figure 30 shows the
eddy current signals generated when testing a hollow tube with an internal rotating probe and the discontinuities in the
positions shown.
Fig. 29 Several fabricated discontinuities used as reference standards in eddy current inspection
Fig. 30
Eddy current signals obtained with an internal rotating probe operating at 250 kHz for the discontinuities
shown. (a) 2 mm (0.08 in.) diam radial hole. (b) OD surface narrow slit.
(c) OD surface longitudinal groove.
Source: Ref 4
Reference cited in this section
4.
R. Halmshaw, Nondestructive Testing, Edward Arnold, 1987
Eddy Current Inspection
Revised by the ASM Committee on Eddy Current Inspection
*
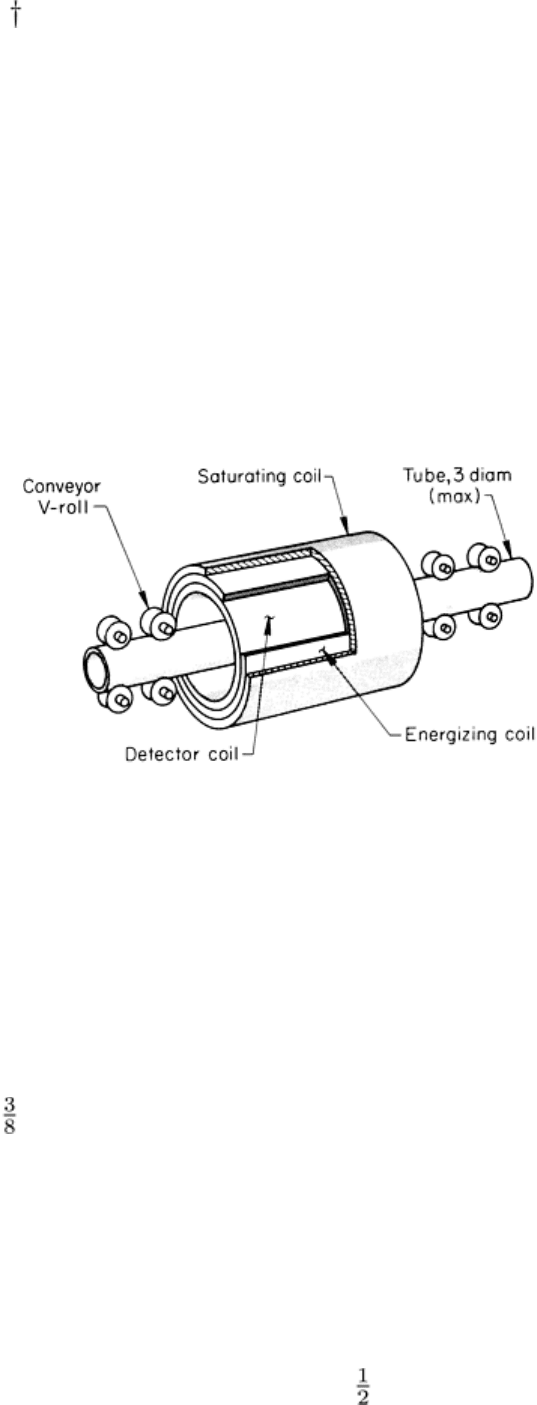
Inspection of Tubes
The techniques used in the eddy current inspection of tubes differ depending on the diameter of the tube. Additional
information is available in the articles "Remote-Field Eddy Current Inspection" and "Tubular Products" in this Volume.
Tube Outside Diameter Under 75 mm (3 in.)
Tubes up to 75 mm (3 in.) in diameter can be eddy current inspected for discontinuities using an external encircling coil.
The diameter limitation is imposed primarily by resolution requirements; that is, as the diameter is increased, the area of a
given discontinuity becomes an increasingly smaller percentage of the total inspected area.
The inspection is performed by passing the tube longitudinally through a concentric coil assembly. The coil assembly
contains an energizing (primary) coil, a differentially wound detector (secondary) coil, and when inspecting
ferromagnetic materials, a magnetic-saturating (direct current) coil. A typical coil assembly and V-roll conveyor for
transporting the tube are shown in Fig. 31.
Fig. 31
Setup and encircling coil components for continuous eddy current inspection of ferromagnetic or
nonferromagnetic tubes up to about 75 mm (3 in.) in diameter
The energizing coil is energized with alternating current at a frequency compatible with the inspection situation (typically
1 kHz for many ferromagnetic products) and induces the eddy currents in the tube. The detector coil monitors the flow of
the induced currents and permits detection of current variations, which are indicative of discontinuities. The saturating
coil, when used, is energized with direct current at high current levels to produce magnetic saturation in the cylinder. This
increases the eddy current penetration and nullifies the effects of magnetic variables that may otherwise degrade the
signal-to-noise ratio of the inspection. Because of the orientation of eddy current flow, this type of inspection is best
suited to the detection of such discontinuities as pits, slugs, seams, laps, and cracks. The inside diameter of the coil
assembly is about 9.5 mm ( in.) larger than the outside diameter of the tube to allow for mechanical or geometric
irregularities. The coil is centered on the tube. The cylinder-conveying mechanism must provide smooth, uniform
propulsion. Throughput speeds of 30 m/min (100 sfm) are common. Because inspection instrumentation is normally
designed for a fixed throughput speed, conveyor speed should be held within about ±10% of nominal.
Encircling coil inspection offers simplicity of application, both electrically (a single inspection coil assembly and circuit
for total wall inspection) and mechanically (no scanning mechanisms required). A disadvantage is that the discontinuity is
located with respect to only its longitudinal, not its circumferential, position. For best results, each inspection system must
be carefully adapted to the product it is to inspect. When this is achieved, a large majority of objectionable discontinuities
can be detected at high speed and at low cost using eddy current methods. Eddy current inspection is excellent for
detecting discontinuities that are below the surface or within 13 mm ( in.) of the surface. The three examples that follow
show typical applications of eddy current inspection on tubes of up to 75 mm (3 in.) outside diameter.
Example 1: Quality Control of Nonferromagnetic Heat Exchanger Tubesheet Rolled
Joints.
General inspection of heat exchanger tubes can be performed with differential or absolute probes. For dimensional
measurements, however, absolute probes are normally used.
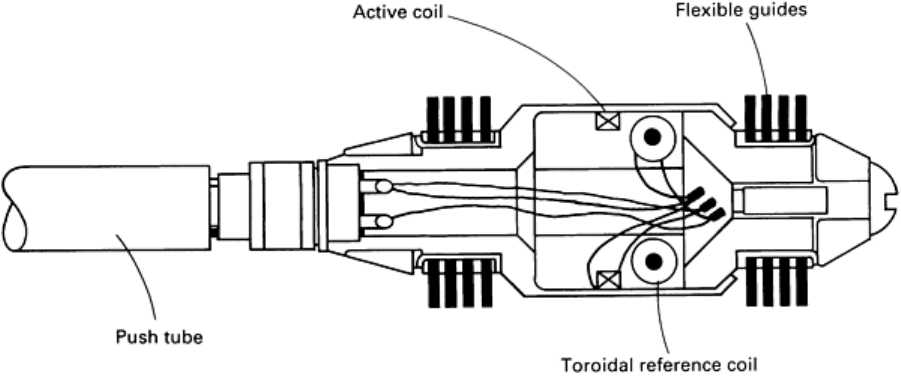
The absolute probe (Fig. 32) uses a toroidal reference coil that matches the characteristic impedance of the test coil within
10% over a wide frequency range, making it effective for multifrequency testing. Good guidance is essential for absolute
probes; flexible wafter guides (Fig. 32) center the probe by peripheral contact, but collapse to cope with diametral
variations and deposits.
Fig. 32
Absolute bobbin probe with flexible wafter guides used for the eddy current evaluation of heat exchanger
tubesheet rolled joints
One application of an absolute probe is the measurement for location of the rolled joint relative to the tubesheet secondary
face and the degree of rolling in tubesheet rolled joints. Heat exchangers and steam generators are normally assembled
with nonferromagnetic tubes rolled into the tubesheet and then welded at the primary tubesheet face. Rolling is primarily
performed to eliminate corrosion-prone crevices. However, if tubes are rolled beyond the tubesheet secondary face, they
are prone to cracking. Therefore, the location and, to a lesser extent, the degree of rolling are critical. These dimensions
cannot be readily measured directly. A dual-frequency eddy current method, using an absolute probe, can provide such
measurements rapidly and reliably. A high test frequency locates tube-expanded regions, and a low frequency
simultaneously locates the tubesheet face. As shown in Fig. 33(a), the tubesheet has an Inconel nonferromagnetic overlay,
which makes detection easier.
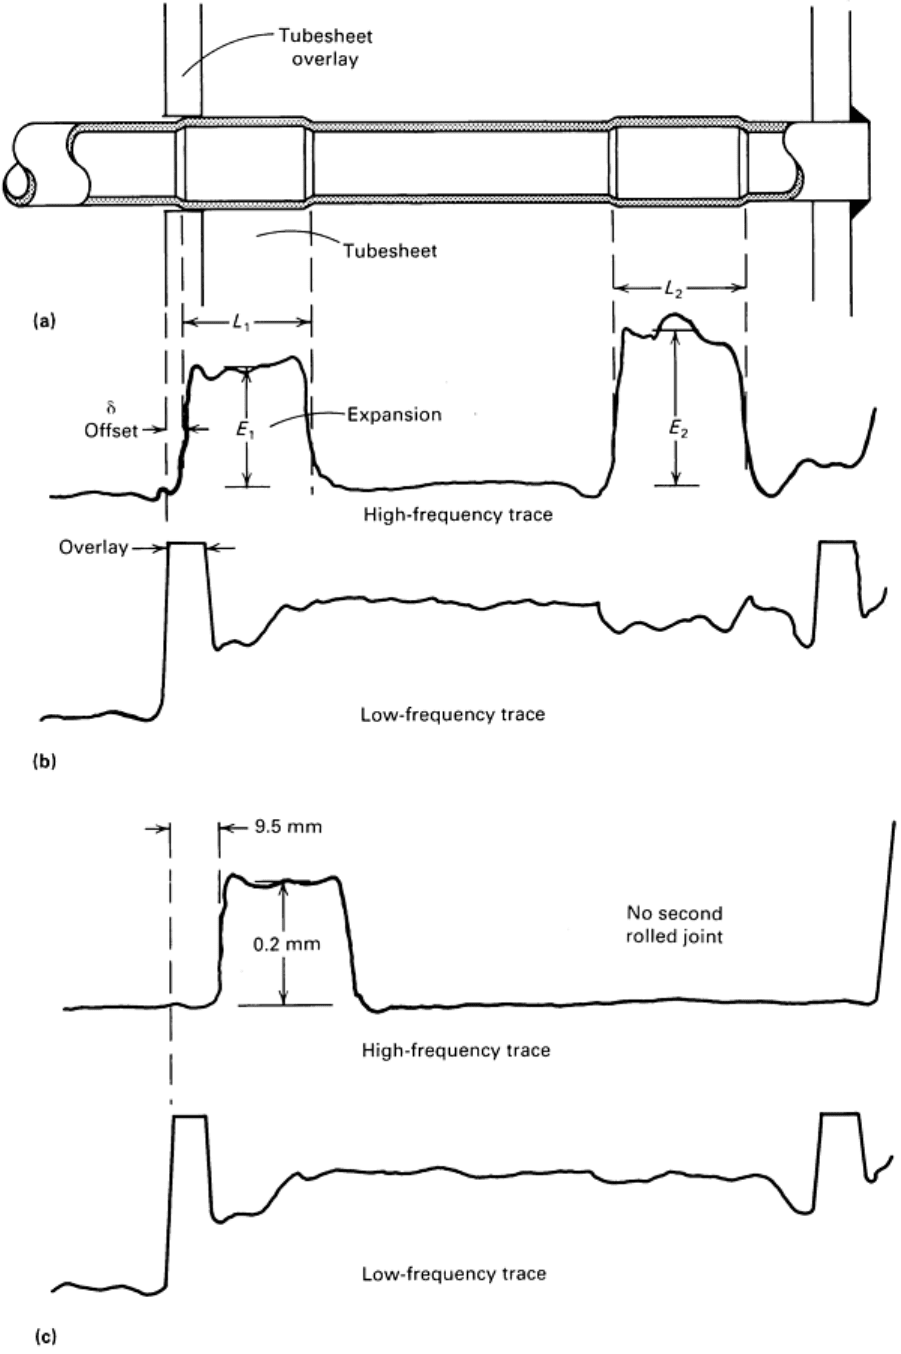
Fig. 33 Dual-
frequency inspection of tubesheet showing tube expansion, offset, and overlay regions of rolled
areas. (a) Cross-
sectional view of tubesheet region. (b) Traces showing typical rolled joints. (c) Traces showing
incorrect tubesheet rolled joints. The high-
frequency (700 kHz) traces display tube expansion dimensions, while

the low-frequency (100 kHz) traces display the tubesheet overlay location.
Strip chart traces of a typical tube are illustrated in Fig. 33(b). One channel displays the high-frequency (700 kHz) signal,
and the other the low-frequency (100 kHz) signal. The location of the rolled joint relative to the tubesheet secondary face
and degree of rolling can be readily determined. Figure 33(c) illustrates the results from an improperly rolled tube, with a
large crevice region (9.5 mm, or in.) and without the secondary rolled joint. Using this technique, the distance between
the rolled joint and tubesheet face can be measured rapidly to an accuracy of ±1 mm (±0.04 in.), and the increase in
diameter of the rolled sections can be measured to better than ± 10%. No surface preparation of the tubing is required
prior to testing.
Example 2: Probes for Inspecting Ferromagnetic Heat Exchanger Tubes.
Ferromagnetic tubes present special problems in eddy current testing. Real defect signals are normally indistinguishable
from those due to normal permeability variations. Permeability values can range from 20 to several hundred in
engineering materials and can vary with composition, cold work, and thermal history. The best remedy for the eddy
current testing of magnetic tubes is magnetic saturation in the vicinity of the test coil(s). If greater than 98% saturation
can be achieved, the signals from defects and other anomalies display the characteristic phase expected for
nonferromagnetic tubes. Unfortunately, not all magnetic tubes can be completely saturated. In these cases, eddy current
inspection reduces to a measurement of magnetic perturbation. A thin, internal surface layer adjacent to the probe
responds to the distortion of the magnetic flux at defects from the saturation field. This classifies the technique with
nondestructive testing methods such as magnetic particle inspection and flux leakage testing (see the articles "Magnetic
Particle Inspection" and "Magnetic Field Testing" in this Volume).
The importance of achieving maximum saturation is illustrated in Fig. 34, which shows results from a type 439 stainless
steel heat exchanger tube. A 15.9 mm (0.625 in.) OD by 1.2 mm ( in.) thick tube with internal and external calibration
defects and shot-peened area was used to compare the performance of various saturation probes. As shown in Fig. 34(a),
the external defects ranged from 20 to 100% deep. Figure 34(b) shows the signals obtained with a probe capable of 98%
saturation; the eddy current signals from the external calibration holes display the characteristic phase rotation with depth
expected for nonmagnetic materials. In contrast, with only 89% saturation the signals are distorted and indistinguishable
from change-in-magnetic-permeability signals (Fig. 34c). From similar tests on other ferromagnetic tubes it has been
found that at least 98% saturation is needed (relative permeability < 1.2) for reliable test results. This requires detailed
optimization of the saturation magnet design for each ferromagnetic tube material.
