ASM Metals HandBook Vol. 17 - Nondestructive Evaluation and Quality Control
Подождите немного. Документ загружается.


•
Theoretical prediction of the change in impedance of eddy current inspection coils caused by small
flaws
• Improved
instrumentation resulting from the development of vacuum tubes, semiconductors, integrated
circuits, and microprocessors which led to better measurement techniques and response to subtle
changes in the flow of eddy currents in metals
• Metallurgy and metals fabrication
• Improved instrumentation, signal display, and recording
Electromagnetic induction was discovered by Faraday in 1831. He found that when the current in a loop of wire was
caused to vary (as by connecting or disconnecting a battery furnishing the current), an electric current was induced in a
second, adjacent loop. This is the effect used in eddy current inspection to cause the eddy currents to flow in the material
being inspected and it is the effect used to monitor these currents.
In 1864, Maxwell presented his classical dissertation on a dynamic theory of the electromagnetic field, which includes a
set of equations bearing his name that describe all large-scale electromagnetic phenomena. These phenomena include the
generation and flow of eddy currents in conductors and the associated electromagnetic fields. Thus, all the
electromagnetic induction effects that are basic to the eddy current inspection method are described in principle by the
equations devised by Maxwell for particular boundary values for practical applications.
In 1879, Hughes, using an eddy current method, detected differences in electrical conductivity, magnetic permeability,
and temperature in metal. However, use of the eddy current method developed slowly, probably because such an
inspection method was not needed and because further development of the electrical theory was necessary before it could
be used for practical applications.
Calculating the flow of induced current in metals was later developed by the solution of Maxwell's equations for specific
boundary conditions for symmetrical configurations. These mathematical techniques were important in the electric power
generation and transmission industry, in induction heating, and in the eddy current method of inspection.
An eddy current instrument for measuring wall thickness was developed by Kranz in the mid-1920s. An example of early
well-documented work that also serves as an introduction to several facets of the eddy current inspection method is that of
Farrow, who pioneered in the development of eddy current systems for the inspection of welded steel tubing. He began
his work in 1930 and by 1935 had progressed to an inspection system that included a separate primary energizing coil,
differential secondary detector coil, and a dc magnetic-saturating solenoid coil. Inspection frequencies used were 500,
1000, and 4000 Hz. Tubing diameters ranged from 6.4 to 85 mm ( to 3 in.). The inspection system also included a
balancing network, a high-frequency amplifiers, a frequency discriminator-demodulator, a low-frequency pulse amplifier,
and a filter. These are the same basic elements that are used in modern systems for eddy current inspection.
Several artificial imperfections in metals were tried for calibrating tests, but by 1935 the small drilled hole had become
the reference standard for all production testing. The drilled hole was selected for the standard because:
• It was relatively easy to produce
• It was reproducible
• It could be produced in precisely graduated sizes
• It produced a signal on the eddy curren
t tester that was similar to that produced by a natural
imperfection
• It was a short imperfection and resembled hard-to-
detect, short natural weld imperfections. Thus, if the
tester could detect the small drilled hole, it would also detect most of the natural weld imperfections
Vigners, Dinger, and Gunn described eddy current type flaw detectors for nonmagnetic metals in 1942, and in the early
1940s, Förster and Zuschlag developed eddy current inspection instruments. Numerous versions of eddy current
inspection equipment are currently available commercially. Some of this equipment is useful only for exploratory
inspection or for inspecting parts of simple shape. However, specially designed equipment is extensively used in the
inspection of production quantities of metal sheet, rod, pipe, and tubing.

Eddy Current Inspection
Revised by the ASM Committee on Eddy Current Inspection
*
Principles of Operation
The eddy current method of inspection and the induction heating technique that is used for metal heating, induction
hardening, and tempering have several similarities. For example, both are dependent on the principles of electromagnetic
induction for inducing eddy currents within a part placed within or adjacent to one or more induction coils. The heating is
a result of I
2
R losses caused by the flow of eddy currents in the part. Changes in coupling between the induction coils and
the part being inspected and changes in the electrical characteristics of the part cause variations in the loading and tuning
of the generator.
The induction heating system is operated at high power levels to produce the desired heating rate. In contrast, the system
used in eddy current inspection is usually operated at very low power levels to minimize the heating losses and
temperature changes. Also, in the eddy current system, electrical-loading changes caused by variations in the part being
inspected, such as those caused by the presence of flaws or dimensional changes, are monitored by electronic circuits. In
both eddy current inspection and induction heating, the selection of operating frequency is largely governed by skin effect
(see the section "Operating Variables" in this article). This effect causes the eddy currents to be concentrated toward the
surfaces adjacent to the coils carrying currents that induce them. Skin effect becomes more pronounced with increase in
frequency.
The coils used in eddy current inspection differ from those used in induction heating because of the differences in power
level and resolution requirements, which necessitate special inspection coil arrangements to facilitate the monitoring of
the electromagnetic field in the vicinity of the part being inspected.
Functions of a Basic System. The part to be inspected is placed within or adjacent to an electric coil in which an
alternating current is flowing. As shown in Fig. 1, this alternating current, called the exciting current, causes eddy currents
to flow in the part as a result of electromagnetic induction. These currents flow within closed loops in the part, and their
magnitude and timing (or phase) depend on:
• The original or primary field established by the exciting currents
• The electrical properties of the part
• The electromagnetic fields established by currents flowing within the part
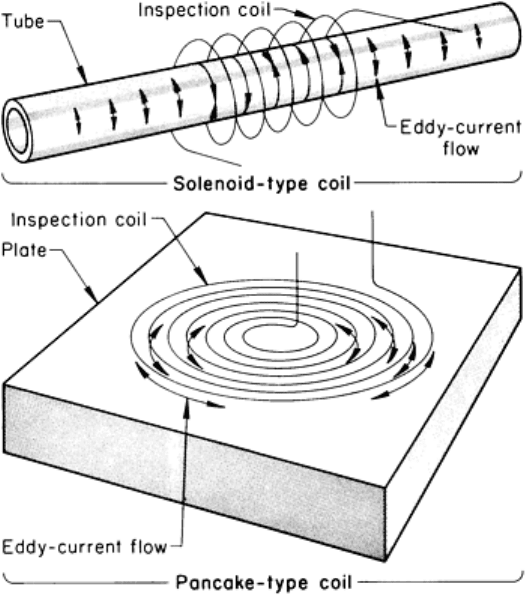
Fig. 1
Two common types of inspection coils and the patterns of eddy current flow generated by the exciting
current in the coils. Solenoid-type coil is applied to cylindrical or tubular parts; pancake-
type coil, to a flat
surface.
The electromagnetic field in the region in the part and surrounding the part depends on both the exciting current from the
coil and the eddy currents flowing in the part. The flow of eddy currents in the part depends on:
• The electrical characteristics of the part
• The presence or absence of flaws or other discontinuities in the part
• The total electromagnetic field within the part
The change in flow of eddy currents caused by the presence of a crack in a pipe is shown in Fig. 2. The pipe travels along
the length of the inspection coil as shown in Fig. 2. In section A-A in Fig. 2, no crack is present and the eddy current flow
is symmetrical. In section B-B in Fig. 2, where a crack is present, the eddy current flow is impeded and changed in
direction, causing significant changes in the associated electromagnetic field. From Fig. 2 it is seen that the
electromagnetic field surrounding a part depends partly on the properties and characteristics of the part. Finally, the
condition of the part can be monitored by observing the effect of the resulting field on the electrical characteristics of the
exciting coil, such as its electrical impedance, induced voltage, or induced currents. Alternatively, the effect of the
electromagnetic field can be monitored by observing the induced voltage in one or more other coils placed within the field
near the part being monitored.
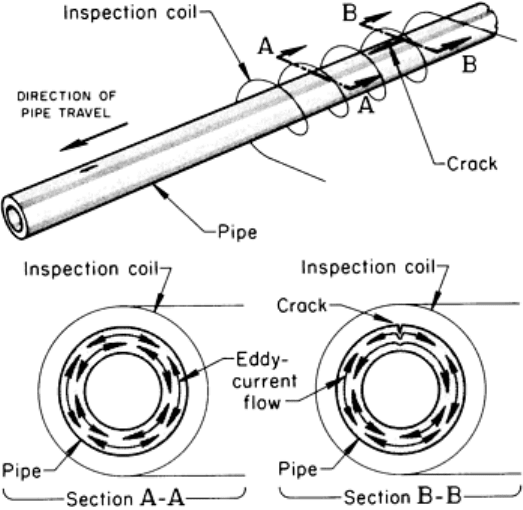
Fig. 2 Effect of a crack on the pattern of eddy current flow in a pipe
Each and all of these changes can have an effect on the exciting coil or other coil or coils used for sensing the
electromagnetic field adjacent to a part. The effects most often used to monitor the condition of the part being inspected
are the electrical impedance of the coil or the induced voltage of either the exciting coil or other adjacent coil or coils.
Eddy current systems vary in complexity depending on individual inspection requirements. However, most systems
provide for the following functions:
• Excitation of the inspection coil
• Modulation of the inspection coil output signal by the part being inspected
• Processing of the inspection coil signal prior to amplification
• Amplification of the inspection coil signals
• Detection or demodulation of the inspection coil signal, usually accom
panied by some analysis or
discrimination of signals
•
Display of signals on a meter, an oscilloscope, an oscillograph, or a strip chart recorder; or recording of
signal data on magnetic tape or other recording media
• Handling of the part being inspected an
d support of the inspection coil assembly or the manipulation of
the coil adjacent to the part being inspected
Elements of a typical inspection system are shown schematically in Fig. 3. The particular elements in Fig. 3 are
for a system developed to inspect bar or tubing. The generator supplies excitation current to the inspection coil and a
synchronizing signal to the phase shifter, which provides switching signals for the detector. The loading of the inspection
coil by the part being inspected modulates the electromagnetic field of the coil. This causes changes in the amplitude and
phase of the inspection coil voltage output.
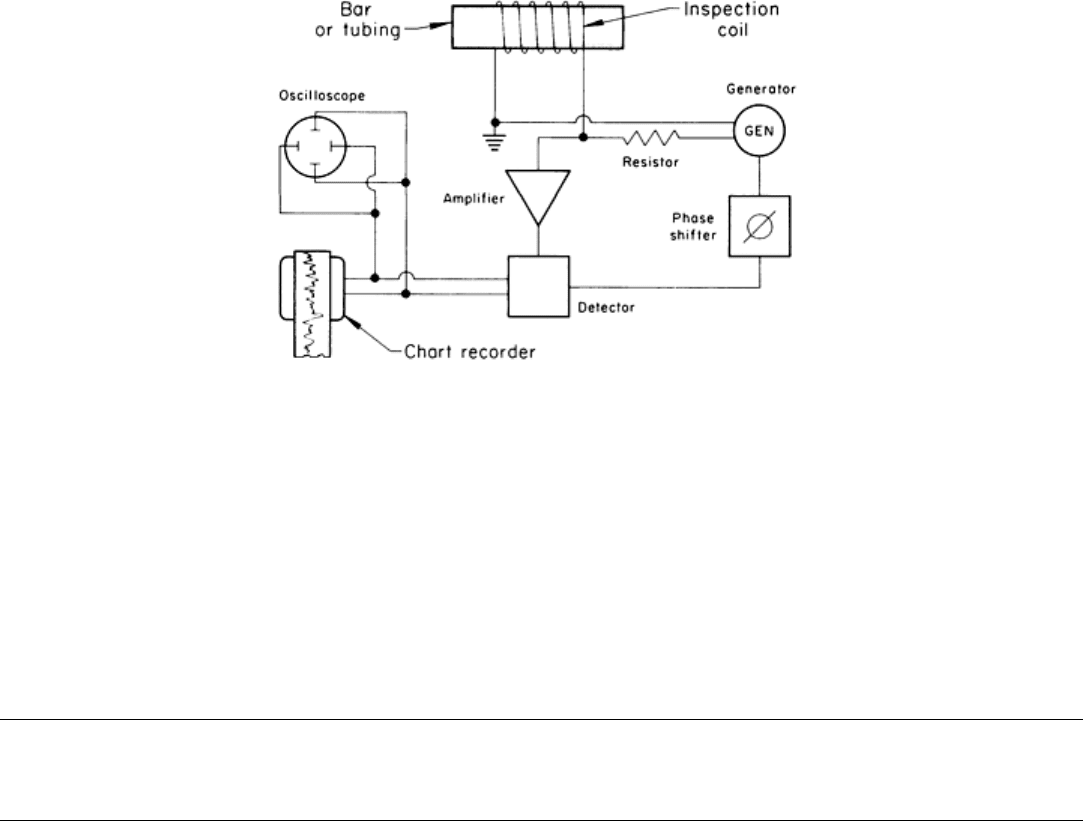
Fig. 3 Principal elements of a typical system for eddy current inspection of bar or tubing. See description in text.
The output of the inspection coil is fed to the amplifier and detected or demodulated by the detector. The demodulated
output signal, after some further filtering and analyzing, is then displayed on an oscilloscope or a chart recorder. The
displayed signals, having been detected or demodulated, vary at a much slower rate, depending on:
• The speed at which the part is fed through an inspection coil
• The speed with which the inspection coil is caused to scan past the part being inspected
Eddy Current Inspection
Revised by the ASM Committee on Eddy Current Inspection
*
Operating Variables
The principal operating variables encountered in eddy current inspection include coil impedance, electrical conductivity,
magnetic permeability, lift-off and fill factors, edge effect, and skin effect. Each of these variables will be discussed in
this section.
Coil Impedance
When direct current is flowing in a coil, the magnetic field reaches a constant level, and the electrical resistance of the
wire is the only limitation to current flow. However, when alternating current is flowing in a coil, two limitations are
imposed:
• The ac resistance of the wire, R
• A quantity known as inductive reactance, X
L
The ac resistance of an isolated or empty coil operating at low frequencies or having a small wire diameter is very nearly
the same as the dc resistance of the wire of the coil. The ratio of ac resistance to dc resistance increases as either the
frequency or the wire diameter increases. In the discussion of eddy current principles, the resistance of the coil wire is
often ignored, because it is nearly constant. It varies mainly with wire temperature and the frequency and spatial
distribution of the magnetic field threading the coil.
Inductive reactance, X
L
, is the combined effect of coil inductance and test frequency and is expressed in ohms. Total
resistance to the flow of alternating current in a coil is called impedance, Z, and comprises both ac resistance, R, and
inductive reactance, X
L
. The impedance can be expressed as Z = , where X
L
= 2πfL
0
, f is the test frequency
(in Hertz), and L
0
is the coil inductance (in henrys).
When a metal part is placed adjacent to or within a test coil, the electromagnetic field threading the coil is changed as a
result of eddy current flow in the test object. In general, both the ac resistance and the inductive reactance of the coil are
affected. The resistance of the loaded coil consists of two components, namely, the ac resistance of the coil wire and the
apparent, or coupled, resistance caused by the presence of the test object. Changes in these components reflect conditions
within the test object.
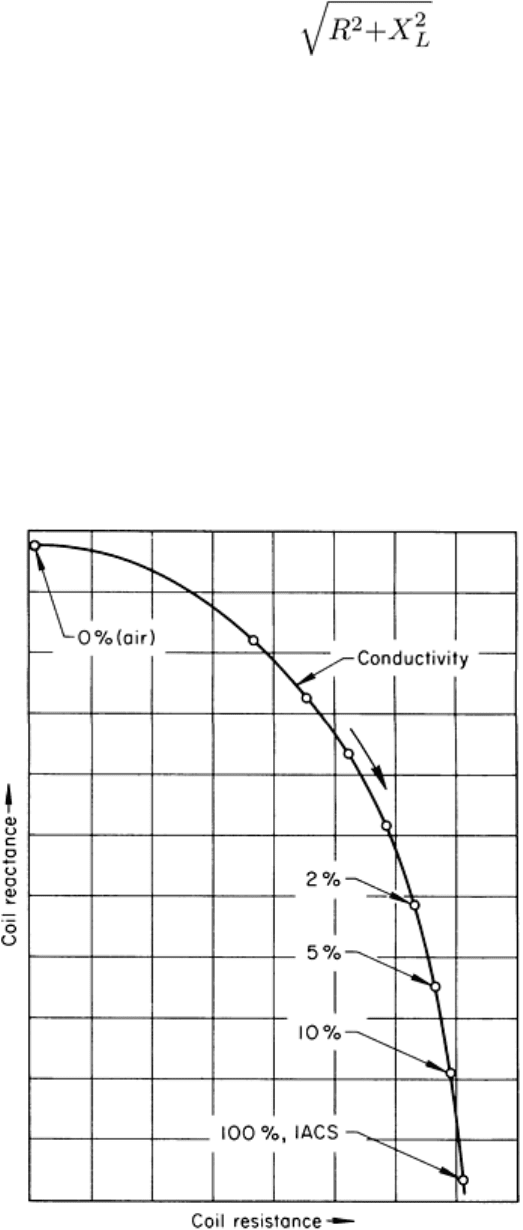
Impedance is usually plotted on an impedance-plane diagram. In the diagram, resistance is plotted along one axis and
inductive reactance along the other axis. Because each specific condition in the material being inspected may result in a
specific coil impedance, each condition may correspond to a particular point on the impedance-plane diagram. For
example, if a coil were placed sequentially on a series of thick pieces of metal, each with a different resistivity, each piece
would cause a different coil impedance and would correspond to a different point on a locus in the impedance plane. The
curve generated might resemble that shown in Fig. 4, which is based on International Annealed Copper Standard (IACS)
conductivity ratings. Other curves would be generated for other material variables, such as section thickness and types of
surface flaws.
Fig. 4 Typical impedance-
plane diagram derived by placing an inspection coil sequentially on a series of thick
pieces of metal, each with a different IACS electrical resistance or conductivity rating.
The inspection frequency
was 100 kHz.
Impedance Components. Figure 5(a) shows a simplified equivalent circuit of an inspection coil and the part being
inspected. The coil is assumed to have inductance, L
0
, and negligible resistance. The part being inspected consists of a
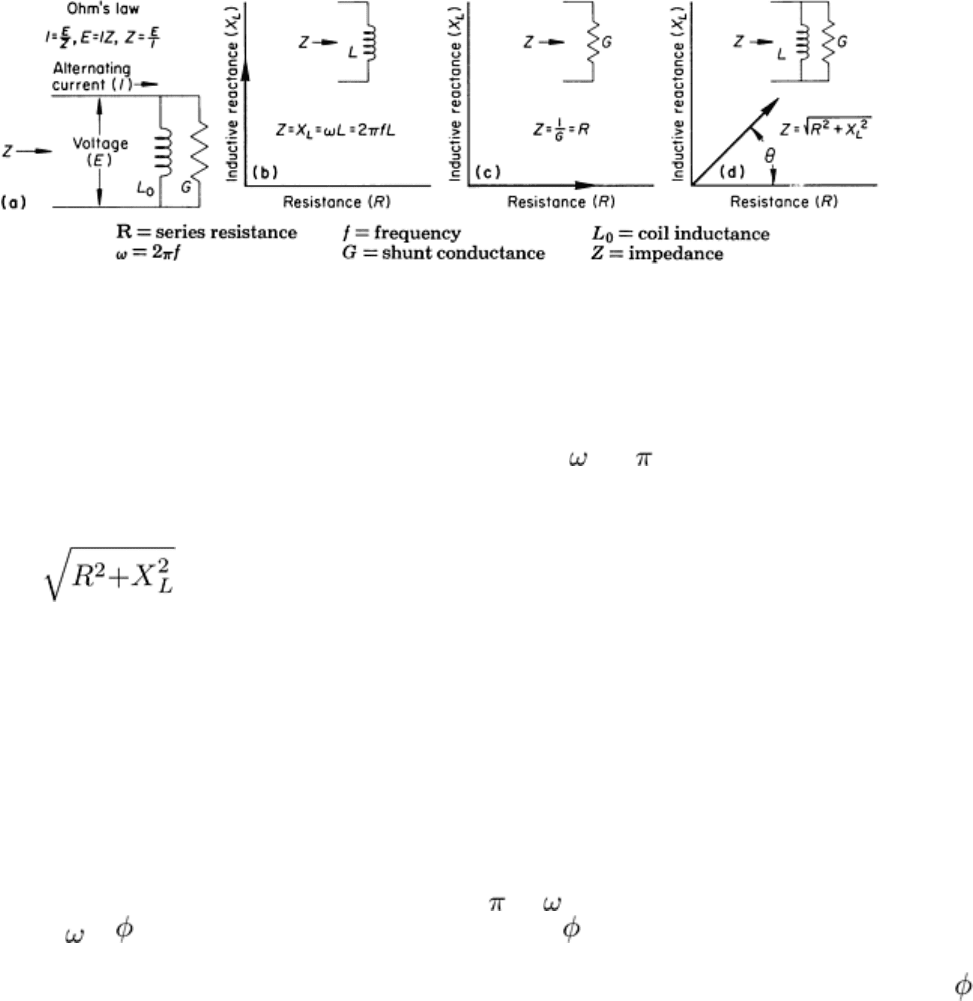
very thin tube having shunt conductance, G, closely coupled to the coil. When an alternating current is caused to flow into
the system under steady-state conditions, some energy is stored in the system and returned to the generator each cycle and
some energy is dissipated or lost as heat each cycle. The inductive-reactance component, X
L
, of the impedance, Z, of the
circuit is proportional to the energy stored per cycle, and the resistance component, R, of the impedance is proportional to
the energy dissipated per cycle. The impedance, Z, is equal to the complex ratio of the applied voltage, E, to the current, I,
in accordance with Ohm's law. The term complex is used to indicate that, in general, the alternating current and voltage
do not have the same phase angle.
Fig. 5
Simplified equivalent circuit (a) of an eddy current inspection coil and the part being inspected. (b) to (d)
Three impedance diagrams for three conditions of the equivalent circuit. See text for explanation.
Figures 5(b) to (d) show three impedance diagrams for three conditions of the equivalent circuit in Fig. 5(a). When only
the coil is present, the circuit impedance is purely reactive; that is, Z = X
L
= L = 2 fL, as shown in Fig. 5(b). When only
the conductance of this equivalent circuit is present (a hypothetical condition for an actual combination of inspection coil
and part being inspected), the impedance is purely resistive; that is, Z = 1/G = R, as shown in Fig. 5(c). When both coil
and conductance are connected, the impedance has both reactive and resistive components in the general instance, and the
impedance Z = , as shown in Fig. 5(d). Here, R is the series resistance and X
L
is the series reactance. An
angle, θ, is associated with the impedance, Z. This angle is a function of the ratio of the two components of the
impedance, R and X
L
. In Fig. 5(d), this angle, θ, is about 45°.
Points and loci on impedance-plane diagrams can be displayed using phasor representation because of the close
relationship between the impedance diagrams and the phasor diagrams. In a given circuit with input impedance Z,
applying an impressed fixed current I, will produce a signal voltage E in accordance with Ohm's law (E = IZ). This signal
voltage can be displayed as a phasor. With I fixed, the signal voltage E is directly proportional to the impedance Z. Thus,
the impedance plane can be readily displayed using the phasor technique.
Phasor Representation of Sinusoids. One method often used in signal analysis and in the representation of eddy
current inspection signals is the phasor method schematically shown in Fig. 6. In Fig. 6(a) are shown three vectors, A, B,
and C, which are rotating counterclockwise with radian velocity 2 ft = t. The equations that describe these vectors are
of the form K sin ( t + ), where K is a constant equal to A, B, or C and is the electrical phase angle. These equations
are plotted in Fig. 6(b). The length of the vectors A, B, and C determine the amplitude of the sinusoids generated in Fig.
6(b). The physical angle between the vectors A and B, or between A and C, determines the electrical phase angle, ,
between sinusoids. In Fig. 6(b), these angles are +90° and -45°, respectively.
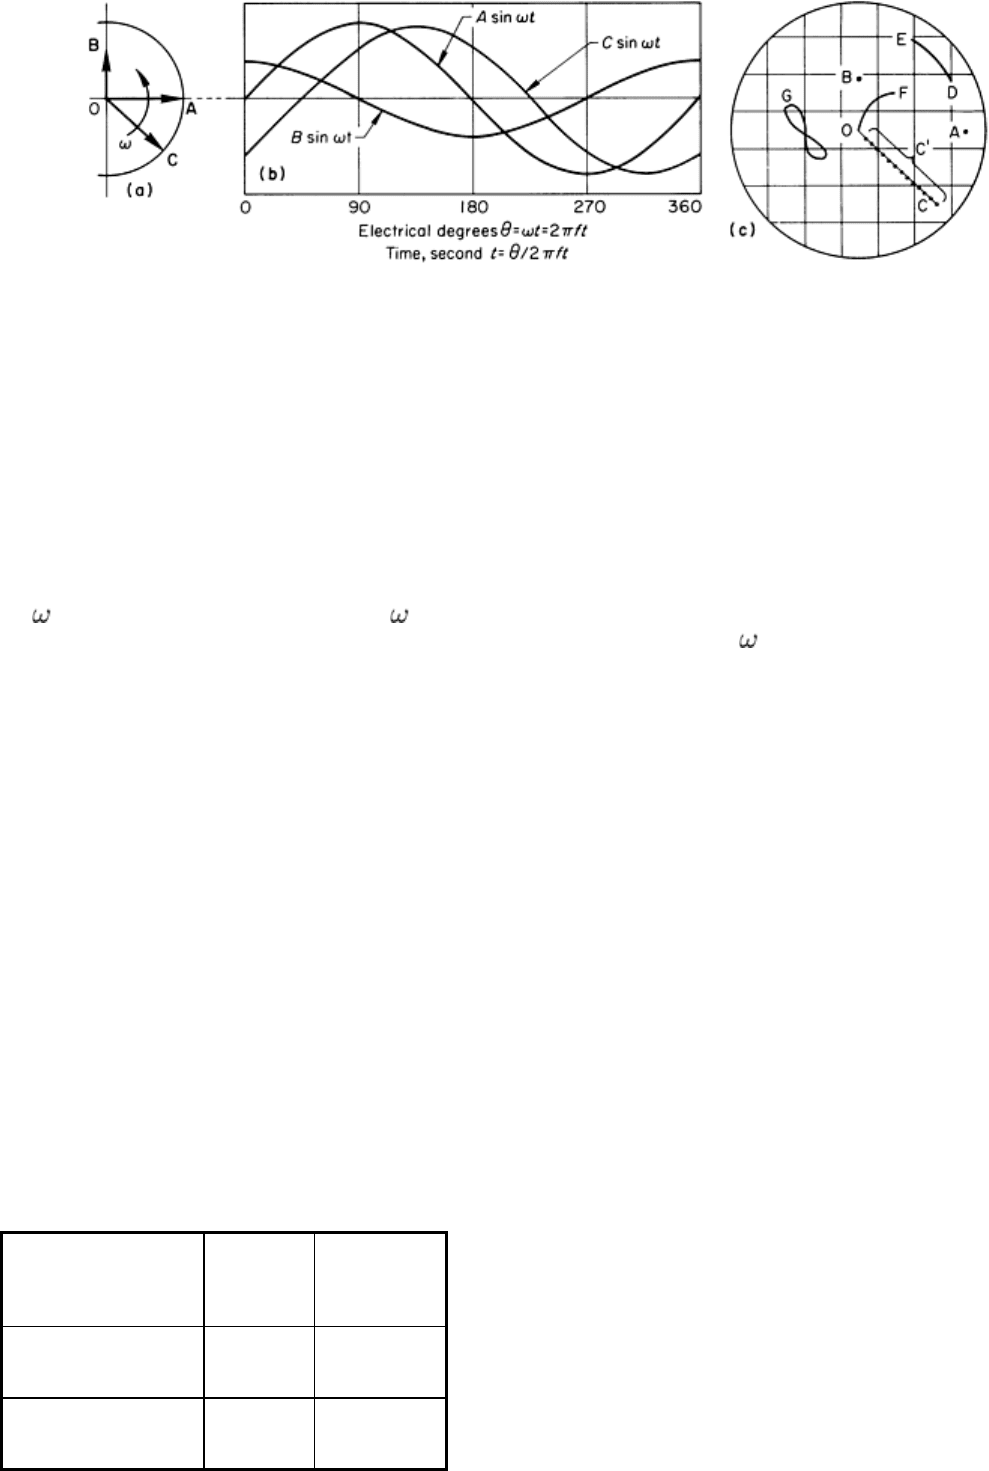
Fig. 6 Phasor representation of sinusoids. See text for explanation.
The three vectors, A, B, and C, are considered to be rotating at frequency, f, generating three rather monotonous
sinusoids. This system of three vectors rotating synchronously with the frequency of the sinusoids is not very useful,
because of its high rate of rotation. However, if rotation is stopped, the amplitudes and phase angles of the three sine
waves can be easily seen in a representation called a phasor diagram.
In eddy current inspection equipment, the sine wave signals are often expanded in quadrature components and displayed
as phasors on an x-y oscilloscope, shown in Fig. 6(c). Usually, only the tips of the phasors are shown. Thus, A and B in
Fig. 6(c) show the cathode ray beam position representing the two sinusoids of Fig. 6(b). Point C represents a sinusoid C
sin t having the same amplitude as A sin t, but which lags or follows it in phase by an electrical angle equal to 45°.
The points indicated as C' represent sinusoids having the same phase angle as C sin t, but with different amplitudes. The
concept of a phasor locus is introduced by varying the amplitude gradually from the maximum at C to zero at the origin
O. This results in the beam spot moving from C to O, producing a locus. In contrast, a shift of the phase angle of a
sinusoid causes a movement of the phasor tip around the origin O as shown by the arc DE. Here, D represents a sinusoid
having the same amplitude as the sinusoid represented by A but leading it by 30°. Increasing this phase angle from 30 to
60° results in the phasor locus DE. When both amplitude and phase changes occur, more complicated loci can be formed
as shown at F and G.
Electrical Conductivity
All materials have a characteristic resistance to the flow of electricity. Those with the highest resistivity are classified as
insulators, those having an intermediate resistivity are classified as semiconductors, and those having a low resistivity are
classified as conductors. The conductors, which include most metals, are of greatest interest in eddy current inspection.
The relative conductivity of the common metals and alloys varies over a wide range.
Capacity for conducting current can be measured in terms of either conductivity or resistivity. In eddy current inspection,
frequent use is made of measurement based on the International Annealed Copper Standard. In this system, the
conductivity of annealed, unalloyed copper is arbitrarily rated at 100%, and the conductivities of other metals and alloys
are expressed as a percentage of this standard. Thus, the conductivity of unalloyed aluminum is rated 61% IACS, or 61%
that of unalloyed copper. The resistivity and IACS conductivity ratings of several common metals and alloys are given in
Table 1.
Table 1 Electrical resistivity and conductivity of several common metals and alloys
Metal or alloy Resistivity,
μΩ· mm
Conductivity,
% IACS
Silver 16.3 105
Copper, annealed 17.2 100

Gold 24.4 70
Aluminum 28.2 61
Aluminum alloys
6061-T6
41 42
7075-T6
53 32
2024-T4
52 30
Magnesium 46 37
70-30 brass 62 28
Phosphor bronzes 160 11
Monel 482 3.6
Zirconium 500 3.4
Zircaloy-2 720 2.4
Titanium 548 3.1
Ti-6Al-4V alloy 1720 1.0
Type 304 stainless steel
700 2.5
Inconel 600 980 1.7
Hastelloy X 1150 1.5
Waspaloy 1230 1.4
Many factors influence the conductivity of a metal, notably, temperature, composition, heat treatment and resulting
microstructure, grain size, hardness, and residual stresses. Conversely, eddy currents can be used to monitor composition
and various metallurgical characteristics, provided their influence on conductivity is sufficient to provide the necessary
contrast. For example, it is possible to monitor the heat treatment of age-hardenable aluminum alloys because of the
marked effect of hardness on conductivity (Fig. 7).
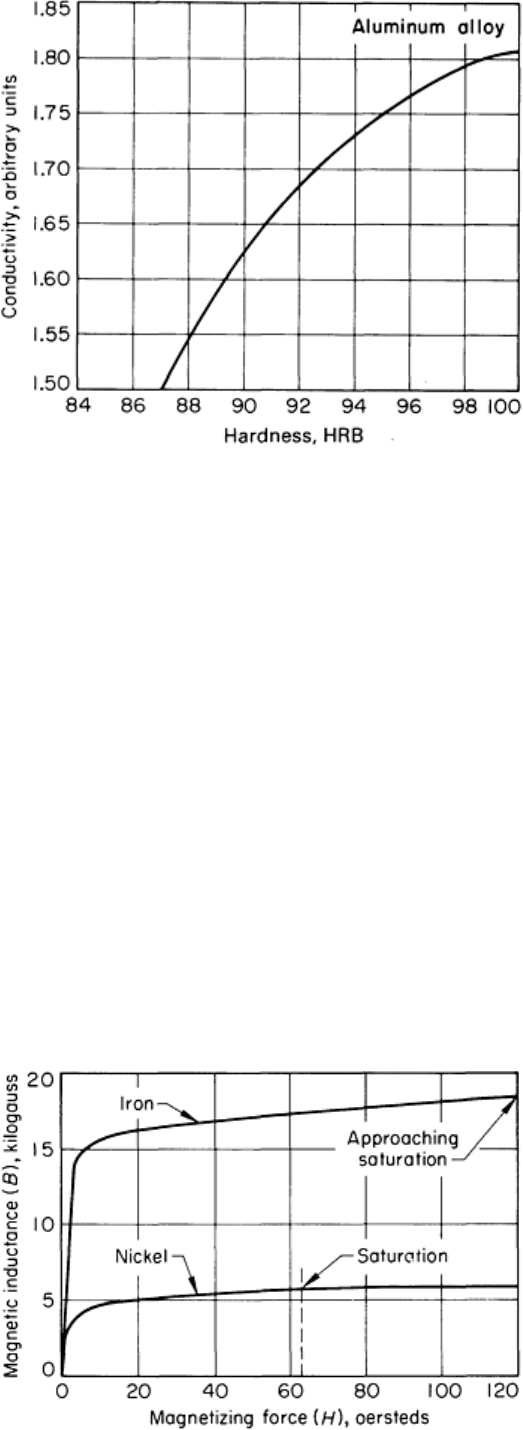
Fig. 7 Relation of hardness and electrical conductivity in an age-
hardenable aluminum alloy that permits the
eddy current monitoring of heat treatment of the alloy
Magnetic Permeability
Ferromagnetic metals and alloys, including iron, nickel, cobalt, and some of their alloys, act to concentrate the flux of a
magnetic field. They are strongly attracted to a magnet or an electromagnet, have exceedingly high and variable
susceptibilities, and have very high and variable permeabilities.
Magnetic permeability is not necessarily constant for a given material but depends on the strength of the magnetic field
acting upon it. For example, consider a sample of steel that has been completely demagnetized and then placed in a
solenoid coil. As current in the coil is increased, the magnetic field associated with the current will increase. The
magnetic flux within the steel, however, will increase rapidly at first and then level off so that an additionally large
increase in the strength of the magnetic field will result in only a small increase in flux within the steel. The steel sample
will then have achieved a condition known as magnetic saturation. The curve showing the relation between magnetic field
intensity and the magnetic flux within the steel is known as a magnetization curve. Magnetization curves for annealed
commercially pure iron and nickel are shown in Fig. 8. The magnetic permeability of a material is the ratio between the
strength of the magnetic field and the amount of magnetic flux within the material. As shown in Fig. 8, at saturation
(where there is no appreciable change in induced flux in the material for a change in field strength) the permeability is
nearly constant for small changes in field strength.
