ASM Metals HandBook Vol. 17 - Nondestructive Evaluation and Quality Control
Подождите немного. Документ загружается.

1.
Mater. Eval., Vol 30 (No. 10), Oct 1972, p 219-228
Magnetic Particle Inspection
Revised by Art Lindgren, Magnaflux Corporation
Inspection of Hollow Cylindrical Parts
Some hollow cylindrical parts requiring magnetic particle inspection present difficulties in processing because of
configuration, extraneous leakage field interference, requirements for noncontact of magnetizing units, the overall time
required, or low L/D ratio. Techniques for inspecting long pieces of seamless tubing (oil well tubing), butt-welded and
longitudinally welded carbon steel pipe or tubing, and a cylinder with a closed end are described in the following sections.
Oil well tubing is made of high-strength steel using hot finishing operations and has upset ends for special threading.
The discontinuities most expected are longitudinally oriented on the main body of the tube and transversely oriented on
the upset ends. For these reasons, the entire length of the tube is circularly magnetized and inspected for longitudinal-type
discontinuities. Also, the upset ends are longitudinally magnetized and inspected for transverse-type discontinuities. Tube
sections are usually more than 6 m (20 ft) long.
An insulated central conductor is used to introduce circular magnetism instead of passing the current through the material
by head contacts. The central conductor facilitates inspection of the inside surface of the upset ends; the direct-contact
method would not provide the required field.
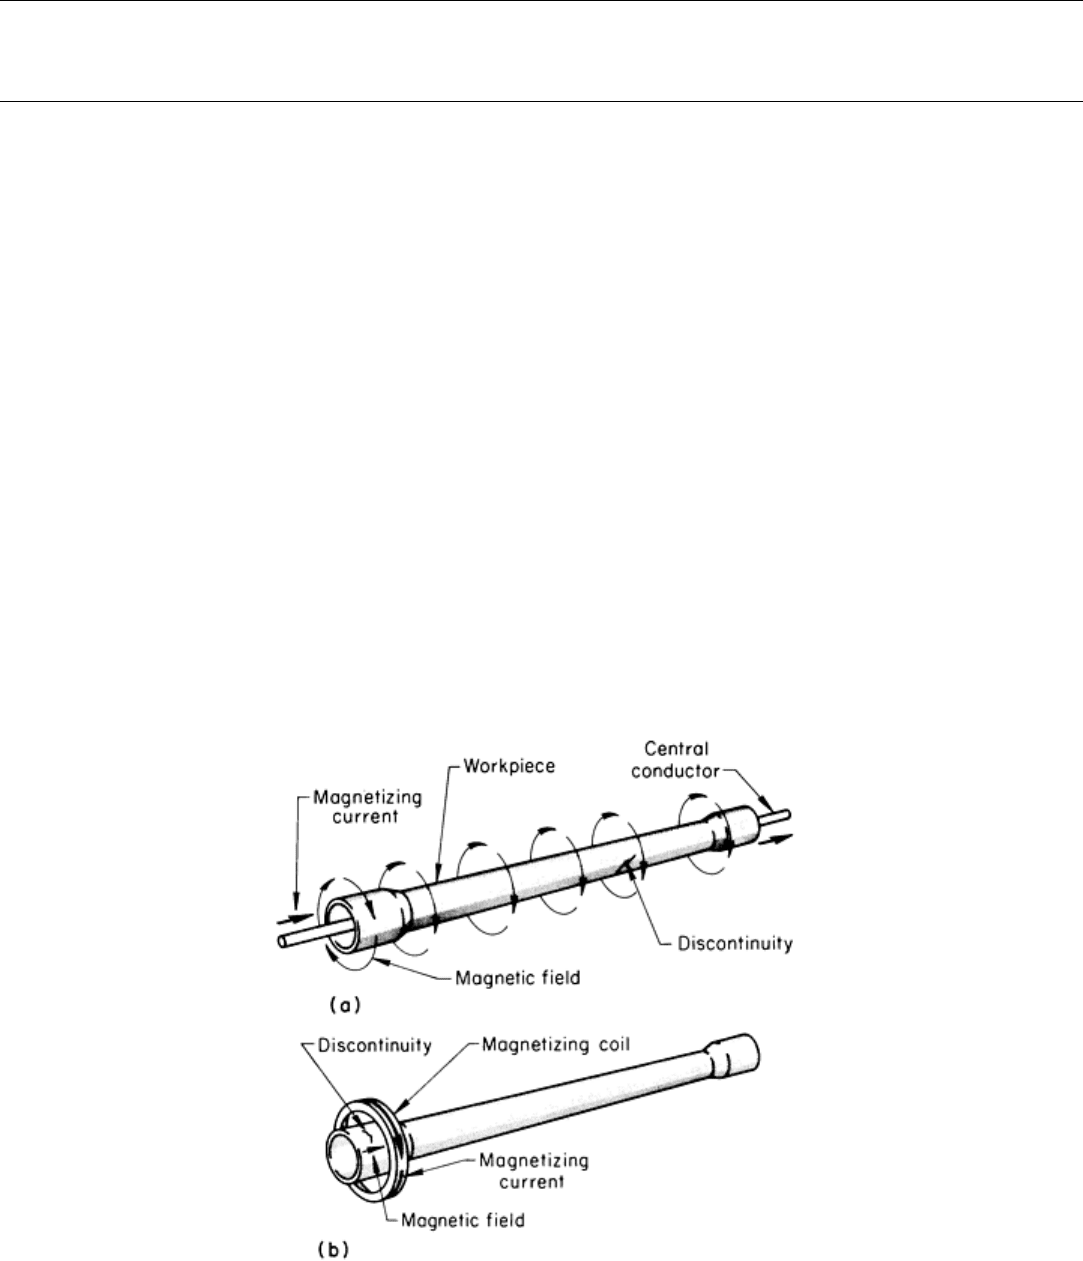
The central-conductor technique used for circumferential magnetization of the tube body is illustrated in Fig. 38(a). The
magnetic particles are applied to the outside surface of the tube. The residual-magnetism technique is used. The current
density for this test is usually 31 to 39 A/mm (800 to 1000 A/in.) of tube diameter.
Fig. 38 Magnetic particle inspection of oil well tubing for longitudinal (a) and circumferential (b) discontinuities
The encircling-coil technique used to magnetize the upset ends in the longitudinal direction is shown in Fig. 38(b). The
residual-magnetism technique is used. Both the inside and outside surfaces are inspected for discontinuities.
Welds in Carbon Steel Pipe. Magnetic particle inspection using the prod technique is a reliable method of detecting
discontinuities in consumable-insert root welds and final welds in carbon steel pipe up to 75 mm (3 in.) in nominal
diameter. (For larger-diameter pipe, less time-consuming magnetic particle techniques can be used.) The types of
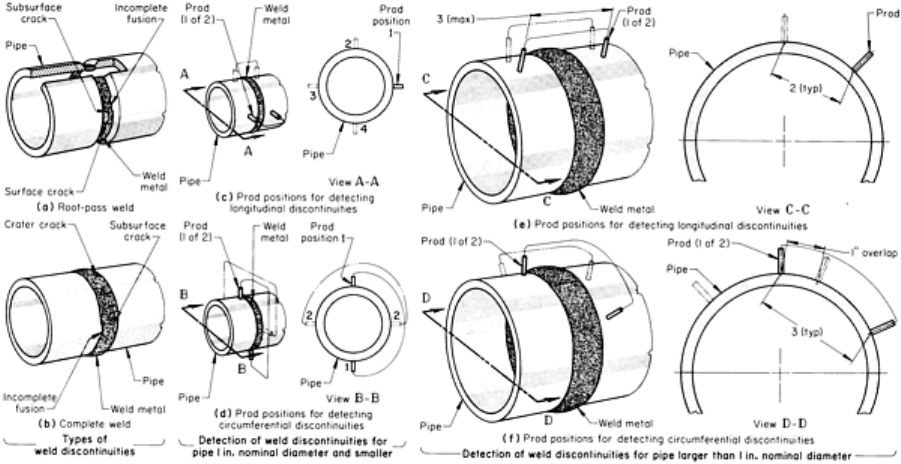
discontinuities found in root welds are shown in Fig. 39(a), and those found in final welds are shown in Fig. 39(b).
Fig. 39 Magnetic particle inspection for detection of discontinuities in consumable-
insert root welds and final
welds in carbon steel pipe. Dimensions given in inches
Placement of the prods is important to ensure reliable inspection of the welds. Circular magnetization, used to check for
longitudinal discontinuities, is accomplished by placing the prods at 90° intervals (four prod placements) around the pipe,
as shown in Fig. 39(c). For pipes larger than 25 mm (1 in.) in nominal diameter, prods should be spaced around the pipe
at approximately 50 mm (2 in.) intervals, as shown in Fig. 39(e). Circumferentially oriented discontinuities are revealed
by placing the prods as shown in Fig. 39(d). The prods are placed adjacent to and on opposite sides of the weld bead to
ensure flux flow across the weld metal. If the circumferential distance between the prods is greater than 75 mm (3 in.)
when positioned as shown in Fig. 39(d), the prods should be positioned as shown in Fig. 39(f). To ensure proper
magnetization, the areas inspected should overlap approximately 25 mm (1 in.). Magnetic particles are applied to the weld
area while the current is on because of the low retentivity of carbon steel.
A buildup of magnetic particles in the fusion-line crevice of the weld is indicative of either a subsurface discontinuity or a
nonrelevant indication because of the abrupt change in material thickness and/or the crevicelike depression between the
weld metal and the base metal. However, a true indication, as from incomplete fusion between the weld metal and the
base metal, would be a sharply defined particle pattern. This pattern would be difficult if not impossible to remove by
blowing with a hand-held powder blower while the magnetizing current is being applied. If the indication at the fusion
zone can be blown away with a hand-held powder blower, the indication is nonrelevant. The current used is
approximately 3.9 A/mm (100 A/in.) of prod spacing.
Hollow cylinders closed at one end, such as drawn shells or forged fluid-power cylinders, can be magnetized
circumferentially for the inspection of longitudinal discontinuities using a head shot end-to-end. However, this technique
does not provide sensitivity for discontinuities on the inside surface.
As shown in Fig. 40, a central conductor can be used in such a manner that the closed end of the cylinder completes the
current path. Also, the open end of the cylinder is accessible for the application of a wet-particle bath to the inside
surface, which can then be inspected directly. For thin-wall cylinders, discontinuities on the inside surface produce
subsurface-type indications on the outside surface. The central-conductor method for magnetization is advantageous when
the inside diameter is too small to permit direct internal viewing.
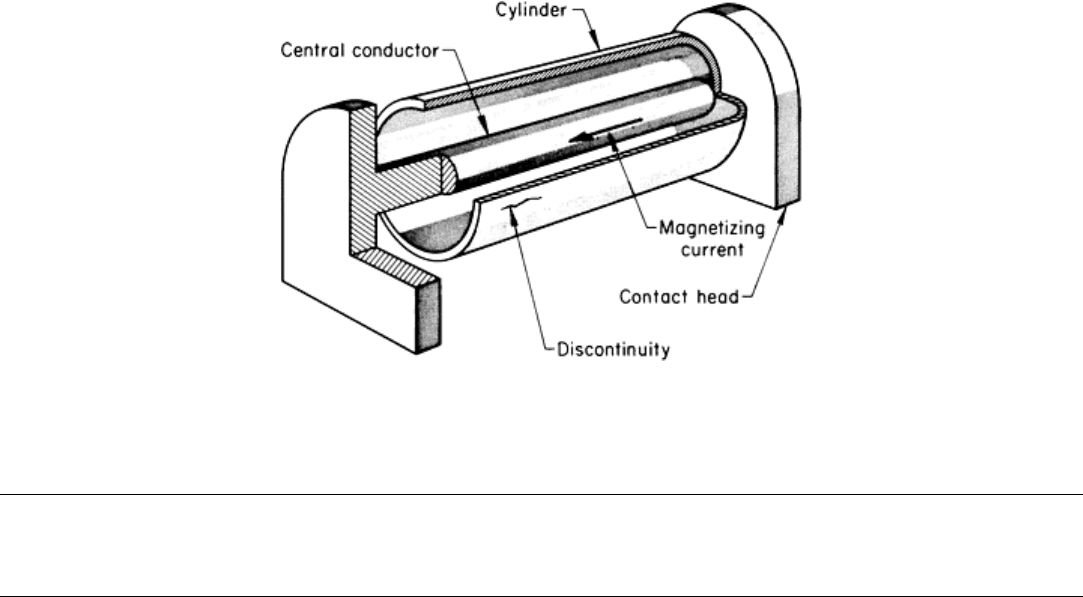
Fig. 40 Use of a central conductor for the magnetic particle testing of a cylinder with one end closed
Magnetic Particle Inspection
Revised by Art Lindgren, Magnaflux Corporation
Inspection of Castings and Forgings
Castings and forgings may be difficult to inspect because of their size and shape. External surfaces can usually be
inspected with prods; however, on large parts this can be time consuming, and inspection of interior surfaces may not be
adequate.
High-amperage power supplies, in conjunction with flexible cable used with clamps (as contact heads), central
conductors, or wrapping, can effectively reduce inspection time because relatively large areas can be inspected with each
processing cycle. Figure 41 illustrates the direct-contact, cable-wrap, and central-conductor techniques that can be used to
inspect two relatively large parts. The three circuits for each part can be applied on a single-shot basis or, if high-output
multidirectional equipment is available, can be combined into a single inspection cycle.
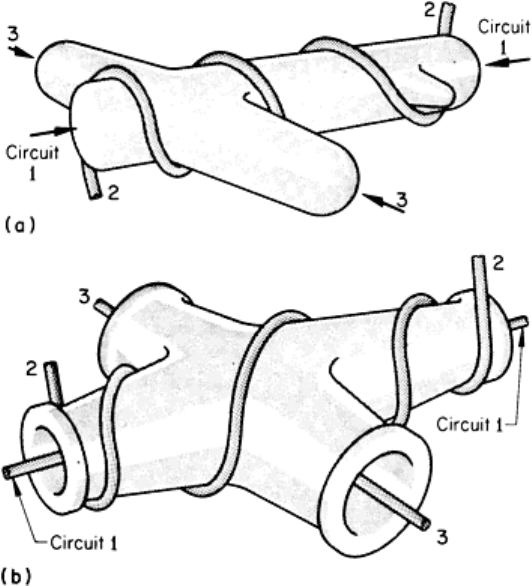
Fig. 41
Methods of using cable for applying magnetizing circuits to large forgings and castings. For the forging
in (a), circuits 1 and 3 are head shots and circuit 2 is a cable wrap. For the casting in (b), circuits 1 and 3 are
central conductors and circuit 2 is a cable wrap.
Generally, the higher-amperage power supplies are of the dc type. Alternating current and half-wave current supplies are
limited to outputs of approximately 5000 to 6000 A because of the reactive impedance component associated with these
types of current. Wet particles are generally preferred as the inspection medium in the presence of strong dc fields
because wet particles exhibit much more mobility on the surface of a part than dry particles. Wet particles also readily
permit full coverage of large surface areas and are easy to apply to internal surfaces.
Crane Hooks. The inspection of crane hooks, as required by the Occupational Safety and Health Act, has focused
attention on cracks and other discontinuities in these components. Crane hooks are generally magnetic particle inspected
with electromagnetic yokes having flexible legs. Power supplies are 115-V, 60-Hz alternating current and half-wave
current. Stress areas in a crane hook are:
• The bight (in tension) on both sides and in the throat (area A, Fig. 42)
• The area below the shank (in compression and tension) on four sides (area B, Fig. 42)
• The shank (in tension), mainly in threads and fillet (area C, Fig. 42)
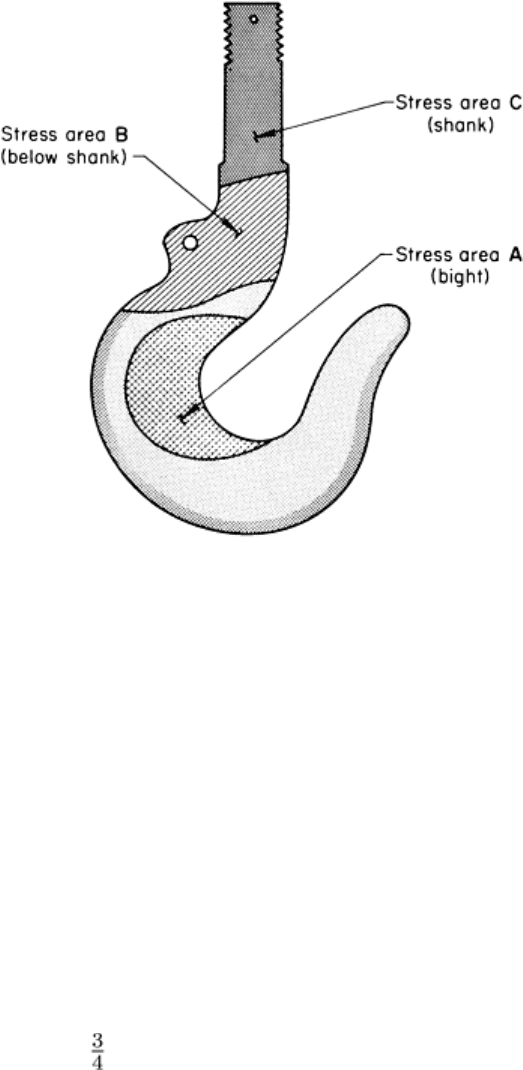
Fig. 42 Forged crane hook showing stress areas subject to inspection
The steps involved in the magnetic particle inspection of crane hooks are as follows:
1. Remove dirt and oil from hook
2. Magnetize and apply particles to areas A and B in Fig. 42
, using a yoke and an ac field parallel to the
axis of the hook
3. For hooks out of surface, inspect the shank (area C, Fig. 42
), using a yoke and an ac field parallel to the
axis of the hook
4. For hooks in service, inspect the shank ultrasonically
5. Repeat steps 2 and 3 using a dc field for subsurface indications
The 50 kN (6 tonf) crane hook shown in Fig. 43 was removed from a jib crane after an indication was found during
magnetic particle inspection. The discontinuity was found to be a deep forging lap. Sectioning the hook through the lap
revealed a discontinuity about 19 mm ( in.) deep in a 50 mm (2 in.) square section (section A-A, in Fig. 43). All
inspections of the hook were made with the magnetic field parallel to the hook axis, thus inspecting for transverse cracks
and other discontinuities. Because of the depth of the lap, the defect was detected even though the field was parallel to its
major dimension. A sufficient flux-leakage field occurred at the surface to attract the magnetic particles.
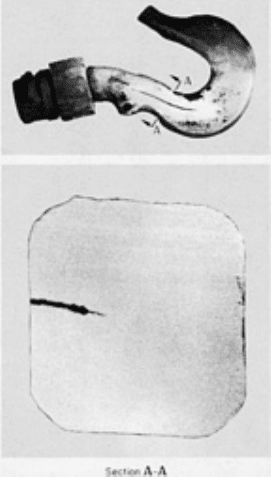
Fig. 43
50 kN (6 tonf) crane hook showing magnetic particle indication of a forging lap and section through
hook showing depth of lap
Inspection of a 90 kN (10 tonf) crane hook revealed a forging lap in the area below the shank. The lap was transverse and
was located in the fillet below the keeper hole. A fatigue crack had initiated in the lap.
Drive-Pinion Shaft. An annual preventive maintenance inspection was performed on the large forged drive-pinion
shaft shown in Fig. 44(a), and detection of a large crack (arrows, Fig. 44b) in the fillet between the shaft and coupling
flange prevented a costly breakdown. Three areas were magnetic particle inspected for cracks:
• Along the shaft
• The fillet between the shaft and the coupling flange (cracked area, Fig. 44b)
• At each fillet in the wobbler coupling half (arrows, Fig. 44a)
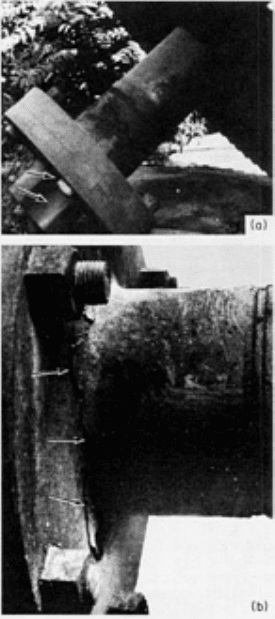
Fig. 44 Forged drive-
pinion shaft and coupling in which the detection of a crack during preventive maintenance
magnetic particle inspection prevented a costly breakdown. (a) Drive-
pinion shaft and coupler assembly;
arrows show locations of fillets on wobbler coupling half
that were inspected. (b) Fillet between shaft and
coupling flange showing crack (at arrows) found during inspection
Inspection was conducted using a portable power source capable of up to 1500-A output in alternating current or half-
wave direct current. Double prod contacts and a 4/0 cable were used to introduce the magnetic fields in the shaft. The
fillets in the wobbler coupling half were inspected for discontinuities with double prod contacts.
The steps involved in inspecting the shaft were as follows:
1. Clean all areas to be tested
2. Wrap cable around shaft and apply current providing 2900 ampere-turns.
Inspect for transverse cracks
in the shaft portion
3. Place prods across fillet at coupling flange (Fig. 44
b) at spacing of 152 to 203 mm (6 to 8 in.); apply
500-A current, producing a circular field perpendicular to fillet.
Inspect for discontinuities parallel to
fillet
4.
Place prods across fillet at flange on wobbler coupling half and across fillets in shaft portion (arrows,
Fig. 44a) at spacing of 152 to 203 mm (6 to 8 in.); apply 500-
A current, producing a circular field
perpendicular to the fillets. Inspect for discontinuities parallel to the fillets
Disk or Gear on Shaft. A forged or cast disk or gear on a heavy through shaft can be wrapped with a cable to form
two opposing coils, as shown for the disk in Fig. 45. The two opposing coils produce radial magnetic fields on each side
of the disk. This type of field reveals circumferential discontinuities on the sides of the disk and transverse discontinuities
in the shaft. Also, the shaft can be used as a central conductor for the purpose of locating radial discontinuities in the disk
and longitudinal discontinuities in the shaft.
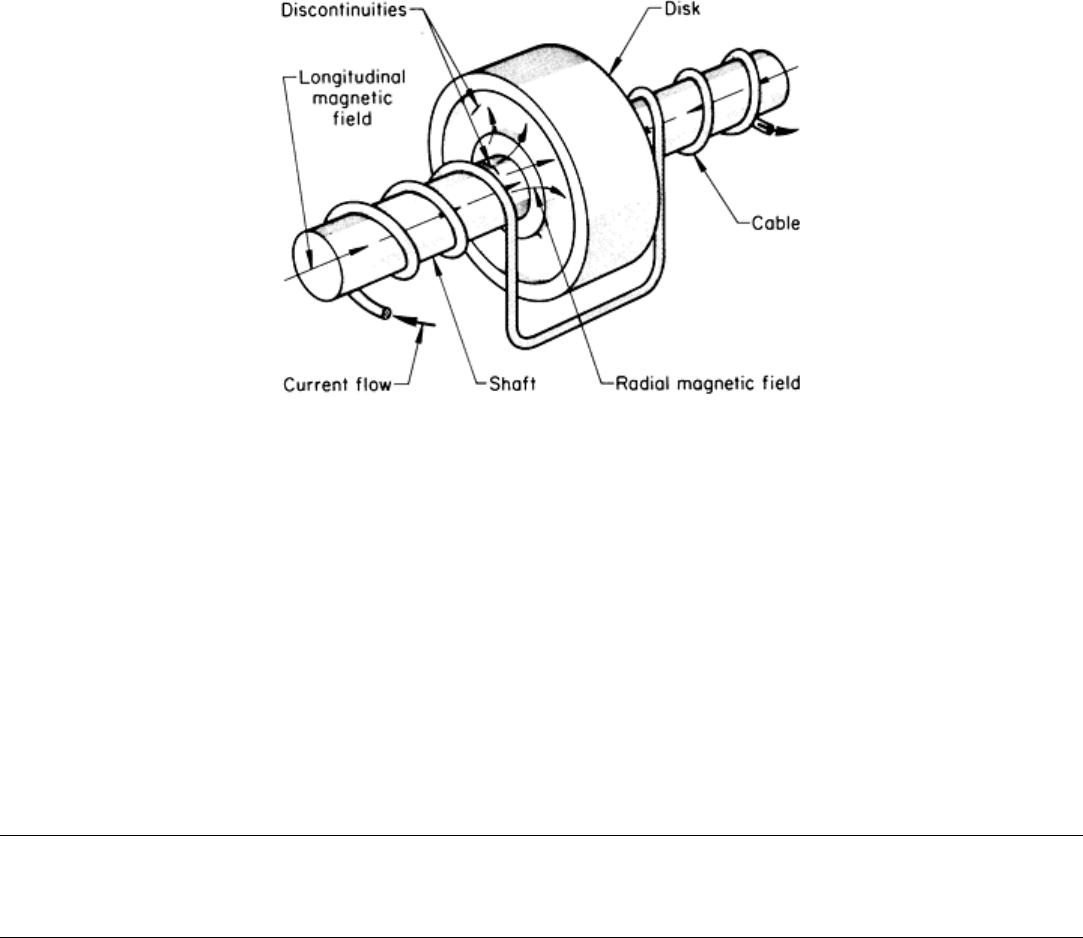
Fig. 45 Disk on a through shaft in which the sh
aft was cable wrapped to produce a longitudinal magnetic field
in the shaft and a radial field in the disk. Using the shaft as a central conductor produced a circular magnetic
field in both the shaft and the disk.
In parts where the shaft extends from one side only, a pole piece can be used to simulate a through shaft. The pole piece
should have approximately the same diameter as the shaft.
Y-shaped parts may not be processed on a horizontal wet-particle unit in such a manner that only one shot will be
required for complete inspection. This is true even though steps are taken to ensure that the current is divided equally
through the two upper legs of the Y. With equally divided current, an area of no magnetization will exist at the junction of
the two legs. A Y-shaped part can be processed in two steps using a conventional horizontal wet-particle unit, or it can be
processed in one operation using a modified unit having a double headstock and special current assurance magnetizing
circuit.
Magnetic Particle Inspection
Revised by Art Lindgren, Magnaflux Corporation
Inspection of Weldments
Many weld defects are open to the surface and are readily detectable by magnetic particle inspection with prods or yokes.
For the detection of subsurface discontinuities, such as slag inclusions, voids, and inadequate joint penetration at the root
of the weld, prod magnetization is best, using half-wave current and dry powder. Yokes, using alternating current, direct
current, or half-wave current, are suitable for detecting surface discontinuities in weldments.
The positioning of a yoke with respect to the direction of the discontinuity sought is different from the corresponding
positioning of prods. Because the field traverses a path between the poles of the yoke, the poles must be placed on
opposite sides of the weld bead to locate cracks parallel to the bead (Fig. 6), and adjacent to the bead to locate transverse
cracks. Prods are spaced adjacent to the weld bead for parallel cracks and on opposite sides of the bead for transverse
cracks.
For applications in which holding the prod contacts by hand is difficult or tiring, prods incorporating magnetic clamps, or
leeches, that magnetically hold the prods to the work are available. The prods carrying the magnetizing current are held
firmly to the work by an electromagnet. Both prods can be attached by the magnets, or one of the prods can be held
magnetically and the other by hand.
There is one type of weld on which the penetrating power of half-wave current results in nonrelevant indications: a T-
joint welded from one or both sides for which complete joint penetration is not specified and in which an open root is
permissible and almost always present. When half-wave current is used with prods, this open root will probably be
indicated on the weld surface. This nonrelevent indication can be eliminated by using alternating current instead of half-
wave current.
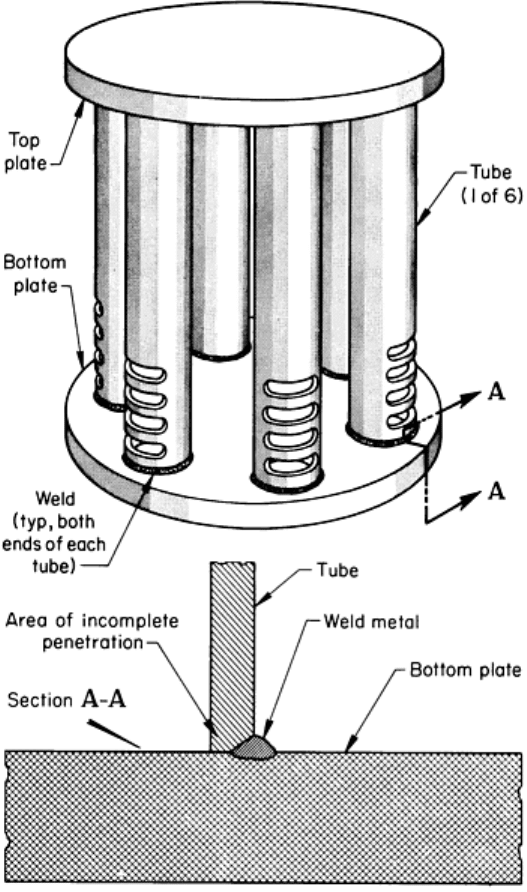
A case in which nonrelevant magnetic particle indications were found occurred at the welded T-joints between six tubes
and the end plates of a complicated assembly (Fig. 46). The welds were made from the outside of the tubes only. Liquid
penetrant and radiographic inspections and metallographic examination disclosed that the integrity of the welds was good.
Investigations revealed that the depth of penetration of the field produced by dc magnetization was sufficient to reveal the
joint along the inside wall of the cylinder. Inspection by ac magnetization, which had less depth of penetration of the
field, eliminated these indications.
Fig. 46 Assembly in which T-joints between tubes and end plates that were welded (as specified) with partial
penetration produced nonrelevant magnetic particle indications when inspected using dc magnetization
The detectability of subsurface discontinuities in butt welds between relatively thin plates can often be improved by
positioning a dc yoke on the side opposite the weld bead, as shown in Fig. 47. Magnetic particles are applied along the
weld bead. Improvement is achieved because of the absence of extraneous leakage flux that normally emanates from the
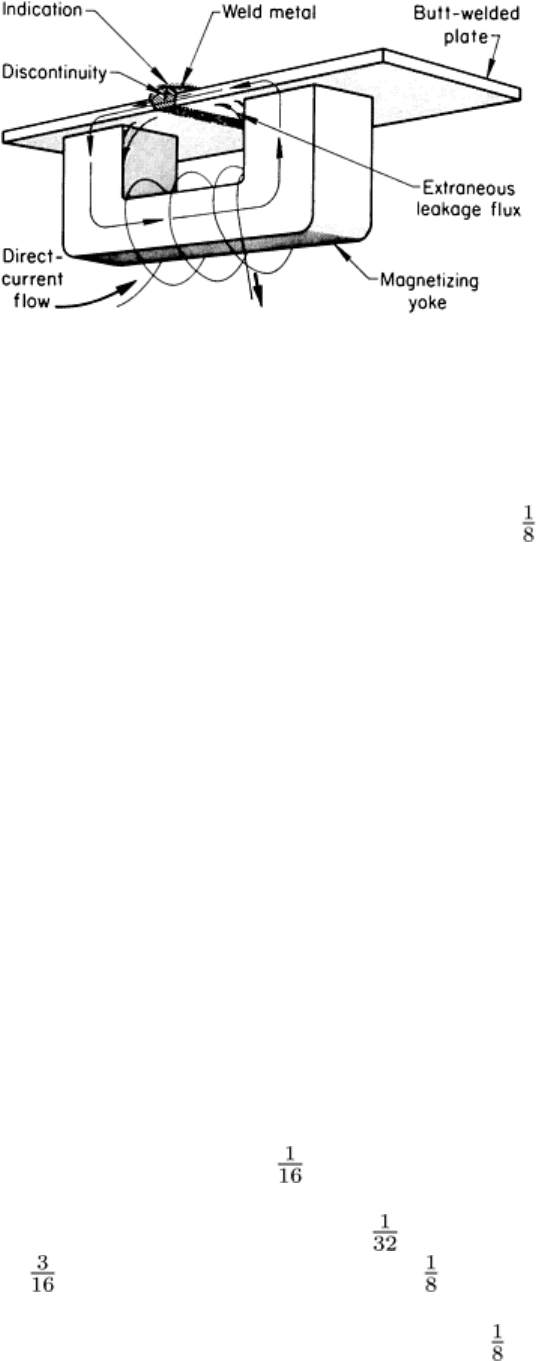
yoke pole pieces. Techniques developed and used for the magnetic particle inspection of weldments are described in the
two examples that follow.
Fig. 47 Method of using a yoke for detecting subsurface discontinuities in butt welds joining thin plates
Example 3: Magnetic Particle Inspection of Shielded Metal-Arc Welds in the
Outer Hull of a Deep-Submergence-Vessel Float Structure.
The outer hull of the float structure of a deep-submergence vessel was made of 3.2 mm ( in.) thick steel plate and was
butt welded using the shielded metal-arc process. For magnetic particle inspection, the weld areas were magnetized with
prods, using a half-wave current of 3.9 A/mm (100 A/in.) of prod spacing. Dry, red magnetic particles provided adequate
sensitivity and color contrast for inspection.
The crowns on the surfaces of the welds were removed with a flat chisel. Neither grinding of the welds nor the use of
pneumatic needle guns was permitted. The surfaces were cleaned of paint, scale, and slag by sand or vapor blasting.
The area to be inspected was shielded from air currents to prevent disturbing the magnetic particle indications. Magnetic
particles were applied with a powder dispenser hand-held 305 to 381 mm (12 to 15 in.) from the weld at an angle of 30 to
45° to the surface of the plate along the axis of the weld. The powder dispenser was held stationary once it was positioned
for each prod placement. The powder was allowed to float to the weld surface so that a very light dustlike coating of
particles settled on the surface being tested. Excessive application of magnetic particles required removal of all particles
and reapplication.
Longitudinal discontinuities were detected by placing the prods at a 152 mm (6 in.) spacing parallel to the longitudinal
axis of the weld and on the surface of the weld. Successive prod spacings overlapped approximately 25 mm (1 in.) to
ensure complete coverage. For the detection of transverse discontinuities, prods were positioned at right angles to the
weld axis, 75 to 152 mm (3 to 6 in.) apart on each side of the weld, and at intervals not exceeding one-fourth the prod
spacing.
Magnetic particle inspection was used instead of radiography. Following are the maximum radiographic acceptance
standards from which the magnetic particle procedures were developed:
• A linear or linearly disposed indication 1.6 mm ( in.) or
more in length, with its length at least four
times greater than its width
• A single slag (subsurface) indication longer than 0.8 mm ( in.), an
d multiple slag indications closer
together than 4.8 mm ( in.) or totaling more than 3.2 mm (
in.) in any 152 mm (6 in.) of weld
length
• A cluster of four or more indications of any size spaced within 3.2 mm ( in.) of each other
