ASM Metals HandBook Vol. 17 - Nondestructive Evaluation and Quality Control
Подождите немного. Документ загружается.

Reference test standards for calibrating and standardizing the bond inspection instruments are essential. Even with
adequate reference standards, inspection often produces conflicting information or a deviation of results. In these cases,
more than one inspection method should be used in order to improve the accuracy of the data and to define the deviating
condition. Under ideal conditions, the test standard with built-in defects of selected sizes should closely duplicate the
structure adherends to be inspected. The laminate skin should be of the same thickness, and the honeycomb core should
be of the same size and density. Other variations to be encountered in the test specimen, such as tapered core, chemically
milled skins and doublers, and so on, should be incorporated into the test standard.
Except for built-in defects, the test standard for adhesive-bonded structures should be fabricated in the same manner as
the production assembly. The void or defect should be introduced in the same bond line as that to be inspected in the
structure. The standard can be a series of simple test specimens composed of details identical to the several areas of the
assembly to be inspected and having a bond of good quality but with controlled or known defect locations and size.
Attempts to produce voids or controlled understrength bonds by the local application of grease or other foreign materials
have been found to be ineffective. All adhesives and primers vary and may not respond to the following suggested
methods of standard preparation. Therefore, the finished standards should be evaluated by various NDT methods prior to
validation of their use as an inspection standard. Neutron radiography is an excellent method for verification if voids,
porosity, or both have been generated in the standard. The standard must then be inspected by the test instrument chosen
for the particular part to confirm its ability to locate the flaw.
Metal-To-Metal Reference Standards. Various methods have been developed for producing simulated voids,
porosity, or unbonds in metal-to-metal bonded laminates. Numerous ways to produce reference standards for metal-to-
metal bonded joints or assemblies are described in Ref 10. Because of the variety of such standards, it is not possible to
describe all of them in this article, and it is recommended that the reader consult the references for additional information.
Figure 46 shows two methods for producing standards for simulated skin-to-adhesive unbonds. The method 1 or 2
standards are useful for all NDT application methods provided the Teflon or Mylar inserts do not bond to the adherends.
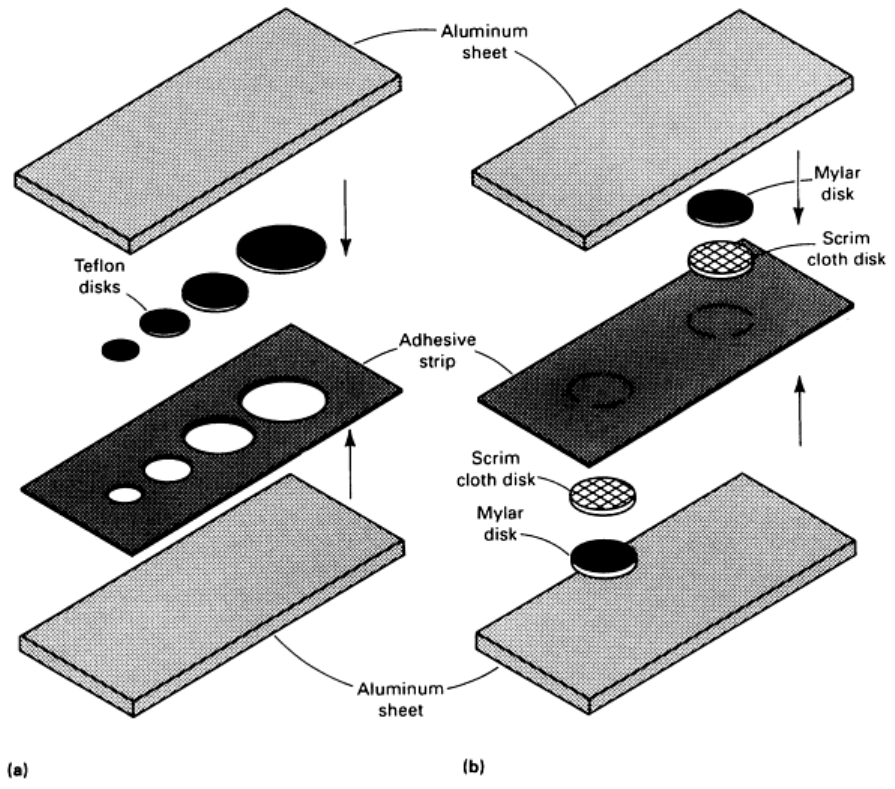
Fig. 46
Two methods of fabricating unbond reference standards. (a) Method 1 uses two pieces of aluminum
sheet that have been anodized and primed and then bonded together with a piece of adhesive that has various-
size cutouts filled with 0.13 mm (0.005 in.) thick Teflon disks. (b) Method 2 uses metal as in method 1, but the
voids are produced by placing a disk sandwich of Mylar and scrim cloth of desired size on the uncured adhesive.
The assembly is then bonded.
Void, Porosity, and Unbond Standards. Voids or unbonds of specified sizes are difficult to produce because free-
flowing adhesive may fill the anticipated void or unbond area. One researcher was successful in producing natural flaws
in the adhesive layer of metal-to-metal bond joints (Ref 1). By trial-and-error methods, defect conditions such as a void
produced by removing a section of adhesive, a void produced by inserting a 0.64 mm (0.025 in.) diam wire between
adherends, and porosity caused by inserting a 0.38 mm (0.015 in.) diam wire between adherends prior to bonding can be
produced at specific locations in a bonded joint and with the desired sizes to be detected in an x-ray radiograph.
The methods 3, 4, and 5 standards (Fig. 47) are useful for manual bond test methods (such as Fokker, Harmonic, and 210
bond test applications) and for pulse-echo ultrasonics. The holes at the edge and center of the method 3 standard are
required if pinch-off of adhesive occurs near the edge with thicker adhesive near the center of the standard. For maximum
sensitivity, a bond joint should be inspected from both sides, and method 3 and 4 standards are used. If the joint can be
inspected from only one side, the method 5 standard is used. Holes are drilled after the part is bonded.
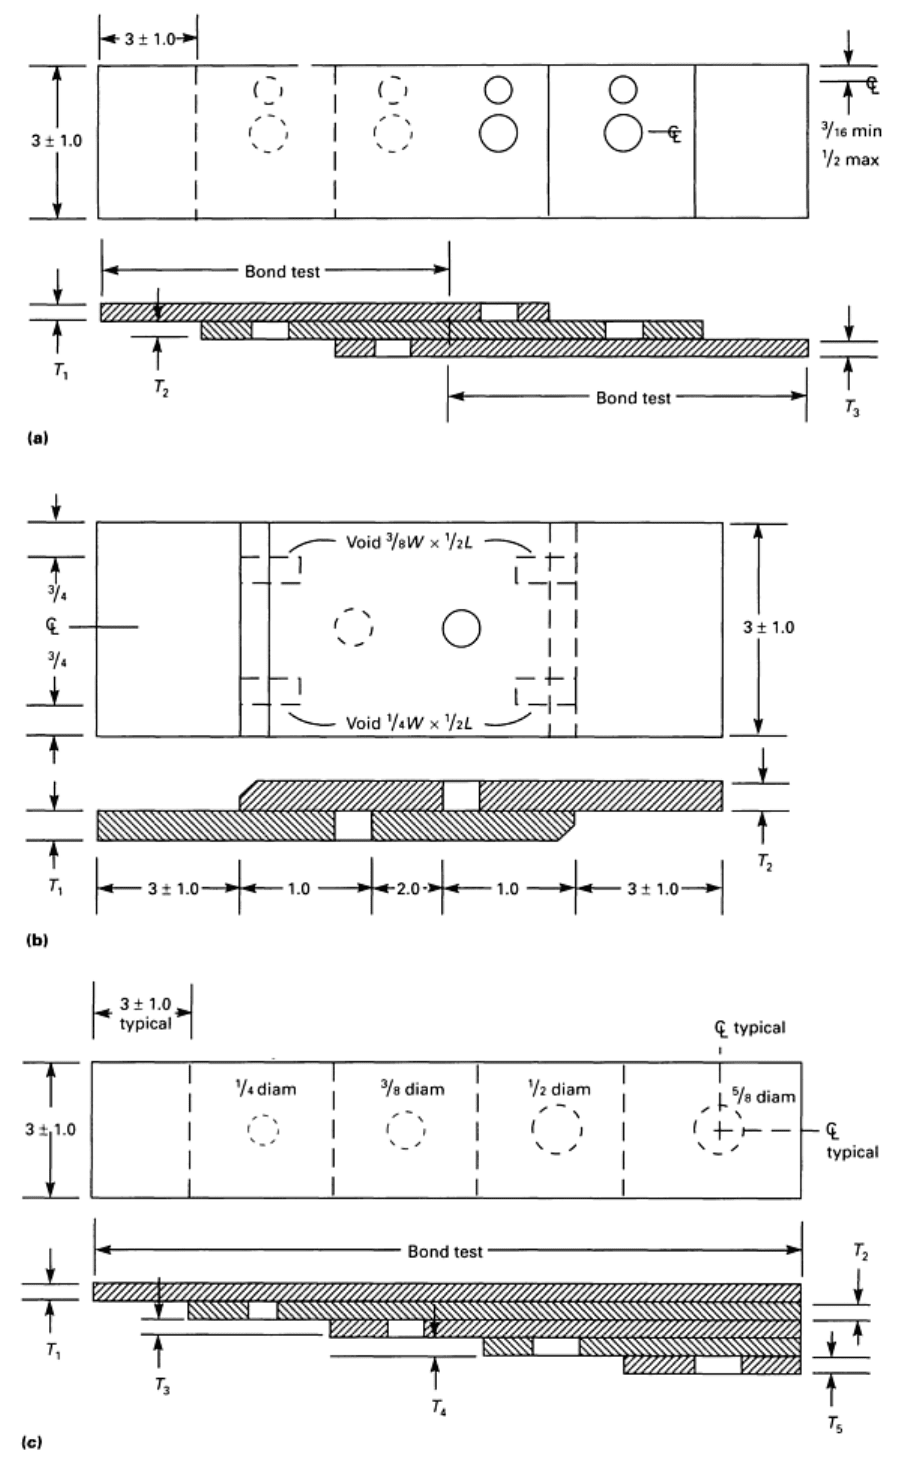

Fig. 47 Additional methods for fabricating unbond reference standards. (a) Me
thod 3 uses three flat,
unchamfered aluminum sheets of different thicknesses. This standard can be inspected from either side. Hole
diameters can vary from 6.4 to 13 mm ( to
in.) and are free of adhesive. (b) Method 4 uses two chamfered
aluminum sheets of different thicknesses with drilled holes 9.5 or 13 mm ( or in.)
in diameter (free of
adhesive) and edge voids made by inserting Teflon shims of the size shown. Shims must be removed after
bonding. This standard can be inspected from either side. (c) Method 5 is a flat step standard using a buildup of
various sheet thic
knesses that matches the structure to be inspected. There should be no adhesive at the base
of the holes. This standard should be inspected from the top side only. Dimensions given in inches
Standards containing porosity can be made by the wire insertion method or by bonding a large-area panel 0.6 × 0.6 m (2 ×
2 ft, minimum) at low pressure (275 kPa, or 40 psi, maximum). In bonding with a mat (nonwoven) carrier, the adhesive
pinches off at the outer edge, producing a picture frame of gross porosity close to the edge. Scattered porosity and some
small voids are produced throughout the rest of the panel. After ultrasonic C-scan or radiographic inspection,
representative specimens or small standards can be removed from the panel. The methods for producing voids and
porosity are useful for creating defects at specific locations in slow-cycle fatigue test specimens. This type of specimen is
used to study the effects of defects under load, cycle rate, or environment.
Burned-Adhesive Standards. Method 6 (Fig. 48) is used to fabricate a standard representing burned adhesive caused
by improper drilling or sawing of bonded panels. If improper drills, excessive drill speed and feed, or no coolant is used,
burning of the adhesive adjacent to the hole may occur.
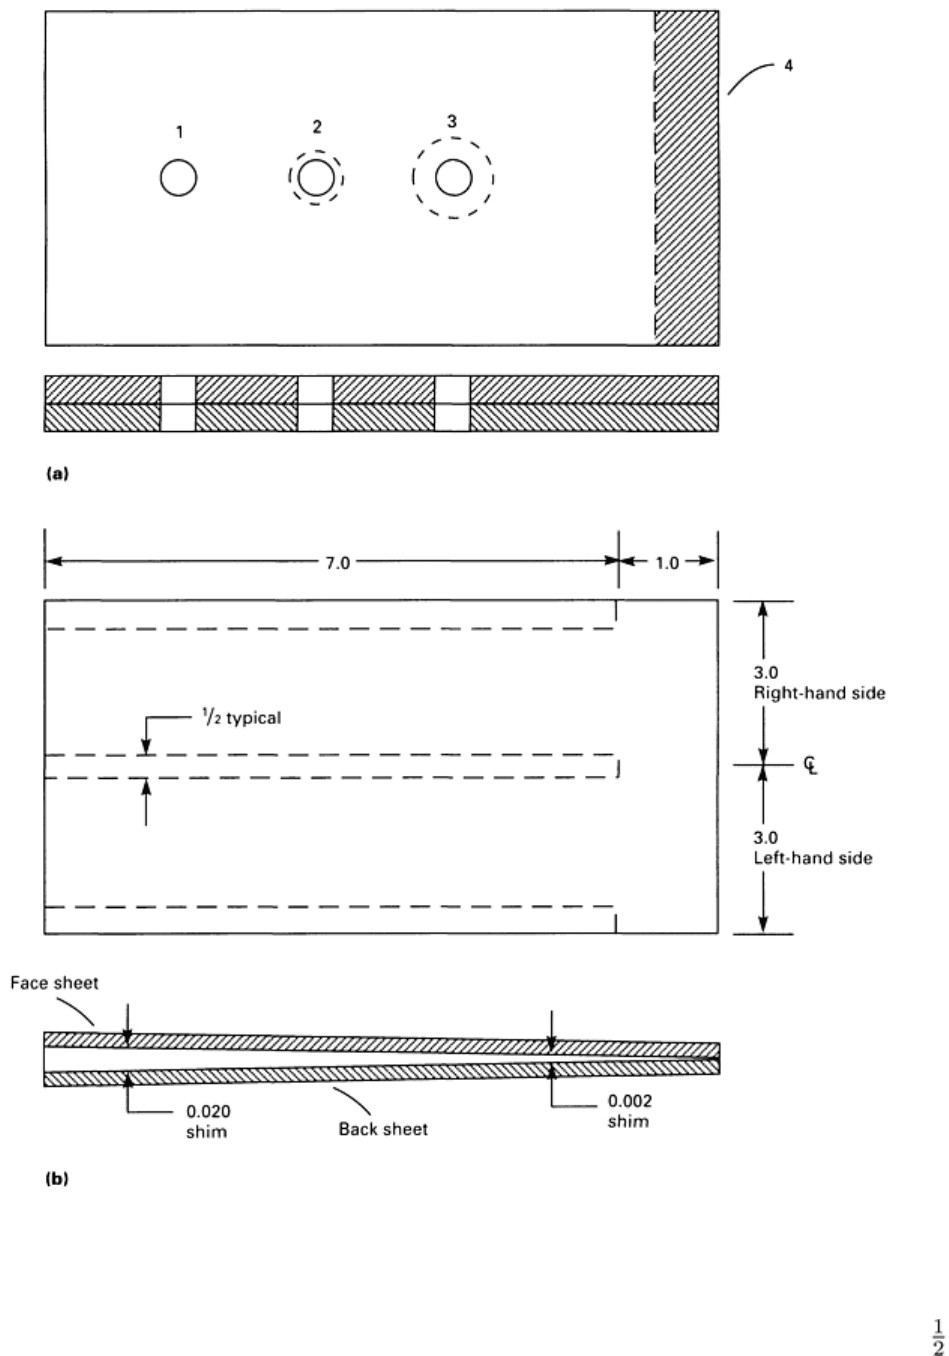
Fig. 48 Additional methods for fabrication unbond reference standards. (a) Method 6 presents a burned-
adhesive standard in which (1) is a good-
quality hole, (2) is a slightly burned adhesive, (3) is a grossly burned
adhesive, and (4) is a grossly burned edge caused by abusive band sawing. (b) Method 7 becomes a variable-
quality standard by inserting tapered shims between face and back sheet before bonding. Three 13 mm (
in.)
wide shims are shown in place. Tapered shims cause increasing porosity going from right to left. Half of the
face sheet can be removed after inspection to reveal the condition of the adhesive. Dimensions given in inches
Variable-Quality Standards. Method 7 (Fig. 48) is a way to fabricate a variable-quality standard. Through the use of
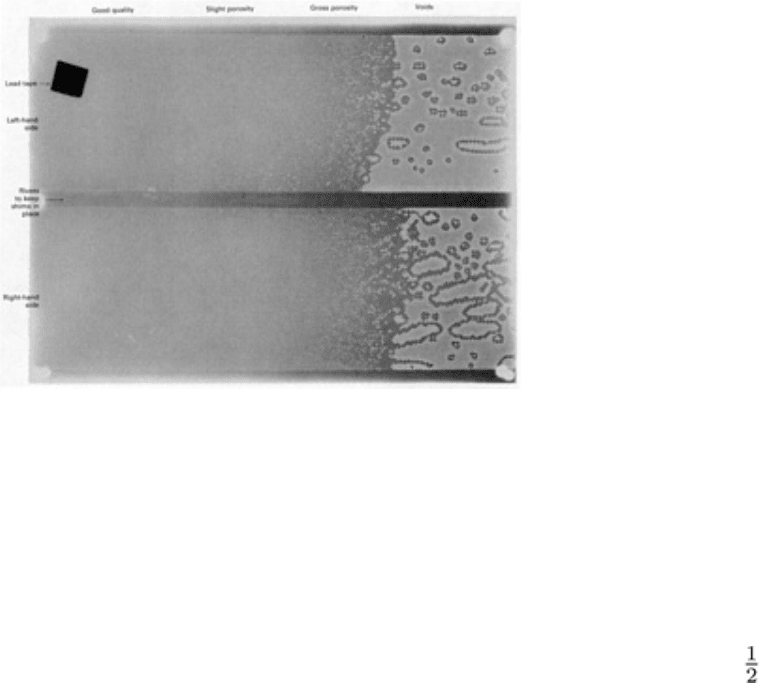
tapered shims, good quality is obtained at the thin end and poor quality at the thick end. Figure 49 shows a positive
reproduction made from an x-ray negative of AF-55 adhesive in a tapered standard. For visual correlation, only the right-
hand upper skin need be removed from the panel, thus revealing the variable adhesive quality. The left-hand side is kept
intact to determine variations in NDT instrument response to different adhesive quality conditions.
Fig. 49 Positive print from x-ray negative of tapered-shim variable-quality standard shown as method 7 in
Fig.
48
Calibration of Bond Testers. When the size of the unbond or void is not of primary concern or to calibrate
instruments to a bond/no-bond response, the following standards prove adequate. These standards are especially useful for
resonant-type instruments such as the Fokker, Harmonic, Sondicator, and 210 bond testers. They relate well to the bonded
part when a 120 to 175 °C (250 to 350 °F) curing epoxy or epoxy phenolic resin system, which does not attenuate the
ultrasonic energy, is used. Basically, the standards are made by cutting 38 mm (1.5 in.) diam holes in a 13 mm ( in.)
thick plywood panel and then bonding 75 × 75 mm (3 × 3 in.) aluminum sheets, using room-temperature curing
adhesives, so that the center of the sheet is centered over the holes in the plywood. The thickness of the aluminum sheets
is chosen to match the thickness of the aluminum adherends of the test part. The number of sheets is governed by the
number of adherends in the test part. When the aluminum sheet is bonded to a wooden base, it does not resonate freely
and reacts similarly to unbonds in the part being inspected.
Honeycomb Reference Standards. Method 1 or 2 (Fig. 46) is used to create a void or unbond reference standard for
honeycomb. For honeycomb standards, the unbonds are created between the adhesive-to-skin and adhesive-to-core
interfaces. Skin-to-adhesive voids or unbonds are usually easier to detect than adhesive-to-core unbonds. Another way to
prepare a void or unbond standard for a honeycomb panel is illustrated in Fig. 50. This standard is useful when attempting
to detect unbonds on both sides of the panel if inspection can be performed from only one side.
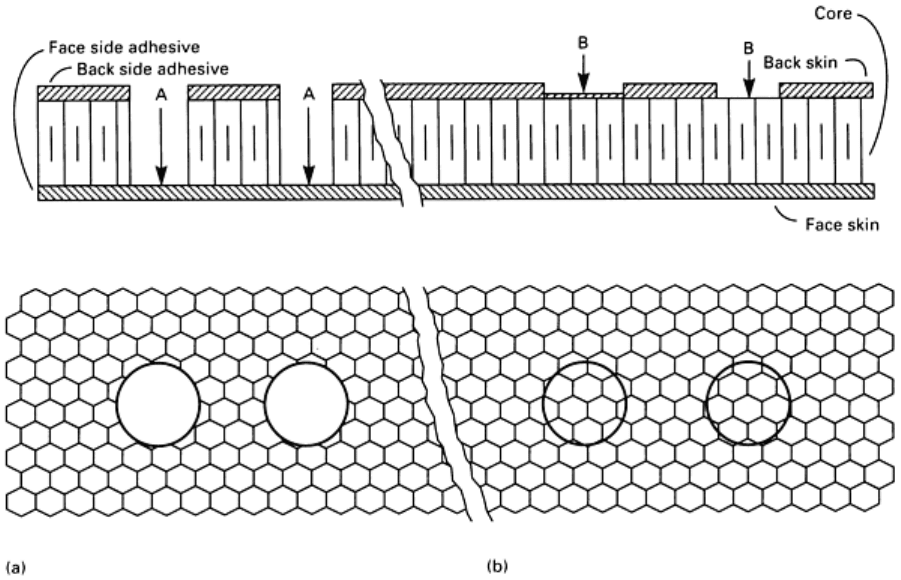
Fig. 50
Construction details for making a honeycomb standard for voids and unbonds. (a) Back skin and core
cut out to desired diameter. Cutting through face sheet adhesive shows skin-to-
adhesive unbond; cutting to the
adhesive shows adhesive-to-core unbond. (b) Cutting through back skin first to the adhesive to show skin-to-
adhesive unbond and then through the adhesive to show adhesive-to-core unbond. Note that Tefl
on disks can
be used to help separate adhesive from skins at cutouts. All tests are to be made from the face skin side.
Honeycomb crushed core standards are made by inserting 25 mm (1 in.) diam, 0.13 and 0.25 mm (0.005 and
0.010 in.) thick metal disks between the skin and core and then applying pressure. The disks are removed and the panel is
bonded. The 0.13 mm (0.005 in.) crushing is very subtle and is difficult to detect radiographically. The 0.25 mm (0.010
in.) crushing is easily detectable.
Water intrusion standards are produced by hot-bonding one skin to the core, adding various quantities of water into
the cells, and then cold-bonding the second facing sheet in place.
Core-splice standards are made by cutting the edges of the core with a taper and then applying foaming adhesive to
one side of the splice before bonding. Voids in the foaming adhesive are detectable by low-kilovoltage radiography. Core-
to-closure voids are made by eliminating foaming adhesive at small areas along the joint.
Separator sheet standards are produced by bonding-in a desired size of the material at the skin-to-adhesive and
adhesive-to core interfaces.
A blown core standard can be made by mechanically damaging the core prior to bonding.
Corroded core or core-to-adhesive corrosion standards can be made by bonding only one skin to the core
(open-face honeycomb) and then alternately spraying the honeycomb side in a salt spray system. The degree of corrosion
can be monitored visually. If it is desired to close up the panel, the second facing sheet can be cold-bonded to the other
side of the core.
Substitute Standards. When the ideal standards are not available, other standards of construction similar to that of the
test part can be used. However, honeycomb standards should not be used for metal-to-metal laminate structure, and vice
versa.

Inspection Without Standards. When standards are not available, a known undamaged area can be used as the
standard. Repaired areas are inspected by comparing them to an unrepaired area. The instrument reading may change
because of structural changes resulting from the repair. Repeated inspection scans must be conducted under various
instrument settings, and the inspection should be verified by other methods and/or instruments. A knowledge of the part
configuration (for example, number of bond lines, adhesive thickness, skin thickness, and so on) is essential for
interpreting the test results.
References cited in this section
1. M.T. Clark, "Definition and Non-Destructive Detection of Critical Adhesive Bond-Line Flaws," AFML-
TR-78-108, U.S. Air Force Materials Laboratory, 1978
4.
P. Bijlmer and R.J. Schliekelmann, The Relation of Surface Condition After Pretreatment to Bondability of
Aluminum Alloys, SAMPE Q., Oct 1973
10.
D. Hagemaier and R. Fassbender, Nondestructive Testing of Adhesive Bonded Structures, SAMPE Q.,
Vol
9 (No. 4), 1978
32.
"Adhesive Bonding (Structural) for Aerospace Systems, Requirements for," MIL-A-83377
33.
"Adhesive Bonded Aluminum Honeycomb Sandwich Structure, Acceptance Criteria," MIL-A-83376
34.
"Inspection Requirements, Nondestructive: For Aircraft Materials and Parts," MIL-I-6870 (ASG)
35.
"Nondestructive Testing Personnel Qualification and Certification," MIL-STD-410
Nondestructive Inspection of Adhesive-Bonded Joints
*
Donald J. Hagemaier, Douglas Aircraft Company, McDonnell Douglas Corporation
Evaluation and Correlation of Inspection Results
The experience, confidence, and effectiveness of NDI technicians and engineering personnel are gained by correlating
NDI results with destructive testing. Comparisons can be made between the NDI results and the actual size, shape,
location, and type of defect. Mistakes will occur in the early stages of the bonding program, but if accurate records,
photographs, and sketches are kept, they can serve as effective training devices. Sections of defective parts should be kept
for training purposes. All these items add to the confidence of the inspector in evaluating and accurately reporting defects.
They also add to the engineer's confidence in the inspector and in the data reported by the inspector.
Procedure
Before new adhesive-bonded assemblies are fabricated on a mass production basis, the first assembly is evaluated by
numerous methods. Inspections are performed and NDT results are evaluated to detect any variations in the part that are
indicative of discontinuities. The part is then cut up, and special precautions are taken to section through the
discontinuities or to separate the joint at the discontinuity to identify and verify the NDI results. To determine which NDT
method(s) detected the discontinuity, the NDI technicians use different color markings--for example, blue for x-ray, green
for ultrasonic, red for a bond tester, and so on. These markings can be affixed to the surface of the part or placed on a
transparent overlay of the part. When the part is sectioned, the results will identify which NDT method(s) correctly
identified the location, size, shape, and type of discontinuity. Although it is expensive, cutting the adhesive-bonded
assemblies is sometimes the only way to determine the nature of the discontinuity or to verify its existence. All inspection
results should be carefully documented for future reference.
Once a highly confident inspection technique is established, the remaining defective assemblies can be used for
developing repair procedures. The original NDI techniques can then be used for determining if the repairs are effective. In
some cases, defective parts are consistently produced, and the material, production process, or design must be changed to
correct the condition. This condition is usually evident when the same type of defect occurs in the same location in all
manufactured parts.
Reliable feedback from manufacturing personnel is beneficial to the NDI technician. This information can include such
items as too high or too low an oven temperature, incorrect heat-up rate, leaks in the vacuum bag, additional layers of
adhesive added at a particular spot in the assembly, and so on. With this information, the NDI technician is better
prepared to inspect a particular group of parts.
Destructive Correlations of NDI Results
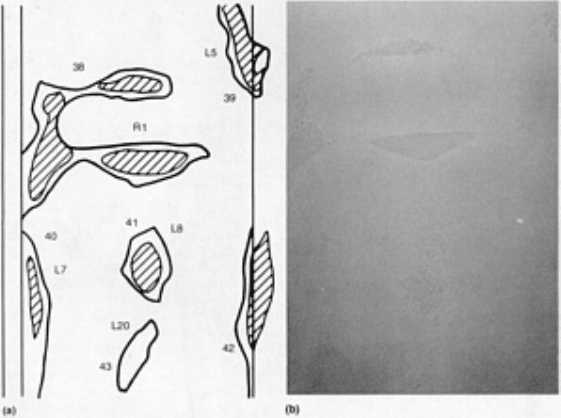
Following is a typical example of correlating NDI results by destructive testing. In this example, a metal-to-metal joint
containing a bonded doubler and longerons and frames was rejected for numerous voids and porosity. The initial
inspection was performed using the Fokker bond tester, and the defective areas were marked on the surface of the part, as
shown in Fig. 51(a). The inspection results were verified using the 210 bond tester. The part was then sent out for thermal
neutron radiography. There was excellent correlation between the Fokker bond test results and the neutrograph (Fig. 51b).
Fig. 51 Correlation of NDI res
ults. The same specimen was inspected by (a) Fokker bond tester and (b)
neutron radiography. See text for discussion.
The panel was then ultrasonically C-scanned using the through transmission technique. Again, the correlation was
excellent, as shown in Fig. 52. A plastic overlay was made to record the Fokker bond tester results.
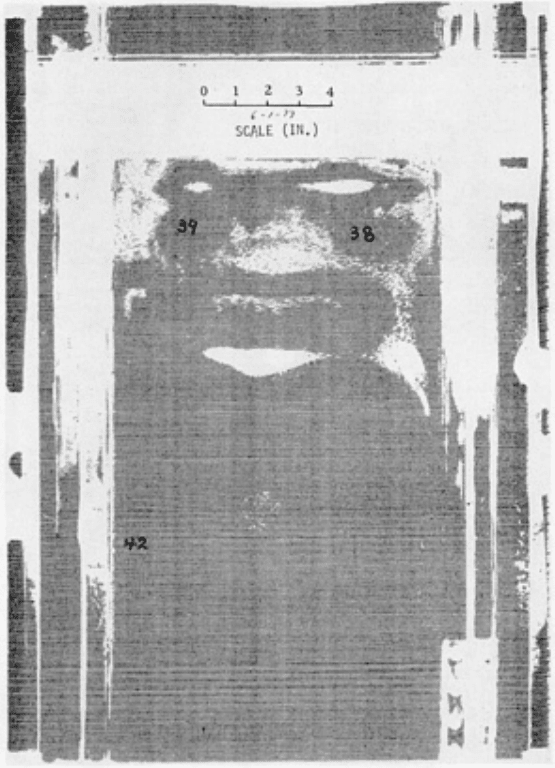
Fig. 52 Ultrasonic C-scan recording of panel in Fig. 51 showing voids and porosity.
Through transmission
method was used with low-gain (31 dB).
The part was then subjected to chemical milling to dissolve the aluminum adherends, leaving the adhesive layer intact.
The adhesive thickness was measured and recorded. The destructive to nondestructive correlation was again excellent and
revealed that the adhesive thickness in and around the defects was greater (0.33 to 0.46 mm, or 0.013 to 0.018 in.) than in
the nondefective areas (0.18 to 0.28 mm, or 0.007 to 0.011 in.). In addition to the correlations noted above, lap shear
specimens could have been made through the different defect conditions, and variations in bond strength could have been
determined.
Because of the variety of defects that can occur in honeycomb assemblies, defects detected by one test method should be
verified by an additional, but similar test method. Time and facilities permitting, the assembly should also be x-rayed in
the defective area.
Ultrasonic Wave Interference Effects
In the ultrasonic inspection of adhesive-bonded joints, the following two conditions may cause ultrasonic wave
interference (Fig. 24) effects:
• When inspecting bond lines under tapered metal doublers
• When inspecting close to the edge of a bonded laminate and the adhesive is thin due to pinch-off (
Ref
10)
