ASM Metals HandBook Vol. 17 - Nondestructive Evaluation and Quality Control
Подождите немного. Документ загружается.

wide use is that radiography provides a permanent record of the results of the inspection. This record is important because
the inspector can review the radiographs at any time to ensure that federal, state, or insurance requirements have been
met.
Acceptance standards were developed according to the limits of radiography (what can or cannot be detected by the
method) and by the quality level obtainable by the manufacturing practices used to produce the vessels. Essentially, the
acceptance standards do not permit the existence of indications of the following types of flaws: cracks, incomplete fusion,
incomplete penetration, slag inclusions exceeding a given size that is not related to the thickness of the part, and porosity
that exceeds that presented in illustrated charts provided in the codes. These standards result from the ability to
distinguish among porosity, slag, and incomplete fusion in the radiograph; more important, they also mean that no
indications of cracks or of incomplete fusion are permitted.
Magnetic Particle Inspection. The procedures for magnetic particle inspection reference ASTM E 709 (Ref 4) or
section V of the ASME code for the method. Acceptance standards permit no cracks, but rounded indications of
discontinuities are permitted provided they do not exceed a certain size or number in a specified area. Magnetic particle
inspection is universally used on ferromagnetic parts, on weld preparation edges of ferromagnetic materials, and on the
final welds after the vessel has been subjected to the hydrostatic test. A magnetic particle inspection must be conducted
twice on each area, with the lines of magnetic flux during the second application at approximately 90° to the lines of
magnetic flux in the first application. Depending on the shape of the part and its location at the time of inspection,
magnetization can be done by passing a current through the part or by an encircling coil and sometimes by a magnetic
yoke. The acceptance level is judged by a qualified operator and is subject to review by an authorized code inspector.
Liquid penetrant inspection is usually employed on nonferromagnetic alloys, such as some stainless steels and high-
nickel alloys. The acceptance standards are the same as for magnetic particle inspection and are also judged by an
operator, subject to review by a code inspector. The methods are specified to those contained in ASTM E 165 (Ref 5) or
section V of the ASME code. Water-washable, postemulsifiable, or solvent-removable penetrants can be used. A water-
washable color-contrast penetrant is usually employed because it is easy to handle, requires no special ventilation, and is
nontoxic. Sometimes, special requirements dictate the use of either a solvent-removable color-contrast penetrant or a
fluorescent penetrant.
Ultrasonic inspection is used to inspect piping, pressure vessels, turbine rotors, and reactor coolant pump shafts.
Straight-beam ultrasonic inspection is specified to detect laminations in plates and to detect discontinuities in welds and
forgings. This technique is described in general and specific terms in section XI of the ASME code, in the United States
Nuclear Regulatory Commission Regulatory Guide 1.150 (Ultrasonic Testing of Reactor Vessel Welds During Preservice
and Inservice Examinations), and in companion reports written by utility ad hoc committees (Ref, 1). Angle-beam
inspection is specified for welds, and a more detailed procedure is presented, including reporting requirements, It is
mandatory, however, that ultrasonic inspection, either by straight beam or angle beam, be conducted to a detailed written
procedure. These procedures are usually developed by the manufacturer. Specifications and standards for steel pressure
vessels are given in ASTM A 577 (Ref 6), A 578 (Ref 7), and A 435 (Ref 8). Acceptance standards for the inspection of
welds by ultrasonics closely parallel the acceptance standards for radiography. Cracks, incomplete fusion, and incomplete
penetration are not permitted. The size permitted for other linear indications is the same for the slag permitted by
radiography. However, ultrasonic inspection can detect cracks better than radiography, but it is sometimes difficult to
separate cracks from other linear indications by ultrasonics. Furthermore, ultrasonic inspection procedures refer to the
amplitude of the signal obtained from a calibration notch, hole, or reflector placed in a standard reference block, but not
all slag inclusions or cracks in an actual workpiece present a similar response to that obtained from the artificial
calibrator.
Advanced ultrasonic systems (see the section "In-Service Quantitative Evaluation" in this article) and the improvements
in codes and regulations have combined to make ultrasonic inspection one of the most commonly used nondestructive
methods in the power industry. Advanced ultrasonic methods are intended to ensure that the vessel remains fit for
continued service by detecting and sizing defects that could degrade structural integrity.
Acoustic emission (AE) inspection has been used for the following applications (Ref 9):
• Inspection of chemical and petrochemical vessels
•
Monitoring nuclear plant components or systems during hydrotests, plant operation, or preservice
pressure testing of the primary system
• Monitoring during pressure testing of intentionally flawed vessels
• Monitoring fiber-
reinforced plastic tanks, with the major problems being associated with poor
manufacturing techniques that allow dust and other foreign objects to be mixed in with the resin
• Monitoring liquefied petroleu
m gas storage tanks. The main problems associated with this type of test
program include the different propagation paths and attenuation coefficients caused by the geometry of
the vessel and the correct transducer locations and spacing
Rupture tests on experimental vessels with wall thicknesses up to 150 mm (6 in.) have been monitored, and such tests
help define the acoustic emission response patterns that can be used to recognize incipient vessel failures. However, many
of the vessel rupture tests monitored by acoustic emission have been conducted mainly to provide fracture mechanics
data, and the acoustic emission monitoring was an add-on feature (Ref 9).
Acoustic emission tests are often conducted during preshutdown operations in an effort to identify areas requiring special
maintenance or during special tests while under slightly varied operational conditions. Data on wave propagation and
failure mechanisms have been recorded and used to develop reliable acoustic emission evaluation techniques (Ref 10).
The advancement of AE inspection techniques includes the introduction of an AE methodology into Section V, Article
12, of the ASME Boiler and Pressure Vessel Code as a December 1988 Addendum. Other AE methodologies in the
inspection of fiber-glass and metal pressure vessels are described in the article "Acoustic Emission Inspection" in this
Volume.
Eddy Current Inspection. One of the rapidly increasing applications for this method is the inspection of thin-wall
(0.9 to 1.5 mm, or 0.035 to 0.060 in.) Inconel alloy steam generator tubing (Ref 11, 12) and heat exchanger tubing (Ref
13). The focus of steam generator tube inspection by eddy current has shifted from concentrating solely on the detection
and characterization of tube wall denting and wastage to more complex tube wall degradation mechanisms. The newer
degradation mechanisms consist of intergranular attack (IGA), stress-corrosion cracking (SCC), mechanical wear, and
pitting in the presence of copper. A summary of steam generator tubing defects is shown in Fig. 1. In response to the
complexity of these newer problems, eddy current instrumentation has also evolved from a single-frequency to a multiple-
frequency configuration. The analog instrumentation has been replaced by digital multiple-frequency instrumentation,
offering more consistent data acquisition. The wider dynamic range offered by the digital instrumentation allows analysis
of eddy current data obtained from traditionally difficult areas, such as dented tube support/tube sheet interfaces and roll
transition/roll expansion areas within the tube sheet. Additional information, including typical data produced by multiple-
frequency instrumentation, can be found in the article "Eddy Current Inspection" in this Volume.
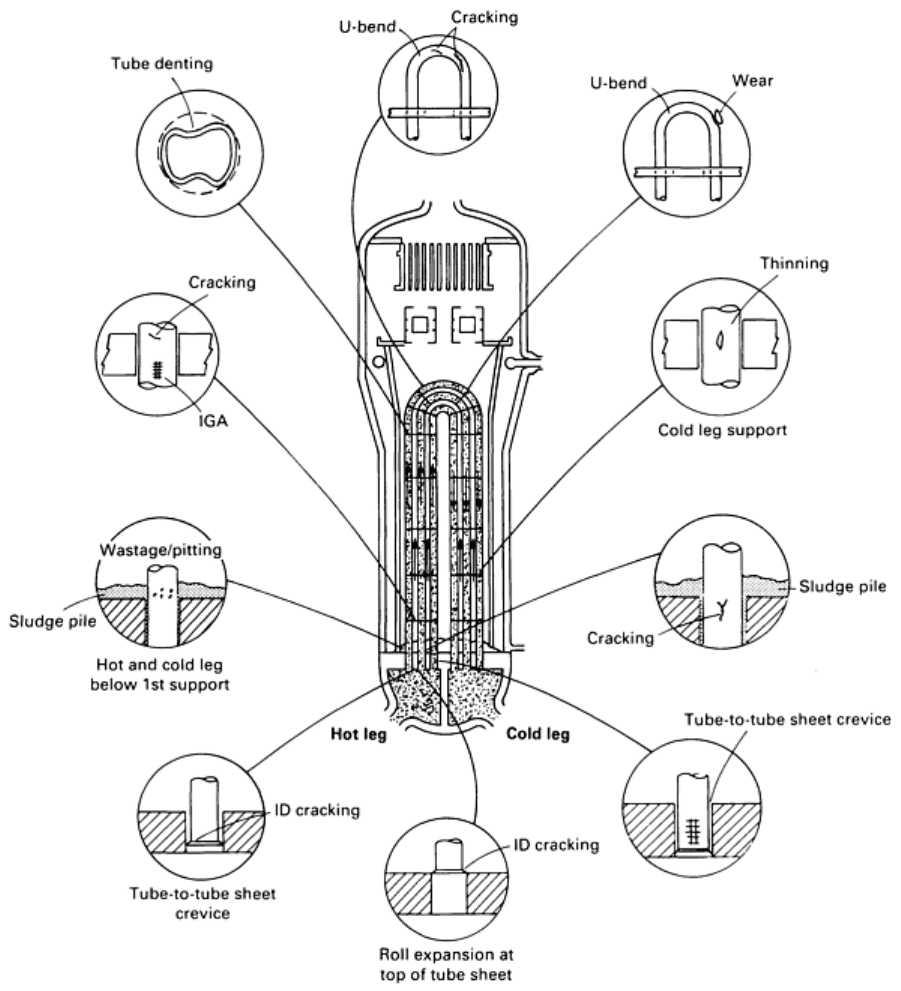
Fig. 1 Locations of known tube wall degradations in recirculating steam generators. Source: Ref 11
Another advancement is that of remote-field eddy current testing, which has been used to examine nuclear fuel rods and
other tubular products. The article "Remote-Field Eddy Current Inspection" in this Volume can be consulted for details
and results of analyses.
Replication microscopy, or field metallography, is an effective and economical means of obtaining an image of a
component surface, permitting both on-site and laboratory examination and evaluation of the metallurgical condition of
the material (see the article "Replication Microscopy Techniques for NDE" in this Volume). Material sample removal
from critical components is a costly and time-consuming process that often necessitates part replacement, weld repair, and
stress relief. The replication examination is completed without having to cut out a portion of the component, and the
metallurgical data can be determined in fine detail. Therefore, material evaluation can be performed with a nondestructive
and cost-effective method that does not require the removal of material samples.
Specimen (Surface) Preparation. Critical surface locations for inspection are identified, and external insulation is
removed. The area to be replicated is polished with progressively finer grits and compounds. The final compound is a
0.25 m diamond polishing paste, which ensures a surface finish of 1 m or better.
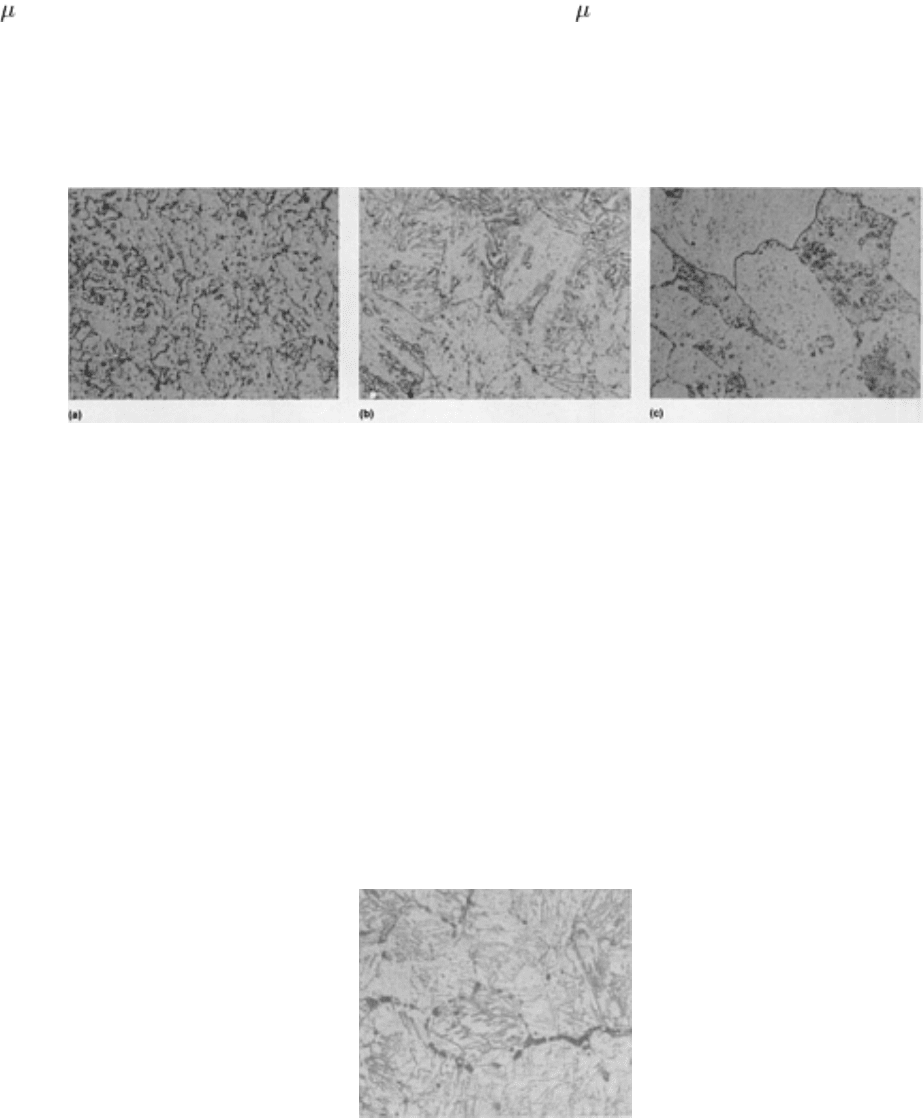
The surface is then etched to reveal the microstructural detail (Fig. 2). A plastic film is applied, cured, and carefully
removed. The surface of the film in contact with the polished area retains a precise, reverse image of the etched
component surface.
Fig. 2
Weld microstructures showing no evidence of microvoids in a secondary superheater outlet header made
from 1.25Cr-0.5Mo steel. (a) Weld metal. (b) Heat-affected zone. (c) Base metal. Weld location: nozzle-to-
header weld (header side of weld). All 400×. Courtesy of H.I. Newton, Babcock & Wilcox
Procedure/Defect Analysis. In the laboratory, the replica is examined using standard light (optical) microscopy, or it
can be viewed at high magnification with an electron microscope. To improve resolution, the replica is enhanced by
shadowing with sputtering or vacuum evaporation techniques.
An actual replica magnified to 400× is shown in Fig. 3. The microstructure indicates that linked creep voids exist along
the grain boundaries in this component, suggesting that creep is active and that cracking is imminent. The progression of
damage from microstructural voiding to linked voids to cracking is schematically illustrated in Fig. 4. Replicas can reveal
all the microvoids, microcracks, and microstructural features in exact detail, just as if the metal surface itself were being
viewed.
Fig. 3 Replica showing random and linked microvoids in the heat-
affected zone of a secondary superheater
outlet header weld. 400×. Courtesy of H.I. Newton, Babcock & Wilcox
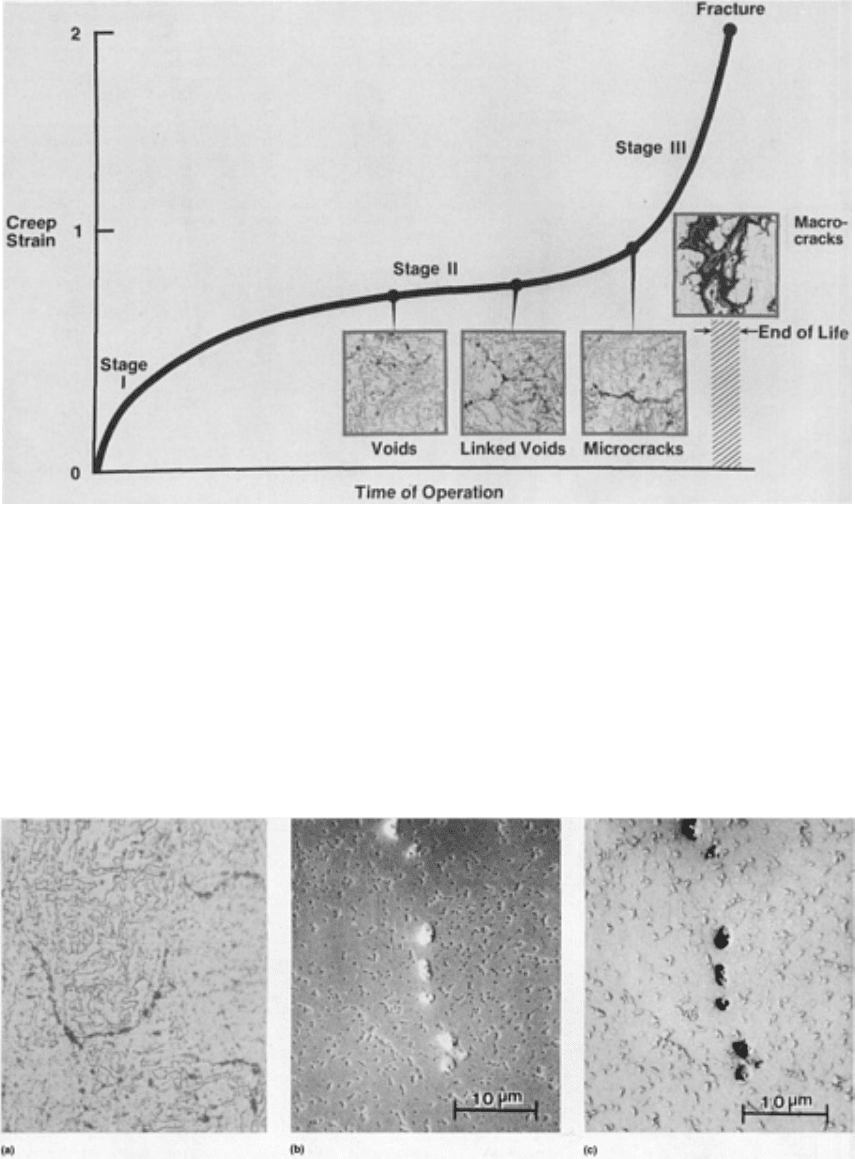
Fig. 4 Progression of creep damage over time as depicted by replica photomicrographs.
Courtesy of H.I.
Newton, Babcock & Wilcox
The principal application of the replication technique is in revealing metallurgical anomalies and incipient damage
(cracking). In the absence of fatigue and/or preexisting defects, creep cracks are theorized to initiate by the formation,
growth, and linkup of voids into microcracks, which in turn consolidate to form macrocracks (Fig. 5). The propagation of
the macrocracks can then lead to final failure.
Fig. 5 Replicas of creep damage in pressure vessel components. (a) Random and linked microvoids in a 1.25Cr-
0.5Mo main steam line weld
. 425×. Courtesy of H.I. Newton, Babcock & Wilcox. (b) and (c) A comparison of
scanning electron micrographs of a replica from 1.25Cr-
0.5Mo material with aligned creep cavities. (b) Normal
contrast. (c) Reversed image contrast. Etched with 4% picral. Court
esy of E.V. Sullivan, Aptech Engineering
Services, Inc.
In actuality, a creep-fatigue interaction better describes the type of damage mechanism most often encountered. It is
theorized that the creep mechanism described previously is accomplished by a fatigue mechanism. In a creep-fatigue
interaction, one may observe a mixture of intergranular and transgranular crack growth surfaces with the absence of
voiding. The presence of preexisting flaws affords an initiation site for cracking and subsequent material degradation.

Actively growing cracks are evidence that the condition of a component is deteriorating under service loads; this warrants
monitoring, repair, or replacement. Creep-fatigue interaction is discussed in detail in the article "Creep-Fatigue
Interaction" in Mechanical Testing, Volume 8 of ASM Handbook, formerly 9th Edition Metals Handbook.
The advantages of the replication techniques are many. It is nondestructive. An accurate image of the component
surface is also obtained. In addition, early detection of damage and the evaluation of existing failure mechanisms are
possible. Replicas also reinforce decision making with regard to the need to replace or repair critical degraded
components.
Limitations. There are also disadvantages with the replication technique. The analysis is limited to the accessible
surface of the component. The replication technique is also site sensitive. In addition, no compositional analysis of the
microstructural constituents is possible with surface replicas, although extraction replicas have been used in chemical
analysis (see the section "Precipitate Analysis" in the article "Replication Microscopy Techniques for NDE" in this
Volume). With these limitations in mind, it is recommended that replication be used in conjunction with other
nondestructive techniques to provide a complete overall evaluation of a component.
References cited in this section
2. ASME Boiler and Pressure Vessel Code: Section II--Material Specifications, Part A--
Ferrous Materials;
Section III, Division 1--Nuclear Power Plant Components; Section V--
Nondestructive Examination; Section
VIII--Division 1--Pressure Vessels, Division 2--Alternative Rules for Pressure Vessels; Section IX--
Welding and Brazing Qualifications; Section XI--
Rules for Inservice Inspection of Nuclear Power Plant
Components, American Society of Mechanical Engineers
3. "Recommended Practice for Nondestructive Testing Personnel Certification," SNT-TC-
1A, American
Society for Nondestructive Testing, 1988
4. "Standard Recommended Practice for Magnetic Particle Examination," E 709,
Annual Book of ASTM
Standards, American Society for Testing and Materials
5. "Standard Practice for Liquid Penetrant Inspection Method," E 165, Annual Book of ASTM Standards,
American Society for Testing and Materials
6. "Standard Specification for Ultrasonic Angle-Beam Examination of Steel Plates," A 577,
Annual Book of
ASTM Standards, American Society for Testing and Materials
7. "Standard Specification for Straight-
Beam Ultrasonic Examination of Plain and Clad Steel Plates for
Special Applications," A 578, Annual Book of ASTM Standards, American Socie
ty for Testing and
Materials
8. "Standard Specification for Straight-Beam Ultrasonic Examination of Steel Plates," A 435,
Annual Book of
ASTM Standards, American Society for Testing and Materials
9. B.R.A. Wood, Acoustic Emission Applied to Pressure Vessels, J. Acoust. Emiss.,
Vol 6 (No. 2), 1989, p
125-132
10.
J.C. Spanner, Acoustic Emission in Pressure Vessels, in Pressure Vessel and Piping Technology--
1985: A
Decade of Progress, American Society of Mechanical Engineers, 1985, p 613-632
11.
K. Krzywosz, Recent NDE Experiences With PWR Steam Generator Tubing Inspection, in
NDE in the
Nuclear Industry, ASM INTERNATIONAL, 1987, p 157-167
12.
R.H. Ferris, A.S. Birks, and P.G. Doctor, Qualification of Eddy Current Steam Generator Tube
Examination, in NDE in the Nuclear Industry, ASM INTERNATIONAL, 1987, p 71-73
13.
V.S. Cecco and F.L. Sharp, Special Eddy Current Probes for Heat Exchanger Tubing, in
NDE in the
Nuclear Industry, ASM INTERNATIONAL, 1987, p 109-174
Note cited in this section
* The material on replication microscopy in this section was prepared by H.I. Newton, Babcock & Wilcox.

Nondestructive Inspection of Boilers and Pressure Vessels
Inspection of Plates, Forgings, and Tubes
Plates up to 300 mm (12 in.) thick, such as those conforming to ASME SA-533, grade B (Fe-Mn-Ni-Mo) are used for
pressure vessel shell sections. All plates are ultrasonically inspected 100%. Pulse-echo search units have been adapted for
this inspection. The search unit consists of an immersion-type longitudinal wave or shear wave transducer encased in a
container holding a liquid couplant. Because the container can conform to minor surface irregularities on the material
being inspected, much of the surface conditioning previously required for contact inspection is eliminated. Good, sound
penetration and a stable back reflection are obtained with this type of unit.
Straight-beam inspection is conducted over the entire surface of the plate. Calibration for straight-beam inspection is
accomplished by adjusting the back-reflection amplitude from the opposite surface to approximately 75% of the height of
the CRT. Discontinuities causing a loss of back reflection that cannot be contained in a 75 mm (3 in.) diam circle are
unacceptable. Laminar-type discontinuities, which are the most common type of imperfections encountered in plate
materials, are readily detected by straight-beam inspection.
The angle-beam inspection of plates is included in many specifications. Scanning is conducted in overlapping passes over
the entire surface in two directions at 90° to each other. Calibration is accomplished by adjusting the signal to a square
notch milled to a depth of 3% of the plate thickness. Discontinuity indications equal to or exceeding the signal amplitude
from the notch are cause for rejection.
During the ultrasonic inspection of plates, close attention must be given to signal patterns that indicate the presence of
discontinuities, such as secondary piping, which do not normally produce significant response indications on the
oscilloscope. Discontinuities of this type can result in untimely rejection or high rework costs if not detected prior to the
start of fabrication.
Forgings used for pressure vessel flanges, head flanges, and nozzles are commonly purchased to the requirements of
ASME specifications, such as those of ASME SA-508, class 2 (Fe-Mn-Ni-Cr-Mo-V), and are heat treated and
nondestructively inspected by the supplier. Ultrasonic inspection is required on two surfaces of the forging using the
straight-beam inspection method; for ring or hollow round shapes, angle-beam inspection is specified. These inspections
must be carried out prior to contour machining to ensure complete volumetric coverage. Inspection is repeated to the
maximum extent practical after machining and heat treatment are completed. Discontinuity indications observed by
straight-beam inspection that cause a loss of back reflection, and by angle-beam inspection that are equal to a 3%-of-
plate-thickness notch, will result in the rejection of the component.
Ferromagnetic forgings are inspected by magnetic particle inspection methods after final heat treatment and contour
machining. Linear discontinuities such as laps, cracks, or inclusions are cause for rejection.
Tubular products can receive ultrasonic and liquid penetrant inspections prior to release for fabrication. As stated above,
eddy current inspection is common during the in-service inspection of tubular products.
Nondestructive Inspection of Boilers and Pressure Vessels
Nondestructive Inspection During Fabrication
Plates are formed into shell cylinder segments or into hemispherical segments for the top and bottom heads. Shell plates
of thick material are hot formed by pressing to the radius required. Plates for head segments are hot formed over dies
machined to the proper contour. After the hot forming is completed, the plates are allowed to cool and are then inspected
to confirm that the proper radius has been obtained. The formed section is then reheated, water quenched, and tempered to
obtain the required mechanical properties. Samples are cut from the heat-treated material and tested to determine the
tensile and impact properties of the material before further fabrication is permitted.
Fit-Up and Welding. Edges of plates that are machined in preparation for welding are magnetic particle inspected.
Surface discontinuities, other than laminar types less than 25 mm (1 in.) long, are removed. Discontinuities with any
significant thickness are further investigated by radiographic or ultrasonic inspection to determine their nature and extent.
Welding of the longitudinal seams in the shell cylinders is commonly performed by the multilayer submerged arc process.
Single arc and tandem arc procedures are used, with preheating and postheating when specified. Welding of head-torus
sections can be done using the horizontal submerged arc process, in which the weld beads are deposited through the
thickness of the material. With the horizontal submerged arc process, the axis of the weld is in a vertical position, and
each weld bead is deposited from the inside to the outside of the seam progressively upward until the complete length is
welded. A manual welding procedure (usually, shielded metal arc) in which the axis of the weld is in the vertical position
is sometimes used instead of the submerged arc process. These processes require NDI techniques suitable for adequate
interpretation of discontinuity size. After welding and interstage stress relieving of the longitudinal seams are completed,
the weld is magnetic particle inspected and radiographed.
The design of the weld joint and the welding procedure used are important considerations in determining the extent of
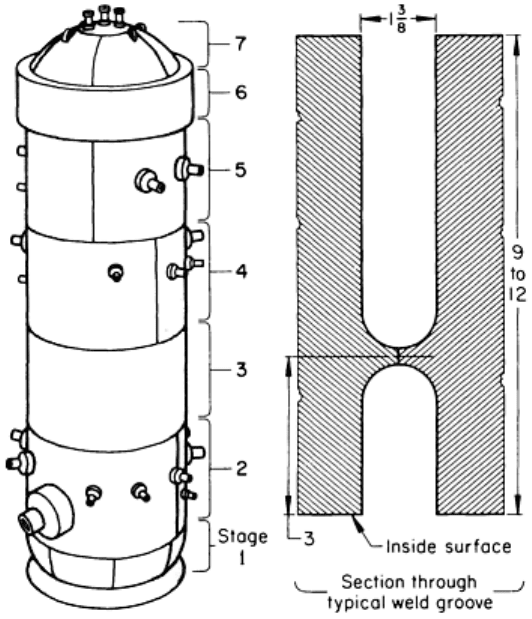
nondestructive inspection and the adequacy of the results. The narrow-groove weld joint illustrated in Fig. 6 provides for
good radio-graphic inspection, including crack detection. Those cracks that are more likely to occur along the sidewall of
a weld are essentially parallel to the radiographic beam in the joint design. When the radiographs are made with
equipment and techniques that obtain good sensitivity in these thick-section welds, cracks of this type can be readily
detected. Welds having wide-angle sidewalls require additional angle radiography or ultrasonic inspection.
Fig. 6 Sequence of assembly and typical narrow-
groove joint used for the welding of thick plates in pressure
vessels
The depth at which slag inclusions are beneath the surface and the thickness of the inclusions usually cannot be
determined by radiographs taken normal to the weld surface. Discontinuity indications observed on the film usually
require additional angle radiography or ultrasonic inspection to determine the depth and thickness of the slag inclusions.
Acceptance standards for welds made in the vertical position are more rigid than acceptance standards applied to other
welding procedures.
Clad Vessels. Certain types of pressure vessels, such as some nuclear vessels or chemical-processing vessels, are
fabricated from carbon or alloy steels whose inside surfaces are clad with a layer of stainless steel. With these types of
vessels, the inner surfaces are machined smooth to provide a suitable surface for cladding. Machining is done after the
shell and head-torus subassemblies have been completed. After machining, the smoothed surfaces are magnetic particle
inspected; no indications of linear discontinuities are permitted.
Also at this manufacturing stage, the formed and heat-treated material is again ultrasonically inspected. This inspection is
performed using the straight-beam method over the entire surface of the material. Changes in the acoustic quality of the
material as a result of heat treatment may cause minor differences in the signal amplitude from those indications
previously recorded.
The inner surfaces of large pressure vessels are clad, oscillating multiple-wire systems or strip electrodes. Three-wire and
six-wire self-shielded flux-cored wire, plasma arc processes, and electroslag overlays are also used for pressure vessel
applications.
Liquid penetrant inspection is performed on all clad surfaces. When properly cleaned, the as-deposited clad surface is
adequate for liquid penetrant inspection. Solvent-removable red-dye penetrants are often used for this inspection.
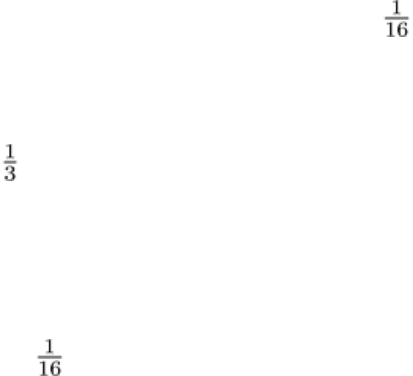
Acceptance standards do not allow linear indications of any type. Rounded indications with less than 1.5 mm ( in.)
maximum dimension are acceptable. Mating surfaces of machined flanges and surfaces of O-ring seals are inspected to
more rigid acceptance standards. Sealing surfaces must be free of any indications.
Calibration for inspection of the cladding is accomplished by setting up the inspection equipment on a reference block
clad by the same process as the material being inspected. A 10 mm ( in.) wide slot is machined through the backing
material to the cladding interface. The ultrasonic pattern observed from the slot in the reference block provides the
acceptance standard for the cladding.
Inspections are conducted from the clad side of the material, except for small-diameter nozzles. When inspecting from the
side opposite the cladding, close observation must be given to the presence of laminar discontinuities in the base material
that could mask the area of inspection. Cladding on mating flange surfaces is inspected to a more rigid standard by pitch-
catch echo testing. The two-transducer system is calibrated on a 1.5 mm ( in.) diam, side-drilled hole at the interface
of the cladding and base material. Discontinuity indications exceeding the amplitude of the signal from the calibration
hole are unacceptable.
Assembly. Shell cylinders and flanges are joined together by welding the girth seams using the submerged arc process.
Back grooves, final surfaces, and surfaces prepared for welding are magnetic particle inspected. Radiography is
performed after cladding the inside of the welded girth seam.
Nozzle openings are cut in the shell cylinder and are then machined to the size and shape required for fitting the nozzles.
The narrow-groove weld joint, through the shell thickness, is used for the nozzle-to-shell weld.
Nozzle welds are made by either the manual or the automatic submerged arc process. In addition to magnetic particle and
radiographic inspection, all nozzle welds are subjected to ultrasonic inspection. The techniques for the ultrasonic
inspection of welds contained in the ASME code are used as the basic method of inspection. Angle-beam inspection is
performed on the outer surface of the shell adjacent to the nozzle weld. The sound beam is aimed about 90° to the weld
and manipulated laterally and longitudinally so that maximum coverage is obtained.
Sound-beam dispersion from the effect of the clad interface prevents full-node sound transmission. Only the
discontinuities encountered in the initial sound path through the material can be consistently detected by the angle beam.
Straight-beam inspection is performed by directing the sound into the weld from the inside of the nozzle. The
combination of straight-beam and angle-beam inspection provides full inspection coverage of the weld.
For the detection of cracks in welds, ultrasonics and radiography have complementary advantages and disadvantages.
Vertical, subsurface cracks in a weld that are readily detectable by radiographic methods are extremely difficult to detect
by ultrasonics. Discontinuities oriented in a plane other than normal to the weld surface can be best detected
ultrasonically.

Various beam angles and frequencies are used to establish the best ultrasonic procedure that could be applied to
production welds. The standard 45° transducer at a frequency of 2.25 MHz is commonly used for the detection of cracks.
However, to provide additional assurance, scanning should be performed at a gain setting of at least ten times the
calibration sensitivity.
Final Inspection. After assembly is completed and all inspections are verified, the vessel is subjected to a final stress-
relieving treatment. Magnetic particle inspection of all exposed ferritic material is again performed, using the yoke
method. Arc strikes that are likely to occur with the prod method are thus avoided on the final stress-relieved surface.
Final machining of the vessel and head is done after stress relieving. All machined surfaces are inspected by liquid
penetrants after the vessel is dimensionally inspected.
Vessel and head inside surfaces are thoroughly cleaned, and the vessel is positioned vertically for hydrostatic testing.
After hydrostatic testing, all exposed ferritic welds are magnetic particle inspected. Instrumentation and attachment welds
are liquid penetrant inspected.
A baseline ultrasonic inspection can be performed on the completed vessel. This inspection provides a record of
ultrasonic indications that can be used as a reference for future in-service inspections of the vessel. The data generated
from this inspection are useful only if the method of inspection during the in-service inspection is compatible with the
baseline inspection method. The effect of the cladding interface on the ultrasonic sound beam requires increased
sensitivity settings on the equipment if inspection is conducted from the inside of the vessel. Beam-angle changes due to
the irregular cladding interface require exact duplication of the position of the transducer and the entrance angle of the
sound beam if reproducible results are to be obtained. Equipment capable of remotely controlling these variables is
essential if these inspections are to be conducted.
Nondestructive Inspection of Boilers and Pressure Vessels
Visual Inspection of Pressure Vessels
Visual inspection can readily detect misalignment, movement of mating parts, surface contamination, cracks, and other
surface discontinuities. Direct examination is possible when the eye or an equivalent detector can be placed within 600
mm (24 in.) of the surface to be inspected. Where radiation levels are too high or access is limited, remote inspections can
be used; telescopes, periscopes, borescopes, fiber optics, or television monitoring systems are available (see the article
"Visual Inspection" in this Volume).
Visual inspection requirements are extensive in section XI of the ASME Boiler and Pressure Vessel Code. In general, all
weld areas not receiving volumetric inspections must be visually inspected after hydrostatic testing. Also, comprehensive
inspections are applied to bolting, piping, pumps, and valves.
Nondestructive Inspection of Boilers and Pressure Vessels
Radiographic Inspection of Pressure Vessels
A radiograph is basically a two-dimensional picture of the intensity distribution of a form of radiation that is projected
from a source (ideally, a point source) and that has passed through a material that attenuates the intensity of the radiation.
Voids, changes in thickness, or regions of different composition will, under favorable circumstances, attenuate the
radiation by different amounts, producing a projected shadow of themselves. Three forms of penetrating radiation are
used in radiography: x-rays, γ-rays, and neutrons. X-rays were the earliest to be used. Detailed information on
radiography is available in the article "Radiographic Inspection" in this Volume.
Radiography is normally used to examine welded seams in fabricated pressure vessels. The main reasons for the use of
radiography are the following:
