ASM Metals HandBook Vol. 17 - Nondestructive Evaluation and Quality Control
Подождите немного. Документ загружается.

A wide variety of ultrasonic bond testers have been developed over the past 20 years. As a consequence, this mode of
bond inspection probably requires the most study because of the number of instruments available and the claims of the
manufacturers. Various independent studies have been conducted in an attempt to clarify the situation (Ref 2, 3, 10, 11,
12, 13, 14, 15, 16, 17, 18, 19, 20). The results of these studies revealed that all the instruments are capable, in varying
degrees, of determining the quality of the bond. None of the instruments is capable of establishing the adhesive quality of
a bond that is defective as a result of:
• Poor surface preparation of the substrate
• Insufficient cure temperature
• Contamination of the adhesive or substrate prior to bonding
The conclusions indicate that ultrasonic bond test instruments are the most reliable and sensitive for detecting voids,
porosity, thick adhesive, and corrosion at the bond line, and that they can be used to inspect metal-to-metal and
honeycomb structures.
Instruments such as the Coinda Scope, Stub Meter (Ref 13, 14), Sonic Resonator (Ref 11), and Arvin Acoustic-Impact
Tester (Ref 15) have not found general acceptance and are no longer on the market. Following is a short description of the
ultrasonic bond testers currently being used to inspect adhesive-bonded assemblies.
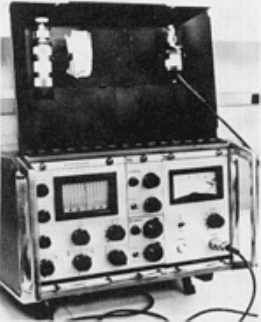
The Fokker Bond Tester (Fig. 26) is based on the analysis of the dynamic characteristics of the mass-spring and
dashpot system formed by the combination of the bonded assembly with a piezoelectric transducer having known mass
and resonance characteristics. Changes in the viscoelastic properties of the adhesive layer are detected as variations in the
resonance frequency and impedance of the system. The calibrated body acts as a transducer that can be driven at different
frequencies. The dimensions of the transducer are chosen in relation to the total thickness of the metal sheet to be tested
and to the required mode of resonance. The response of the total system, as shown by the impedance curve over the swept
frequency band, is displayed on a CRT display (A scale) (Fig. 27), and the peak-to-peak amplitude of the curve is shown
by a microammeter (B scale).
Fig. 26 Fokker bond tester
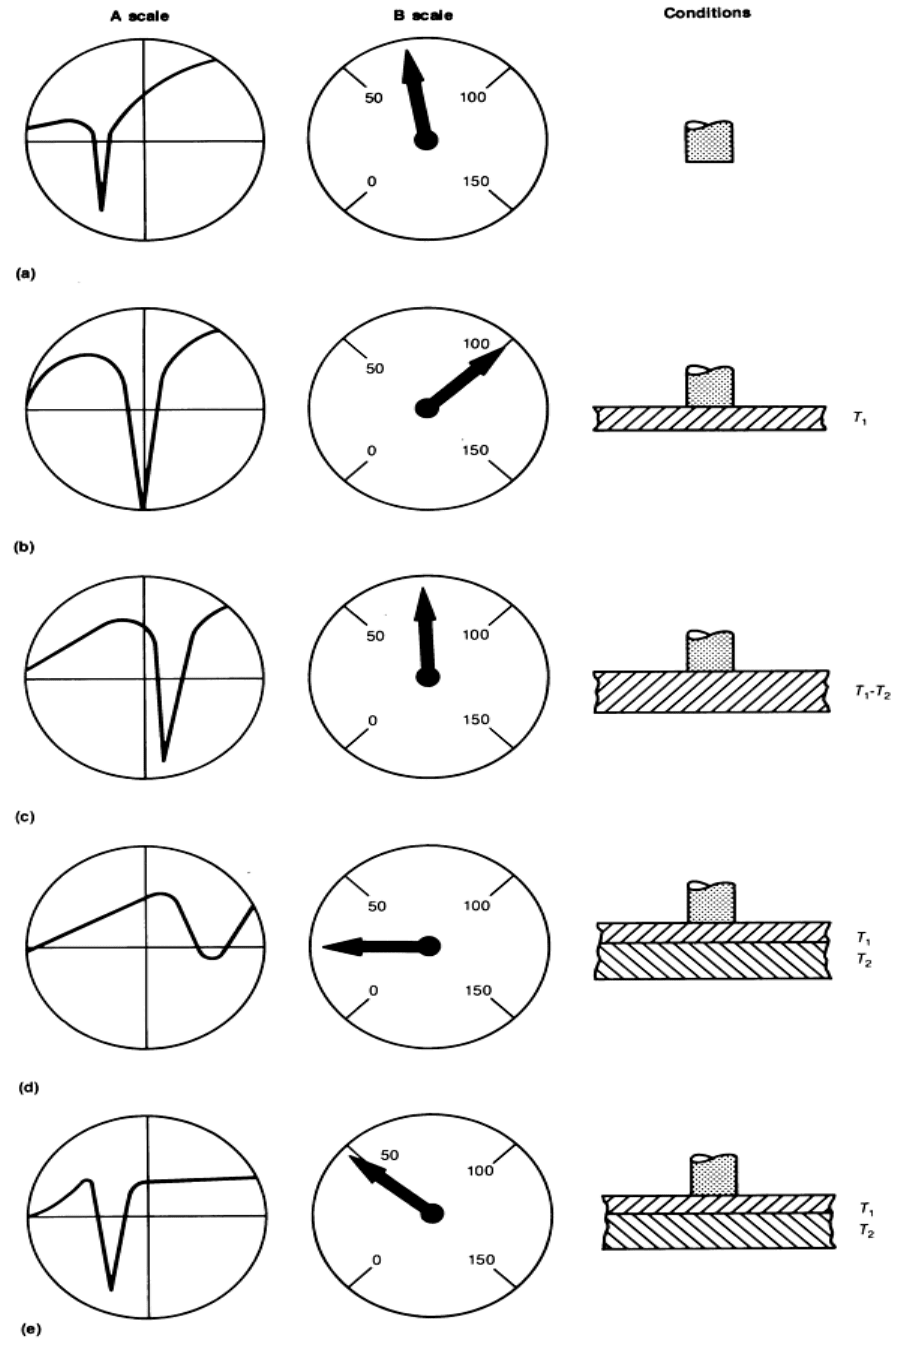
Fig. 27 Several ty
pical Fokker bond tester readings for specific bond conditions. (a) Probe held in air. (b) Probe
is on top of the upper adherend (no bonds) and is a calibration for unbond condition. (c) Probe placed on a
single piece of metal as thick as combined parts be
ing bonded and calibrated for ultimate quality. (d) Probe
placed on bonded joint with good-quality bond (no voids); high-
strength bond. (e) Probe placed on bonded joint
with porosity; low-strength bond
For inspecting metal-to-metal bonded joints, the probe containing the calibrated body is placed on top of a piece of sheet
material with the same thickness as the upper sheet material of the bonded laminate. The central frequency of the
oscillator is selected such that the lowest point of the impedance curve is in the center of the A scale. Simultaneously, the
B scale is adjusted to 100 (Fig. 27). Calibration of the instrument on a nonbonded sheet ensures that, in all cases of a
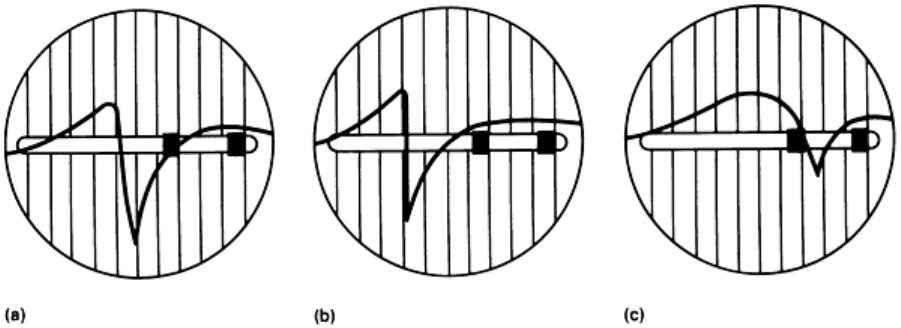
complete void, the peak position will return to the center of the A scale and that the B scale reading will be 100 (Fig. 28).
The next calibration places the probe on a piece of metal sheet equivalent in thickness to all the metal sheets in the subject
bonded laminate. The peak obtained in this test is the resonance frequency to be expected of an ideally bonded laminate
(Fig. 27 and 28).
Fig. 28 Typical displays of Fokker bond tester A scale for various qualities of adhesive-
bonded joints. (a)
Central frequency, no strength. (b) Higher frequency, low strength. (c) Lower frequency, high strength
The quality of cohesion from any test can be accurately determined by comparing the instrument reading with established
correlation curves. In practice, the acceptance limits are based on the load or stress requirements of the adhesive for each
joint. The accuracy of the prediction of quality depends primarily on knowing the manufacturing variables and the
accuracy of the nondestructive and destructive tests conducted in accordance with MIL-STD-860 (Ref 21). The
destructive test for metal-to-metal joints uses the lap shear specimen and, for honeycomb panels, uses the tension
specimen for bond strength correlations. Comparative tests by several investigators indicate the Fokker bond tester to be
more reliable in quantitatively measuring bond strength as related to voids and porosity in the joint (Ref 2, 3, 5, 10, 16,
18, 22, 23). For the inspection of honeycomb, calibration is accomplished in the same manner except that the micrometer
(B scale) on the instrument is used. The degree of quality is reflected on the B scale. Low-quality bonds will give a high B
reading, and good-quality bonds will give a low B reading.
The Fokker bond tester has been successfully applied to a wide variety of bonded sandwich assemblies and overlap-type
joints of various adherends, adhesive materials, and configurations. The method has proved suitable for joints having
reasonably rigid adherends, including metallic and nonmetallic materials. Highly elastomeric or porous adherends
attenuate ultrasonic response. The method is most sensitive to the properties of the adhesive and is particularly sensitive
to voids, porosity, and incomplete wetting (unbond). Fokker tests readily detect:
• Voids in either adhesive or nonmetallic adherend materials
• Cracks and delaminations in adherends
• Unbonded, flawed, ruptured, unspliced, or crushed honeycomb core
Data indicate the test to be capable of measuring bond degradation caused by such factors as moisture, salt spray,
corrosion, heat aging, weathering, and fatigue.
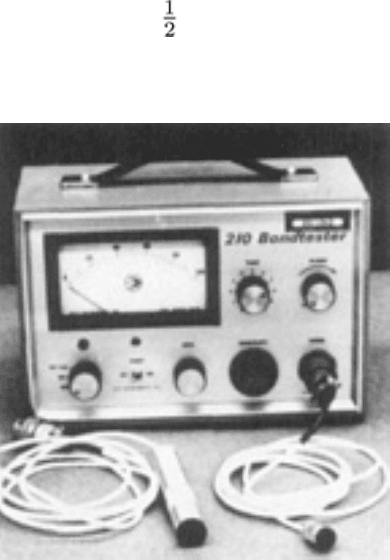
NDT-210 Bond Tester (Fig. 29). Sound waves from a resonant transducer are transmitted into, and received from, the
bonded structure. Unbonds or voids in the structure alter the sound beam characteristics, which in turn affect the
electroacoustic behavior (impedance) of the transducer. A frequency range extending from less than 100 Hz to more than
6 MHz is provided for maximum performance. The unit automatically adjusts to the resonant frequency of the probe. A
precision automatic gain control oscillator maintains a constant voltage at all frequencies, eliminating the need for manual
adjustment. Test response is displayed on a 114 mm (4 in.) wide meter. The operator can set an adjustable alarm to
trigger when the response exceeds a preset level.
Fig. 29 NDT-210 bond tester
Metallic, nonmetallic, or a combination of joints can be inspected for voids and unbonds. The joints can be adhesively
bonded, brazed, or diffusion bonded.
The Shurtronics Mark I harmonic bond tester (Fig. 30), now identified as the Advanced Bond Evaluator, is a
portable, low-frequency, eddy sonic instrument that uses a single transducer for the inspection of thin metal laminations
and metal-to-honeycomb bonded structures. The instrument utilizes a coil that electromagnetically vibrates the metal face
sheet. This coil induces a pulsed eddy current flow in a conductive material by an oscillating electromagnetic field in the
probe. The alternating eddy current flow produces an accompanying alternating magnetic field in the part. The attraction
of the magnetic fields causes acoustomechanical vibrations in the part. When a structural variation is encountered, the
change in acoustic response is detected by a broadband receiving microphone located inside the eddy current probe.
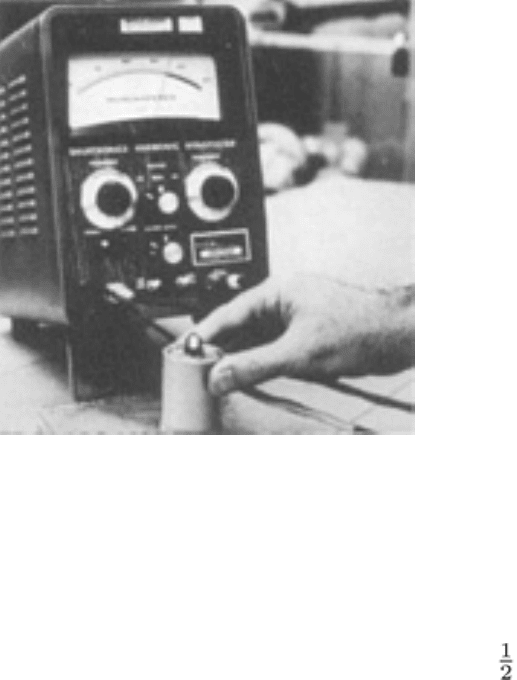
Fig. 30 Shurtronics harmonic bond tester
An ultrasonic oscillator generates a 14- to 15-kHz electric signal in the probe coil, creating an oscillating electromagnetic
field. The resulting acoustomechanical vibration in the testpiece is detected by a microphone with a bandwidth of 28 to 30
kHz. The microphone signal is filtered, amplified, and displayed on a microammeter. The instrument is calibrated to read
just above zero for a condition of good bond and to read full scale for unbonds over 13 mm ( in.) in diameter or larger.
This method does not require a liquid couplant on the part surface. It is useful for the quick detection of unbonds in large-
area bonded metal laminates, metal-to-nonmetal laminates, or honeycomb structures. It is highly effective for detecting
skin-to-core unbonds or voids in acoustic-honeycomb panels utilizing perforated facing sheets. The sensitivity of the
instrument decreases rapidly for skin thickness over 2.0 mm (0.080 in.) and near the edge of the part.
The Advanced Bond Evaluator (ABE) bond tester (Fig. 31) has the following improvements:
• 1% alarm accuracy: Vernier control ensures test repeatability with zero hysteresis
• Phase comparator:
Detects defects in nonmetallic composite materials and provides additional
information on metallic structures
• Portable operation: Self-contained batteries and built-in recharger
• Modular construction: Plug-in circuit boards for fast field servicing and maintenance
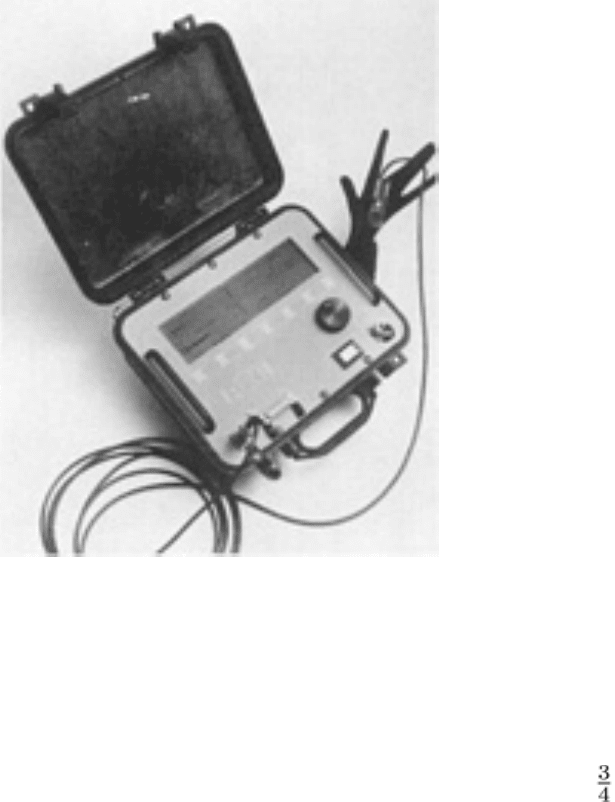
Fig. 31 Advanced Bond Evaluator bond tester. Courtesy of M. Gehlen, UniWest/Shurtronics Corporation
The Sondicator is a pulsed transmit/receive ultrasonic portable instrument that is capable of operating in a very low (25
to 50 kHz) acoustic frequency range. The instrument operates within this range at a selected single frequency, obtained by
manual tuning for best instrument performance. The model S-2 contains two meters and associated electronic circuitry,
along with a test probe containing two Teflon-tipped transducers mounted approximately 19 mm ( in.) apart. One
transducer imparts vibration at 25 kHz into the surface. Vibrations travel laterally through the material to the other
transducer. The second transducer detects the amplitude and phase relationship of the vibrating surface, directing the
associated signals to the two meters of the test equipment. If the probe encounters a delaminated or unbounded area, it
will in effect be introducing vibration into an area that is thinner than the bonded area. The amplitude of vibration will
increase and the phase of vibration will shift as the thinner section vibrates more vigorously. The needles on the two
meters will move toward each other.
The instrument is primarily used to detect delaminations of the bond or laminar-type voids in metal and nonmetal
structures. The inspection can be performed from one face of the structure or by through transmission. It requires no
liquid couplant. Multiple bond lines and part edges will reduce the sensitivity of the instrument. Because of the
directionality of the sound from the transmitter to the receiver, the part must be scanned uniformly. The unit is capable of
detecting defects 25 mm (1 in.) in diameter and larger in most materials. Metallic and nonmetallic materials can be
inspected without changing probes. Audible and visible alarms are activated by received signals. The instrument can
detect internal delaminations and voids in bonded wood, metal, plastic, hard rubber, honeycomb structures, Styrofoam,
and composites. It can measure skin or face sheet thickness in composite structures as a change in amplitude or phase
(Fig. 32).
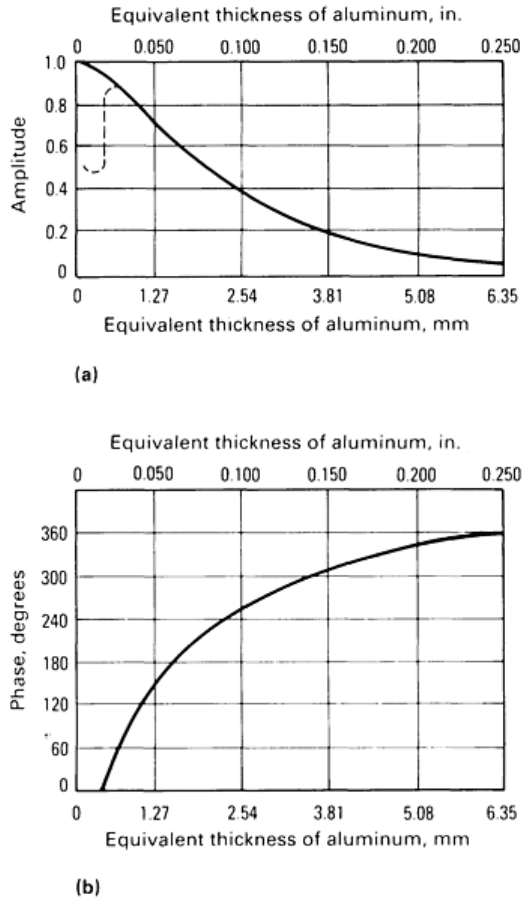
Fig. 32 Variation of amplitude (a) and phase (b) as detected with a Sondicator
Bondascope 2100. The Bondascope (Fig. 33) is an advanced microprocessor-based device that operates on the
principle of ultrasonic impedance analysis. This technique allows the total ultrasonic impedance vector for the material to
be monitored as a flying dot on a scope display. With the center of the scope screen as the origin (reference), impedance
phase changes are displayed circumferentially, while impedance amplitude changes are displayed radially. Thus, the
position of the dot on the scope immediately reveals the phase and amplitude of the impedance of the material (Fig. 33a).
Therefore, defects at different bond lines each possess a characteristic dot position on the scope display.
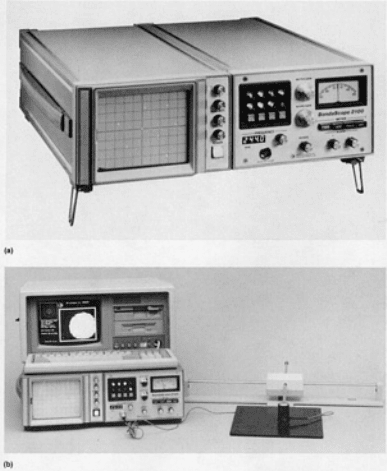
Fig. 33 Bondascope 2100. (a) Front view of unit showing CRT readout of bond line depths. (b) Unit used as
a
component in a PortaScan bond testing system. Courtesy of R.J. Botsco, NDT Instruments
With the addition of a 640-KB random access memory (RAM) portable computer having a 229 mm (9 in.) built-in color
monitor, a high-speed plug-in data acquisition card (DAC), a software package, and a 1.4 to 1.8 kg (3 to 4 lb) scanner
incorporating a ball-bearing gimbal probe holder, the Bondascope 2100 becomes an integral part of the PortaScan
(portable ultrasonic color scan imaging) system that can be used for both C-scan imaging and set-up flying dot
(impedance plane) imaging (Fig. 33b).
Figure 34 illustrates the typical Bondascope response to unbonds at different bond lines (depths) in a multilayered
adhesive-bonded laminate. The instrument was calibrated so that the dot was in the center of the screen (origin) when the
probe was placed on a well-bonded section of the laminate. The numbered dots represent the signals obtained when the
probe was placed over regions having unbonds located at different respective bond line depths in the laminate. The dot
labeled "air" is the signature obtained when the probe was off the sample. Thus, improper ultrasonic coupling into the
material is quickly recognized.
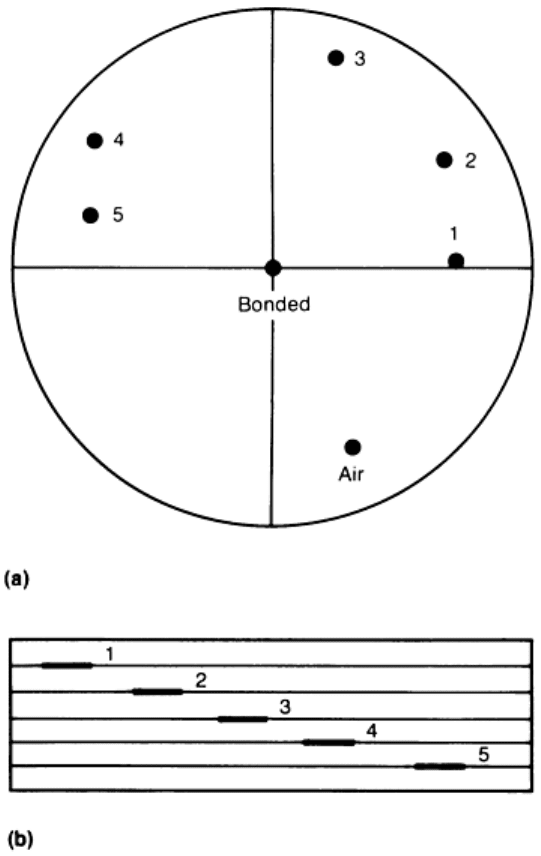
Fig. 34
Bondascope ultrasonic impedance plane presentation for multilayer laminar. (a) Orientation of
Bondascope display of the unbonds shown in (b). (b) Multilayer bonded lamina
te with unbonds located at 1, 2,
and so on
A meter on the Bondascope, by means of selectable push buttons, can display the signal amplitude, phase, or the vertical
resolved component of the amplitude. Through the use of a phase-rotator control, the signal response can be positioned so
that nonrelevant signals are suppressed from the meter/alarm readings.
A keyboard push-button matrix allows the operator to digitally program calibration-sample reference dots on the scope
display to aid in interpreting signals obtained during actual testing. This type of storage display not only facilitates
operation and interpretation but also eliminates the confusing permanent streaks that would occur if a conventional
storage scope were used to display the flying dot.
The Bondascope is suitable for inspecting metallic and nonmetallic bonded structures (multilayered laminates or
honeycomb). Graphite-epoxy and other fiber-matrix composites can also be tested with this device.
The NovaScope is a sophisticated high-resolution, pulsed ultrasonic thickness gage with a digital readout and scope
display for qualifying the echo pattern. It is primarily intended for either manual contact probe or focused immersion
(squiter) applications for which the conventional digital-only readout gages are not suitable. This is the case for structures
having complex, difficult-to-test shapes or whenever the product is in motion. The instrument has a variety of controls for
optimizing the test response to the desired ultrasonic echo periods.
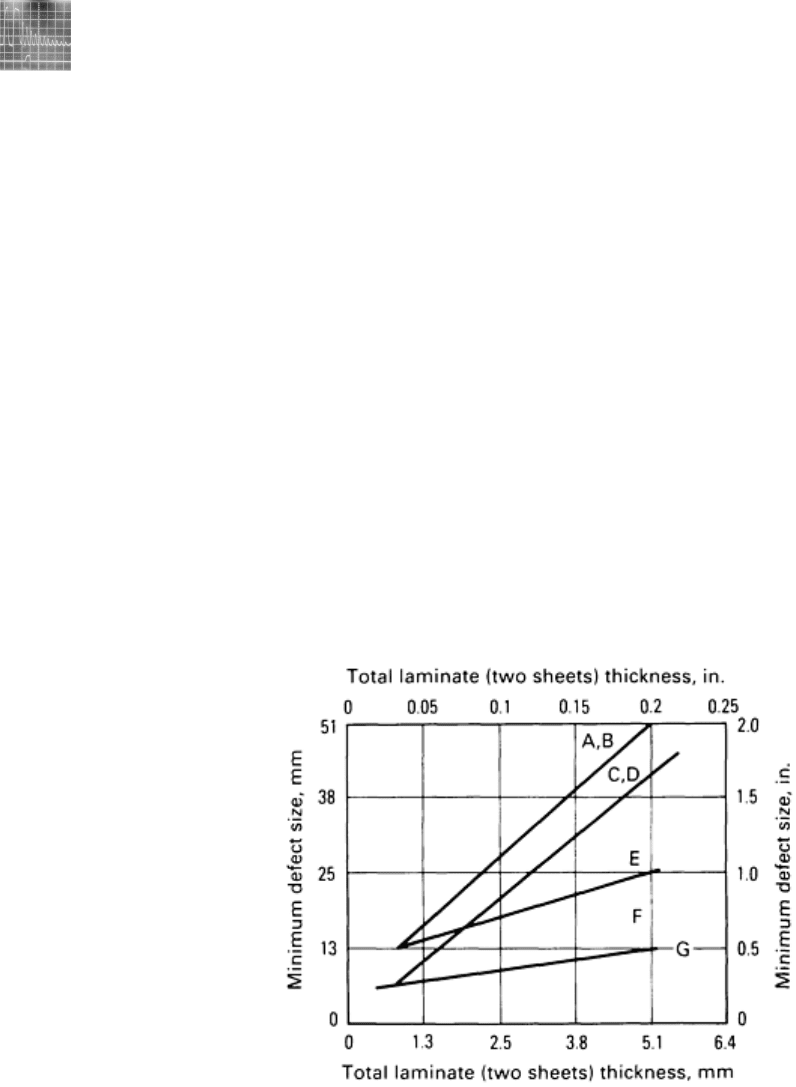
Figure 35 shows the resolving power of the instrument for gaging thin materials. In this case, the material is a steel sheet
only 0.15 mm (0.006 in.) thick. The upper trace is the A-scan echo pattern, while the lower trace shows the thickness gate
adjusted between two successive echoes from the thickness of 0.15 mm (0.006 in.). This instrument is useful for testing
thin composite laminates for delaminations, for detecting corrosion in aircraft skins, and for bond line thickness gaging.
Fig. 35 Novascope CRT display of a 0.15 mm (0.006 in.) steel sheet. Upper trace: A-
scan echo pattern. Lower
trace: Thickness gate reading obtained from two successive echoes.
Courtesy of R.T. Anderson, NDT
Instruments
Ultrasonic and Bond Tester Method Sensitivity. The defect detection sensitivity of ultrasonic techniques with
respect to defect size and location is highly dependent on the changing conditions of part complexity, number of bond
lines, operator experience, and so on. Most instruments detect major defects most of the time, but in some cases special
techniques and skills are needed to conduct a reliable inspection. Whenever possible, bonded structures should be
inspected from opposite surfaces to detect small defects. In the ultrasonic bond test methods, different-size search units or
probes are available. The smallest flaw that can be readily detected is of the order of one-half the diameter of the search
unit or probe element.
Test Frequency. The higher the test frequency, the smaller the flaw that can be detected. Ultrasonic testing at 5 or 2.25
MHz will detect smaller flaws than can be detected with the Sondicator (25 to 50 kHz) and the harmonic bond tester (15
kHz). With multiple bond lines in a structure, smaller flaws become progressively more difficult to detect from the
surface through succeeding bond lines. This does not apply to ultrasonic through transmission or reflector plate testing, in
which the small-diameter sound beam passes completely through the part. Figure 36 shows the relative defect sensitivity
of ultrasonic and bond tester techniques.
Fig. 36
Relative sensitivity of instruments used to inspect bonded laminates of increasing total thicknesses. A,
Sondicator, contact method; B, Shurtronics harmonic bond tester; C, Fokker bond tester; D, NDT-
210 bond
tester; E, Sondicator, through transmission method; F, ultrasonic pulse-
echo; G, ultrasonic through
transmission
X-Ray Radiography
