ASM Metals HandBook Vol. 17 - Nondestructive Evaluation and Quality Control
Подождите немного. Документ загружается.

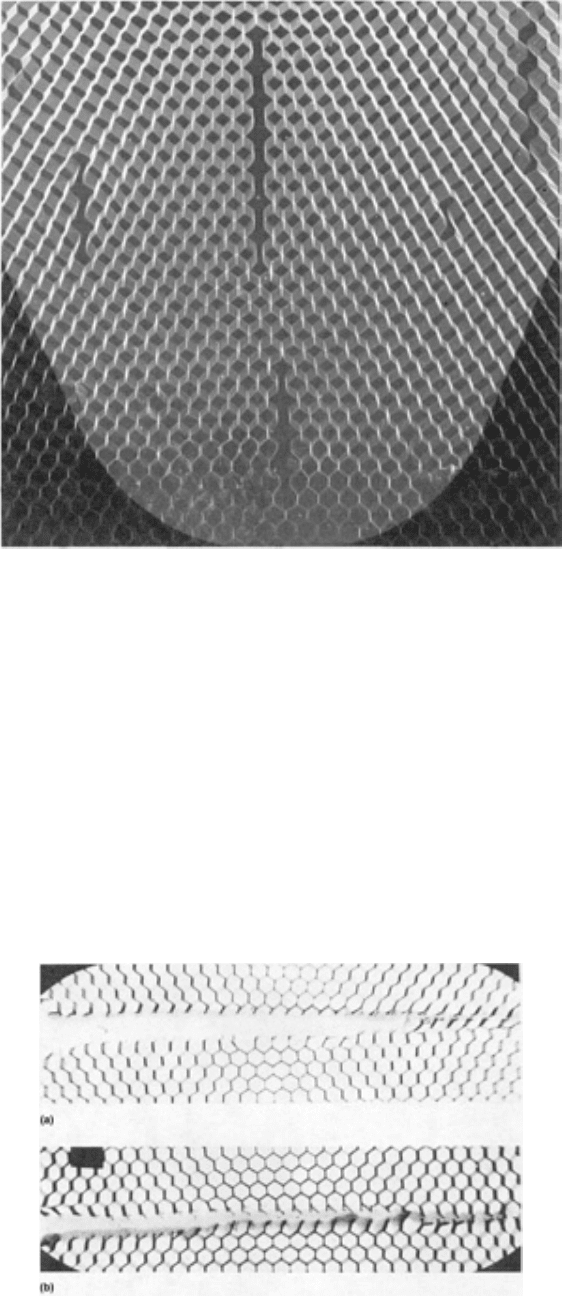
Fig. 14 Radiographic illustration of a blown core
Voids in Foam Adhesive Joints. Defects in core-to-closure, core-to-core splice, core-to-trailing edge fitting, and
chemically milled steps (Fig. 8) in foam adhesive joints can result from the following conditions:
• The foam adhesive can slump or fall, leaving a void between the core and the face skins.
This particular
condition is most readily detected by ultrasonics
•
The core edge dimension may be cut undersize and the foam does not expand uniformly to fill the gap
between the closure and the core
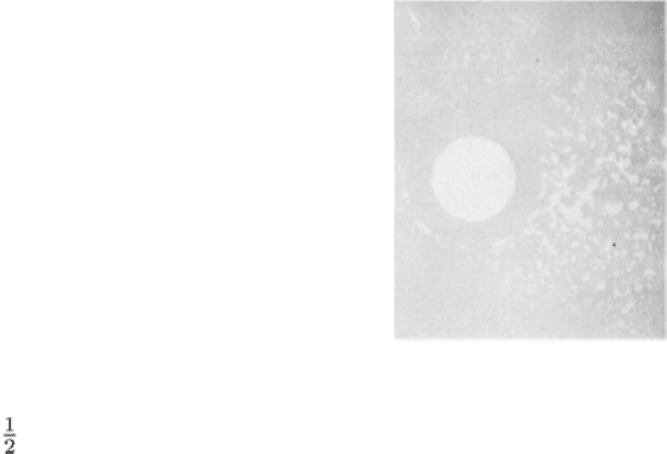
• The foaming adhesive can fail to expand and surround the core tangs, as illustrated in Fig. 15
Fig. 15 Positive print from x-
ray radiograph of foaming adhesive at core splice. (a) Lack of or unacceptable
foaming at core splice. (b) Acceptable foaming at core splice
Protective Film Left on Adhesive. Protective films are usually given a bright color so that they can be seen and
removed from the adhesive before bonding. If they remain on the adhesive, the adhesive is prevented from contacting one
of the adherends. This condition is very difficult to detect by ultrasonic techniques and x-ray radiography, with which it
would appear as a mottled condition. It generally produces porosity, especially at the perimeter, which aids in its
detection.
Metal-to-Metal Defects. The most prominent defects are voids and porosity. Disbonds can occur under the following
conditions:
• When the core is slightly higher than a closure member
• Lack of applied pressure from tooling
• Entrapped volatiles in the bond joint prior to cure
• Excessive moisture in the adhesive prior to cure
• Contaminated honeycomb core
Voids and porosity are detectable by low-kilovoltage (15 to 50 kV) x-ray techniques using a beryllium-window x-ray
tube, by thermal neutron radiography, and by ultrasonic C-scan techniques employing small-diameter or focused search
units operating at 5 to 10 MHz. If the flaw is the result of insufficient pressure, the adhesive will be porous, as shown in
Fig. 4 and 5. The lower the kilovoltage and/or the thicker or denser the adhesive, the higher the resolution of the flaw
image. In general, the flaw size detectable by radiography is smaller than that detected by ultrasonics. Also, some
adhesives, such as AF-55 and FM-400, are x-ray opaque, which yields a much higher contrast among voids, porosity, and
solid adhesive (Fig. 16). Disbonds (separation between adhesive and adherend) are best detected by ultrasonic techniques.
Fig. 16 Positive print from neutron radiograph s
howing void and porosity in an adhesive bond line. Two 13 mm
( in.) thick aluminum adherends bonded with EA 9628 adhesive are shown; AF-55 adhes
ive bond would have
yielded similar results with x-ray radiography.
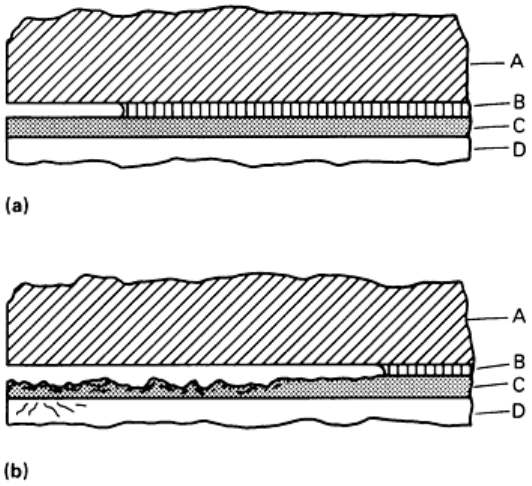
One of the most important types of voids in honeycomb assemblies is the leakage-type void, which is oriented normal to
the metal-to-metal bond line and penetrates to the core. Moisture can penetrate such a void during operational service and
cause corrosion or ice damage to the core. This type of void is illustrated in Fig. 17(a) and 17(b).
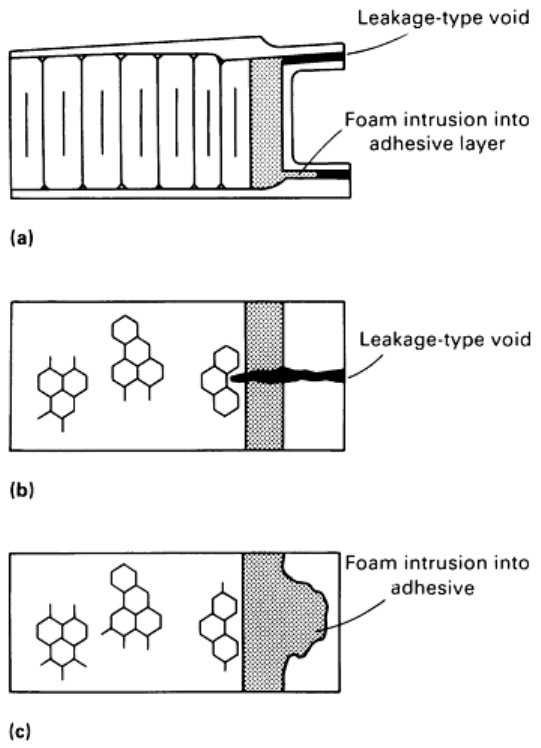
Fig. 17 Schematics of leakage-type void and foam intrusion in metal-to-metal joints. (a) Leakage-
type void,
and foam intrusion into adhesive layer caused by excessive gap between extrusion and skins. (b) Leakage-
type
void. (c) Foam intrusion into adhesive
Foam Intrusion. Another type of defect that can cause problems in radiography is foam intrusion into a metal-to-metal
joint near a closure. This type of flaw is illustrated in Fig. 17(a) and 17(c). Ultrasonically, it will appear bonded; therefore,
ultrasonics cannot confirm the radiographic findings. Because this may or may not be a defect, it must be determined by
engineering analysis.
Skin-to-Core Voids at Edges of Chemically Milled Steps or Doublers. This condition occurs when the
adhesive fails to bridge the gap at the edges of chemically milled or laminated steps or doublers (Fig. 8). This is detected
radiographically as a dark line or an elliptically shaped dark image. Ultrasonically, it will appear as a linear void along the
chemically milled step position.
Missing Fillets. As pressure is applied during the bonding cycle, adhesive fillets are formed at the edges of each
honeycomb cell. Fillets will not be formed if pressure is not maintained. If the adhesive is x-ray opaque, this condition is
readily detected by directing the radiation at an angle of approximately 30° with respect to the centerline of the core or
closure web. If the adhesive is not x-ray opaque, then ultrasonic, eddy sonic, and tap tests can be used to locate the area
having unbonded cells. Ultrasonic C-scan can be used to record skin-to-adhesive and adhesive-to-core voids. Adhesive-
to-core voids are more difficult to detect than skin-to-adhesive voids.
Short core can exist if the core edges are cut shorter than the assembly into which it will be placed and bonded. It is
detectable by x-ray radiography and is evident as core edges that do not tie into the closure via the foaming adhesive.
Foreign Objects. Honeycomb assemblies may contain foreign objects as a result of poor fabrication practices. Nuts,
rivets, small fasteners, metal chips, and similar items can be left in the honeycomb cells before bonding or as a result of
drilling operations for fastener installations near hinge points. These objects are easily detected by x-ray radiography.
They are usually not detrimental if they can be potted in place with a room-temperature adhesive.
Repair Defects
All the flaws or defects defined previously for metal-to-metal or honeycomb sandwich assemblies can occur during
salvage or repair of these components. Repairs must be of good quality in order to maintain the reliability of the bonded
structure during continued service.
In-Service Defects
Most defects or flaws caused during service originate from impact damage, corrosion, and poor fabrication.
Impact Damage. Many bonded assemblies are made from thin materials and are susceptible to damage by impact.
Damage can be caused by small arms projectiles, work stands, dropped tools, personnel walking on no-step assemblies,
stones or other debris thrown by aircraft wheels, and similar damage. Impact imposes strain on the adhesive, causing it to
crack or separate from the adherends. Impact can cause crushed honeycomb core, resulting in loss of strength. The
crushed core can resonate during service and slowly degrade the adhesive by fatigue until it debonds from the adherend or
until cracks occur adjacent to the skin-to-core fillets. Fortunately, impact damage will generally leave a mark in the
surface of the part. These surface marks pinpoint or indicate possible subsurface damage, which can be evaluated by NDT
inspections.
Corrosion can be found in all structural concepts. However, a good example of bonding excellence is the honeycomb
acoustic panels for the DC-10 and 747 engine inlets. These applications are quite demanding because of the combination
of sonic and ambient environment being introduced into the perforated sandwich structure. Stable oxide surface
preparation is an essential part of the bond foundation. Improper surface preparation can result in an unstable oxide layer,
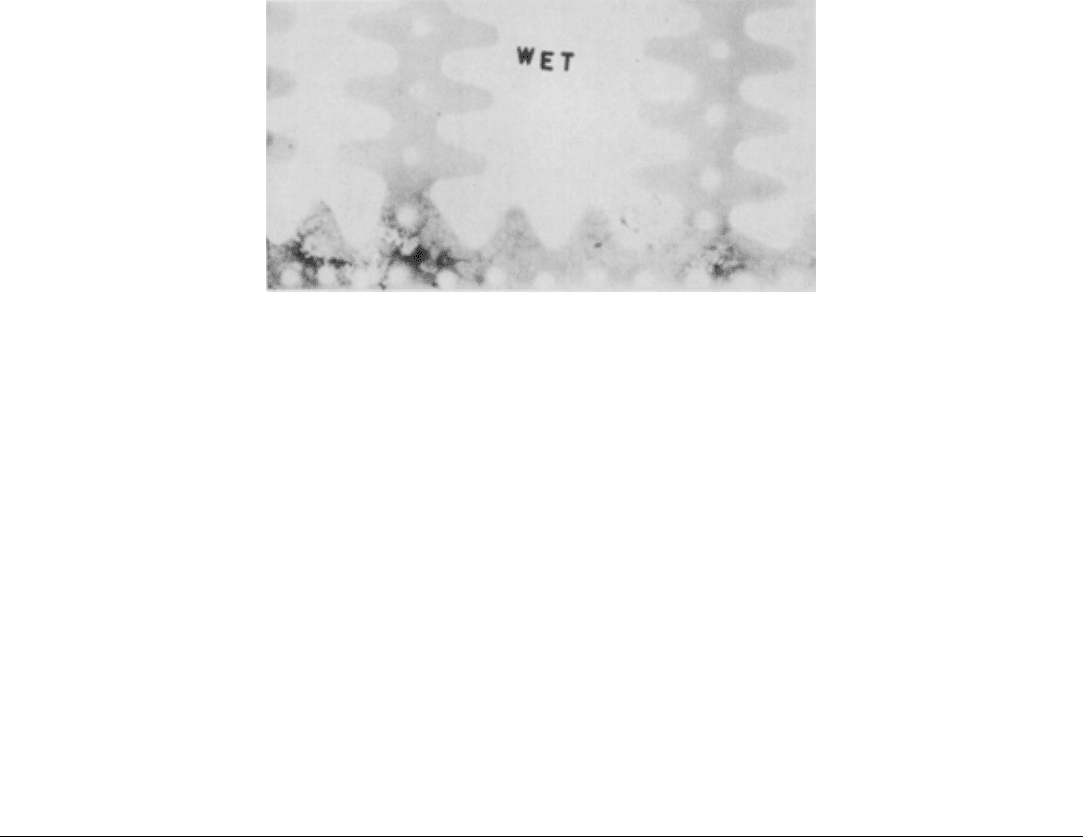
which may allow the entry of moisture, delamination, and/or crevice corrosion (Fig. 18).
Fig. 18
Schematics illustrating the causes of adhesive delamination for a metal adherend. (a) Results of
moisture entry in the unstable oxide. (b) Corrosion of cladding and base aluminum.
A, adhesive primer system;
B, oxide; C, alcladding; D, base aluminum
Moisture entry to the core of a honey-comb assembly eventually leads to corrosion of the core. This occurs when
moisture moves along the bond line to the individual cells. Moisture moves more rapidly in an assembly if the core is
perforated. Fortunately, this moisture problem is detectable by NDT inspection methods. Water is detectable by x-ray
radiography or by acoustic emission testing with a hot-air gun or heat lamp to cause boiling or cavitation of the water (Ref
7, 8, 9). Core corrosion and subsequent core-to-skin delamination is detectable by a variety of NDT methods, such as x-
ray, contact ultrasonic ringing, sonic bond testers, eddy sonic, tap test, and acoustic emission with a heat source.
Figure 19 shows a section from a commercial aircraft wing trailing edge that had moisture entry at the leading and trailing
edges, resulting in bond line corrosion. The corrosion in this panel was detected by x-ray radiography, bond testers, tap
test, neutron radiography (which looked much like Fig. 19), and acoustic emission using a heat source.
Fig. 19 Positive print from x-ray radiograph showing interface corrosion of an adhesive-bon
ded aluminum
laminate
Poor Fabrication (Flaws or Weak Bonds). In-service failures can occur from weak bonds (adhesion failures)
caused by poor surface preparation, unstable oxide failure, and corrosion of alcladding and base aluminum alloy (Fig. 18).
Many tests show that the alclad on 7000-series aluminum sheet is very susceptible to corrosion attacks in the bond line
and must be thoroughly tested before consideration for bonding operations. The 2000-series alclad aluminum alloys are
not as susceptible to this condition. Both series of alloys with no alclad surface but with good surface preparation,
adhesive, and corrosion-inhibiting primer will have no corrosion problems.
Another manufacturing condition that leads to adhesion failures is caused by improper cleaning of the honeycomb core
prior to bonding. This condition results if glycol (which is often used to support the core when it is machined) is not
completely removed prior to bonding. Incomplete removal of glycol will cause a weak bond to exist, and in-service
stresses may cause a skin-to-core delamination. This condition is controlled by adding a fluorescent tracer to the glycol.
After the core is machined and cleaned, it is inspected, using an ultraviolet (black) light, for any residual glycol prior to
bonding.
References cited in this section
1.
M.T. Clark, "Definition and Non-Destructive Detection of Critical Adhesive Bond-Line Flaws," AFML-TR-
78-108, U.S. Air Force Materials Laboratory, 1978
2.
R.J. Schliekelmann, Non-Destructive Testing of Adhesive Bonded Metal-to-Metal Joints, Non-Destr. Test.,
April 1972
3.
R.J. Schliekelmann, Non-Destructive Testing of Bonded Joints--
Recent Developments in Testing Systems,
Non-Destr. Test., April 1975
4.
P. Bijlmer and R.J. Schliekelmann, The Relation of Surface Condition After Pretreatment to Bondability of
Aluminum Alloys, SAMPE Q., Oct 1973
5.
K.J. Rienks, "The Resonanc
e/Impedance and the Volta Potential Methods for the Nondestructive Testing of
Bonded Joints," Paper presented at the Eighth World Conference on Nondestructive Testing, Cannes, France,

1976
6.
J.C. Couchman, B.G.W. Yee, and F.M. Chang, Adhesive Bond Strength Classifier, Mater. Eval.,
Vol 37 (No.
5), April 1979
7.
J. Rodgers and S. Moore, Applications of Acoustic Emission to Sandwich Structures,
Acoustic Emission
Technology Corporation, 1980
8.
J. Rodgers and S. Moore, "The Use of Acoustic Emission for Det
ection of Active Corrosion and Degraded
Adhesive Bonding in Aircraft Structures," Sacramento Air Logistics Center (SM/ALC/MMET), McClellan
Air Force Base, 1980
9.
The Sign of a Good Panel Is Silence, Aviat. Eng. Maint., Vol 3 (No. 4), April 1979
Nondestructive Inspection of Adhesive-Bonded Joints
*
Donald J. Hagemaier, Douglas Aircraft Company, McDonnell Douglas Corporation
Applications and Limitations of NDT to Bonded Joints
A variety of NDT methods are available for inspection. Only the methods applicable to the inspection of bonded
structures will be discussed in this section. All the methods or techniques presented can be used in fabrication inspections,
while only a limited number are applicable to on-aircraft or in-service inspection. The following methods have proved to
be the most successful in detecting flaws in bonded laminates and honeycomb assemblies.
Visual Inspection
All metal details must be inspected to ensure conformity with design. Before large assemblies are ready for bonding, the
details are assembled in the bonding jig as though bonding were to occur. In place of the adhesive, a sheet of Verifilm is
used. This material has nearly the same flow characteristics as the adhesive, but it is prevented from bonding by release
film so that it will not stick to the details. The whole assembly is placed in an autoclave or press just as if it were being
bonded. After the heat-pressure cycle, the parts are disassembled, and the Verifilm is inspected visually to determine if
the pressure marks are uniform throughout. A uniform marking gives good assurance of proper pressure at the bond lines.
All areas showing no pressure must be inspected and parts modified to obtain proper fit and pressure during the cure
cycle. A poor showing on the Verifilm is cause to rerun the check.
When the details go through an anodize cycle, a visual check can be made for phosphoric acid anodize but not for other
types of anodize. For visual verification of phosphoric anodize, the inspector looks through a polarizing filter at an angle
of approximately 5 to 10° from parallel to the surface of the anodized part. The surface of the panel is well lighted by a
fluorescent tube, and the inspector rotates the polarizing filter while observing the anodized surface. If the panel has been
properly anodized, the inspector, viewing at an angle of 50 to 100° from the panel surface, will see a change in hues
equivalent to the colors of the rainbow.
From the opened wedge crack specimen, the inspector looks at the failed surface to determine the type of failure. Areas of
poor adhesion occur where the adhesive has separated from the substrate. This condition is manifested by variations in
color and texture. A cohesive failure occurs through the adhesive and is uniform in color and texture.
After an assembly is bonded, it is inspected visually for scratches, gouges, dings, dents, or buckles. The adhesive flash
and fillets can be inspected for cracks, voids, or unbonds at the edge. Feeler gages can then be used to determine the depth
of the unbond at the edge. The in-service visual inspection of bonded joints can reveal cracked metal or adhesive fillets,
delamination or debonding due to water intrusion or corrosion, impact or foreign object damage, and blisters, dents, or
other mechanical damage.
Ultrasonic Inspection
A number of different types of ultrasonic inspection using pulsed ultrasound waves at 2.25 to 10 MHz can be applied to
bonded structures. Following is a brief description of the various ultrasonic techniques being used to inspect bonded
structures. Additional information is available in the article "Ultrasonic Inspection" in this Volume.
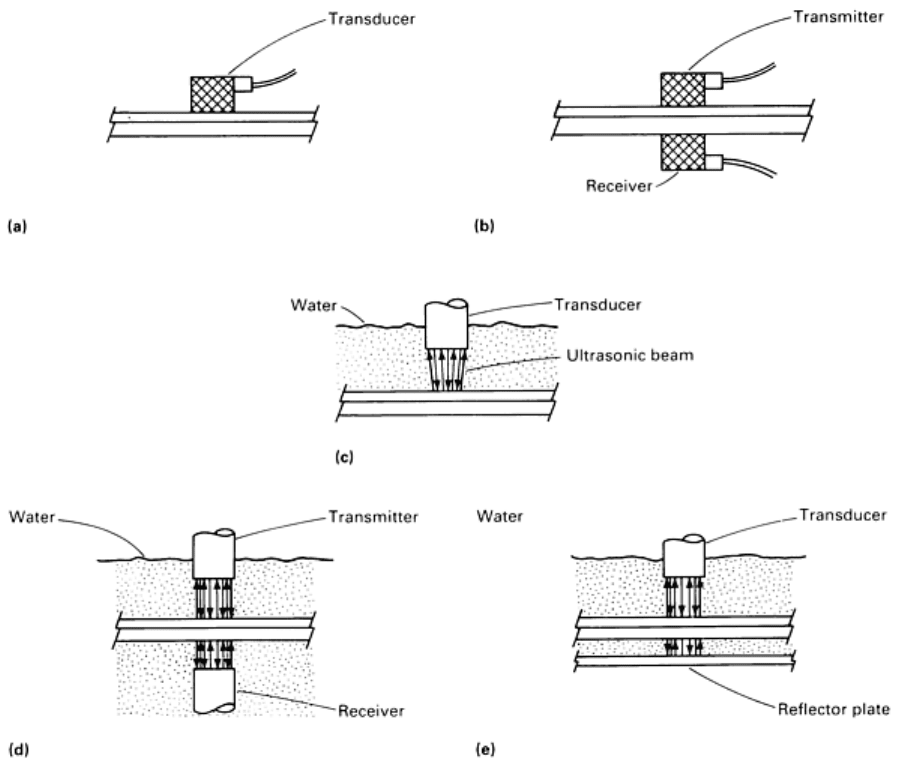
Contact Pulse Echo. In this technique, the ultrasonic beam is transmitted and received by a single search unit placed
on one surface of the part (Fig. 20a). The sound is transmitted through the part, and reflections are obtained from voids at
the bond line. If the bond joint is of good quality, the sound will pass through the joint and will be reflected from the
opposite face, or back side. Bonded aircraft structure is usually composed of thin skins, which result in multiple back
reflections on the CRT screen of the pulser/receiver. The appearance of multiple reflections on the CRT has prompted
some inspectors to term this the ringing technique. When a void is present, the reflection pattern changes on the CRT and
no ringing is seen. For bonded parts having skins of different thickness, inspection should be conducted from the thin skin
side.
Fig. 20 Ultrasonic inspection t
echniques. (a) Contact pulse echo with a search unit combining a transmitter and
receiver. (b) Contact through transmission. Transmitting search unit on top and receiving search unit on
bottom. (c) Immersion pulse echo with search unit (transmitter/receive
r) and part being inspected under water.
(d) Immersion through transmission with both search units (transmitter and receiver) and part under water. (e)
Immersion reflector plate. Same as (c) but search unit requires a reflector plate below the part being inspected
Contact through transmission (Fig. 20b) is useful for inspecting flat honeycomb panels and metal-to-metal joints.
Special search-unit holding devices have been fabricated so that the test can be performed by one inspector. Such a device
is used for inspecting the metal-to-metal closures of a bonded honeycomb panel. Longer and wider-spaced holders have
been fabricated from tubing. The holding tool should be custom designed for the assembly being inspected. To perform
the test, liquid couplant must be applied to both sides of the assembly.
Immersion Method. For this method, the assembly must be immersed in a tank of water, or water squirters must be
used to act as a couplant for the ultrasonic beam. There are three fundamental techniques: pulse echo (Fig. 20c), through
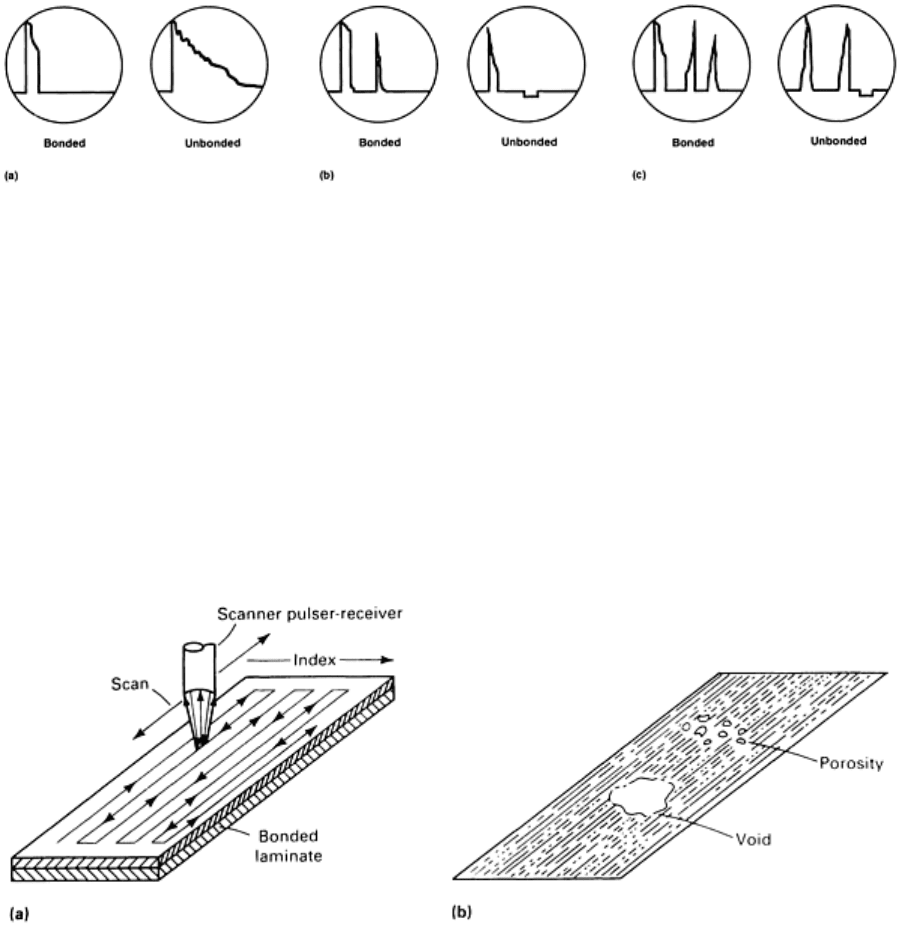
transmission (Fig. 20d), and reflector plate (Fig. 20e). Typical CRT displays for bonded and unbonded samples using
these three immersion techniques are shown in Fig. 21. These techniques are applicable to bonded laminates and
honeycomb structures. The choice of technique is partially based on the thickness and configuration of the bonded
assembly as well as physical size.
Fig. 21 Typical CRT C-scan displays obtained for both bonded and
unbonded structures using three pulsed
ultrasound techniques. (a) Pulse echo. (b) Through transmission. (c) Reflector plate
Bonded structures are generally inspected by the immersion method using a C-scan recorder. A C-scan recorder is an
electrical device that accepts signals from the pulser-receiver and prints out a plan-view record of the part on a wet or dry
facsimile paper recording (Fig. 22). To obtain the recording, the bonded panel is placed tinder water in a tank, and the
ultrasonic search unit is automatically scanned over the part. The ultrasonic signals for bond-unbond conditions are
determined from built-in defect reference standards. The signals are displayed on the pulser-receiver CRT screen, and the
signal amplitude is used to operate the recording alarm after setting the electronic gate around the signal of interest (Fig.
23). Generally, high-amplitude signals will record, but low-amplitude signals will not record. The recording level is
adjustable to select the desired signal amplitude. Figure 23 illustrates a typical ultrasonic C-scan recording system.
Fig. 22 Schematics of immersion ultrasonic C-scan (a) scanner motion and (b) plan-view record of C-
scan
recording on facsimile paper
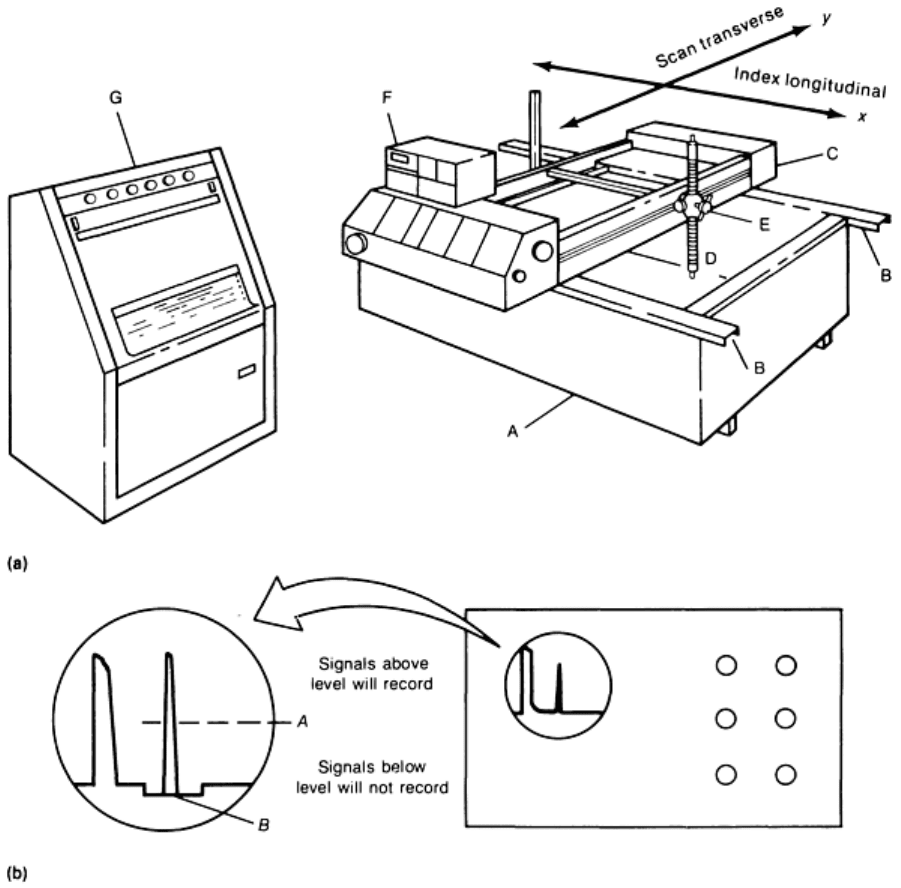
Fig. 23 Ultrasonic C-
scan immersion system. (a) The system consists of a large water tank (A) with side rails
(B), which support the movable bridge (C).
The search unit (D) is held at a proper distance above the part by
the scanner arm (E), moves across the part, and is then indexed along the longitudinal axis. The visual pulser-
receiver unit (F) is mounted on the bridge. A permanent record is made by the C-scan recorder (G). (b) Close-
up of pulser-receiver on the right and a close-up of the CRT presentation on the left. A recording level (A
) is set
on the instrument. All signals above will record on the C-scan machine, and signals below will not show. Item B
is an automatic recording gate associated with the mechanics of record making.
Ultrasonic immersion techniques, employing a C-scan recorder, are extensively used by aircraft manufacturers to inspect
adhesive-bonded assemblies. The C-scan recordings provide a permanent record with information on the size, orientation,
and location of defects in bonded assemblies. The C-scan systems are designed to inspect particular parts and therefore
vary considerably in size and configuration. Computer-operated controls have been incorporated into some systems to
control the scanning motions of the search units and to change instrument gain at changes of thickness in the assembly.
The through transmission and reflector plate techniques are easier to perform than the pulse-echo technique and are useful
for producing C-scan recordings of test specimens and flat laminates. Special equipment is required for large panels,
squirters for honeycomb panels that cannot be immersed, and contour followers for contoured parts.
Ultrasonic Inspection Limitations. The ultrasonic method suffers from destructive wave interference thickness.
Adhesive thickness interference effects are most notable at the pinch-off zone near the edges of laminates bonded with
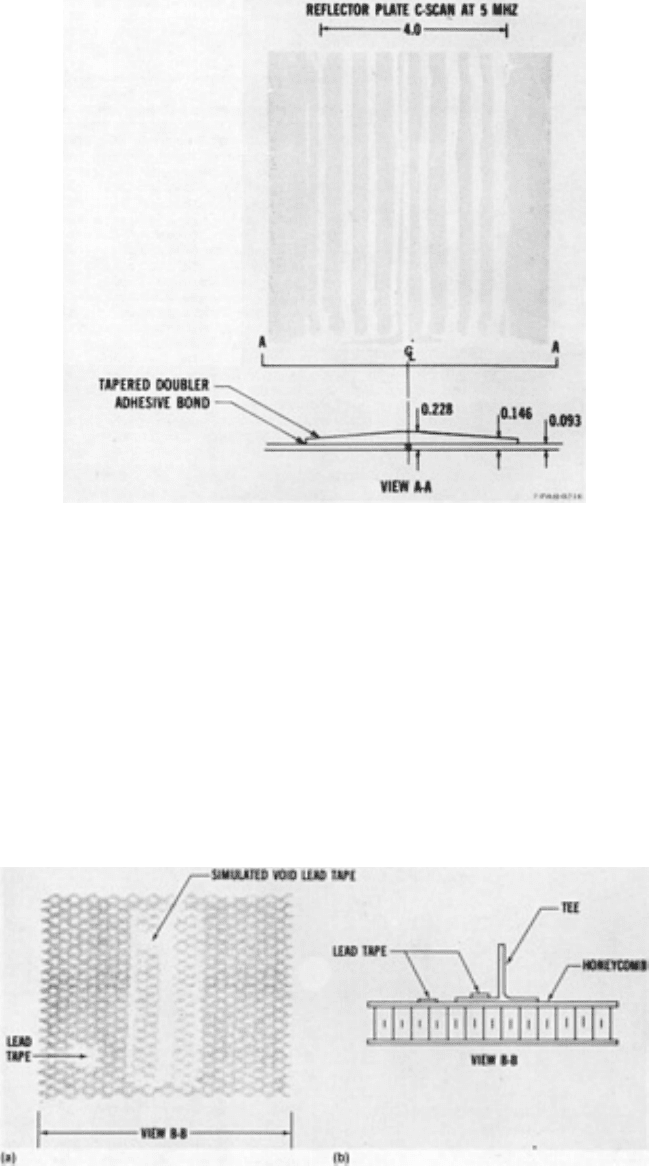
adhesive using a mat (nonwoven) carrier. Metal thickness interference effects (Fig. 24) are usually obtained from any
laminate having a bonded tapered doubler. The problem with the interference effects is that they make the parts appear
unbonded. The phenomenon is complex and will require further study before its effects can be eliminated.
Fig. 24 Reflector plate C-
scan at 5 MHz of ultrasonic destructive interference effects due to varying adherend
thickness
Ultrasonic bond test methods or neutron radiography is used to determine the acceptability of bonded assemblies yielding
C-scan results showing interference effects (see the section "Ultrasonic Bond Testers" in this article). Figure 25 shows a
through transmission C-scan of a bonded honeycomb assembly. The lead tape (generally used for radiography) attenuates
the ultrasonic beam and is therefore used to simulate voids and also as an index or orientation marker to relate the location
of flaws in the part to the C-scan recording. In the contact pulse-echo ultrasonic inspection of bonded laminates,
inspection from the thin adherend side produces the best results.
Fig. 25 Through transmission C-scan of adhesive-bonded honeycomb. (a) C-scan of section B-
B at 5 MHz using
lead tape to simulate void. (b) Cross-sectional view B-B of bonded honeycomb showing position of lead tape
Ultrasonic Bond Testers
