ASM Metals HandBook Vol. 17 - Nondestructive Evaluation and Quality Control
Подождите немного. Документ загружается.


Radiography is a very effective method of inspection that allows a view into the interior of bonded honeycomb structures.
The radiographic technique provides the advantage of a permanent film record. On the other hand, it is relatively
expensive, and special precautions must be taken because of the potential radiation hazard. With the radiographic method,
inspection must be conducted by trained personnel. This method utilizes a source of x-rays to detect discontinuities or
defects through differential densities or x-ray absorption in the material. Variations in density over the part are recorded
as various degrees of exposure on the film. Because the method records changes in total density through the thickness, it
is not preferred for detecting defects (such as delaminations) that are in a plane normal to the x-ray beam.
Some adhesives (such as AF-55 and FM-400) are x-ray opaque, allowing voids and porosity to be detected in metal-to-
metal bond joints (Fig. 5a). This is extremely advantageous, especially for complex-geometry joints, which are difficult to
inspect during fabrication. The x-ray inspection should be performed at low kilovoltage (25 to 75 kV) for maximum
contrast. A beryllium-window x-ray tube should always be used when radiographing adhesive-bonded structures. To
hasten exposures, medium-speed, fine-grain film should be used. Selection of the film cassette should be given special
consideration because some cassette materials produce an image on the film at low kilovoltages.
Neutron Radiography
Neutron radiography is very similar to x-ray or -ray radiography in that both depend on variations in attenuation to
achieve object contrast on the resultant radiograph. However, significant differences exist in the effectiveness of the two
methods, especially when certain combinations of elements are examined. The mass absorption coefficients of the
different elements for x-rays assume a near-linear increase with atomic number, while the coefficients for thermal
neutrons show no such proportionality. The attenuation of x-rays is largely determined by the density of the material
being examined. Thus, thicker and/or denser materials appear more opaque. The absorption for thermal neutrons is a
function of both the scattering and capture probabilities for each element. The density or thickness of a material or
component is less important in determining whether it will be transparent or opaque to the passage of neutrons. For
example, x-rays will not pass through lead easily, yet they will readily penetrate hydrocarbons. In contrast, neutrons will
penetrate lead and are readily absorbed by the hydrogen atoms in an adhesive or hydrocarbon material.
Neutron Sources. Neutrons are produced from accelerator, radioisotope, or reactor sources. Neutrons, like x-rays, can
be produced over an enormous energy range with large differences in attenuation at the various energy levels. The major
efforts in neutron radiography have been performed using thermal neutrons because the best detectors exist in this energy
regime. Neutron sources generally produce -rays of moderate intensity, so that a neutron detector sensitive to -ray
radiation has a -ray image superimposed on the neutron image.
Direct Versus Transfer Method. The most widely used imaging method is conventional x-ray film with converter
screens. The rate of radioactive emission of the converter screen divides the photographic imaging into prompt emission
or delayed emission. The prompt-emission converters (gadolinium or rhodium) require that the film be present during
neutron exposure. This process is referred to as the direct method. The delayed-emission converters (indium or
dysprosium) allow for activation of the converter and transfer of the induced image to the film after neutron exposure.
This technique is referred to as the transfer method. In the original film, the neutron opaque areas appear lighter than the
surrounding material. Image contrast can be increased by making a contact positive print from the film negative. When
this is done, the neutron opaque area will be darker than the surrounding material.
Evaluation of Adhesive-Bonded Structures. Hydrogenous (adhesive) materials inspected by neutron radiography
can be delineated from other elements in many cases where x-ray radiography is inadequate. However, the neutron
radiography inspection method does not appear to be cost effective for the routine inspection of adhesive-bonded
structures. It is extremely useful for evaluating the quality of built-in defect reference standards or for failure analysis. If
the adhesive is not x-ray opaque, neutron radiography can be used to detect voids and porosity. The hydrogen atoms in
the adhesive absorb thermal neutrons, rendering it opaque. Detailed information on this inspection method is available in
the article "Neutron Radiography" in this Volume.
Tap Test
Perhaps the simplest inspection method for ensuring that a bond exists between the honeycomb and the facing sheet is
that of coin tapping. An unbond is readily apparent by a change in the tone or frequency of sound produced when an
adhesive-bonded structure is tapped with a coin or rod as compared to the sound produced for a bonded area. Coins such
as silver dollars or half-dollars are used for this test. For standardized production testing, a 13 mm ( in.) diam solid
nylon or aluminum rod, 102 mm (4 in.) in length, with the testing end smoothly rounded to a 6.4 mm ( in.) radius, is
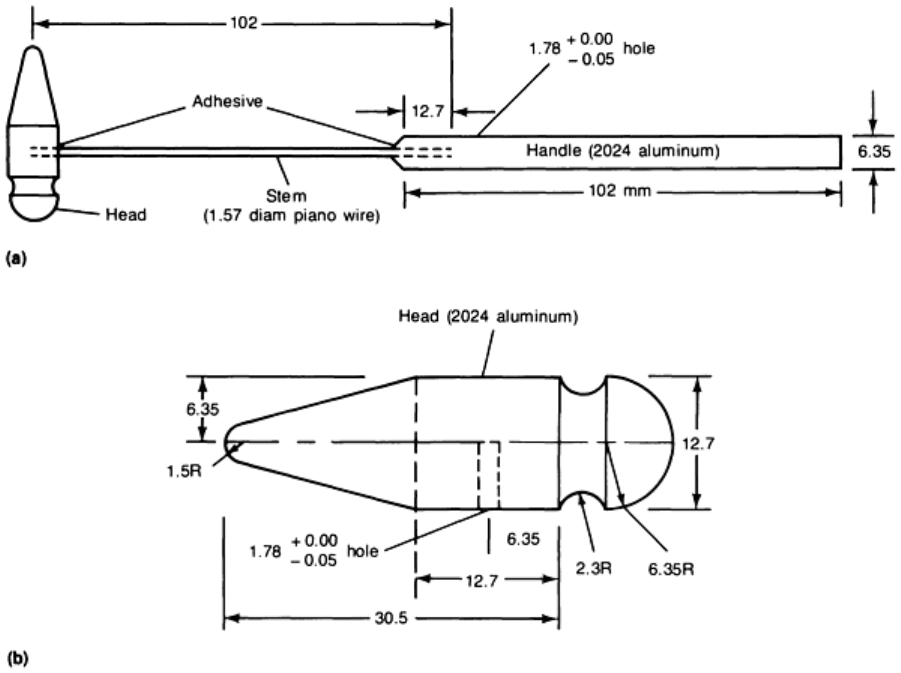
used. Another version of a tap tester is the aluminum hammer shown in Fig. 37.
Fig. 37
Construction details for an inspection tap hammer. (a) Complete assembly. (b) Tap hammer head.
Liquid/paste adhesive can be used if desired. The hole in the handle/head can be
reduced to provide an
interference fit and to preclude the need for the adhesive. Dimensions given in millimeters
Tap testing with a coin or a small aluminum rod or hammer is useful for locating large voids or disbonds of the order of
38 mm diameter or larger in metal-to-metal or thin facing-sheet honeycomb assemblies. Tap testing is limited to the
detection of upper facing sheet to adhesive disbonds or voids. It will not detect voids or disbonds at second, third, or
deeper adherends. The test method is subjective and may yield wide variations in test results. On thin face sheets, the coin
tap will produce undesirable small indentations. In this case, an instrument such as the Shurtronics harmonic bond tester
can be used effectively.
Acoustic Emission
In certain cases, acoustic emission techniques are more effective than x-ray or conventional ultrasonic methods in
detecting internal metal corrosion and moisture-degraded adhesive in bonded panels. The principle is based on the
detection of sound or stress wave signals created by material undergoing some physical or mechanical transformation.
Regarding the detection of bond line corrosion, the acoustic signals apparently arise from cavitation or the boiling of
moisture within the joint. If the corroded joint is dried out before the acoustic emission test is performed, no acoustic
response is obtained.
The equipment consists basically of an amplifier and a piezoelectric sensor with a resonant frequency of about 200 kHz.
The emission level is recorded on a chart or counter. Other equipment includes a signal processor, a search unit, a 50-dB
preamplifier, an x-y chart recorder or counter, and a hot-air gun (Fig. 38). Simple heating methods employing a hot-air
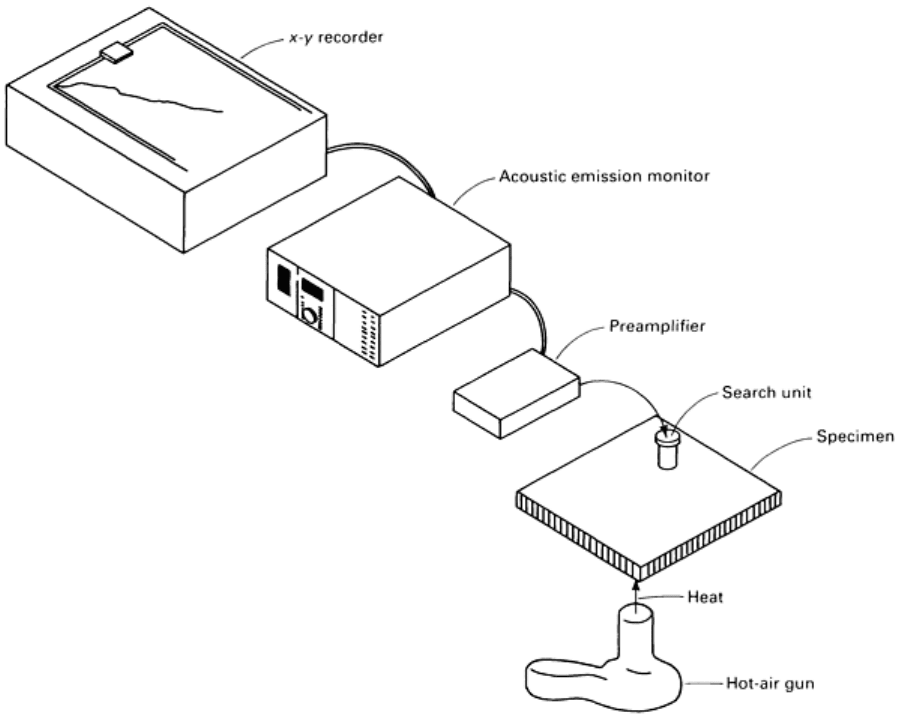
gun or heat lamp are used to increase emissions from active corrosion sights or to boil moisture. Heating can be done
from the search-unit side.
Fig. 38 Acoustic emission detection of active corrosion in adhesive-bonded structures
The panel to be tested is heated to about 65 °C (150 °F) by holding the hot-air gun within 50 to 75 mm (2 to 3 in.) of the
surface of the panel for about 15 to 30 s. Immediately after heating, the transducer or search unit is placed a short distance
from the heated spot. The transducer is held in position for 15 to 30 s to obtain a complete record of any emission in the
heated area. The inspection is conducted on a 152 mm (6 in.) grid. An important consideration during the test is the
manner in which the transducer is held against the part surface. Because movement of the transducer can produce
appreciable noise, care must be taken in its placement and holding.
Corrosion has been detected in a number of adhesive-bonded honeycomb structures (Ref 7, 8, 9). A direct inspection cost
savings of more than 75% over comparative x-ray inspection has been achieved. Additional information on this inspection
method is available in the article "Acoustic Emission Inspection" in this Volume.
Special NDT Methods
Holographic Interferometry. Defects such as core-to-skin and core-splice voids, delaminations, crushed core, and
bond line corrosion can usually be detected by holographic nondestructive test techniques (Ref 3, 24). A hologram of the
test specimen is first recorded by means of laser light reflected from its surface and superimposed on a mutually coherent
reference beam in the plane of a high-resolution photographic emulsion. The hologram provides a complete record of all
visual information about the entire illuminated surface of the specimen, including the phase and the amplitude of the
reflected wave front.
The specimen is then stressed in one of several possible ways, including heat, pressure change, evacuation, and acoustic
vibration. A surface displacement differential of only a few microinches between a defective and a good-quality bond is
adequate to produce a holographic image. Differential surface displacements, caused by subsurface anomalies, are
observed or recorded with one or more of the following three holographic techniques:
• Real time: The stress-
illuminated specimen is viewed through its developed hologram (made in a
different state of stress)
• Time lapse:
Two holographic exposures are made on the same plate, with the specimen in two states of
stress, and then reconstructed
• Time average: The hologram is recorded during many cycles of sinusoidal vibration of the specimen
A fluid-gate photographic plate holder provides for the in-place development of holograms and enhances the speed of the
operation (Ref 24). Because of the acute sensitivity of holographic interferometry to small disturbances, it is necessary to
reduce spurious and unwanted acoustic noise and temperature gradients within the environment of the testing system.
Floor vibrations arising from heavy traffic, the loading/unloading of vehicles, and heavy-duty machinery generate noise
that must be minimized.
Systems for testing sandwich structures generally use helium-neon gas lasers, which normally deliver between 60 and 80
mW of power at 632.8 nm (6328 Å). This power is sufficient to examine at least 0.19 m
2
(2 ft
2
) of surface area, and the
deep red color of the light is close enough to the sensitivity peak of the eye for good fringe-to-back-ground contrast.
A typical real-time hologram showing a skin-to-core void revealed by thermal stressing is illustrated in Fig. 39. In large
measure, the basic limitation of holography is related to the stressing techniques utilized. Holography cannot be used
without a surface manifestation of a defect during stressing. If the material thickness precludes detection of a resolvable
fraction of the fringe spacing, then the technique is ineffective. It is not useful for inspecting complex laminates, because
of the inability to stress the void areas. Thermal stressing of aluminum is unsatisfactory, because of its high thermal
conductivity (heat is transferred laterally rather than vertically through the joint). Holography is satisfactory for inspecting
honeycomb structures, but few voids exist at the skin-to-core interface. It is limited in locating voids at honeycomb
closures or multilaminate metal-to-metal areas. Numerous flaws in the closure areas of bonded honeycomb assemblies
(voids and porosity) detected by ultrasonics and x-ray methods were not detected by holographic interferometry.
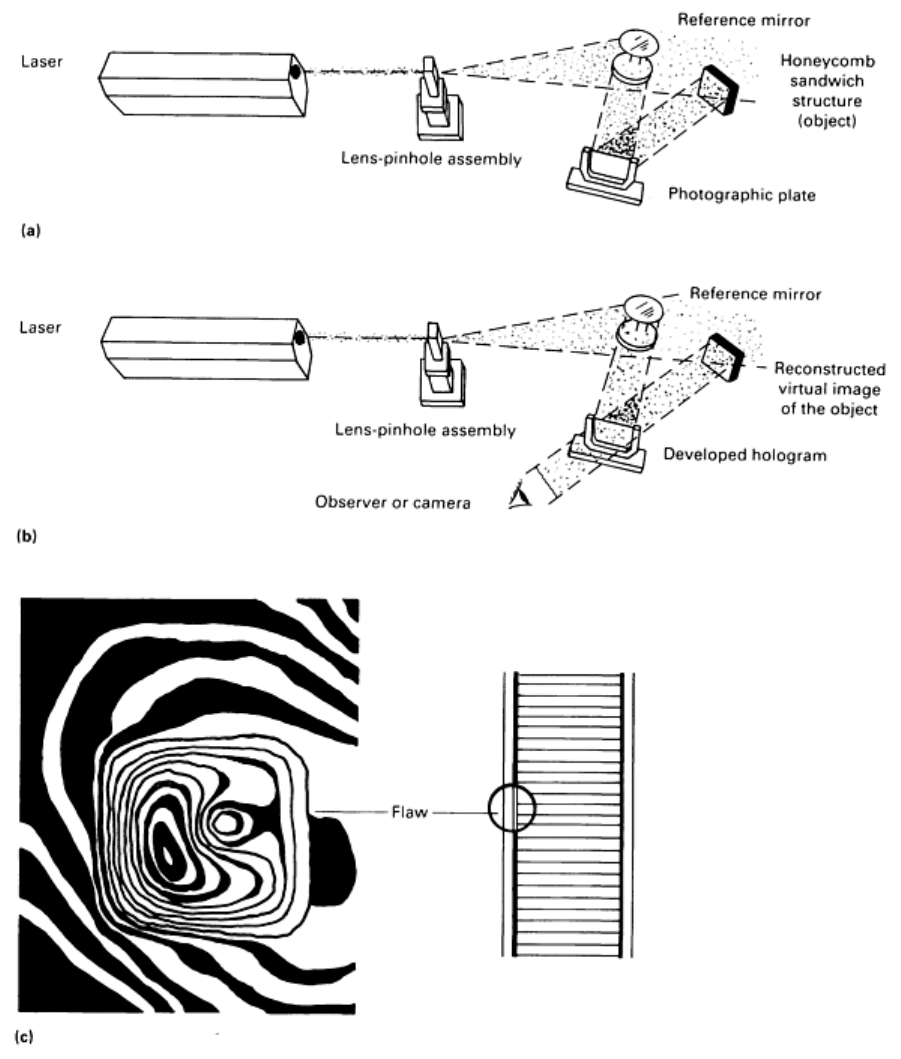
Fig. 39 Holographic recording and viewing. (a) Setup for recording hologram. (b) Setup for real-
time viewing of
hologram. (c) Example of real-time hologram of a flaw (void in adhesive) in a honeycomb core assembly.
The
part was heated to give thermal stressing.
At Fokker-VFW, a holographic installation for testing bonds was developed and put into use for production inspection
(Ref 3). The installation uses a single hologram for components up to 6 m (20 ft) in length. It has adjustable optics for
optimum sensitivity and component scanning. The defect area can be magnified and the results presented on a highly
sensitive video monitor which can record the information. The bonded components can be deformed by either vibrations
or thermal effects.
Interference holography shows much more than just bond defects, and training is needed for personnel to learn to
distinguish areas that are defective from those that are merely not ideal (Ref 2, 3, 21). Core-splice location and quality can
be inspected, and core machining anomalies are visible. Also, the thermal method is the most practical deformation
method for sandwich structures, especially for graphite-epoxy skins bonded to aluminum core. Extensive studies have
shown that thermal deformation is difficult to use for metal-to-metal structures (Ref 21). These difficulties led workers at
Fokker to concentrate on vibration testing because of the relation between resonance properties and cohesion quality.
Much time will be needed to develop a universal system of quality testing based on interference holography. However, a
specific interference holography system has been developed for the inspection of truck and aircraft tires (Ref 25). A wide
variety of tire defects have been detected and categorized for both new and retread tires and have been related to
durability. Detailed information on this inspection method is available in the article "Optical Holography" in this Volume.
Infrared or Thermal Inspection. The thermal NDT of adhesive-bonded structures has been performed by a variety
of techniques, including the following:
• Infrared radiometer testing (Ref 22, 26)
• Thermochromic or thermoluminescent coatings (Ref 22, 27)
• Liquid crystals (cholesteric) (Ref 28, 29)
For infrared radiometer testing, the detector employs a moving heat source and records variations in heat
absorption or emission while scanning the part surface. The scanners, or detectors, used in infrared testing are called
radiometers. The radiometer generates an electrical signal exactly proportional to the incident radiant flux. Because
scanning and temperature sensing are performed without contact, the observed surface is not disturbed or modified in any
way. The thermal pattern from the part under test can be observed on a CRT, storage (memory) tube, or x-y recorder.
Tests are performed by heating the sample with a visible-light heat source (quartz lamp or hot-air gun), then observing the
surface heating effects with the radiometer. Heat is applied to both bonded and unbonded areas. The bonded areas will
conduct more heat than the unbonded areas because of good thermal conduction to the honeycomb structure. The test
panel is first coated with flat-black paint to ensure uniform surface emissivity. The sample is then scanned as shown in
Fig. 40. Graphs are obtained by connecting the horizontal movement of the sample to one axis of an x-y recorder and the
radiometer output to the other axis. Typical line scan and area scan test results are shown in Fig. 40(b) and 40(d),
respectively. Similar results are obtained with the AGA Thermovision (in the pitch or catch or through transmission
modes) (Ref 22). Good results are generally obtained when testing graphite-fiber or boron-fiber composite face sheets
bonded to aluminum core. Honeycomb structures fabricated exclusively from aluminum (skin and core), or aluminum
skin bonded to plastic core, are difficult to inspect by infrared methods because of the lateral heat flow in the aluminum
face sheets.
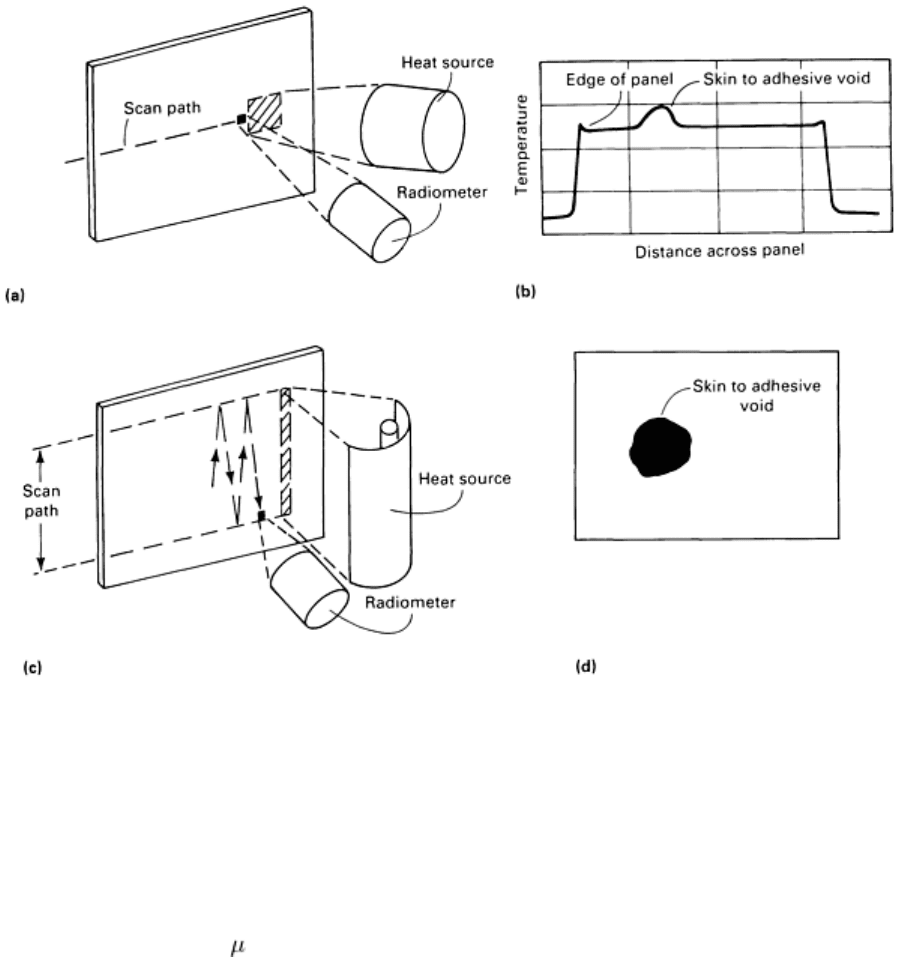
Fig. 40
Schematics and readouts illustrating infrared radiometer tests. (a) Arrangement for line scan test. (b)
Example of readout and method of void detection. (c) Arrangement for area scan test. (d) Example of readout
and method of void detection
Thermochromic or Thermoluminescent Coatings. The use of an ultraviolet-sensitive coating containing a
thermoluminescent phosphor that emits light under excitation by ultraviolet radiation (black light) permits the direct
visual detection of disbonds as dark regions in an otherwise bright (fluorescent) surface (Ref 22, 27). The coating is
sprayed on and dried to a 75 to 130 m (3 to 5 mil) thick plastic film. Defects appear as darkened areas when the panel is
heated to 60 °C (140 °F) and viewed under ultraviolet light (Fig. 41). The defective regions can then be marked on the
plastic film with a felt-tip pen. The rate of fluorescent reversal and retention depends on the thermal conductivity of the
underlying structure.
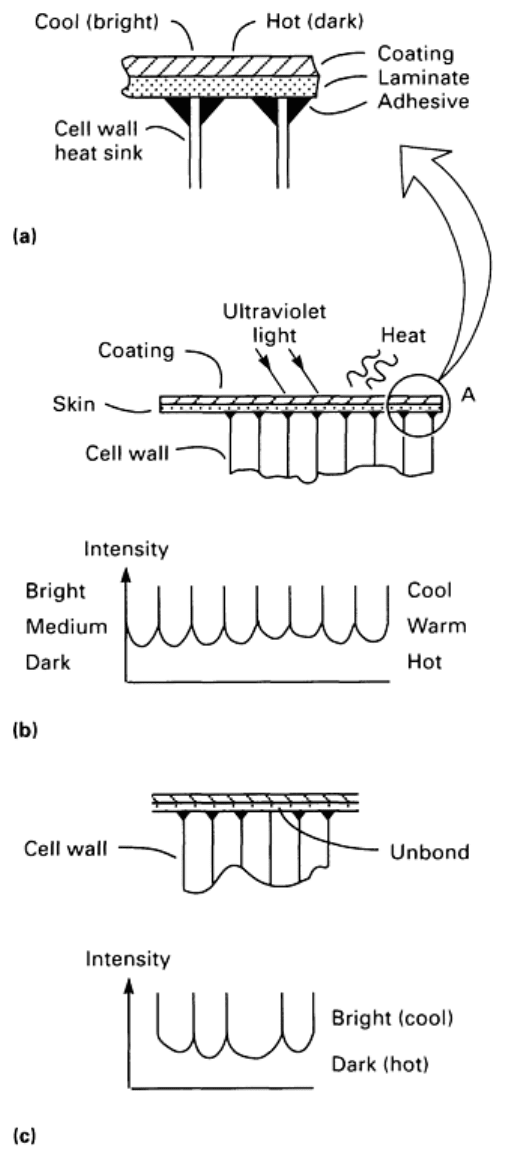
Fig. 41
Thermoluminescent coating technique on boron composite aluminum honeycomb flap assembly. (a)
Close-up of honeycomb structure.
(b) Plot of intensity versus location for bonded joint at locations shown. (c)
Plot of intensity versus location for unbonded joint at location shown
Thermochromic paints consist of a mixture of temperature-indicating materials that change color when certain
temperatures are reached. Thirty-six materials covering the temperature range of 40 to 1628 °C (104 to 2962 °F) are
available, with the low-temperature materials being used for bond inspection. The low-temperature paint changes from
light green to vivid blue upon reaching 40 °C (104 °F). The color change will last (in the defect area) for about 15 min
based on the relative humidity. The dark areas can be made to revert back to the original color by applying moisture in the
form of steam. The tests can be repeated a number of times without destroying the properties of the paint. The paints are
easy to apply and remove.
Liquid crystals are a mixture of cholestric compounds that change color when their temperature changes as little as
0.84 °C (1.5 °F) and they always attain the same color at a given temperature for a specific crystal composition. After
suitable surface preparation or cleaning, a thin coating of liquid crystals is applied by spray or brush to the test object
surface. When the object is correctly heated (relatively low temperatures) with a heat lamp or hot-air gun, the defects are
indicated by differences in color (Ref 28, 29). Unfortunately, the color continues to change through a specific color band
as it is heated and cooled. Therefore, the defects must be marked on the surface of the part as they appear and disappear.
Photographs can be taken as a record of the test results after specific defects are located. The test can be repeated a
number of times without destroying the liquid crystals. In some cases, black paint is required under the liquid crystal
coating to obtain uniform emissivity and color contrast in the defect areas. The theory and results obtained using liquid
crystals are virtually the same as for thermoluminescent and thermochromic coatings. Detailed information on thermal
NDT is available in the article in the article "Thermal Inspection" in this Volume.
Leak Test. A hot-water leak test is generally conducted on all bonded honeycomb assemblies immediately after
fabrication or repair. The test is performed by immersing the part in a shallow tank of water heated to about 65 °C (150
°F). The heat causes the entrapped air to expand, and if there are any leakage paths, bubbles will be generated at the
leakage site. The panel is monitored visually for escaping bubbles, and the leakage site is marked on the panel for
subsequent sealing. A part that leaks after fabrication will generally develop problems in service. After the leak test, the
assembly is radiographed for water that may have become entrapped during the leak test. Additional information is
available in the article "Leak Testing" in this Volume.
Acoustical holography provides a way to observe the interior properties of composite laminates or adhesive-bonded
joints. This acoustical technique employs ultrasound to obtain three-dimensional information on the internal structure of
the test specimen. The acoustical hologram is the converter, or recorder, which allows acoustic information to be
visualized much as film is the converter or recorder for light. The acoustic imagers employ different holographic
recording techniques, depending on the specific application of the instrument (Ref 30).
Liquid-Surface Acoustical Holography. In this method, the liquid surface acts as a dynamic film for momentary
storage of the hologram while it is converted to a visual image through the use of coherent laser light. This technique (Fig.
42) allows real-time acoustical imaging, supplying the operator with an instantaneous view of all internal structures.
Because the part must be moved through the fixed acoustic beam, part size is a limiting factor in this technique.
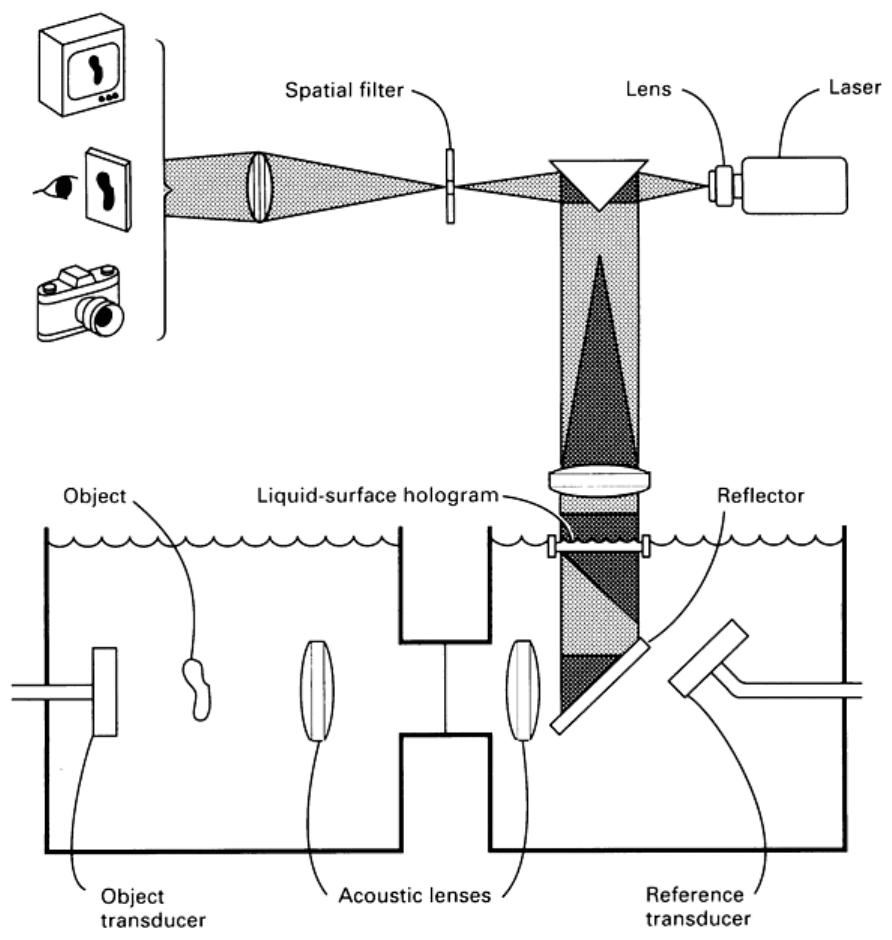
Fig. 42 Schematic of a liquid-surface imaging system
Scanning acoustical holography employs a scanning technique to construct the hologram. The hologram is then
recorded on either transparency film or a storage oscilloscope. This technique provides a permanent record of the
holographic information and allows the operator to observe the reconstructed image at a later time. By illuminating either
the liquid-surface hologram or the transparency film with laser light, the operator can immediately observe all interior
properties of the test sample. Figure 43 schematically illustrates a scanning holographic system. The capability of
acoustical holography to reveal flaws in bonded structure is covered in Ref 31. One drawback to the use of scanning
acoustical holography is the high cost of the equipment. In addition, considerable time is needed to reconstruct the various
holograms of the entire part.
