ASM Metals HandBook Vol. 17 - Nondestructive Evaluation and Quality Control
Подождите немного. Документ загружается.


Immersion ultrasonic inspection is used on tubes ranging in diameter from 6.4 to 254 mm ( to 10 in.), with wall
thicknesses as small as 0.25 mm (0.01 in.). In some installations, four channels are used, two for the detection of
transverse flaws and two for longitudinal flaws. Because these tests are usually critical, they are performed at low speeds,
usually less than 3 m/min (10 sfm).
The liquid penetrant inspection of nonferrous tubular products is performed in the conventional manner, as
described in the article "Liquid Penetrant Inspection" in this Volume.
Note cited in this section
* Examples 3, 4, 5, and 6 were prepared by J.P. Crosson, Lucius Pitkin, Inc.
Nondestructive Inspection of Tubular Products
In-Service Inspection
**
The demand for the in-service inspection of tubular products has been increasing in many industries, including the
petroleum, chemical, nuclear, and steelmaking industries. When there is access to the outer surface of the tubing, several
of the conventional inspection methods can be used, but when the outside surface is inaccessible, the problem is more
complex because the test equipment must pass through the tube. This requirement sharply limits the inspection methods
and equipment that can be used.
Tubular Products in Commercial Applications
Equipment used to inspect from the inside surface must use transducers that move with respect to the shape of the
testpiece being inspected. Even with this limitation, the variety of eddy current, flux leakage, and ultrasonic devices
available is large enough that commercial equipment can usually be found that is capable of meeting all requirements.
Both eddy current equipment and flux leakage equipment have been successful in applications that require passage
through the tube. In one application employing eddy current equipment, a combination exciting and detector probe is
rotated as it passes through the tube of a reactor heat exchanger. The equipment has high sensitivity and operates at high
speed (Ref 19). If the tubes are made of a nominally nonmagnetic metal that is slightly and variably magnetic, such as a
Monel alloy or an austenitic stainless steel, it is necessary to magnetically saturate the tubes, using either a direct current
field or a permanent magnet. A combination of the three units--inductor, detector, and saturator--built into a small probe
has been successfully used to detect small flaws in the 13 mm ( in.) diam by 1.24 mm (0.049 in.) wall tubes of a nuclear
power plant steam generator (Ref 21).
Acoustic emission is a promising technique for the nondestructive inspection of buried pipe. Holes are drilled through the
soil to the pipe at intervals of perhaps 120 m (400 ft) to allow sensors to be placed on the pipe. A heavy truck, driven over
the area in which the pipe is buried, produces simultaneous indications on the instrumentation connected to each sensor.
Analysis of the indication determines the presence or absence of cracks. Examples 7, 8, 9, 10 show typical uses of the
ultrasonic inspection and eddy current inspection of tubular products.
Example 7: Intergranular Attack and Root Cracks in Welded Austenitic Stainless Steel
Tubing Detected Using Contact Shear-Wave Ultrasound Techniques.
Contact shear-wave inspection techniques are very effective for detecting intergranular attack and/or root weld cracking
in stainless steel tubing. These techniques were developed to overcome the limitations of inspecting formed and installed
tubing in aircraft or other areas having limited accessibility.
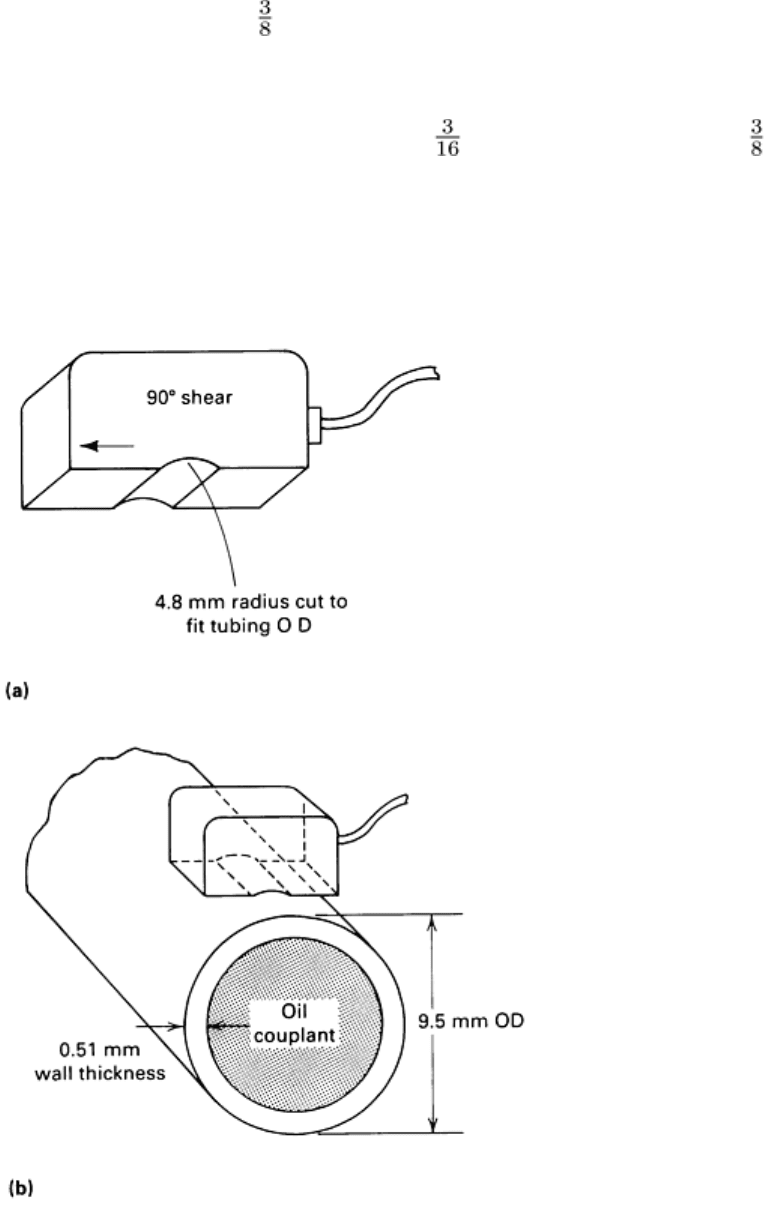
This example demonstrates techniques applied to 9.5 mm ( in.) outside diameter stainless steel tubing with a 0.51 mm
(0.020 in.) wall thickness. However, these techniques can be modified to enable detection of intergranular attack and/or
root weld cracking in various materials and sizes.
A 15-MHz Rayleigh (surface) wave transducer is machined with a 4.8 mm ( in.) radius to fit the 9.5 mm ( in.)
outside diameter of the 0.51 mm (0.020 in.) wall thickness tubing to be inspected (Fig. 13a). The transducer is then
positioned on the tubing, as shown in Fig. 13(b). No prior preparation of the sample was required. Mixed-mode shear
wave is induced in the tubing to detect intergranular attack (Fig. 14) using a ring-pattern CRT display (Fig. 15). This
transducer is also very sensitive and can be used for detecting root weld cracks (Fig. 16). The ultrasound instrument will
be set up for monitoring discrete echoes from the root crack. The display produced is shown in Fig. 17.
Fig. 13 15-MHz Rayleigh surface wave trans
ducer (90° shear) used for detecting intergranular attack and root
weld cracks. (a) Transducer with radius machined on transducer shoe to allow device to conform to tubing
outside diameter. (b) Transducer positioned on tube outside diameter to couple to tu
be using a lightweight oil
couplant. Source: L.D. Cox, General Dynamics Corporation
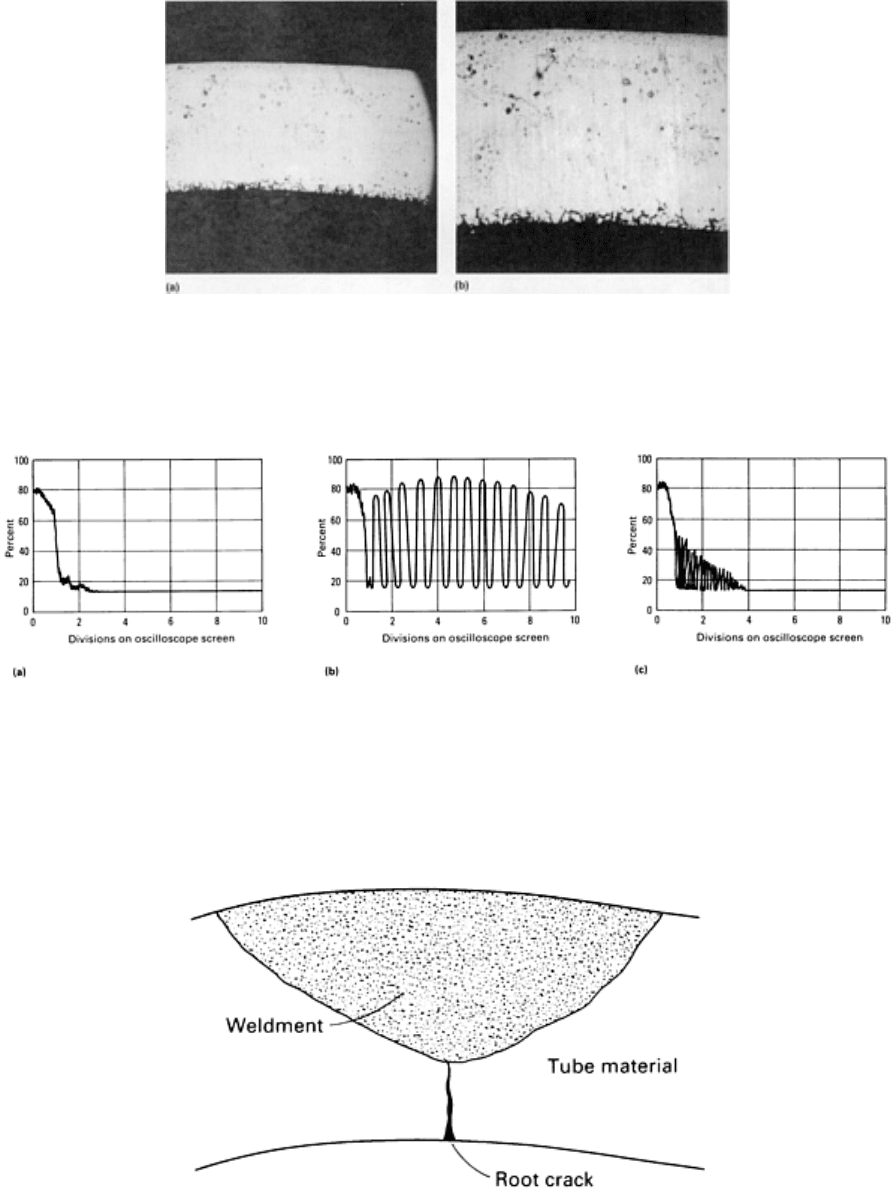
Fig. 14 Intergranular attack of 0.51 mm (0.020 in.) wall thickness, Fe-21Cr-6Ni-
9Mn stainless steel tubing
inside diameter. (a) 60×. (b) 85×. Courtesy of L.D. Cox, General Dynamics Corporation
Fig. 15 Mixed-
mode shear wave used to detect intergranular attack showing oscilloscope screen display for (a)
transducer in air, (b) transducer coupled to an acceptable tube having no defects due to intergranular attack,
and (c)
transducer coupled to tube rejected because of intergranular attack. Significant attenuation of the
ultrasonic signal in (c) is due to scatter. Source: L.D. Cox, General Dynamics Corporation
Fig. 16 Cross section of a tube having a crack at the root of the weld seam.
Source: L. D. Cox, General
Dynamics Corporation
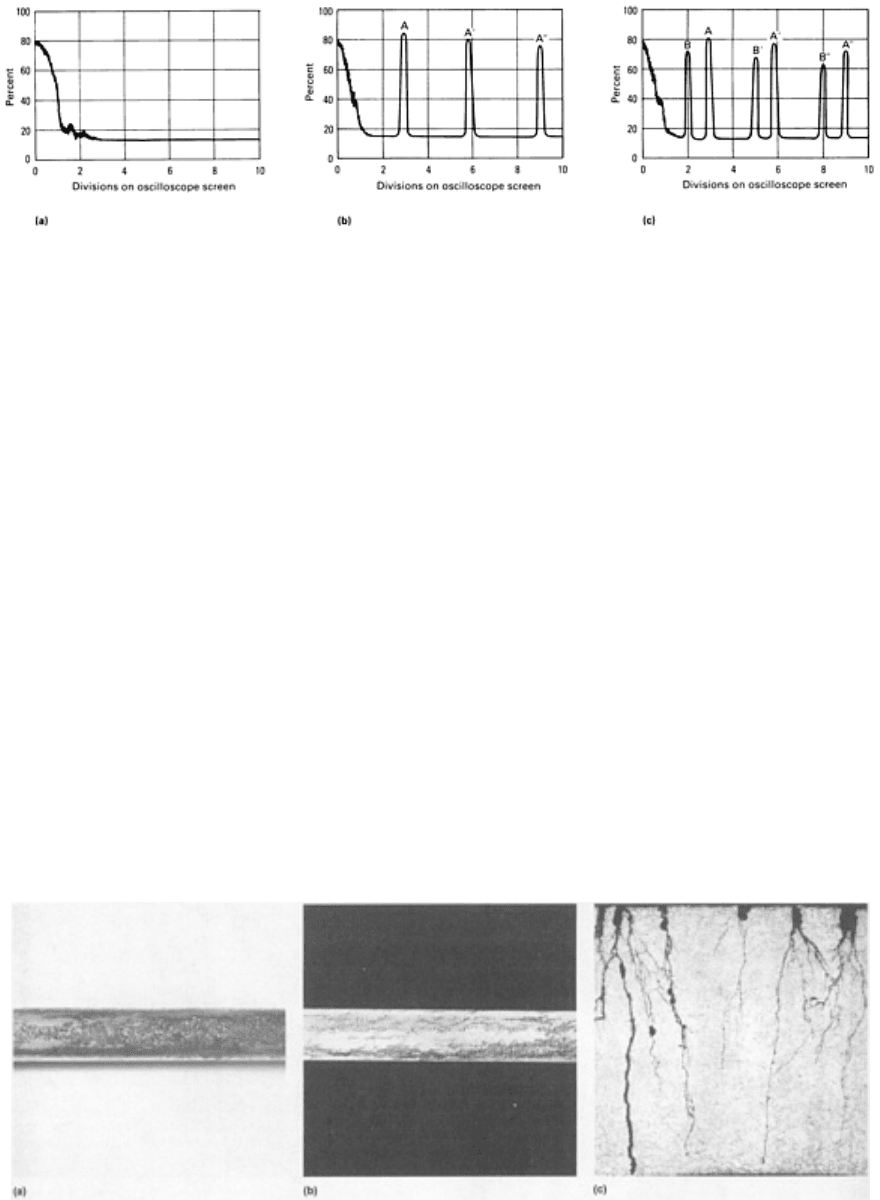
Fig. 17
Plots obtained on oscilloscope screen with ultrasonic device set up to monitor discrete echoes from a
root crack: (a) transducer in air; (b) transducer coupled to tube devoid of root
crack defects; and (c)
transducer coupled to tube rejected due to presence of a root crack. Signal A in (b) and (c) is due to reflection
from the transducer/tube OD contact point. Signal B in (c) is the root crack signal [when the transducer is
indexed circumferentially, the A signal will be stationary (no change in time-of-
flight) while the B signal will
shift]. Source: L.D. Cox, General Dynamics Corporation
Example 8: Eddy Current Inspection of Pitting and Stress-Corrosion Cracking of Type
316 Stainless Steel Evaporator Tubes in a Chemical Processing Operation.
Eddy current inspection was performed on a vertical evaporator unit used in a chemical processing plant. The evaporator
contained 180 tubes 25 mm (1 in.) in diameter.
It was advised that the tube material was type 316 stainless steel. The shell side fluid was condensate and gaseous
methylene chloride, while the tube side fluid was contaminated liquid methylene chloride.
Eddy current inspection revealed 101 tubes that exhibited severe outer surface pitting and cracklike indications near each
tube sheet. Several tubes exhibiting strong indications were pulled and examined visually and metallurgically.
It was observed that the indications correlated with rust-stained, pitted, and cracked areas on the outer surfaces. The
observed condition was most severe along the portions of the tubes located between the upper tube support and top tube
sheet. Figures 18(a) and 18(b) show a pitted and cracked area before and after dye-penetration application.
Fig. 18 Pitting and stress corrosion in type 316 stainless steel evaporator tubes. (a) Rust-
stained and pitted
area n
ear the top of the evaporator tube. Not clear in the photograph, but visually discernible, are myriads of
fine, irregular cracks. (b) Same area shown in (a) but after dye-
penetrant application to delineate the extensive
fine cracks associated with the rust-stained, pitted surface. (c) Numerous multibranched, transgranular stress-
corrosion cracks initiating from the outer surface pits. 35×. Courtesy of J.P. Crosson, Lucius Pitkin, Inc.
Metallographic examination revealed that the cracking initiated from the outer surface, frequently at pits, and penetrated
the tube wall in a transgranular, branching fashion. The crack features were characteristic of chloride stress-corrosion
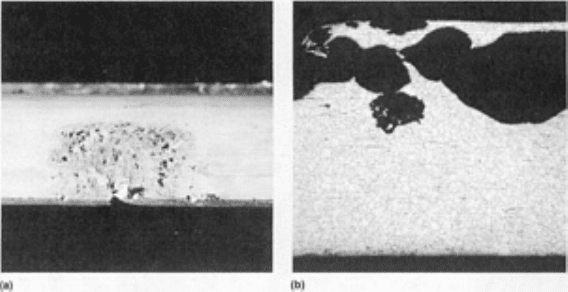
cracking. In many cases, the cracking, rather than penetrating straight through the tube wall, veered off in a tangential
direction at or about mid-wall, suggesting the possibility of a change in the residual stress-field from tube drawing. Figure
18(c) shows stress-corrosion cracking originating from pits on the outer surface of the tube.
The results of the examination indicated that the subject tube failures occurred by way of stress-corrosion cracking as a
result of exposure to a wet-chloride-containing environment. Therefore, a change in tube material was recommended to
avoid future failures and loss of service.
Example 9: Eddy Current Inspection of a Pitted Type 316 Stainless Steel Condenser
Tube.
Eddy current inspection was performed on approximately 200 stainless steel tubes in a main condenser unit aboard a
container ship. The stainless steel tubes comprised the upper two tube rows in the condenser. The tube material was
reported to be type 316 stainless steel; this was confirmed by subsequent chemical analysis. The remaining tubes were
90Cu-10Ni. Recurring leaks had occurred in the stainless steel tubes, but no leaks had occurred in the copper-nickel tubes.
Eddy current indications typical of inner surface pitting were observed in 75% of the stainless steel tubes inspected. A
tube exhibiting a strong indication was pulled from the condenser and examined visually and metallographically.
Visual examination of the outer surface revealed occasional patches of rust-colored deposit at the locations of the eddy
current indications. No apparent defects of any type were observed on the outer surface.
Subsequent splitting of the tube revealed several areas of severe pitting corrosion attack on the inner surface at locations
corresponding to the eddy current indications. The corrosion progressed in such a way as to hollow out the wall thickness,
and at several locations the pits had completely penetrated the wall thickness. The pitting corrosion attack tended to be
close to the bottom of the tube and essentially in line along the tube sample length.
Figure 19(a) shows a severely pitted location. Metallographic examination revealed the attack to be broad and
transgranular in nature without any corrosion product build-up at or around the pits. Figure 19(b) shows the manner in
which the pitting had penetrated into and beneath the inner surface.
Fig. 19
Pitted type 316 stainless steel condenser tube. (a) Inner surface of main condenser tube showing
extensive but localized pitting corrosion attack. 1×. (b) Longitudinal section passing through a pitted area
showing extensive pitting that had progressed beneath the inner surface of the main condenser tube.
55×.
Courtesy of J.P. Crosson, Lucius Pitkin, Inc.
The results of the examination revealed that the subject stainless steel condenser tube had failed as a result of pitting
corrosion attack, which initiated at the inner surface and progressed through the tube wall. That the pitting was essentially
on the bottom of the tubes was strong evidence of deposit-type pitting corrosion attack.
Deposit attack occurs when foreign material carried by the tube side fluid settles or deposits on the inner surface,
generally at the bottom of the tube. The deposit shields the tube surface, creating a stagnant condition in which the fluid
beneath the deposit becomes deficient in oxygen compared to the free-flowing fluid around the deposit. The difference in
oxygen content results in the formation of an oxygen concentration cell in which the smaller, oxygen-deficient sites
become anodic with respect to the larger oxygenated cathodic sites. As a result, pitting corrosion attack occurs at the
anodic sites.
In stainless steel, the condition is further aggravated by the fact that type 316 stainless steel performs best in a service
where the fluid is oxidizing and forms a passive film on the surface of the tube. If there is an interruption in the film, as
may be caused by chemical breakdown through decomposition of organic materials or mechanically by abrasion, and if
the damage film is not reformed, pitting corrosion will initiate and grow at the damaged site. In main condenser service,
certain deposits, such as shells, sand, or decomposing sea life, can initiate breakdown of the passive film.
Example 10: Eddy Current Inspection of a Magnetic Deposit Located on a Steel Tube at
Tube Sheet Joint in a Centrifugal Air-Conditioning Unit.
In this case, defective tubes were not detected. However, the results of the eddy current inspection were directly
influenced by a previous tube failure in the unit.
Eddy current inspection of the condenser bundle of a centrifugal air-conditioning unit revealed several tubes with
indications typical of tube-wall wear at locations corresponding to the tube supports. One of the tubes exhibiting
indications was pulled and visually examined. A tightly adherent magnetic deposit was observed at the area of the tube in
contact with the first tube support. Splitting the tube revealed the deposit to be tightly packed in the fins, as shown in Fig.
20. This tube was of tru-finned rather than skip-finned design; that is, the tube did not have smooth support saddles where
it was in contact with the tube support plate. Instead, the tube was finned from end to end. Therefore, although the test
instrument parameters were selected to phase out the magnetically induced indications from the steel tube supports, the
magnetic deposit, which was tightly embedded between the fins, was closer to the internal test probe and caused an
indication that was interpreted as tube-wall wear.
Fig. 20 Magnetic corrosion product embedded in the tube fin
s at the tube support of a steel tube. The corrosion
product caused by eddy current indication characteristic of tube-wall wear at the support.
Courtesy of J.P.
Crosson, Lucius Pitkin, Inc.
Through further investigation it was determined that a previous tube failure had caused the Freon on the shell side to
become contaminated with water. This condition proved corrosive to the steel supports and shell and subsequently caused
the magnetic corrosion deposit observed at the tube support.
Oil-Country Tubular Products
The application of nondestructive inspection to the tubular products of the oil and gas distribution industry is extensive
and is vital to successful operation. The American Petroleum Institute has, with international cooperation and
international acceptance, developed tubing and pipe specifications that include many rigorous requirements for
nondestructive inspection (Ref 22). Inspection installations range from simple magnetic particle installations to complex
assemblies of machinery whose continuous productivity is completely dependent on the reliability and accuracy of its
nondestructive inspection equipment. The larger installations may use ultrasonic, eddy current, flux leakage, or
radiographic equipment, singly or in combination, and can be supplemented by magnetic particle inspection.
The inspections of pipe or casing can be performed during manufacture, when it is received on site, while it is in service,
or when it must be inspected for reuse or resale. When inspection is included in the manufacturing operation, tests are
usually performed immediately after the pipe is produced and again after processing has been completed.
Industry has promoted the development and use of highly sophisticated equipment for the in-service inspection of pipe in
diameters of 75 mm (3 in.) and larger. In one of several different pipe crawlers available commercially, the probe travels
through the gas lines and, by means of flux leakage measurements, reports on the condition of the pipe. Another type of
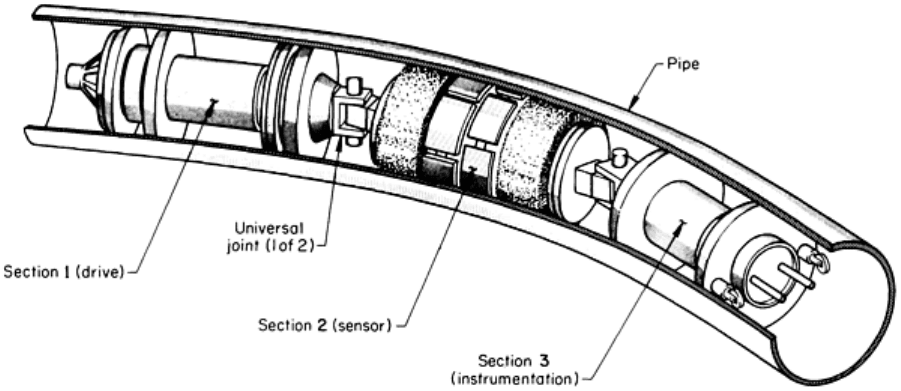
in-service inspection unit, which is shown in Fig. 21, includes tight-fitting seals so that it can be propelled through the
pipelines by the oil or gas being carried. The traveling unit includes not only the test instrumentation and a tape recorder
but also a power supply so that it is completely self-sufficient, requiring no connection outside the pipe. The sections of
this unit are connected by universal joints to permit passage around bends. When the unit completes its cycle, total
information on the condition of the pipe is immediately available.
Fig. 21 Self-contained flux leakage inspection unit used in oil and gas pipeline for in-service inspection
One of the most important inspection procedures in this industry involves the inspection of girth welds joining the ends of
pipes to each other or to fittings and bends. Although radiographic tests are widely favored for this application (Ref 23),
supplementary tests are needed to detect the tightly closed flaws not detected by radiography (Ref 12). This industry also
uses automated inspection of small tubular pipe couplings. One machine separates acceptable couplings from rejectable
couplings automatically and requires no operator. The couplings are fed into the machine from a cutoff lathe. After
automatic inspection to API specifications, rejectable couplings are diverted to a reject receptacle.
Nondestructive Inspection of Steel Pipelines (Ref 24)
The nondestructive inspection of welds in steel pipe is used to eliminate discontinuities that could cause failure or
leakage. Most steel pipes for gas transmission are made by the hot rotary forging of pierced billets or by forming plate or
strip and then welding by either the submerged arc or the resistance process. Pipes are usually made to one of the API
specifications, with supplementary requirements if necessary.
Submerged Arc Welded Pipe. The shrinkage of liquid metal upon solidification results in primary piping in the
ingot, which can cause laminations oriented in the plane of the plate or strip rolled from the ingot. Laminations can also
result from secondary piping and from large inclusions. Laminations can nucleate discontinuities during welding or
propagate to form a split in the weld. They cannot be detected by radiography, because of their orientation, but they can
be detected by ultrasonics or can be seen when they occur as skin laminations.
The API specifications do not require nondestructive inspection of the plate or strip before welding, but ultrasonic
inspection is mandatory in some customer requirements. Generally, the periphery of the plates must be examined to
ensure that edges to be welded are free of laminations.

Pulse-echo ultrasonic inspection has been used for most plate-inspection specifications. This method cannot distinguish
laminations near the surface remote from the probe, because the echoes from the laminations cannot be inspected from the
back echo. Some specifications require that the plate be inspected from both surfaces or that transmission methods be
used.
Manual scanning, although time consuming, is feasible because the echo pattern from laminations persists on the
oscilloscope screen and is easy to interpret. However, if laminations are fragmented or at an oblique angle to the surface
of the plate, there is no distinct flaw echo, but merely a loss of back echo. In most pulse-echo equipment, no account is
taken of this loss; therefore, transmission methods are preferable for plate inspection. Such methods normally require
mechanization with automatic recording of the results, and inspection systems based on these methods have been installed
in some plate mills.
In both transmission and pulse-echo inspection, the probe area represents the area of the plate under inspection at any
instant. Shear-wave angle probes are used to detect lamination, but the method is not reliable, particularly for the thin
plates used in pipe manufacture. Laminations can also be detected by ultrasonic Lamb waves, which can inspect a zone
extending across some or all of the plate. Lamb waves have been used on steel sheet, but they cannot be excited in plates
more than 6.4 mm ( in.) thick using standard equipment. Special equipment is now available for plate up to 13 mm (
in.) thick.
The main flaws that occur in submerged arc welds are incomplete fusion and incomplete penetration between the inside
and outside weld beads or between the base metal and the filler metal, cracks, undercut or underfill, and overflow. The
API standards require full-length inspection of welds by radiography or ultrasonics. Fluorescent screens or television
screens are permitted for radiography, and they are often used because they are less expensive than radiographic film,
although less discriminating. Fluoroscopy is inherently less sensitive to the more critical flaws, cracks, incomplete
sidewall fusion, and incomplete penetration. Ultrasonic inspection is more sensitive to serious flaws and can be
automated.
The arrangements of transmitter and receiver probes in ultrasonic inspection of submerged arc welded pipe for detection
of longitudinally and transversely oriented discontinuities are shown in Fig. 22. The region of the oscilloscope time base
corresponding to the weld region is analyzed electronically, and echoes above the amplitude of the reference derived from
the calibration block actuate a relay that can operate visible or audible warnings, paint sprays, or pen recorders. In some
installations, only one probe is used on each side of the weld, and detection of discontinuities that are oriented
transversely to the weld is not possible. To ensure correct lateral positioning of the probes on the weld, they are mounted
on a frame, which is then moved along the weld; alternatively, the pipe can be moved past stationary probes.
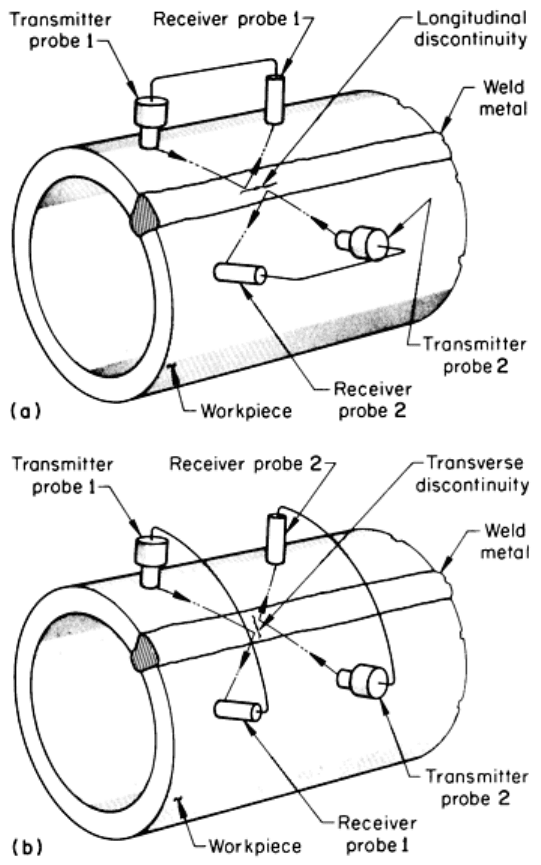
Fig. 22 Diagram of arrangements of probe
s in the ultrasonic inspection of submerged arc welded pipe for the
detection of (a) longitudinally oriented and (b) transversely oriented discontinuities
Accurate positioning of the probes over the welds is difficult because the width, shape, and straightness of the weld bead
vary. The inspection area is limited in order to reduce confusion between echoes from flaws within the weld and the
boundaries of the weld reinforcement. Acoustic coupling can be reduced by the probes riding up on weld spatter, by
drifting of the scanning frame, by loss of coupling water, or by loose mill scale.
General practice is to use automatic ultrasonic inspection methods and to radiograph those regions of the pipe suspected
of containing discontinuities. If radiography does not reveal an objectionable flaw, the ultrasonic indication is ignored and
the pipe is accepted. This procedure would accept cracks or laminations parallel to the plate surface that, because of their
orientation, cannot be detected by radiography. As an alternative approach, regions that give an ultrasonic flaw indication
should be inspected radiographically and by manual ultrasonics. If the original ultrasonic indication was from a
discontinuity shown by the radiograph to be acceptable within the specification or if the manual ultrasonic inspection
revealed that the indication was a spurious echo arising from a surface wave or from local weld shape, then the pipe was
accepted; if the radiograph showed an objectionable flaw, then the pipe was rejected. If there was no explanation for the
echo, it was assumed to have arisen from a discontinuity adversely oriented for radiography.
Seamless Pipe. There are two sources of flaws in roll forged seamless pipe: inhomogeneities and the manufacturing
process. Inhomogeneities in the ingot such as primary and secondary ingot pipe can be carried into the roll-forged product
and can cause flaws in a similar manner to the formation of laminations in steel plate. Such flaws are likely to have a
major dimension oriented in the plane of the pipe wall. In manufacturing, the rolls and the mandrel can cause surface
discontinuities such as tears and laps, and such discontinuities will have substantial orientation normal to the pipe wall. In
addition, pipes and tubes produced by working pierced billets are prone to eccentric wall thickness, with the eccentricity
varying along the length of the pipe.
The API specifications that cover seamless line pipe require neither nondestructive inspection nor wall thickness
measurement away from the pipe ends. In some mills, destructive inspections are carried out on samples cut from each
pipe end to determine the presence of primary pipe flaws. In some API standards (casing, tubing, and drill pipe),
nondestructive inspection is optional, but in other standards (high-strength casing and tubing) nondestructive inspection of
the full pipe length is mandatory. Magnetic particle, ultrasonic, or eddy current inspection methods are permitted.
Magnetic particle inspection methods have little or no sensitivity to discontinuities that do not show on the surface
and are likely to detect laminar discontinuities resulting from ingot piping. Although surface laps are amenable to
magnetic crack detection, it would be difficult to apply the inspection method to internal-surface discontinuities.
Eddy current inspection methods can be used to inspect seamless tubing. Very rapid inspection rates are possible
with the encircling-coil system. When pipe is passed through a coil fed with alternating current, the resistive and reactive
components of the coil are modified; the modification depends on dimensions (and therefore indirectly on
discontinuities), electrical conductivity and magnetic permeability, and the annulus between the pipe and the coil (and
therefore the outside diameter of the pipe). The analysis to determine which effect is causing any modification is
complex.
Eddy current methods are extensively used for the inspection of small, nonferrous tubes, but ferrous material causes
complications from magnetic permeability. The initial permeability is affected by residual-stress level. Roll-forged pipe
may have varying amounts of residual cold work, depending on the original soaking conditions and the time taken to
complete forging. The effect can be alleviated by applying a magnetically saturated field; equipment that can produce a
magnetically saturated field has been installed in steel tube mills. However, saturation becomes more difficult as pipe
diameter increases.
Radiographic inspection methods, employing either x-ray or γ-ray transmission, can be used with a scintillation
counter to estimate the wall thickness of pipe. The accuracy of scintillation counters depends on the size of the count for a
given increment of thickness; the count increases with the time the increment is in the beam. As a result, the count, and
therefore the accuracy, increases with decreasing scanning rate. When large-diameter pipes are scanned at realistic rates,
eccentricity is usually averaged out.
Ultrasonic inspection methods can detect discontinuities oriented both in the plane of, and normal to, the pipe wall.
Discontinuities in the plane of the wall can be detected by using a compression-wave probe scanning at normal incidence.
For discontinuities normal to the wall, the beam is converted to shear wave and propagated around or along the tube. The
pipe is rotated and moved longitudinally relative to the probes, thus giving a helical scan.
The reliability of mechanized scanning is a function of acoustic coupling, and optimum results are achieved with
immersion coupling. The efficiency of acoustic coupling through large columns of water is lower but much more
consistent than that through the thin liquid films used in contact scanning. Immersion methods also eliminate probe wear
and the requirement for specially contoured probes to accommodate each pipe size.
Alternatively, immersion coupling by a column of water flowing between the probe and the pipe can be used. With this
method, probe-rotation scanning is possible. Advantage can be taken of the smaller inertia of the probes to increase the
scanning rate, and therefore the speed of inspection, by about an order of magnitude.
When an ultrasonic beam propagates radially through the pipe wall, the time interval between successive back echoes
reflected from the bore surface is directly proportional to the wall thickness. If the first back echo is used to trigger a high-
speed electronic counter whose frequency is such that it will produce a count of 100 during the time taken to receive four
echoes in 25 mm (1 in.) thick plate and if a subsequent back echo is used to stop the counter, a count proportional to the
wall thickness is produced. By changing the frequency of the counter oscillator, it is possible to change the thickness
range inspected or to accommodate different materials. Information from the counter can be fed to a chart recorder, thus
continuously recording the wall thickness. Lamination would be recorded as an abrupt localized reduction in wall
thickness.
