ASM Metals HandBook Vol. 17 - Nondestructive Evaluation and Quality Control
Подождите немного. Документ загружается.

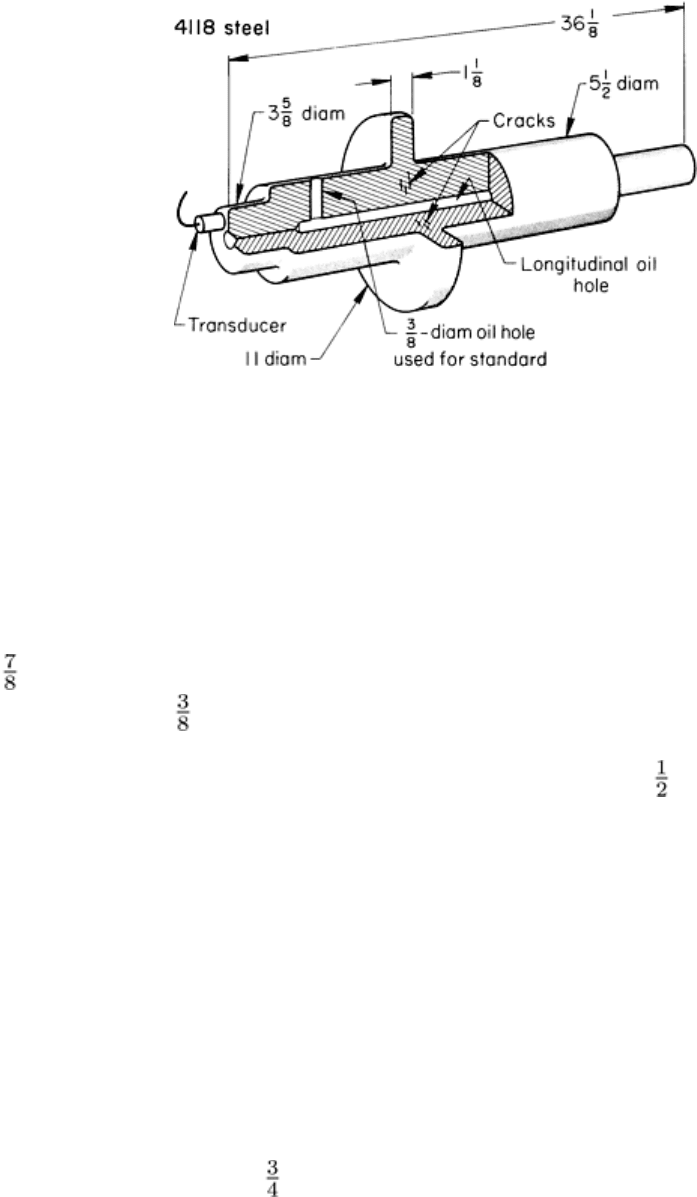
Fig. 25 Upset shaft forging, of 4118 steel, that was ultrasonically inspected by the pulse-e
cho longitudinal
wave technique. Dimensions given in inches
The location of these cracks, their orientation, and the size of the shaft all indicated that ultrasonics would be the best
method for detection. Two approaches were feasible. The first was to send a longitudinal beam in from the end of the
shaft, and the second was to use a shear wave from the outside diameter of the shaft adjacent to the flange. The first
technique was selected because it permitted testing of shafts already assembled.
A 22 mm ( in.) diam, 2.25-MHz transducer was used with a plastic wear face and an oil couplant. The shaft had a
radially drilled oil hole 9 mm ( in.) in diameter (note location in Fig. 25). This radial hole was used as a landmark and
standard to set the sensitivity. The signal from this hole was set to give full-screen height from a known flaw-free shaft.
The end of the shaft was scanned in a zone extending from the center out 40 mm (1 in.) radially. The area around the
longitudinal oil hole within the upset section was the area where the flaws occurred (Fig. 25).
When the shaft was tested from the short end (measured from the upset), a portion of the test area was in the shadow of
the radial oil hole. In addition, because of the distance to the radial hole, the second multiple of the radial-hole signal
occurred at the same point on the screen as did the flaws. For this reason and because of variation in flaw orientation, it
was desirable to test the shaft from the long end as well as from the short end. In the assembled machines, the only access
was to the long end of the shaft. The same standard was used from the long end of the shaft, but an instrument having
higher sensitivity was required to produce a full-screen signal from the radial hole because of the added length of beam
path.
The rejection level was set at 20% of full screen and was based on the size of flaws observed when the shafts were cut up.
The flange portion was first cut out of the shaft and retested with a smaller-diameter transducer to better define the extent
of the flaw. The section was further cut until one edge of the flaw was exposed. When possible, this reduced section was
broken open through the flaw. The fracture face provided the best view of the extent and shape of the flaws. If the
inclusion flaws were larger than 20 mm ( in.) in diameter, they were considered rejectable even if they had not cracked
in heat treatment. An attempt was made to test the shafts in the as-forged condition, but this approach was not reliable
because some inclusions developed cracks during heat treatment.
Similar but slightly larger shafts were found to have the same types of flaws. These shafts were tested with the same
technique as described above and initially showed a very high rate of rejection. No flaws were found when the rejected
shafts were sectioned, and when the shafts were retested, no flaws were found. After some investigation, it was realized
that the flaw signals were false. When a portion of the beam struck the oily surface of the longitudinal oil hole, a mode-
converted wave was reflected back to the search unit. The time of travel of the mode-converted false signal coincided
with the time of travel of the true flaw signals, causing rejection of the shafts. The problem was solved by removing the
oil film from the longitudinal oil hole.

Example 11: Ultrasonic Inspection of B-58 Nose Landing Gear Trunnion.
The development of this inspection focused on the nose landing gear trunnions (Fig. 26). Initiation sites for stress-
corrosion cracking were found to originate on the trunnion-bore inside surfaces at the forging parting plane (Fig. 27). The
trunnion is made from forged aluminum alloy 7075-T6. After examination of previous failures, it was shown that these
cracks may propagate to a severe condition before the trunnion fails. A manual shear wave ultrasonic inspection was
developed that concentrated on these initiation sites.
Fig. 26 Location of nose landing gear trunnion (arrows) on a B-
58 aircraft. Courtesy of Tom Dusz, The
University of Dayton Research Institute
Fig. 27 Loca
tion of parting line on trunnion. (a) Top view of parting line. (b) Bottom view of parting line.
Courtesy of Tom Dusz, The University of Dayton Research Institute
Inspection Procedure. The equipment needed for this inspection includes a flaw detection instrument capable of a
test frequency of 5 MHz; a 5-MHz search unit with a special lens contoured to 45 mm (1.75 in.) cylindrical radius; a
reference standard containing artificial notches 0.25, 0.50, and 1.25 mm (0.010, 0.020, and 0.050 in.) deep; and a clean oil
couplant. The reference standard is manufactured from the outer bore section of an actual trunnion. The sensitivity
calibration is performed by applying sufficient couplant to the reference standard and by positioning the search unit over
the 1.25 mm (0.050 in.) deep notch. A full-scale amplitude signal is obtained. The standard is scanned, and the signals are
observed from the 0.25 and 0.50 mm (0.010 and 0.020 in.) deep notches. The instrument sweep delay is adjusted until the
first reflected signals from the artificial defects reach their peak amplitude at the center of the screen. The sensitivity,
pulse length, and reject controls are used to obtain a 95% amplitude signal from the 0.25 mm (0.010 in.) deep notch. The
part is cleaned with an acceptable solvent to remove dirt, grease, tar, loose paint, and other debris. The forging parting
plane and two planes parallel and 40 mm (1.5 in.) on either side of the forging parting plane are marked with ink that will
not come off the part during the inspection. The areas of concern include the entire area between the parting line and the
parallel lines, the bolt hole to the web on top, and the ground area on the bottom.
A defect signal first appears near the center of the screen and moves to the left as the search unit is scanned closer to the
parting line. When the search unit is scanned from the parting line back toward the parallel line, the defect signal moves
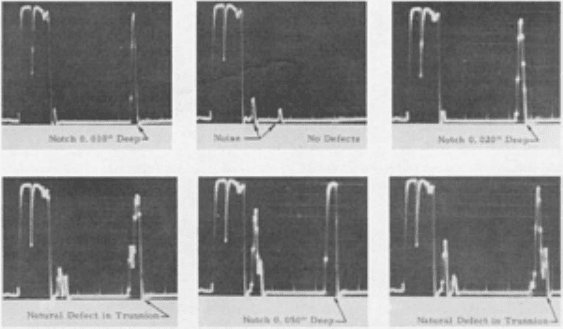
from the left of the screen (near the front surface noise) to the center of the screen. Figure 28 shows some typical
amplitude signals that may appear on the screen. Any defect indications showing a 25% and greater amplitude signal are
considered for further disassembly evaluation and/or replacement.
Fig. 28 Typical signals that may appear
during inspection. Dimensions given in inches. Courtesy of Tom Dusz,
The University of Dayton Research Institute
Conclusion. The development of this testing technique enabled inspectors to locate very gross or severe conditions
before trunnion failure occurred. This greatly reduced the amount of on-aircraft failures.
Example 12: Ultrasonic Inspection by the Immersion Technique of an
Aluminum Alloy Forging Having No Parallel Surfaces.
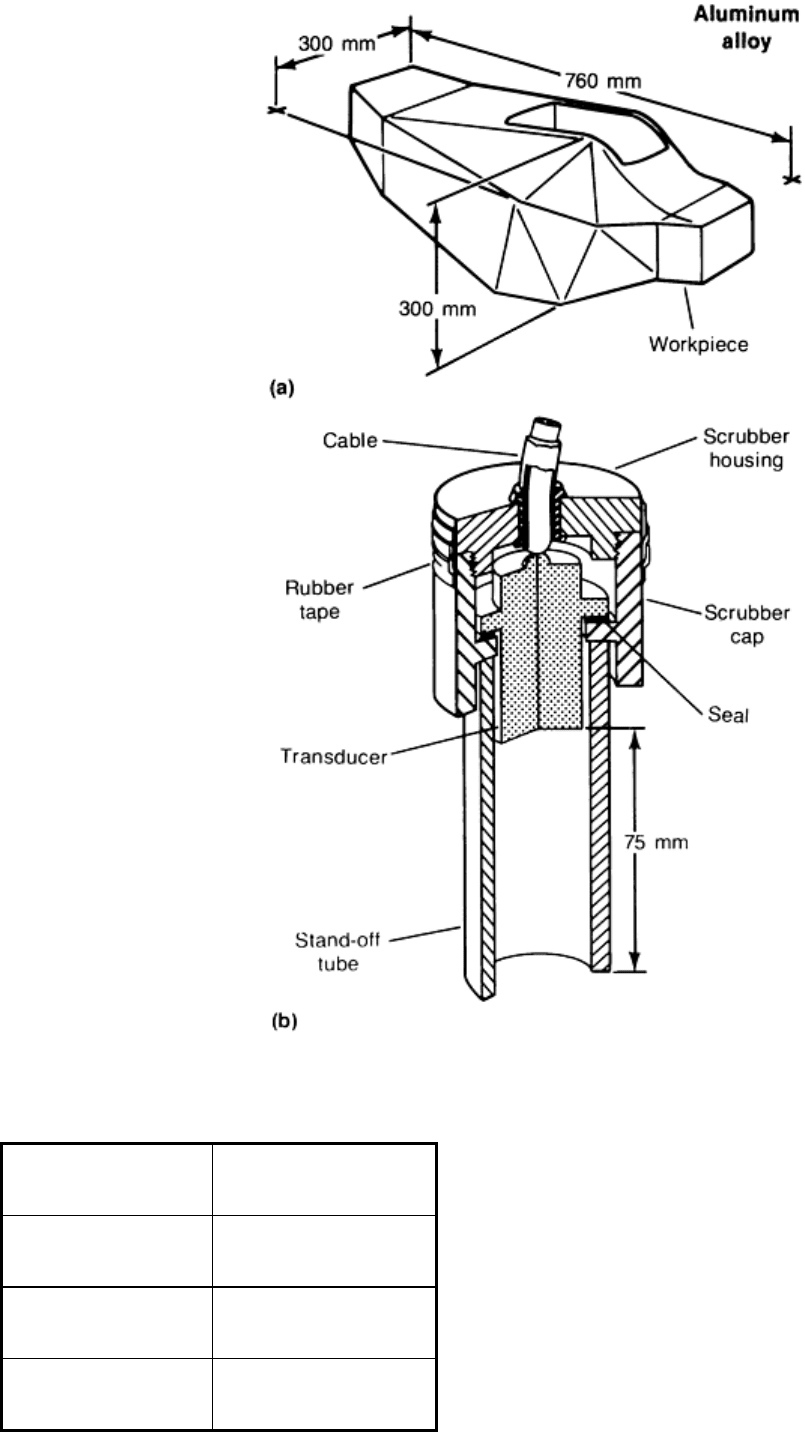
The aluminum alloy forging shown in Fig. 29(a) was ultrasonically inspected by the immersion (water) technique using a
hand-held search unit. Details of the inspection conditions are given in the table accompanying Fig. 29.
Inspection technique Immersion, hand-held unit
Mode of sound Longitudinal wave
Frequency, MHz 5
Cable length, m (ft) 6 (20)
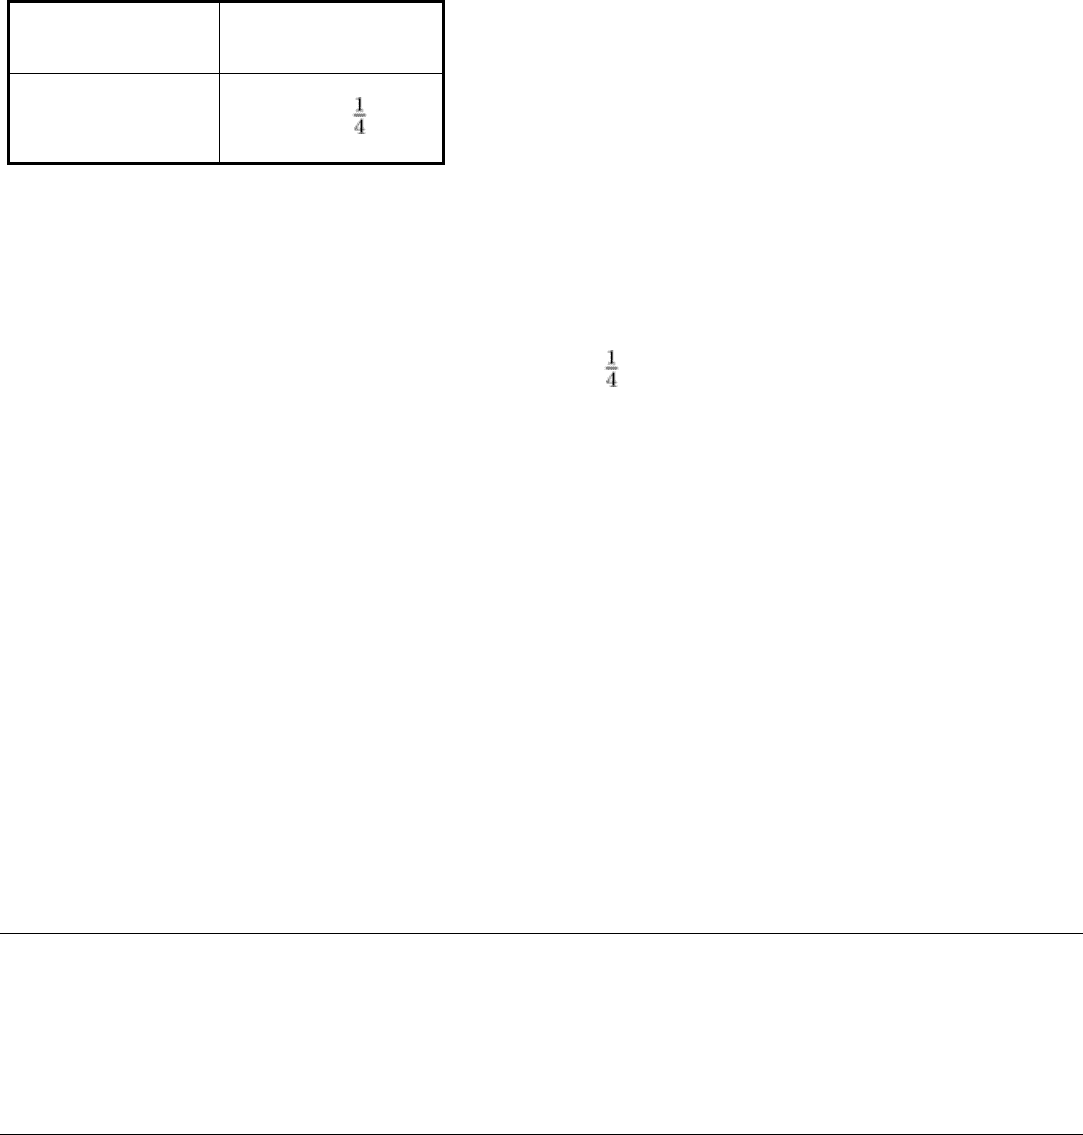
Water distance, mm (in.)
75 (3)
Stand-off tube, mm (in.)
25 (1) ID, 30 (1 ) OD
Fig. 29
Aluminum alloy forging (a) having no parallel sides that was ultrasonically inspected by the immersion
technique, using the transducer assembly and stand-
off tube shown in (b) and the conditions listed in the
accompanying table
Reference standards were used for calibrating the oscilloscope that corresponded to full- and half-metal thickness of the
thickest section of the forging and for a metal thickness of 6 mm ( in.). Equivalent flat-bottom-hole sizes required for
the inspection class were used in the calibration standards.
The inspection was performed to determine whether internal discontinuities of any type were present. For the, type of
forging shown in Fig. 29(a), because of the continuously changing metal thicknesses and surface contours, immersion
testing using a hand-held search unit was the most suitable method of ultrasonic inspection. This inspection procedure is
called scrubbing. The search unit consisted of a transducer fitted with a hollow plastic tube, called a stand-off tube, to
maintain a constant water distance of 75 mm (3 in.) from the entry surface (see transducer assembly, Fig. 29b). The cable
and scrubber housing were attached to the scrubber cap. This portion of the unit was wrapped with watertight rubber tape
because the unit is partially or totally submerged during use. The stand-off tube, while submerged, was completely filled
with water, with no air gaps or bubbles present.
During inspection of the forging, the operator had to be aware of the metal thickness under examination at any particular
moment. As a result of nonparallel surfaces, the screen presentation usually did not have a directly reflected first back
reflection, because the back surface was not normal to the ultrasound beam path. There was a series of lesser-amplitude
back reflections resulting from the sound wave bouncing around within the forging and ultimately being picked up by the
search unit. These back reflections moved back and forth for short distances along the trace line. The operator had a good
knowledge of the changing metal thicknesses and was able to determine the presence of a discontinuity relative to where
an indication appeared on the trace line. Substantiation of a discontinuity was accomplished by inspecting the area from
the opposite surface and establishing its depth relative to total metal thickness.
Note cited in this section
** Example 11was prepared by Carol Miller, Wright Research & Development Center, Wright-
Patterson Air
Force Base. The research was conducted by Automation Industries, Inc., under Air Force contract.
Nondestructive Inspection of Forgings
Eddy Current and Electromagnetic Inspection
In the nondestructive inspection of forgings, the eddy current method is commonly used to detect flaws, while the
electromagnetic method is used to detect differences in microstructure, chemical composition, or hardness.
Electromagnetic inspection, which is restricted to ferromagnetic materials, is sometimes categorized as a modification of
the eddy current method because both techniques are based on electromagnetic principles.
In concept, eddy current equipment functions by the introduction of relatively high-frequency alternating currents into the
surface areas of conductive materials. The response of the material to the induced field is then measured by a mechanism
sensitive to the induced field. Detailed information is available in the article "Eddy Current Inspection" in this Volume.
Detection of Flaws
The detection of flaws in forgings by eddy current inspection is almost always done with a system consisting of a single
probe that is connected to an instrument generically known as a defectometer. This system is balanced with the probe in
air and is further balanced to a null value on sound material of the same composition, heat treatment, and surface
condition as the forging to be inspected. Areas of the surface of the forging where flaws are suspected are scanned with
the probe, which searches for an unbalance due to the flaw. Generally, the scanning is done in two directions
approximately at right angles to each other.
The advantages of eddy current inspection for flaw detection include the following:
•
The unbalance level can be adjusted and calibrated with notches of known depth in the same material in
the same c
ondition, which can give a reasonable estimate of the depth of the flaw. This estimate can be
helpful in reaching a decision as to the serviceability of the forging
• In the event that flaws are oriented in one direction only, as with seams or rolling laps
in the original
stock, the technique can be automated
• Threshold gates, which are automatic signal-
monitoring networks, are available to automatically signal
flaws of a sufficient magnitude to be judged defective. These signals can in turn be used to mark
or
otherwise identify flawed forgings or locations on the forging having flaws
• The automated tester can be operated by unskilled personnel once the system has been calibrated. Solid-
state electronics and their adaptation to eddy current equipment permit v
ery stable instrumentation with
no need for constant adjustment
The disadvantages of eddy current inspection for detection of flaws include the following:
• The correlation between unbalance signal and flaw depth is often not linear, for a variety of reas
ons.
Accordingly, this method is frequently used as a go/no-
go device at a depth of flaw, plus or minus a
band of uncertainty. The band of uncertainty must be determined by experimental methods
• In ferrous materials, variations in the decarburization levels can render the method invalid
• This method is not suited to the detection of deep subsurface flaws
Detection of Differences in Microstructure
Differences in microstructure, which usually register as differences in hardness, can be detected by electromagnetic
inspection using either encircling coils or spot probes as pickups. Regardless of whether a probe or a coil is used, the
instrumentation must be set up and balanced in accordance with the manufacturer's directions. This is done without
forgings in or near the pickup, with forgings in the pickup, or sometimes both with and without forgings.
Once the test setup has been established, it is necessary to have good-quality forgings of known electromagnetic response
available to ensure that the instrumentation has not varied. These forgings (which are sometimes referred to as masters)
must be available to personnel who are trained in the setup and maintenance of the equipment.
The advantages of electromagnetic inspection for detecting differences in microstructure include the following:
•
The equipment can be electronically gated based on the response of the instrumentation to the properties
of the forging
•
Electromagnetic inspection can be readily automated for properties throughout a forging (usually an
encircling coil) or for properties at a specific location (using a spot probe)
• Once it has been properly set up, the operation can be effectively run by unskilled personnel
The disadvantages of electromagnetic inspection for detecting differences in microstructure include the following:
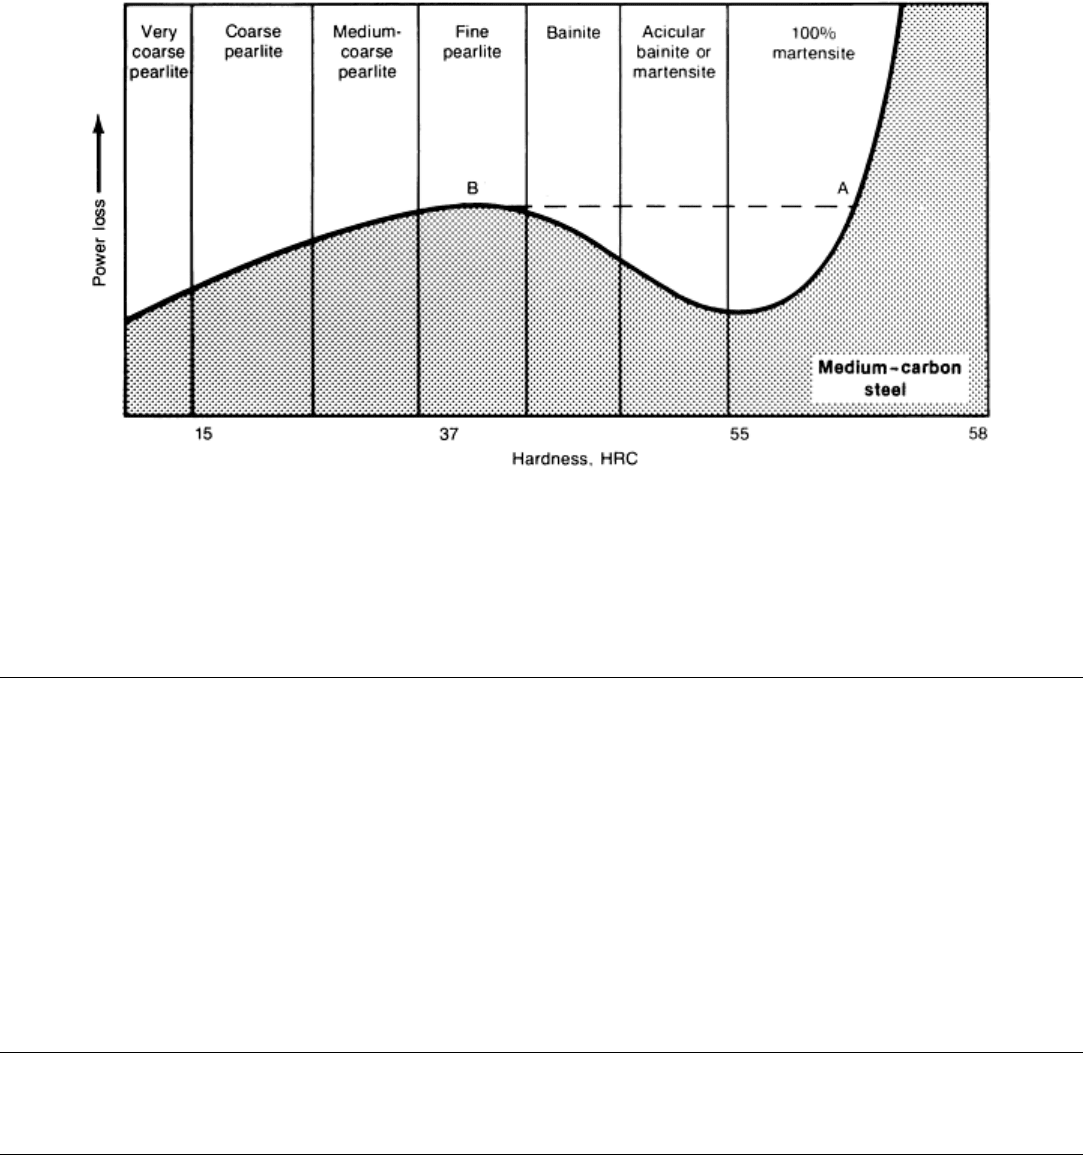
•
A given response can indicate more than one condition in the forging; for this reason, testing technique
must be developed very carefully. For example, as illustrated in Fig. 30 by an electromagnetic S-
curve
for a medium-
carbon steel forging, when two variables (hardness and microstructure) exist, the curve
shows essentially the same height in power loss for 37 HRC as for 56.5 HRC (dashed line B-A, in
Fig.
30) even though the microstructure is widely different
•
Development of techniques can be done only by trained personnel; even then, a great deal of
experimentation is usually required to develop procedures that will yield accurate results
Fig. 30 Relation of an electromagnetic S-curve to variations in hardness and microstructure of a medium-
carbon steel forging
Nondestructive Inspection of Forgings
Radiographic Inspection
Radiography (γ-ray or x-ray) is not extensively used for the inspection of forgings for two reasons. First, the types of
discontinuities most commonly located by radiography (gas porosity, shrinkage porosity, and shrinkage cavities) are not
usually found in forgings. Second, for the types of internal discontinuities that are commonly found in forgings
(inclusions, pipe, bursts, or flakes), ultrasonic inspection is more effective, more adaptable, and more economical.
Radiographic techniques can sometimes be helpful in the further investigation of known internal discontinuities in
forgings when the presence of these discontinuities has been determined earlier by ultrasonic inspection. In sections that
are not too thick to penetrate with available radiographic equipment, the size, orientation, and possibly the type of
discontinuities can be evaluated by radiography.
Nondestructive Inspection of Castings
By the ASM Committee on Nondestructive Inspection of Castings
*
Introduction

INSPECTION PROCEDURES for castings are established at the foundry to ensure conformance with customer drawings
and documents, which are frequently based on various government, technical society, or commercial specifications. For a
foundry to ensure casting quality, inspection procedures must be efficiently directed toward the prevention of
imperfections, the detection of unsatisfactory trends, and the conservation of material--all of which ultimately lead to
reduction in costs. Inspectors should be able to assess on sight the probable strong and weak points of a casting and know
where weaknesses and faults would most likely be found.
The inspection of castings normally involves checking for shape and dimensions, coupled with aided and unaided visual
inspection for external discontinuities and surface quality. Chemical analyses and tests for mechanical properties are
supplemented by various forms of nondestructive inspection, including leak testing and proof loading, all of which are
used to evaluate the soundness of the casting. These inspections add to the cost of the product; therefore, the initial
consideration must be to determine the amount of inspection needed to maintain adequate control over quality. In some
cases, this may require full inspection of each individual casting, but in other cases sampling procedures may be
sufficient.
Note
* Lawrence E. Smiley, Reliable Castings Corporation; Bruce G. Isaacson, Bio-Ima
ging Research Inc.; R.A.
Armistead, Advanced Research and Applications Corporation; I.C.H. Hughes, BCIRA International
Centre for Cast Metals Technology (Great Britain); John Johnston, Krautkramer Branson; Carol Miller,
Wright Research & Development Center, Wright-Patterson Air Force Base
Nondestructive Inspection of Castings
By the ASM Committee on Nondestructive Inspection of Castings
*
Inspection Categories
Methods for Determining Surface Quality. Cracks and other imperfections at the surface of a casting can be
detected by a number of inspection techniques, including visual inspection, chemical etching, liquid penetrant inspection,
eddy current inspection, and magnetic particle inspection (which can also reveal discontinuities situated immediately
below the surface). All these inspection methods require clean and relatively smooth surfaces for effective results.
Methods for Detecting Internal Discontinuities. The principal nondestructive methods used for detecting internal
discontinuities in castings are radiography, ultrasonic inspection, and eddy current inspection. Of these methods,
radiography is the most highly developed technique for detailed inspection; it can provide a pictorial representation of the
form and extent of many types of internal discontinuities. Ultrasonic inspection, which is less universally applicable, can
give qualitative indications of many discontinuities. It is especially useful in the inspection of castings of fairly simple
design, for which the signal pattern can be most reliably interpreted. Ultrasonic inspection can also be used to determine
the shape of graphite particles in cast iron. Eddy current and other closely related electromagnetic methods are used to
sort castings for variations in composition, surface hardness, and structure.
Infrared thermography (thermal inspection) has also occasionally been proposed as a method for detecting subsurface
defects. However, its successful uses have generally been restricted to the detection of larger defects because of the
relatively slow rates at which heat can be put into a component and because of the relatively low sensitivity of infrared
detectors. Increased use of thermal inspection may occur with the introduction of pulsed video thermography, in which a
very short burst of intense heat is directed at the component. The presence of near-surface defects influences the rate at
which heat is dissipated from the surface, and temperature variations are detected with a high-resolution infrared camera
recorded onto videotape and presented as an image on a TV monitor. The method was developed for the detection of
small defects in composites and in aerospace turbine engine blades, but some initial results obtained with cast iron test
plates have proved promising (Ref 1).
Methods for Dimensional Inspection. A number of techniques are used to determine the dimensional accuracy of
castings. These include manual checks with micrometers, manual and automatic gages, coordinate measuring machines,
and three-dimensional automatic inspection stations (machine vision systems). This article will discuss the use of
coordinate-measuring machines. Additional information on methods for dimensional inspection can be found in the
Section "Inspection Equipment and Techniques" in this Volume.
Reference cited in this section
1.
P.J. Rickards, Progress in Guaranteeing Quality Through Nondestructive Methods of Evaluation,
Foundryman Int., April 1988, p 196-209
Nondestructive Inspection of Castings
By the ASM Committee on Nondestructive Inspection of Castings
*
Casting Defects
Foundrymen refer to the deviations in less-than-perfect castings as discontinuities, but these imperfections are more
commonly termed casting defects. Some casting defects may have no influence on the function or the service life of cast
components, but will give an unsatisfactory appearance or will make further processing, such as machining, more costly.
Many such defects can be easily corrected by shotblast cleaning or grinding. Other defects that may be more difficult to
remove can be acceptable in some locations. The casting designer must understand the differences and must write
specifications that meet the true design needs.
Classification of Casting Defects. Foundrymen have traditionally used rather unique names, such as rattail, scab,
buckle, snotter, and shut, to describe various casting imperfections (such terms are defined in the "Glossary of Terms" in
Casting, Volume 15 of ASM Handbook, formerly 9th Edition Metals Handbook). Unfortunately, foundrymen may use
different nomenclature to describe the same defect. The International Committee of Foundry Technical Associations has
standardized the nomenclature, starting with the identification of seven basic categories of casting defects:
• Metallic projections
• Cavities
• Discontinuities
• Defects
• Incomplete casting
• Incorrect dimension
• Inclusions or structural anomalies
In this scheme, the term discontinuity has the specific meaning of a planar separation of the metal, that is, a crack.
Table 1 presents some of the common defects in each category. In general, defects that can serve as stress raisers or crack
promoters are the most serious. These include preexisting cracks, internal voids, and nonmetallic inclusions.
Table 1 International classification of common casting defects
No. Description Common
name
Sketch
Metallic Projections
A 100:
Metallic projections in the form of fins or flash
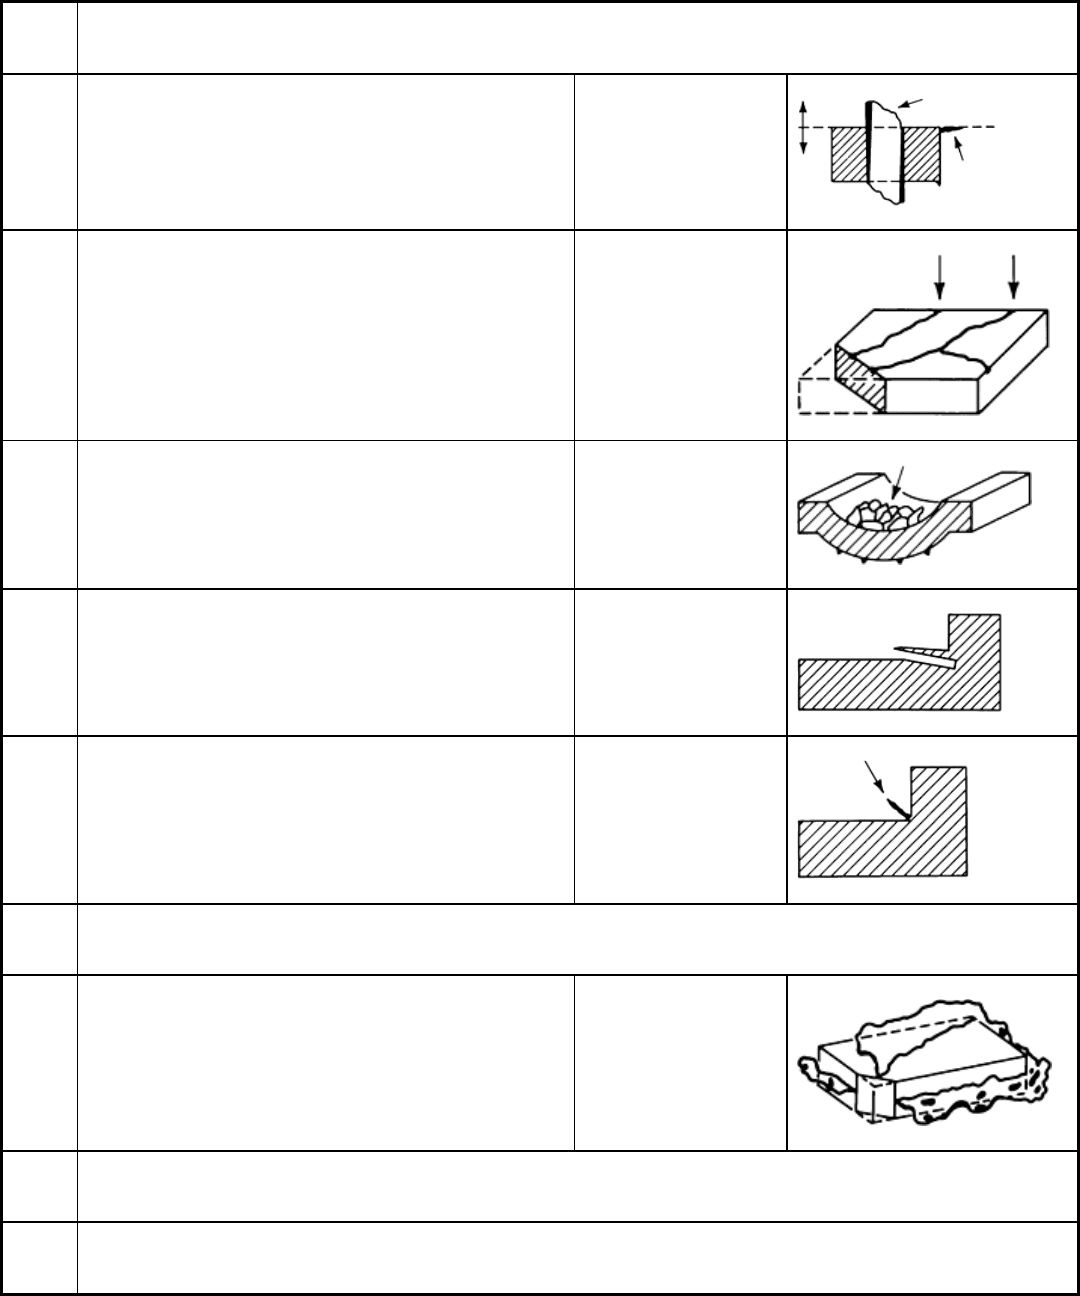
A 110:
Metallic projections in the form of fins (or flash) without change in principal casting dimensions
A 111 Thin fins (or flash) at the parting line or at core prints Joint flash or fins
A 112 Projections in the form of veins on the casting surface Veining or finning
A 113 Network of projections on the surface of die castings Heat-checked die
A
114
(a)
Thin projection parallel to a casting surface, in re-entrant
angles
Fillet scab
A 115 Thin metallic projection located at a re-entrant angle and
dividing the angle in two parts
Fillet vein
A 120:
Metallic projections in the form of fins with changes in principal casting dimensions
A
123
(a)
Formation of fins in planes related to direction of mold
assembly (precision casting with waste pattern); principal
casting dimensions change
Cracked or broken mold
A 200:
Massive projections
A 210:
Swells
