ASM Metals HandBook Vol. 17 - Nondestructive Evaluation and Quality Control
Подождите немного. Документ загружается.

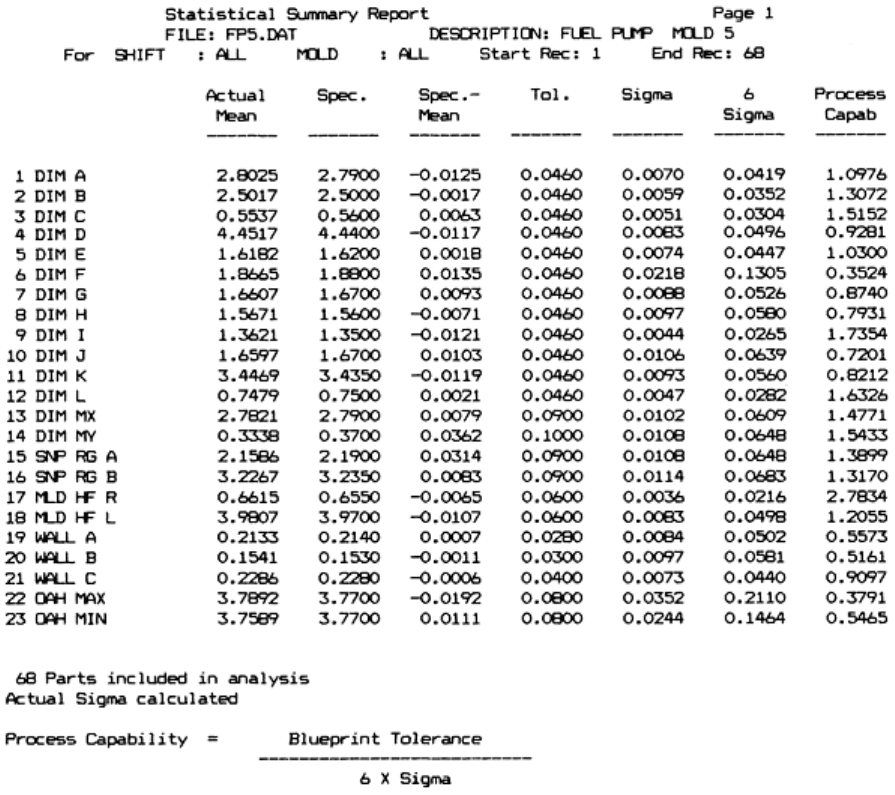
Fig. 5
Statistical summary report showing the mean of measured observations, the blueprint specification for
the mean, the differe
nce between specified and measured means, the tolerance, the standard deviation of the
measured dimensions, and the capability of the process. These calculations are performed for all measured
dimensions on the part.
Histograms. An alternative method of assessing capability involves the use of a histogram, or frequency plot. This is a
graph that plots the number of occurrences within successive, equally spaced ranges of a given measured dimension.
Figure 6 shows an example output report of this type. A graph such as this, which has superimposed upon it the tolerance
limits for the dimension being analyzed, allows a quick, qualitative evaluation of the variation and capability of the
process. It also allows the normality of the process to be judged through comparison with the expected bell-shaped curve
of a normal process.
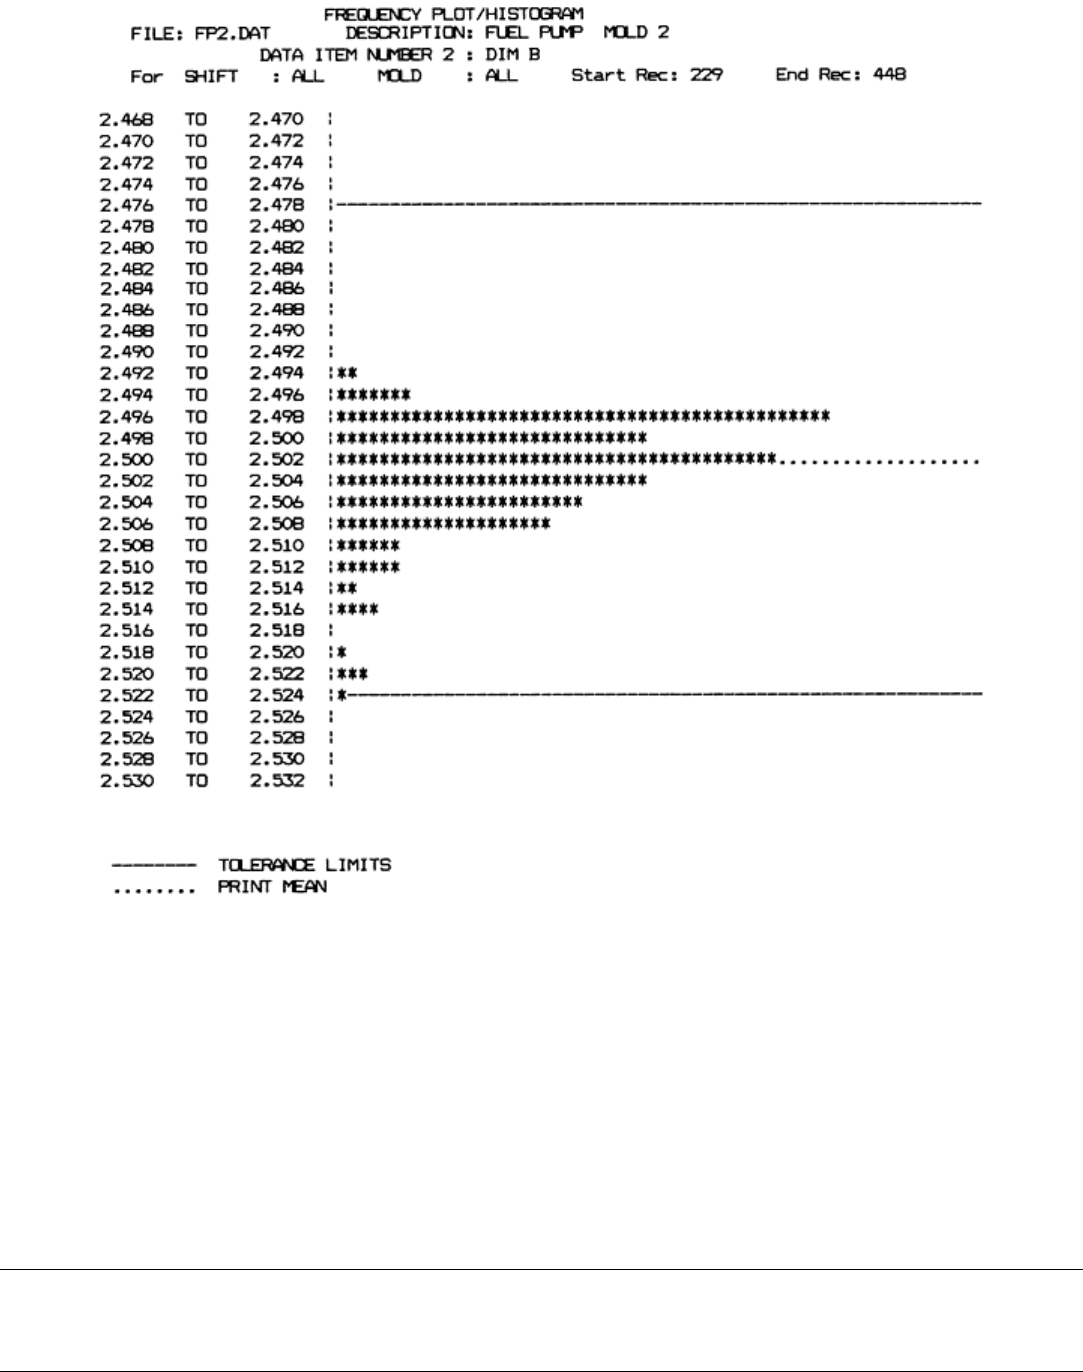
Fig. 6 Frequency plot for one measured dimension showing the distribution of the measurements
Other Applications for Computer-Aided Inspection. The general sequence described for semiautomatic
dimensional inspection can be applied to a number of other inspection criteria. Examples would include pressure testing
or defect detection by electronic vision systems. The statistical analysis of scrap by defect types is also very helpful in
identifying problem areas. In some cases, direct data input to a computer may not be feasible, but the benefits of entering
data manually into a statistical analysis program should not be overlooked. The computer allows rapid analysis of large
amounts of data so that statistically significant trends can be detected and proper attention paid to appropriate areas for
improvement. The benefits and costs of each anticipated application of automation to a particular situation, as well as the
feasibility of applying state-of-the-art equipment, need to be studied as thoroughly as possible prior to implementation.
Nondestructive Inspection of Castings
By the ASM Committee on Nondestructive Inspection of Castings
*
Liquid Penetrant Inspection
Liquid penetrant inspection essentially involves a liquid wetting the surface of a workpiece, flowing over that surface to
form a continuous and uniform coating, and migrating into cracks or cavities that are open to the surface. After a few
minutes, the liquid coating is washed off the surface of the casting, and a developer is placed on the surface. The
developer is stained by the liquid penetrant as it is drawn out of the cracks and cavities. Liquid penetrants will highlight
surface defects so that detection is more certain. Details of this method can be found in the article "Liquid Penetrant
Inspection" in this Volume.
Liquid penetrant inspection should not be confined to as-cast surfaces. For example, it is not unusual for castings of
various alloys to exhibit cracks (frequently intergranular) on machined surfaces. A pattern of cracks of this type may be
the result of intergranular cracking throughout the material because of an error in composition or heat treatment, or the
cracks may be on the surface only as a result of machining or grinding. Surface cracking may result from insufficient
machining allowance, which does not allow for complete removal of imperfections produced on the as-cast surface, or it
may result from faulty machining techniques. If imperfections of this type are detected by visual inspection, liquid
penetrant inspection will show the full extent of such imperfections, will give some indication of the depth and size of the
defect below the surface by the amount of penetrant absorbed, and will indicate whether cracking is present throughout
the section.
Liquid penetrant inspection is sometimes used in conjunction with another nondestructive method. Such is the case in the
following example.
Example 1: Tail Rotor Gearbox Failure on the H-53 Helicopter.
The H-53 tail rotor gearbox mounting lugs experienced failures that resulted in at least two aircraft accidents. The
gearbox is a magnesium casting, either AZ-91 or ZE-41. Initially, only visual inspection using a 10× magnifying glass
was required. Initiation sites for the cracking were found to be localized in a few areas adjacent to the attached lugs (Fig.
7). A manual eddy current inspection was developed that concentrated on the potential initiation sites. If an indication was
found, then a fluorescent penetrant inspection was performed as a backup inspection.
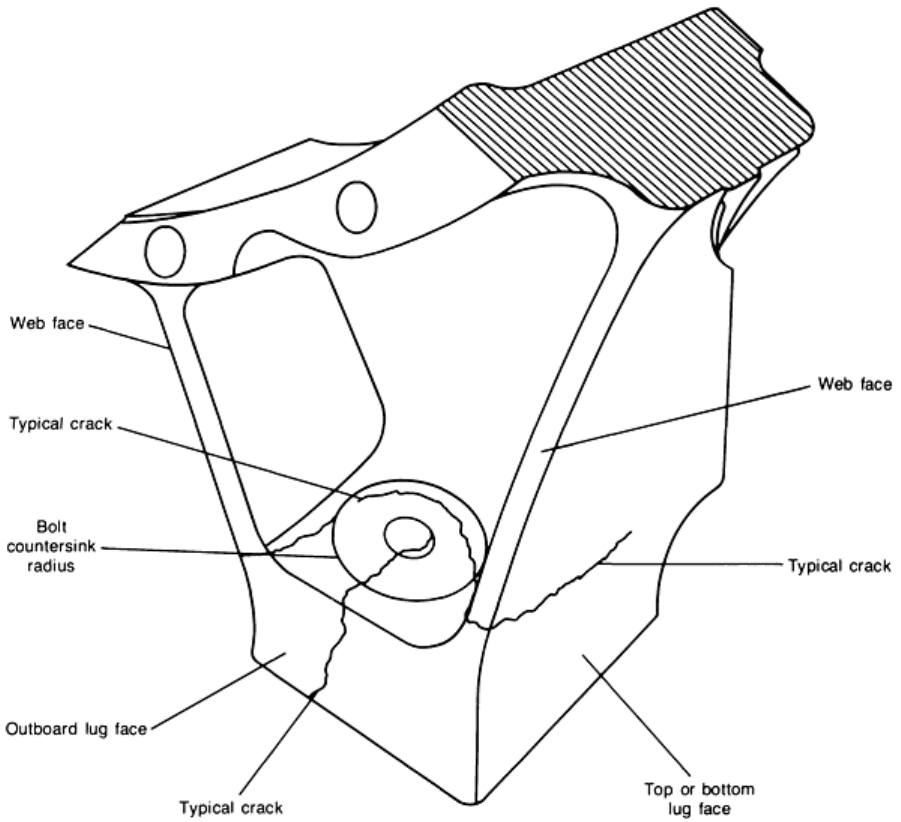
Fig. 7 Helicopter transmission mounting lug. Note: bolt is shown removed for clarity.
Bolt is not removed for
eddy current inspection.
Inspection Procedure. An eddy current tester with a flawgate and shielded probes was used to perform the
inspection. The instrument is calibrated using standard magnesium alloy (either AZ-91 or ZE-41) calibration blocks. The
tester is calibrated on a 0.50 mm (0.020 in.) slot to achieve a minimum 150 A deflection. The flawgate is calibrated to
activate for meter deflection greater than 150 A. The part is scanned very slowly over all critical areas. As an aid for the
inspection of the lug edges, a wooden toothpick is taped to the probe to maintain a constant probe-to-edge distance. A
positive indication--meter deflection greater than 150 A--requires a fluorescent penetrant inspection.
In preparation for the fluorescent penetrant inspection, the paint in the area to be inspected is removed. The required
penetrant material sensitivity is level II or III and is used with a halogenated solvent remover and non-aqueous developer.
Clean cloths moistened with solvent cleaner are required for the cleaning step. The inspection area is never flushed with
solvent. An initial inspection is required before the developer is applied. If no indications are noted, developer is applied.
When an indication is noted, it is wiped with a cotton swab moistened with solvent, and the area is inspected for the
indication bleed-back. A 30-min penetrant dwell time is required. The minimum required dwell time between cleaning
and application of the developer is 10 min before inspection. The minimum developer dwell time is half the penetrant
dwell time, and a maximum developer dwell time is not to exceed the penetrant dwell time.
After the inspection, all developer residue is removed from the mounting lug. Areas of greatest concern include the mount
pad radius areas, lug flanges along edges, and the mounting pad. After completion of penetrant inspection, the finishes on

the mounting lug are replaced in such a way that the eddy current inspection is not hindered and the visual inspection is
enhanced. The visual inspection is enhanced by painting the lugs light gray or white.
Conclusions. These inspections were performed during scheduled inspection intervals until magnesium alloy castings
were replaced with A356.0 aluminum alloy castings.
Nondestructive Inspection of Castings
By the ASM Committee on Nondestructive Inspection of Castings
*
Magnetic Particle Inspection
Magnetic particle inspection is a highly effective and sensitive technique for revealing cracks and similar defects at or just
beneath the surface of castings made of ferromagnetic metals. The capability of detecting discontinuities just beneath the
surface is important because such cleaning methods as shot or abrasive blasting tend to close a surface break that might
go undetected in visual or liquid penetrant inspection.
When a magnetic field is generated in and around a casting made of a ferromagnetic metal and the lines of magnetic flux
are intersected by a defect such as a crack, magnetic poles are induced on either side of the defect. The resulting local flux
disturbance can be detected by its effect on the particles of a ferromagnetic material, which become attracted to the region
of the defect as they are dusted on the casting. Maximum sensitivity of indication is obtained when a defect is oriented in
a direction perpendicular to the applied magnetic field and when the strength of this field is sufficient to saturate the
casting being inspected.
Equipment for magnetic particle inspection uses direct or alternating current to generate the necessary magnetic fields.
The current can be applied in a variety of ways to control the direction and magnitude of the magnetic field.
In one method of magnetization, a heavy current is passed directly through the casting placed between two solid contacts.
The induced magnetic field then runs in the transverse or circumferential direction, producing conditions favorable to the
detection of longitudinally oriented defects. A coil encircling the casting will induce a magnetic field that runs in the
longitudinal direction, producing conditions favorable to the detection of circumferentially (or transversely) oriented
defects. Alternatively, a longitudinal magnetic field can be conveniently generated by passing current through a flexible
cable conductor, which can be coiled around any metal section. This method is particularly adaptable to castings of
irregular shape. Circumferential magnetic fields can be induced in hollow cylindrical castings by using an axially
disposed central conductor threaded through the casting.
Small castings can be magnetic particle inspected directly on bench-type equipment that incorporates both coils and solid
contacts. Critical regions of larger castings can be inspected by the use of yokes, coils, or contact probes carried on
flexible cables connected to the source of current; this setup enables most regions of castings to be inspected. Equipment
and techniques associated with this method can be found in the article "Magnetic Particle Inspection" in this Volume.
Nondestructive Inspection of Castings
By the ASM Committee on Nondestructive Inspection of Castings
*
Eddy Current Inspection
Eddy current inspection consists of observing the interaction between electromagnetic fields and metals. In a basic
system, currents are induced to flow in the testpiece by a coil of wire that carries an alternating current. As the part enters
the coil, or as the coil in the form of a probe or yoke is placed on the testpiece, electromagnetic energy produced by the
coils is partly absorbed and converted into heat by the effects of resistivity and hysteresis. Part of the remaining energy is
reflected back to the test coil, its electrical characteristics having been changed in a manner determined by the properties
of the testpiece. Consequently, the currents flowing through the probe coil are the source of information describing the
characteristics of the testpiece. These currents can be analyzed and compared with currents flowing through a reference
specimen.
Eddy current methods of inspection are effective with both ferromagnetic and nonferromagnetic metals. Eddy current
methods are not as sensitive to small, open defects as liquid penetrant or magnetic particle methods are. Because of the
skin effect, eddy current inspection is generally restricted to depths less than 6 mm ( in.). The results of inspecting
ferromagnetic materials can be obscured by changes in the magnetic permeability of the testpiece. Changes in temperature
must be avoided to prevent erroneous results if electrical conductivity or other properties, including metallurgical
properties, are being determined.
Applications of eddy current and electromagnetic methods of inspection to castings can be divided into the following
three categories:
• Detecting near-
surface flaws such as cracks, voids, inclusions, blowholes, and pinholes (eddy current
inspection)
•
Sorting according to alloy, temper, electrical conductivity, hardness, and other metallurgical factors
(primarily electromagnetic inspection)
•
Gaging according to size, shape, plating thickness, or insulation thickness (eddy current or
electromagnetic inspection)
The following example demonstrates the use of eddy current inspection for the evaluation of an induction-hardened
surface on a gray iron casting.
Example 2: Eddy Current Inspection of Hardened Valve Seats on Gray Iron
Automotive Cylinder Heads.
Exhaust-valve seats on gray iron automotive engine cylinder heads were induction hardened to withstand use with lead-
free fuels. The seats were specified to be hardened to 50 HRC to a depth of 1.27 to 2.03 mm (0.050 to 0.080 in.). Failure
to achieve these depths could lead to excessive recession of the seat, causing premature failure.
To establish the feasibility of, and the conditions for, eddy current inspection of cylinder heads having valve seats of
different diameters, an adjustable probe was made using a 10 mm (0.400 in.) diam standard probe. The end was machined
to a 120° conical point, and the probe was mounted in a plastic holder. A scrap valve stem mounted in the holder was
used to position the probe on the valve seat. The probe was centered on the valve seat by moving the probe in its holder
and by the adjusting screw. After the inspection conditions were established, rugged units for use by production
inspectors were made of stainless steel with the protected probe in a fixed position to suit the cylinder-head seat.
In operation, the probe was brought into intimate contact with the hardened surface, and a meter reading was taken.
Positioning of the probe on the valve seat is shown in Fig. 8. The meter reading, taken from an instrument calibrated from
-100 to +100, was compared with a developed chart for case depth versus meter reading (a linear relationship). A meter
reading of 0 was established for 50 HRC at a depth of 1.27 mm (0.050 in.) and -40 for 2.03 mm (0.080 in.). The
instrumentation was set up to respond to A
r
(resistive component). Inspection was performed at a frequency of 2 kHz.
Extensive laboratory and production inspection has shown a standard deviation, of ±0.8 mm (±0.03 in.) and a
confidence limit of 3 for the total data generated.
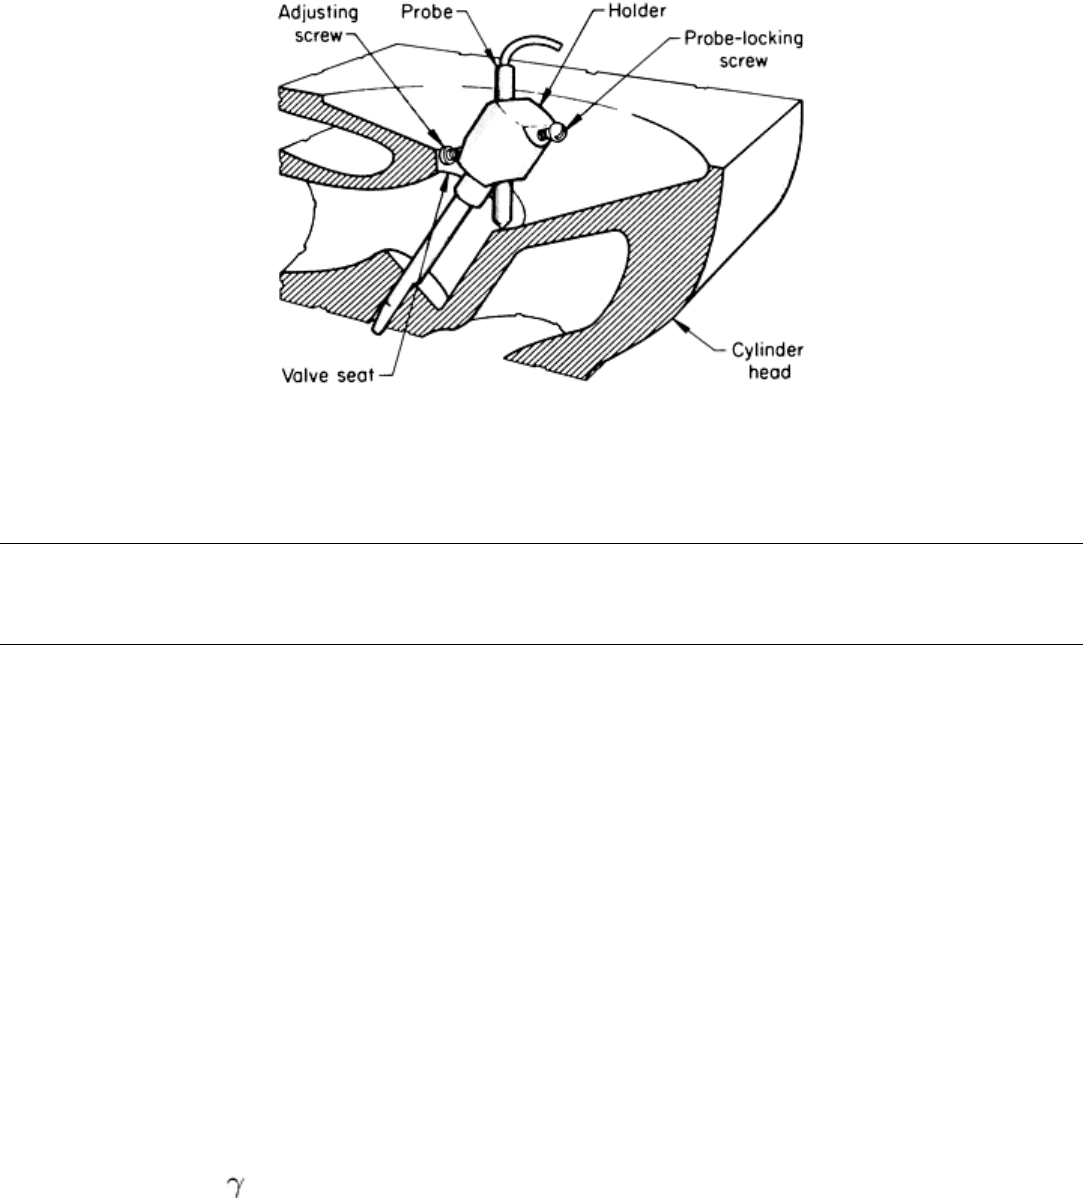
Fig. 8 Eddy current inspection using an adjustable probe for determining case depth of an induction-
hardened
gray iron valve seat.
Nondestructive Inspection of Castings
By the ASM Committee on Nondestructive Inspection of Castings
*
Radiographic Inspection
Radiographic inspection is a process of testing materials using penetrating radiation from an x-ray generator or a
radioactive source and an imaging medium, such as x-ray film or an electronic device. In passing through the material,
some of the radiation is attenuated, depending on the thickness and the radiographic density of the material, while the
radiation that passes through the material forms an image. The radiographic image is generated by variations in the
intensity of the emerging beam.
Internal flaws, such as gas entrapment or nonmetallic inclusions, have a direct effect on the attenuation. These flaws
create variations in material thickness, resulting in localized dark or light spots on the image.
The term radiography usually implies a radiographic process that produces a permanent image on film (conventional
radiography) or paper (paper radiography or xero radiography), although in a broad sense it refers to all forms of
radiographic inspection. When inspection involves viewing an image on a fluorescent screen or image intensifier, the
radiographic process is termed filmless or real-time inspection. When electronic nonimaging instruments are used to
measure the intensity of radiation, the process is termed radiation gaging. Tomography, a radiation inspection method
adapted from the medical computerized axial tomography scanner, provides a cross-sectional view of a testpiece. All of
the above terms are primarily used in connection with inspection that involves penetrating electromagnetic radiation in
the form of x-rays or -rays. Neutron radiography refers to radiographic inspection using neutrons rather than
electromagnetic radiation.
The sensitivity, or the ability to detect flaws, of radiographic inspection depends on close control of the inspection
technique, including the geometric relationships among the point of x-ray emission, the casting, and the x-ray imaging
plane. The smallest detectable variation in metal thickness lies between 0.5 and 2.0% of the total section thickness.
Narrow flaws, such as cracks, must lie in a plane approximately parallel to the emergent x-ray beam to be imaged; this
requires multiple exposures for x-ray film techniques and a remote-control parts manipulator for a real-time system.
Real-time systems have eliminated the need for multiple exposures of the same casting by dynamically inspecting parts
on a manipulator, with the capability of changing the x-ray energy for changes in total material thickness. These
capabilities have significantly improved productivity and have reduced costs, thus enabling higher percentages of castings
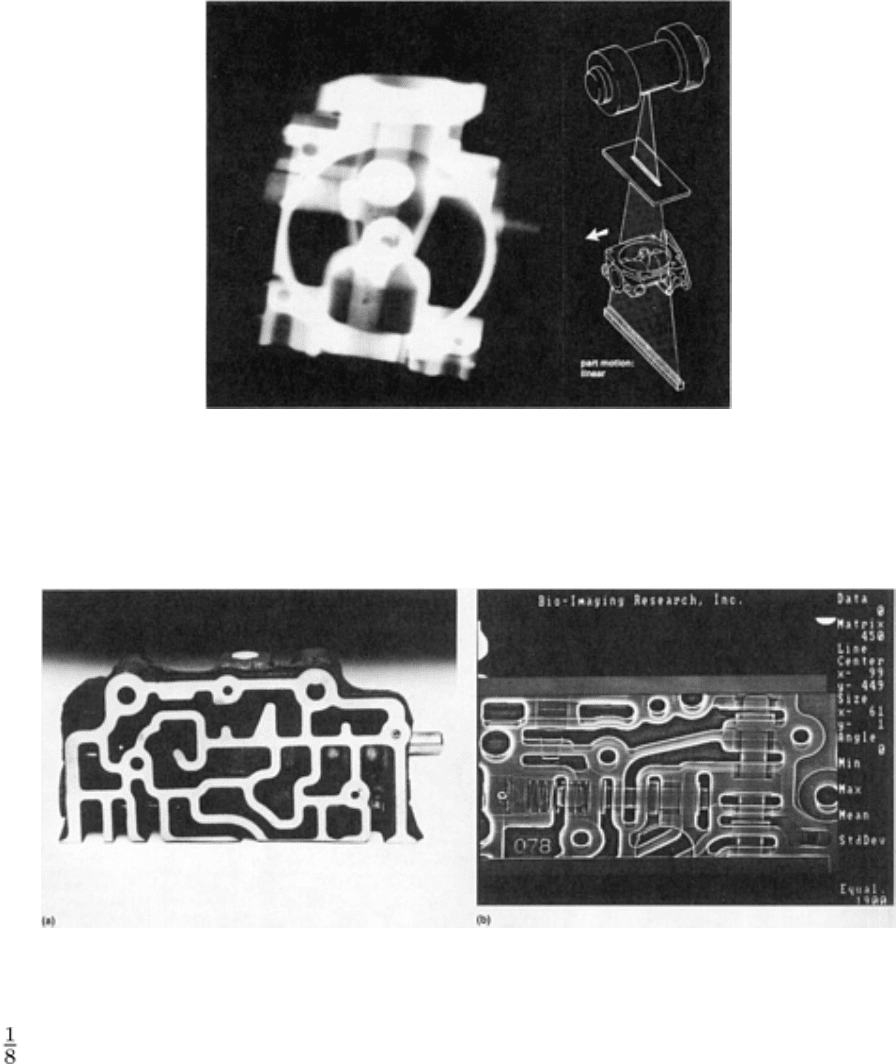
to be inspected and providing instant feedback after repair procedures. Figures 9 and 10 show real-time digital
radiography images of automotive components.
Fig. 9
Digital radiography image of a die cast aluminum carburetor. Porosity appears as dark spots in the area
of the center bore, through the vertical center of the image. Courtesy of B.G. Isaacson, Bio-
Imaging Research,
Inc.
Fig. 10
Evaluation of cast transmission housing assembly. (a) Photograph of cast part. (b) Digital radiography
image used to verify the steel spring pin
and shuttle valve assembly through material thicknesses ranging from
3 mm ( in.) in the channels to 25 mm (1 in.) in the rib sections of the casting. Courtesy of B.G. Isaacson, Bio-
Imaging Research, Inc.
Advances. Several advances have been made to assist the industrial radiographer. These include the computerization of
the radiographic standard shooting sketch, which graphically shows areas to be x-rayed and the viewing direction or angle
at which the shot is to be taken, and the development of microprocessor-controlled x-ray systems capable of storing
different x-ray exposure parameters for rapid retrieval and automatic warm-up of the system prior to use. The advent of
digital image-processing systems and microfocus x-ray sources (near point source), producing energies capable of
penetrating thick material sections, have made real-time inspection capable of producing images equal to, and in some
cases superior to, x-ray film images by employing geometric relations previously unattainable with macrofocus x-ray
systems. The near point source of the microfocus x-ray system virtually eliminates the edge unsharpness associated with
larger focus devices.
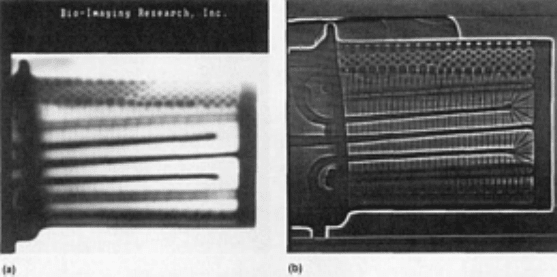
Digital image processing can be used to enhance imagery by multiple video frame integration and averaging techniques
that improve the signal-to-noise ratio of the image. This enables the radiographer to digitally adjust the contrast of the
image and to perform various edge enhancements to increase the conspicuity of many linear indications (Fig. 11).
Fig. 11
Digital radiography images of an investment cast jet engine turbine blade showing detail through a
wide range in material thickness. The
trailing edge of the blade (along the top of the image) is 2 mm (0.080
in.) thick, the root section of the blade (to the far left in the image) is 19 mm (0.75 in.) thick, and the shelf
area (to the right of the root section) is 25 mm (1 in.) thick. The ima
ge shown in (a) is unprocessed; the image
in (b) is processed to subdue the background and to enhance edges and internal features.
Courtesy of B.G.
Isaacson, Bio-Imaging Research, Inc.
Interpretation of the radiographic image requires a skilled specialist who can establish the correct method of exposing the
castings with regard to x-ray energies, geometric relationships, and casting orientation and can take all of these factors
into account to achieve an acceptable, interpretable image. Interpretation of the image must be performed to establish
standards in the form of written or photographic instructions. The inspector must also be capable of determining if the
localized indication is a spurious indication, a film artifact, a video aberration, or a surface irregularity. The article
"Radiographic Inspection" in this Volume provides additional information on real-time digital systems.
Computed tomography, also known as computerized axial tomography (or CAT scanning), is a more sophisticated x-
ray imaging technique originally developed for medical diagnostic use (Ref 2). It is the complete reconstruction by
computer of a tomographic plane, or slice of an object. A collimated (fan-shaped) x-ray beam is passed through a section
of the part and is intercepted by a detector on the other side. The part is rotated slightly, and a new set of measurements is
made; this process is repeated until the part has been rotated 180°.
The resulting image of the slice (tomogram) is formed by computer calculations based on electronic measurement (digital
sampling) of the radiation transmitted through the object along different paths during the rotating scan. The data thus
accumulated are used to compute the densities of each point in the cross section, enabling the computer to reconstruct a
two-dimensional visual image of the slice.
The shapes of internal features are determined by their computed densities. After one slice is produced through a
complete rotation, either the part or the radiation source and detector can be moved and a three dimensional image built
up through the scanning of successive slices.
Compared to electronic radiography, computed tomography provides increased sensitivity and detection capabilities. The
contrast resolution of a good-quality tomographic image is 0.1 to 0.2%, which is approximately two orders of magnitude
better than with x-ray film.
In addition, images are produced in a quantitative, ready-to-use digital format (Ref 3). They provide detailed physical
information, such as size, density, and composition, to aid in evaluating defects. Methods are being developed to use this
information to predict failure modes or system performance under operating loads. The data can also be easily
manipulated to obtain various types of images, to develop automated flaw detection techniques, and to promote efficient
archiving. Figures 12 and 13 illustrate the uses of computed tomography for examining castings. More detailed
information can be found in the article "Industrial Computed Tomography" in this Volume.
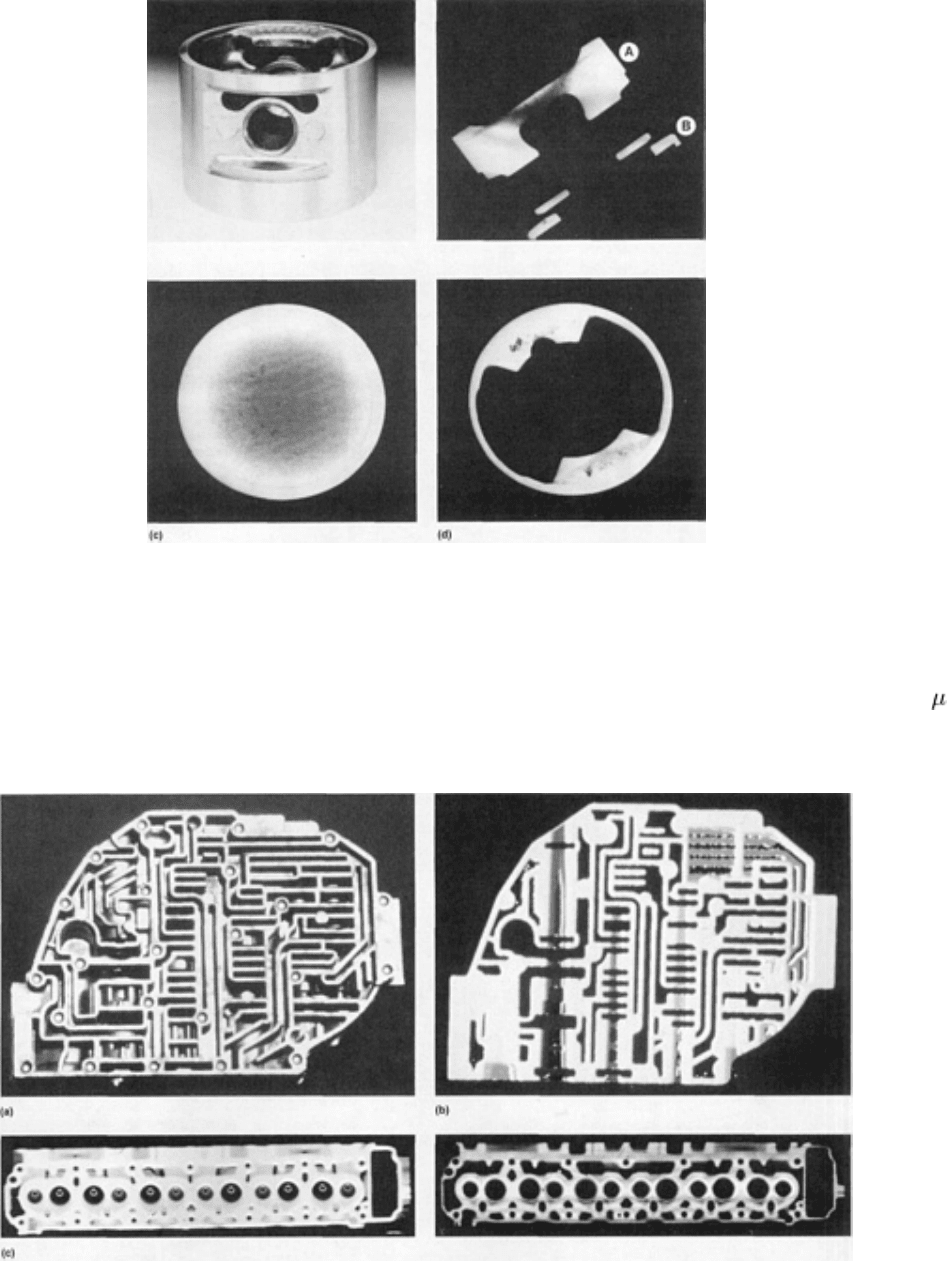
Fig. 12 Computed tomographic images of a die cast alumi
num automotive piston. (a) Photograph of cast part.
(b) Vertical slice through the piston shows porosity as dark spots in the crown area (point A) and
counterbalance area (point B). (c) Transverse slice through the crown of the piston verifies the porosity
; the
smallest void that is visible is 0.4 mm (0.016 in.) in diameter. (d) Transverse slice through the counterbalance
area also verifies porosity. Dimensional analysis of the piston walls is possible to an accuracy of ±50
m
(±0.002 in.). Courtesy of B.G. Isaacson, Bio-Imaging Research, Inc.
Fig. 13
Use of computed tomography for examining automotive components. (a) Photograph of a cast
aluminum transmission case with (b) corresponding tomographic image. (c) Two three-
dimensional images of a
cast aluminum cylinder head generated from a set of continuous tomographic scans used to view water-
cooling
chambers where a leak had been detected. Courtesy of R.A. Armistead, Advanced Research and Applications
Corporation.
