ASM Metals HandBook Vol. 17 - Nondestructive Evaluation and Quality Control
Подождите немного. Документ загружается.

the type of flaw present and the end use of the casting. More complex castings usually undergo visual and dimensional
inspection after the removal of gates and risers.
Final inspection establishes the quality of the finished casting through the use of any of the methods previously
mentioned. Visual inspection also includes the final measurement and comparison of specified and actual dimensions.
Dimensions of castings from a large production run can be checked with gages, jigs, fixtures, or coordinate measuring
systems.
Liquid penetrant inspection is extensively used as a visual aid for detecting surface flaws in aluminum alloy
castings. Liquid penetrant inspection is applicable to castings made from all the aluminum casting alloys as well as
castings produced by all methods. One of the most useful applications, however, is the inspection of small castings
produced in permanent molds from alloys such as 296.0, which are characteristically susceptible to hot cracking. For
example, in cast connecting rods, hot shortness may result in fine cracks in the shank sections. Such cracks are virtually
undetectable by unaided visual inspection, but are readily detectable by liquid penetrant inspection.
All the well-known liquid penetrant systems (that is, water-washable, postemulsifiable, and solvent-removable) are
applicable to the inspection of aluminum alloy castings. In some cases, especially for certain high-integrity castings, more
than one system can be used. Selection of the system is primarily based on the size and shape of the castings, surface
roughness, production quantities, sensitivity level desired, and available inspection facilities.
Pressure testing is used for castings that must be leaktight. Cored-out passages and internal cavities are first sealed off
with special fixtures having air inlets. These inlets are used to build up the air pressure on the inside of the casting. The
entire casting is then immersed in a tank of water, or it is covered by a soap solution. Bubbles will mark any point of air
leakage.
Radiographic inspection is a very effective means of detecting such conditions as cold shuts, internal shrinkage,
porosity, core shifts, and inclusions in aluminum alloy castings. Radiography can also be used to measure the thickness of
specific sections. Aluminum alloy castings are ideally suited to examination by radiography because of their relatively
low density; a given thickness of aluminum alloy can be penetrated with about one-third the power required for
penetrating the same thickness of steel.
Aluminum alloy castings are most often radiographed with an x-ray machine, using film to record the results. Real-time
(digital) radiography and computed tomography are also widely used and are best suited to detecting shrinkage, porosity,
and core shift (Fig. 12 and 13). Gamma-ray radiography is also satisfactory for detecting specific conditions in aluminum
castings. Although the γ-ray method is used to a lesser extent than the x-ray method, it is about equally as effective for
detecting flaws or measuring specific conditions. Aluminum alloy castings are most often radiographed to detect
approximately the same types of flaws that may exist in other types of castings, that is, conditions such as porosity or
shrinkage, which register as low-density spots or areas and appear blacker on the film or real-time image screen than the
areas of sound metal.
Aluminum ingots may contain hidden internal cracks of varying dimensions. Depending on size and location, these cracks
may cause an ingot to split during mechanical working and thermal treatment, or they may appear as a discontinuity in the
final wrought product. Once the size and location of such cracks are determined, an ingot can be scrapped, or sections free
from cracks can be sawed out and processed further. Because the major dimensions of the cracks are along the casting
direction, they present good reflecting surfaces for sound waves traveling perpendicular to the casting direction.
Therefore, ultrasonic methods using a wave frequency that gives adequate penetration into the ingot provide excellent
sensitivity for 100% inspection of that part of the ingot containing critical cracks. Because of ingot thickness (up to 400
mm, or 16 in.) and the small metal separation across the crack, radiographic methods are impractical for inspection.
Ultrasonic Inspection. Aluminum alloy castings are sometimes inspected by ultrasonic methods to evaluate internal
soundness or wall thickness. The principal uses of ultrasonic inspection for aluminum alloy castings include the detection
of porosity in castings and internal cracks in ingots.

Nondestructive Inspection of Castings
By the ASM Committee on Nondestructive Inspection of Castings
*
Inspection of Copper and Copper Alloy Castings
The inspection of copper and copper alloy castings is generally limited to visual and liquid penetrant inspection of the
surface, along with radiographic inspection for internal discontinuities. In specific cases, electrical conductivity tests and
ultrasonic inspection can be applied, although the usual relatively large cast grain size could prevent a successful
ultrasonic inspection.
Visual inspection is simple yet informative. A visual inspection would include significant dimensional measurements as
well as general appearance. Surface discontinuities often indicate the presence of internal discontinuities.
For small castings produced in reasonable volume, a destructive metallographic inspection on randomly selected samples
is practical and economical. This is especially true on a new casting for which foundry practice has not been optimized
and a satisfactory repeatability level has not been achieved.
For castings of some of the harder and stronger alloys, a hardness test is a good means of estimating the level of
mechanical properties. Hardness tests are of less value for the softer tin bronze alloys because hardness tests do not reflect
casting soundness and integrity.
Because copper alloys are nonmagnetic, magnetic particle inspection cannot be used to detect surface cracks. Instead,
liquid penetrant inspection is recommended. Ordinarily, liquid penetrant inspection requires some prior cleaning of the
casting to highlight the full detail.
For the detection of internal defects, radiographic inspection is recommended. Radiographic methods and standards are
well established for some copper alloy castings (for example, ASTM E 272 and E 310).
As a general rule, the method of inspection applied to some of the first castings made from a new pattern should include
all those methods that provide a basis for judgment of the acceptability of the casting for the intended application. Any
deficiencies or defects should be reviewed and the degree of perfection defined. This procedure can be repeated on
successive production runs until repeatability has been ensured.
Gas Porosity. Copper and many copper alloys have a high affinity for hydrogen, with an increasing solubility as the
temperature of the molten bath is increased. Conversely, as the metal cools in the mold, most of this hydrogen is rejected
from the metal. Because all the gas does not necessarily escape to the atmosphere and may become entrapped by the
solidifying process, gas porosity may be found in the casting.
In most alloys, gas porosity is identified by the presence of voids that are relatively spherical and are bright and shiny
inside. Visible upon sectioning or by radiography, they may either be small, numerous, and rather widely dispersed or
fewer in number and relatively large. Regardless of size, they are seldom interconnected except in some of the tin bronze
alloys, which solidify in a very dendritic mode. In these alloys, the gas porosity tends to be distributed in the interstices
between the dendrites.
Shrinkage voids caused by the change in volume from liquid to solid in copper alloys are different only in degree and
possibly shape from those found in other metals and alloys. All nonferrous metals exhibit this volume shrinkage when
solidifying from the molten condition.
Shrinkage voids may be open to the air when near or exposed to the surface, or they may be deep inside the thicker
sections of the casting. They are usually irregular in shape, compared to gas-generated defects, in that their shape
frequently reflects the internal temperature gradients induced by the external shape of the casting.
Hot Tearing. The tin bronzes as a class, as well as a few of the leaded yellow brasses, are susceptible to hot shortness;
that is, they lack ductility and strength at elevated temperature. This is significant in that tearing and cracking can take
place during cooling in the mold because of mold or core restraint. In aggravated instances, the resulting hot tears in the

part appear as readily visible cracks. Sometimes, however, the cracks are not visible externally and are not detectable until
after machining. In extreme cases, the cracks become evident only through field failure because the tearing was deep
inside the casting.
Nonmetallic inclusions in copper alloys, as with all molten alloys, are normally the result of improper melting and/or
pouring conditions. In the melting operation, the use of dirty remelt or dirty crucibles, poor furnace linings, or dirty
stirring rods can introduce nonmetallic inclusions into the melt. Similarly, poor gating design and pouring practice can
produce turbulence and can generate nonmetallic inclusions. Sand inclusions may also be evident as the result of
improper sand and core practice. All commercial metals, by the nature of available commercial melting and molding
processes, usually contain very minor amounts of small nonmetallic inclusions. These have little or no effect on the
casting. Inclusions of significant size or number are considered detrimental. A thorough review of copper alloy melting,
refining, and casting practices is available in Casting, Volume 15 of ASM Handbook, formerly 9th Edition Metals
Handbook.
Nondestructive Inspection of Castings
By the ASM Committee on Nondestructive Inspection of Castings
*
References
1.
P.J. Rickards, Progress in Guaranteeing Quality Through Nondestructive Methods of Evaluation,
Foundryman Int., April 1988, p 196-209
2. P.M. Bralower, Nondestructive Testing. Part I. The New Generation in Radiography, Mod. Cast.,
Vol 76
(No. 7), July 1986, p 21-23
3. R.A. Armistead, CT: Quantitative 3-D Inspection, Adv. Mater. Process.,
Vol 133 (No. 3), March 1988, p
42-48
4. A.G. Fuller, P.J. Emerson, and G.F.Sergeant, A Report on the Effect Upon M
echanical Properties of
Variation in Graphite Form in Irons Having Varying Amounts of Ferrite and Pearlite in the Matrix Structure
and the Use of Nondestructive Tests in the Assessments of Mechanical Properties of Such Irons,
Trans.
AFS, Vol 88, 1980, p 21-50
5.
A.G. Fuller, Evaluation of the Graphite Form in Pearlitic Ductile Iron by Ultrasonic and Sonic Testing and
the Effect of Graphite Form on Mechanical Properties, Trans. AFS, Vol 85, 1977, p 509-526
6. P.J. Rickards, "Progress in Guaranteeing Quality Through Non-
Destructive Methods of Evaluation," Paper
21, presented at the 54th International Foundry Congress, New Delhi, The International Committee of
Foundry Technical Associations (CIATF), Nov 1987
7. A.G. Fuller, Nondestructive Assessment of the Properties of Ductile Iron Castings, Trans. AFS,
Vol 88,
1980, p 751-768
Nondestructive Inspection of Powder Metallurgy Parts
R.C. O'Brien and W.B. James, Hoeganaes Corporation
Introduction
THE PROBLEM of forming defects in green parts during compaction and ejection has become more prevalent as parts
producers have begun to use higher compaction pressures in an effort to achieve high-density, high-performance powder
metallurgy (P/M) steels. In this article, several nondestructive inspection methods are evaluated, with the aim of
identifying those that are practical for detecting defects as early as possible in the production sequence.

The most promising nondestructive testing methods for P/M applications include electrical resistivity testing, eddy current
and magnetic bridge testing, magnetic particle inspection, ultrasonic testing, x-ray radiography, gas permeability testing,
and -ray density determination. The capabilities and limitations of each of the techniques are evaluated in this article.
Nondestructive Inspection of Powder Metallurgy Parts
R.C. O'Brien and W.B. James, Hoeganaes Corporation
Current Status of P/M Testing
In the ceramics industry, the fraction of the finished-part cost that arises from scrap due to flaws introduced during
processing is estimated to average 50%, and it can be as high as 75% (Ref 1). Although the ceramics industry has been
mobilized for the past 15 years toward the use of nondestructive evaluation in processing, the P/M industry has built up
only a scattered background of experience (Ref 2).
To remain competitive, P/M parts producers have increasingly turned to simplified processing. It has been shown that the
physical properties of P/M parts, especially the fatigue strength, are always improved by increasing the density (Ref 3).
The need for densification by double pressing can often be avoided by pressing to high density in a single step. However,
the use of higher compaction pressures requires the utmost attention to materials selection, tool design, and press setup
(Ref 4). A quick, preferably nondestructive method of crack detection would be of great benefit during press setup and for
testing the integrity of parts as early as possible in their production sequence.
The growth of nondestructive testing in the 1980s has been explosive, and the field has benefited greatly from
computerized image reconstruction techniques applied to radiography, ultrasonic, and even magnetic particle inspection.
Commercial test systems are being marketed as fast as the technology is developed, and the metal powder industry should
find solutions to its on-line testing needs by reviewing methods being used by other parts fabrication technologies.
In preparing this article, a number of test methods presented themselves as having potential for crack detection in green
(unsintered) P/M compacts, and these are recommended for further investigation. For a detailed overview of P/M
technology, the reader is referred to Powder Metal Technologies and Applications, Volume 7 of the ASM Handbook.
References cited in this section
1.
J.W. McCauley, Materials Testing in the 21st Century, in
Nondestructive Testing of High Performance
Ceramics,
Conference Proceedings, American Ceramics Society/American Society for Nondestructive
Testing, 1987, p 1
2.
R.W. McClung and D.R. Johnson, Needs Assessment for NDT and Characterization of C
eramics:
Assessment of Inspection Technology for Green State and Sintered Ceramics, in
Nondestructive Testing of
High Performance Ceramics,
Conference Proceedings, American Ceramics Society/American Society for
Nondestructive Testing, 1987, p 33
3.
R.C. O
'Brien, "Fatigue Properties of P/M Materials," SAE Technical Paper 880165, Society of Automotive
Engineers, March 1988
4.
G.F. Bocchini, "High Pressure Compaction, High Pressure Coining, and High Pressure Repressing of P/M
Parts," Paper presented at the P
revention and Detection of Cracks in Ferrous P/M Parts Seminar, Metal
Powder Industries Federation, 1988
Nondestructive Inspection of Powder Metallurgy Parts
R.C. O'Brien and W.B. James, Hoeganaes Corporation
Summary of Defect Types in P/M Parts
The four most common types of defects in P/M parts are ejection cracks, density variations, microlaminations, and poor
sintering.
Ejection Cracks. When a part has been pressed, there is a large residual stress in the part due to the constraint of the die
and punches, which is relieved as the part is ejected from the die. The strain associated with this stress relief depends on
the compacting pressure, the green expansion of the material being compacted, and the rigidity of the die. Green
expansion, also known as spring out, is the difference between the ejected-part size and the die size. A typical value of
green expansion for a powder mix based on atomized iron powder pressed at relatively high pressure (600 to 700 MPa, or
45 to 50 tsi) is 0.20%. In a partially ejected compact, for example, the portion that is out of the die expands to relieve the
residual stress, while the constrained portion remains die size and a shear stress is imposed on the compact. When the
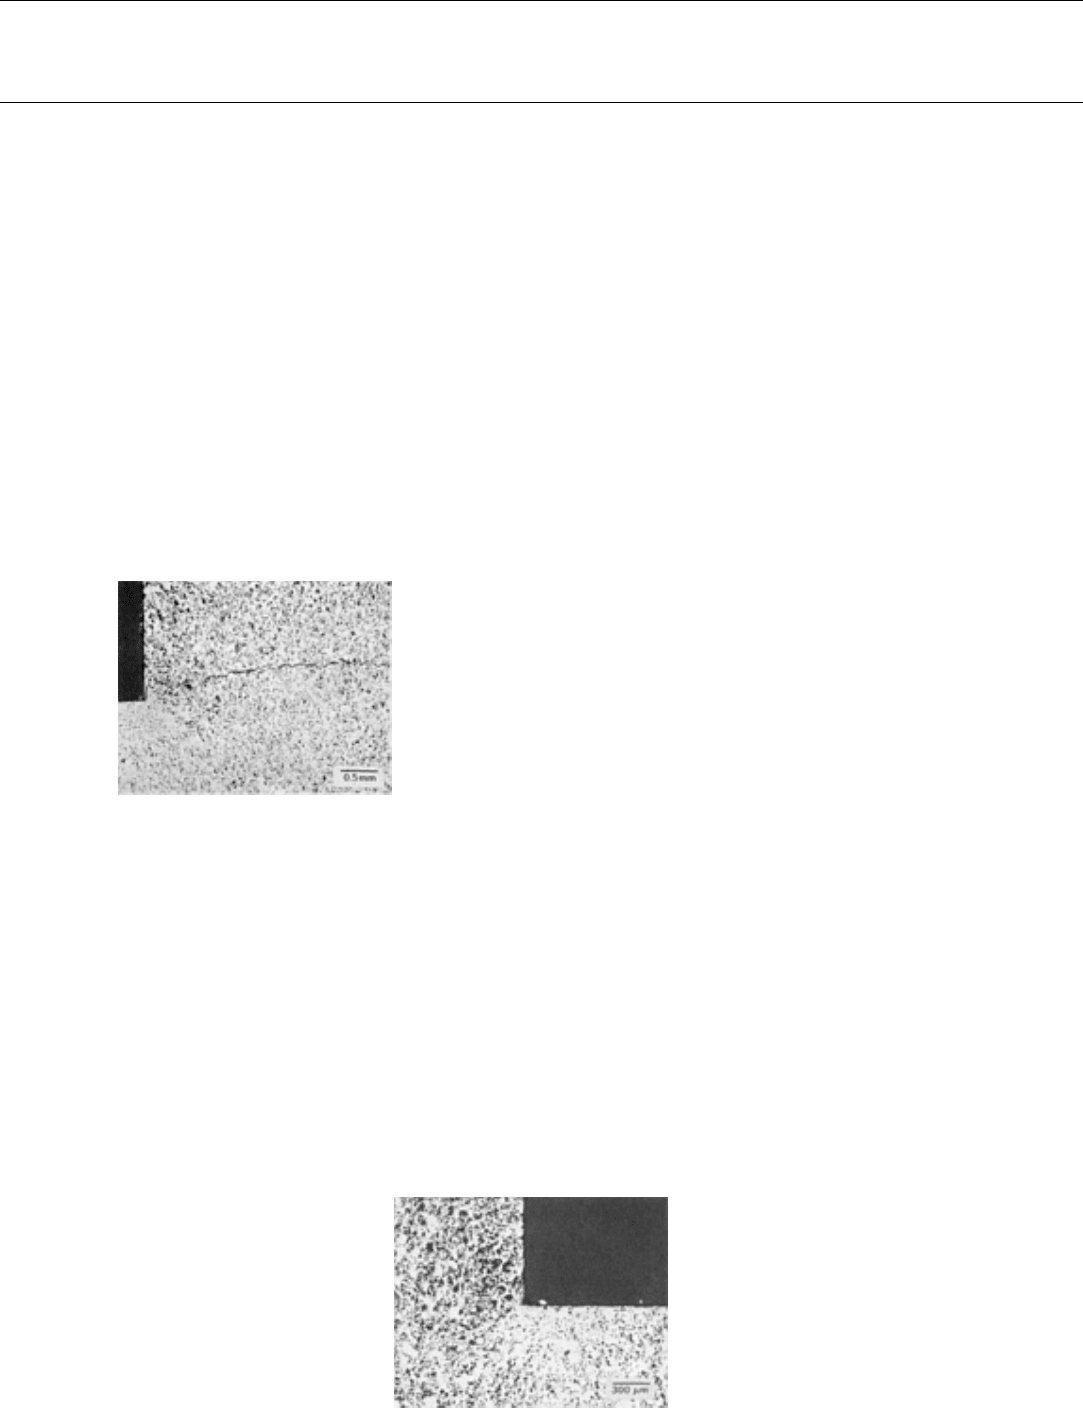
ability of the powder compact to accommodate the shear stress is exceeded, ejection cracks such as the one shown in Fig.
1 are formed.
The radial strain can be alleviated to a degree by increasing
the die rigidity and designing some release into the die cavity.
However, assuming that the ejection punch motions are
properly coordinated, the successful ejection of multilevel
parts depends to a large degree on the use of a high-quality
powder that combines high green strength with low green
expansion and low stripping pressure.
Density Variations. Even in the simplest tool geometry
possible--a solid circular cylinder--conventional pressing of a
part to an overall relative density of 80% will result in a
distribution of density within the part ranging from 72 to 82%
(Ref 5). The addition of simple features such as a central hole
and gear teeth presents minor problems compared with the
introduction of a step or second level in the part. Depending on the severity of the step, a separate, independently actuated
punch can be required for each level of the part. During the very early stage of compaction, the powder redistributes itself
by flowing between sections of the die cavity. However, when the pressure increases and the powder movement is
restricted, shearing of the compact in planes parallel to the punch axis can only be avoided by proper coordination of
punch motions. When such shear exists, a density gradient results.
The density gradient is not always severe enough for an associated crack to form upon ejection. However, a low-density
area around an internal corner, as shown in Fig. 2, can be a fatal flaw, because this corner is usually a point of stress
concentration when the part is loaded in service.
Fig. 2 Density gradient around an internal corner in a part made with a single-piece stepped punch. Unetched
Fig. 1 Ejection crack in sintered P/M steel. Unetched

Microlaminations. In photomicrographs of unetched part cross sections, microlaminations such as those shown in Fig.
3 appear as layers of unsintered interparticle boundaries that are oriented in planes normal to the punch axis. They can be
the result of fine microcracks associated with shear stresses upon ejection; such microcracks fail to heal during sintering.
Because of their orientation parallel to the tensile axis of standard test bars, they have little influence on the measured
tensile properties of the bars, but are presumed to be a cause of severe anisotropy of tensile properties.
Fig. 3 Microlaminations in sintered P/M steel. Unetched
Poor Sintering. When unsintered particle boundaries result from a cause other than shear stresses, they are usually
present because of insufficient sintering time or sintering temperature, a nonreducing atmosphere, poor lubricant burn-off,
inhibition of graphite dissolution, or a combination of these. A severe example is shown in Fig. 4. Unlike
microlaminations, defects associated with a poor degree of sintering are not oriented in planes.
Fig. 4 Poor degree of sintering in P/M compact. Unetched
Reference cited in this section
5.
F.V. Lenel, Powder Metallurgy Principles and Application, Metal Powder Industries Federation, 1980, p 112
Nondestructive Inspection of Powder Metallurgy Parts
R.C. O'Brien and W.B. James, Hoeganaes Corporation
Nondestructive Tests and Their Applicability to P/M Processing
As described below, applicable inspection methods for P/M parts can be broadly classified into the following categories:
• Radiographic techniques
• Acoustic methods
• Thermal inspection
• Electrical resistivity inspection
• Visual inspection and pressure testing
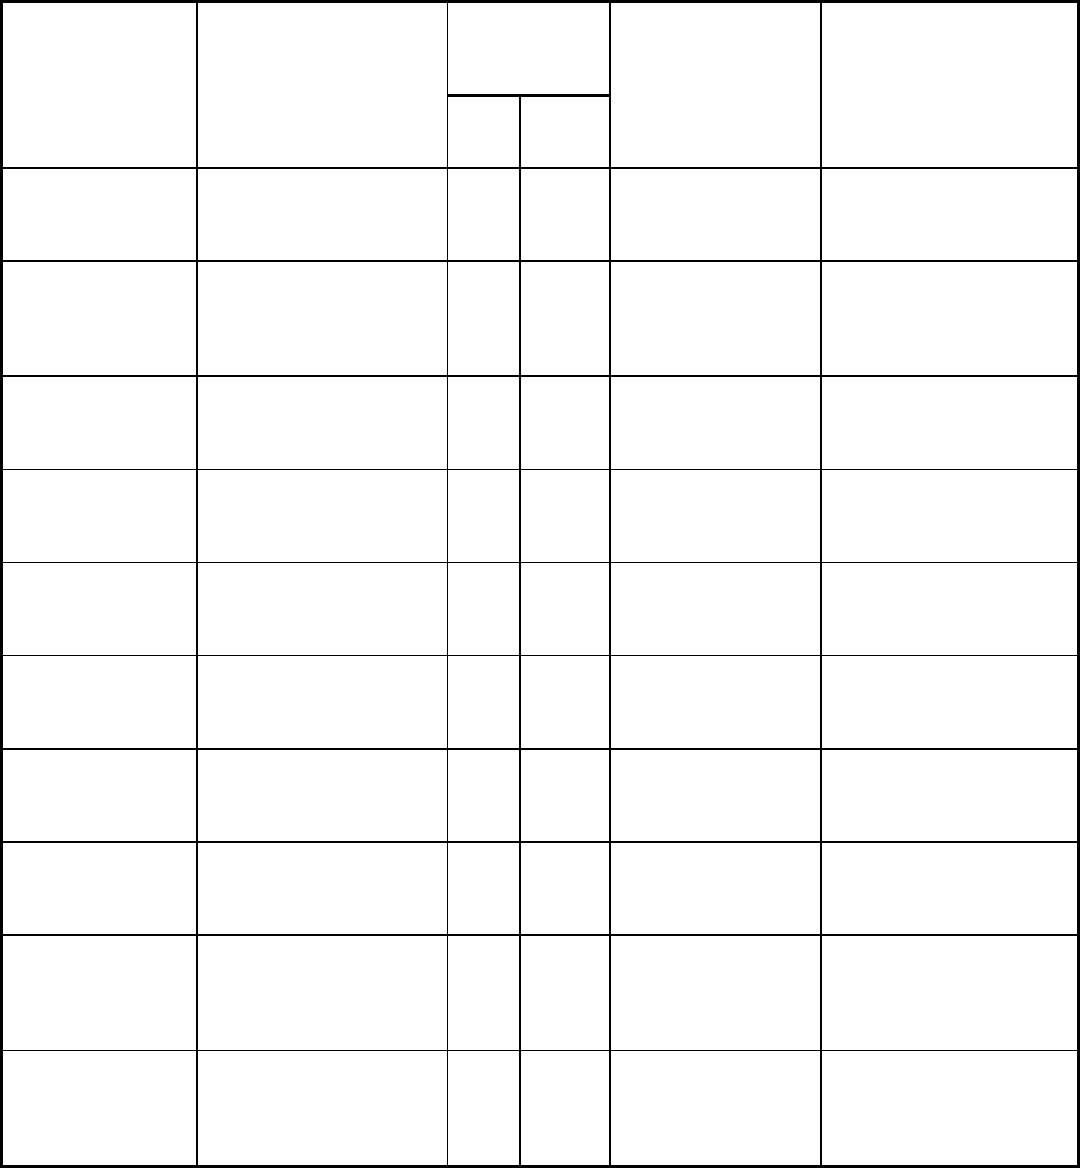
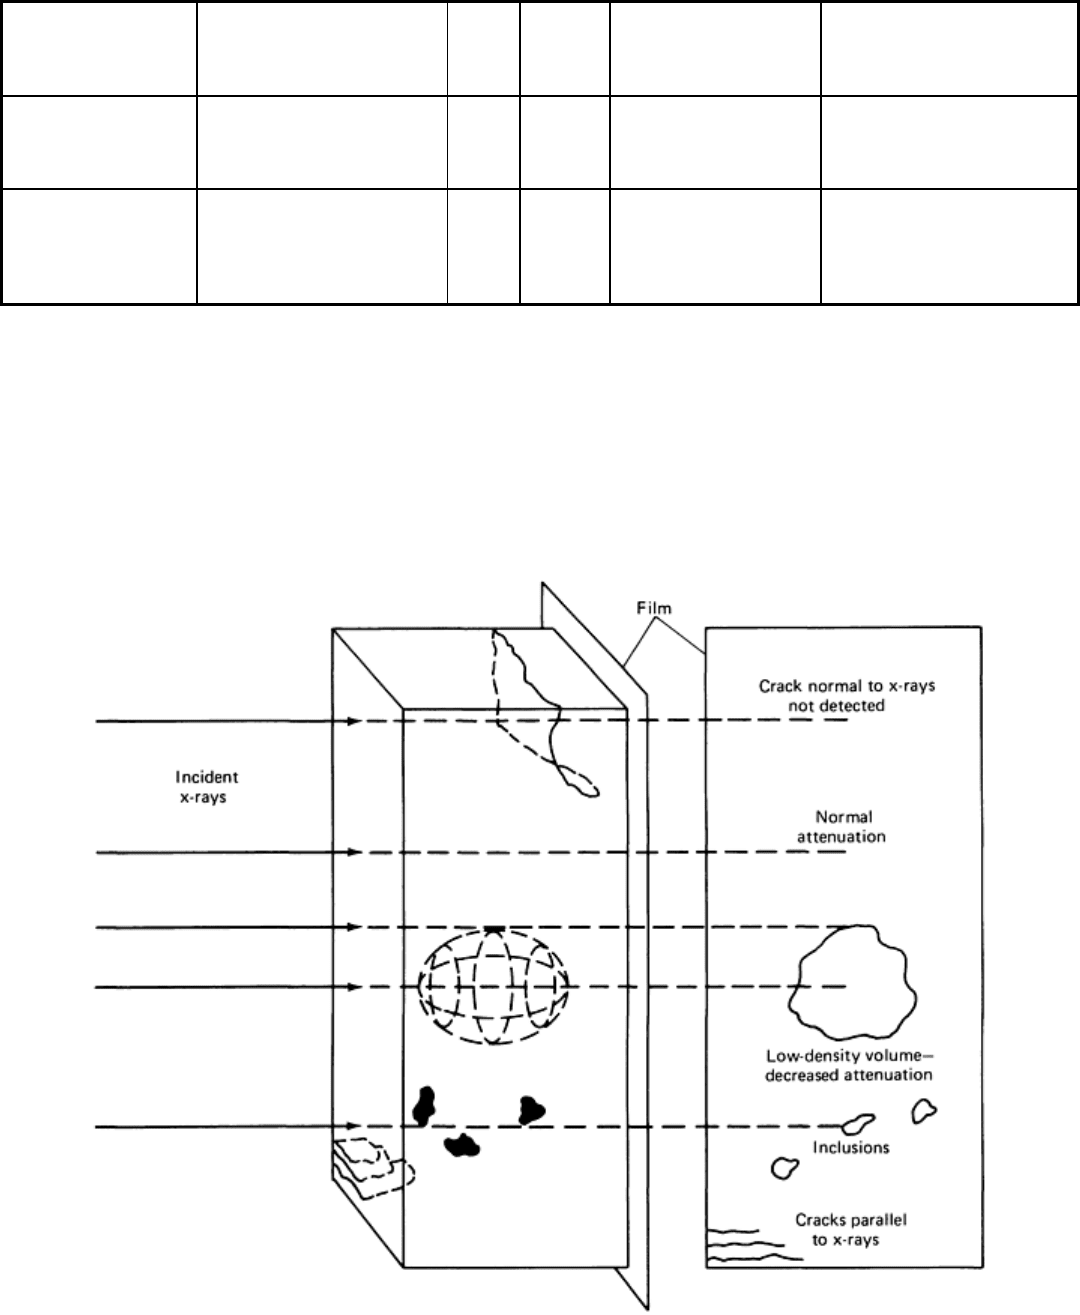
The techniques covered in this article are summarized in Table 1. Additional information on these procedures can be
found in the Section "Methods of Nondestructive Evaluation" in this Volume.
Table 1 Comparison of the applicability of various nondestructive evaluation methods to flaw detection in
P/M parts
Applicability to
P/M parts
(a)
Method Measured/detected
Green
Sintered
Advantages
Disadvantages
X-ray radiography Density variations, cracks,
inclusions
C C Can be automated
Relatively high initial cost;
radiation hazard
Computed
tomography
Density variations, cracks,
inclusions
C C Can be automated;
pinpoint defect location
Extremely high initial cost;
highly trained operator
required; radiation hazard
Gamma-ray density
determination
Density variations A A High resolution and
accuracy; relatively fast
High initial cost; radiation
hazard
Ultrasonic imaging:
C-scan
Density variations, cracks D B Sensitive to cracks; fast
Coupling agent required
Ultrasonic imaging:
SLAM
Density variations, cracks D C Fast; high resolution
High initial cost; coupling
agent required
Resonance testing Overall density, cracks D B Low cost; fast
Does not give information on
defect location
Acoustic emission Cracking during pressing and
ejection
C D Low cost
Exploratory
Thermal wave
imaging
Subsurface cracks, density
variations
D C No coupling agent
required
Flat or convex surfaces only
Electrical resistivity Subsurface cracks, density
variations, degree of sinter
A A Low cost, portable, high
potential for use on
green compacts
Sensitive to edge effects
Eddy current/magnetic
bridge
Cracks, overall density,
hardness, chemistry
C A Low cost, fast, can be
automated; used on P/M
valve seat inserts
Under development;
Magnetic particle
inspection
Surface and near-surface
cracks
C A Simple to operate, low
cost
Slow; operator sensitive
Liquid dye penetrant
inspection
Surface cracks C D Low cost
Very slow; cracks must
intersect surface
Pore pressure
rupture/gas
permeability
Laminations, ejections,
cracks, sintered density
variations
A A Low cost, simple, fast Gas-tight fixture required;
cracks in green parts must
intersect surface
(a)
A, has been used in the production of commercial P/M parts; B, under development for use in P/M; C, could be developed for use in P/M, but
no published trials yet; D, low probability of successful application to P/M
Radiographic Techniques
X-Ray Radiography. Any feature of a part that either reduces or increases x-ray attenuation will be resolvable by x-ray
radiography. Some types of flaws and their x-ray images are shown in Fig. 5.
Fig. 5 Schematic of flaws and their x-ray images. Defect types that can be detected by x-
ray radiography are
those that change the attenuation of the transmitted x-rays. Source: Ref 6
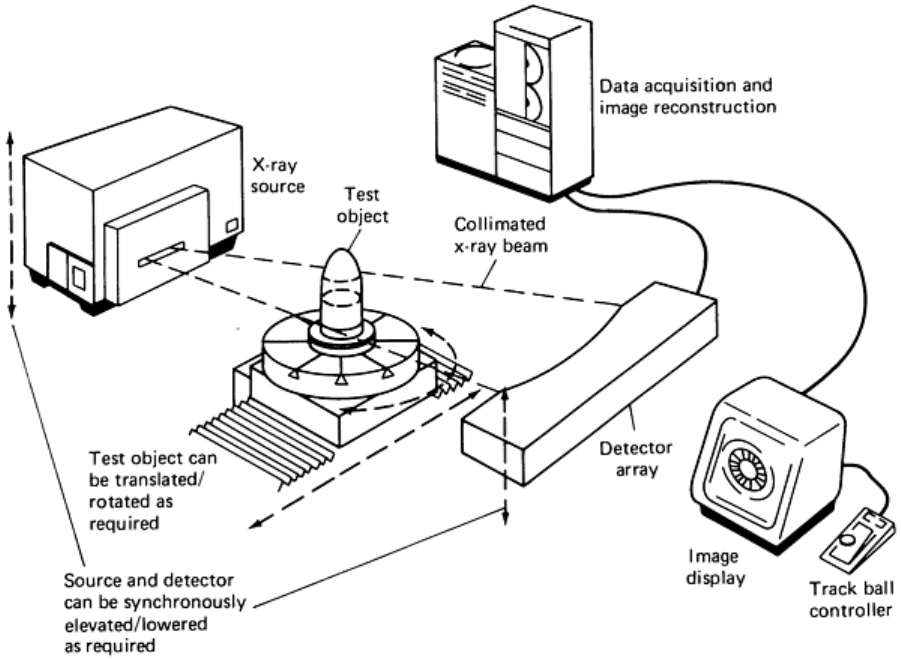
The ability to detect defects depends on their orientation to the x-ray source. A crack parallel to the x-rays will result in
reduced attenuation of the rays, and the x-ray film will be darker in this region. A thin crack perpendicular to the x-ray
will hardly influence attenuation and will not be detected.
Historically, flaw detection by x-ray radiography has been an expensive and cumbersome process suited only to safety-
critical and high added value parts. The process has been considerably improved by the development of real-time imaging
techniques that replace photographic film. Real-time imaging means that parts can be tested rapidly and accepted or
rejected on the spot.
Real-time x-ray systems include image intensifiers or screens that convert x-rays into visible light and discrete detector
arrays that convert x-rays into electronic signals (which are reconstructed by computer for video display). The image in
all these systems can be recorded and digitized for image enhancement. The ability of the system to detect flaws is,
however, still sensitive to defect orientation. Additional information is available in the article "Radiographic Inspection"
in this Volume.
Computed tomography is a recently developed version of x-ray radiography that includes highly sophisticated
analysis of the detected radiation. A tomographic setup consists of a high-energy photon source, a rotation table for the
specimen, a detector array, and the associated data analysis and display equipment, as shown in Fig. 6. The ability to
rotate the specimen increases the chance of orienting a defect relative to the x-rays such that it will be detected. The x-ray
source and detector array can be raised or lowered to examine different planes through the sample.
Fig. 6
Schematic of computed tomography, which is the reconstruction by computer of a series of tomographic
planes (slices) of an object. The transmitted intensity of the fan-
shaped beam is processed by computer and
the resulting image is displayed on a terminal. Source: Ref 7
In a typical system, the photon source can be a radioisotope such as
60
Co, depending on the energy requirements of the
individual specimens. The lead aperture around the source acts as a collimator to produce a fan-shaped beam about 5 mm
(0.2 in.) thick. The sample is rotated in incremental steps, and the transmitted radiation is detected at each step by
computer-controlled detectors situated one every 14 mm (0.55 in.) in a two-dimensional array.
The computer then reconstructs the object using intensity data from a number of scans at different orientations. The
output is in the form of a two-dimensional plan in which colors are mapped onto the image according to the intensity of
the transmitted radiation. The resolution available depends on the difference in density between the various features of the
object. For example, steel pins embedded in polyvinyl chloride plastic are more easily resolvable than aluminum pins of
the same diameter (Ref 7). Experiments with P/M samples have shown that density can be measured to better than 1%
accuracy, with a spatial resolution of 1 mm (0.04 in.) (Ref 8). The article "Industrial Computed Tomography" in this
Volume contains more information on the principles and applications of this technique.
Gamma-Ray Density Determination. Local variations in the density of P/M parts have been detected by measuring
the attenuation of γ-rays passing through the part (Ref 9). Depending on the material and the dimensions of the part,
density can be measured to an accuracy of ±0.2 to ±0.7%, and the technique has been used by P/M parts fabricators in
place of immersion density tests as an aid in tool setting.
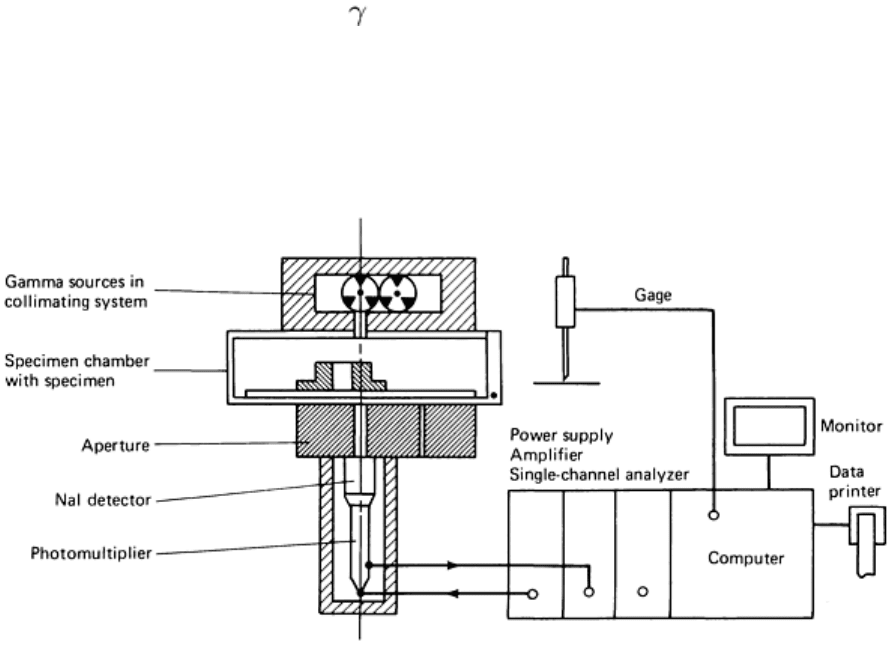
The apparatus consists of a vertically collimated -ray beam originating from a radioisotope. The beam passes through
the sample as shown in Fig. 7 and reaches a detector via a 1 mm (0.04 in.) diam aperture, where the transmitted intensity
is measured. The detector consists of a sodium iodide scintillation crystal, which in turn excites a photomultiplier.
Exposure time is 1 to 2 min; a 4 mm (0.15 in.) aperture can reduce this time to 30 s at the expense of some resolution. The
radiation source of the Gamma Densomat is Americium 241 (60 keV). For high-energy beams, Cesium 137 (660 keV)
can be substituted.
Fig. 7 Schematic of the Gamma Densomat. Source: Ref 9
This method has been shown to be particularly useful in cases where the section of the part to be checked is too small for
immersion density measurements (Ref 10). Tool life was extended when the method was used for part density checks in
order to avoid overloading.
Acoustic Methods
Ultrasonic Testing. Many characteristics of solids can be determined from the behavior of sound waves propagating in
them. Ultrasonic signals impinged on a sample at one surface are transmitted at speeds and attenuated at rates determined
by the density, modulus of elasticity, and continuity of the material. The sound waves are reflected from other surfaces of
the sample, including cracks as well as free surfaces. They can be picked up and amplified for display on a CRT screen,
as described in Ref 6 and the article "Ultrasonic Inspection" in this Volume. The height and position of the flaw/defect
peak indicate its size and location. Although much effort has been directed toward relating sound propagation to the
physical properties of P/M materials, little has been written on the detection of cracks by the ultrasonic inspection of
porous materials.
