ASM Metals HandBook Vol. 17 - Nondestructive Evaluation and Quality Control
Подождите немного. Документ загружается.

nontoxic, finely divided ferromagnetic material of high permeability and low retentivity, free from rust, grease, dirt, or
other materials that may interfere with the proper functioning of the magnetic particles. The particles must also exhibit
good visual contrast with the forging being inspected.
Inspection is by the continuous-current method; that is, the magnetizing current remains on during the period of time that
the magnetic particles are being applied and also while the excess particles are being removed. Prods are spaced 150 to
200 mm (6 to 8 in.) apart, except where restricted by configuration. The magnetic field is induced in two directions, 90°
apart. The current used is 4 to 5 A/mm (100 to 125 A/in.) of prod spacing and is kept on for a minimum of s.
Dry magnetic particles are applied uniformly to the surface, using a light dustlike technique. Excess particles are removed
by a dry-air current of sufficient force to remove the excess particles without disturbing particles that show indications.
The nozzle is held obliquely about 35 to 50 mm (1 to 2 in.) above the test area. Nozzle size and air pressure result in a
pressure (measured by a manometer) of 25 to 40 mm (1.0 to 1.5 in.) of water at an axial distance of 25 mm (1 in.) from
the nozzle and 7.5 to 15 mm (0.3 to 0.6 in.) of water at 50 mm (2 in.) from the nozzle.
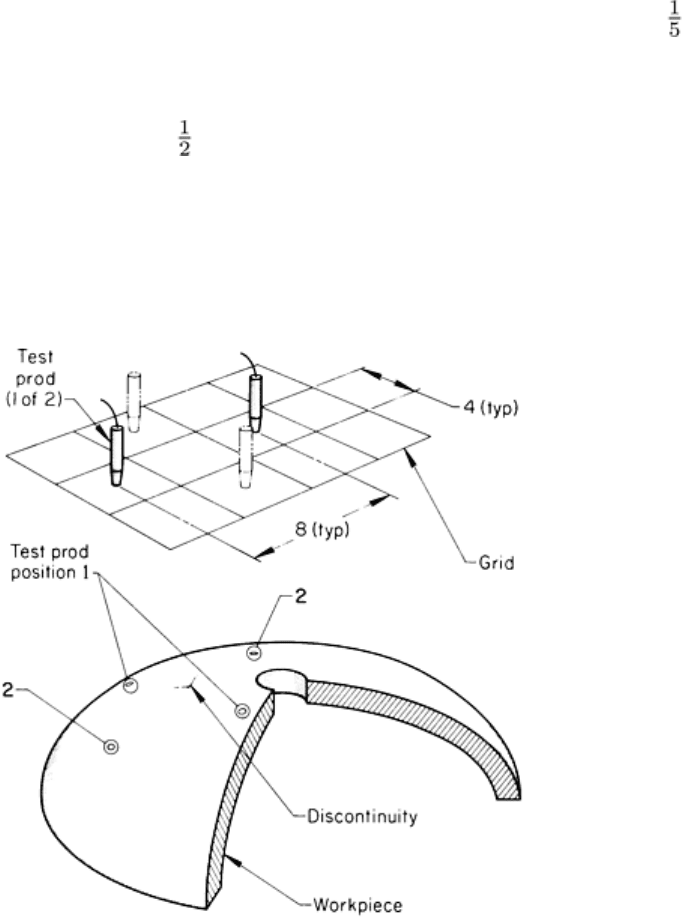
A 100 mm (4 in.) grid pattern over the entire forging surface is normally used for evaluation (Fig. 13). The prods are
placed 200 mm (8 in.) apart (Fig. 13), except where restricted by the shape of the forging, when using this grid pattern.
Fig. 13
Grid pattern and prod positions used in one plant for the magnetic particle inspection of forgings using
prods and the dry-powder technique
Prods are placed on the surface to be tested in the proper position, as shown by position 1 in Fig. 13, and the current is
turned on (4 to 5 A/mm, or 100 to 125 A/in., of prod spacing). The powder is applied, the excess particles are removed,
and the current is turned off. Inspection is conducted during application of the powder and after removal of the excess
particles.
The next step is to reposition the prods 90°, as indicated by position 2 in Fig. 13; the above procedure is then repeated.
When the shape of the forging does not permit a full 90° rotation with the established prod spacing, the prod spacing can
be changed, provided it is not less than 50 mm (2 in.) nor more than 200 mm (8 in.) between prods.

Wet Technique. The magnetic particles selected are nonfluorescent and suspended in a liquid vehicle. The magnetizing
equipment is capable of inducing a magnetic flux of suitable intensity in the desired direction by both the circular and the
longitudinal methods. Direct current from generators, storage batteries, or rectifiers is used to induce the magnetic flux.
Circular magnetization is obtained by passing the current through the forging being examined or through a central
conductor to induce the magnetic flux. Longitudinal magnetization is obtained by using a solenoid, coil, or magnet to
induce the magnetic flux. The magnetic particles are nontoxic and exhibit good visual contrast. The viscosity of the
suspension vehicle for the particles must be a maximum of 5 × 10
-6
m
2
/s (5.0 centistokes) at any bath temperature used.
The magnetic particles are limited to 28 to 40 g (1.0 to 1.4 oz) of solid per gallon of liquid vehicle.
The liquid used as a vehicle for the magnetic particles may be a petroleum distillate such as kerosene. Tap water with
suitable rust inhibitors and wetting and antifoaming agents can be substituted for the petroleum distillate. The water
should contain about 0.3% antifoam agent, 3.9% rust inhibitor, and 12.8% wetting agent.
Inspection is carried out by the continuous method. For this method, the magnetizing circuit is closed just before applying
the suspension or just before removing the forging from the suspension. The circuit remains closed for approximately to
s.
For circular magnetization, an ammeter is used to verify the presence of adequate field strength. For verifying adequate
field strength in longitudinal magnetization, a field indicator is useful. Typical current levels utilized to provide an
adequate field strength are 4 to 12 A/mm (100 to 300 A/in.) of diameter of the surface being examined, although current
levels of up to 30 A/mm (750 A/in.) of diameter have been used.
The magnetizing force for longitudinal magnetization is 2000 to 4000 ampere-turns per 25 mm (1 in.) of diameter of the
surface being examined. If both the inside and outside diameters of cylindrical parts are to be inspected, the larger
diameter is used in establishing the current. If it is impractical to attain currents of the calculated magnitude, a magnetic
field indicator is used to verify the adequacy of the magnetic field.
Suspensions must be tested daily or when they appear to have become discolored by oil or contaminated by lint. Common
practice is to test the suspension at the beginning of each operating shift. The suspension test is conducted as follows:
• Let the pump motor run for several minutes to agitate a normal mixture of particles and vehicle
• Flow the bath mixture through the hose and nozzle for a few minutes to clear the hose
• Fill the centrifuge tube to the 100-mL line
• Place the centrifuge tube and stand in a location free from vibration
• Let the tube stand for 30 min for particles to settle out
•
After 30 min, readings for settled particles should be 1.7 to 2.4 mL. If the reading is higher, add vehicle;
if lower, add particle powder to the suspension
Example 1: Magnetic Particle Inspection of 1541 Steel Connecting Rods by the
Multidirectional System.
Connecting rods for piston engines were manufactured from 1541 steel by forging in closed dies. Because connecting
rods used in piston engines are subject to considerable stress, it is necessary to ensure the integrity of these parts,
especially in heavy-duty applications, such as high-performance automobiles and trucks. Accordingly, fluorescent
magnetic particle inspection of the forged connecting rod was done immediately after unwanted scale and dirt were
removed by shotblasting. Bidirectional (longitudinal and transverse) magnetic fields were generated rapidly and
sequentially by the use of a multidirectional magnetizing machine, as shown in Fig. 14. The use of this machine allowed
for a single inspection to detect all discontinuities regardless of their orientation.
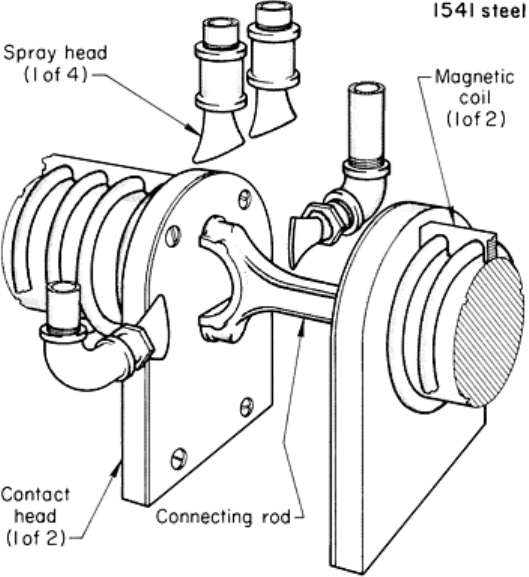
Fig. 14
Setup for the inspection of forged 1541 steel automotive connecting rods by the magnetic particle
method using a multidirectional magnetizing system
The process of manufacturing connecting rods usually results in only longitudinally oriented flaws, but, transversely
oriented flaws occasionally do occur. Hot tears along the trim line and metal folds or laps in the web area are of primary
interest in the inspection. Worn tooling, overheating, and underheating of the forging blanks, as well as improper
trimming, are the primary causes of these flaws.
Inspection Procedure. The inspection of these connecting rods utilized a multidirectional system, and the inspection
procedure was as follows. Initially, the connecting rod was pneumatically clamped in the contact heads (Fig. 14) and then
automatically flooded with a suspension of fluorescent magnetic particles. The magnetizing fields were induced while the
suspension was draining from the part. Current settings for circular magnetization were 1000 A; for longitudinal
magnetization, 4500 ampere-turns equivalent. The magnetizing current automatically switched back and forth, thus
revealing any imperfections regardless of their orientation. Inspection of the forging was done under an ultraviolet light of
no less than 2700 lx (250 ftc) at the surface of the forging. Following completion of inspection, the forging was
demagnetized so that metal chips did not adhere to the surface during subsequent machining operations. The principal
disadvantage of this inspection procedure was that the production rate was limited because the procedure was performed
manually.
Example 2: Use of Electromagnetic, Ultrasonic, and Magnetic Particle Methods
for the Inspection of Forged 1046 Steel Steering Knuckles.
Automobile steering knuckles similar to the forged 1046 steel knuckle shown in Fig. 15 are regarded as extremely high-
integrity pans. At one plant, to provide the required degree of quality control, 100% of all steering knuckles were
nondestructively inspected using three different techniques--electromagnetic comparison for hardness and ultrasonics for
internal soundness at one location, followed by in-line fluorescent magnetic particle inspection.
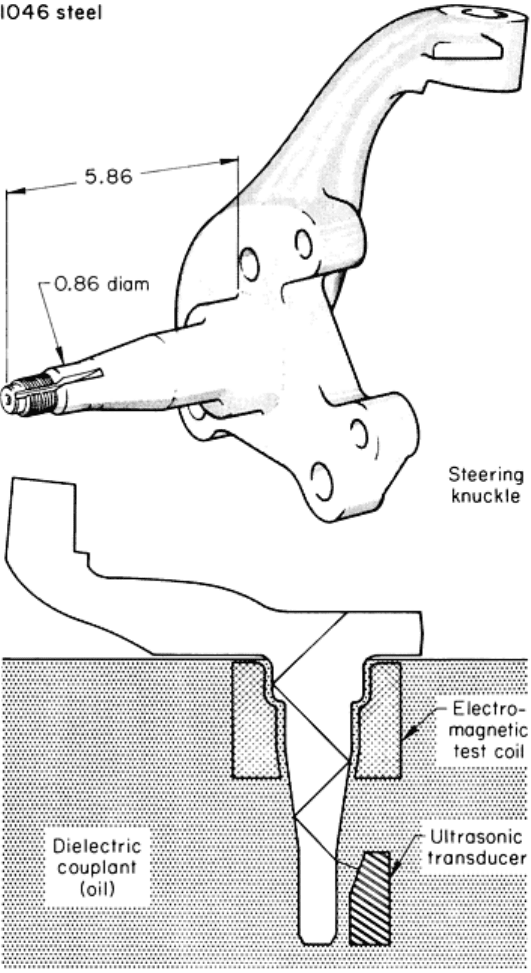
Fig. 15 Steering knuckle, forged from 1046 steel, that was inspected by a combination of electromagneti
c,
ultrasonic, and magnetic particle methods. The setup for electromagnetic and ultrasonic inspection is shown.
Dimensions given in inches
Inspection Procedures. Figure 15 shows the orientation of the steering knuckle during inspection with the
electromagnetic test coil and ultrasonic transducer. Electromagnetic comparator coils were used to evaluate hardness in
the bearing area; the ultrasonic 60° shear wave method was used to detect internal discontinuities in the spindle portion of
the steering knuckle. The spindle of the knuckle was immersed in a dielectric oil to provide couplant for the ultrasonic
inspection; a 5.0-MHz transducer was used. For electromagnetic inspection, a 60-Hz frequency was used for the hardness
detection comparator. Electromagnetic and ultrasonic inspections were combined both for efficiency and compatibility of
the two methods.
All steering knuckles were fluorescent magnetic particle inspected following the electromagnetic-ultrasonic inspection.
This inspection was accomplished by magnetizing the steering knuckle between contact plates, flooding with the particle
suspension, and viewing under an ultraviolet light having an intensity of 2700 lx (250 ftc) minimum. The steering
knuckles were then transported by conveyor to a magnetizing coil for magnetizing in the other direction so that
circumferentially oriented indications would be shown under a subsequent second ultraviolet light inspection. These

nondestructive tests resulted in the detection of both internal and external flaws as well as the detection of variations in
hardness.
Nondestructive Inspection of Forgings
Liquid Penetrant Inspection
Liquid penetrant inspection is a versatile NDI process and is widely used for locating surface imperfections in all types of
forgings, either ferrous or nonferrous, although it is more frequently used on nonferrous forgings. There is no limitation
on the size or shape of a forging that can be liquid penetrant inspected.
Any of the three basic liquid penetrant systems (water-washable, postemulsifiable, and solvent-removable) can be used to
inspect forgings. The product or product form is not a principal factor in the selection of a system. The fundamentals of
the three systems, as well as the advantages and limitations of each for inspecting various products (including forgings),
are presented in the article "Liquid Penetrant Inspection" in this Volume.
Advantages. Among the advantages of liquid penetrant inspection of forgings are the following:
• There are no limitations on metal composition or heat-treated condition
• There are no limitations imposed on the size or shape of the forging that can be inspected
• Liquid penetrant inspection can be done with relatively simple equipment
• Training requirements for inspectors are minimal
• Inspection can be performed at any stage of manufacture
•
Liquid penetrant materials can be taken to the forgings or the forgings taken to the inspection station,
depending on the size and shape of the forgings
The limitations of the liquid penetrant inspection of forgings are basically the same as those for the inspection of other
workpieces. The characteristics of the surface of a forging sometimes impose specific limitations. The most important
general limitations are:
• Liquid penetrant inspection is restricted to detecting discontinuities that are open to the surface
•
Liquid penetrant inspection is basically a visual aid; therefore, results depend greatly on the visual
acuity and judgment of the inspector
• Satisfactory inspection results r
equire that the surface of the forging be thoroughly cleaned before
inspection. The presence of surface scale can cause inaccurate readouts. If the surface of the forging is
excessively scaled, it should be pickled or grit-blasted, preferably pickled. The
forgings should also be
cleaned to remove surface contaminants, such as grease and oil
• Liquid penetrant inspection is slower than magnetic particle inspection
Nondestructive Inspection of Forgings
Liquid Penetrant Detection of Flaws in Steel Forgings
Factors affecting the selection of a special penetrant system for inspecting steel forgings include available equipment;
size, shape, and surface conditions of the forgings; degree of sensitivity required; whether or not the entire forging
requires inspection; and cost. Regardless of which system is used, the degree of success achieved depends greatly on the
surface conditions of the forging. Rough, scaly surfaces are likely to result in either false indications or obscuring of
meaningful flaws. Pickled surfaces are preferred. Abrasive blasting is usually satisfactory for cleaning forging surfaces,
although overblasting must be avoided or some flaws may be tightly closed and prevent the penetrant from entering. The
postemulsifiable and solvent-removable liquid penetrant systems are most often used to inspect steel forgings.
The postemulsifiable system is generally preferred to the water-washable system for forgings because of its greater
sensitivity. Either the fluorescent-penetrant or the visible-dye technique can be used. Selection depends largely on
whether ultraviolet-light inspection can be used. For forgings of a size and shape that can be immersed in tanks and
inspected in a booth, the fluorescent technique is usually preferred.
The solvent-removable system is especially well adapted to applications in which only a portion of the forging
requires inspection. Equipment for this system can be minimal and completely portable or may involve more elaborate
systems used on a production basis, as described in the following examples.
Example 3: Solvent-Removable Liquid Penetrant Inspection of Type 316 Stain-
less Steel Forged Valve Bodies.
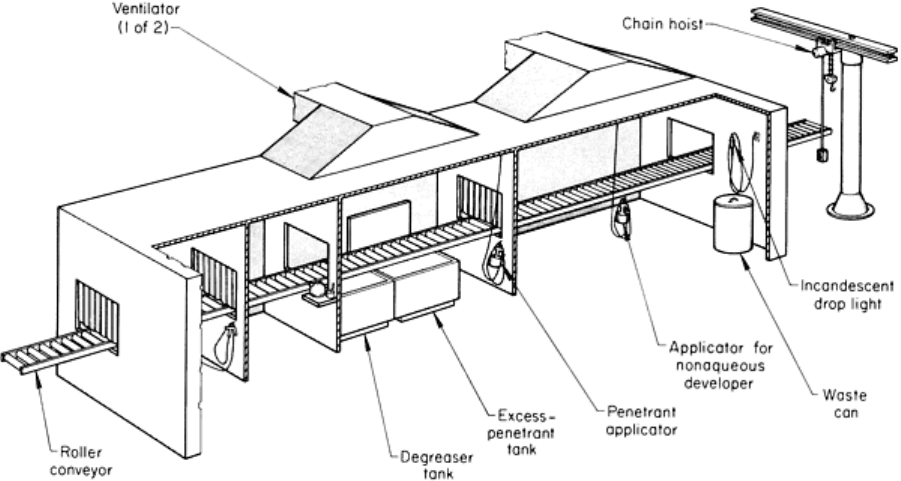
Figure 16 illustrates the equipment layout used for the liquid penetrant inspection of 150 and 200 mm (6 and 8 in.) type
316 stainless steel forged valve bodies by the solvent-removable visible-dye system. This same equipment layout was also
used for many other sizes and types of forgings requiring liquid penetrant inspection, such as the bonnet forgings
described in the next example. The roller conveyor shown in Fig. 16 provided easy handling of relatively large forgings
and, at the same time, allowed for the variations in time cycles that were compatible with the various sizes and shapes of
forgings.
Fig. 16
Equipment layout for the liquid penetrant inspection of type 316 stainless steel forged valve bodies and
bonnet forgings by the solvent-removable visible-dye system
Inspection Procedure. The processing cycle that proved satisfactory for inspection of the forged valve bodies was as
follows:
• Preclean by gritblasting, followed by a light etch in a 30% HNO
3
, 10% HF, and 60% H
2
O (by v
olume)
acid solution. Forgings were also ground and polished as required so that the surface roughness was 6
μm (250 μin.) maximum
• Vapor degrease (wiping with 1,1,1-trichloroethane is an acceptable alternative)
• Apply solvent-removable visible-
dye penetrant with a spray gun at a pressure of approximately 140 kPa
(20 psig). Workpiece temperature should be kept wi
thin the temperature range of 10 to 40 °C (50 to 100
°F)
• Allow dwell time (penetration) of 15 to 20 min
• Rough wipe with lint-free cloth or absorbent paper
• Finish wipe with cloth or absorbent paper moistened with solvent remover (same group as the penetr
ant)
• Air dry for 5 to 10 min
•
Apply nonaqueous developer, using a spray gun or pressurized spray cans, and allow drying time of 7 to
30 min prior to inspection
• Inspect in a booth using adequate light intensity, although at a level that will avoid produci
ng a glare
from the white surface
Acceptable workpieces were then cleaned by flushing with tap water, wiping with 1,1,1-trichloroethane, and air drying.
They were then stamped and moved to the next processing operation.
Forgings that failed to meet acceptance standards were marked by encircling the flaw with a crayonlike marker that did
not contaminate the surface. The flaws were then ground and polished, and the forging was reinspected in accordance
with the above procedure.
Example 4: Solvent-Removable Liquid Penetrant Inspection of Type 316
Stainless Steel Bonnet Forgings.
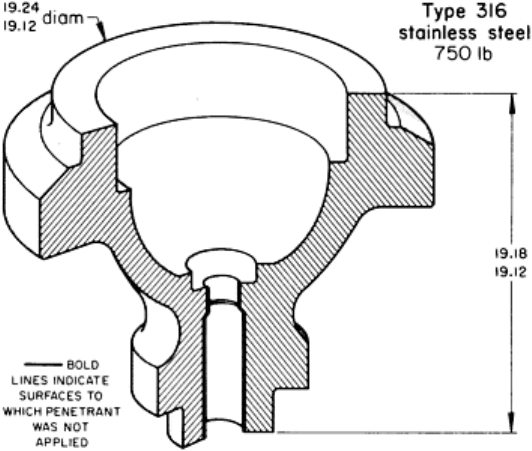
The solvent-removable visible-dye system of liquid penetrant inspection and the equipment shown in Fig. 16 were used to
detect surface imperfections in 340 kg (750 lb) type 316 stainless steel bonnet forgings (Fig. 17).
Fig. 17 Bonnet forging of type 316 stainless steel that was liquid pen
etrant inspected for surface flaws by the
solvent-removable visible-dye system. Dimensions given in inches
Precleaning. Forged bonnets were delivered to the penetrant inspection operation in the machined condition. Machined
workpieces were lightly etched in a 30% HNO
3
, 10% HF, and 60% H
2
O (by volume) acid solution and thoroughly water
rinsed (spray or immersion) to remove all traces of acid. Workpieces were then swabbed with a 5% ammonia solution and
subsequently rerinsed in water (spray or immersion). They were then allowed to dry at room temperature. Immediately
preceding application of the penetrant, the etched forgings were pre-cleaned with 1,1,1-trichloroethane and allowed to dry
at room temperature for at least 5 min.
Inspection Procedure. The forgings were inspected in accordance with the following procedure:

• Apply solvent-removable visible-dye penetrant (group 1, MIL-I-
25135) to the surfaces of the
workpieces with a spray gun attached to the shop air line (brushing is an acceptable alternative). The
penetrant need not be applied to the inside bore surfaces (as indicated in Fig. 17
), because these surfaces
are to be
machined and subsequently inspected. Temperature of the workpiece for this operation as well
as for subsequent operations is maintained within 15 to 50 °C (60 to 120 °F)
• Allow dwell time of 15 to 25 min
• Remove excess penetrant, using a solvent remover o
f the same family as the penetrant, by wiping with
lint-free cloths or absorbent paper
• Final wipe with lint-free cloth or absorbent paper dampened slightly with solvent remover
• Dry at room temperature for 5 to 10 min
• Apply nonaqueous developer with a sp
ray gun, pressurized spray can, or airbrush. Agitate developer
periodically during application. Apply with short dusting strokes so that a uniform but thin layer is
applied
• Perform inspection no sooner than 7 min and no later than 30 min following developer application
• Inspect, using adequate white light, but at a level that will avoid glare
• Clean inspected forgings by wiping with clean cloths moistened with 1,1,1-trichloroethane
Indications were evaluated in accordance with specifications listed as follows:
• Linear indications: None longer than 4.2 mm ( in.)
• Rounded indications: None greater than 4.8 mm ( in.) in diameter
• Linearly disposed rounded indications: Four or more in line separated by 1.6 mm (
in.) or less,
measured edge to edge, are evaluated as linear indications
• Multiple indications: No more than ten within any area of 40 cm
2
(6 in.
2
) and whose major dimension is
no more than 150 mm (6 in.)
Repair and Reinspection. Forgings containing flaws in excess of the above acceptance standards were repaired by
grinding or polishing, provided these operations did not impair dimensional requirements. Forgings that were repaired by
grinding or polishing were subject to reinspection using the technique and acceptance standards outlined above.
Nondestructive Inspection of Forgings
Liquid Penetrant Detection of Flaws in Heat-Resistant Alloy Forgings
Because most heat-resistant alloy forgings are nonmagnetic, the use of magnetic particle inspection for detecting surface
flaws cannot be considered. Liquid penetrants are extensively used for inspecting the surfaces of high-integrity forgings.
Critical forgings such as these require close quality control surveillance. Following production penetrant inspection using
group VI fluorescent penetrant, it is desirable to conduct quality control overchecks on samples selected from previously
inspected batches. These overchecks are performed using highly sensitive, high-resolution penetrants, as described in the
following examples.
Example 5: Routing Liquid Penetrant Inspection of Jet-Engine Cooling Plates
Forged From René 95.
Cooling plates (Fig. 18) used in the rear of several jet engines were forged from René 95, which is a nickel-base heat-
resistant alloy.
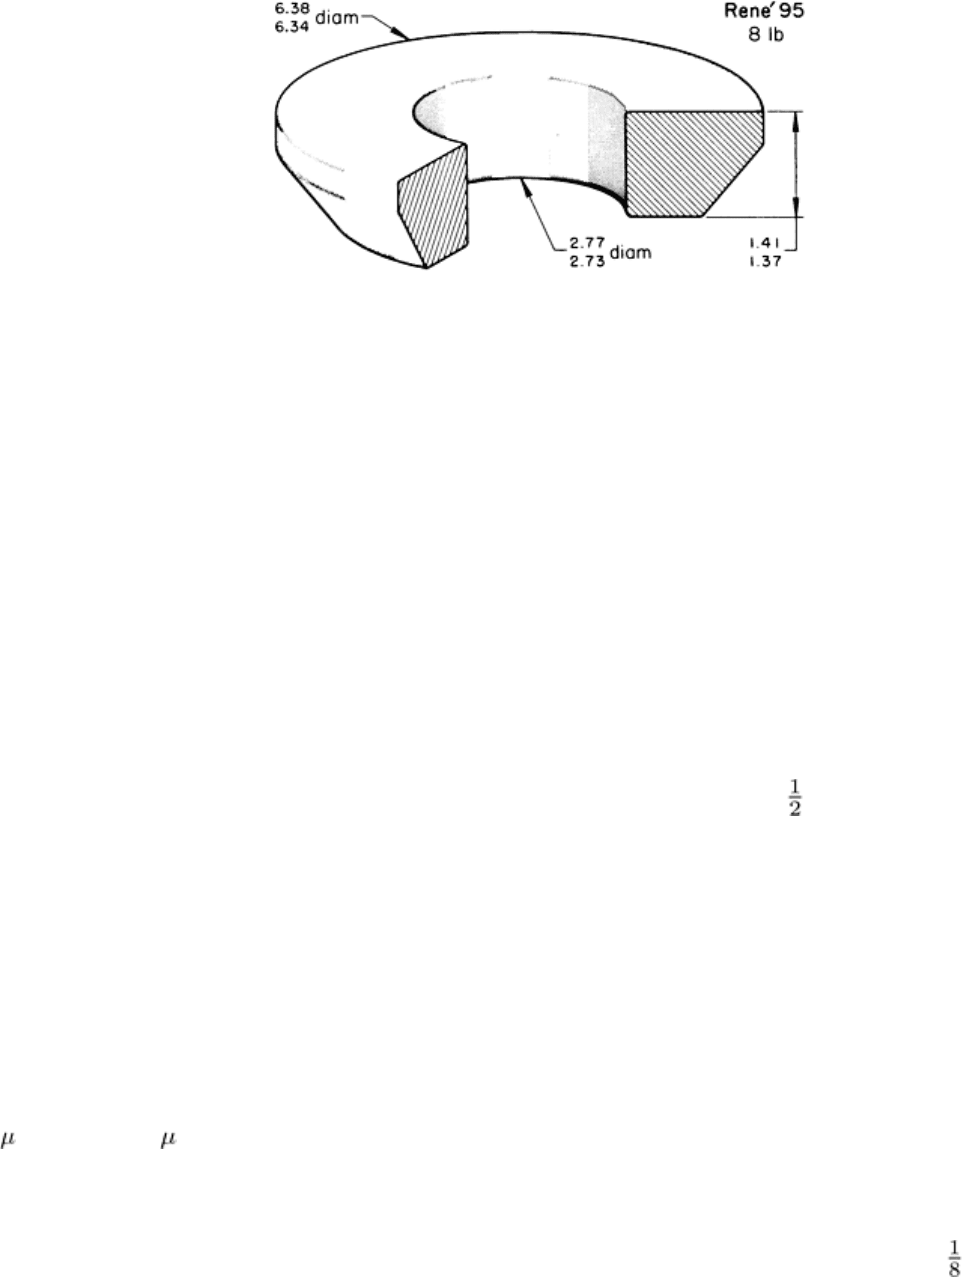
Fig. 18
Forged René 95 cooling plate for a jet engine that was first inspected by the postemulsifiable
fluorescent penetrant system and then reinspected by a high-
resolution penetrant after being accepted.
Dimensions given in inches
Inspection Procedures. Forgings of this type were inspected in accordance with type 1, method B (MIL-I-6866),
which is a postemulsifiable fluorescent penetrant inspection using group VI (MIL-I-25135) penetrants, emulsifiers, and
dry developers. The following procedure was used:
• Clean machined forgings with solvent (1,1,1-trichloroethane) by immersion, swabbing, or wiping
• Lightly etch each forging with an acid mixture of 80% HCl, 13% HNO
3
, and 7% HF (by volume)
• Rinse (immerse or spray) in tap water to remove all traces of acid
•
Air dry prior to penetrant application. Inspect visually for adequacy of etch and to ascertain that
forgings are dry
• Using a basket-type container, immerse several forgings at a time into group VI (MIL-I-
25135)
fluorescent penetrant. Allow to soak in penetrant or rest on drain table for at least 30 min
• Immerse container in emulsifier (group VI, MIL-I-
25135), or hose on emulsifier, taking care to
completely cover each forging completely. Allow emulsification time of 2 min maximum
•
Wash off excessive emulsified penetrant, using water at 40 °C (100 °F) maximum. Forgings can be
immersed in agitated water wash or can be cleaned by a water spray located at the wash station
• Verify adequacy of removal of excess penetrant by use of ultraviolet light located at the wash station
• Dry in oven at 60 to 80 °C (140 to 180 °F) for 7 min maximum
• Visually inspect forging for adequacy of drying cycle
• Apply dry developer over entire surface of forging, using compressed air with a dry developer-
applicator hose
• Allow development time of 10 to 15 min
Following development, the forgings were inspected in a darkened booth using a portable ultraviolet light (intensity: 1060
W/cm
2
, or 6840 W/in.
2
). Unacceptable indications were recorded; acceptance standards were as follows:
• No linear indications are permitted
• Scattered nonlinear indications are permitted if they are not visible at one diamete
r in white light (1075
1x, or 100 ftc, at surface subject to inspection), if they are separated by at least 3 mm (
in.), and if
there are no more than ten in any 25 mm (1 in.) diam area
All rejected forgings were scrapped or salvaged. Forgings that were salvaged were subject to reinspection in accordance
with the above acceptance standards. Following inspection, the forgings were cleaned by solvent or water (spray or
immersion) to remove retained developer. They were then dried at room temperature; a warm air blast was used to speed
up the drying process.

Example 6: Quality Assurance Liquid Penetrant Inspection of Jet-Engine
Cooling Plates Forged From René 95.
Because of the critical application for the forged jet-engine cooling plate described in Example 5 and illustrated in Fig.
18, and because of the type of flaws expected (very tight forging cracks at the periphery and excessive porosity), sample
forgings were periodically selected at random from lots that had been accepted after being inspected by the procedure
described in Example 5. The sample forgings were subjected to liquid penetrant inspection using a commercially
available high-resolution fluorescent penetrant to evaluate the adequacy of each cycle used in the production penetrant
inspection described in Example 5. In particular, the high-resolution penetrant was used to determine the effectiveness of
salvage grinding and polishing operations utilized to remove unacceptable indications detected in the original inspection.
It is important to recognize that the high-resolution penetrants are not normally adaptable to production liquid penetrant
inspection. The following procedure was employed when conducting the quality assurance inspection:
• Thoroughly clean the surface of the forging, using high-
resolution precleaner. When necessary, before
precleaning, lightly etch with an 80% HCl, 13% HNO
3
, and 7%
HF (by volume) acid solution; rinse;
and dry. Allow precleaner to dry for 4 to 5 min
• Apply high-
resolution fluorescent penetrant over entire surface of the forging, using a fine brush or the
dauber attached to the cap of the can containing the penetrant.
Allow penetrant to dry completely
(approximate drying time, 1 min)
• Soak a piece of cheesecloth or equivalent material with high-
resolution penetrant remover and remove
the dried penetrant from the surface of the forging, using a circular motion. The penet
rant remover will
liquefy excess surface penetrant. Remove all traces of excess penetrant by scrubbing with a clean, lint-
free cloth under a flood of tap water at room temperature. Finally, wipe surfaces with a clean, lint-
free
cloth that has been dampened with tap water at room temperature
• Allow surface to dry thoroughly. Drying may be aided by a blast of clean air or by means of a fan
•
Apply nonaqueous developer from agitated spray can, in light, uniform dusting strokes. Hold can
approximately 150 to 250 mm (6 to 10 in.) from the surface of the forging
•
Allow a minimum of 10 min to elapse before inspection and evaluation of indications. Evaluate
indications under ultraviolet light (intensity: 1060 W/cm
2
, or 6840 W/in.
2
) in a darkened inspection
booth. Acceptance standards are the same as those listed in Example 5
• Postclean, using either the high-resolution precleaner or a water wash, and then dry at room temperature
Flaws in excess of acceptance standards detected with the high-resolution penetrants determined the disposition of the lot
or modifications to the production penetrant cycles and appropriate action taken.
Nondestructive Inspection of Forgings
Ultrasonic Inspection
Ultrasonic inspection is used to detect both large and small internal flaws in forgings. Detailed information on the
fundamentals of this method can be found in the article "Ultrasonic Inspection" in this Volume.
Forgings, by their nature, are amenable to ultrasonic inspection. Both longitudinal or shear wave (straight or angle beam)
techniques are utilized. The size, orientation, location, and distribution of flaws influence the selection of technique and
the inspection results. Consider, for example, Fig. 19, which shows the influence of flaw orientation on signal response.
There are, however, some definite limitations. All ultrasonic systems currently in use generate sound electrically and
transmit the energy through a transducer to the forging. Because the relationship of sound transmitted to sound received is
a factor in the inspectability of a forging, particular attention must be given to the surface condition of the forging.
Although techniques and couplants can enhance the energy transmission from the transducer to the forging, as-forged
surfaces impair the effectiveness of ultrasonic inspection. Near-surface flaws are most difficult to detect, and a dead zone
*
at the entry surface often interferes. Because of the difficulty involved in detecting surface flaws by ultrasonic inspection,
another method, such as magnetic particle or liquid penetrant inspection, is often used in conjunction with ultrasonic
inspection to inspect high-integrity forgings thoroughly.
