Snoman R. Dance Music Manual: Tools, Toys, and Techniques
Подождите немного. Документ загружается.

PART 2
Dance Genres
254
mentioning ‘dynamics’ in a previous chapter, both the kick and the snare in
trance will often remain at the highest velocity rather than following the strong –
weak – medium – weak syncopation. Again this is simply because the drums
should pull very little attention away from the main melodic lead. The closed
hi-hats, however, often employ different velocities throughout the bar to add
some interest to the patterns. As a general rule of thumb, the main emphasis
is commonly on the fi rst and fourth (remember that the open hat sits on the
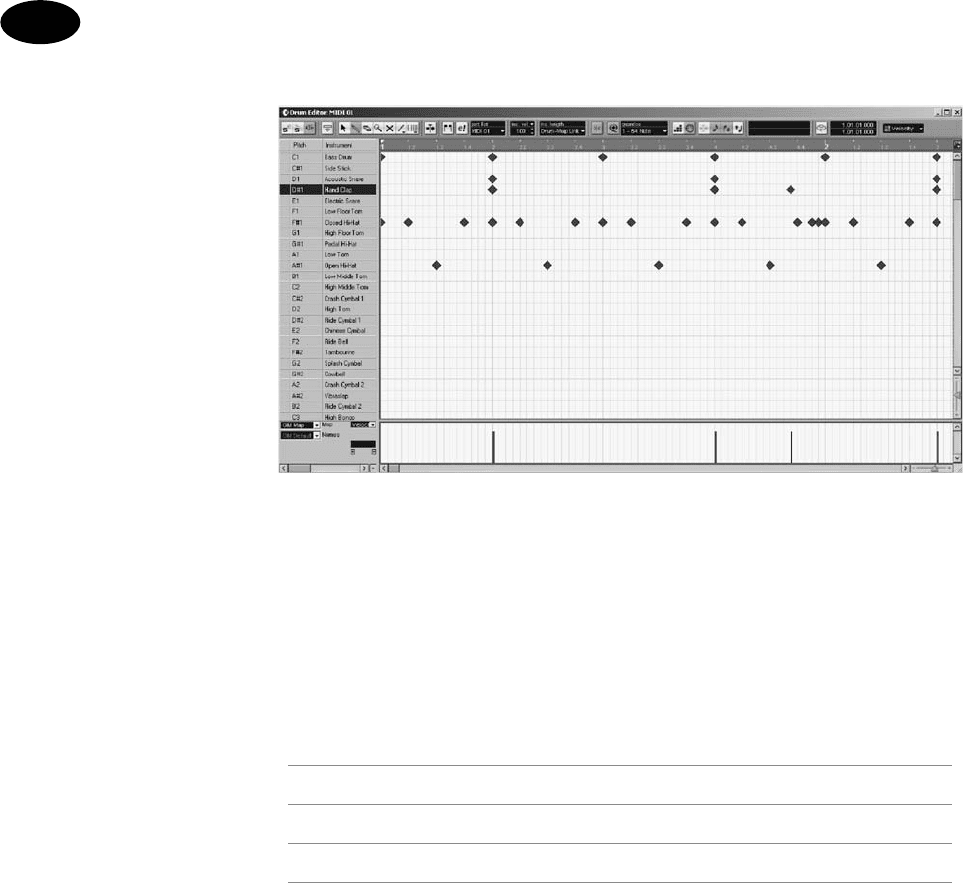
third!) 16th division of the bar as illustrated below:
Bar 16 th Divisions
12345678910111213141516
SMWSSMWSSMWSSMWS
Kick Kick Kick Kick
Of course, this is simply convention and convention shouldn’t always play a
part in your music, so you should feel free to experiment by placing the accents
at different divisions on the beat. By doing so the rhythm of the piece can
change quite severely, so it is worth experimenting.
RHYTHM TIMBRES
Simply playing this rhythm through a GM module you can expect the results to
sound absolutely nothing like the pounding beats you hear in the clubs, so it’s
vital to use the right instruments to produce the sounds. Predictably, all of these
are usually derived from the Roland TR909 but the Waldorf Attack, Novation
Drum Station or a drum sampler and a series of 909 samples will perform the job
just as well. Alternatively, they can be programmed in any capable synthesizer.
FIGURE 12.2
A variation on the
trance loop

Trance
CHAPTER 12
255
The trance kicks tend to be kept quite tight rather than ‘boomy ’ since this keeps
the entire rhythm section sounding fairly strong to produce the four-to-the-
fl oor solidity. To reproduce this try using a 90 Hz sine wave and modulate it
with a positive pitch envelope with no attack and a medium release. If you have
access to the pitch envelopes shape then generally a concave release is more
typical than convex but that’s not to say convex doesn’t produce the results.
Finally, experiment with the decay setting as the faster the decay is set, the
tighter the rhythm will become but there is a limit as to how far you should go.
If the decay is set too short then the kick will become a ‘blip’, so you should
look towards making a kick that has enough body to pull out of the mix but
not so much that it begins to boom. Generally, this, as with most instruments,
is best left as MIDI triggering the drum synth rather than bounced down to
audio as soon as it sounds appropriate, as it allows you to further contort the
kick when the rest of the instrumentation is in place.
As discussed in earlier chapters, compression can also play a large role in get-
ting the kick to sound ‘right’ and should be applied to the 4/4 kick loop, rather
than when the rest of the loop elements are in place. Although many engineers
apply compression after the loop is complete (and feel free to experiment),
keep in mind that the principle here is to ‘pump’ the drums, and if the loop
only has high-frequency elements sat off-beat – the compressor will pump
them. This can work musically with the more expensive compressors but most
budget units will destroy the high frequencies of the hats resulting in a duller
sounding loop. What’s more, as the kick and snare may occur on the same beat
a compressor with the required fast attack setting will capture the higher fre-
quencies of the snare, dulling them too.
This can be avoided by applying compression just to the 4/4 kick loop. Although
there are no underlying elements for the compressor to pump, the attack is set
as fast as possible so that the transient is compressed and some of the high-fre-
quency content is removed to produce a more substantial ‘thud’. The lower the
threshold and higher the ratio, the more this will be evident, but by increasing the
release parameter so that when the compressor is nearing the end of its release the
next kick starts, a good compressor will distort in a pleasing manner. Generally
speaking, most valve-based compressors will pump musically, but the most com-
monly used compressors for this are the Joe Meek SC 2.2, UREI LA 3 or the UREI
1176 LN due to the amount of second-order harmonic distortion they introduce.
If you don’t have access to a good valve compressor, then after compressing it with
a standard unit it’s certainly worth throwing the loop through the PSP Vintage
Warmer to recreate the requisite sound. In fact, even if it is put through a valve
compressor it’s often worth placing it through the vintage warmer anyway.
Once the kick is sounding ‘right’ the snares can be added and further modifi ed
to suit. Notably, these are not always used in the production of trance and claps
are occasionally used in their place – it depends entirely on what your creative
instincts tell you. Nevertheless, whichever is used in the track they will, more
often than not, be sourced from the TR909 or a sample CD (or more com-
monly another record). They can, of course, also be created in a synthesizer but

PART 2
Dance Genres
256
along with the triangle wave it’s worth employing a pink noise waveform rather
than white as it produces a thicker timbre. The pitch envelope is generally set
to positive modulation with a fast attack and a long decay but it’s also worth-
while creating a slurred effect by using negative modulation. This latter snare
can be used as part of a build-up to new instruments.
If a sample has been used and the decay cannot be made any longer, sending
them to a reverb unit set to a short pre-delay and tail will increase the decay.
This is also worth experimenting with even if the decay is long enough as it can
help ‘thicken’ the timbre. If this latter approach is taken, though, it’s prudent
to employ a noise gate to remove some of the reverb’s tail off. After this, much
of the low-frequency content will need removing to provide the basic snare
timbre, so it’s sensible to employ a high-pass fi lter to remove some of the low
end and then experiment with the concave and convex decay parameter (of the
amp envelope). Convex decays tend to be more popular in most trance tracks,
but concave may produce the results to suit what you have in mind.
As previously mentioned, compressors are often used on the snares to help create
the timbre, but rather than compress the transient it’s prudent to set the attack so
that it just misses and captures the decay stage instead. This will prevent the high
frequencies of the snare from being compromised, but by increasing the make-
up gain, the decay stage is increased in volume, helping to produce the often
used and distinctive thwack style timbre. Similar to the kick, the lower the thresh-
old and higher the ratio, the more this will be evident so experiment.
Finally, the closed and open hi-hat patterns will need some modifi cations to
suit the kick and snare. Yet again, these tend to be sourced from the TR909, a
sample CD or another record. However, it is sometimes prudent to programme
your own as these will play a large part in the rhythm of the record.
Ring modulation is possibly the easiest method for creating hi-hats and is eas-
ily accomplished by ring modulating a high-pitched triangle wave with a lower
pitched triangle. The result is a high-frequency noise type waveform that can
then be modifi ed with an amplifi er envelope set to a zero attack, sustain and
release with a short-to-medium decay. If there isn’t enough noise present, it can
be augmented with a white noise waveform using the same envelope. Once this
basic timbre is constructed, shortening the decay creates a closed hi-hat while
lengthening it will produce an open hat. Similarly, it’s also worth experiment-
ing by changing the decay slope to convex or concave to produce fatter or thin-
ner sounding hats.
As both these timbres depend on the high-frequency content to sit at the top
of the mix, compression should be avoided but adjusting the amplifi er decay of
synthesized hi-hats can help to change the perceived speed of the track. If the
hi-hats are sampled then this can be accomplished by importing them into a
‘drum sampler ’ such as Native Instruments Battery, or alternatively you can use a
transient designer such as SPL’s Transient Designer or the software alternative avail-
able in the Waves Transform Package. Using these to keep the decay quite short

Trance
CHAPTER 12
257
they will decay rapidly which will make the rhythm appear faster. Conversely,
by increasing the decay, you can make the rhythm appear slower. Most trance
music tends to keep the closed hi-hats quite short, though, using a short decay
but the open hats often benefi t from lengthening the decay. This can often help
the higher frequencies of the loop gel together more appropriately for the genre.
With the loop complete, it’s worthwhile looping it over a number of bars and
experimenting with the synthesis parameters or a transient designer to each instru-
ment in the loop to create a loop that gels together. This includes lengthening or
shortening the decay parameters, pitching the instruments up or down and apply-
ing effects such as reverb ( subtly!). Although at this stage it’s inadvisable to use com-
pression to warm up the loop, noise gates can be particularly useful for creating
loops with a different rhythmic fl ow. By feeding the entire loop into the gate and
reducing the threshold so that the transients of all the instruments pull though,
shortening the release parameter on the gate will cut some instruments short.
BASS RHYTHM
With the drum groove laid down, most artists then move onto the bass rhythm.
This, in many trance records, commonly consists of simple 8th notes with very
little movement in pitch or in the timbre itself. The reason for this is to leave
more ‘room’ for other elements such as the inter-melodic lines and the chorded
reprise after the middle eight of the track. For this technique to work the bass
most usually sits off the beat rather than on it since they’re kept relatively short
and play a very simple pattern to help keep the focus on the melodic lead.
If they occurred on the beat the groove would sound similar to a march because
there would be no low-frequency energy (LFE) in between the kicks. As a result,
the rhythm would have a series of ‘holes’ in between each kick/bass hit.
Kick … . Kick … . Kick … . Kick … .
Bass … . Bass … . Bass … . Bass … .
To avoid this, the bass commonly sits an eighth after the kick resulting in:
Kick Kick Kick Kick
… Bass … Bass … Bass … Bass
What’s more, by adopting this technique there is a more substantial groove
to the music since the two LFE signals are in effect working as a very basic
Da Capo (binary phrase) throughout the track. That is, the fi rst low-frequency
signal (the kick) is asking a question which is answered by the second low fre-
quency (the bass).
Of course, this, like everything, is open to artistic interpretation, and while it
is generally recommended that the bass occurs after the kick, it isn’t necessary

PART 2
Dance Genres
258
to place it an eighth after. Indeed, by experimenting through moving it subtly
around the off-beat, the groove can become more intense or relaxed. Also, it
isn’t compulsory to use notes that are an eighth in length. While these are com-
monly used to allow the timbre’s characteristics to be evident, smaller notes
can be used to great effect. Similarly, if the track is quite simple even with the
main melody, increasing the length of the notes to a quarter allows more of the
basses character to be evident which can be especially useful if the bass features
lengthy timbre augmentation with LFOs or envelopes.
Generally the bass, as with all the melodic elements of trance, works on a looped
eight-bar basis – that is the melodies, chords and so forth all loop around every
eight bars (usually with a cymbal crash or short snare roll at the end of the eighth
bar to denote the end of the musical passage). This helps to keep the repetition
that forms the basis of the music. Thus, the bass can be programmed over two
bars as a simple series of one pitch notes that can then be pasted to create the
other six bars. Working this way, you can select and pitch each consecutive two
bars of notes up and down to create some movement in the rhythm.
The technique of pitching an entire bar rather than any individual notes within
bars is very common since pitch-shifting constituent notes creates a much more
noticeable bass rhythm. This not only dissuades the focus from the main mel-
ody but also lays down a series of musical ground rules as to how the melody
can be written.
Keep in mind that if the bass features plenty of movement in a bar, for the
track to remain musical, the melody should harmonize with this progression.
However, by keeping the bass at one pitch throughout a bar and only moving
an entire bar up or down the only ground rules to the melody are to harmo-
nize with the movements of the entire bar allowing for more experimentation
on the lead. Of course, this again is merely the conventional approach used
by most trance artists and the example track, and it’s certainly open to artistic
licence. For example, some tracks will keep the bass off-beat but not maintain
even spaces between each hit, thus creating a rhythmic drive to the bass. Tracks
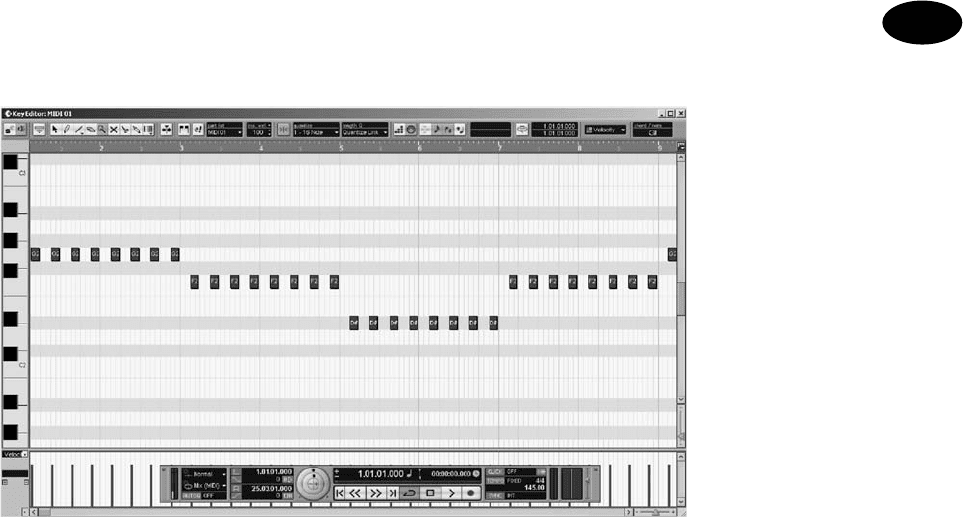
of this nature, however, will usually employ less melodic leads ( Figure 12.3 ).
BASS TIMBRE
For the bass timbre, analogue synthesizers (or DSP equivalents) are invariably
chosen over digital since the bass is exposed from the kick and the ‘distortion’
introduced by analogue produces a warmer tone to complement the kick.
Trance basses are sometimes sourced from sample CDs but many artists have
commented that they prefer to create their own in a synth. Generally speaking,
any analogue synth will produce a good analogue bass but many trance musi-
cians often rely on the Novation Bass Station (VSTi), the Novation SuperNova ,
Novation V-Station (VSTi) or the Access Virus to produce the timbres. Using any
of these, possibly the easiest solution for this timbre is to dial up a preset bass
in a synth and then contort the results to suit the tune. If, however, you wish
Trance
CHAPTER 12
259
to program your own a good starting point is to employ a pulse and sine (or
triangle) oscillator and detune them ⫹ or ⫺ 5 to produce the basic tone. In
general, a heavy transient pluck is not entirely necessary since it isn’t compet-
ing with the kick. Thus, the amp and fi lters attack and decay parameters can be
quite long and, in many instances, the decays actually act as the release param-
eters due to the relatively short duration of the notes.
When using the decay as a release parameter, the amplifi er’s release can then
be used as a ‘fi ne tune ’ parameter to help the bass sit comfortably in with the
drum loop. Additionally, by shortening the attack and decay parameter of
the fi lter envelope, set to modulate at a positive depth, more of a pluck can
be introduced into the sound so that the tone also complements the drum
rhythm. In fact, it’s essential to accomplish this rhythmic and tonal interaction
between the drum loop and the bass by playing around with both the amp and
the fi lters A/D EG before moving on. This is the underpinning of the entire
track, and if it’s weak, any instrumentation dropped on top will not rescue it.
By and large, most trance music doesn’t employ any velocity changes on the bass
rhythm as this is usually associated to control the fi lter cut-off, so the harder it’s
struck, the more the fi lter opens and the more of a pluck it exhibits. This type
of timbral variation is often avoided in order that the bass doesn’t demand too
much attention and rather simply ‘pulses’ along to lay down a solid foundation
for the lead and counter melodies. It is, of course, always prudent to experiment,
and it’s also worth editing the synth so that velocity controls other parameters.
On the subject of experimentation, delay, distortion and compression are often
used on basses. While most effects should be avoided since they tend to spread
the sound across the image (which destroys the stereo perspective) small
FIGURE 12.3
A typical trance bass
rhythm

PART 2
Dance Genres
260
amounts of controlled distortion can help to pull the bass out of the mix or
give it a much stronger presence. Similarly, a conservatively applied delay effect
can be used to create more complex sounding rhythms that will not place any
musical ‘restrictions’ on the lead. Any effects should be applied cautiously,
though, as the purpose of the bass is not to draw attention to itself but simply
underpin the more important elements.
Also, while it’s true to say that the sounds from any synthesizer are already
heavily compressed at the source, the principle behind a compressor here is
to control the results from any preceding effects and to be used as an ‘effect’
itself. Using the exactly same methods as compressing the kick, lengthening or
shortening the release parameter can introduce a different character to the bass.
More importantly, though, with both the drums and bass laid down, if they’re
both fed into a compressor (with the hi-hats muted), it can be set to activate on
each kick which results in it pumping the bass. Generally, the best compressors
to use for this should be either valve or opto due to the second-order harmonic
distortion they introduce, as this helps the mix to pump more musically. Again
this means using the Joe Meek SC 2.2, UREI LA 3 or the UREI 1176 LN, but if
you don’t have access to these, the Waves C1, C4 or Renaissance compressors
will do the trick or the PSP Vintage Warmer if you need more warmth.
Naturally, the amount of compression applied will depend upon the timbres
used, but as a general guideline, start by setting the ratio to 9:1, along with an
attack of 5 ms and a medium release of 200 or so milliseconds. Set the thresh-
old control to 0 dB and then slowly decrease it until every kick registers on the
gain reduction meter by at least 3 dB. To avoid the volume anomaly (i.e. louder
invariably sounds better!), set the make-up gain so that the loop is at the same
volume as when the compressor is bypassed and then start experimenting with
the release settings. By shortening the release the kicks will begin to pump the
bass, which becomes progressively heavier the more that the release is short-
ened. Unfortunately, the only guidelines for how short this should be set are
to use your ears and judgment but try not to get too excited. The idea here is
to help the drums and bass gel together into a cohesive whole and produce a
rhythm that punches along energetically. On the same note, it should not be
compressed so heavily that you lose the excursion of the kick altogether!
Once these two elements are working together, it’s prudent to export the groove
as the four separate two-bar loops of audio and drop them into a sampler. This
allows you to trigger the groove from numerous points along the arrangement
and also permits you to experiment with different progressions by simply hitting
the appropriate key on the sampler. It’s also sensible to export the drum track
alone and keep a note of all compression or effects settings along with the origi-
nal MIDI fi les to come back to later. Most studios will create these ‘track’ sheets,
and it’s wise to do so since many remixers will expect a track sheet if they’re to
remix the music. What’s more, having the groove as a cohesive whole and sat in
a sampler can often speed up the production process since you already have a
groove you’re happy with and therefore are less likely to be tempted to make more
‘tweaks ’ when they aren’t required. In other words, the rest of the instruments
Trance
CHAPTER 12
261
have to be programmed to fi t the groove, rather than constantly tweaking all
instruments to make them all fi t together. Not only this prevents you from
spending months constantly making unnecessary tweaks, but also most tracks
will start with just the groove!
TRANCE MELODIES
With the basic groove laid down a good approach is to programme the melody
before any further elements are programmed since this will often dictate the
direction of any other instrumental counter melodies.
Creating a melodic lead line for trance is possibly the most diffi cult part, as a
good lead is derived from not only the melody but also the timbre and both
of these have to be ‘accurate, ’ so close scrutiny of the current scene and mar-
ket leaders is absolutely essential in acquiring the right feel for the dance fl oor.
Unfortunately, in terms of MIDI programming, trance leads follow very few
‘ rules, ’ so how to programme one is entirely up to your own creative instincts.
That said, as ever there are some general guidelines that can be applied.
Firstly, in many cases the lead is constructed using a ‘chorded’ structure so that
the notes alternate between two notes. This creates the results of jumping from
the ‘key’ of the song to a higher note before returning to the main key again
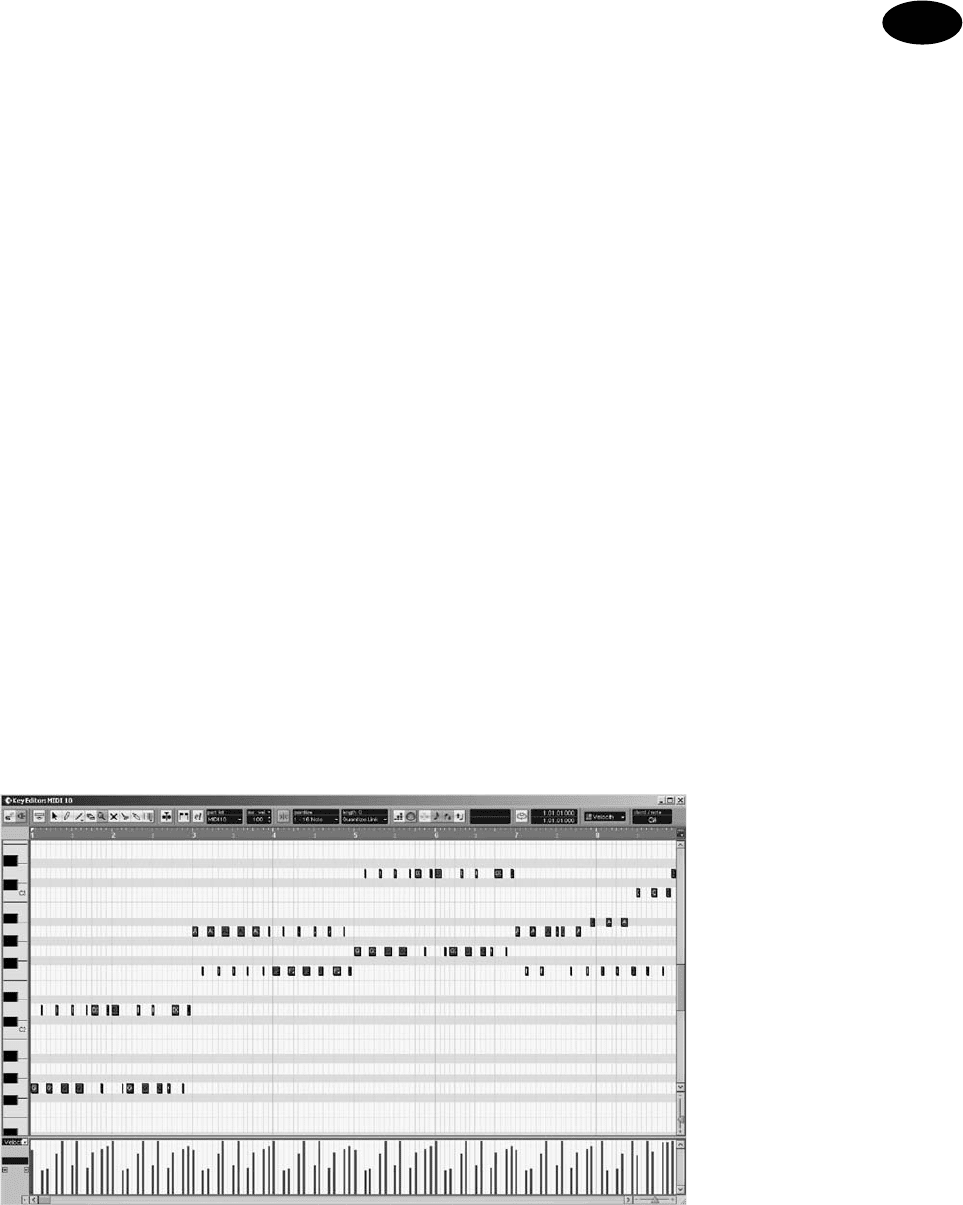
(Figure 12.4 ).
Also, as the above diagram shows, this lead continues over eight bars before
being repeated again and each consecutive two bars of music will tend to rise
in pitch rather than fall. Indeed, this building up the scale plays a key role in
creating trance leads for the dance fl oor. By progressively moving up the scale
FIGURE 12.4
A trance melody

PART 2
Dance Genres
262
throughout the bars and then setting the few fi nal notes of the last bar higher
in scale than any of the preceding notes an uplifting feel results. Conversely, by
setting the fi nal notes lower than that of the start of a bar the feeling is reversed,
resulting in a track that pulls the listener down.
To keep the relative speed and energy of trance, it’s better to keep the notes
short and stabby. This means using a mix of 32nd, 16th and/or 8th notes and
then using the decay and release envelope of the amplifi er to lengthen and
contort the timbre if required. This gives much more control over the groove,
allowing you to immediately adjust the ‘feel’ of the music by simply adjusting
the amplifi er’s release envelope rather than having to ‘kick’ MIDI notes around.
With these guidelines in mind, a lead can be constructed in any manner, but if
inspiration has left you, there are some techniques that can sometimes produce
good results. The fi rst and possibly easiest method is to begin by fashioning a
chord structure from the previously programmed bass line. This can follow the
progression exactly, but generally it’s worthwhile experimenting with a mix of
parallel, oblique or contrary motions. For instance, in the example track the
bass played over eight bars and consisted of:
Bar 1 Bar 2 Bar 3 Bar 4 Bar 5 Bar 6 Bar 7 Bar 8
G G F F D# D# F F
Thus, the key of the lead could follow this progression exactly in a parallel
motion which would produce musically ‘acceptable’ results, even though it
would be somewhat a little boring to the ear. However, by following the pro-
gression in a parallel motion for only the fi rst, second and fourth bar and using
a contrary motion on the third, the interaction between the lead and the bass
exhibits a much better result:
Bar No 12345 6 78
Bass G G F F D# D# F F
Lead G and
D
G and
D
F and
A
F and
A
G and
D
G and
D
F and
A
F and
A
Of course, it isn’t imperative that the third bar becomes contrary and any or
all bars could be contrary, or parallel, or oblique, provided that it sounds right
to you.
Once this basic chord is constructed to complement the bass, using a noise gate
or MIDI CC messages you can cut up each bar in a rhythmic manner. If using
CC messages, though, a much better approach is to write a complex rhythmic
hi-hat pattern and then use the sequencer to convert the hi-hats notes to CC11
messages rather than programme all the CC’s in by hand. This can often lead

Trance
CHAPTER 12
263
to a robotic nature, whereas using a hi-hat pattern you’re much more likely to
produce a rhythmic fl owing gate. Alternatively, you can use a side chain from
the hi-hats or kick drum to pump the chords. This gated effect, once suitable,
can be applied physically to the notes (i.e. cut them up to produce the effect)
so that not only does each note retrigger the synth but also it permits you to
offset the top notes of a chord against the lower ones to produce the alternat-
ing notes pattern that’s often used for the leads.
Alternatively, another frequently used method to create a trance melody is to
begin with a synthesizer’s arpeggiator, as this can help to get the general idea
down. With some trial and error it’s possible to fi nd both arpeggiator pattern
and chord combination to produce some inspiration for a lead melody. Once
recorded as MIDI, this can be further attuned in a sequencer’s key editor.
Another technique that’s often referred to as the ‘two fi ngered ’ approach can
produce useable results too. This involves tapping out a riff using just two keys
an octave apart on the keyboard. By alternating between these two keys keep-
ing the lower key the same and continually moving higher in scale on the sec-
ond key while playing the audio through a delay unit can produce interesting
rhythmic movements. If this is recorded as MIDI information, it can be edited
further by lengthening notes so that they overlap each other slightly or by add-
ing further notes in between the two octaves to construct a melody that builds.
MELODIC TIMBRES
Just as the melody for the lead is important, so is the timbre, and it’s absolutely
vital that time is taken to programme a good one – the entire track will stand
or fall on its quality. As discussed in the chapter on sound design, the lead is
the most prominent part of a track and hence the main instrument that sits in
the mid-range/upper mid-range. Consequently, it should be rich in harmonics
that occupy this area and should also exhibit some fl uctuations in the charac-
ter to remain interesting. This can sometimes be accomplished through mod-
ulating the pitch with an LFO on a digital synth, but the phase initialization
from analogue synths, more often than not, will produce much better, richer
results. Consequently, the preferred synths by many artists are the Access Virus ,
the Novation SuperNova, Novation A-Station or the Novation V-Station (VSTi).
We’ve already covered the basic principles behind creating a harmonically rich
lead, so rather than go into too much detail again here, what follows is a quick
overview:
■ Oscillators:
■ 2 ⫻ pulse detuned by ⫺ 5 and ⫹ 4 cents
■ 1 ⫻ sawtooth (try pitching this up or down an octave)
■ 1 ⫻ pink noise
■ Amp and fi lter envelope:
■ Zero attack
■ Medium decay