Morling K. Geometric and Engineering Drawing
Подождите немного. Документ загружается.

Geometric and Engineering Drawing124
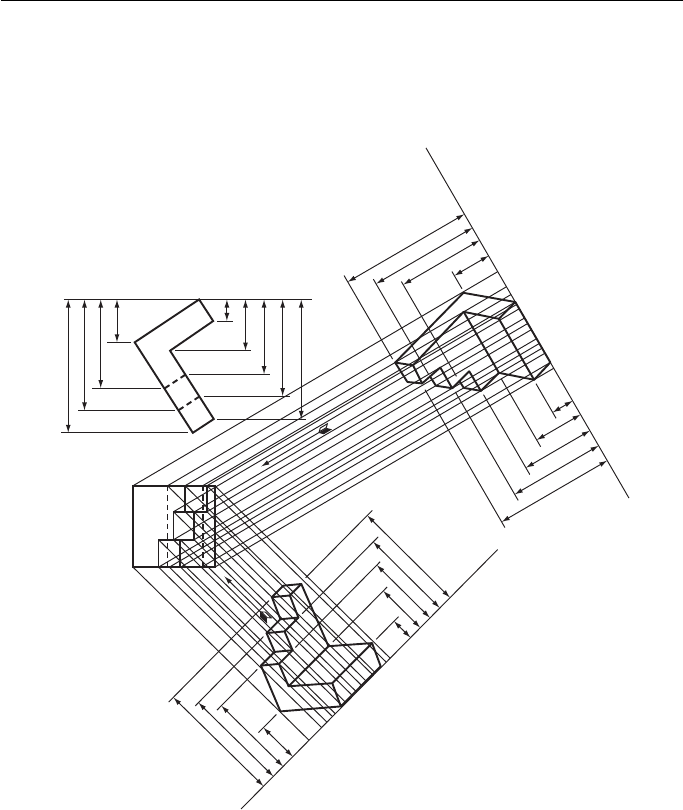
Figure 10.10 shows two AP of a more complicated block. In this case the base
is tilted and therefore cannot be used to measure the heights as before. This is over-
come by drawing a datum line. The heights of all the corners are measured from this
datum. Note that on the AP the datum is drawn at 90 ° to the projection lines.
Plan
Third angle projection
FE
AP looking
along arrow X
AP looking
along arrow Y
Datum
Datum
Datum
a
a
a
b
c
d
e
f
g
h
j
b
c
d
e
f
g
h
j
b
c
d
e
f
g
h
j
X
X
Y
Y
Figure 10.10
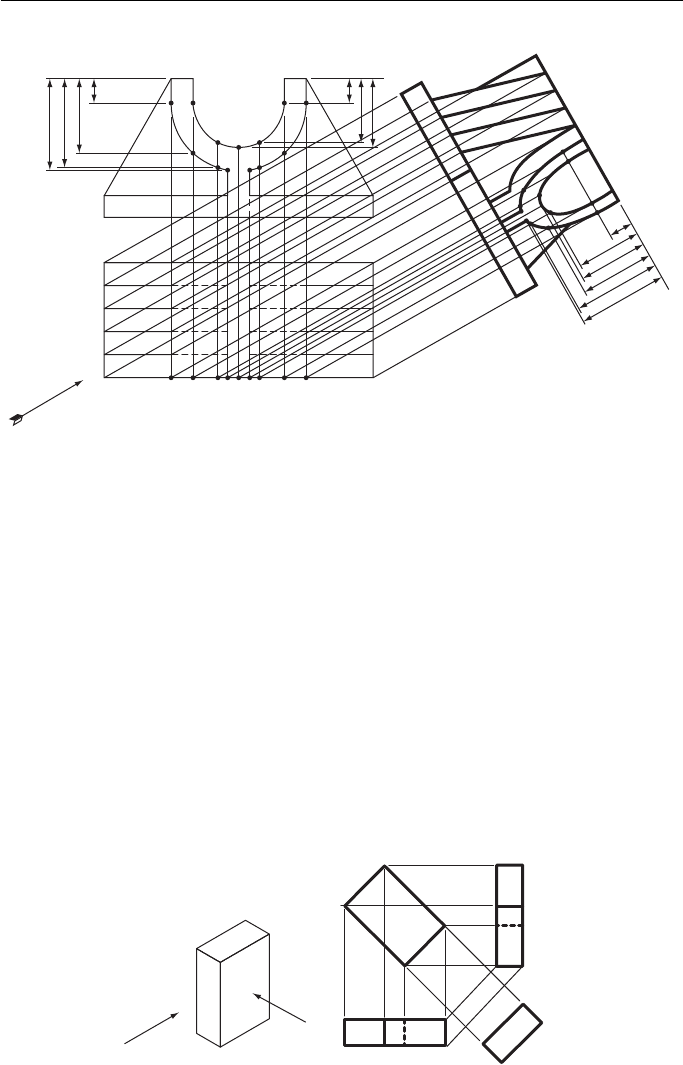
If the outline contains circles or curves, the treatment is similar. Select some points
on the curve and mark off their distances from some convenient datum. In Fig. 10.11
this gives dimensions a , b , c , d , e and f . The positions of these points are marked on
the plan and they are projected onto the AE. The dimensions a to f are then marked
off on the AE and the points joined together with a neat freehand curve.
It is worth stating again the difference between first and third angle projection, par-
ticularly if checked against the above examples. With first angle, if you look from one
side of a view you draw what you see on the other side of that view. With third angle, if
you look from one side of a view you draw what you see on the same side of that view.
Shown below are some of the more common solid geometric solids drawn in
orthographic projection.
Orthographic Projection (First Angle and Third Angle) 125
Prisms and Pyramids
Figure 10.12 shows the following views of a rectangular prism, drawn in first angle
projection with the prism tilted at 45 ° in the FE.
A FE looking along arrow A .
An EE looking along arrow B .
A plan.
An AP showing the cross-sectional shape of the prism.
First angle projection
AE seen in
direction of arrow
FE
Plan
a
a
a
b
c
d
e
f
b
c
d
e
f
Figure 10.11
First angle projection
FE
EE
AP
Plan
A
B
45°
Figure 10.12 Views of a rectangular prism.
Geometric and Engineering Drawing126
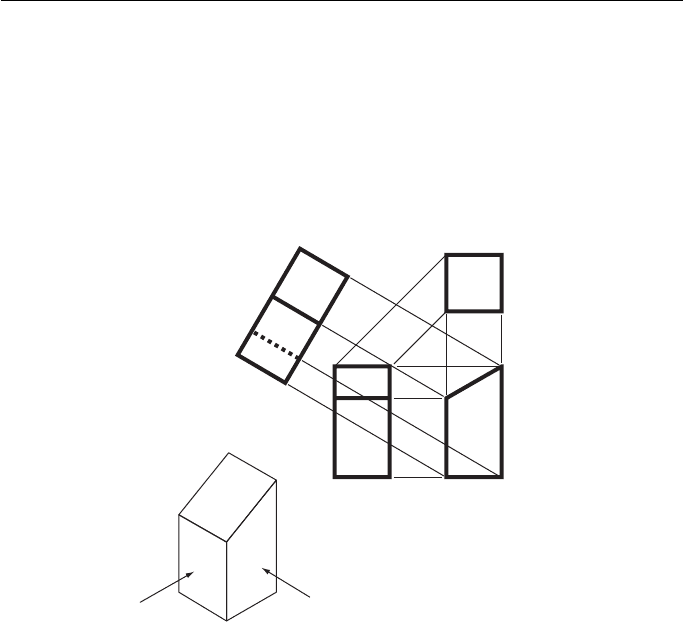
Figure 10.13 shows the following views of a square prism drawn in third angle
projection. The top of the prism has been cut obliquely at 30 ° .
A FE looking along arrow A .
An EE looking along arrow B .
A plan.
An AP projected from the FE at 30 ° .
Third angle projection
Plan
FEEE
B
A
AP
Figure 10.13 Views of a square prism.
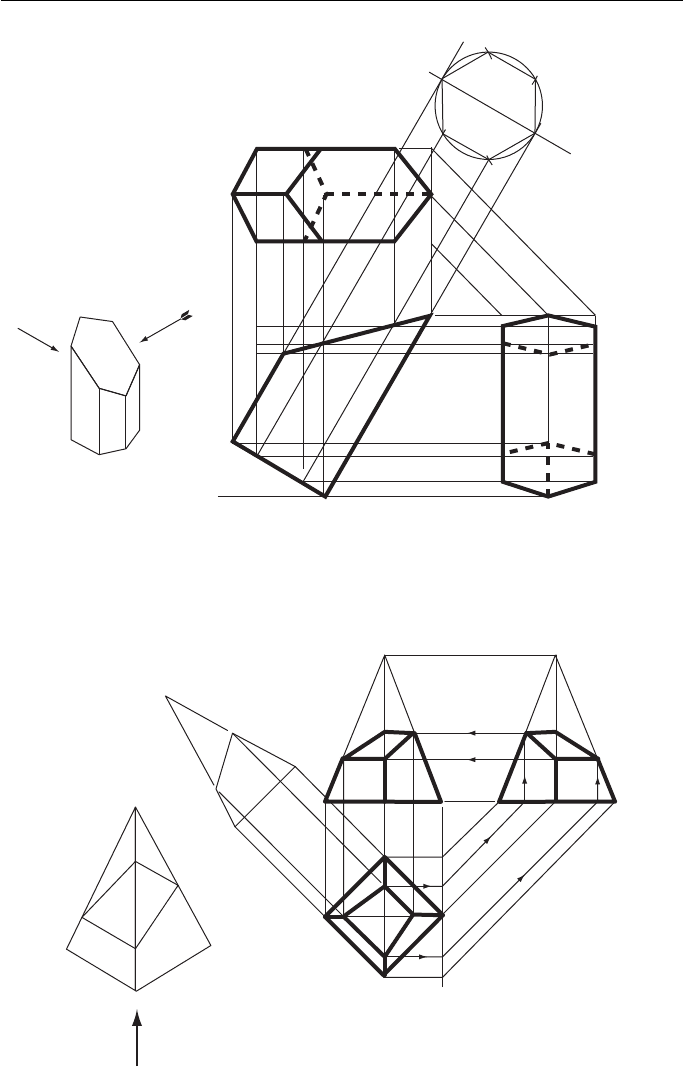
Figure 10.14 shows the following views of a regular hexagonal prism, drawn in
third angle projection with the prism tilted at 30 ° in the FE. The top of the prism has
been cut obliquely at 45 ° .
A FE looking along arrow A .
An EE looking along arrow B .
A plan.
The first view that is drawn is the AP. This is not in the instructions but without it
the FE is very difficult to draw. Arrow A indicates that three sides of the hexagon are
seen in the FE and the AP is constructed so that three sides are seen (rotate the hexa-
gon through 30 ° in the AE and only two sides are seen). The AP is also used to find
the width of the prism in the EE.
Figure 10.15 shows the following views of the frustum of a square pyramid drawn
in first angle projection. The corners of the pyramid are numbered 1 to 4 for easy
identification on each elevation.
A FE looking along the arrow.
An EE seen from the left of the FE.
A plan.
Orthographic Projection (First Angle and Third Angle) 127
Third angle projection
AP (Construction only)
Plan
30°
FE EE
B
A
Figure 10.14 Views of a hexagonal prism.
1
2
3
AE (Construction only)
First angle projection
Plan
EEFE
343
2
1
2
1
4
3
3
4
4
2
2
1
1
4
Figure 10.15 Views of a square pyramid.
Geometric and Engineering Drawing128
With this type of problem it is wise initially to draw the required views as if
the pyramid were complete. Once again it is necessary to draw an AE so that the
oblique face can be drawn on the AE and then points 1, 2, 3 and 4 can be projected
back onto the plan. Points 1 and 3 are then projected onto the FE and points 2 and 4
onto the EE. Points 2 and 4 can be projected from the EE to the FE and points
1 and 3 from the FE to the EE. Note that once the AE has been drawn it is possible to
draw the oblique face on all three views without any further measuring.
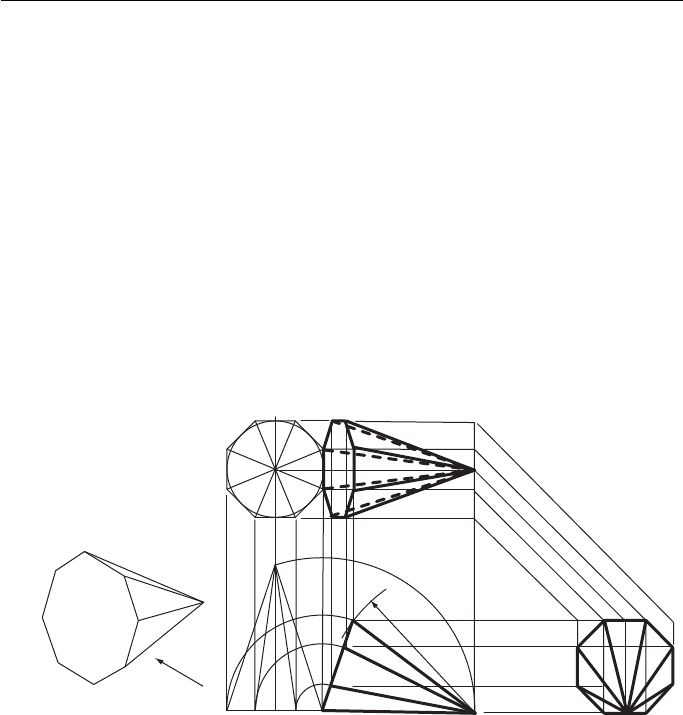
Figure 10.16 shows the following views of an octagonal pyramid drawn in third
angle projection. The pyramid is lying on its side.
A FE looking along the arrow.
An EE seen from the right of the FE.
A plan.
Plan pyramid standing upright
(Construction only)
Third angle projection
Plan
FE
FE Pyramid standing upright
(Construction only)
EE
R = slant height
Figure 10.16 Views of an octagonal prism.
To draw the pyramid lying on its side, first draw it standing upright and then tip
it over. This is done with compasses as shown. If a plan of the pyramid standing
upright is constructed, it makes it easier to find the positions of the corners of the
pyramid in the plan when it has been tipped over.
Orthographic Projection (First Angle and Third Angle) 129
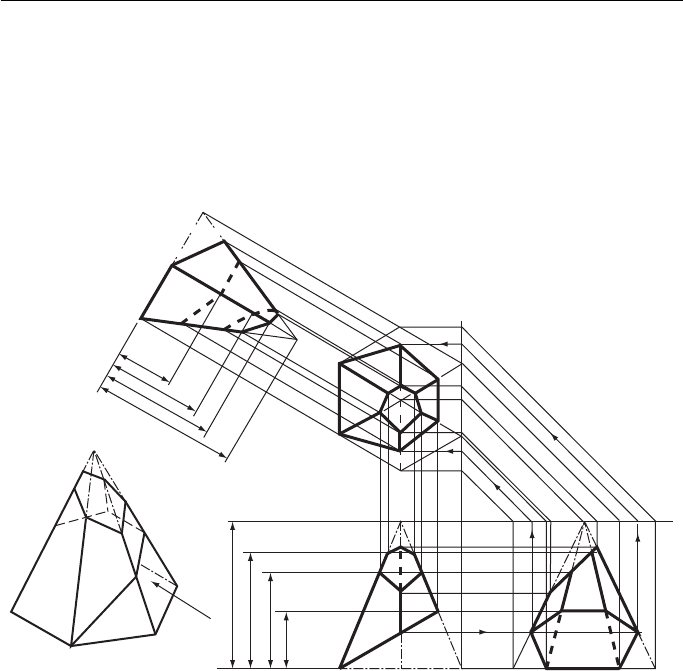
Figure 10.17 shows the following views of a hexagonal pyramid drawn in third
angle projection. The top of the pyramid is cut at 45 ° and the bottom at 30 ° .
A FE seen in the direction of the arrow.
An EE seen from the right of the FE.
A plan.
An AE projected from the plan at 30 ° .
Third angle projection
AE
FE EE
d
a
b
c
d
c
b
a
Plan
Figure 10.17 Views of a hexagonal pyramid.
As for Fig. 10.15 , the pyramid is first drawn as if it were complete, on all four
views. The lower cutting plane is then drawn on the FE. The points where it crosses
the corners are then projected across to the EE and up to the plan. The point where it
crosses the centre corner on the FE cannot be projected straight to the plan and has to
be projected via the EE (follow the arrows).
The upper cutting plane is then drawn on the EE and the points where it crosses
the corners are projected across to the FE and up to the plan.
Most of these corners can be projected straight from the plan onto the AE. The
exceptions are the points on the centre corner and these (dimensions a , b , c and d )
can be transferred from any convenient source, in this case the FE.
Geometric and Engineering Drawing130
Cylinders and Cones
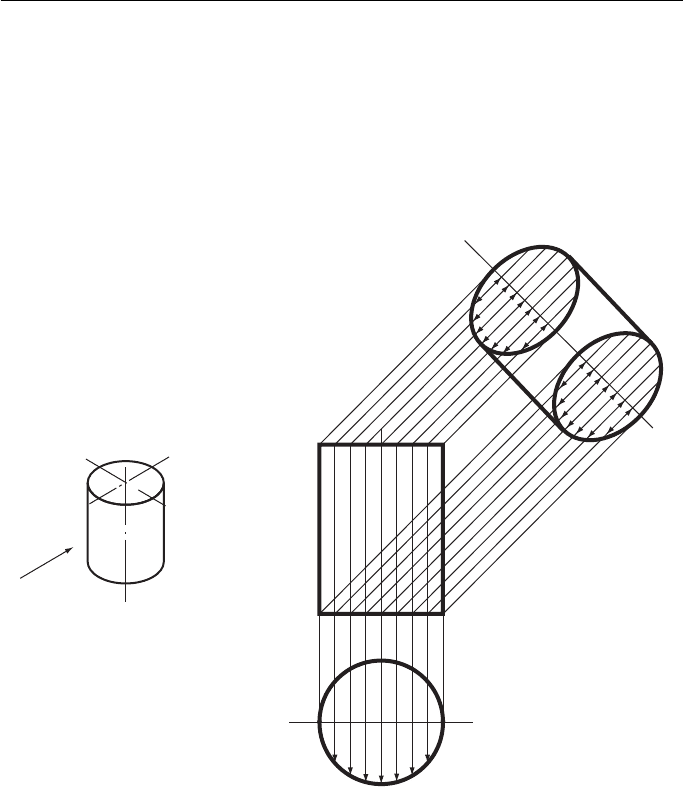
Figure 10.18 shows the following views of a cylinder drawn in first angle projection.
A FE seen in the direction of the arrow.
A plan.
An AP projected from the FE at 45 ° .
Plan
FE
AP
First angle projection
1
2
3
4
5
6
7
1
2
3
4
5
6
7
1
2
3
4
5
6
7
Figure 10.18 Views of a cylinder.
If the plan is divided into several strips the width of the cylinder at any one of
these strips can be measured. The exact positions of each of the strips can be pro-
jected onto the FE and then across to the AP. The width of the cylinder at each of the
strips is transferred from the plan onto the AP with dividers, measured each side of
the centre line (only one side is shown). The points are then joined together with a
neat freehand curve.
Orthographic Projection (First Angle and Third Angle) 131
Figure 10.19 shows the following views of a cylinder drawn in third angle projection.
The cylinder is lying on its side and one end is cut off at 30 ° and the other end at 60 ° .
A FE seen in the direction of the arrow.
An EE seen from the left of the FE.
A plan.
An AP projected from the plan at 60 ° .
Third angle projection
Plan b
b
c
d
c
d
a
a
d
c
b
a
1
2
3
EE
1
1
2
3
2
3
FE
AP
Figure 10.19 Views of a cylinder.
The EE is divided into several strips. The strips are projected from the EE to the
FE and up to the plan. They are also projected from the EE to the plan at 45 ° . The
points where the projectors from the FE and the EE meet on the plan (at a , b , c and
d , etc.) give the outline of the two ellipses on the plan.
The outline of the ellipses on the AP are found by projecting the strips onto the AP
and then transferring measurements 1, 2, 3, etc., from the EE to the AP with dividers.
Geometric and Engineering Drawing132
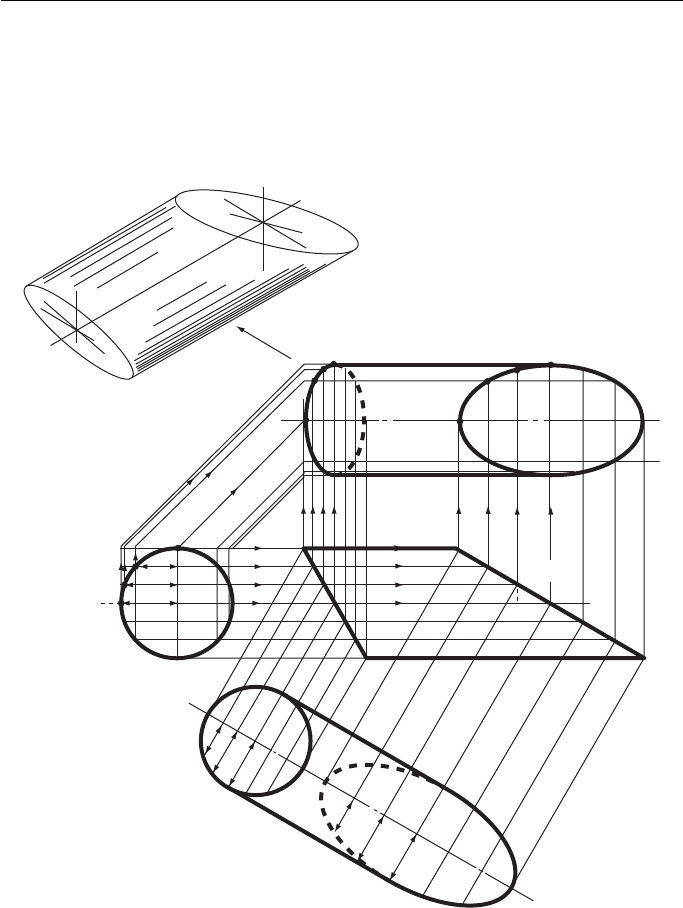
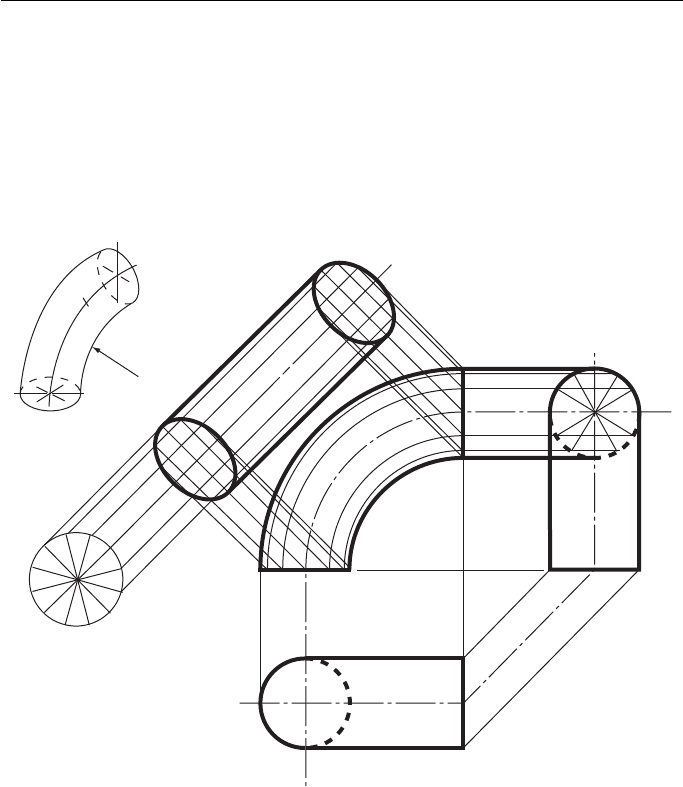
Figure 10.20 shows the following views of a curved cylinder drawn in first angle
projection.
A FE seen in the direction of the arrow.
An EE seen from the left of the FE.
A plan.
An AP projected from the FE at 45 ° .
1
2
3
10'
11'
12'
1'
2'
3'
4'
5'
6'
7'
8'
9'
10'
11'
12'
1'
2'
3'
4'
5'
6'
7'
8'
9'
4
5
6
7
8
9
10
11
12
1
2
3
4
5
6
7
8
9
10
11
12
First angle projection
AP
EE
FE
Plan
(Construction only)
Figure 10.20 Views of a cylinder.
This drawing uses a different method of plotting an AP from the previous two
examples. Instead of being divided into strips, the cylinder is divided into 12 equal
segments. These are marked on the walls of the cylinder as numbers, from 1 to 12.
The ellipses formed on the AP are found by plotting the intersections of the projec-
tors of numbers 1 to 12 from the FE and from a construction drawn in line with the
AP. The projectors intersect in 1 , 2 , 3 etc. Note that on the EE number 1 is at the
top of the circle while on the construction (and hence on the AP) number 1 is on
the right. This, of course, is what you should expect.
Orthographic Projection (First Angle and Third Angle) 133
Third angle projection
AE
(Construction only)
AP
(Construction only)
Plan
1
2
3
4
5
6
7
8
9
1
2
3
4
5
6
7
8
9
10
11
12
10
11
12
FE
EE
Figure 10.21 Views of a cylinder.
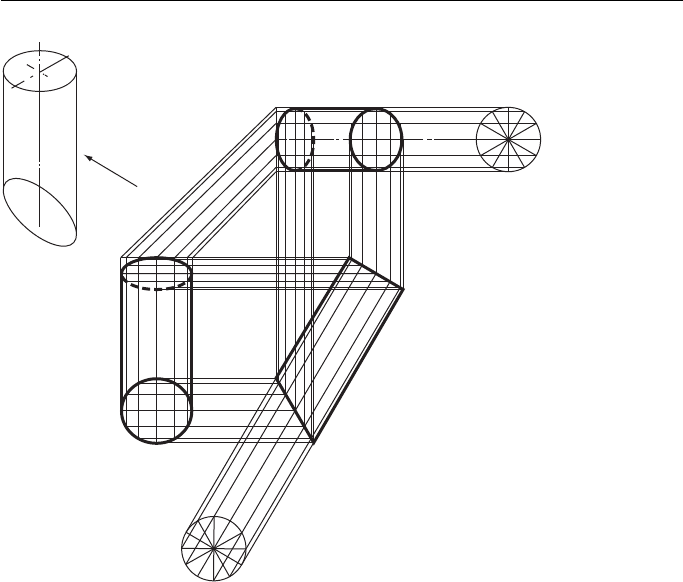
Figure 10.21 shows the following views of a cylinder drawn in third angle projec-
tion. The base of the cylinder is cut obliquely at 30 ° and the cylinder is tilted at 60 °
in the FE.
A FE seen in the direction of the arrow.
An EE seen from the left of the FE.
A plan.
The cylinder is divided into 12 equal segments. This is done on a separate AE and
AP which are constructed just for that purpose. The ellipses are found by plotting the
intersections of the projectors from points 1 and 1, 2 and 2, 3 and 3, 4 and 4, etc.
