Morling K. Geometric and Engineering Drawing
Подождите немного. Документ загружается.

Geometric and Engineering Drawing114
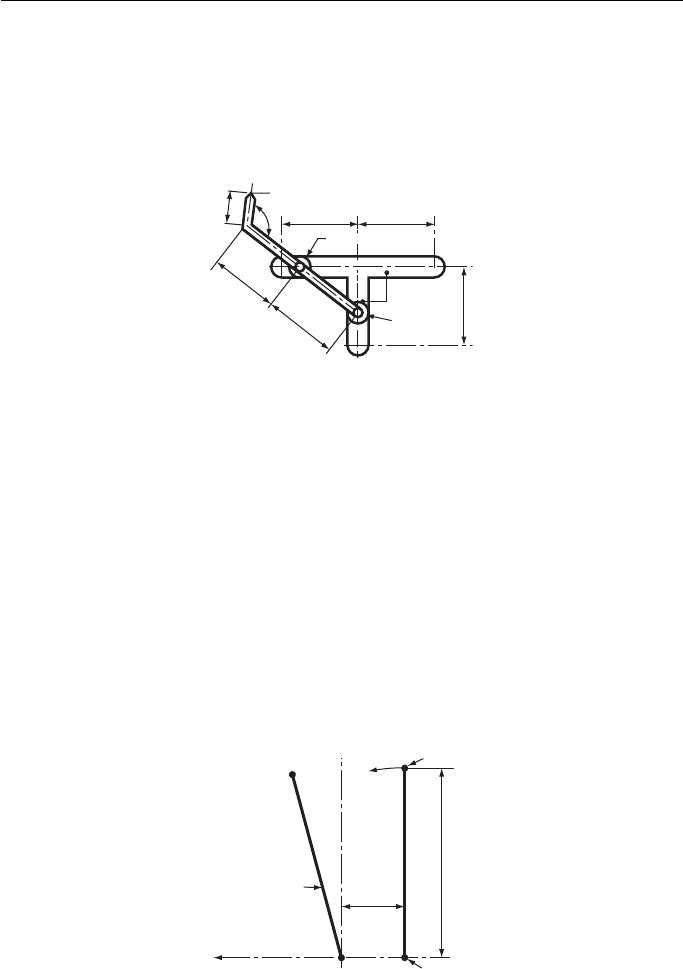
5. In Fig. 5 , rollers 1 and 2 are attached to the angled rod. Roller 1 slides along slot AB while
roller 2 slides along CD and back.
Draw, full size, the locus of P, the end of the rod, for the complete movement of roller 1
from A to B.
South-East Regional Examinations Board
6. As an experiment a very low gear has been fitted to a bicycle. This gear allows the bicycle
to move forward 50 mm for every 15 degrees rotation of the crank and pedal. These details
are shown in Fig. 6 .
(a) Draw, half-full size, the crank and pedal in position as it rotates for every 50 mm for-
ward motion of the bicycle up to a distance of 600 mm. The first forward position has
been shown on the drawing.
(b) Draw a smooth freehand curve through the positions of the pedal which you have
plotted.
(c) From your drawing find the angle of the crank OA to the horizontal when the bicycle
has moved forward 255 mm.
Metropolitan Regional Examinations Board
Position of
pedal and
crank after
15° of rotation
Pedal
Forward motion of bicycle
Spindle
150 mm
50 mm
O
A
Figure 6
25
P
A
Roller 1
Roller 2
Dimensions in mm
D
C
120°
62 62
62
56
62
Slots
B
Figure 5
Loci 115
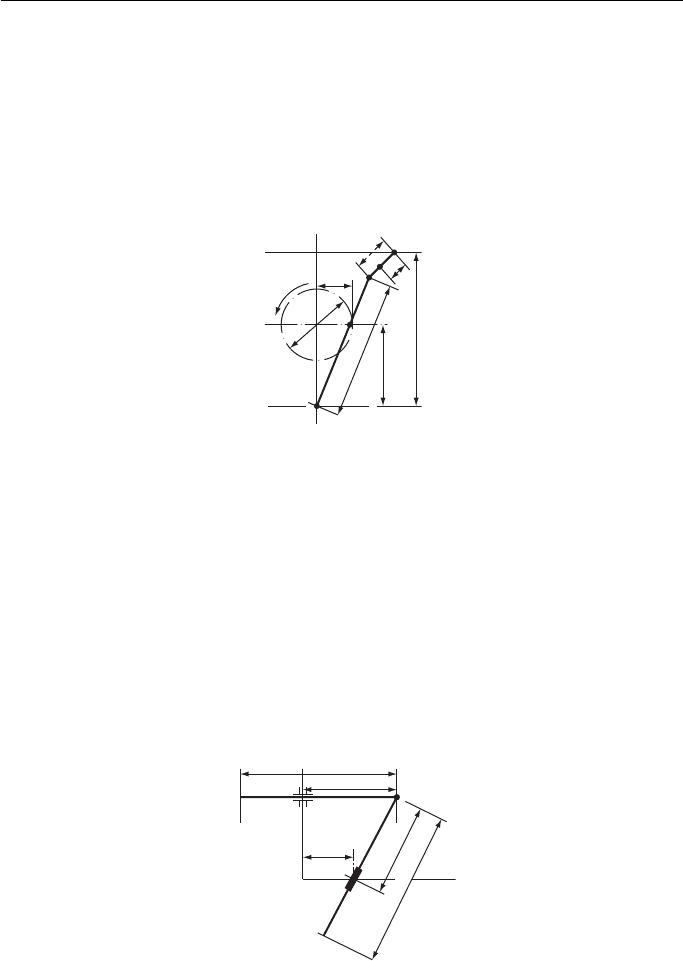
7. Figure 7 is a line diagram of a slotted link and crank of a shaping machine mechanism. The
link AC is attached to a fixed point A about which it is free to move about the fixed point
on the disc. The disc rotates about centre O. Attached to C and free to move easily about
the points C and D is the link CD. D is also free to slide along DE.
When the disc rotates in the direction of the arrow, plot the locus of C, the locus of P on the
link CD, and clearly show the full travel of B on AC.
Southern Universities ’ Joint Board
114
P
C
B
1
E
D
A
Dimensions in mm
φ54
15
27
60
102
Figure 7
C
N
B
M
Dimensions in mm
A
D
125
75
P
37.5
75
125
Figure 8
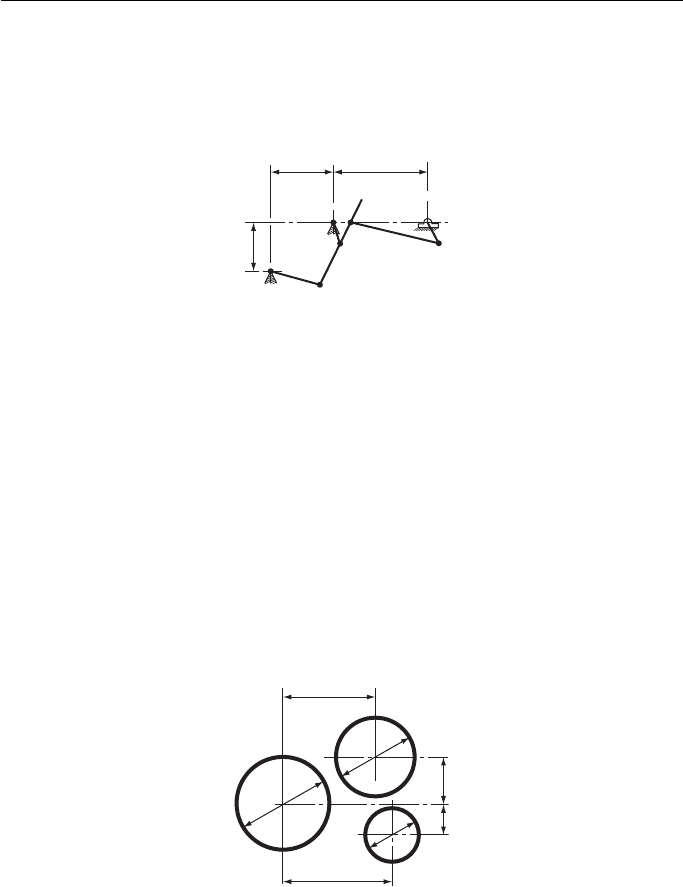
8. In Fig. 8 , MP and NP are rods hinged at P, and A and D are guides through which MP and
NP are allowed to move. D is allowed to move along BC, but rod NP is always perpen-
dicular to BC. The guide A is allowed to rotate about its fixed point. Draw the locus of P
above AB for all positions and when P is always equidistant from A and BC.
This locus is part of a recognised curve. Name the curve and the parts used in its construction.
Southern Universities ’ Joint Board
Geometric and Engineering Drawing116
10. A rod AB 70 mm long rotates at a uniform rate about end A. Plot the path of a slider S,
initially coincident with A, which slides along the rod, at a uniform rate, from A to B and
back to A during one complete revolution of the rod.
Joint Matriculation Board
11. With a permanent base of 100 mm, draw the locus of the vertices of all the triangles with
a constant perimeter of 225 mm.
Oxford and Cambridge Schools Examination Board
12. Three circles lie in a plane in the positions shown in Fig. 10 . Draw the given figure and plot
the locus of a point which moves so that it is always equidistant from the circumferences of
circles A and B. Plot also the locus of a point which moves in like manner between circles
A and C.
75
37.525
87.5
Dimensions in mm
φ76
φ62
φ42
A
B
C
Figure 10
7550
50
PD
E
O
A
C
B
Dimensions in mm
Q
Figure 9
Finally draw a circle whose circumference touches the circles A, B and C and measure
and state its diameter.
Cambridge Local Examinations Board
9. In the mechanism shown in Fig. 9 , OA rotates about O, PC is pivoted at P, and QB is
pivoted at Q. BCDE is a rigid link. OA P C C D D E 25 mm, BC 37.5 mm,
QB 50 mm and AD 75 mm. Plot the complete locus of E.
Oxford and Cambridge Schools Examinations Board
Geometric and Engineering Drawing. DOI:
© 2010 Elsevier Ltd. All rights reserved.2010
10.1016/B978-0-08-096768-4.00010-3
Orthographic Projection
(First Angle and Third Angle)
Orthographic projection is the solution to the biggest problem that a draughtsperson
has to solve – how to draw, with sufficient clarity, a three-dimensional object on a two-
dimensional plane. The drawing must show quite clearly the detailed outlines of all the
faces and these outlines must be fully dimensioned. If the object is very simple, this may
be achieved with a freehand sketch. A less simple object could be drawn in either isomet-
ric or oblique projections, although both these systems have their disadvantages. Circles
and curves are difficult to draw in either system and neither shows more than three sides
of an object in any one view. Orthographic projection, because of its flexibility in allow-
ing any number of views of the same object, has none of these drawbacks.
Orthographic projection has two forms: first angle and third angle; we shall dis-
cuss both. Traditionally, British industry has used first angle while the United States
of America and, more recently, the continental countries used the third angle system.
There is no doubt that British industry is rapidly changing to the third angle system
and, although this will take some years to complete, third angle will eventually be
the national and international standard of orthographic projection.
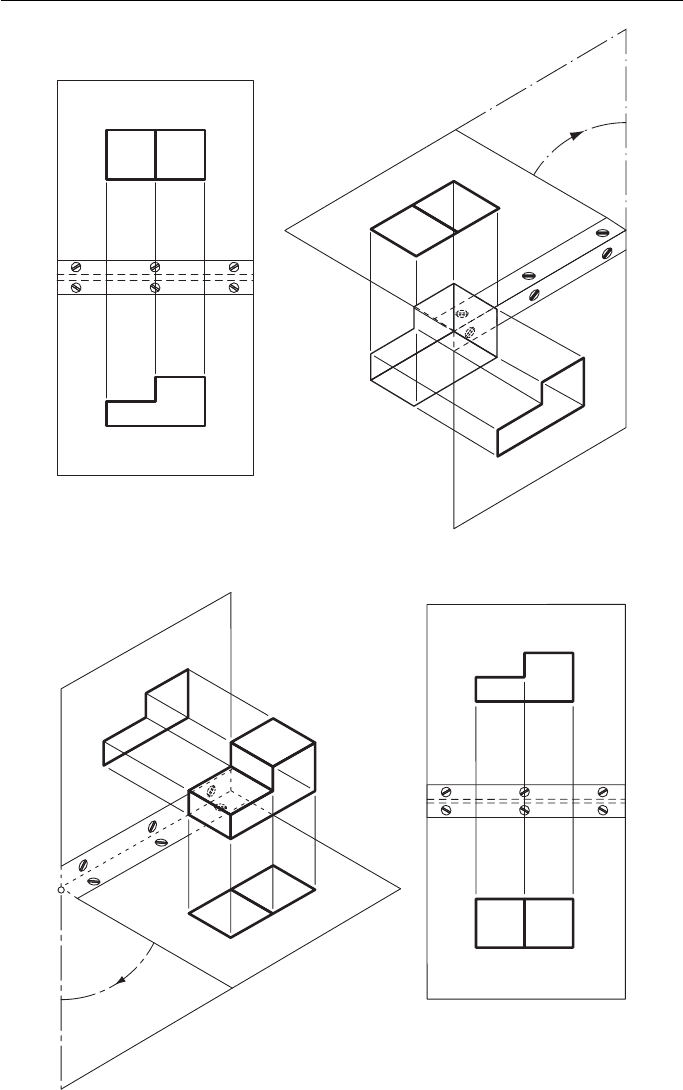
Figure 10.1 shows a stepped block suspended between two planes. A plane is a
perfectly flat surface. In this case one of the planes is horizontal and the other is
vertical. The view looking on the top of the block is drawn directly above the block
on the horizontal plane (HP). The view looking on the side of the block is drawn
directly in line with the block on the vertical plane (VP). If you now take away the
stepped block and, imagining that the two planes are hinged, fold back the HP so that
it lines up with the VP, you are left with two drawings of the block. One is a view
looking on the top of the block and this is directly above another view looking on the
side of the block. These two views are called ‘ elevations ’ .
Figure 10.1 shows the block in third angle orthographic projection. The same
block is drawn in Fig. 10.2 in first angle orthographic projection. You still have a
VP and a HP but they are arranged differently. The block is suspended between the
two planes and the view of the top of the block is drawn on the HP and the view of
the side is drawn on the VP. Again, imagining that the planes are hinged, the HP is
folded down so that the planes are in line. This results in the drawing of the side of
the block being directly above the drawing of the top of the block (compare this with
the third angle drawings).
10
Geometric and Engineering Drawing118
HP
VP
VP
HP
Figure 10.1 Third angle orthographic projection.
HP
HP
VP
VP
Figure 10.2 First angle orthographic projection.
Orthographic Projection (First Angle and Third Angle) 119
Vertical plane
(VP)
Horizontal plane
(HP)
First angle
Second angle
Fourth angle
Third angle
Figure 10.3 Relative positions of first and third angle projections.
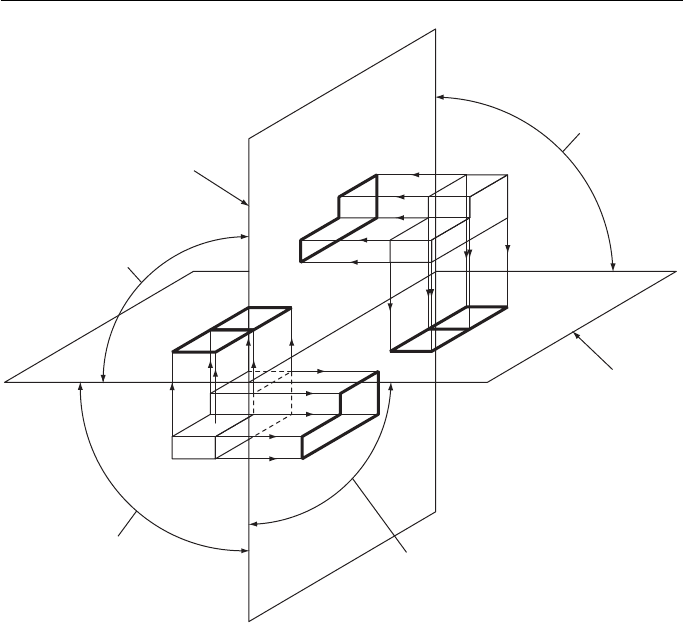
The reason why these two systems are called first and third angle is shown in
Fig. 10.3 . If the HP and the VP intersect as shown, it produces four quadrants. The
first quadrant, or first angle, is the top right and the third is the bottom left. If the
block is suspended between the VP and the HP in the first and third angles, you can
see how the views are projected onto the two planes.
So far we have obtained only two views of the block, one on the VP and one on the
HP. With a complicated block this may not be enough. This problem is easily solved by
introducing another plane. In this case it is a VP and it will show a view of the end of
the block and so, to distinguish it from the other VP, it is called the end vertical plane
(EVP), and the original vertical plane is called the front vertical plane (FVP).
Geometric and Engineering Drawing120
45°
EVP
EVP
FVP
FVP
HP
HP
Figure 10.4 Third angle orthographic projection.
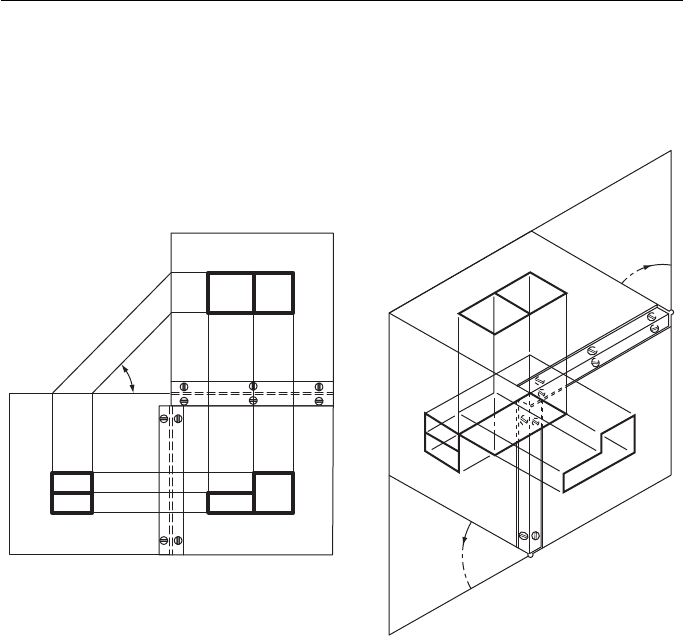
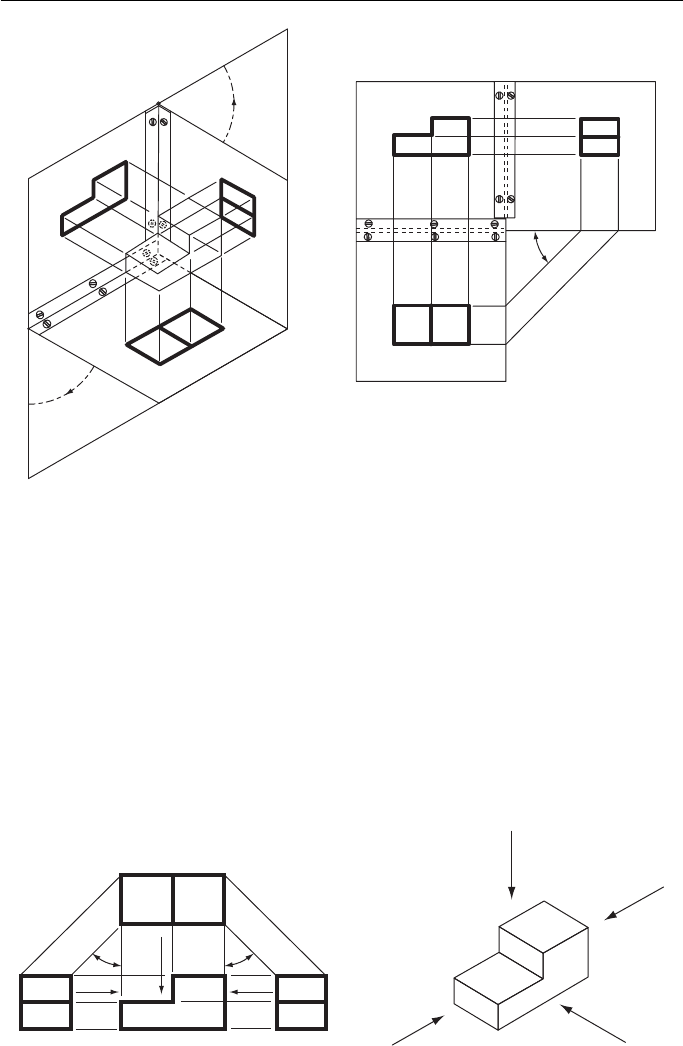
The EVP is hinged to the FVP and when the views have been projected onto
their planes, the three planes are unfolded and three views of the block are shown in
Fig. 10.4 .
The drawing on the FVP is called the front elevation (FE), the drawing on the EVP
is called the end elevation (EE) and the drawing on the HP is called the plan. All three
views are linked together: the plan is directly above the FE; the EE is horizontally in line
with the FE; and the plan and the EE can be linked by drawing 45 ° projection lines. This
is why orthographic projection is so important; it is not just because several views of the
same object can be drawn, it is because the views are linked together.
Figure 10.4 shows three views of the block drawn in third angle; Fig. 10.5 shows
three views of the same block drawn in first angle.
In this case the FE is above the plan and to the left of the EE (compare this with
third angle). Once again, the EE and the plan can be linked by projection lines drawn
at 45 ° .
The system of suspending the block between three planes and projecting views of
the block onto these planes is the basic principle of orthographic projection and must
be completely understood if one wishes to study this type of projection any further.
This is done in Chapter 13.
The following system is somewhat easier to understand and will meet most of the
reader ’ s needs.
Orthographic Projection (First Angle and Third Angle) 121
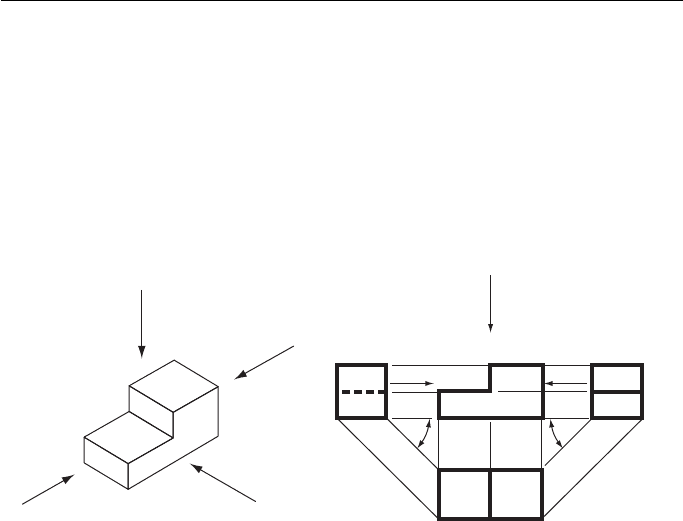
Figure 10.6 shows the same shaped block drawn in third angle projection. First,
draw the view obtained by looking along the arrow marked FE. This gives you the
FE. Now look along the arrow marked EE
1
(which points from the left) and draw
what you see to the left of the FE. This gives you an EE. Now look along the arrow
marked EE
2
(which points from the right) and draw what you see to the right of the
FE. This gives you another EE. Now look down onto the block, along the arrow
marked ‘ plan ’ and draw what you see above the FE. This gives the plan and its exact
position is determined by drawing lines from one of the EE at 45 ° .
Note that with third angle projection, what you see from the left you draw on the
left, what you see from the right you draw on the right and what you see from above
you draw above.
HP
HP
45°
EVP
EVP
FVP
FVP
Figure 10.5 First angle orthographic projection.
Plan
FEEE
(1)
EE
(2)
Plan
45° 45°
EE
1
EE
2
FE
Plan
EE
1
EE
2
Figure 10.6 Third angle orthographic projection.
Geometric and Engineering Drawing122
Figure 10.7 shows the same block drawn in first angle projection. Again, first
draw the view obtained by looking along the arrow marked FE. This gives the FE.
Now look along the arrow marked EE
1
(which points from the left) and draw what
you see to the right of the FE. This gives you an EE. Now look along the arrow
marked EE
2
(which points from the right) and draw what you see to the left of
the FE. This gives you another EE. Now look down on the block, along the arrow
marked ‘ plan ’ and draw what you see below the FE. This gives the plan and its exact
position is determined by drawing lines from one of the EE at 45 ° .
Plan
FE
EE
(2)
EE
(1)
Plan
45°45°
EE
1
EE
2
FE
Plan
EE
1
EE
2
Figure 10.7 First angle orthographic projection.
Note that with first angle projection, what you see from the left you draw on the
right, what you see from the right you draw on the left and what you see from above
you draw below.
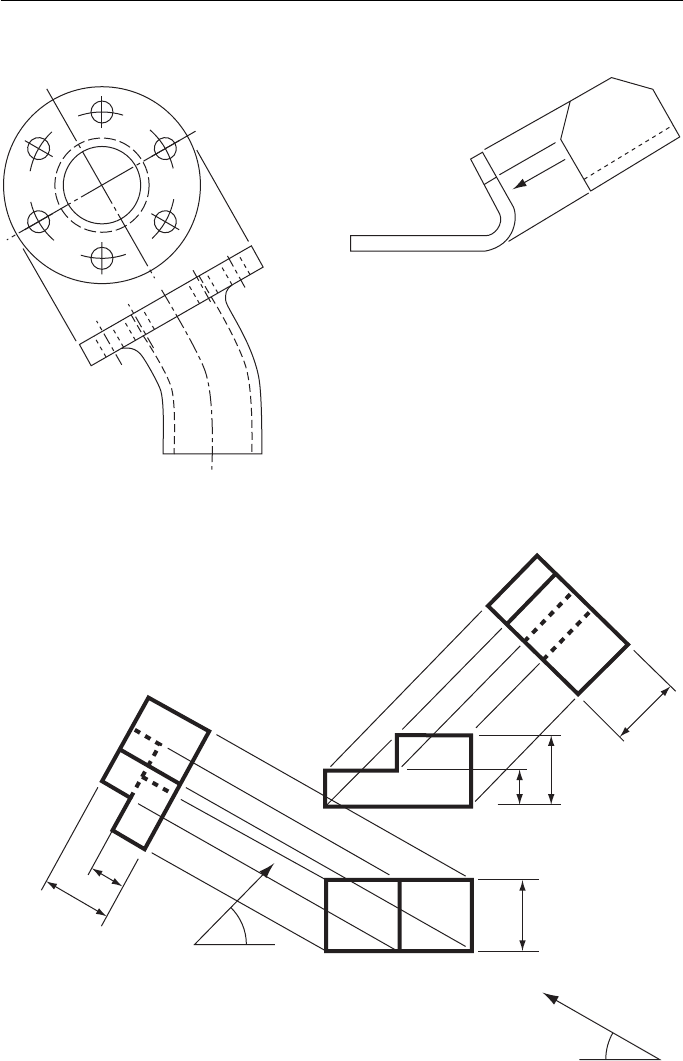
Auxiliary Elevations and Auxiliary Plans
So far we have been able to draw four different views of the same block. In most
engineering drawings these are sufficient but there are occasions when other views
are necessary, perhaps to clarify a particular point. Figure 10.8 shows two examples
where a view other than a FE or an EE is needed to show very important features of
a flanged pipe and a bracket.
These extra elevations are called auxiliary elevations (AE) or auxiliary plans (AP).
Figure 10.9 shows an AE and an AP of the shaped block. One is projected from
the plan at 30 ° and the other from the FE at 45 ° . Projection lines are drawn at those
angles and the heights, H and h, are marked off on one AE and the width W on the
other. Remember that we are dealing with a solid block, not flat shapes on flat paper.
Try to imagine the block as a solid object and these rather odd-shaped elevations will
take on form and make sense.
Orthographic Projection (First Angle and Third Angle) 123
Auxiliary plan showing
face of flange
AE in direction of arrowThird angle projection
Figure 10.8 Views of a cylinder.
First angle projection
A
E in direction
of arrow B
AP in direction
of arrow A
H
A
W
30°
45°
B
h
W
h
H
Figure 10.9 Views of a cone.
